리눅스 그룹관리/사용자/소유자와 그룹변경/chown,chmod,특수권한,setuid (교육 29일차)
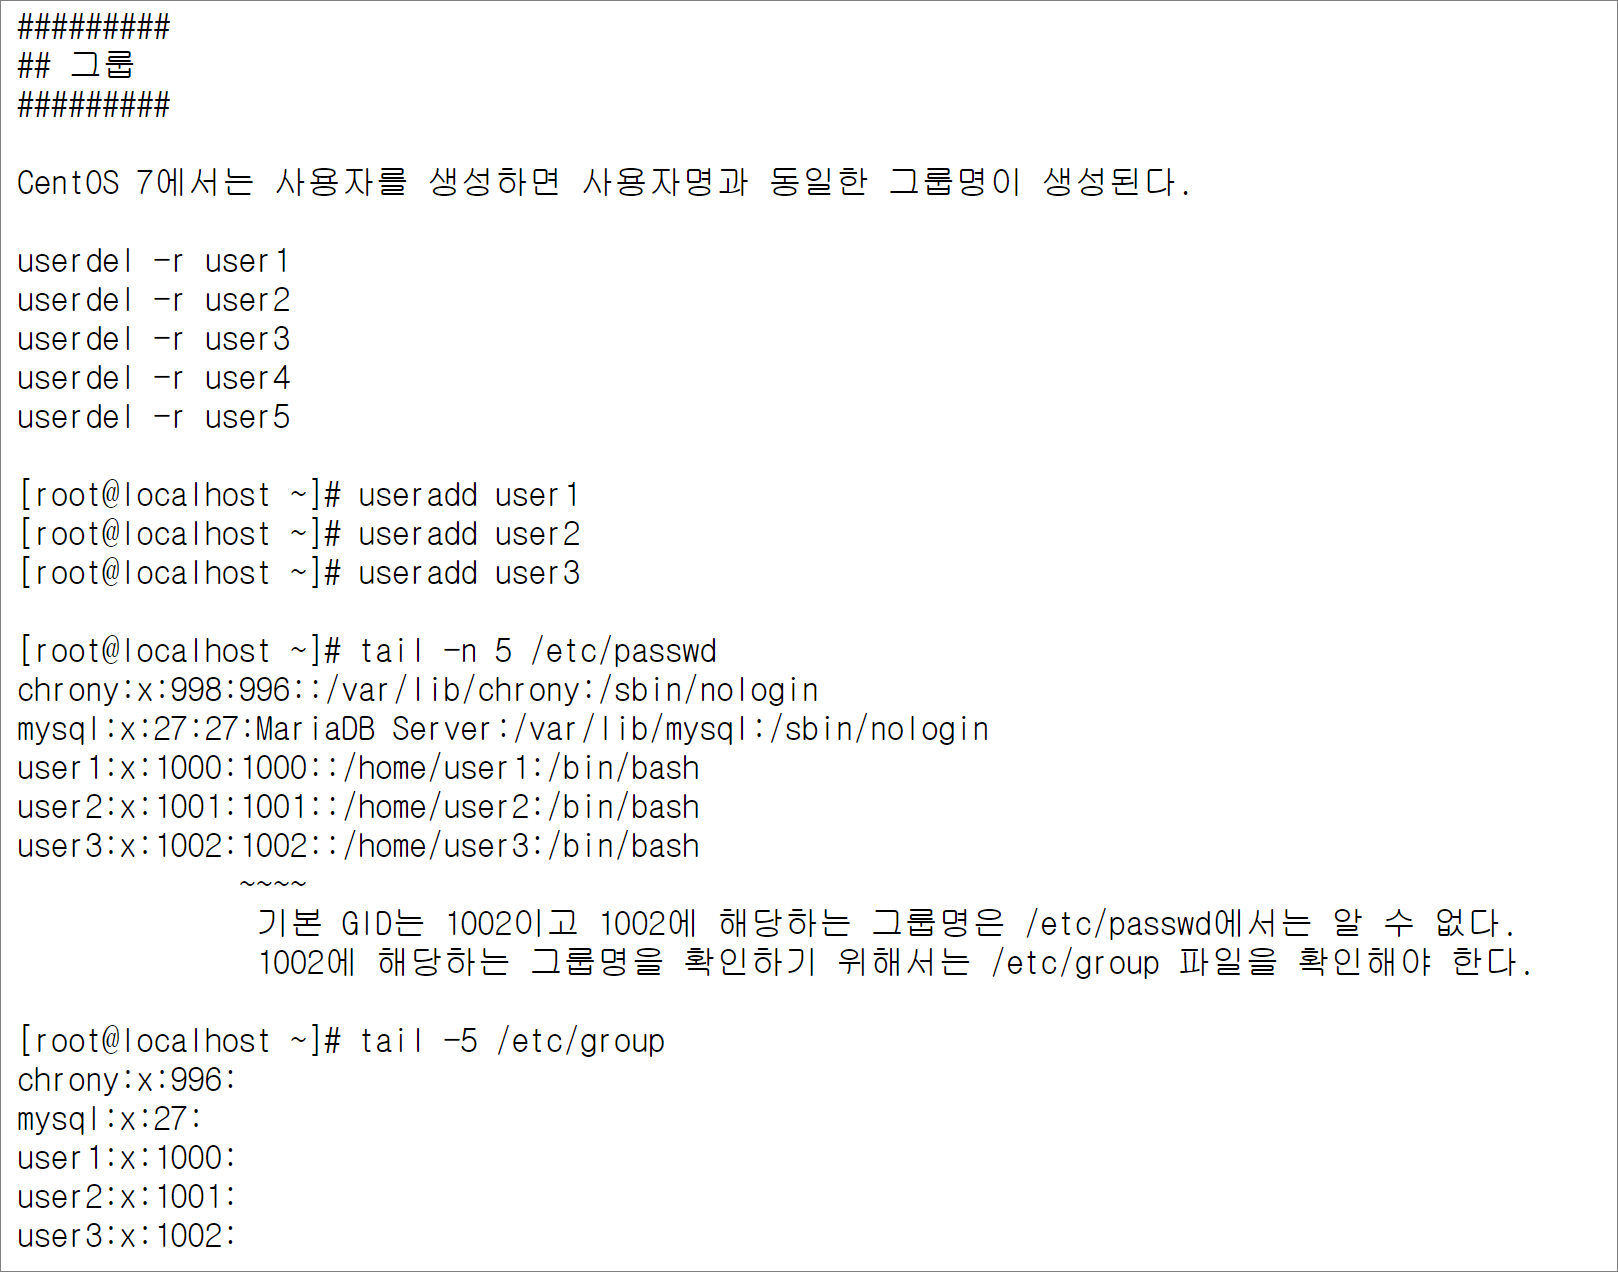

RedHat 계열의 리눅스는 (CentOS 7 포함)에서는 사용자를 생성하면 사용자명과 동일한 그룹명이 생성된다.
기본 GID는 1002이고 1002에 해당하는 그룹명은 /etc/passwd에서는 알 수 없다. 1002에 해당하는 그룹명을 확인하기 위해서는 /etc/group 파일을 확인해야 한다.
1002에 해당하는 그룹명은 user3이라는 것을 알 수 있다.
-g 옵션을 사용하면 사용자에 해당하는 그룹명을 변경할 수 있다.
[root@localhost ~]# grep users /etc/group
users:x:100:
[root@localhost ~]# useradd -g users user4
[root@localhost ~]# tail -4 /etc/passwd
user1:x:1000:1000::/home/user1:/bin/bash
user2:x:1001:1001::/home/user2:/bin/bash
user3:x:1002:1002::/home/user3:/bin/bash
user4:x:1003:100::/home/user4:/bin/bash
[root@localhost ~]# tail -4 /etc/group
mysql:x:27:
user1:x:1000:
user2:x:1001:
user3:x:1002:
[root@localhost ~]# grep users /etc/group
users:x:100:
[root@localhost ~]# useradd -G users user5
[root@localhost ~]# tail -5 /etc/passwd
user1:x:1000:1000::/home/user1:/bin/bash
user2:x:1001:1001::/home/user2:/bin/bash
user3:x:1002:1002::/home/user3:/bin/bash
user4:x:1003:100::/home/user4:/bin/bash
user5:x:1004:1004::/home/user5:/bin/bash
[root@localhost ~]# tail -5 /etc/group
mysql:x:27:
user1:x:1000:
user2:x:1001:
user3:x:1002:
user5:x:1004:
[root@localhost ~]# grep users /etc/group
users:x:100:user5
[root@localhost ~]# useradd -G users user6
[root@localhost ~]# tail -6 /etc/passwd
user1:x:1000:1000::/home/user1:/bin/bash
user2:x:1001:1001::/home/user2:/bin/bash
user3:x:1002:1002::/home/user3:/bin/bash
user4:x:1003:100::/home/user4:/bin/bash
user5:x:1004:1004::/home/user5:/bin/bash
user6:x:1005:1005::/home/user6:/bin/bash
[root@localhost ~]# tail -6 /etc/group
mysql:x:27:
user1:x:1000:
user2:x:1001:
user3:x:1002:
user5:x:1004:
user6:x:1005:
[root@localhost ~]# grep users /etc/group
users:x:100:user5,user6
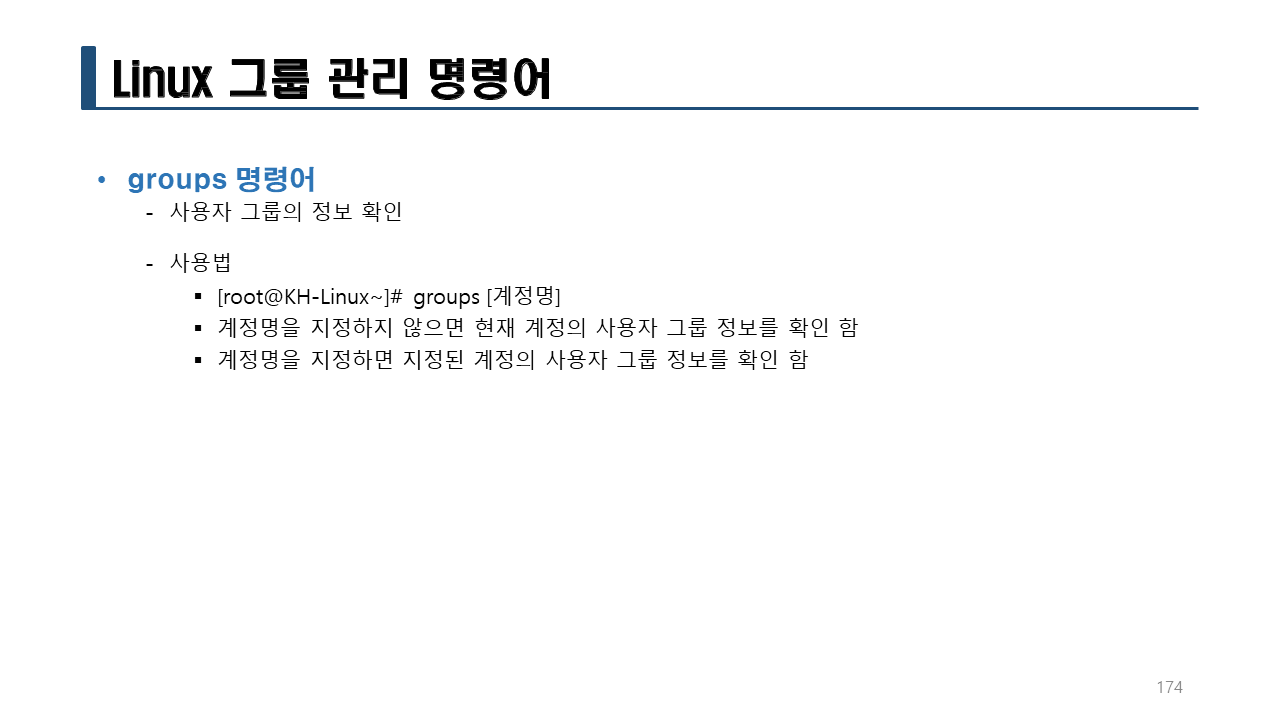
실습> groups
[root@localhost ~]# id
uid=0(root) gid=0(root) groups=0(root) context=unconfined_u:unconfined_r:unconfined_t:s0-s0:c0.c1023
[root@localhost ~]# groups
root
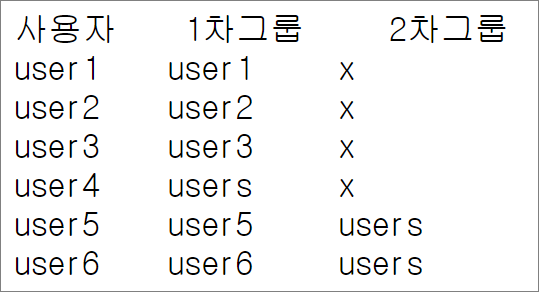
[root@localhost ~]# groups user1
user1 : user1
[root@localhost ~]# groups user2
user2 : user2
[root@localhost ~]# groups user3
user3 : user3
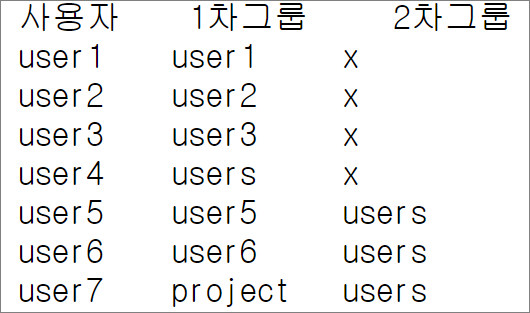
[root@localhost ~]# groups user4
user4 : users
[root@localhost ~]# groups user5
user5 : user5 users
[root@localhost ~]# groups user6
user6 : user6 users
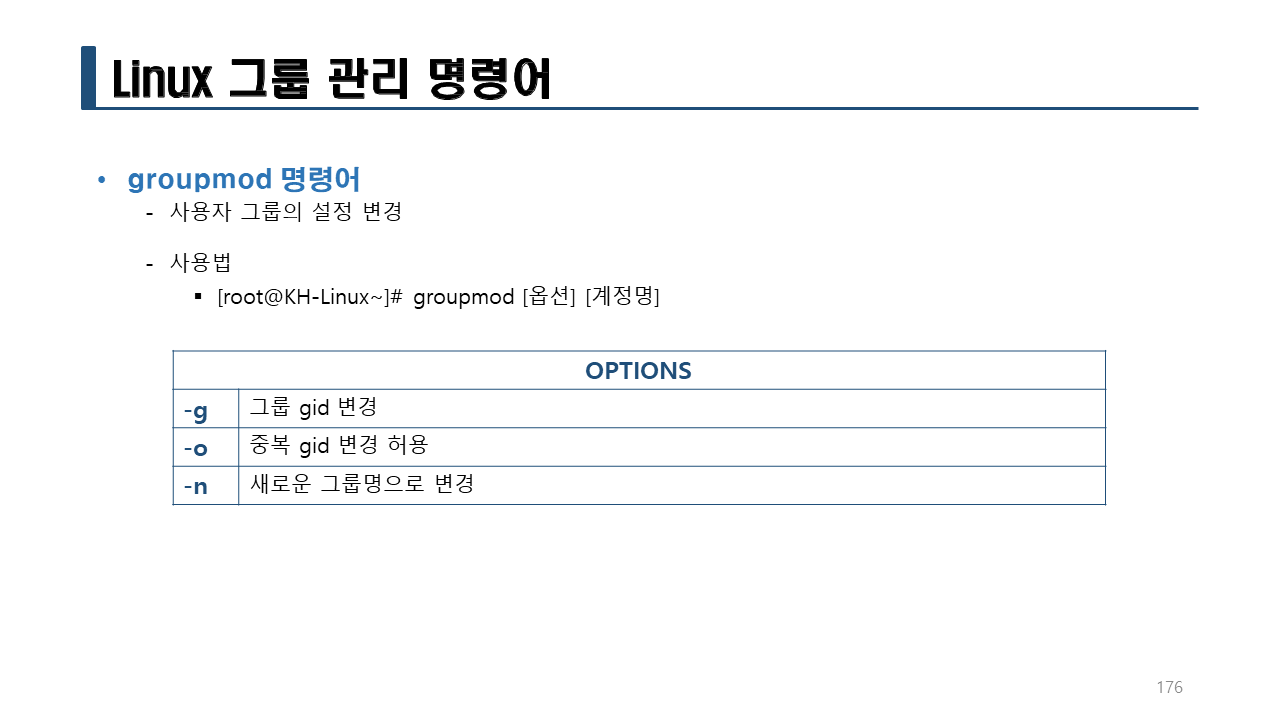
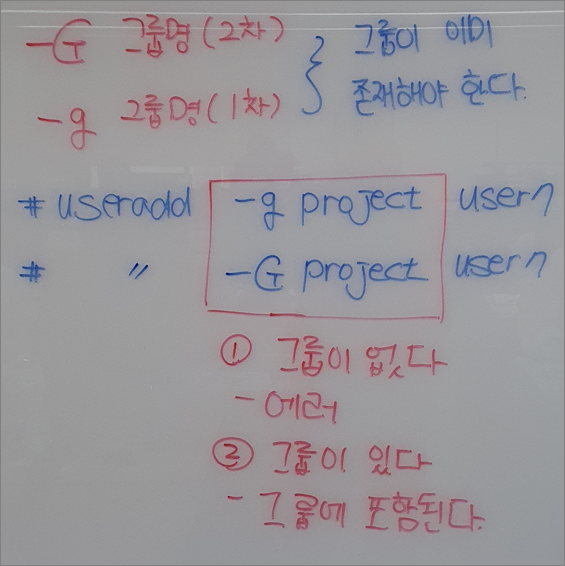
그룹을 생성할 때
-g 그룹명(1차): 그룹이 반드시 존재해야 한다.
-G 그룹명(2차): 그룹이 반드시 존재해야 한다.
[root@localhost ~]# useradd -g project user7
useradd: 'project' 그룹이 없습니다
[root@localhost ~]# useradd -G project user7
useradd: 'project' 그룹이 없습니다
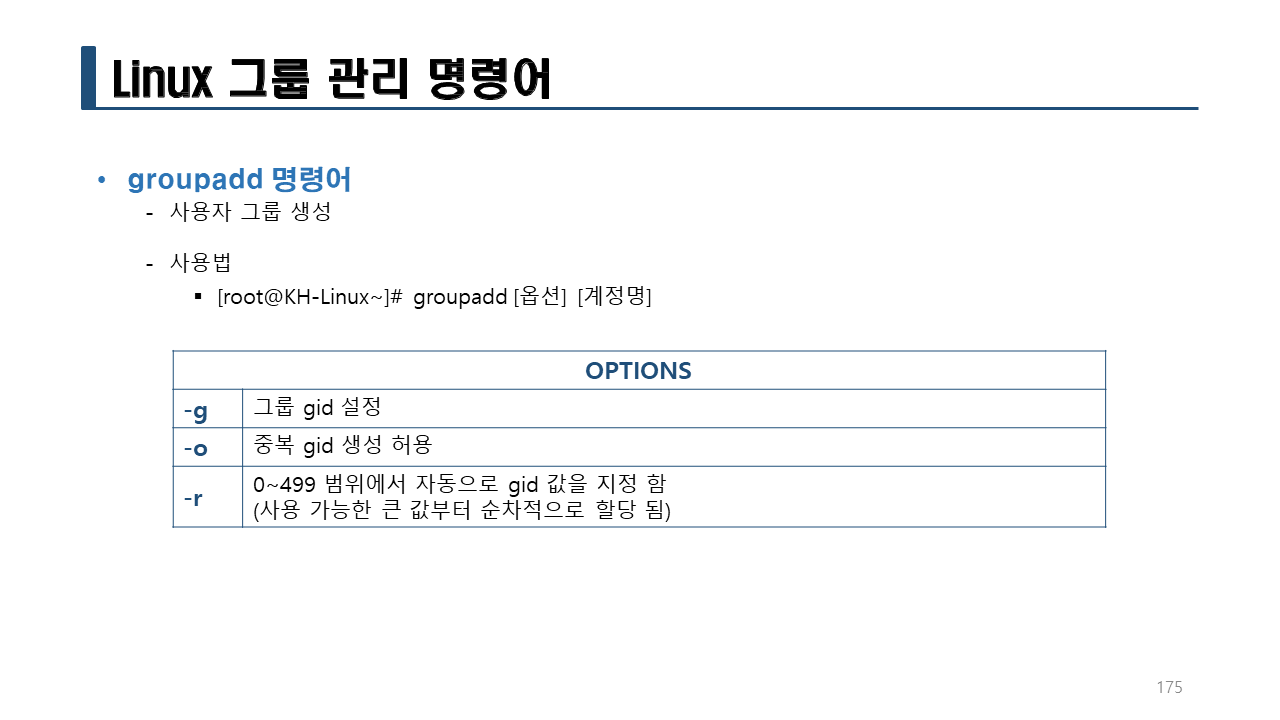
실습> groupadd 명령어
그룹을 생성하는 명령어
- 그룹을 생성할 때 GID(gid)는 /etc/group 의 마지막 번호 다음으로 자동으로 할당된다.
- 그룹의 GID(gid)를 다른 번호로 할당하고자 한다면 -g 옵션을 사용한다.
[root@localhost ~]# tail /etc/group
sshd:x:74:
postdrop:x:90:
postfix:x:89:
chrony:x:996:
mysql:x:27:
user1:x:1000:
user2:x:1001:
user3:x:1002:
user5:x:1004:
user6:x:1005:
[root@localhost ~]# groupadd project
[root@localhost ~]# tail /etc/group
postdrop:x:90:
postfix:x:89:
chrony:x:996:
mysql:x:27:
user1:x:1000:
user2:x:1001:
user3:x:1002:
user5:x:1004:
user6:x:1005:
project:x:1006:
[root@localhost ~]# groupdel project
[root@localhost ~]# groupadd -g 2000 project
[root@localhost ~]# tail /etc/group
postdrop:x:90:
postfix:x:89:
chrony:x:996:
mysql:x:27:
user1:x:1000:
user2:x:1001:
user3:x:1002:
user5:x:1004:
user6:x:1005:
project:x:2000:
[root@localhost ~]# tail /etc/group
postdrop:x:90:
postfix:x:89:
chrony:x:996:
mysql:x:27:
user1:x:1000:
user2:x:1001:
user3:x:1002:
user5:x:1004:
user6:x:1005:
project:x:2000:
[root@localhost ~]# groupdel project
[root@localhost ~]# grep project /etc/group
[root@localhost ~]# groupadd -g 3000 project
[root@localhost ~]# grep project /etc/group
project:x:3000:
[root@localhost ~]# useradd -g project -G users user7
[root@localhost ~]# tail -1 /etc/passwd
user7:x:1006:3000::/home/user7:/bin/bash
[root@localhost ~]# tail -1 /etc/group
project:x:3000:
[root@localhost ~]# grep user7 /etc/group
users:x:100:user5,user6,user7
[root@localhost ~]# su - user7
[user7@localhost ~]$ id
uid=1006(user7) gid=3000(project) groups=3000(project),100(users) context ...(생략)
[user7@localhost ~]$ exit
실습> 사용자 생성하기
-
준비 과정
[root@localhost ~]# mkdir /skelsam
[root@localhost ~]# echo 테스트파일 > /skelsam/.sam
[root@localhost ~]# mkdir /skelsam/public_html
[root@localhost ~]# cp /etc/skel/.bash* /skelsam/
[root@localhost ~]# groupadd -g 2000 tg -
사용자 생성
[root@localhost ~]# useradd -u 1200 -g tg -d /hosting -s /bin/sh -m -k /skelsam/ testuser -
확인
[root@localhost ~]# grep testuser /etc/passwd
testuser:x:1200:2000::/hosting:/bin/sh
[root@localhost ~]# grep tg /etc/group
tg:x:2000:
[root@localhost ~]# ls ~testuser/
public_html
[root@localhost ~]# ls -a ~testuser/
. .. .bash_logout .bash_profile .bashrc .sam public_html
[root@localhost ~]# su - testuser
-sh-4.2$ pwd <-- /bin/sh 이므로 프롬프트가 -sh-4.2$ 가 나온다.
/hosting
-sh-4.2$ exit
logout
[root@localhost ~]#
[root@localhost ~]#
[root@localhost ~]# usermod -s /bin/bash testuser <-- /bin/sh -> /bin/bash 로 변경한다.
[root@localhost ~]# grep testuser /etc/passwd
testuser:x:1200:2000::/hosting:/bin/bash
[root@localhost ~]# su - testuser
마지막 로그인: 목 12월 29 08:42:39 KST 2022 일시 pts/3
[testuser@localhost ~] exit
logout
[root@localhost ~]#
실습> 생성한 사용자/그룹 삭제하기
userdel -r user1
userdel -r user2
userdel -r user3
userdel -r user4
userdel -r user5
userdel -r user6
userdel -r user7
userdel -r testuser
groupdel tg
groupdel project
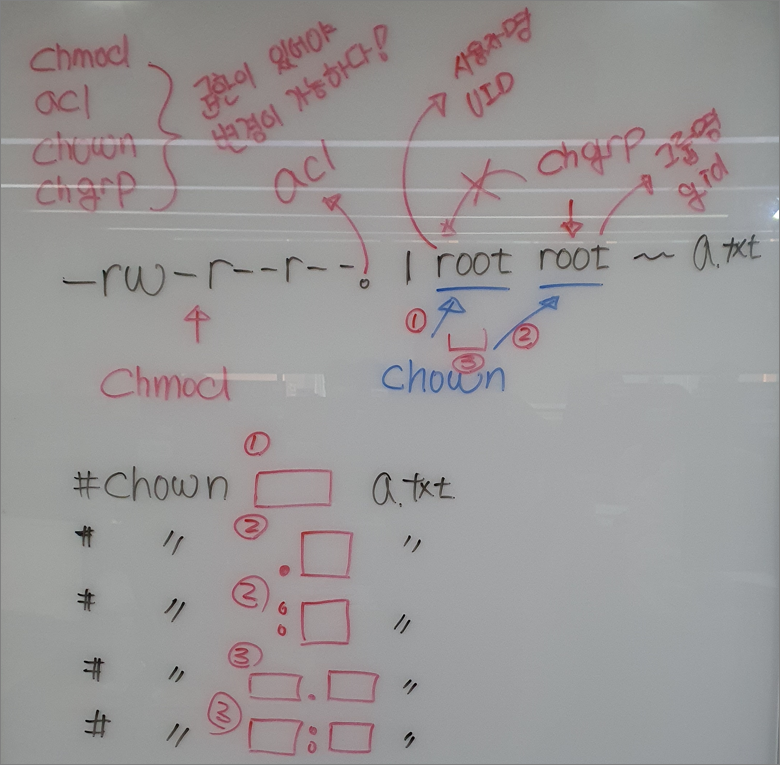

실습> chown 명령어
소유자와 그룹을 변경하는 명령어
[root@localhost ~]# useradd user1
[root@localhost ~]# useradd user2
[root@localhost ~]# useradd user3
[root@localhost ~]# tail -n 3 /etc/{passwd,group}
==> /etc/passwd <==
user1:x:1000:1000::/home/user1:/bin/bash
user2:x:1001:1001::/home/user2:/bin/bash
user3:x:1002:1002::/home/user3:/bin/bash
==> /etc/group <==
user1:x:1000:
user2:x:1001:
user3:x:1002:
[root@localhost ~]# cd
[root@localhost ~]# rm -rf *
[root@localhost ~]# id
uid=0(root) gid=0(root) groups=0(root) context=unconfined_u:unconfined_r:unconfined_t:s0-s0:c0.c1023
[root@localhost ~]# touch a.txt b.txt c.txt; ll
합계 0
-rw-r--r--. 1 root root 0 12월 29 09:39 a.txt
-rw-r--r--. 1 root root 0 12월 29 09:39 b.txt
-rw-r--r--. 1 root root 0 12월 29 09:39 c.txt
소유자 파일명
root -> user1 a.txt
root -> user2 b.txt
root -> user3 c.txt
[root@localhost ~]# chown user1 a.txt
[root@localhost ~]# chown user2 b.txt
[root@localhost ~]# chown user3 c.txt
[root@localhost ~]# ll
합계 0
-rw-r--r--. 1 user1 root 0 12월 29 09:39 a.txt
-rw-r--r--. 1 user2 root 0 12월 29 09:39 b.txt
-rw-r--r--. 1 user3 root 0 12월 29 09:39 c.txt
그룹 파일명
root -> user1 a.txt
root -> user2 b.txt
root -> user3 c.txt
[root@localhost ~]# chgrp user1 a.txt
[root@localhost ~]# chown .user2 b.txt
[root@localhost ~]# chown :user3 c.txt
[root@localhost ~]# ll
합계 0
-rw-r--r--. 1 user1 user1 0 12월 29 09:39 a.txt
-rw-r--r--. 1 user2 user2 0 12월 29 09:39 b.txt
-rw-r--r--. 1 user3 user3 0 12월 29 09:39 c.txt
그룹 파일명
root -> user1 a.txt
root -> user2 b.txt
root -> user3 c.txt
소유자 그룹 파일명
user1 -> user2 user1 -> user3 a.txt
user2 -> user1 user2 -> user3 b.txt
user3 -> user2 user3 -> user2 c.txt
슈퍼유저 or 관리자 or root 는 권한이 높기 때문에 다른 사용자, 다른 그룹으로 변경할 수 있다.
[root@localhost ~]# chown -c user2.user3 a.txt
changed ownership of a.txt' from user1:user1 to user2:user3 [root@localhost ~]# chown -c user1:user3 b.txt changed ownership of b.txt' from user2:user2 to user1:user3
[root@localhost ~]# chown -c user2.user2 c.txt
changed ownership of `c.txt' from user3:user3 to user2:user2
[root@localhost ~]# ll
합계 0
-rw-r--r--. 1 user2 user3 0 12월 29 09:39 a.txt
-rw-r--r--. 1 user1 user3 0 12월 29 09:39 b.txt
-rw-r--r--. 1 user2 user2 0 12월 29 09:39 c.txt
일반 유저 user1 사용자는 권한이 없기 때문에 다른 사용자, 다른 그룹으로 변경할 수 없다.
[root@localhost ~]# su - user1
[user1@localhost ~] touch user1.txt; ll
합계 0
-rw-rw-r--. 1 user1 user1 0 12월 29 09:57 user1.txt
[user1@localhost ~]$ chown user2 user1.txt
chown: changing ownership of user1.txt': 명령을 허용하지 않음 [user1@localhost ~]$ chgrp root user1.txt chgrp: changing group of user1.txt': 명령을 허용하지 않음
[user1@localhost ~]$ ll
합계 0
-rw-rw-r--. 1 user1 user1 0 12월 29 09:57 user1.txt
[user1@localhost ~]$ exit
-R 옵션: 하위디렉터리를 모두 변경한다.
[user1@localhost ~]$ exit
logout
[root@localhost ~]# ls -lR /etc/ | head
/etc/:
합계 1068
-rw-r--r--. 1 root root 5090 11월 16 2020 DIR_COLORS
-rw-r--r--. 1 root root 5725 11월 16 2020 DIR_COLORS.256color
-rw-r--r--. 1 root root 4669 11월 16 2020 DIR_COLORS.lightbgcolor
-rw-r--r--. 1 root root 94 3월 25 2017 GREP_COLORS
-rw-r--r--. 1 root root 1704 8월 13 2019 GeoIP.conf
drwxr-xr-x. 7 root root 134 10월 2 2020 NetworkManager
drwxr-xr-x. 5 root root 57 12월 20 15:48 X11
-rw-r--r--. 1 root root 16 12월 20 15:51 adjtime
[root@localhost ~]#
[root@localhost ~]# chown -R user1 /etc/
[root@localhost ~]# ls -lR /etc/ | head
/etc/:
합계 1068
-rw-r--r--. 1 user1 root 5090 11월 16 2020 DIR_COLORS
-rw-r--r--. 1 user1 root 5725 11월 16 2020 DIR_COLORS.256color
-rw-r--r--. 1 user1 root 4669 11월 16 2020 DIR_COLORS.lightbgcolor
-rw-r--r--. 1 user1 root 94 3월 25 2017 GREP_COLORS
-rw-r--r--. 1 user1 root 1704 8월 13 2019 GeoIP.conf
drwxr-xr-x. 7 user1 root 134 10월 2 2020 NetworkManager
drwxr-xr-x. 5 user1 root 57 12월 20 15:48 X11
-rw-r--r--. 1 user1 root 16 12월 20 15:51 adjtime
[root@localhost ~]# chown -R 0 /etc/|head
[root@localhost ~]# ls -lR /etc | head
/etc:
합계 1068
-rw-r--r--. 1 root root 5090 11월 16 2020 DIR_COLORS
-rw-r--r--. 1 root root 5725 11월 16 2020 DIR_COLORS.256color
-rw-r--r--. 1 root root 4669 11월 16 2020 DIR_COLORS.lightbgcolor
-rw-r--r--. 1 root root 94 3월 25 2017 GREP_COLORS
-rw-r--r--. 1 root root 1704 8월 13 2019 GeoIP.conf
drwxr-xr-x. 7 root root 134 10월 2 2020 NetworkManager
drwxr-xr-x. 5 root root 57 12월 20 15:48 X11
-rw-r--r--. 1 root root 16 12월 20 15:51 adjtime
-R 옵션: 하위 디렉터리까지 user1로 모두 변경한다.
[root@localhost ~]# chgrp user1 /etc/ -R
[root@localhost ~]# ls -lR /etc | head
/etc:
합계 1068
-rw-r--r--. 1 root user1 5090 11월 16 2020 DIR_COLORS
-rw-r--r--. 1 root user1 5725 11월 16 2020 DIR_COLORS.256color
-rw-r--r--. 1 root user1 4669 11월 16 2020 DIR_COLORS.lightbgcolor
-rw-r--r--. 1 root user1 94 3월 25 2017 GREP_COLORS
-rw-r--r--. 1 root user1 1704 8월 13 2019 GeoIP.conf
drwxr-xr-x. 7 root user1 134 10월 2 2020 NetworkManager
drwxr-xr-x. 5 root user1 57 12월 20 15:48 X11
-rw-r--r--. 1 root user1 16 12월 20 15:51 adjtime
[root@localhost ~]# chgrp root /etc/ -R
[root@localhost ~]# ls -lR /etc | head
/etc:
합계 1068
-rw-r--r--. 1 root root 5090 11월 16 2020 DIR_COLORS
-rw-r--r--. 1 root root 5725 11월 16 2020 DIR_COLORS.256color
-rw-r--r--. 1 root root 4669 11월 16 2020 DIR_COLORS.lightbgcolor
-rw-r--r--. 1 root root 94 3월 25 2017 GREP_COLORS
-rw-r--r--. 1 root root 1704 8월 13 2019 GeoIP.conf
drwxr-xr-x. 7 root root 134 10월 2 2020 NetworkManager
drwxr-xr-x. 5 root root 57 12월 20 15:48 X11
-rw-r--r--. 1 root root 16 12월 20 15:51 adjtime
실습> chmod 명령어
8진수 모드 일반 권한
421
rwx
--- 0 000
--x 1 001
-w- 2 010
-wx 3 011
r-- 4 100
r-x 5 101
rw- 6 110
rwx 7 111
[user1@localhost ~]# touch a.txt
[user1@localhost ~]# ll a.txt
-rw-r--r--. 1 root root 0 12월 29 12:59 a.txt
6 4 4
-rw-r--r--. -> -rw-r-----. chmod 640 a.txt
-rw-r-----. -> -rw-------. chmod 600 a.txt
-rw-------. -> -r--------. chmod 400 a.txt
-r--------. -> -rwxr-x---. chmod 750 a.txt
-rwxr-x---. -> -rwx--x--x. chmod 711 a.txt

실습> 특수권한 연습
user s: Set-uid, (t가 올 수 없다.)
group s: Set-gid (t가 올 수 없다.)
other t: Sticky-bit (s가 올 수 없다.)
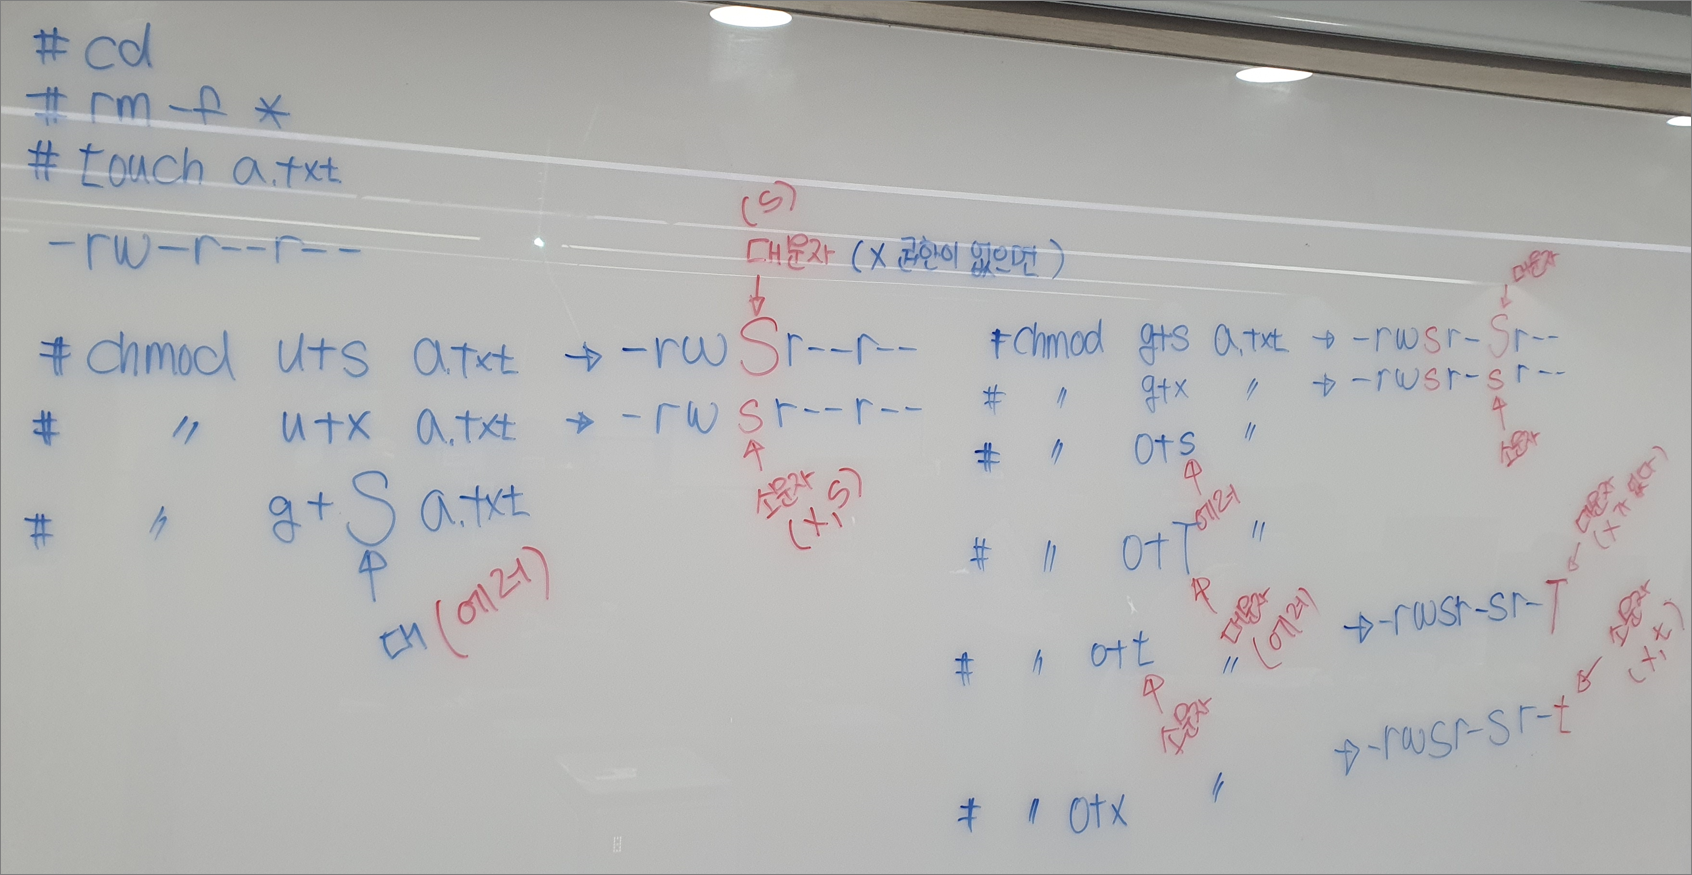
1. 심볼릭 모드로 변경
문자를 이용해서 변경한다.
[root@localhost ~]# rm -f *
[root@localhost ~]# touch a.txt
[root@localhost ~]# ll a.txt
-rw-r--r--. 1 root root 0 12월 29 13:55 a.txt
[root@localhost ~]# chmod u+s a.txt -c
mode of a.txt' changed from 0644 (rw-r--r--) to 4644 (rwSr--r--) [root@localhost ~]# ll a.txt -rwSr--r--. 1 root root 0 12월 29 13:55 a.txt [root@localhost ~]# chmod u+x a.txt -c mode of a.txt' changed from 4644 (rwSr--r--) to 4744 (rwsr--r--)
[root@localhost ~]# ll a.txt
-rwsr--r--. 1 root root 0 12월 29 13:55 a.txt
[root@localhost ~]# chmod g+S a.txt
chmod: invalid mode: g+S' Try 'chmod --help' for more information. [root@localhost ~]# chmod g+s a.txt [root@localhost ~]# ll a.txt -rwsr-Sr--. 1 root root 0 12월 29 13:55 a.txt [root@localhost ~]# chmod g+x a.txt -c mode of a.txt' changed from 6744 (rwsr-Sr--) to 6754 (rwsr-sr--)
[root@localhost ~]# chmod o+T a.txt
chmod: invalid mode: o+T' Try 'chmod --help' for more information. [root@localhost ~]# chmod o+t a.txt -c mode of a.txt' changed from 6754 (rwsr-sr--) to 7754 (rwsr-sr-T)
[root@localhost ~]# ll a.txt
-rwsr-sr-T. 1 root root 0 12월 29 13:55 a.txt
[root@localhost ~]# chmod o+x a.txt -c
mode of `a.txt' changed from 7754 (rwsr-sr-T) to 7755 (rwsr-sr-t)
[root@localhost ~]# ll a.txt
-rwsr-sr-t. 1 root root 0 12월 29 13:55 a.txt
2. Octal 모드로 변경
8진수를 이용해서 변경한다.
특수권한,사용자권한,그룹권한,아더권한
0~7 0~7 0~7 0~7
[root@localhost ~]# chmod 755 a.txt
[root@localhost ~]# ll a.txt
-rwxr-xr-x. 1 root root 0 12월 29 13:55 a.txt
[root@localhost ~]# chmod 4655 a.txt
[root@localhost ~]# ll a.txt
-rwSr-xr-x. 1 root root 0 12월 29 13:55 a.txt
[root@localhost ~]# chmod 4755 a.txt
[root@localhost ~]# ll a.txt
-rwsr-xr-x. 1 root root 0 12월 29 13:55 a.txt
[root@localhost ~]# chmod 2765 a.txt
[root@localhost ~]# ll a.txt
-rwxrwSr-x. 1 root root 0 12월 29 13:55 a.txt
[root@localhost ~]# chmod 2755 a.txt ; ll a.txt
-rwxr-sr-x. 1 root root 0 12월 29 13:55 a.txt
[root@localhost ~]# chmod 1756 a.txt ; ll a.txt
-rwxr-xrwT. 1 root root 0 12월 29 13:55 a.txt
[root@localhost ~]# chmod 1777 a.txt; ll a.txt
-rwxrwxrwt. 1 root root 0 12월 29 13:55 a.txt
실습> Set-UID 테스트
1. 권한 확인
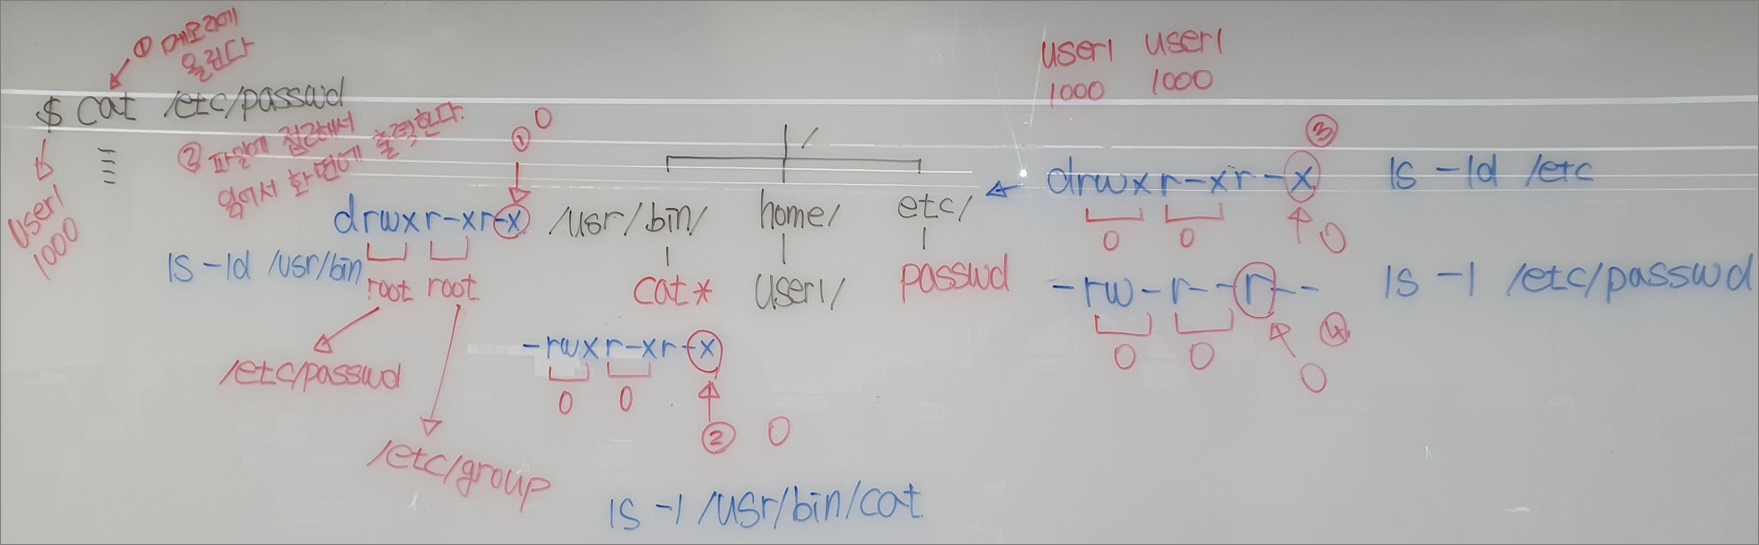
[root@localhost ~]# ll /usr/bin/passwd
-rwsr-xr-x. 1 root root 27856 4월 1 2020 /usr/bin/passwd
[root@localhost ~]# ll /etc/shadow
----------. 1 root root 690 12월 29 09:36 /etc/shadow
2. 비밀번호 설정
user1의 비밀번호를 설정한다.
비밀번호의 마지막에는 /etc/shadow 파일에 비밀번호가 저장된다.
root 이므로 /etc/shadow 파일에 쓸 수 있다.
[root@localhost ~]# echo 1 | passwd --stdin user1
user1 사용자의 비밀 번호 변경 중
passwd: 모든 인증 토큰이 성공적으로 업데이트 되었습니다. <-- /etc/shadow 파일에 저장
3. 비밀번호 확인
[root@localhost ~]# grep user1 /etc/shadow
user1:YWIOdpOj$auAY1ucEt4OYy3HqwHOhAZeK/sUdlHDZDb1tKOuPBeMgl8CBdgOCx0Ciqn98iFNcIyyzvepfUHhkt9F33ttuf/:19355:0:99999:7:::
4. 사용자 변경
user1의 비밀번호를 변경한다.
비밀번호의 마지막에는 /etc/shadow 파일에 비밀번호가 저장된다.
user1이지만 /usr/bin/passwd 파일이 Set-UID가 설정되어 있으므로 root권한으로
실행이 되고 있기 때문에 /etc/shadow 파일에 쓸 수 있다.
[root@localhost ~]# su - user1
마지막 로그인: 목 12월 29 10:41:40 KST 2022 일시 pts/2
[user1@localhost ~]$ passwd
user1 사용자의 비밀 번호 변경 중
user1에 대한 암호 변경 중
(현재) UNIX 암호:
새 암호:
새 암호 재입력:
passwd: 모든 인증 토큰이 성공적으로 업데이트 되었습니다. <-- /etc/shadow 파일에 저장
[user1@localhost ~]$ exit
5. 비밀번호 확인
변경된 비밀번호를 확인한다.
[root@localhost ~]# grep user1 /etc/shadow
user1:Xzd/r9Yj$D13GBOMB3OaYqU.HX68e8KDkRvXOn2bSk3HTWv.sUT3I6M6yNZHFSZ5mEaj0B6CgM1/uu8aAgMeyQLNi1AbrH.:19355:0:99999:7:::
실습> 소스레벨로 접근해서 setuid 확인하기
작업은 /tmp 에서 작업한다.
C언어: 소스 --- 컴파일 ---> 실행파일
참고: https://cafe.naver.com/linuxmasternet/122
gcc 패키지를 설치한다.
[user1@localhost ~]# yum -y install gcc
관리자와 일반유저의 작업 디렉터리를 /tmp 디렉터리로 이동하고 실습을 진행한다.
[user1@localhost ~]# cd /tmp
$ cd /tmp
vi -> :set noai -> :set paste -> i -> 붙여넣기 -> ESC -> :wq
[user1@localhost ~]# vi setuidTest.c
/*
- 파일명: setuidTest.c
- 프로그램 설명: setuid 테스트
- 작성자: 리눅스마스터넷
- getuid(): uid를 가져오는 함수
- geteuid(): euid를 가져오는 함수
*/
#include <stdio.h>
int main()
{
printf("uid = %d\n", getuid());
printf("euid = %d\n", geteuid());
return 0;}
gcc를 이용해서 setuidTest.c 소스 파일을 컴파일해서 실행파일 setuidTest를 뽑니다.
[user1@localhost ~]# gcc -o setuidTest setuidTest.c
[user1@localhost ~]# ll setuidTest
-rwxr-xr-x. 1 root root 8472 5월 28 06:44 setuidTest
ELF 64-bit LSB executable: 64bit 실행파일
ELF 32-bit LSB executable: 32bit 실행파일
[user1@localhost ~]# file setuidTest
setuidTest: ELF 64-bit LSB executable, x86-64, version 1 (SYSV), dynamically linked (uses shared libs), for GNU/Linux 2.6.32, BuildID[sha1]=89eed2829792e4a95e684bf059b327670ae7d946, not stripped
setuid 권한이 없을 때 실행한 결과
[user1@localhost ~]# ./setuidTest
uid = 0
euid = 0
[user1@localhost ~]# su - user1
$ cd /tmp
$ ./setuidTest
uid = 1000
euid = 1000
$ exit
setuid 권한이 있을 때 실행한 결과
[user1@localhost ~]# chmod u+s setuidTest -c
mode of `setuidTest' changed from 0755 (rwxr-xr-x) to 4755 (rwsr-xr-x)
[user1@localhost ~]# ./setuidTest
uid = 0
euid = 0
[user1@localhost ~]# su - user1
$ cd /tmp
$ ./setuidTest
uid = 1000
euid = 0 <-- setuid가 설정되어 있으므로 관리자인 0의 권한을 갖는다.
euid는 프로세스가 파일에 접근하기 위한 권한이다.
실습> setuid를 이용한 /etc/shadow 파일 출력하기
1. setuid 권한이 없는 경우
[root@localhost ~]# ll /bin/cat
-rwxr-xr-x. 1 root root 54080 11월 17 2020 /bin/cat
[root@localhost ~]# ll /etc/shadow
----------. 1 root root 786 12월 29 14:24 /etc/shadow
[root@localhost ~]#
[root@localhost ~]# su - user1
마지막 로그인: 목 12월 29 14:54:46 KST 2022 일시 pts/2
[user1@localhost ~]$ cat /etc/shadow
cat: /etc/shadow: 허가 거부
[user1@localhost ~]$ exit
2. 권한 변경
setuid 권한을 /bin/cat 파일에 설정한다.
[root@localhost ~]# chmod u+s /bin/cat; ll /bin/cat
-rwsr-xr-x. 1 root root 54080 11월 17 2020 /bin/cat
3. setuid 권한이 있는 경우
/bin/cat 파일이 setuid 권한이 있기 때문에 cat이 메모리에 올라갈 때 euid 권한이 0으로 설정되어 있기
때문에 /etc/shadow의 소유자와 일치하므로 파일을 볼 수 있다.
여기서 root(uid 0)은 일반 파일의 읽기 권한이 없어도 접근할 수 있다.
[root@localhost ~]# su - user1
마지막 로그인: 목 12월 29 14:59:08 KST 2022 일시 pts/2
[user1@localhost ~]$ cat /etc/shadow
root:iXBLLqvofj2H5vsH$5LOMzT9/AX6Rt/fJAl6NdH1geqtD2iXvP5O0hYM/0diQC8LAx9Uh2JnmXEvTmqfRKNL9eLYvso/EaN1LL5HU0.::0:99999:7:::
bin::18353:0:99999:7:::
daemon::18353:0:99999:7:::
adm::18353:0:99999:7:::
lp::18353:0:99999:7:::
sync:*:18353:0:99999:7:::
:
:(생략)
!!! 중요 !!!
uid가 0인 사용자 root는 r(read), w(write)권한이 제약을 받지 않고 사용할 수 있다.
객체(파일)에 rw 권한이 없어도 uid가 0인 사용자 root는 rw권한의 제약을 받지 않는다.
단 x(execute)는 제약을 받는다.
실행파일에 x가 없으면 실행이 안된다.
실습> setuid를 이용한 /etc/shadow 파일 출력하기
1. 소스코드 작성
[user1@localhost ~]# cd /tmp
[user1@localhost ~]# vi readShadow2.c
/*
- 파일명: readShadow2.c
- 프로그램 설명: /etc/shadow 파일을 출력한다.
- 작성자: 리눅스마스터넷
- setuid(): uid 설정하는 함수
- geteuid(): euid를 가져오는 함수
*/
#include <stdio.h>
#include <stdlib.h>
int main()
{
FILE *fp;
char buf[1000];
printf("uid = %d\n", getuid());
printf("euid = %d\n", geteuid());

// /etc/shadow 파일을 읽어서 buf 변수에 저장한다.
if((fp = fopen("/etc/shadow", "r")) == NULL)
{
    fprintf(stderr, "/etc/shadow 파일을 오픈하지 못했습니다.\n");
    exit(1);
}

fgets(buf, sizeof(buf)-1, fp);  // 첫 번째 라인만 읽어서 buf 변수에 저장한다.
fclose(fp);

printf("%s\n", buf);  // 변수 buf에 저장된 값을 출력한다.

return 0;
}
2. 컴파일
컴파일을 하면 setuid가 설정되어 있지 않는다.
[user1@localhost ~]# gcc -o readShadow2 readShadow2.c
[user1@localhost ~]# ll readShadow2
-rwxr-xr-x. 1 root root 8824 7월 5 22:37 readShadow2
3. setuid 권한이 없는 경우
euid의 값 1000과 /etc/shadow 값을 비교하면 마지막 Other 부분을 참고하게 된다.
Other는 읽기 권한이 없기 때문에 readShadow2 프로세스가 /etc/shadow 파일에 접근할 수 없게 된다.
그러므로 OS가 파일에 접근을 못하게 막아버린다.
[user1@localhost ~]# su - user1
$ /tmp/readShadow2
uid = 1000
euid = 1000
/etc/shadow 파일을 오픈하지 못했습니다.
$ exit
4. setuid 권한이 있는 경우
euid의 값 0과 /etc/shadow 값을 비교하면 소유자 User 부분을 참고하게 된다.
User는 읽기 권한이 없어도 readShadow2 프로세스가 /etc/shadow 파일에 접근할 수 있게 된다.
그러므로 OS가 파일에 접근을 해서 파일의 내용을 읽어서 출력할 수 있게 된다.
[user1@localhost ~]# chmod u+s readShadow2
[user1@localhost ~]# ll readShadow2
-rwsr-xr-x. 1 root root 8824 7월 5 22:37 readShadow2
[user1@localhost ~]# su - user1
$ /tmp/readShadow2
uid = 1000
euid = 0
root:yvmj8k2lft900HdF$bTUqEha8YLI9FoojjKQiEMOOvCO6arnyFYPken990dHasIrrLBSXs3pnIgCF336iHVq60DqrPuKUW1mTzCp7l/::0:99999:7:::
