필요한 라이브러리 다운 해서 lib 폴더에 저장
자바 activation
jar 다운하고 아티팩트 id로 인텔리제이에 maven 연결
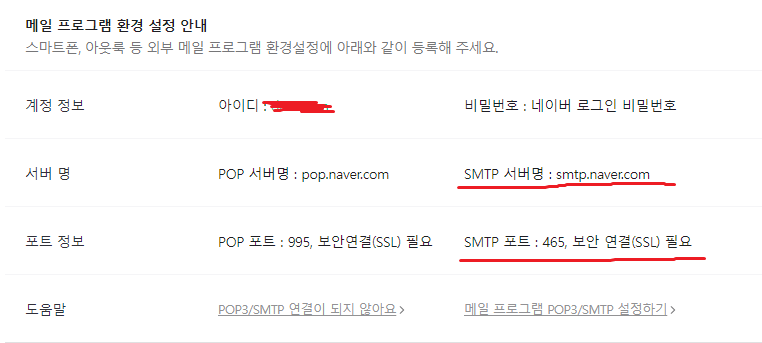
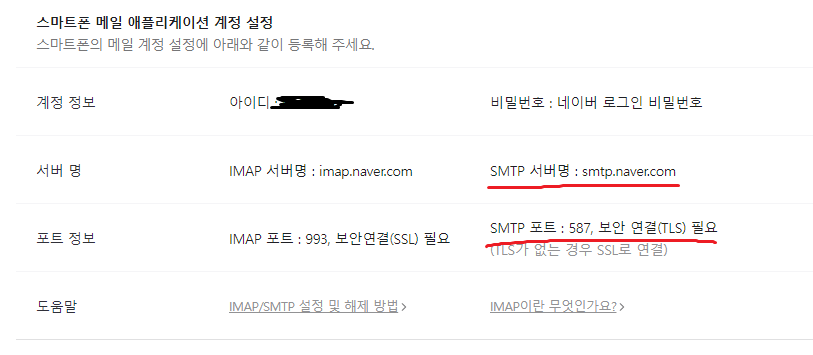
네이버 메일 설정
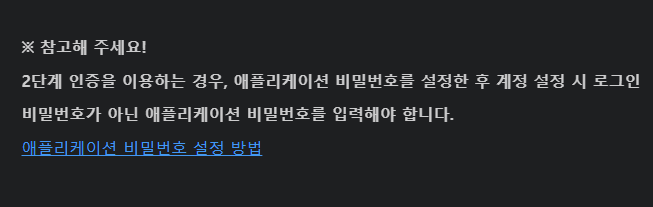
2단계 인증(qr) 사용시 안내
imap/smtp

pop3/smtp
util.SMTPAuthenficator 생성

메일 보내기 form
<form action="onlinepro.jsp" id="login_frm" class="frm">
<table class="tb1">
    <tbody>
    <tr>
        <th><label for="id">아이디</label></th>
        <td><input type="text" name="id" id="id" value="<%=sid%>" readonly></td>
    </tr>
    <tr>
        <th><label for="name">이름</label></th>
        <td><input type="text" name="name" id="name" value="<%=sname %>" readonly></td>
    </tr>
    <tr>
        <th><label for="email">보낼 이메일</label></th>
        <td><input type="email" name="email" id="email" required></td>
    </tr>
    <tr>
        <th><label for="tel">연락처</label></th>
        <td><input type="tel" name="tel" id="tel" placeholder="연락처 기입" required></td>
    </tr>
    <tr>
        <th><label for="question">상담 제목</label></th>
        <td><input type="text" name="question" id="question" class="indata" placeholder="제목 입력" autofocus required></td>
    </tr>
    <tr>
        <th><label for="answer">상담 내용</label></th>
        <td><textarea name="answer" id="answer" cols="50" rows="15" placeholder="내용 입력" required></textarea></td>
    </tr>
    <tr>
        <td colspan="2">
            <input type="submit" value="글쓰기" class="inbtn">
            <input type="reset" value="내용 리셋" class="inbtn">
        </td>
    </tr>
    </tbody>
</table>
</form>
아이디 비번 클래스
package com.chunjae.data;

public class Email {
    public static String ID = "네이버 아이디";
    public static String PW = "네이버 비밀번호";

}
SMTPAuthenficator
package com.chunjae.util;

import com.chunjae.data.Email;

import javax.mail.Authenticator;
import javax.mail.PasswordAuthentication;

// 사용할 메일과 비밀번호 설정 가능
// lib에 넣는 경우 동작에 문제는 없지만 인텔리제이 상에서 빨간 줄이 뜬다.
public class SMTPAuthenficator extends Authenticator {
    @Override
    protected PasswordAuthentication getPasswordAuthentication() {
        return new PasswordAuthentication(Email.ID, Email.PW);
    }
}
online.jsp
<%@ page contentType="text/html;charset=UTF-8" pageEncoding="UTF-8" language="java" %>
<%@include file="/encoding.jsp"%>
<!DOCTYPE html>
<html lang="en">
<head>
<meta charset="UTF-8">
<meta name="viewport" content="width=device-width, initial-scale=1.0">
<title>온라인 상담</title>
<%@ include file="../head.jsp" %>
<!-- 스타일 초기화 : reset.css 또는 normalize.css -->
<link href="https://cdn.jsdelivr.net/npm/reset-css@5.0.1/reset.min.css" rel="stylesheet">
<!-- 플러그인 연결-->
<script src="https://code.jquery.com/jquery-3.7.0.min.js"></script>
<!-- 스타일 초기화 -->
<link rel="stylesheet" href="../css/reset.css">
<!-- 웹 폰트 -->
<link rel="stylesheet" href="../css/font.css">
<!-- css 모듈화 -->
<link rel="stylesheet" href="../css/common.css">
<link rel="stylesheet" href="../css/hd.css">
<link rel="stylesheet" href="../css/ft.css">
<style>
/* 본문 영역 스타일 */
.contents { clear:both; min-height: 100vh; background-image: url("../img/login.jpg");
background-repeat: no-repeat; background-position: center -250px; }
.contents::after { content:""; clear:both; display:block; width:100%; }
.page { clear:both; width: 100vw; height: 100vh; position:relative; }
.page::after { content:""; display:block; width: 100%; clear:both; }
.page_wrap { clear:both; width: 1200px; height: auto; margin:0 auto; }
.page_tit { font-size:48px; text-align: center; padding-top:0.7em; color:#fff;
padding-bottom: 1.3em; }
.breadcrumb { clear:both;
width:1200px; margin: 0 auto; text-align: right; color:#fff;
padding-top: 28px; padding-bottom: 28px; }
.breadcrumb a { color:#fff; }
.tb1 { width:600px; margin:0 auto; font-size: 18px;}
.tb1 th { width: 200px; line-height: 24px;
border-bottom: 1px solid #333; border-top: 1px solid #333; box-sizing: border-box; text-align: center;}
.tb1 td { width: 400px; line-height: 24px;
border-bottom: 1px solid #333; border-top: 1px solid #333; box-sizing: border-box; text-align: center;}
.indata { display:inline-block; width: 400px; height: 32px; line-height: 32px;
text-indent:14px; font-size:14px; }
.inbtn { display:block; border-radius:100px;
min-width:140px; padding-left: 24px; padding-right: 24px; text-align: center;
line-height: 48px; background-color: #333; color:#fff; font-size: 18px; cursor: pointer; }
.inbtn:first-child { float:left; }
.inbtn:last-child { float:right; }
.inbtn:hover {
background-color: #666666;
}
</style>
</head>
<body>
<div class="wrap">
<header class="hd" id="hd">
<%@ include file="../header.jsp" %>
</header>
<div class="contents" id="contents">
<div class="breadcrumb">
<p><a href="/">HOME</a> > <a href="/faq/addFaq.jsp">온라인 상담</a></p>
</div>
<section class="page" id="page1">
<div class="page_wrap">
<h2 class="page_tit">온라인 상담</h2>
<form action="onlinepro.jsp" id="login_frm" class="frm">
<table class="tb1">
<tbody>
<tr>
<th><label for="id">아이디</label></th>
<td><input type="text" name="id" id="id" value="<%=sid%>" readonly></td>
</tr>
<tr>
<th><label for="name">이름</label></th>
<td><input type="text" name="name" id="name" value="<%=sname %>" readonly></td>
</tr>
<tr>
<th><label for="email">이메일</label></th>
<td><input type="email" name="email" id="email" required></td>
</tr>
<tr>
<th><label for="tel">연락처</label></th>
<td><input type="tel" name="tel" id="tel" placeholder="연락처 기입" required></td>
</tr>
<tr>
<th><label for="question">상담 제목</label></th>
<td><input type="text" name="question" id="question" class="indata" placeholder="제목 입력" autofocus required></td>
</tr>
<tr>
<th><label for="answer">상담 내용</label></th>
<td><textarea name="answer" id="answer" cols="50" rows="15" placeholder="내용 입력" required></textarea></td>
</tr>
<tr>
<td colspan="2">
<input type="submit" value="글쓰기" class="inbtn">
<input type="reset" value="내용 리셋" class="inbtn">
</td>
</tr>
</tbody>
</table>
</form>
</div>
</section>
</div>
<footer class="ft" id="ft">
<%@ include file="../footer.jsp" %>
</footer>
</div>
</body>
</html>onlinepro.jsp
<%@ page contentType="text/html;charset=UTF-8" pageEncoding="UTF-8" language="java" %>
<%-- 1. 라이브러리 가져옴 --%>
<%@ page import="com.chunjae.util.*" %>
<%@ page import="java.util.*, javax.mail.*, javax.mail.internet.*" %>
<%-- 2. 인코딩 설정--%>
<%@ include file="/encoding.jsp"%>

<%-- 학원에서는 안되니 집에서 해봐라--%>
<%
    //3. 보내온 이메일 데이터 받기
    String name = request.getParameter("name");
    String id = request.getParameter("id");
    String email = request.getParameter("email");    //보내는 사람 이메일
    String tel = request.getParameter("tel");
    String title = request.getParameter("title");
    String content = request.getParameter("content");
    String to = "받는 사람 이메일";  //받는 사람 이메일

    //4. smtp 설정 -> Properties 활용
    Properties p = new Properties();
    p.put("mail.smtp.host","smtp.naver.com");
    p.put("mail.smtp.port", "465");
    p.put("mail.smtp.starttls.enable", "true");
    p.put("mail.smtp.ssl.enable", "true");
    p.put("mail.smtp.auth", "true");
    p.put("mail.smtp.debug", "true");
    p.put("mail.smtp.socketFactory.port", "465");
    p.put("mail.smtp.socketFactory.class", "javax.net.ssl.SSLSocketFactory");
    p.put("mail.smtp.socketFactory.fallback", "false");

    //5. 이메일 보내기
    try {
        Authenticator auth = new SMTPAuthenficator();
        Session ses = Session.getInstance(p, auth); // 인증 권한이 필요할 때 메일을 보낼 경우
//        Session.getDefaultInstance(p) //인증 권한이 필요 없을 때 이메일을 보낼 경우 사용, 이미 로그인 된 경우
        ses.setDebug(true);
        MimeMessage msg = new MimeMessage(ses); // 파일 첨부나 객체 까지 전달할 때 사용하는 클래스

        msg.setSubject(title); //  제목 추가

        StringBuffer buffer = new StringBuffer();   //이메일 내용
        buffer.append("보내는 사람 : ");
        buffer.append(name+"\n");
        buffer.append("연락처 : ");
        buffer.append(tel+"\n");
        buffer.append("이메일 : ");
        buffer.append(email+"\n");
        buffer.append("제목 : ");
        buffer.append(title+"\n");
        buffer.append("내용 : ");
        buffer.append(content+"\n");

        // string을 인터넷 주소로 변형
        Address fromAddr = new InternetAddress(email);  //보내는 사람
        msg.setFrom(fromAddr);

        Address toAddr = new InternetAddress(to);      // 받는 사람
        msg.addRecipient(Message.RecipientType.TO, toAddr); // 하나의 이메일 주소만 등록

        // 버퍼의 내용을 보낼때 사용
        msg.setContent(buffer.toString(), "text/html;charset=UTF-8"); // 내용
        Transport.send(msg); // 메일 전송
    } catch(Exception e){
        e.printStackTrace();
        return;
    } finally {
        response.sendRedirect("/index.jsp");
    }

%>
자바 풀 스택 주니어 개발자