핵심만 먼저 보고 가자!
➡️ Debounce: 입력/이벤트가 잠시 멈출 때까지 기다렸다가 한 번만 실행
- 검색창 자동완성, 창 크기 변경 후 레이아웃 계산 등 마지막 입력이 중요할 때
➡️ Throttle: 정해둔 간격마다 최대 한 번만 실행
- 스크롤 위치 계산, 윈도우 스크롤/휠, 드래그 등 지속 중간값이 중요할 때
➡️ 라이브러리 (lodash) 써도 되고, 직접 구현도 간단하다!
➡️ React에서는 커스텀 훅을 만들어 쓰면 재활용이 쉽다
왜 필요할까?
브라우저는 스크롤 중에 scroll 이벤트를 초에 수십에서 수백 번 호출한다..!
매번 무거운 계산 (API 요청, DOM 측정, 차트 업데이트)을 하면 성능 저하가 발생한다...
그래서 이벤트를
"묶어서" 보내거나 (Throttle),
"마지막 것만" 처리 (Debounce) 해서 부담을 줄인다.
비유로 이해해보자
➡️ Debounce
: 웨이터가 주문을 적다가 손님이 말을 멈추면 그제서야 주문을 확정하는 것
➡️ Throttle
: 수도꼭지에 유량 제한기를 달아, 물이 아무리 많이 와도 일정 간격마다 한 번씩만 내보내는 것
표로 한 눈에 비교해보자
| 구분 | Debounce | Throttle |
|---|---|---|
| 정의 | 입력이 멈춘 뒤 N ms 후 실행 | N ms 간격마다 최대 한 번 실행 |
| 쓰임새 | 검색창, 자동저장, 리사이즈 후 정리 | 스크롤 위치 계산, 드래그 위치 추적 |
| 핵심 옵션 | leading / trailing 실행 제어 | leading / trailing 실행 제어 |
| 장점 | 불필요한 호출 거의 제거 | 실시간성(연속 동작 중 중간 반영) 확보 |
| 주의 | 너무 길면 반응이 둔해짐 | 간격이 길면 부자연스러울 수 있음 |
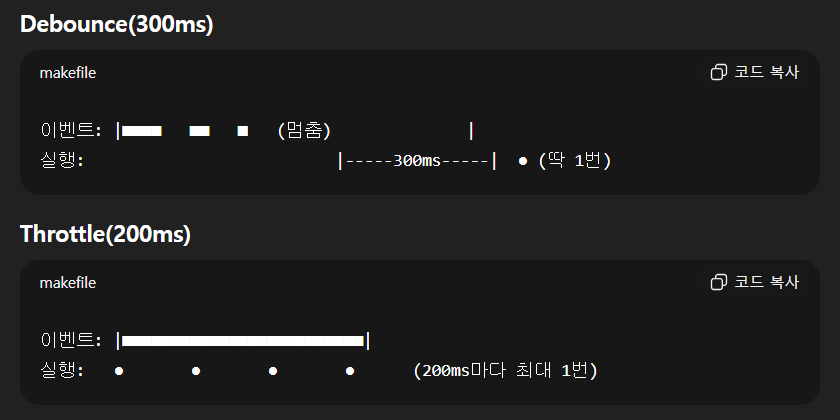
타임라인으로 이해해보자
JS로 구현해보자 (직접 만들어보기)
➡️ Debounce 함수
function debounce(fn, delay, { leading = false, trailing = true } = {}) {
  let timer = null;
  let lastArgs, lastThis, called = false;

  return function debounced(...args) {
    lastArgs = args;
    lastThis = this;

    const callNow = leading && !timer;
    clearTimeout(timer);

    timer = setTimeout(() => {
      timer = null;
      if (trailing && (!leading || called)) {
        fn.apply(lastThis, lastArgs);
      }
      called = false;
    }, delay);

    if (callNow) {
      fn.apply(lastThis, lastArgs);
      called = true;
    }
  };
}
➡️ Throttle 함수
function throttle(fn, interval, { leading = true, trailing = true } = {}) {
  let lastTime = 0;
  let timer = null;
  let lastArgs, lastThis;

  const invoke = () => {
    lastTime = Date.now();
    fn.apply(lastThis, lastArgs);
  };

  return function throttled(...args) {
    const now = Date.now();
    lastArgs = args;
    lastThis = this;

    if (!lastTime && leading === false) lastTime = now;

    const remaining = interval - (now - lastTime);

    if (remaining <= 0 || remaining > interval) {
      if (timer) {
        clearTimeout(timer);
        timer = null;
      }
      invoke();
    } else if (!timer && trailing !== false) {
      timer = setTimeout(() => {
        timer = null;
        if (trailing !== false) invoke();
      }, remaining);
    }
  };
}
실전 예제!
➡️ 검색창 자동완성 → Debounce 300ms
<input id="q" placeholder="검색어를 입력하세요" />
<script>
const input = document.getElementById('q');

const fetchSuggest = (q) => {
  // 실제로는 fetch(`/api/suggest?q=${encodeURIComponent(q)}`)
  console.log('API 요청:', q);
};

const onInput = debounce((e) => {
  const q = e.target.value.trim();
  if (q) fetchSuggest(q);
}, 300);

input.addEventListener('input', onInput);
</script>
➡️ 스크롤 위치 기반 헤더 축소 → Throttle 100ms
const onScroll = throttle(() => {
  const y = window.scrollY;
  document.body.classList.toggle('shrink-header', y > 80);
}, 100);

window.addEventListener('scroll', onScroll);
React에서 사용하기 (커스텀 훅)
➡️ 값 디바운싱 훅 (useDebouncedValue)
import { useEffect, useState } from 'react';

export function useDebouncedValue<T>(value: T, delay = 300) {
  const [v, setV] = useState(value);
  useEffect(() => {
    const id = setTimeout(() => setV(value), delay);
    return () => clearTimeout(id);
  }, [value, delay]);
  return v;
}- 사용:
function SearchBox() {
  const [q, setQ] = useState('');
  const dq = useDebouncedValue(q, 300);

  useEffect(() => {
    if (!dq) return;
    // dq로 API 호출
  }, [dq]);

  return <input value={q} onChange={e => setQ(e.target.value)} />;
}
➡️ 콜백 스로틀 훅 (useThrottleFn)
import { useRef, useEffect, useCallback } from 'react';

export function useThrottleFn<F extends (...a: any[]) => void>(fn: F, interval = 200) {
  const lastTimeRef = useRef(0);
  const timerRef = useRef<number | null>(null);
  const fnRef = useRef(fn);
  useEffect(() => { fnRef.current = fn; }, [fn]);

  const throttled = useCallback((...args: Parameters<F>) => {
    const now = Date.now();
    const remaining = interval - (now - lastTimeRef.current);

    if (remaining <= 0) {
      if (timerRef.current) { window.clearTimeout(timerRef.current); timerRef.current = null; }
      lastTimeRef.current = now;
      fnRef.current(...args);
    } else if (!timerRef.current) {
      timerRef.current = window.setTimeout(() => {
        timerRef.current = null;
        lastTimeRef.current = Date.now();
        fnRef.current(...args);
      }, remaining);
    }
  }, [interval]);

  useEffect(() => () => { if (timerRef.current) window.clearTimeout(timerRef.current); }, []);

  return throttled as F;
}- 사용:
function ScrollAwareHeader() {
  const onScroll = useThrottleFn(() => {
    // 스크롤 처리
  }, 100);

  useEffect(() => {
    window.addEventListener('scroll', onScroll);
    return () => window.removeEventListener('scroll', onScroll);
  }, [onScroll]);

  return <header>...</header>;
}
Lodash로 더 쉽게 사용해보자!
npm i lodashimport { debounce, throttle } from 'lodash';
const onChange = debounce((value: string) => { /* API 요청 */ }, 300, {
leading: false,
trailing: true,
});
const onScroll = throttle(() => { /* 스크롤 로직 */ }, 100, {
leading: true,
trailing: true,
});- 장점: battle-tested, 옵션이 풍부하다!
- 단점: 번들 크기
(필요 시 lodash-es + 트리쉐이킹, 혹은 import debounce from 'lodash/debounce'처럼 부분 import)
언제 무엇을 골라야 할까?
-
검색창/자동저장/리사이즈 후 레이아웃: 마지막 상태만 중요 → Debounce
-
스크롤 중 애니메이션/프로그레스/무한스크롤: 중간 상태도 중요 → Throttle
-
API 과금/쿼터가 빡빡한 자동완성: Debounce로 불필요 호출 최소화
-
부드러운 따라가기 UI(패럴럭스, 드래그 프리뷰): Throttle로 지속 반영
자주 하는 실수와 팁
-
이벤트 리스너에 매번 새 함수 바인딩
- React에서 useCallback/커스텀 훅으로 참조 안정화
-
너무 긴 지연 시간
- Debounce를 800ms 이상 주면 느리게 느껴짐. 250~400ms부터 테스트
-
서버측도 보호
- 클라이언트 디바운스/스로틀만 믿지 말고 서버 레이트 리미트도 함께
-
leading/trailing 의미 혼동
-
leading: true = 첫 이벤트 즉시 실행
-
trailing: true = 마지막 이벤트 이후 한 번 더 실행
-
-
타이머 정리 누락
- 컴포넌트 언마운트 시 clearTimeout/clearInterval 필수
성능 체감 테스트
-
크롬 DevTools → Performance → 스크롤/입력 전/후로 녹화 →
스루풋(Frames), 메인 스레드 바쁜 시간, 이벤트 핸들러 호출 횟수를 비교 -
Network 탭에서 API 호출 횟수가 디바운스 도입 후 줄었는지 확인
TypeScript 시그니처 예시
export function debounce<F extends (...a: any[]) => any>(
  fn: F,
  delay: number,
  options?: { leading?: boolean; trailing?: boolean }
): (...args: Parameters<F>) => void;

export function throttle<F extends (...a: any[]) => any>(
  fn: F,
  interval: number,
  options?: { leading?: boolean; trailing?: boolean }
): (...args: Parameters<F>) => void;
미니 FAQ!
Q. Throttle과 requestAnimationFrame은 뭐가 달라요?
A. requestAnimationFrame은 다음 페인트 직전에 한 번 실행합니다(대개 60fps). Throttle은 임의의 간격을 가집니다. 스크롤 중 위치 계산처럼 프레임 동기화가 중요한 경우 rAF + Throttle을 함께 쓰기도 합니다.
Q. Debounce를 입력창에 쓰면 타이핑이 느려지나요?
A. onChange 등 이벤트 핸들러 내부의 무거운 작업만 디바운스하세요. 입력 자체는 즉시 반영하고, API 호출만 디바운스하는 식으로 분리하면 UX가 좋아집니다.
Q. leading만 켜고 trailing 끄면?
A. 첫 번만 실행되고, 그 뒤로는 간격 내 호출이 무시됩니다(Throttle 기준). UX에 따라 다르게 조합하세요.
마지막 정리
➡️ Debounce = 멈추면 실행, Throttle = 간격마다 실행
➡️ 상황에 맞게 고르면 성능과 UX가 동시에 좋아진다!