CloudNet@ 가시다님이 진행하는 단기 CI/CD 과정 Study 내용을
실습한 내용과 개인적인 경험을 정리하고자 합니다.
1주차 학습한 내용은 Jenkins CI/CD + Docker 입니다.
0. 실습 환경 구성
macOS에 테스트 환경 구성
- HW: Macbook Air M1
- SW: Docker Desktop, VSCODE와 Docker 확장 설치
brew install docker --cask docker
brew install visual-studio-code --cask
1. 컨테이너를 활용한 애플리케이션 개발
1.1 특정 문자열 출력하는 컨테이너 생성/실행
- Hello Docker 문자열 출력
# 코드 작성
mkdir 1.1 && cd 1.1

echo "print ('Hello Docker')" > hello.py

cat > Dockerfile <<EOF
FROM python:3
COPY . /app
WORKDIR /app
CMD python3 hello.py
EOF

# 컨테이너 이미지 빌드
docker pull python:3
docker build . -t hello
docker image ls -f reference=hello  # -f 옵션은 이번 학습을 통해 알게 됨

# 컨테이너 실행
docker run --rm hello # 문자열 출력하는 Container 1회성으로 생성 후 삭제, 이미지는 유지 됨 
- Hello CloudNet@ 출력
# 코드 수정
echo "print ('Hello CloudNet@')" > hello.py

# 컨테이너 이미지 빌드 : latest 활용 해보자!
docker build . -t hello:1              # Tag로 1을 부여
docker image ls -f reference=hello
docker tag hello:1 hello:latest        # 최신 버전 요청시 참고하도록 latest tag 부여
docker image ls -f reference=hello

# 컨테이너 실행
docker run --rm hello:1
docker run --rm hello    # Tag 생략 시 latest 참고 함
CI/CD 빌드 배포 전체 과정 중, 컨테이너 이미지 Tag 태그은 어떻게 사용 해야 될까 고민해보자.
🤔 Jenkins 빌드 시 IMAGE_TAG에 BUILD_ID 또는 GIT_COMMIT 해시를 추가해 태그 관리
1.2 openjdk container 통해 java 소스 Build
# 코드 작성
mkdir 1.2 && cd 1.2

cat > Hello.java <<EOF
class Hello {
    public static void main(String[] args) {
        System.out.println("Hello Docker");
    }
}
EOF

cat > Dockerfile <<EOF
FROM openjdk
COPY . /app
WORKDIR /app
RUN javac Hello.java    # The complie command
CMD java Hello          # hello code run command
EOF

# 컨테이너 이미지 빌드
docker pull openjdk
docker build . -t hello:2
docker tag hello:2 hello:latest
docker image ls -f reference=hello

# 컨테이너 실행
docker run --rm hello:2  # openjdk download, hello.java build, hello.class 실행
docker run --rm hello    # openjdk download, hello.java build, hello.class 실행

# 컨테이너 이미지 내부에 파일 목록을 보면 어떤가요? 꼭 필요한 파일만 있는가요? 보안적으로 어떨까요?
docker run --rm hello ls -l  # 소스와 java compiler 존재, container 해킹된 경우 악의적으로 코드 변경 가능

# RUN 컴파일 시 소스코드와 java 컴파일러(javac)가 포함되어 있음. 실제 애플리케이션 실행에 필요 없음.
docker run --rm hello javac --help  # javac 실행 가능
docker run --rm hello ls -l
1.3 Multistage build (컴파일과 실행환경 분리)
-
보안을 위해 소스 코드를 build 하는 환경과 실행하는 환경을 분리하기 위해 Dockerfile을 2 step 으로 처리
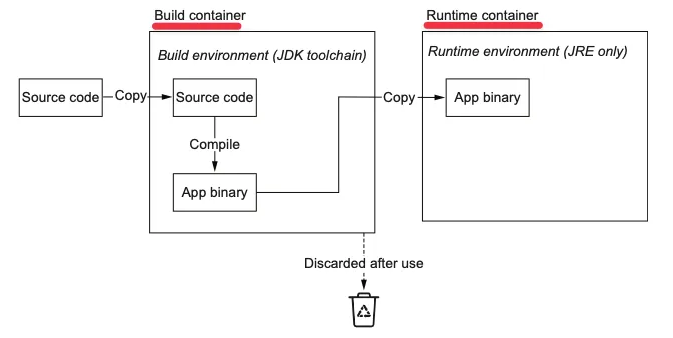
-
코드 작성 & 실행
# 코드 작성
mkdir 1.3 && cd 1.3

cat > Hello.java <<EOF
class Hello {
    public static void main(String[] args) {
        System.out.println("Hello Multistage container build");
    }
}
EOF

cat > Dockerfile <<EOF
FROM openjdk:11 AS buildstage
COPY . /app
WORKDIR /app
RUN javac Hello.java

FROM openjdk:11-jre-slim
COPY --from=buildstage /app/Hello.class /app/
WORKDIR /app
CMD java Hello
EOF

# 컨테이너 이미지 빌드 : 용량 비교 해보자!
docker build . -t hello:3
docker tag hello:3 hello:latest
docker image ls -f reference=hello

# 컨테이너 실행
docker run --rm hello:3
docker run --rm hello

# 컨테이너 이미지 내부에 파일 목록을 보면 어떤가요?
docker run --rm hello ls -l          # Compile된 Hello.class 만 조회
docker run --rm hello javac --help   # Compiler 존재하지 않아 의도한 Error 발생
2. CI/CD 실습 환경 구성
2.1 컨테이너 2대(Jenkins, gogs) : 호스트 OS 포트 노출(expose)로 접속 및 사용
- Jenkins, gogs 컨테이너 기동
# 작업 디렉토리 생성 후 이동
mkdir cicd-labs
cd cicd-labs

#
cat <<EOT > docker-compose.yaml
services:

  jenkins:
    container_name: jenkins
    image: jenkins/jenkins
    restart: unless-stopped
    networks:
      - cicd-network
    ports:
      - "8080:8080"
      - "50000:50000"
    volumes:
      - /var/run/docker.sock:/var/run/docker.sock
      - jenkins_home:/var/jenkins_home

  gogs:
    container_name: gogs
    image: gogs/gogs
    restart: unless-stopped
    networks:
      - cicd-network
    ports:
      - "10022:22"
      - "3000:3000"
    volumes:
      - gogs-data:/data

volumes:
  jenkins_home:
  gogs-data:

networks:
  cicd-network:
    driver: bridge
EOT


# 배포
docker compose up -d
docker compose ps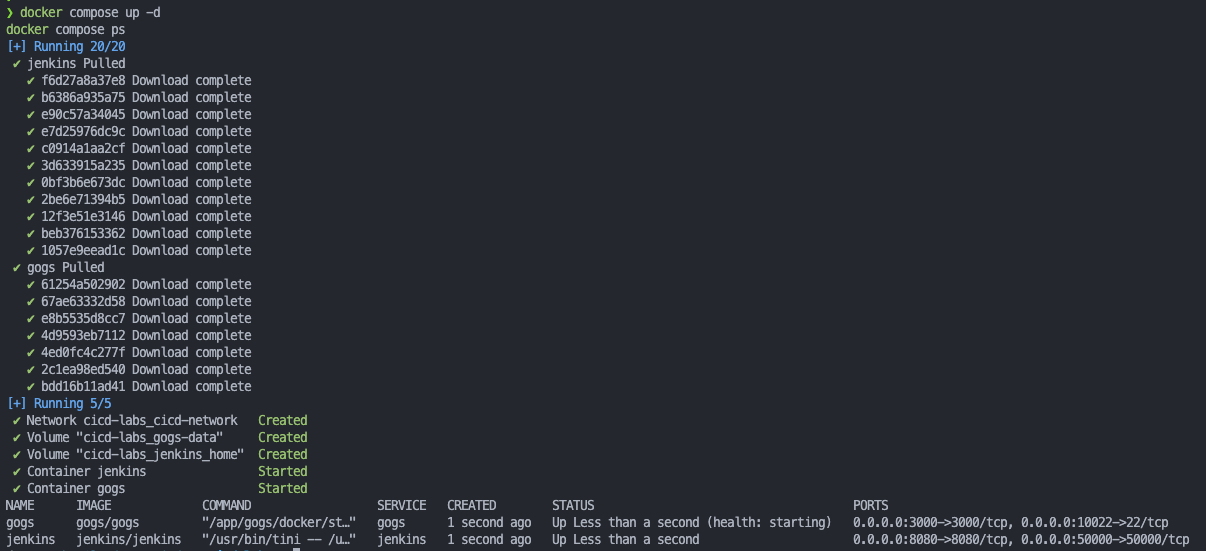
# 기본 정보 확인
for i in gogs jenkins ; do echo ">> container : $i <<"; docker compose exec $i sh -c "whoami && pwd"; echo; done

# 도커를 이용하여 각 컨테이너로 접속
docker compose exec jenkins bash
exit

docker compose exec gogs bash
exit
- Jenkins 컨테이너 초기 설정
# Jenkins 초기 암호 확인
docker compose exec jenkins cat /var/jenkins_home/secrets/initialAdminPassword
11977f293ddb402a9189fb8e71f2e69f
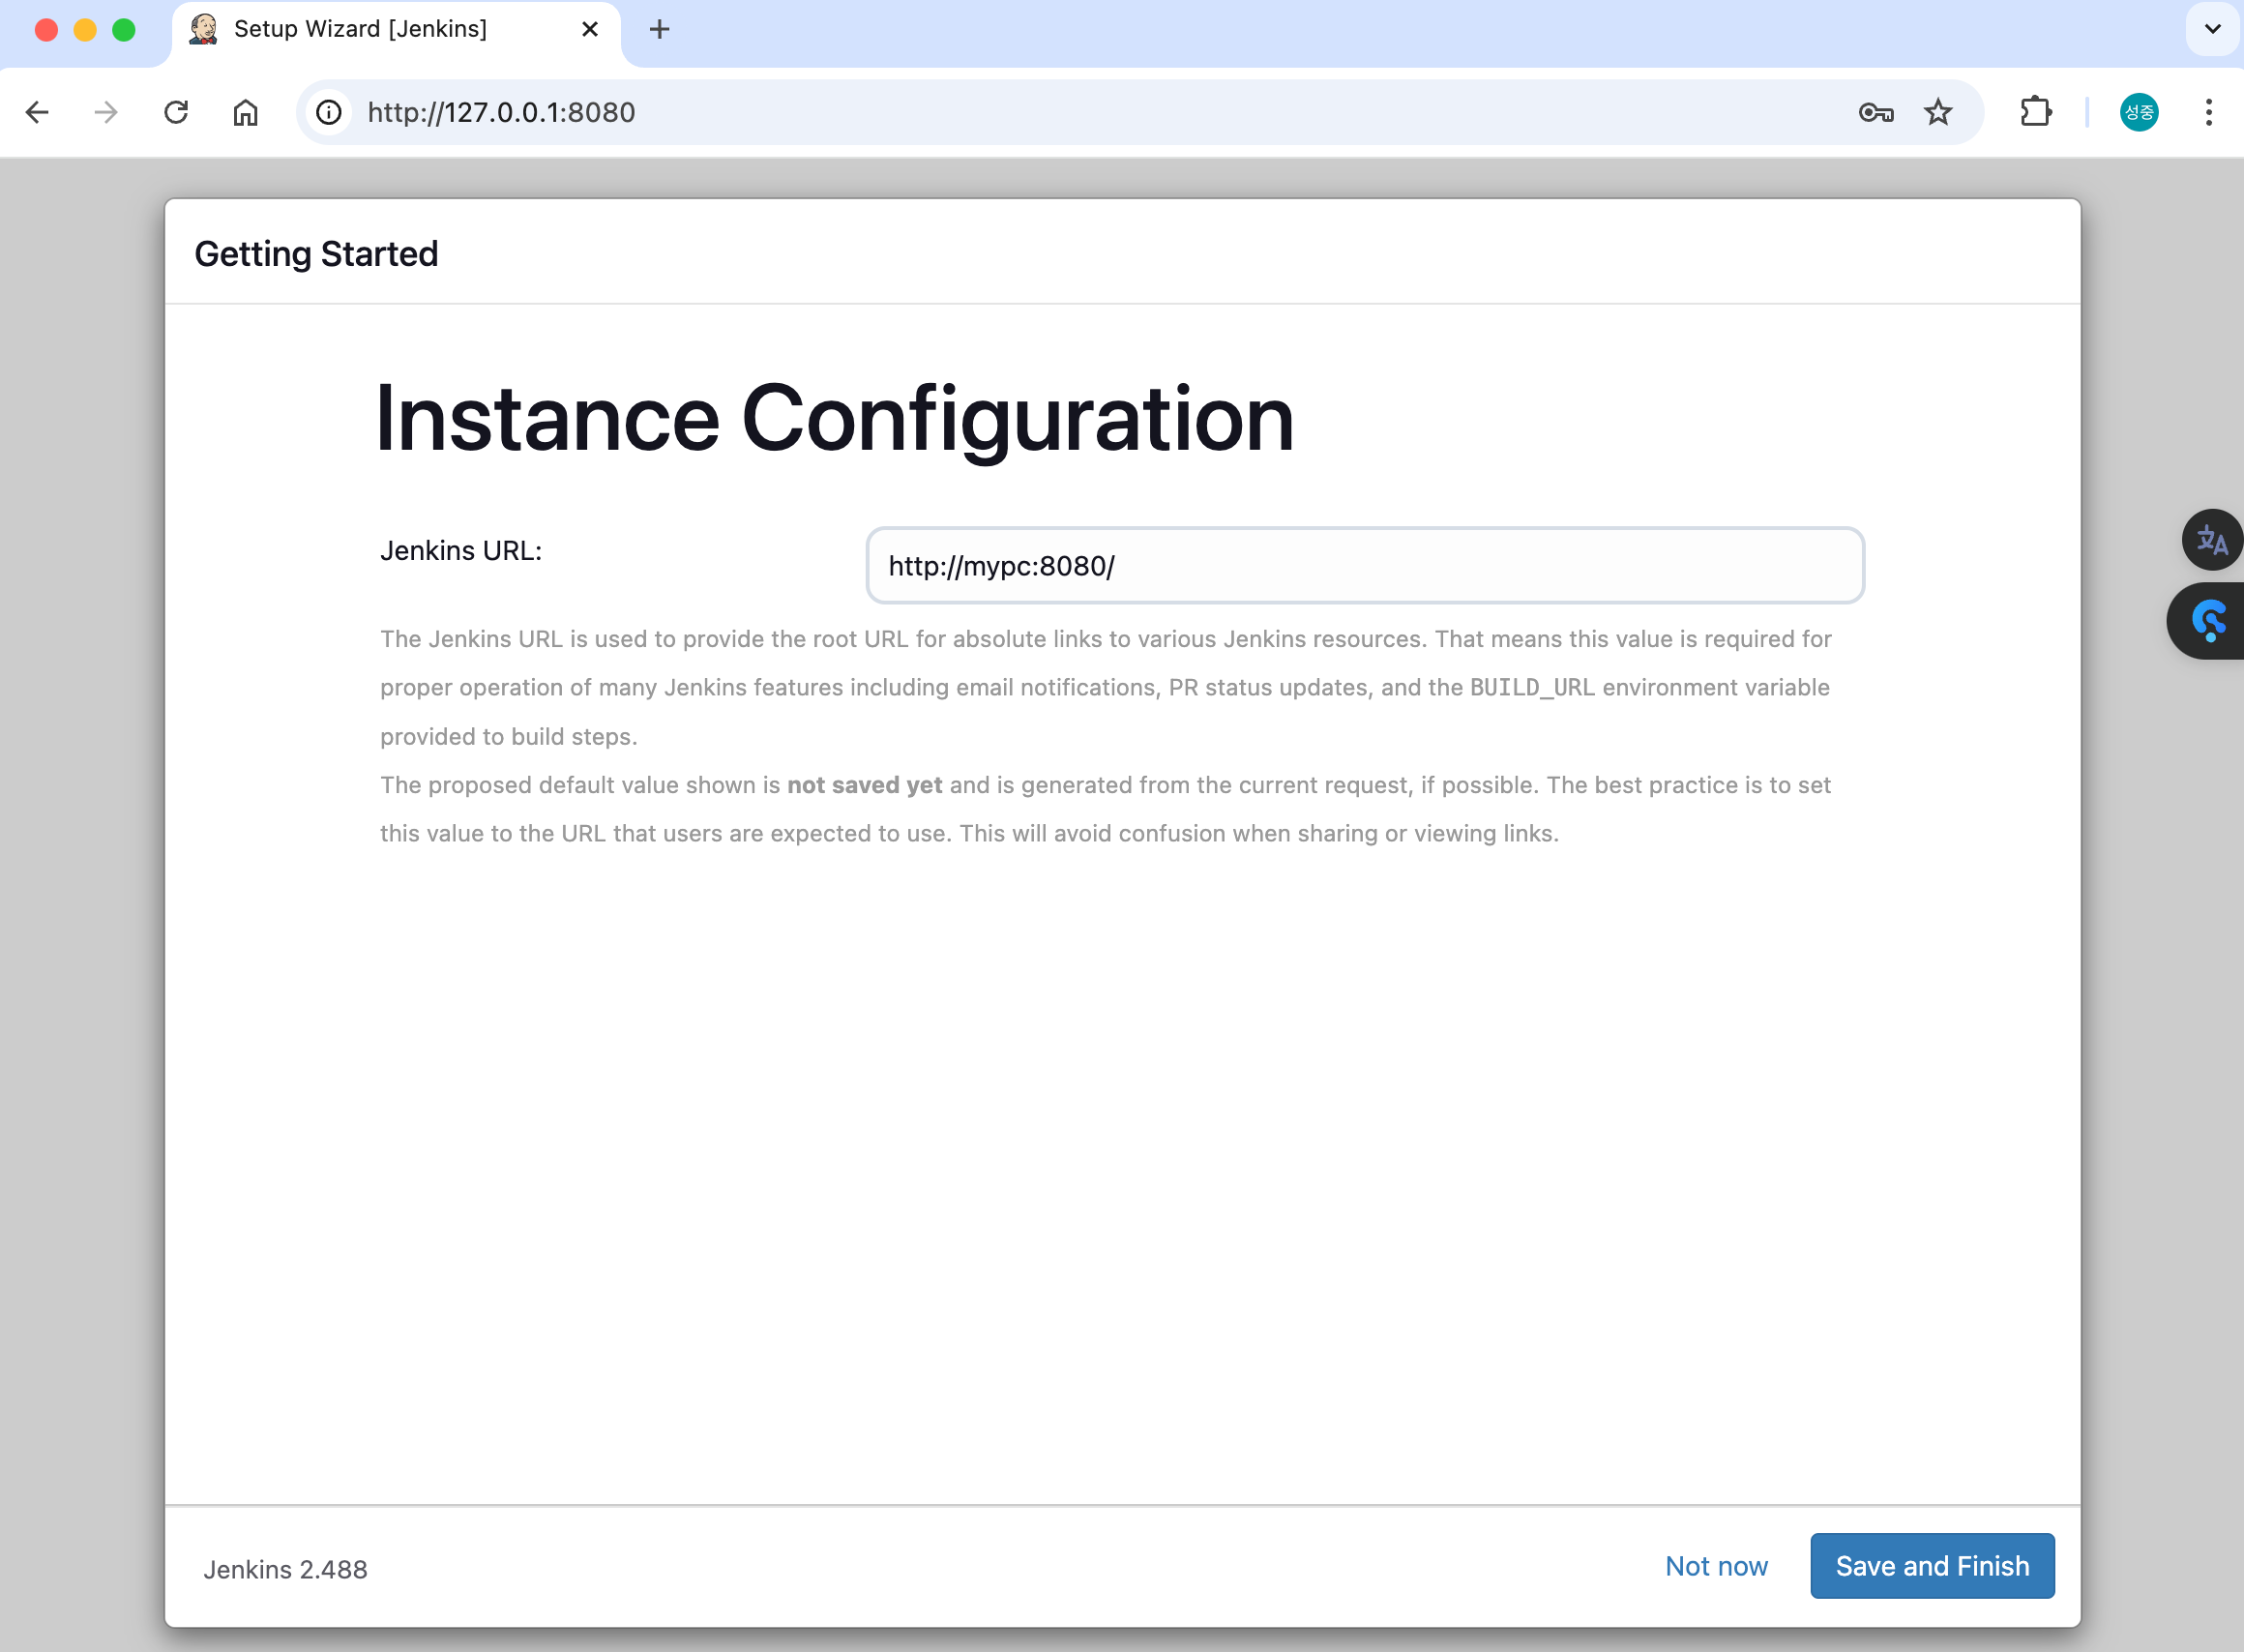
# Jenkins 웹 접속 주소 확인 : 계정 / 암호 입력 >> admin / qwe123
open "http://127.0.0.1:8080" # macOS
웹 브라우저에서 http://127.0.0.1:8080 접속 # Windows
# (참고) 로그 확인 : 플러그인 설치 과정 확인
docker compose logs jenkins -f

- Jenkins URL 설정 : 각자 자신의 PC의 IP를 입력 > /etc/hosts에 자신의 IP mypc 로 사전변경 (Local IP 변경 대비)
- ipconfig getifaddr en0
192.168.0.36 - cat /etc/hosts
192.168.0.36 mypc
- ipconfig getifaddr en0
- ❤️ 팁 실습 완료 후 해당 컨테이너 중지 상태로 둘 경우 → 재부팅 및 이후에 다시 실습을 위해 컨테이너 시작 시
# 실습 완료 후 해당 컨테이너 중지 상태로 둘 경우
docker compose stop
docker compose ps
docker compose ps -a

# mac 재부팅 및 이후에 다시 실습을 위해 컨테이너 시작 시
docker compose start
docker compose ps- ❤️ 특정 컨테이너만 삭제 후 다시 초기화 상태로 기동 시
# gogs : 볼륨까지 삭제
docker compose down gogs -v
docker compose up gogs -d

# jenkins : 볼륨까지 삭제
docker compose down jenkins -v
docker compose up jenkins -d
2.2 Jenkins는
Jenkins의 탄생 배경
Jenkins는 2004년, Sun Microsystems의 개발자 Kohsuke Kawaguchi에 의해 Hudson이라는 이름으로 시작되었습니다. 개발 과정에서 반복되는 작업을 자동화하려는 필요성을 느껴, CI(Continuous Integration)를 구현하는 오픈소스 도구를 만들었습니다.
- CI의 필요성: 개발자들이 코드 변경을 자주 커밋하는 Agile 환경에서, 코드 통합 과정에서 발생하는 문제를 빠르게 발견하고 해결해야 했습니다.
- Hudson에서 Jenkins로의 전환: 2011년 Oracle이 Sun Microsystems를 인수하면서, Hudson의 상표권과 개발 철학을 둘러싼 논란이 발생했습니다. 이로 인해 Hudson의 커뮤니티는 Jenkins라는 독립 프로젝트로 분리되었습니다.
Jenkins의 역할
Jenkins는 CI/CD 파이프라인의 중심 허브로, 소프트웨어 빌드, 테스트, 배포 과정을 자동화합니다.
주요 역할:
- Continuous Integration: 코드 변경이 리포지토리에 병합될 때마다 자동으로 빌드와 테스트를 실행.
- Continuous Delivery: 코드를 프로덕션 환경으로 지속적으로 배포.
- 자동화 허브: 다양한 도구 및 서비스를 통합하여 개발 및 운영 자동화.
Jenkins의 주요 제공 기능
- 플러그인 아키텍처: Jenkins는 1,800개 이상의 플러그인을 제공하며, 다양한 툴과 기술(예: Git, Docker, Kubernetes 등)과 통합 가능.
- 멀티플랫폼 지원: Windows, macOS, Linux 등 다양한 운영체제에서 실행 가능.
- 분산 빌드: 마스터-에이전트 구조로 대규모 빌드 작업 분산 처리.
- Pipeline-as-Code: 선언적(Declarative) 또는 스크립트 방식으로 CI/CD 파이프라인 정의 가능.
- 다양한 인증 방식: LDAP, SAML, GitHub OAuth와 같은 인증 및 권한 관리.
- 웹 기반 UI: 사용자 친화적인 대시보드 제공.
- 자동화 스케줄링: cron 또는 기타 트리거를 기반으로 작업 실행.
주요 플러그인
Jenkins의 확장성을 높이는 주요 플러그인은 다음과 같습니다:
- Git Plugin: Git 리포지토리와 통합, 코드 변경 감지 및 트리거.
- Pipeline Plugin: Jenkinsfile로 CI/CD 워크플로우 정의.
- Docker Plugin: 컨테이너 기반 빌드 및 배포 지원.
- Kubernetes Plugin: 쿠버네티스 클러스터와 통합하여 에이전트를 동적으로 관리.
- Slack Notification Plugin: 빌드 상태를 실시간 알림으로 통지.
- Blue Ocean Plugin: CI/CD 파이프라인의 시각화를 개선한 인터페이스.
Jenkins 사용법
1) 설치
-
Docker로 설치:
docker run -p 8080:8080 -p 50000:50000 jenkins/jenkins:lts -
Linux 설치 (예: Ubuntu):
sudo apt update
sudo apt install openjdk-11-jre
wget -q -O - https://pkg.jenkins.io/debian/jenkins.io.key | sudo apt-key add -
sudo sh -c 'echo deb http://pkg.jenkins.io/debian binary/ > /etc/apt/sources.list.d/jenkins.list'
sudo apt update
sudo apt install jenkins
2) 초기 설정
- Jenkins 첫 실행 후 초기 암호를
/var/lib/jenkins/secrets/initialAdminPassword에서 확인. - 플러그인 설치 및 관리자 계정 생성.
3) Jenkinsfile 작성
pipeline {
    agent any
    stages {
        stage('Build') {
            steps {
                echo 'Building...'
            }
        }
        stage('Test') {
            steps {
                echo 'Testing...'
            }
        }
        stage('Deploy') {
            steps {
                echo 'Deploying...'
            }
        }
    }
}
4) 파이프라인 설정
- Jenkins 대시보드에서 "New Item" → "Pipeline" 선택 후 Jenkinsfile 경로 설정.
5) 트리거 설정
- Git webhook, 주기적 빌드(cron), 또는 수동 실행을 통해 파이프라인 실행.
Jenkins 사용 사례
- CI/CD 파이프라인 구축: GitHub와 Docker Hub 통합으로 빌드, 테스트, 배포 자동화.
- 테스트 자동화: Selenium, JUnit과 같은 테스트 프레임워크와의 통합.
- 다중 환경 배포: 스테이징 → 프로덕션 환경으로의 점진적 배포.
Jenkins 사용 시 유의점
- 확장성: 플러그인 사용 시, 관리 복잡도가 증가할 수 있으므로 필요 플러그인만 사용.
- 보안: 기본 설정은 보안에 취약할 수 있으므로, TLS 설정 및 액세스 제한 강화 필요.
- 모니터링: 빌드 큐나 작업 로그 모니터링을 통해 성능 병목 현상 파악.
Jenkins는 다양한 환경에 적응 가능하며, 소프트웨어 개발 워크플로우를 효율적으로 관리할 수 있는 강력한 도구입니다. CI/CD를 시작하거나 확장하려는 팀에게 필수적인 선택지입니다! 🚀
2.3 gogs는
Gogs(Go Git Service)는 Git 저장소를 호스팅할 수 있는 오픈소스 경량 소프트웨어입니다. Gogs는 Go 언어로 개발되었으며, 간단하고 효율적인 Git 호스팅 환경을 제공하는 것이 주요 목표입니다.
Gogs의 주요 특징
- 경량 및 간편 설치:
- Gogs는 경량화에 중점을 두어 작은 리소스에서도 실행 가능하며, 설치와 구성이 매우 간단합니다. 독립 실행형 바이너리를 제공해 별도의 복잡한 의존성 설치 없이 사용할 수 있습니다.
- 다양한 플랫폼 지원:
- Gogs는 Windows, macOS, Linux, ARM 등 다양한 플랫폼에서 실행 가능합니다. 이를 통해 다양한 환경에서 Git 호스팅을 구현할 수 있습니다.
- 내장 웹 인터페이스:
- 사용자 친화적인 웹 UI를 제공하며, 이를 통해 프로젝트 생성, 관리, 브랜치 관리, 커밋 기록 보기 등을 할 수 있습니다.
- Git과 완벽 호환:
- Git 프로토콜과 완전히 호환되며, HTTPS 및 SSH를 지원합니다.
- 다양한 인증 방식:
- LDAP, PAM, OAuth2 등의 인증 방식을 지원하며, 외부 인증 시스템과 통합할 수 있습니다.
- 확장성과 플러그인:
- 플러그인을 지원하여 추가 기능을 개발하거나 설치할 수 있습니다.
- 작은 팀 및 개인 사용자를 위한 적합성:
- 간단한 설치와 관리 덕분에 작은 팀, 스타트업, 개인 개발자가 사용하기에 이상적입니다.
Gogs의 주요 사용 사례
- 사내 Git 서버: Gogs는 자체 Git 서버를 운영하려는 조직이나 팀에 적합합니다.
- 프로젝트 관리: Git 저장소를 통해 코드 버전 관리를 수행하고, 웹 UI로 쉽게 프로젝트를 관리할 수 있습니다.
- 개인용 Git 호스팅: GitHub 또는 GitLab 대신 자체적으로 호스팅 환경을 구축하고 싶은 개인 개발자가 사용할 수 있습니다.
Gogs와 GitLab/Gitea 비교
- Gogs vs GitLab: Gogs는 GitLab보다 훨씬 가벼운 솔루션이며, 작은 서버 환경에 적합합니다. 반면, GitLab은 대규모 팀과 복잡한 CI/CD 환경을 지원하는 강력한 도구입니다.
- Gogs vs Gitea: Gitea는 Gogs에서 포크된 프로젝트로, 커뮤니티 주도로 더 활발히 개발되고 있습니다. Gitea는 Gogs에 비해 더 많은 기능과 활발한 업데이트를 제공합니다.
설치 방법
Gogs는 단일 바이너리로 배포되므로 간단하게 설치할 수 있습니다. 아래는 기본 설치 절차입니다:
- Gogs 공식 사이트 또는 GitHub에서 바이너리 다운로드.
- 실행 파일을 실행하여 기본 설정.
- 웹 인터페이스를 통해 초기 설정 완료.
참고
Gogs는 단순성과 가벼움을 중시하며, 복잡한 설정이나 대규모 프로젝트를 지원하는 데는 한계가 있을 수 있습니다. 만약 더 큰 프로젝트나 CI/CD와의 강력한 통합을 원한다면 GitLab이나 Gitea 같은 대안을 고려하는 것도 좋습니다.
3. Jenkins, gogs,dockerhub 추가 설정
3.1 Docker-out-of-Docker 방식으로 Jenkins 설치
- Jenkins 컨테이너 내부에 도커 실행 파일 설치
docker compose exec --privileged -u root jenkins bash
-----------------------------------------------------
id
curl -fsSL https://download.docker.com/linux/debian/gpg -o /etc/apt/keyrings/docker.asc
chmod a+r /etc/apt/keyrings/docker.asc
echo \
"deb [arch=$(dpkg --print-architecture) signed-by=/etc/apt/keyrings/docker.asc] https://download.docker.com/linux/debian \
$(. /etc/os-release && echo "$VERSION_CODENAME") stable" | \
tee /etc/apt/sources.list.d/docker.list > /dev/null
apt-get update && apt install docker-ce-cli curl tree jq -y
docker info
docker ps
which docker
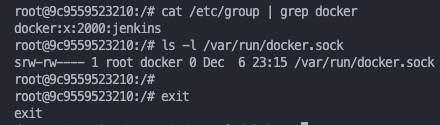
# Jenkins 컨테이너 내부에서 root가 아닌 jenkins 유저도 docker를 실행할 수 있도록 권한을 부여
groupadd -g 2000 -f docker
chgrp docker /var/run/docker.sock
ls -l /var/run/docker.sock
usermod -aG docker jenkins
cat /etc/group | grep docker
exit
--------------------------------------------
# jenkins item 실행 시 docker 명령 실행 권한 에러 발생 : Jenkins 컨테이너 재기동으로 위 설정 내용을 Jenkins app 에도 적용 필요
docker compose restart jenkins
sudo docker compose restart jenkins  # Windows 경우 이후부터 sudo 붙여서 실행하자

# jenkins user로 docker 명령 실행 확인
docker compose exec jenkins id
docker compose exec jenkins docker info
docker compose exec jenkins docker ps- 실습 내용
❯ docker compose exec jenkins id

uid=1000(jenkins) gid=1000(jenkins) groups=1000(jenkins),2000(docker)
❯ docker compose exec jenkins docker info

Client: Docker Engine - Community
 Version:    27.3.1
 Context:    default
 Debug Mode: false
 Plugins:
  buildx: Docker Buildx (Docker Inc.)
    Version:  v0.17.1
    Path:     /usr/libexec/docker/cli-plugins/docker-buildx
  compose: Docker Compose (Docker Inc.)
    Version:  v2.29.7
    Path:     /usr/libexec/docker/cli-plugins/docker-compose

Server:
 Containers: 2
  Running: 2
  Paused: 0
  Stopped: 0
 Images: 12
 Server Version: 27.3.1
 Storage Driver: overlayfs
  driver-type: io.containerd.snapshotter.v1
 Logging Driver: json-file
 Cgroup Driver: cgroupfs
 Cgroup Version: 2
 Plugins:
  Volume: local
  Network: bridge host ipvlan macvlan null overlay
  Log: awslogs fluentd gcplogs gelf journald json-file local splunk syslog
 Swarm: inactive
 Runtimes: io.containerd.runc.v2 runc
 Default Runtime: runc
 Init Binary: docker-init
 containerd version: 472731909fa34bd7bc9c087e4c27943f9835f111
 runc version: v1.1.13-0-g58aa920
 init version: de40ad0
 Security Options:
  seccomp
   Profile: unconfined
  cgroupns
 Kernel Version: 6.10.14-linuxkit
 Operating System: Docker Desktop
 OSType: linux
 Architecture: aarch64
 CPUs: 4
 Total Memory: 7.654GiB
 Name: docker-desktop
 ID: 3c04a1af-86e9-44fe-91ed-cc64e951af51
 Docker Root Dir: /var/lib/docker
 Debug Mode: false
 HTTP Proxy: http.docker.internal:3128
 HTTPS Proxy: http.docker.internal:3128
 No Proxy: hubproxy.docker.internal
 Labels:
  com.docker.desktop.address=unix:///Users/sjkim/Library/Containers/com.docker.docker/Data/docker-cli.sock
 Experimental: false
 Insecure Registries:
  hubproxy.docker.internal:5555
  127.0.0.0/8
 Live Restore Enabled: false

WARNING: daemon is not using the default seccomp profile
❯ docker compose exec jenkins docker ps

CONTAINER ID   IMAGE             COMMAND                  CREATED        STATUS                    PORTS                                              NAMES
9c9559523210   jenkins/jenkins   "/usr/bin/tini -- /u…"   10 hours ago   Up 40 seconds             0.0.0.0:8080->8080/tcp, 0.0.0.0:50000->50000/tcp   jenkins
ad547a6a8954   gogs/gogs         "/app/gogs/docker/st…"   10 hours ago   Up 48 minutes (healthy)   0.0.0.0:3000->3000/tcp, 0.0.0.0:10022->22/tcp      gogs
3.2 Gogs 컨테이너 초기 설정 : Repo(Private)
- 초기 설정 웹 접속
# 초기 설정 웹 접속
open "http://127.0.0.1:3000/install" # macOS
웹 브라우저에서 http://127.0.0.1:3000/install 접속 # Windows- 초기 설정
- 데이터베이스 유형 : SQLite3
- 애플리케이션 URL :
http://<각자 자신의 PC IP>:3000/ - 기본 브랜치 : main
- 관리자 계정 설정 클릭 : 이름(계정명 - 닉네임 사용 devops), 비밀번호(계정암호 qwe123), 이메일 입력
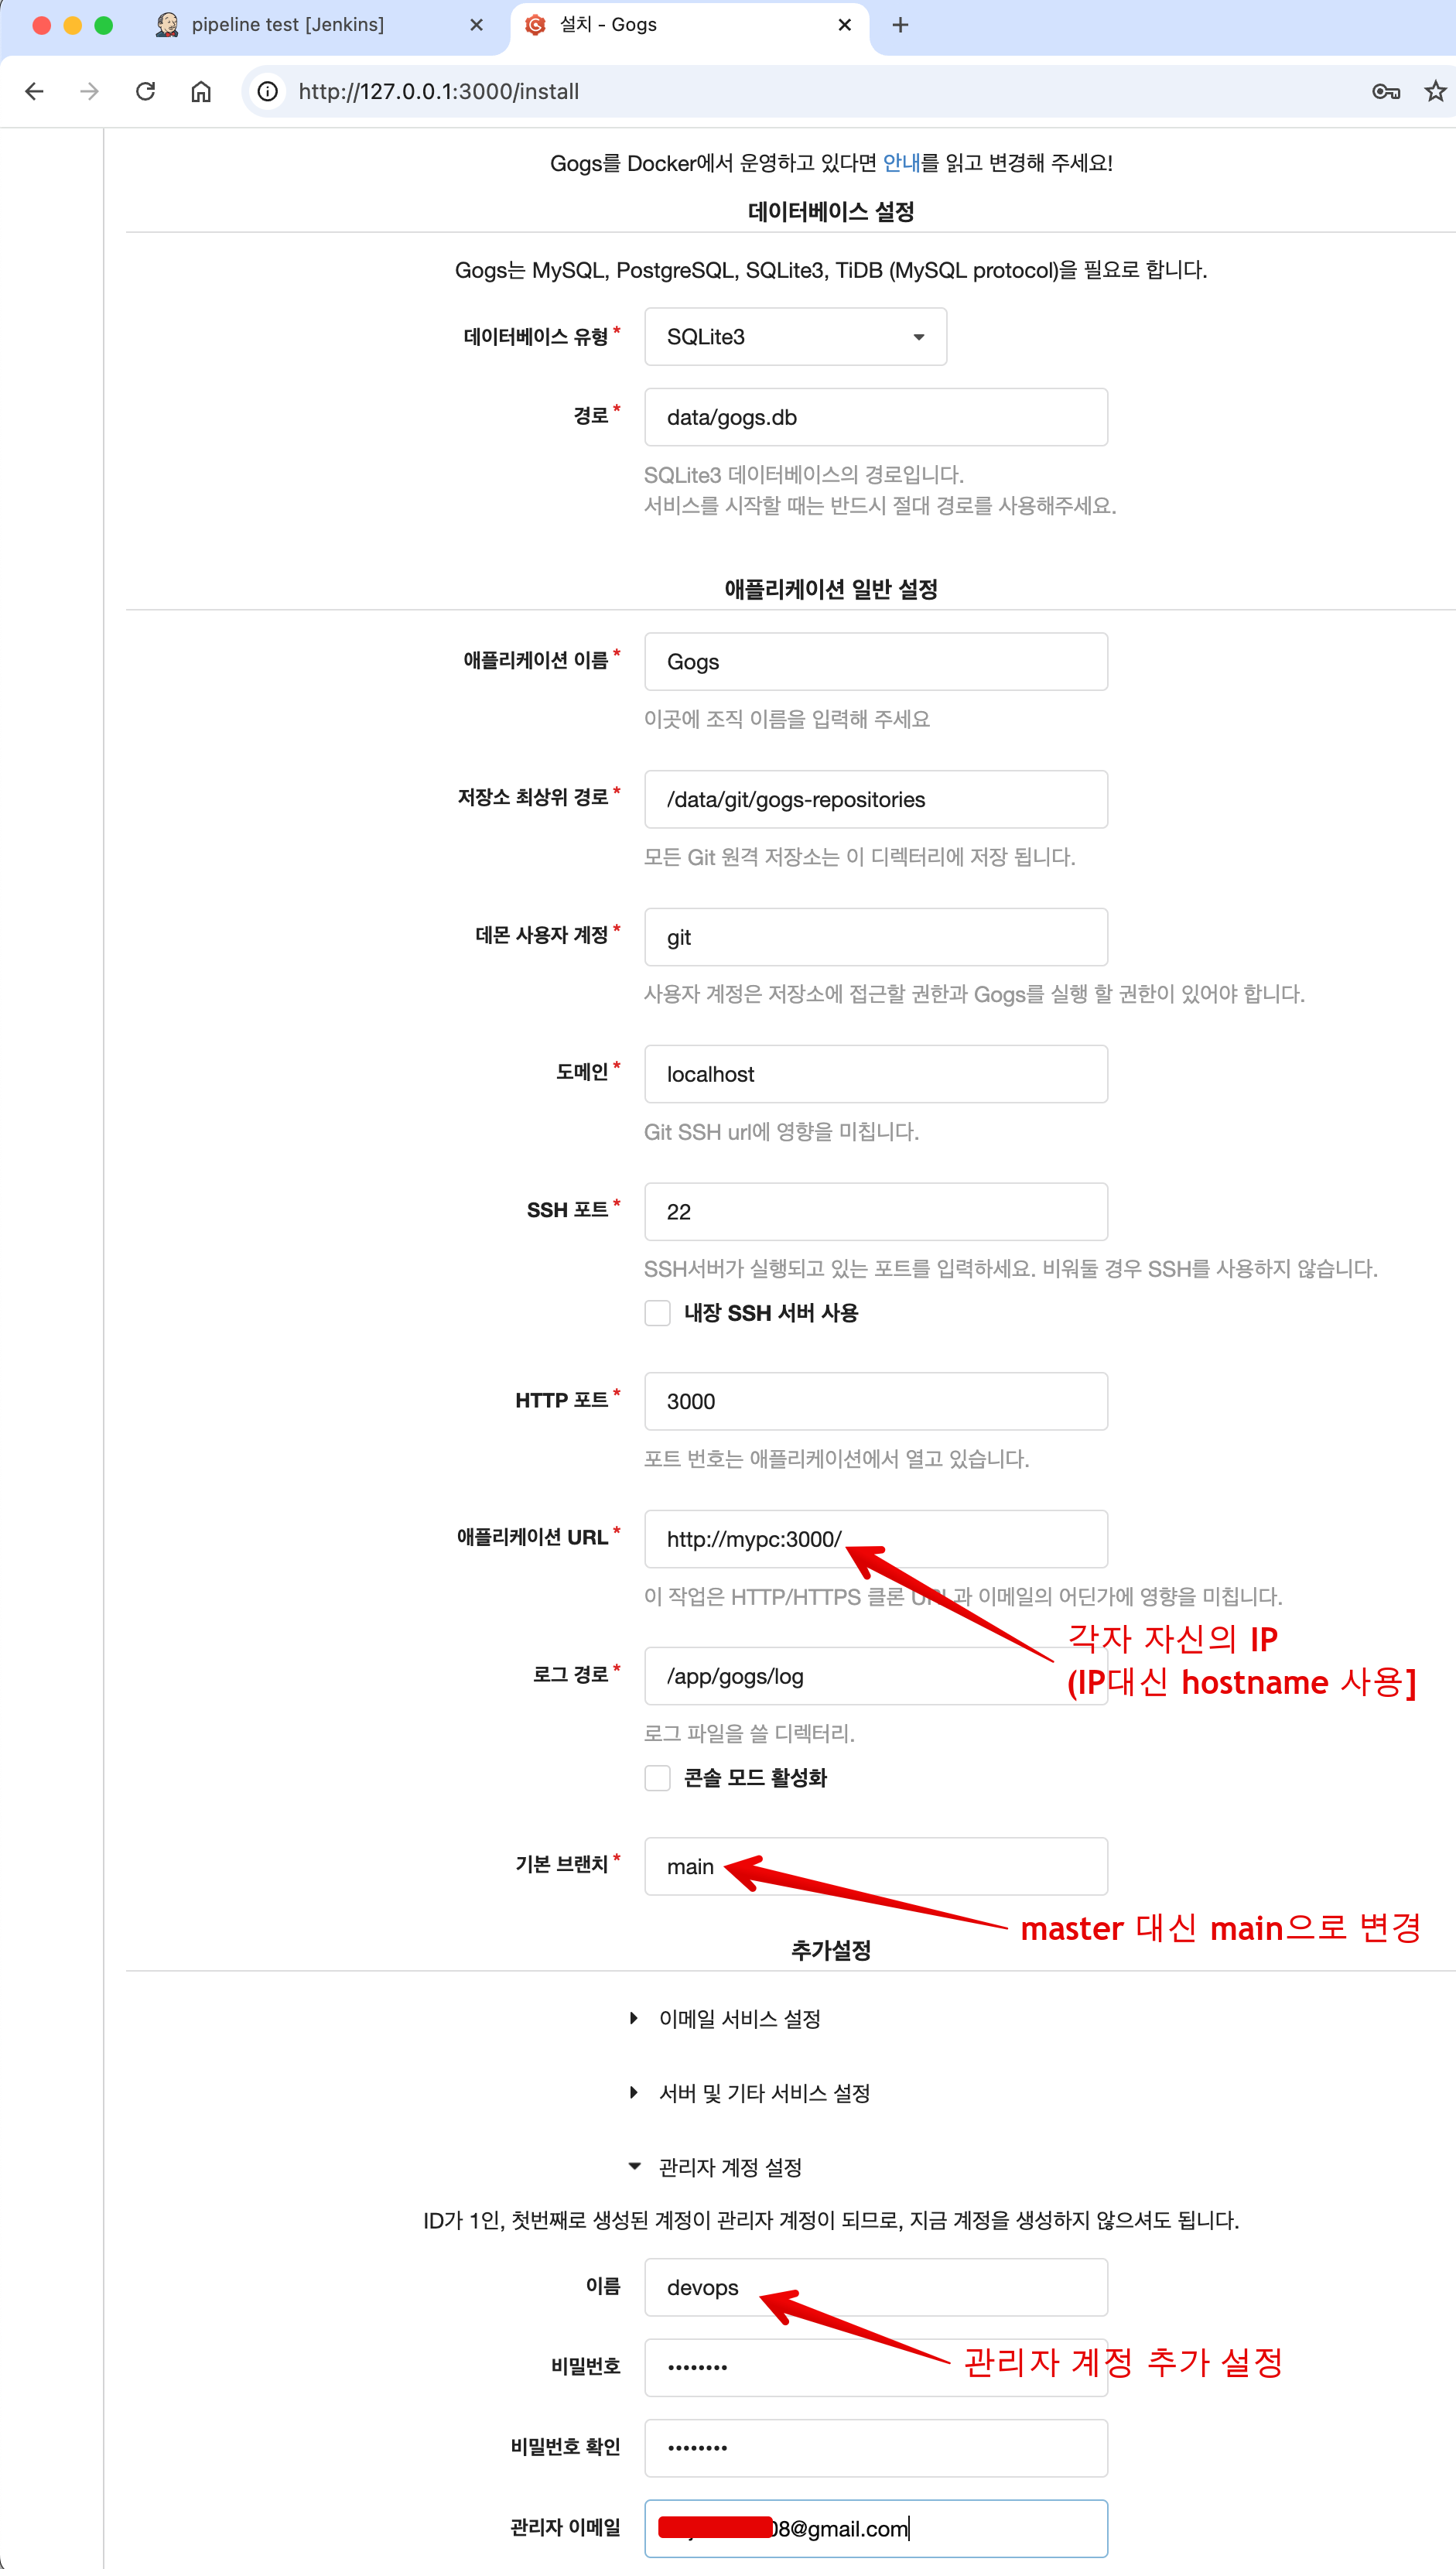
- Gogs 설치하기 클릭 ⇒ 관리자 계정으로 로그인 후 접속
docker compose exec gogs ls -l /data
docker compose exec gogs ls -l /data/gogs
docker compose exec gogs ls -l /data/gogs/conf
docker compose exec gogs cat /data/gogs/conf/app.ini
❯ docker compose exec gogs ls -l /data

total 12
drwxr-xr-x    4 git      git           4096 Dec  7 00:19 git
drwxr-xr-x    5 git      git           4096 Dec  6 13:40 gogs
drwx------    2 git      git           4096 Dec  6 13:40 ssh
❯ docker compose exec gogs ls -l /data/gogs

total 12
drwxr-xr-x    2 git      git           4096 Dec  7 00:19 conf
drwxr-xr-x    2 git      git           4096 Dec  7 00:19 data
drwxr-xr-x    2 git      git           4096 Dec  7 00:19 log
❯ docker compose exec gogs ls -l /data/gogs/conf

total 4
-rw-r--r--    1 git      git            943 Dec  7 00:19 app.ini
❯ docker compose exec gogs cat /data/gogs/conf/app.ini

BRAND_NAME = Gogs
RUN_USER   = git
RUN_MODE   = prod

[database]
TYPE     = sqlite3
HOST     = 127.0.0.1:5432
NAME     = gogs
SCHEMA   = public
USER     = gogs
PASSWORD =
SSL_MODE = disable
PATH     = data/gogs.db

[repository]
ROOT           = /data/git/gogs-repositories
DEFAULT_BRANCH = main

[server]
DOMAIN           = localhost
HTTP_PORT        = 3000
EXTERNAL_URL     = http://mypc:3000/
DISABLE_SSH      = false
SSH_PORT         = 22
START_SSH_SERVER = false
OFFLINE_MODE     = false

[email]
ENABLED = false

[auth]
REQUIRE_EMAIL_CONFIRMATION  = false
DISABLE_REGISTRATION        = false
ENABLE_REGISTRATION_CAPTCHA = true
REQUIRE_SIGNIN_VIEW         = false

[user]
ENABLE_EMAIL_NOTIFICATION = false

[picture]
DISABLE_GRAVATAR        = false
ENABLE_FEDERATED_AVATAR = false

[session]
PROVIDER = file

[log]
MODE      = file
LEVEL     = Info
ROOT_PATH = /app/gogs/log

[security]
INSTALL_LOCK = true
SECRET_KEY = ZjrZVucuM2H5yIS-
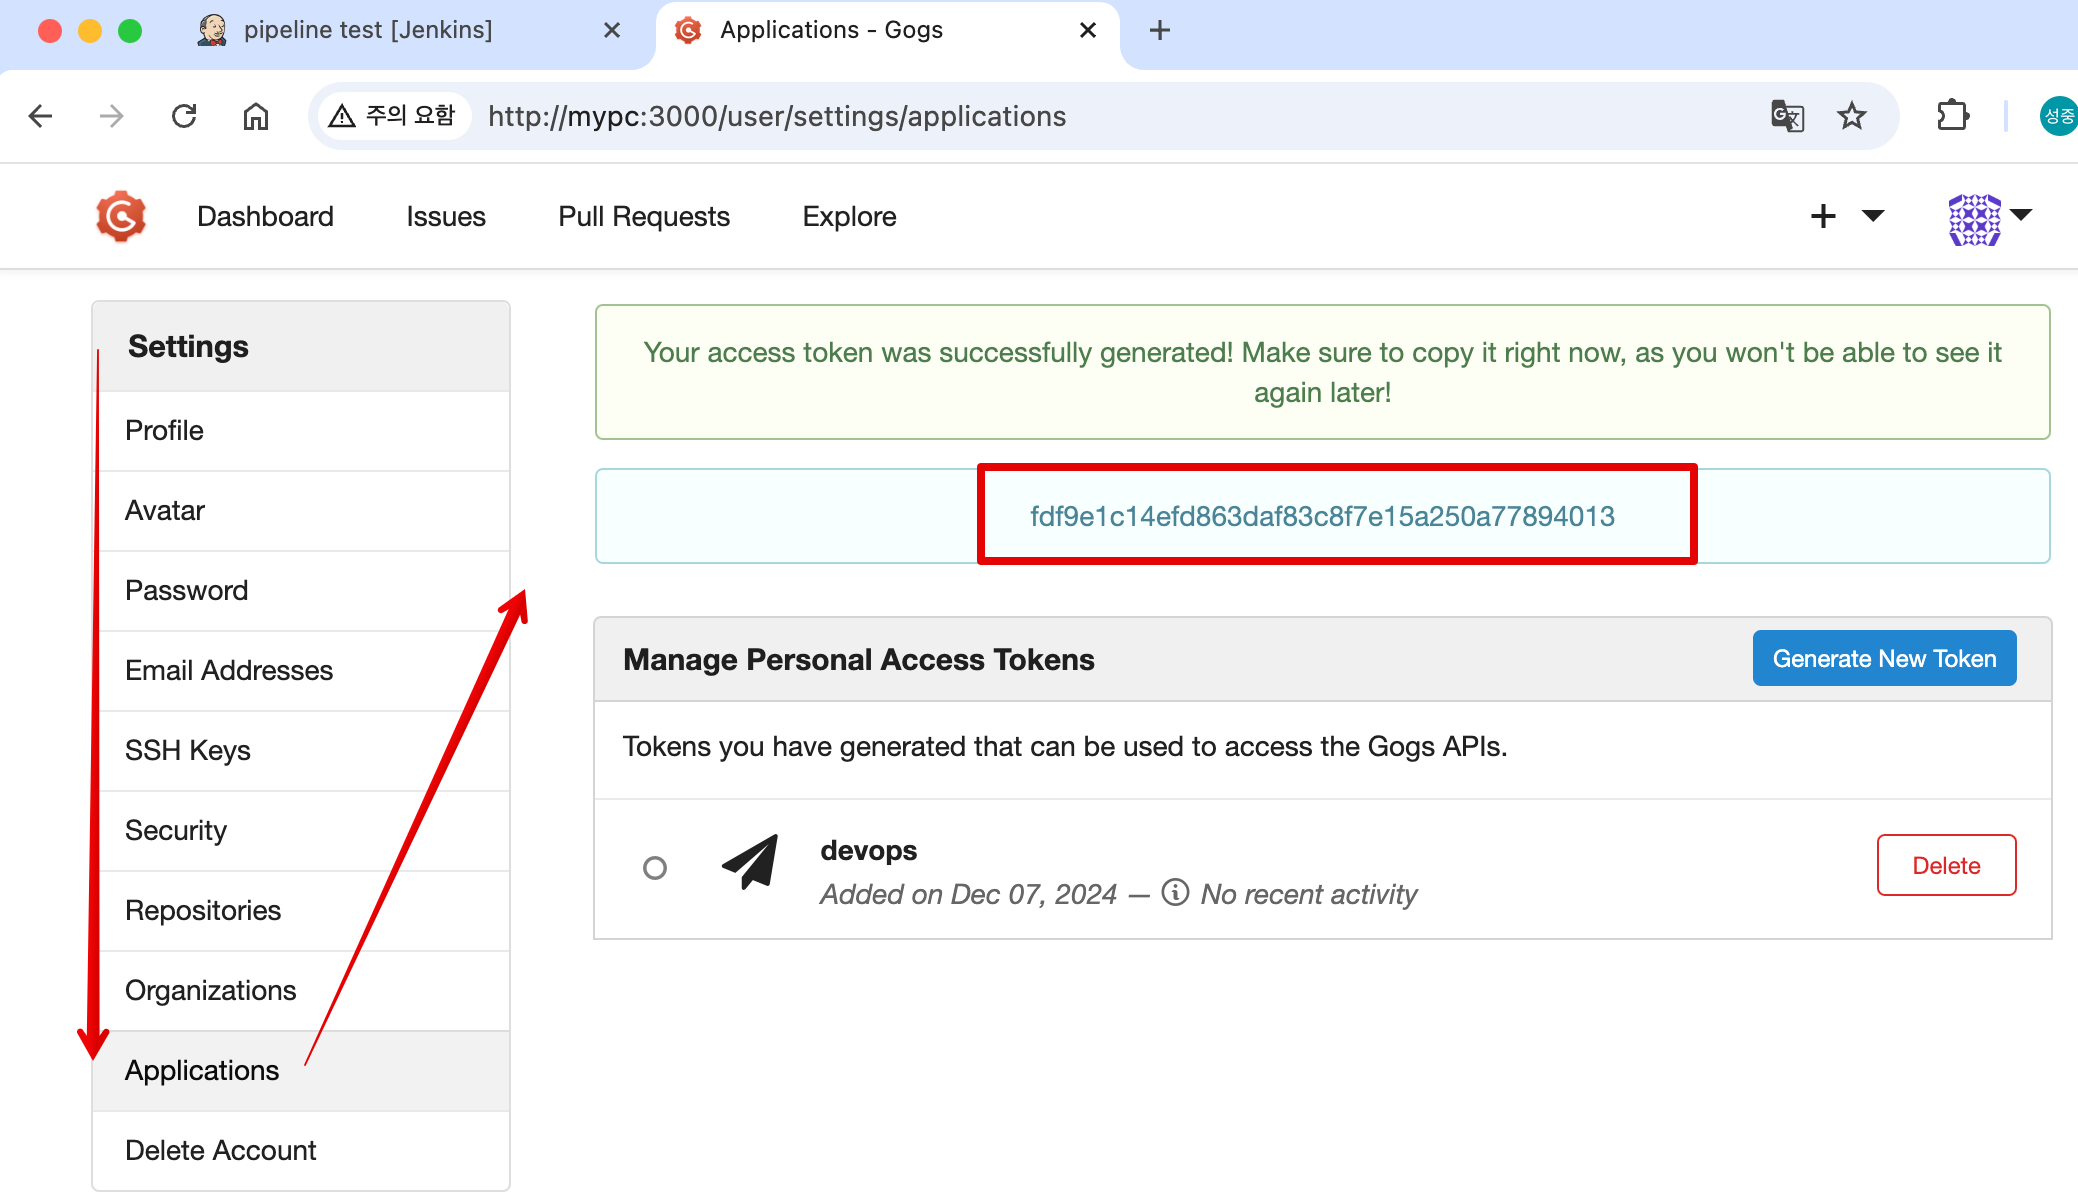
로그인 후 → Your Settings → Applications : Generate New Token 클릭 - Token Name(devops) ⇒ Generate Token 클릭 : 메모해두기! ( fdf9e1c14efd863daf83c8f7e15a250a77894013 )
-
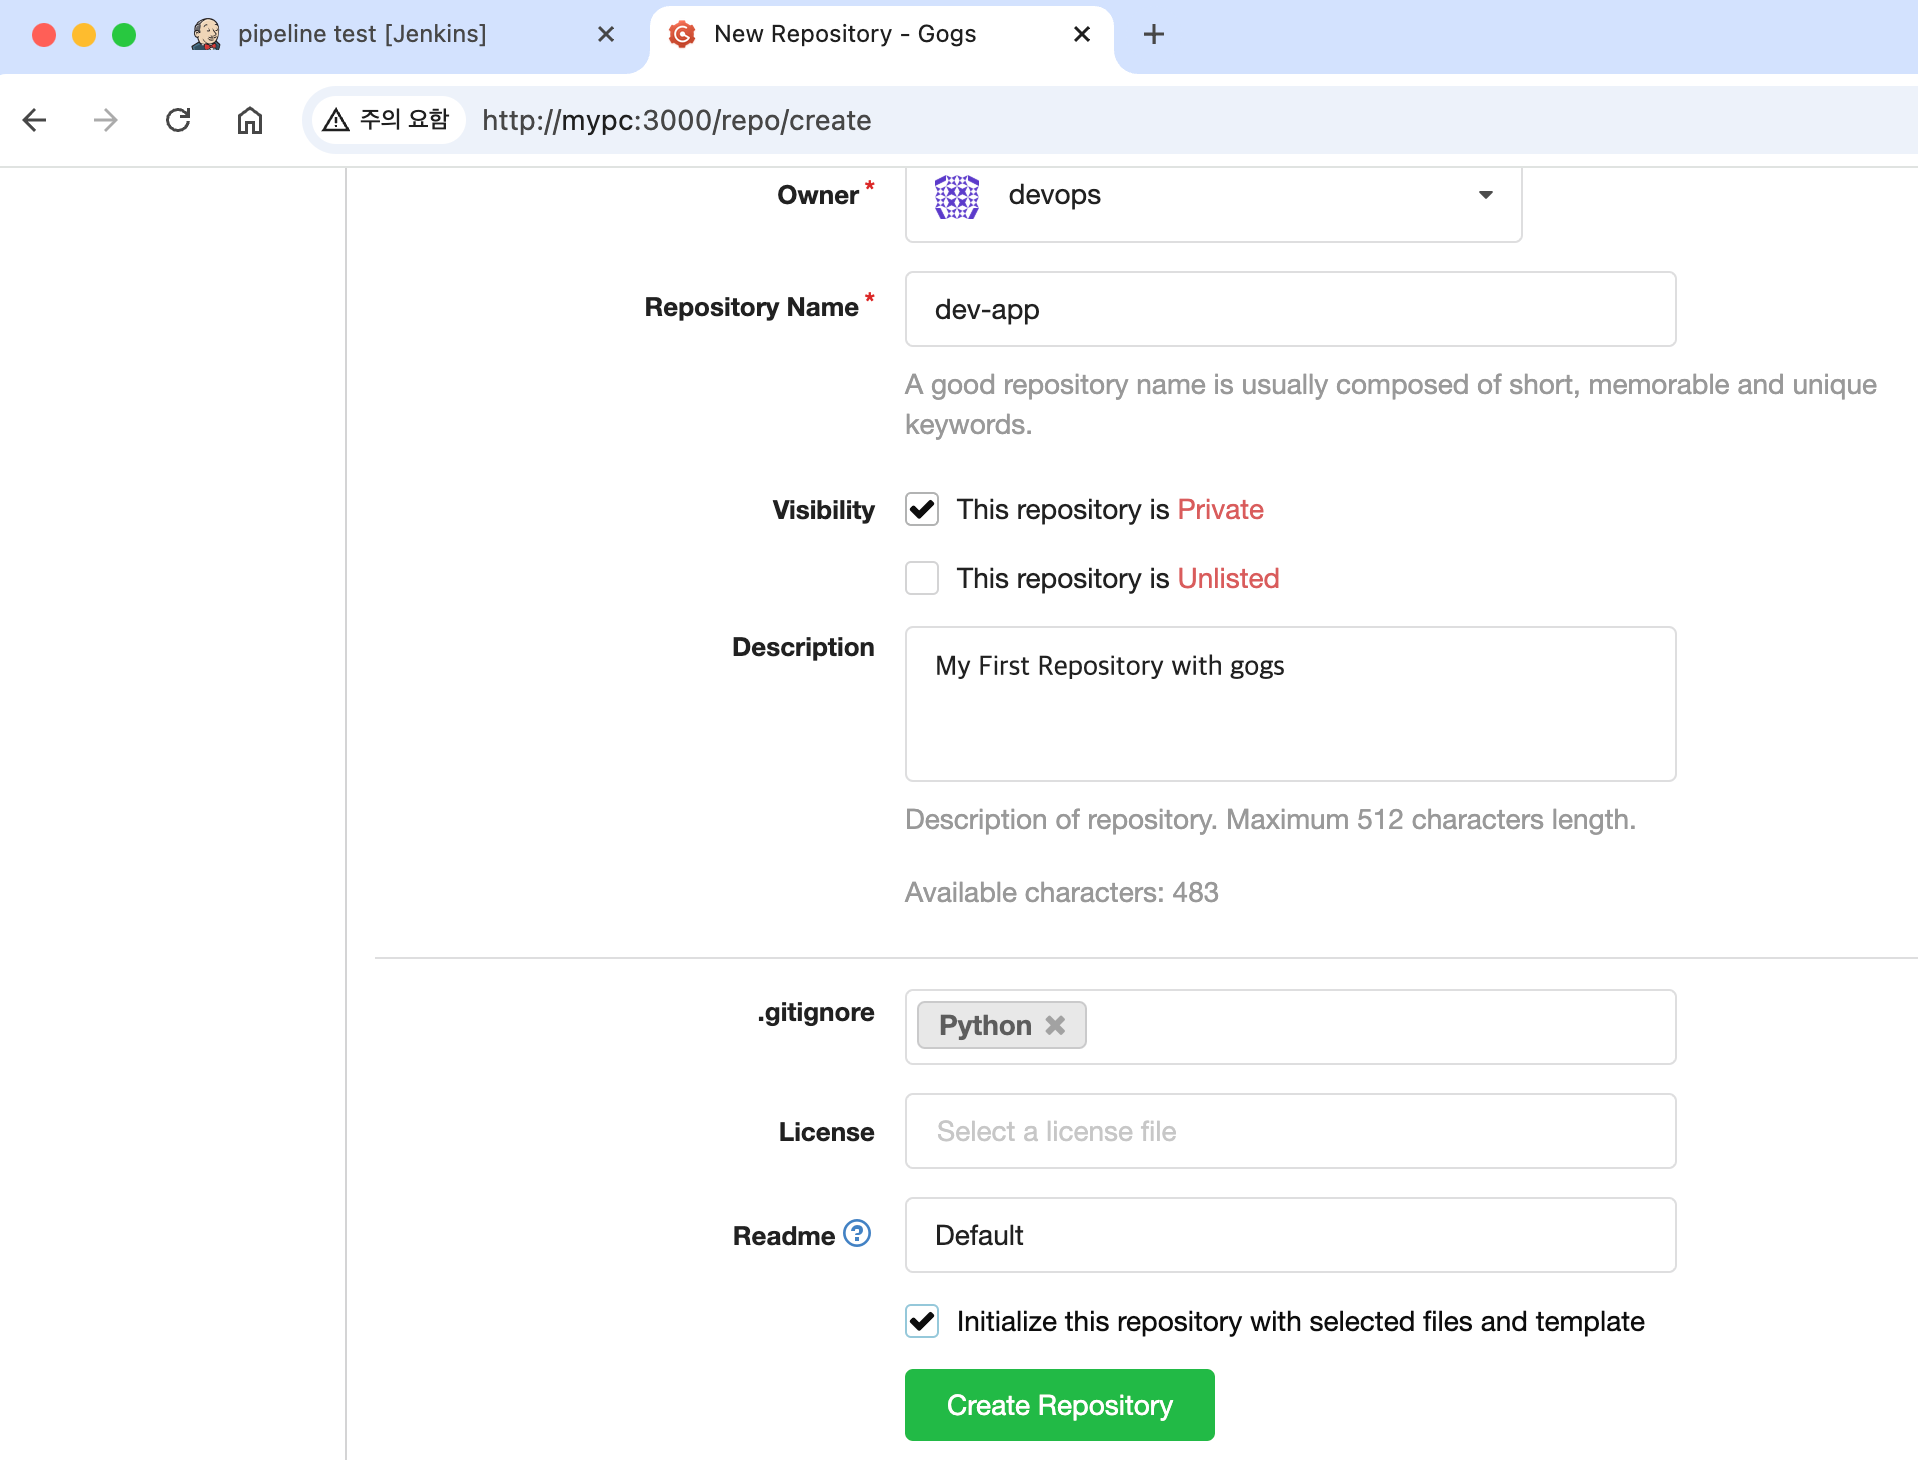
New Repository
- Repository Name : dev-app
- Visibility : (Check) This repository is Private
- .gitignore : Python
- Readme : Default → (Check) initialize this repository with selected files and template
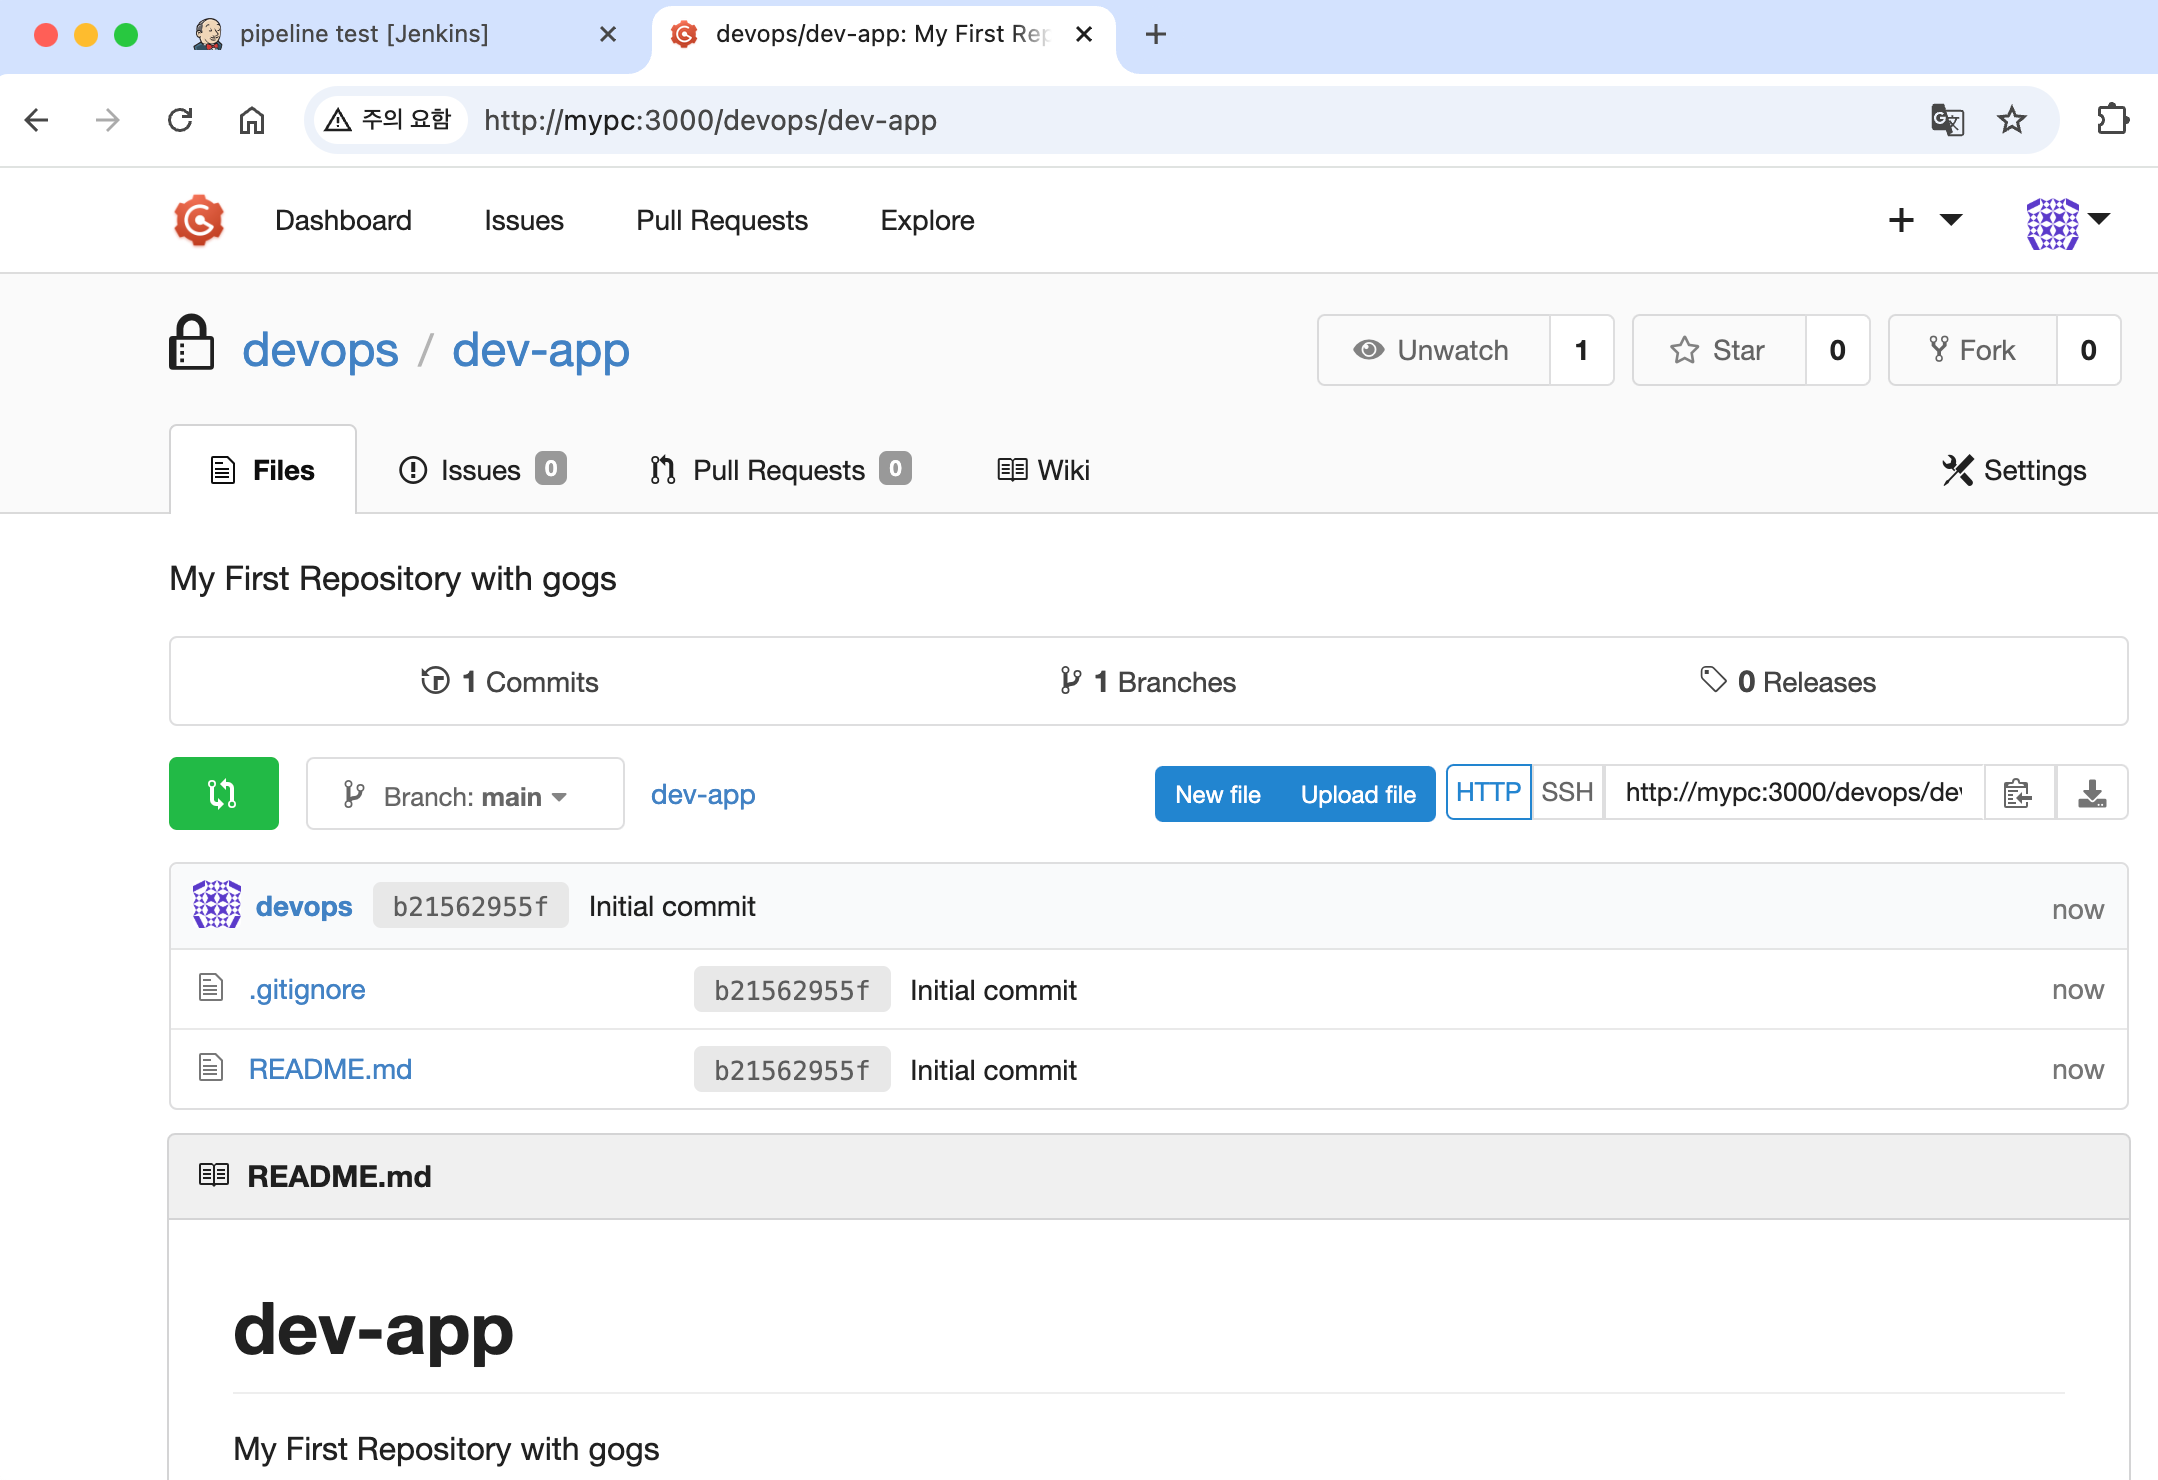
⇒ Create Repository 클릭 : Repo 주소 확인
- Gogs 실습을 위한 저장소 설정 : jenkins 컨테이너 bash 내부 진입해서 git 작업 진행 ← 호스트에서 직접 git 작업하셔도 됩니다.
#
docker compose exec jenkins bash
-----------------------------------
whoami
pwd
cd /var/jenkins_home/
tree
#
git config --global user.name "<Gogs 계정명>"
git config --global user.name "devops"
git config --global user.email "a@a.com"
git config --global init.defaultBranch main
#
git clone <각자 Gogs dev-app repo 주소>
git clone http://192.168.254.124:3000/devops/dev-app.git
Cloning into 'dev-app'...
Username for 'http://192.168.254.124:3000': devops # Gogs 계정명
Password for 'http://devops@192.168.254.124:3000': <토큰> # 혹은 계정암호
...
#
tree dev-app
cd dev-app
git branch
git remote -v
# server.py 파일 작성
cat > server.py <<EOF
from http.server import ThreadingHTTPServer, BaseHTTPRequestHandler
from datetime import datetime
class RequestHandler(BaseHTTPRequestHandler):
def do_GET(self):
self.send_response(200)
self.send_header('Content-type', 'text/plain')
self.end_headers()
now = datetime.now()
response_string = now.strftime("The time is %-I:%M:%S %p, CloudNeta Study.\n")
self.wfile.write(bytes(response_string, "utf-8"))
def startServer():
try:
server = ThreadingHTTPServer(('', 80), RequestHandler)
print("Listening on " + ":".join(map(str, server.server_address)))
server.serve_forever()
except KeyboardInterrupt:
server.shutdown()
if __name__== "__main__":
startServer()
EOF
# Dockerfile 생성
cat > Dockerfile <<EOF
FROM python:3.12
ENV PYTHONUNBUFFERED 1
COPY . /app
WORKDIR /app
CMD python3 server.py
EOF
# VERSION 파일 생성
echo "0.0.1" > VERSION
#
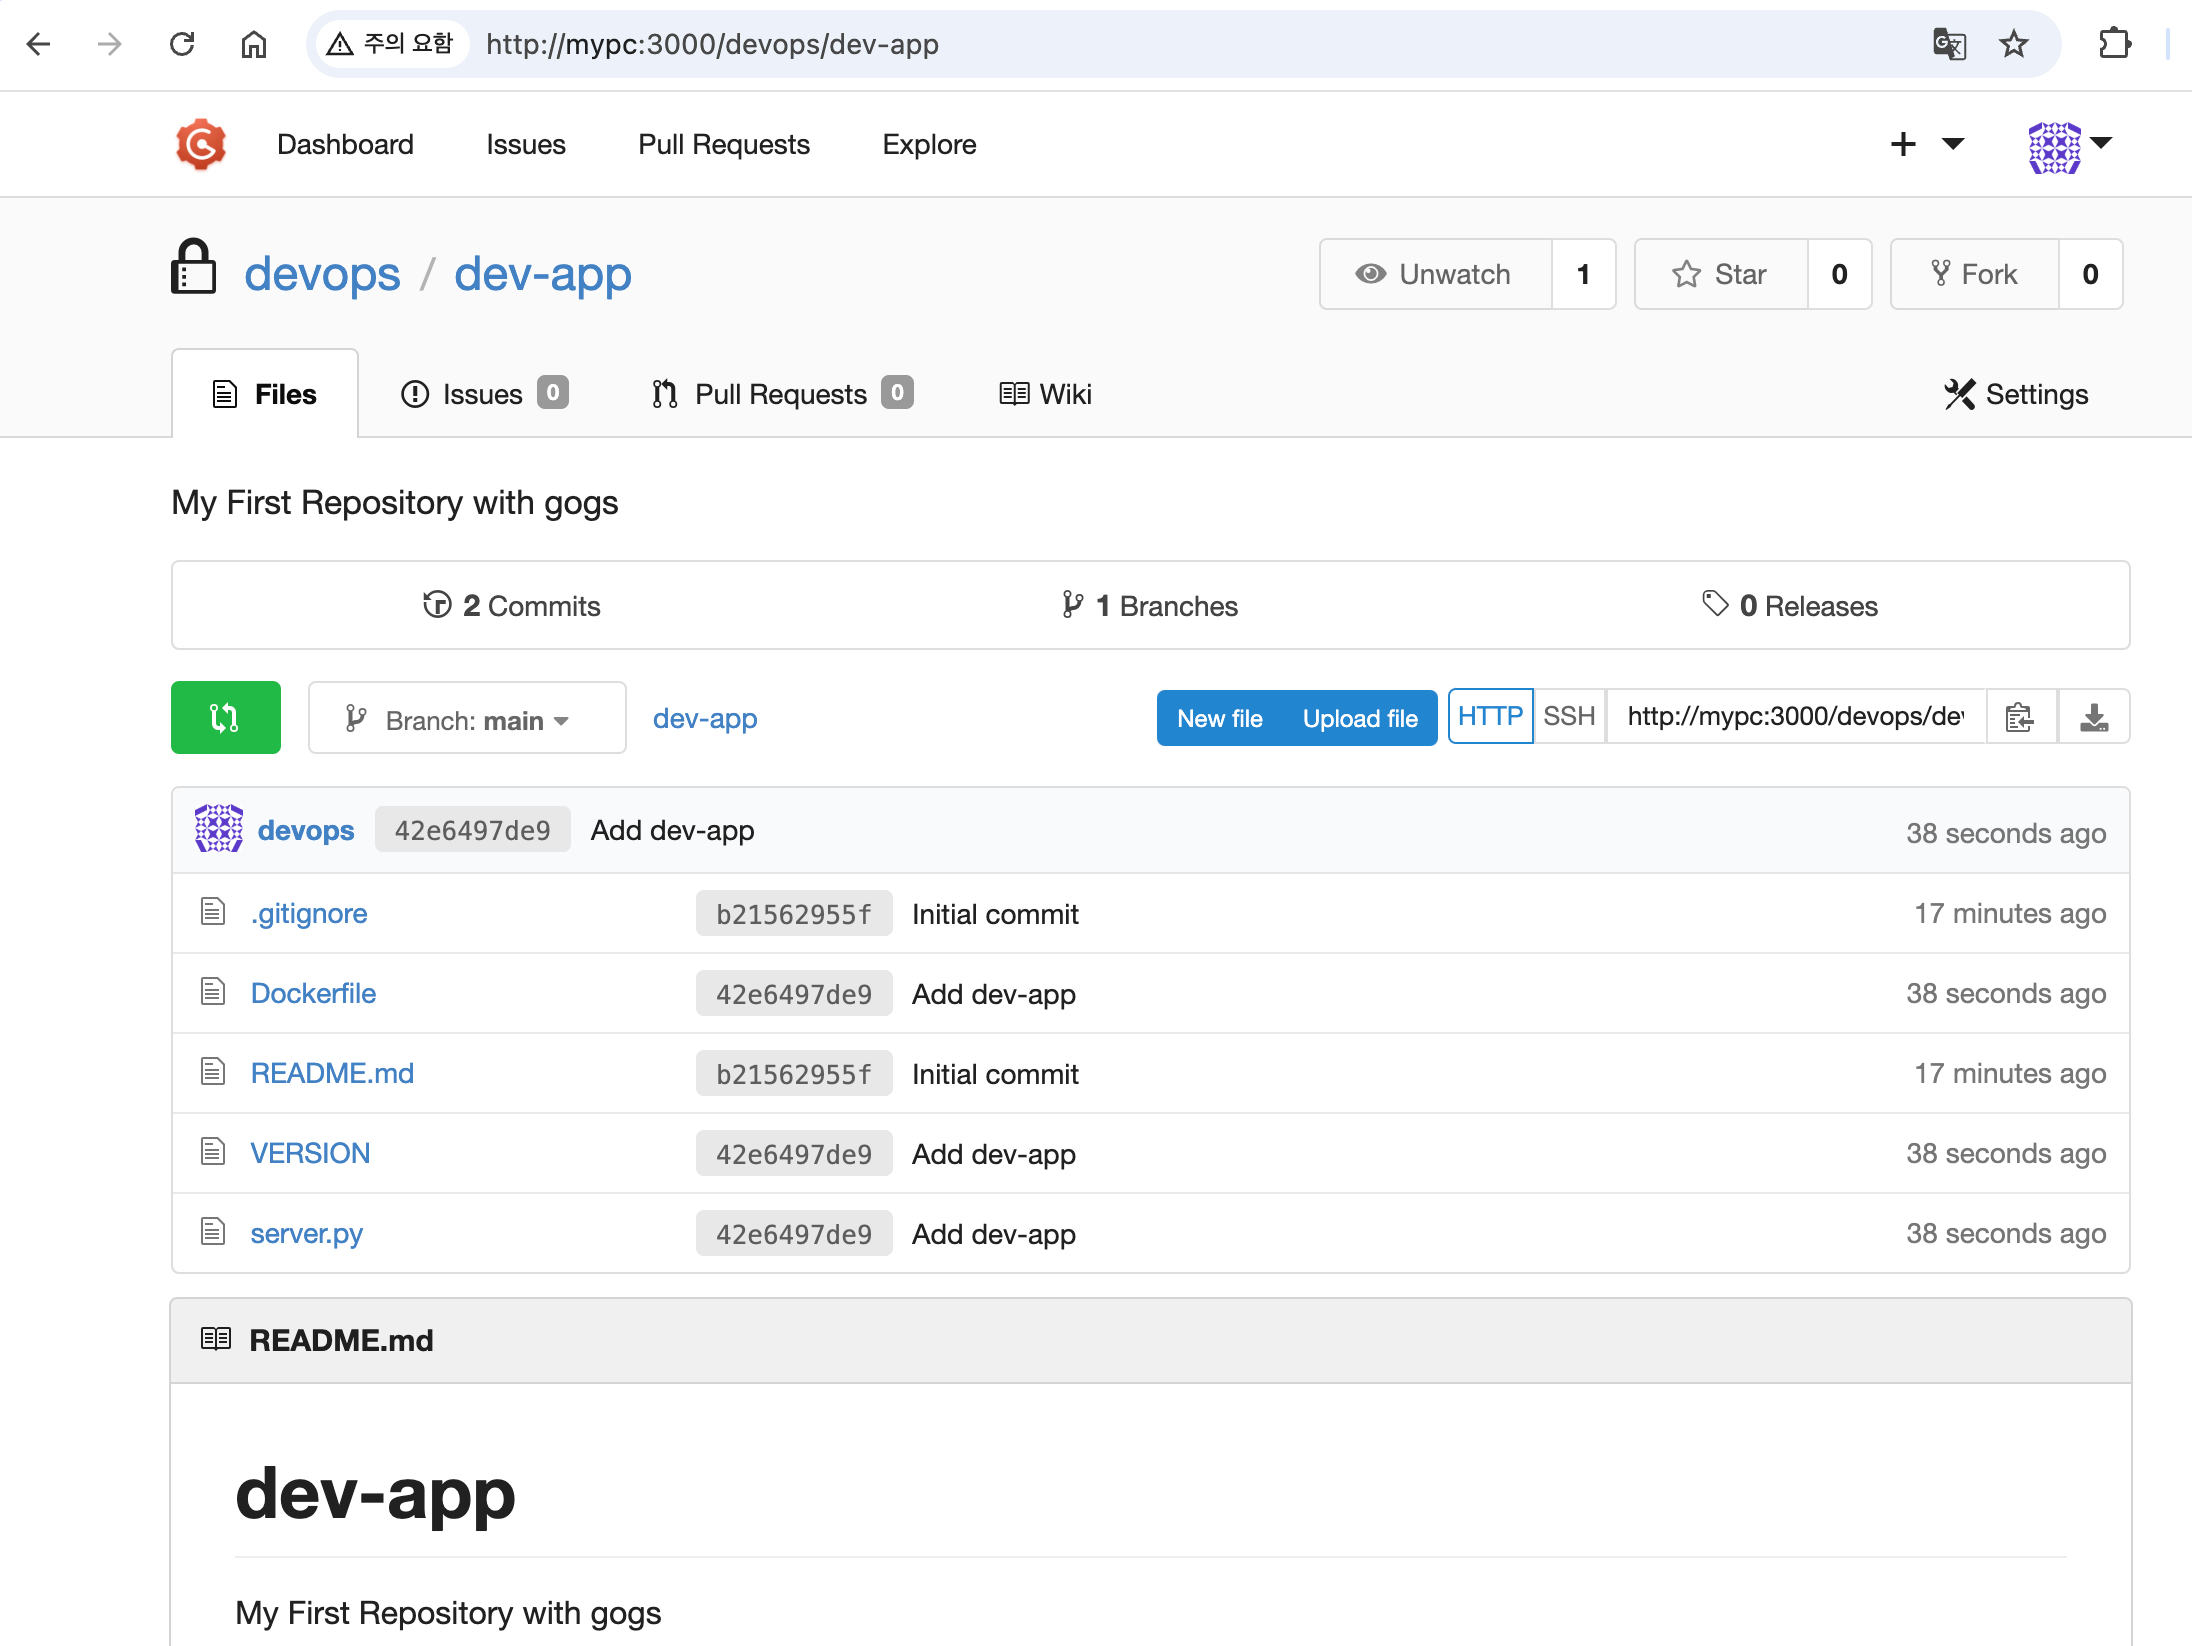
git add .
git commit -m "Add dev-app"
git push -u origin main
...- Gogs Repo 에서 확인
3.3 Dockerhub
Docker Hub는 Docker 이미지를 저장, 공유, 관리할 수 있는 클라우드 기반의 레지스트리 서비스입니다. 주로 애플리케이션 배포와 컨테이너화된 환경에서 많이 사용됩니다.
주요 기능
-
이미지 저장소
Docker Hub는 컨테이너 이미지를 저장하는 중앙화된 플랫폼입니다. 사용자는 이미지를 퍼블릭(public) 또는 프라이빗(private)으로 저장할 수 있습니다. -
이미지 공유
Docker Hub에 저장된 이미지를 다른 사용자 또는 팀과 쉽게 공유할 수 있습니다. 오픈 소스 프로젝트에서 자주 사용됩니다. -
자동화 빌드
GitHub 또는 Bitbucket과 연동하여 코드가 업데이트될 때 Docker 이미지를 자동으로 빌드하고 배포할 수 있습니다. -
공식 이미지 제공
Docker Hub에는 검증된 공식 이미지(예: Python, MySQL, Nginx)가 제공됩니다. 이는 신뢰할 수 있는 이미지로서 바로 사용할 수 있습니다. -
검색 기능
다양한 이미지(공식, 사용자 제공)를 검색하고 다운로드할 수 있습니다. -
Webhooks
Docker Hub는 Webhooks를 제공하여, 특정 이미지의 업데이트가 있을 때 알림을 통해 CI/CD 파이프라인과 통합할 수 있습니다.
실습 환경 구성
-
계정 생성과정 설명은 생략하겠습니다.
-
Python Demo 컨테이너 Image Build / Upload
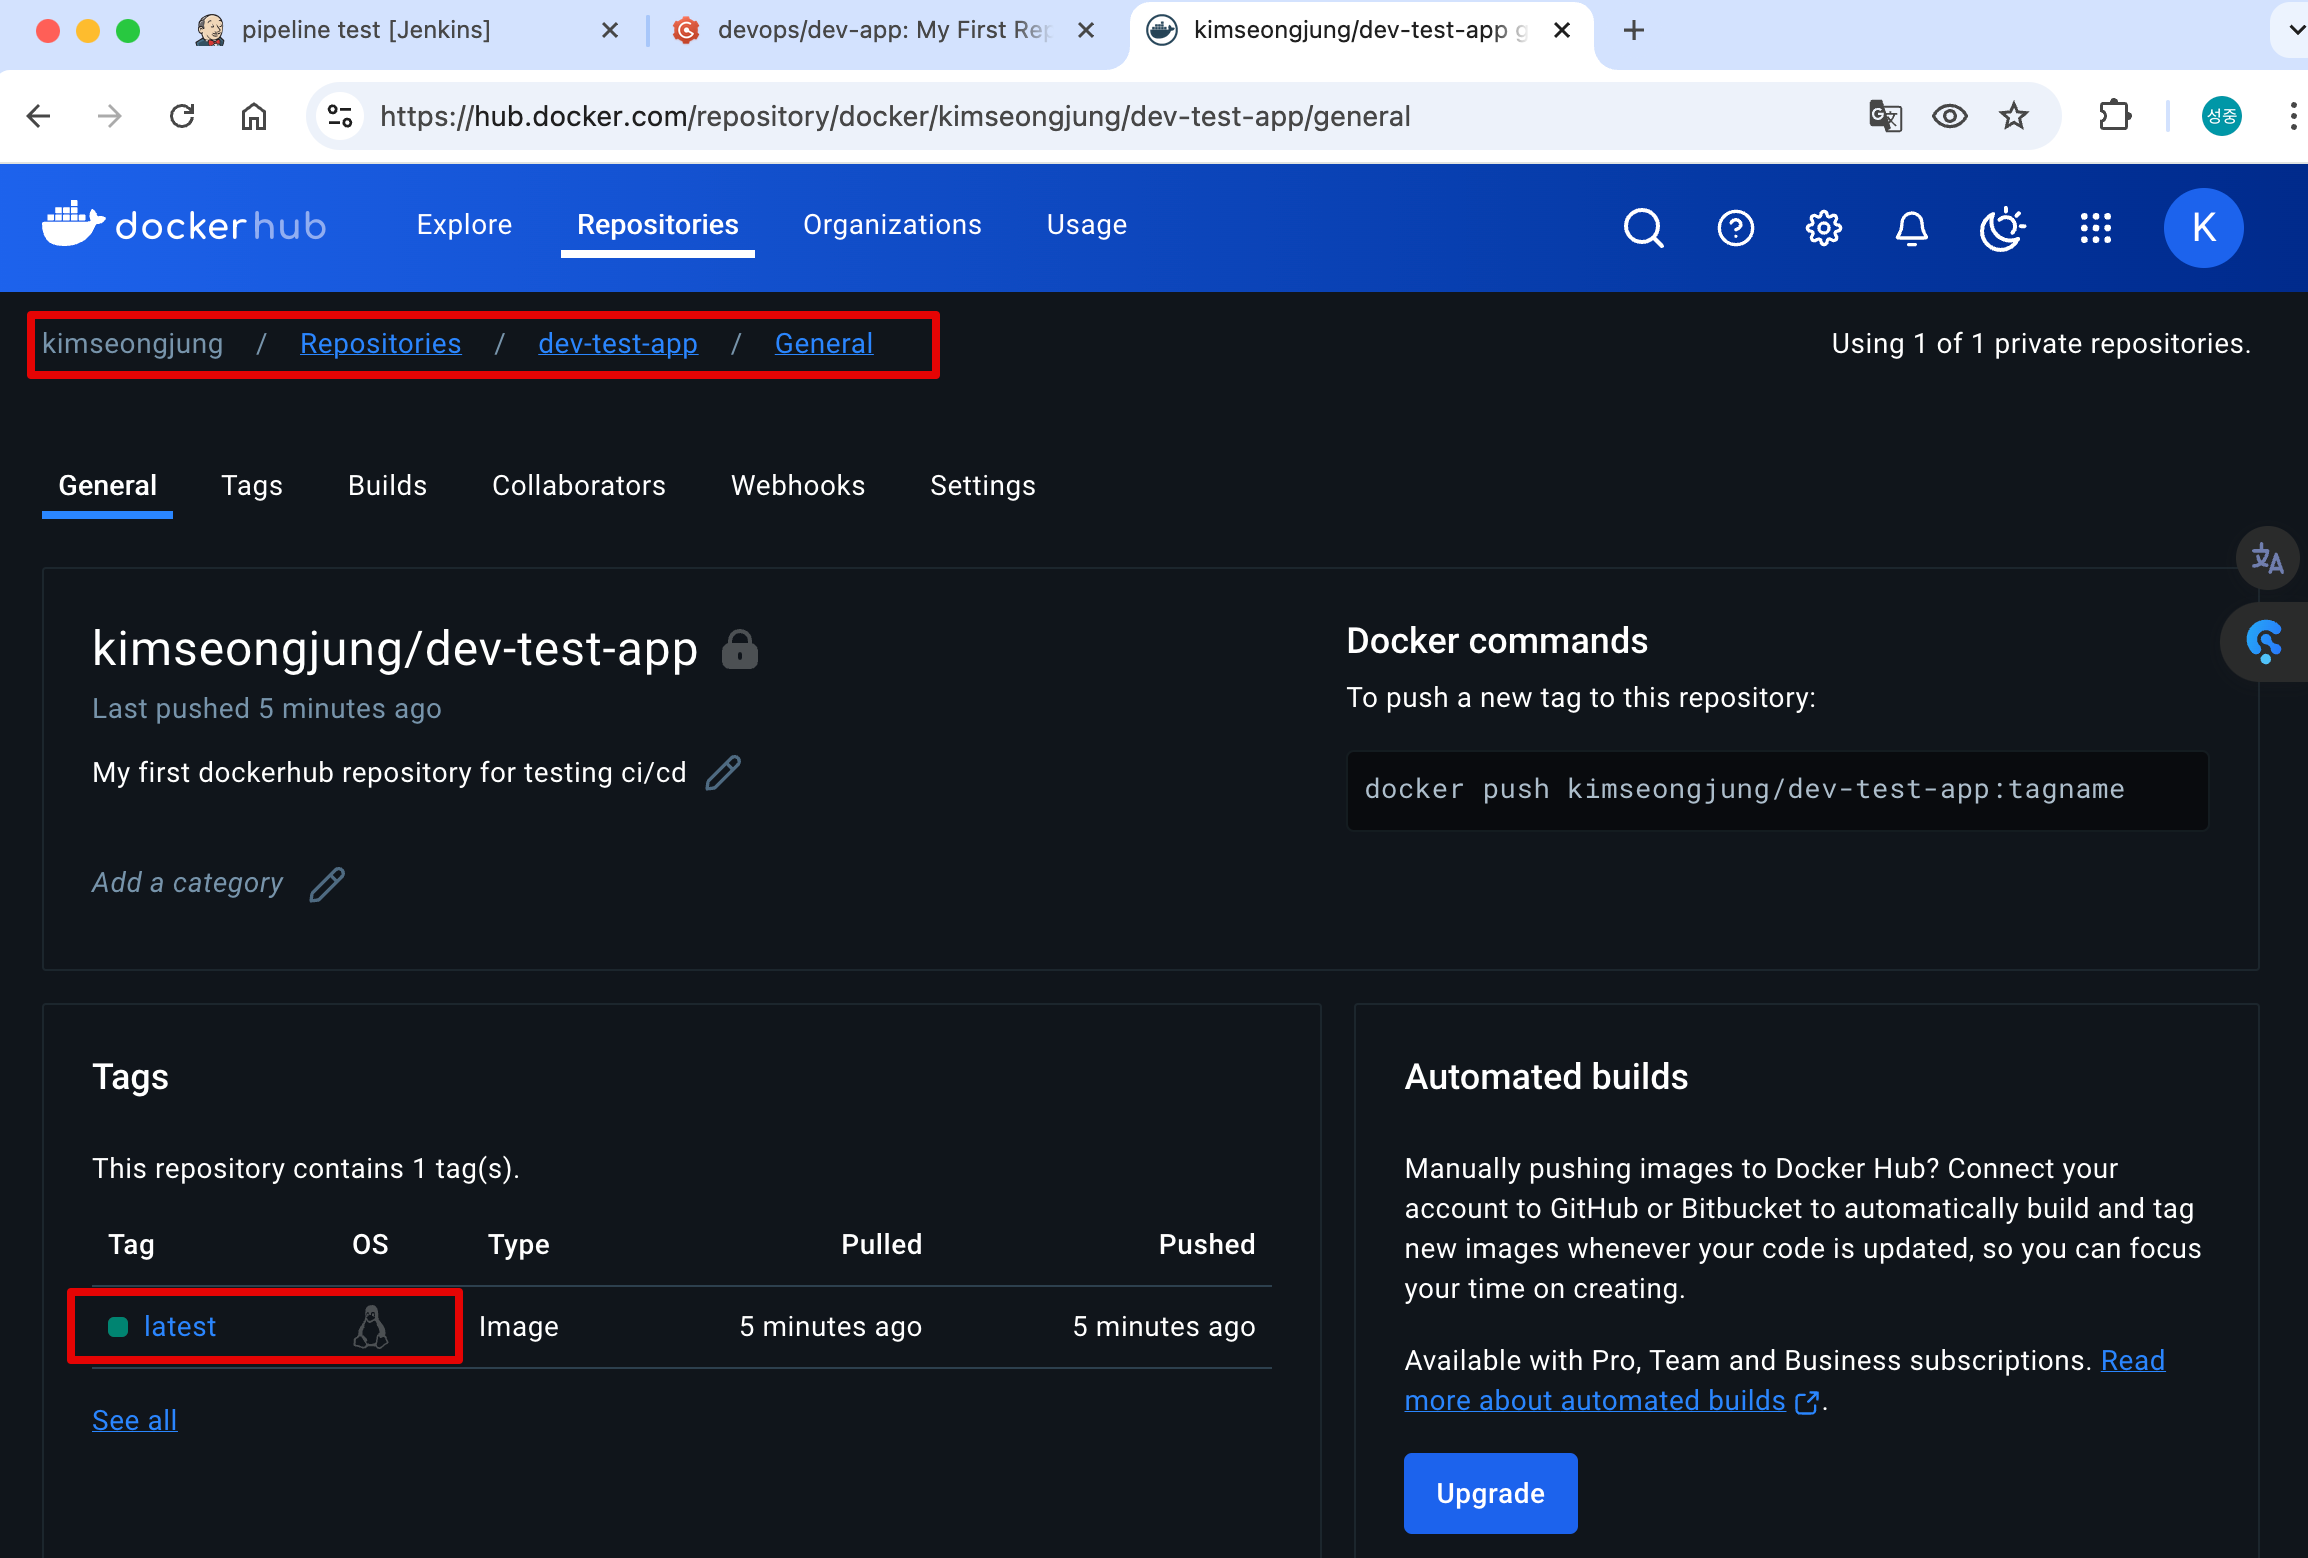
# Dockerfile 파일 작성
cat > Dockerfile <<EOF
FROM busybox
CMD echo "Hello world! This is my first Docker image."
EOF
cat Dockerfile

# 빌드
DOCKERID=<자신의 도커 계정명>
DOCKERREPO=<자신의 도커 저장소>
DOCKERID=kimseongjung
DOCKERREPO=dev-test-app

docker build -t $DOCKERID/$DOCKERREPO .
docker images | grep $DOCKERID/$DOCKERREPO

# 실행 확인
docker run $DOCKERID/$DOCKERREPO

# 로그인 확인
docker login - icebreaker70@gmail.com

# 푸시
docker push $DOCKERID/$DOCKERREPO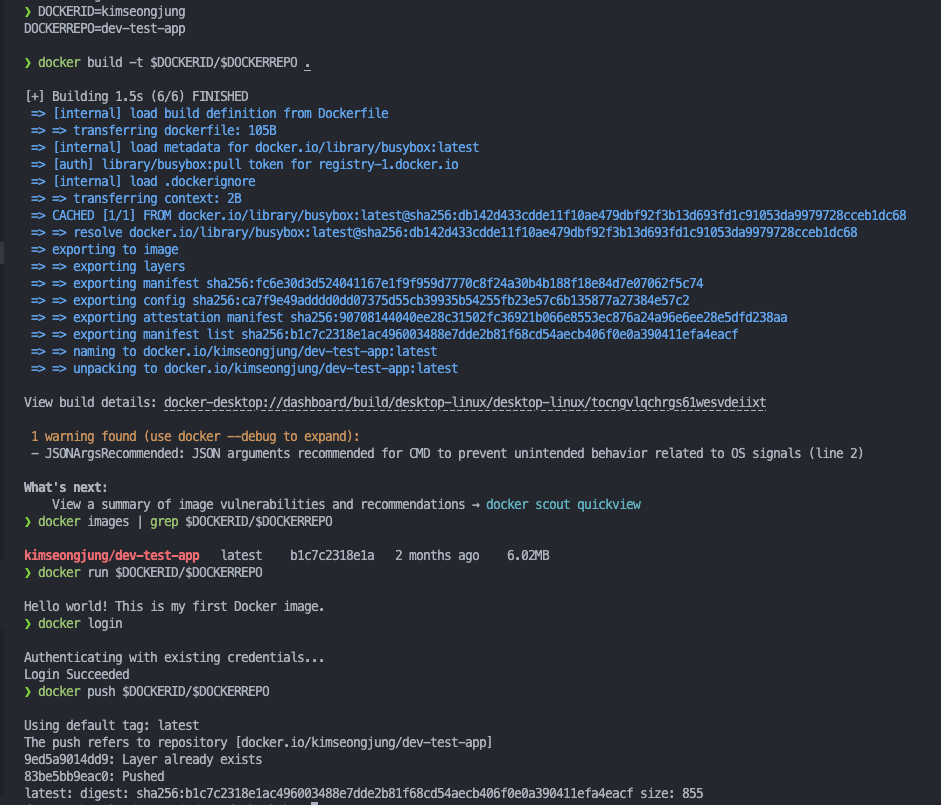
-
push 후 확인
-
🍪 Name your local images using one of these methods:
- When you build them, using
docker build -t <hub-user>/<repo-name>[:<tag> - By re-tagging the existing local image with
docker tag <existing-image> <hub-user>/<repo-name>[:<tag>]. - By using
docker commit <existing-container> <hub-user>/<repo-name>[:<tag>]to commit changes.
- When you build them, using
4. Jenkins 기본 사용
4.1 작업 소개 (프로젝트, Job, Item) : 3가지 유형의 지시 사항 포함
- 작업을 수행하는 시점 Trigger
- 작업 수행 태스크 task가 언제 시작될지를 지시
- 작업을 구성하는 단계별 태스크 Built step
- 특정 목표를 수행하기 위한 태스크를 단계별 step로 구성할 수 있다.
- 이것을 젠킨스에서는 빌드 스텝 build step이라고 부른다.
- 태스크가 완료 후 수행할 명령 Post-build action
- 예를 들어 작업의 결과(성공 or 실패)를 사용자에게 알려주는 후속 동작이나, 자바 코드를 컴파일한 후 생성된 클래스 파일을 특정 위치로 복사 등
- (참고) 젠킨스의 빌드 : 젠킨스 작업의 특정 실행 버전
- 사용자는 젠킨스 작업을 여러번 실행할 수 있는데, 실행될 때마다 고유 빌드 번호가 부여된다.
- 작업 실행 중에 생성된 아티팩트, 콘솔 로드 등 특정 실행 버전과 관련된 모든 세부 정보가 해당 빌드 번호로 저장된다.
4.2 작업 구성( Job Configuration : General 일반 섹션)
-
프로젝트 활성화/비활성화 오른쪽 위 토글 버튼 Enabled , Disabled
-
오래된 빌드 삭제 Discards old builds : 삭제 시기 결정 옵션 - 기간(기본값 14일), 회숫(기본값 50개) → 제한값 초과 시 오래된 빌드 삭제
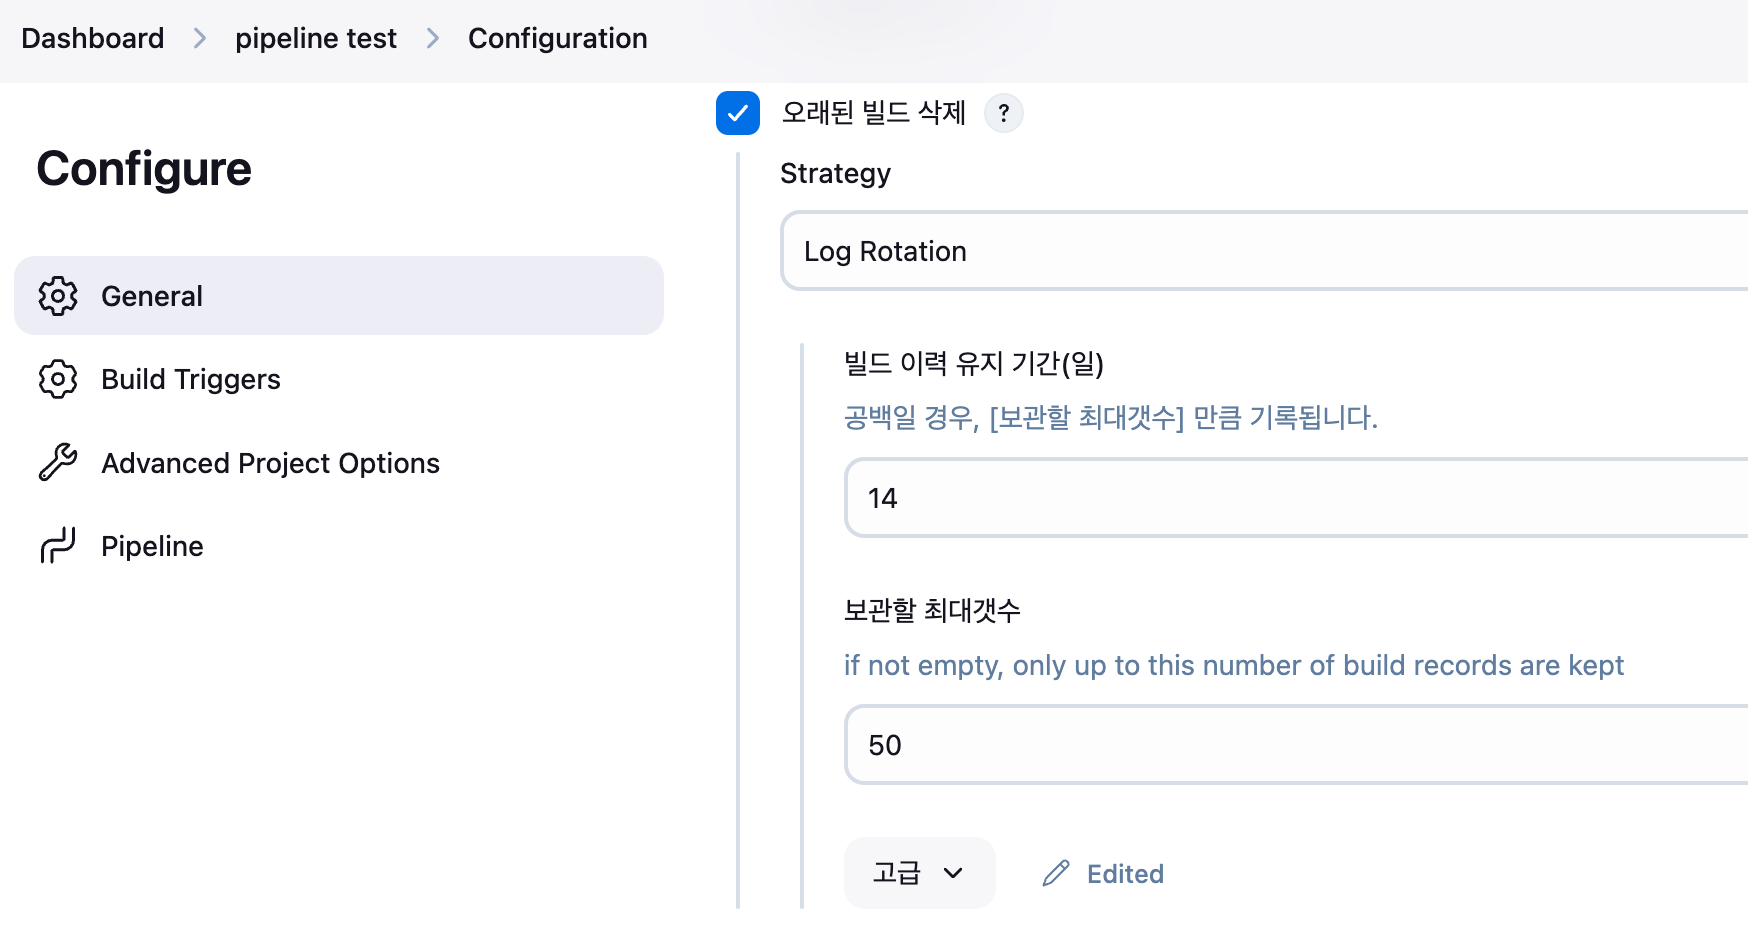
- 빌드 이력 유지 기간(일) Days to keep builds : 14 입력 시 이 작업의 빌드를 최대 14일간 유지.
- 빌드 유지 최대 개수(보관할 최대갯수) Max # of builds to keep : 50 입력 시 51번 이후에는 가장 오래된 빌드부터 순서대로 삭제.
- 고급 - 아티팩트 유지 기간(산출물 보관 일수) Days to keep artifacts : 빌드 후 산출물(예. jar war) 유지 기간
- 고급 - 아티팩트 유지 최대 개수 Max # of builds to keep with artifacts : 빌드 후 아티팩트 유지 개수
-
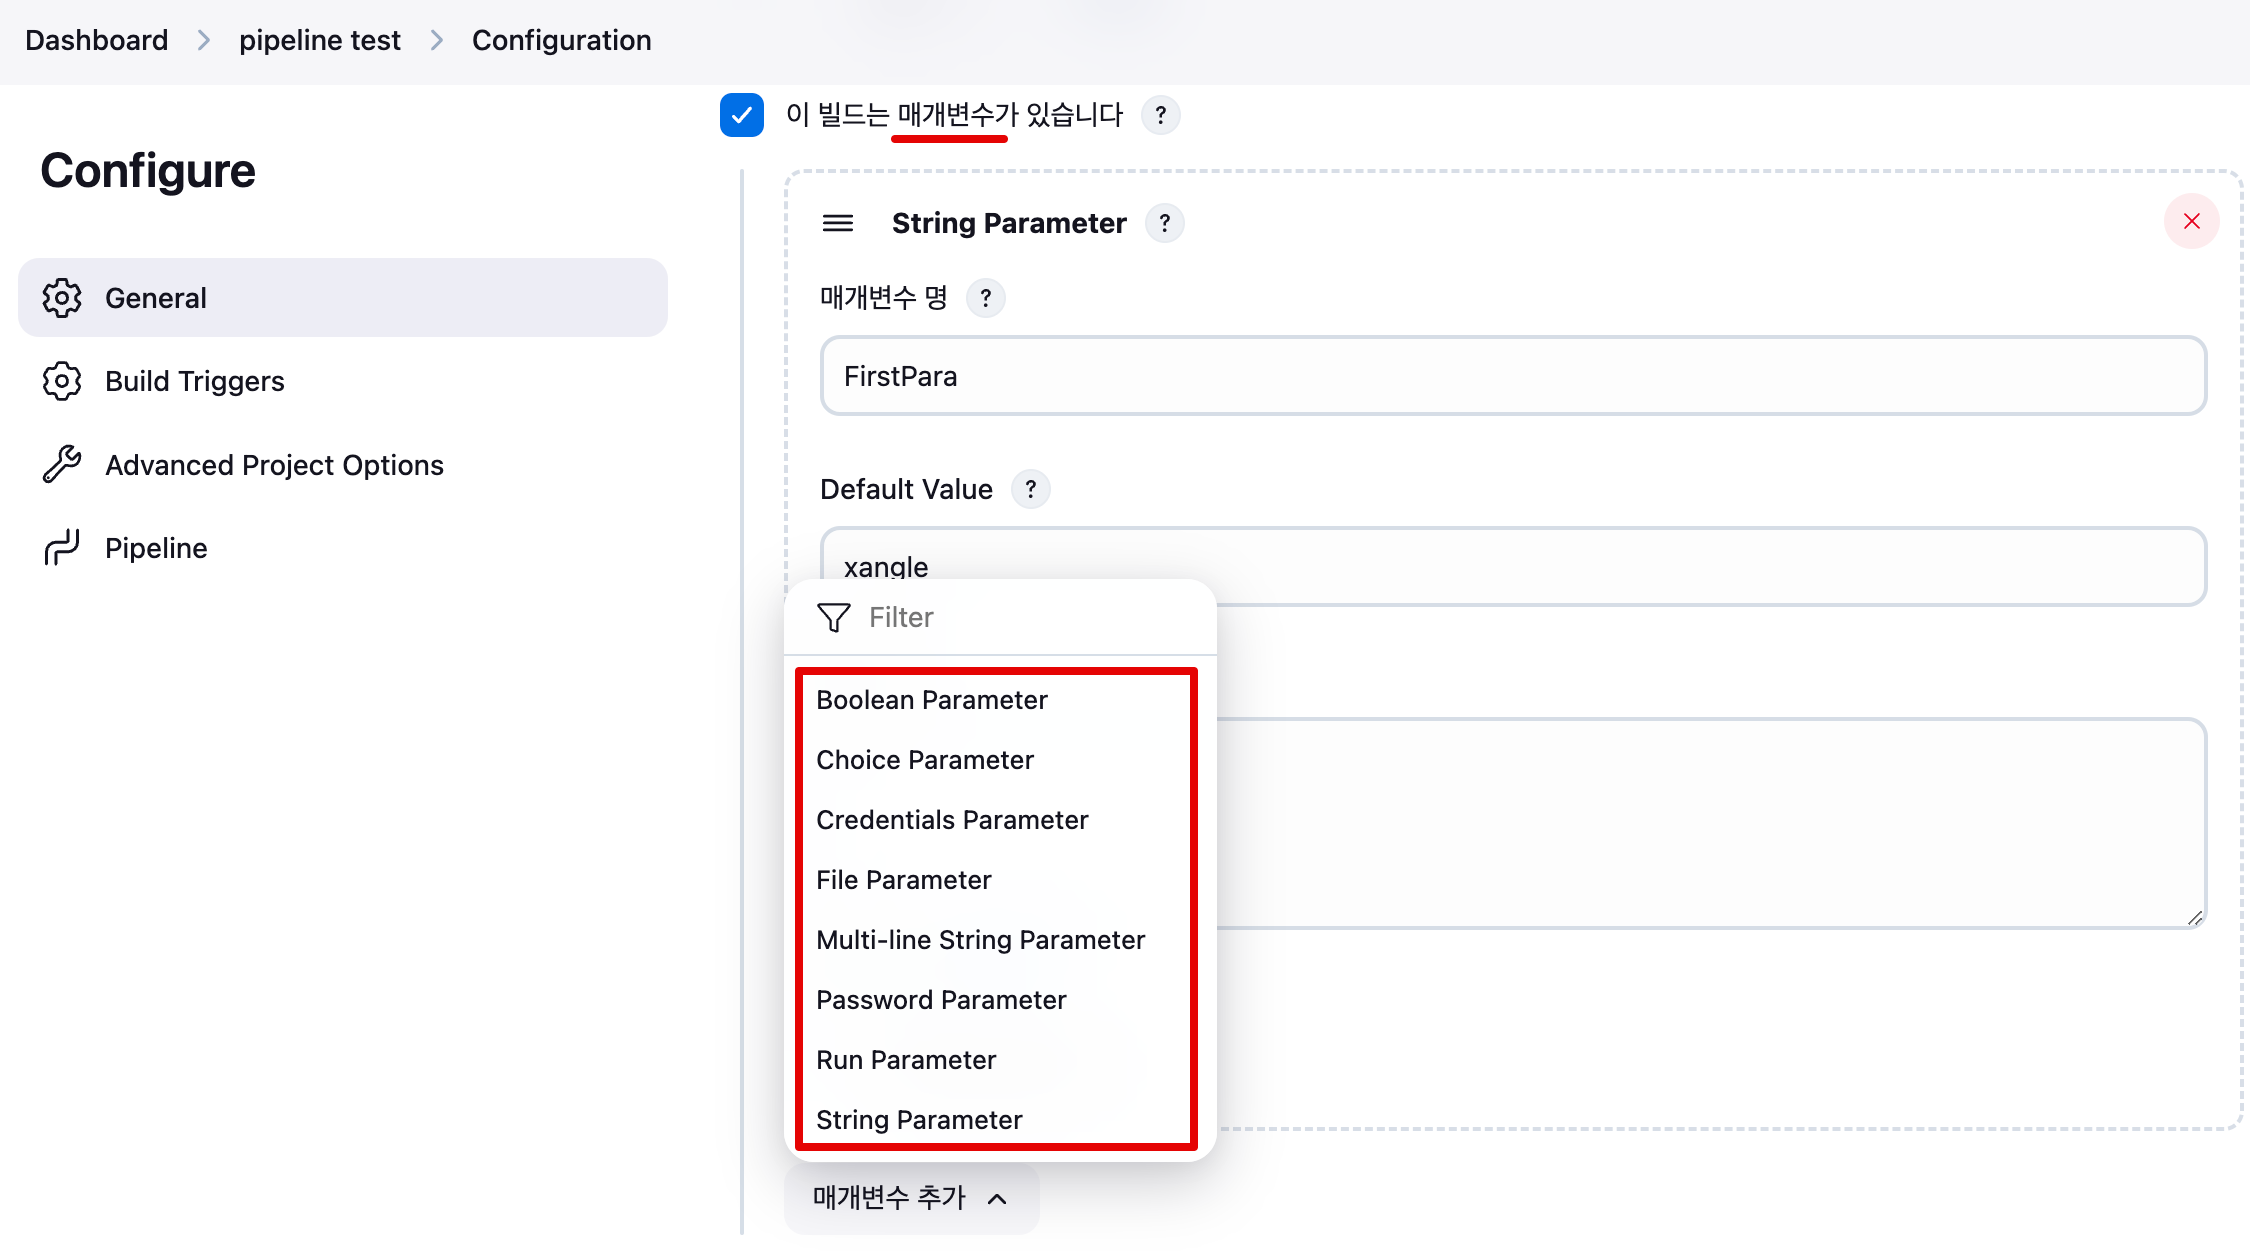
매개변수형 프로젝트 (이 빌드는 매개변수가 있습니다 This project is parameterized) : 외부 입력 받을 때 사용
-
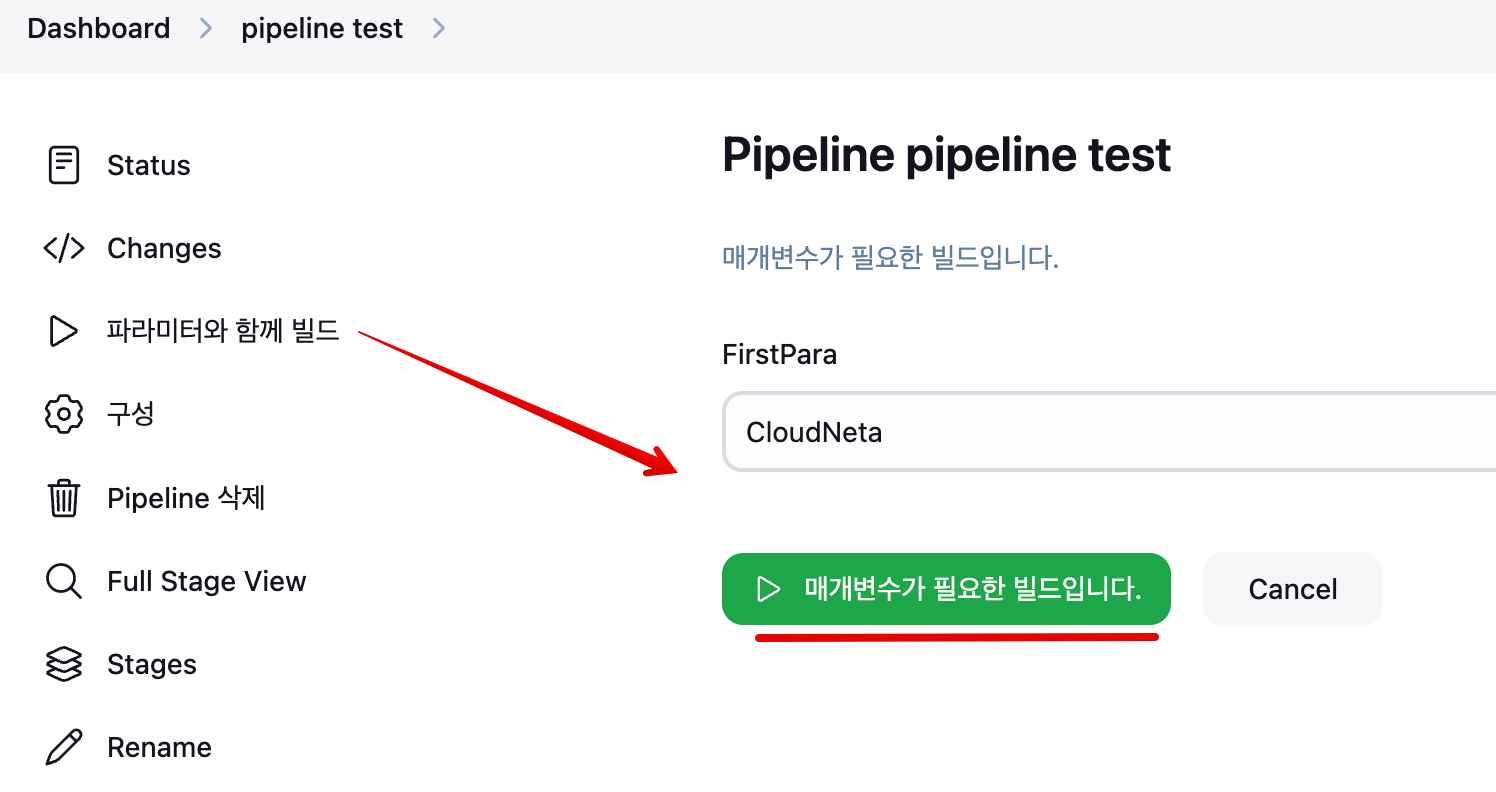
String Parameter 클릭 : 매개변수 명(FirstPara) , Default Value(xangle)
-
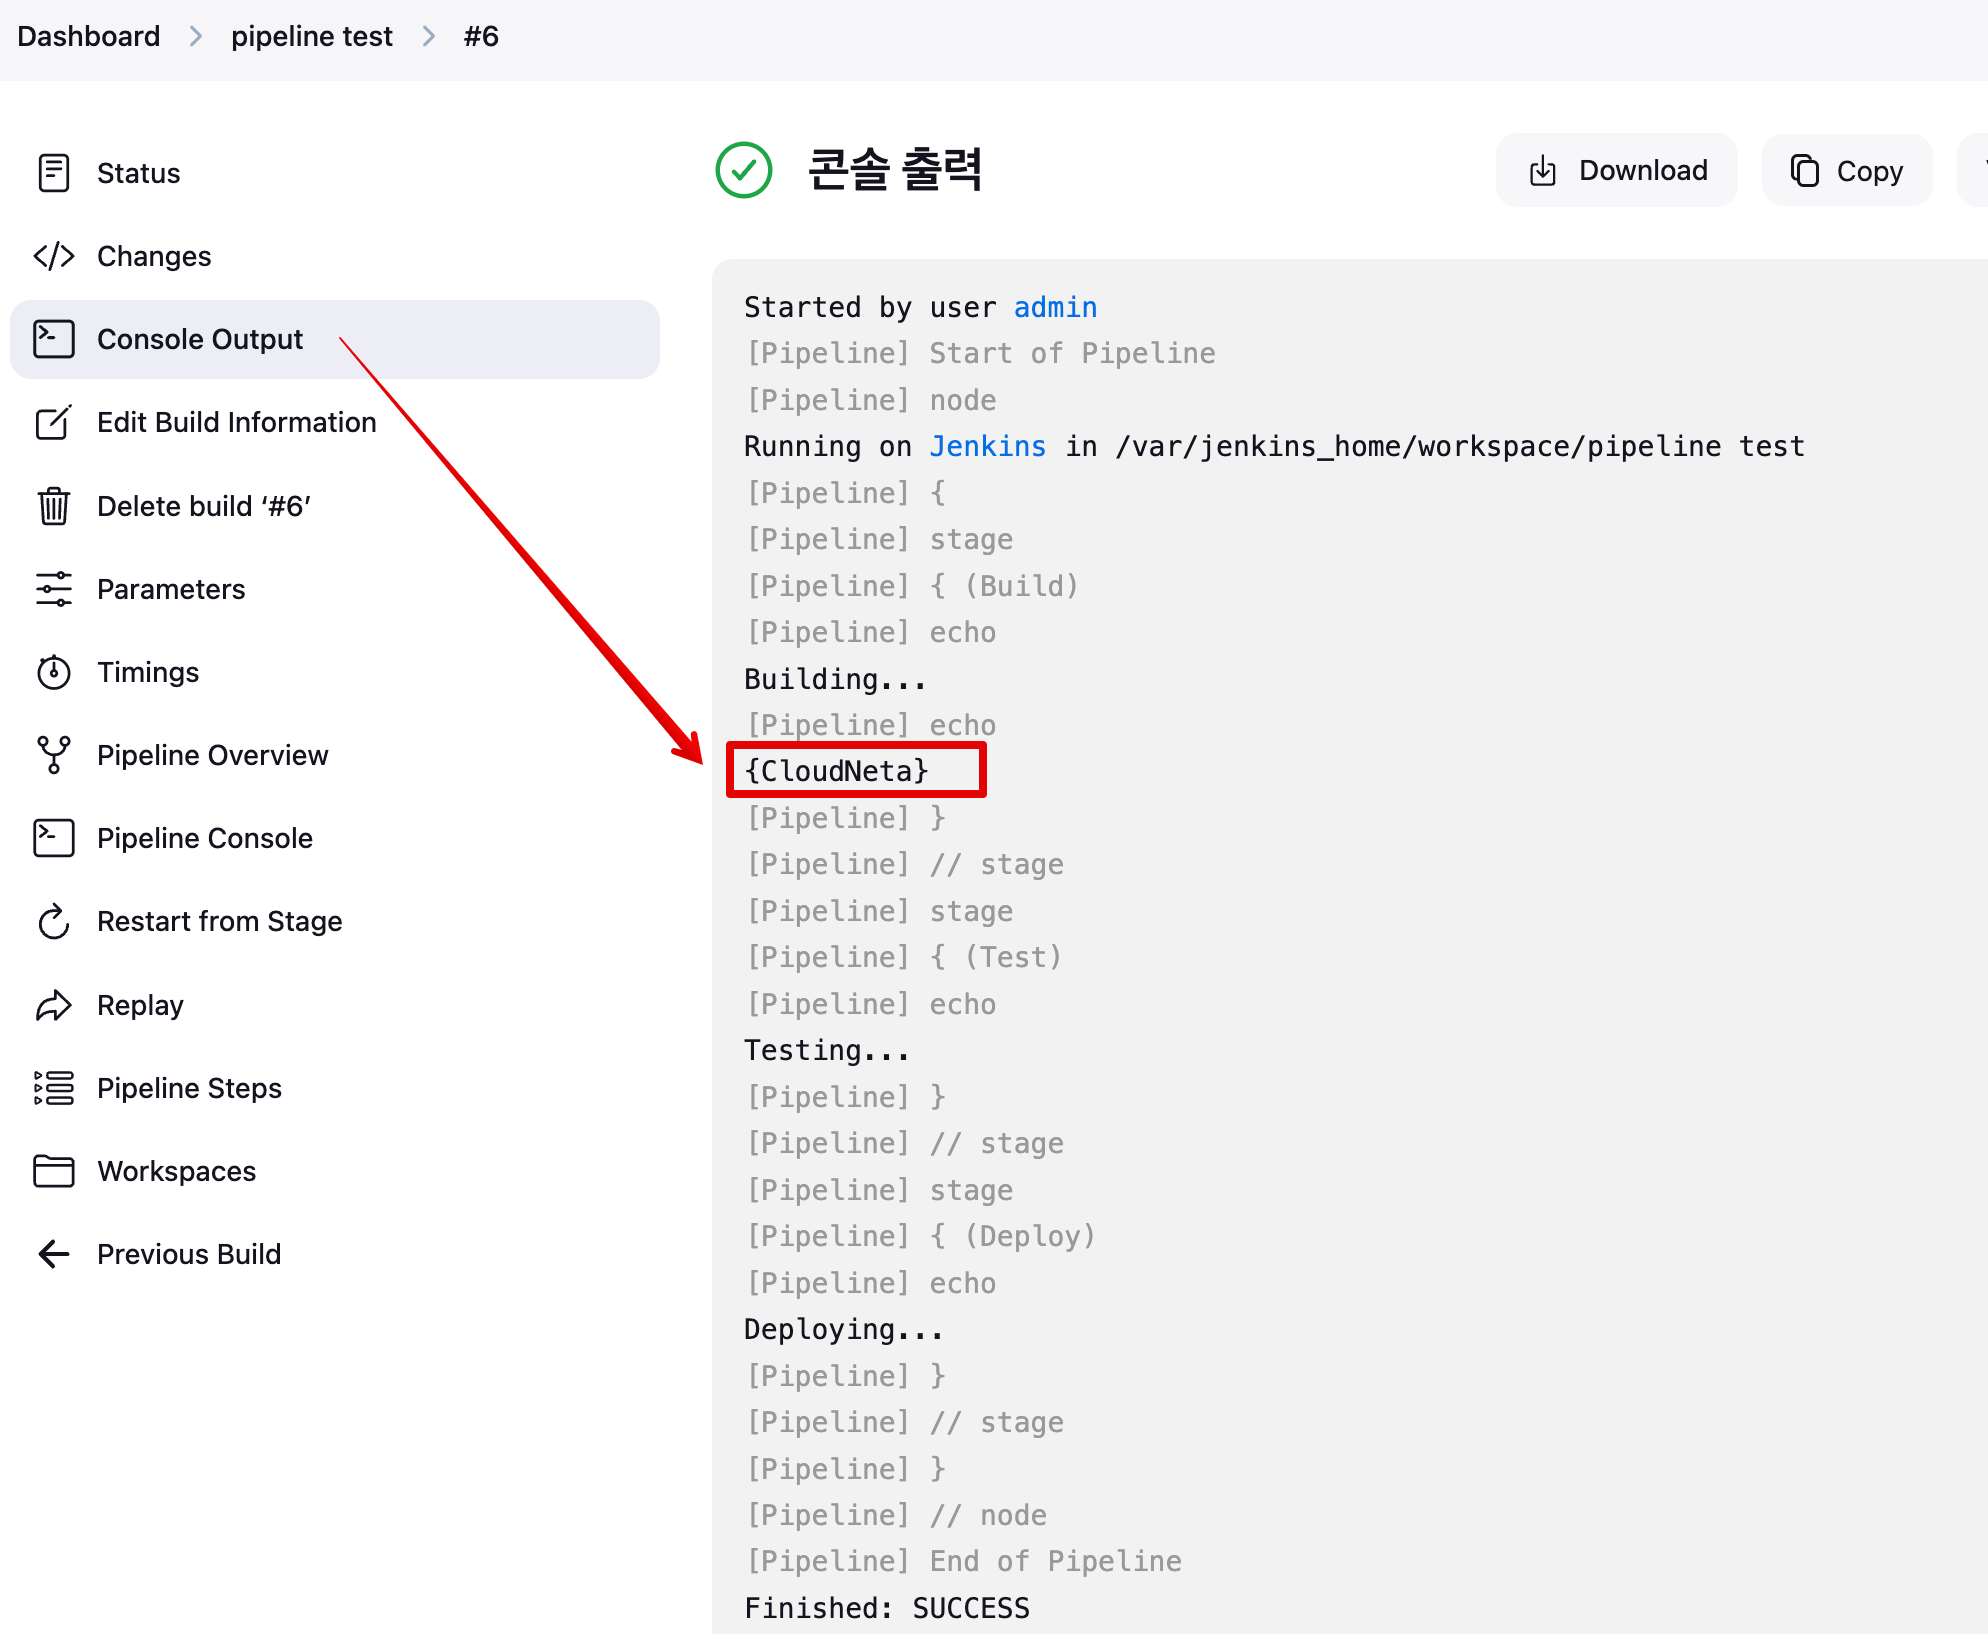
Build Steps : Execute shell 에 아래 입력
echo "{$FirstPara}" -
‘파라미터와 함께 빌드’ 클릭 → 매개변수 확인 후 ‘매개변수가 필요한 빌드입니다’ 클릭
-
Console Output 에서 확인
-
-
동시 빌드 실행 (필요한 경우 concurrent 빌드 실행) Execute concurrent builds if necessary
- 이 옵션은 독립적인 여러 단계로 분리될 수 있는 긴 빌드 프로세스 실행 시 유용
-
고급 옵션 Advanced
- 대기 시간 Quiet period : 옵션 사용 시 새로운 빌드가 즉시 시작되지 않는다. 빌드 큐(대기열)에 추가되고 지정된 시간이 지나야 빌드가 시작됨.
- 아래 처럼 5초 입력 시, 빌드가 시작되기 전에 5초 동안 빌드 큐에서 대기함.
- 아래 처럼 5초 입력 시, 빌드가 시작되기 전에 5초 동안 빌드 큐에서 대기함.
- 재시도 횟수 Retry Count : 예를 들어 옵션 미 사용 시, SCM(깃)에 사용 작업(첫 번째 체크아웃) 시도가 실패하자마자 바로 작업 실패로 처리됨
- 아래 처럼 옵션 사용(3) 입력 시, SCM 체크 아웃을 3번 시도하며, 재시도 사이의 시간 간격은 10초다
- 아래 처럼 옵션 사용(3) 입력 시, SCM 체크 아웃을 3번 시도하며, 재시도 사이의 시간 간격은 10초다
- 업스트림(선행 작업) 프로젝트가 빌드 중일 때 빌드 차단 : 선행 프로젝트가 빌드 큐에 있을 때 이 프로젝트/작업을 실행하지 않음
- 다운스트림(후행 작업) 프로젝트가 빌드 중일 때 빌드 차단 : 후행 프로젝트가 빌드 큐에 있을 때 이 프로젝트/작업을 실행하지 않음
- 커스텀 워크스페이스 사용 (사용자 빌드 경로 사용 Use custom workspace) : 작업용 워크스페이스 기본 경로를 변경 가능
- 의존성 빌드 로그 유지 Keep the build logs of dependencies : 현재 작업과 관련된 모든 빌드가 ‘로그 순환' 기능에서 제외. 즉 로그 유지!
- 대기 시간 Quiet period : 옵션 사용 시 새로운 빌드가 즉시 시작되지 않는다. 빌드 큐(대기열)에 추가되고 지정된 시간이 지나야 빌드가 시작됨.
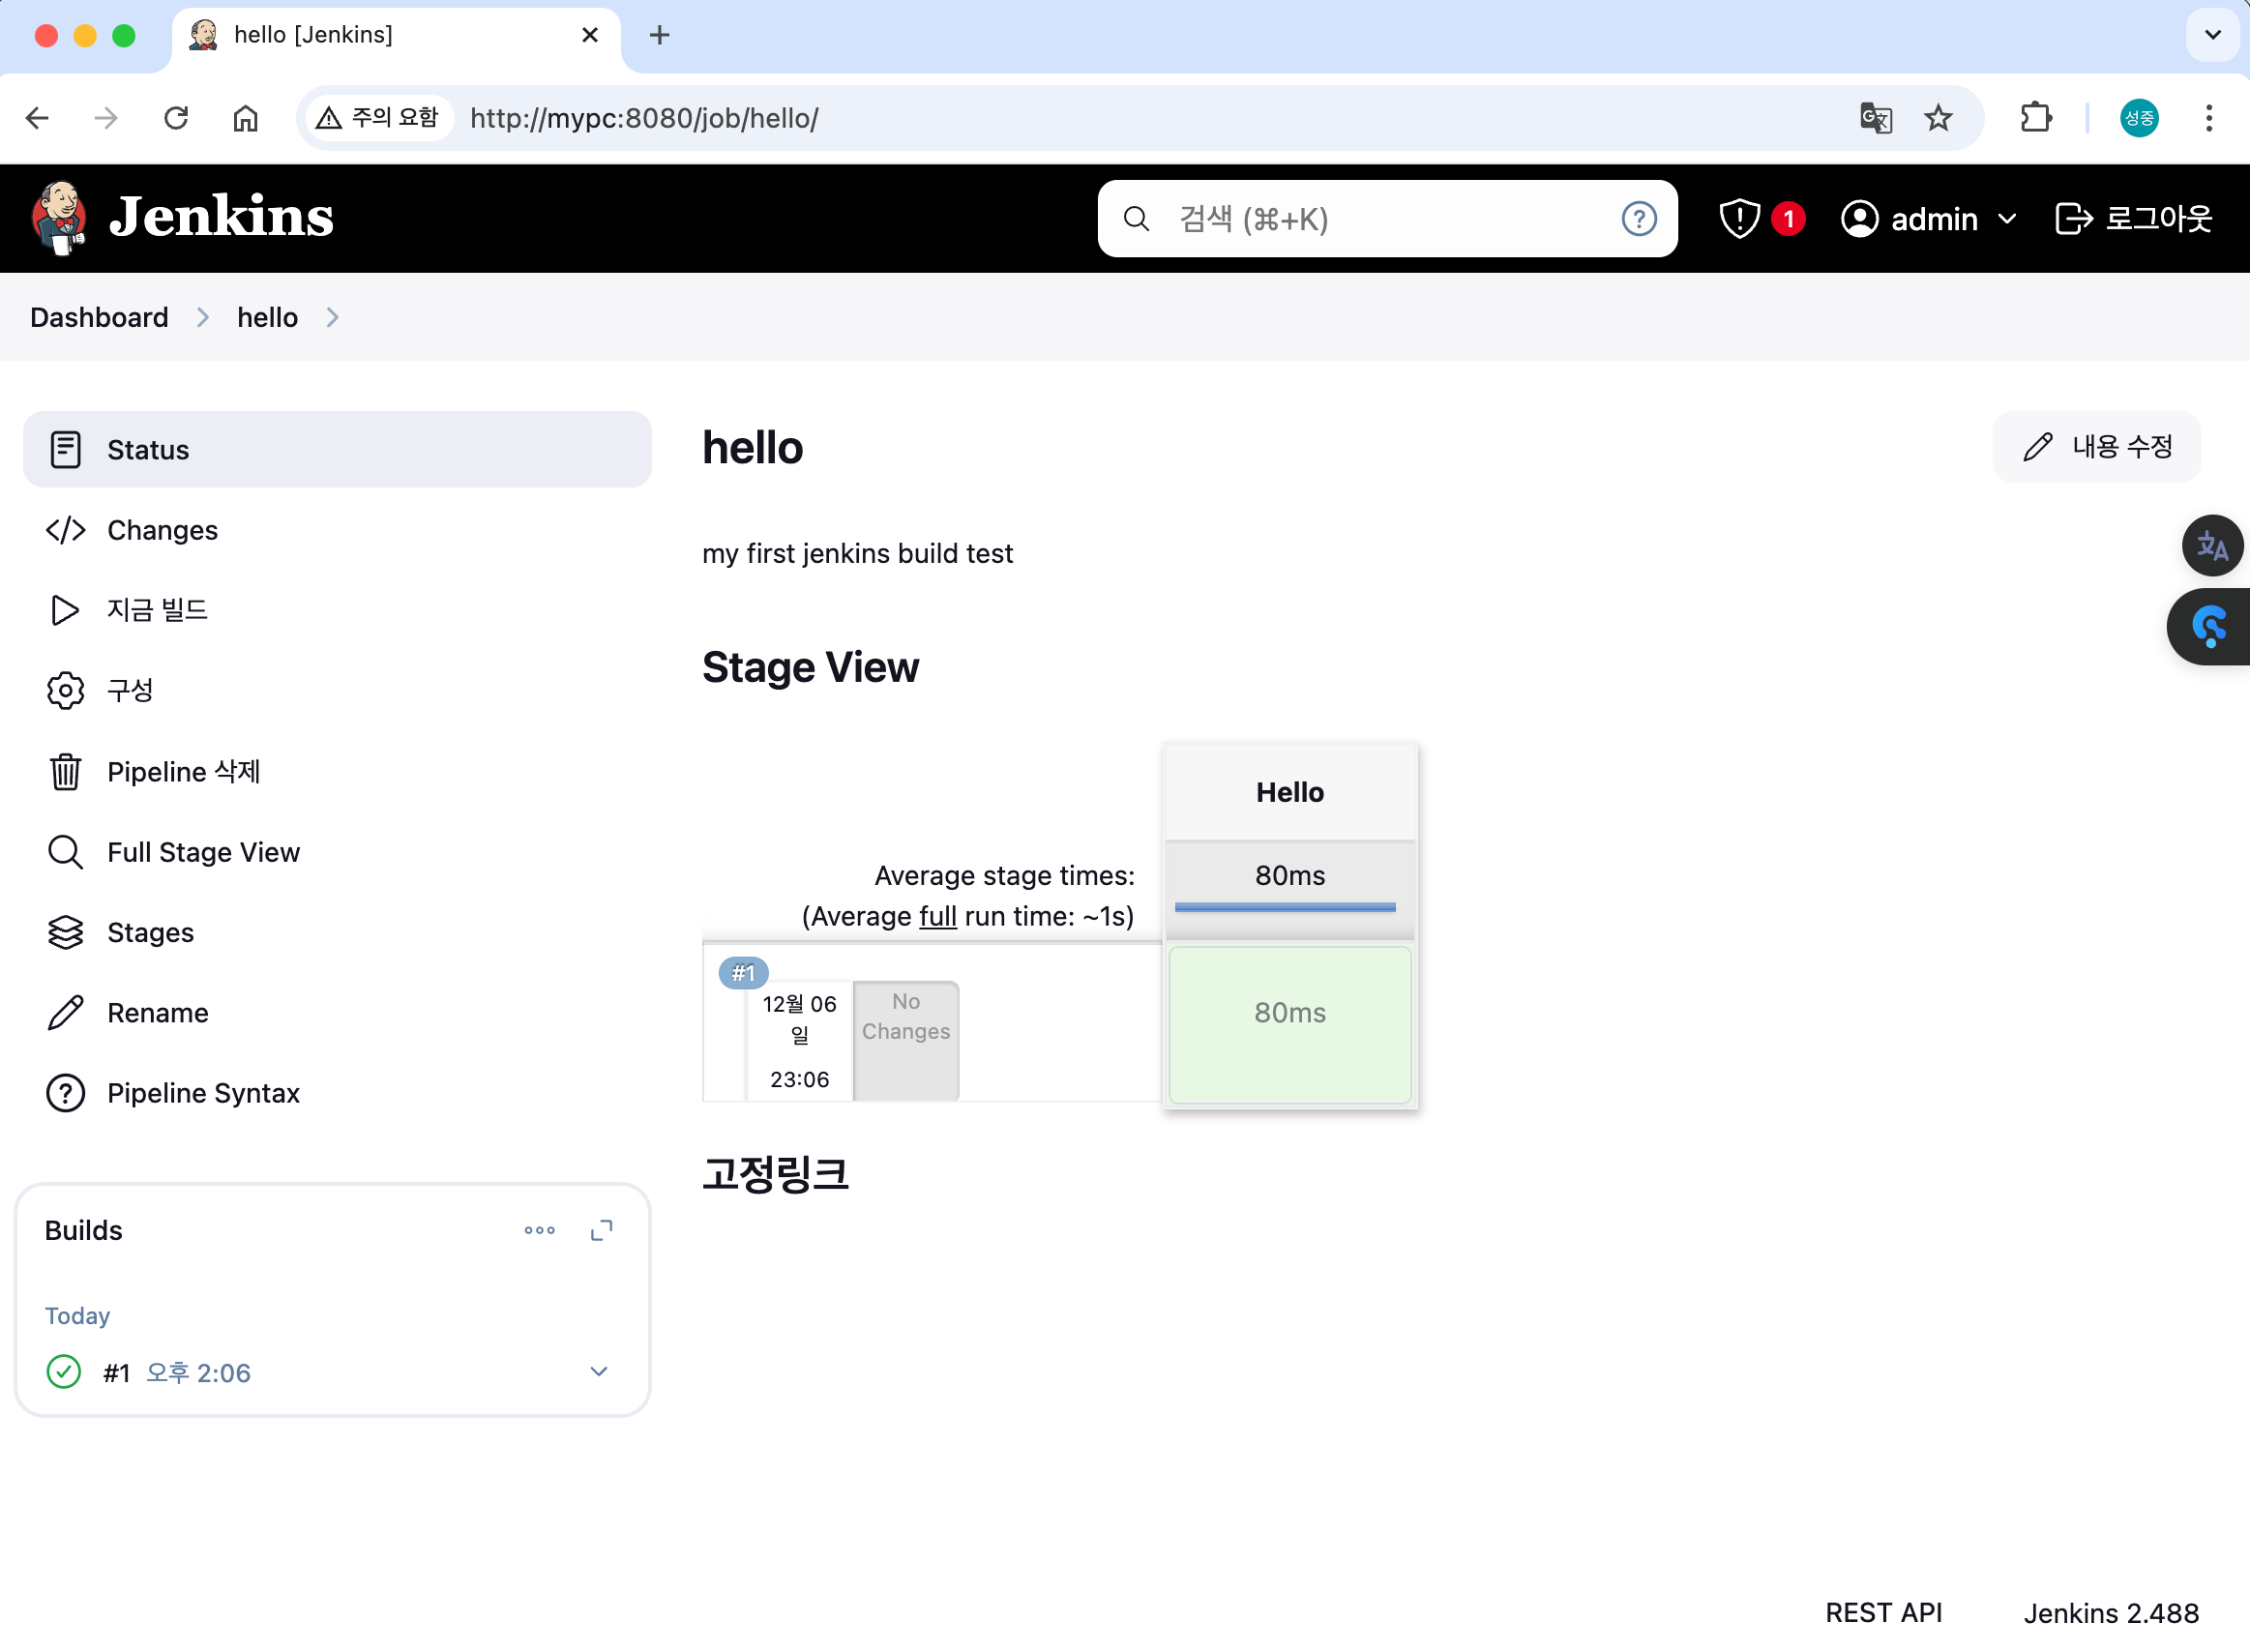
4.3 Jenkins Item 생성 : item name(first) - docker 명령 실행 확인
- Build Steps : Execute shell ⇒ Save 후 지금 빌드 : Console Output 확인
echo "docker check" | tee test.txt
docker ps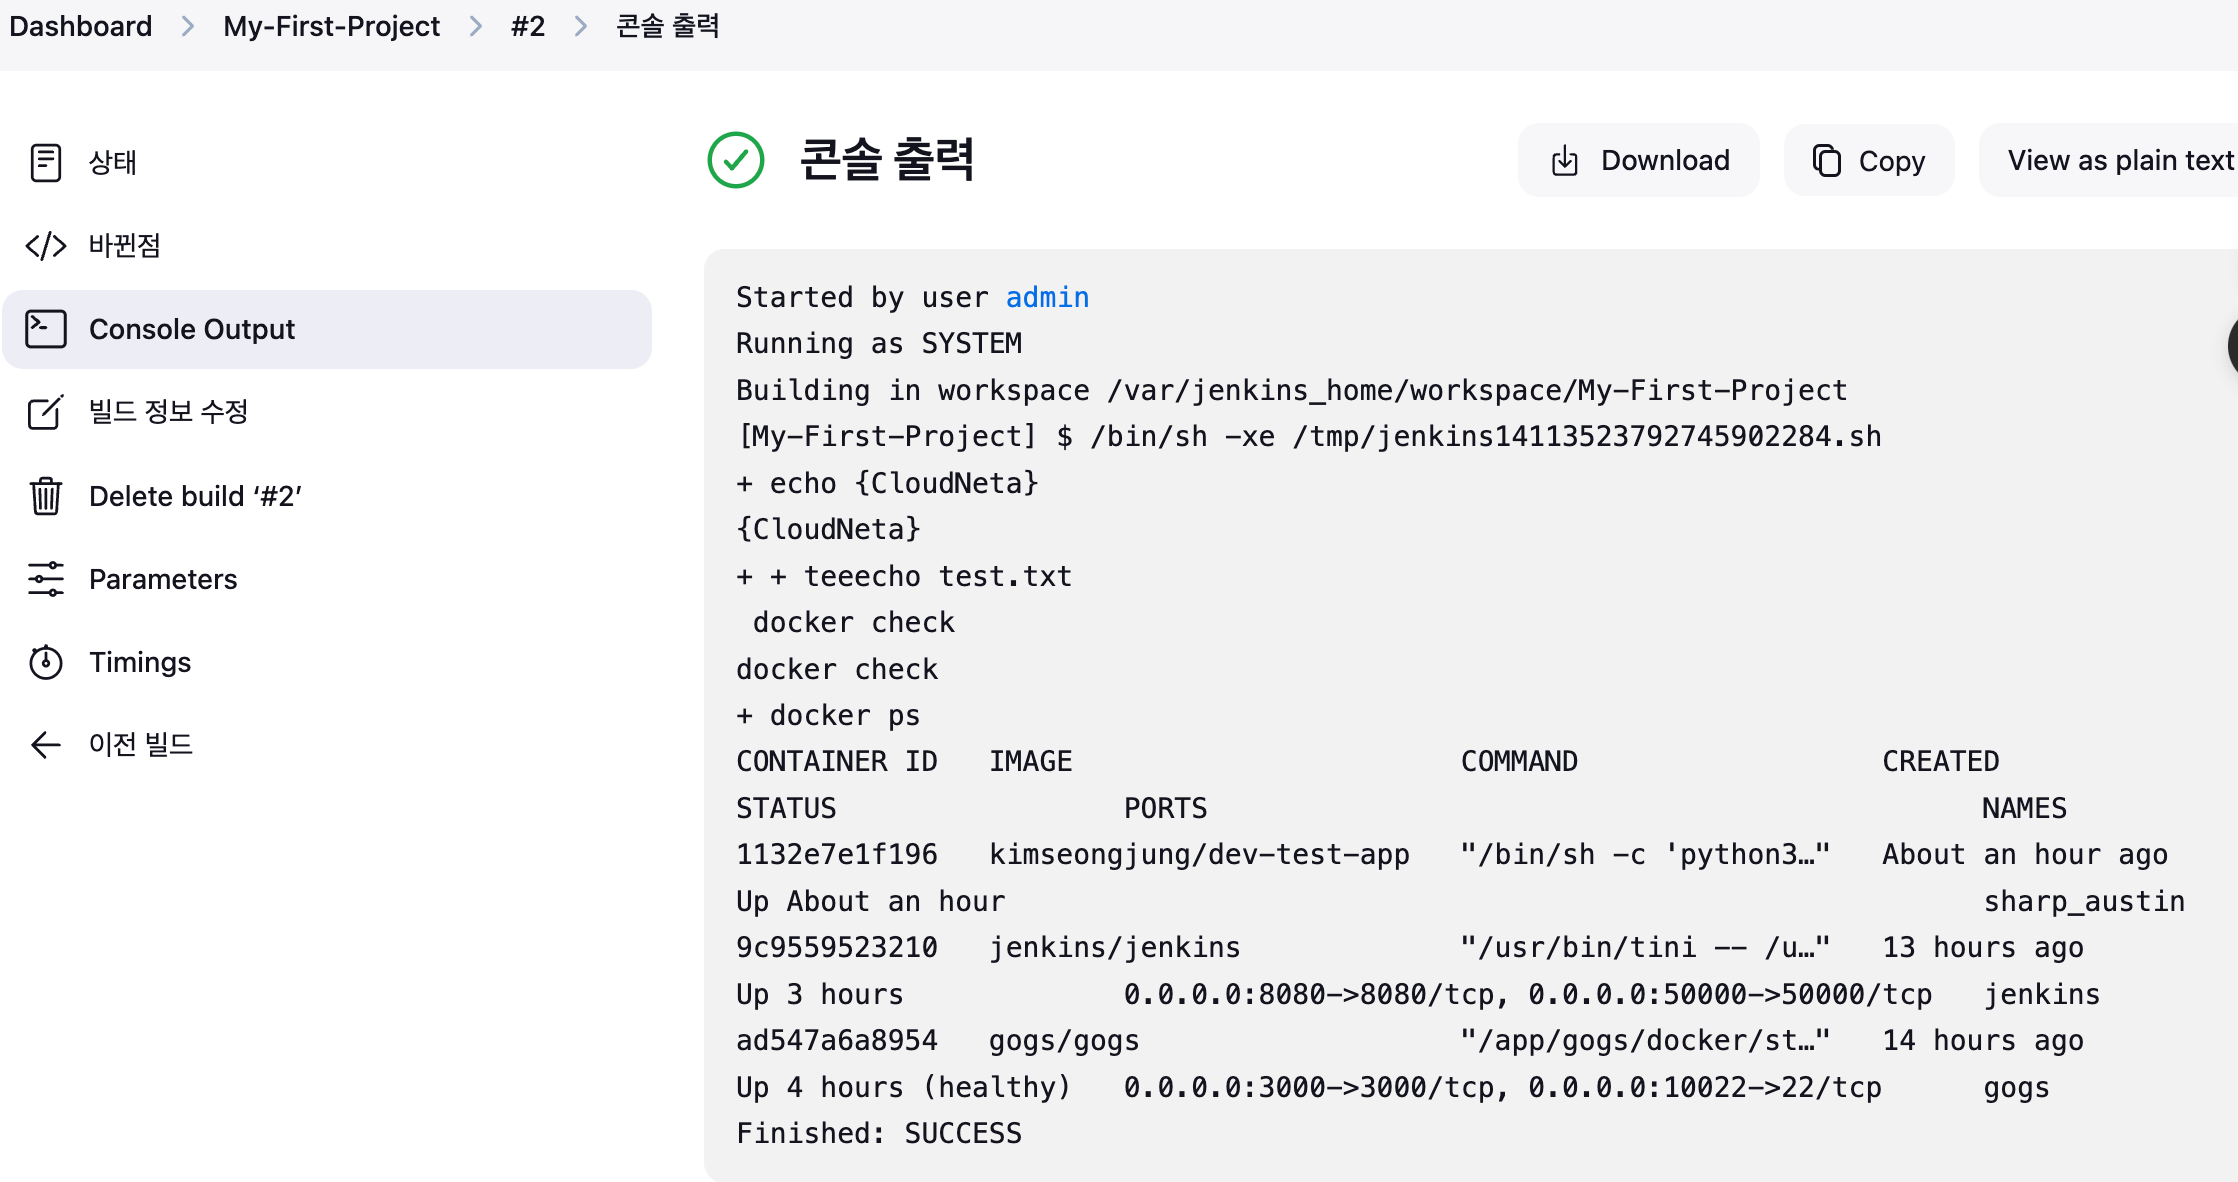
- Item 이름별 작업 공간 workspace 확인

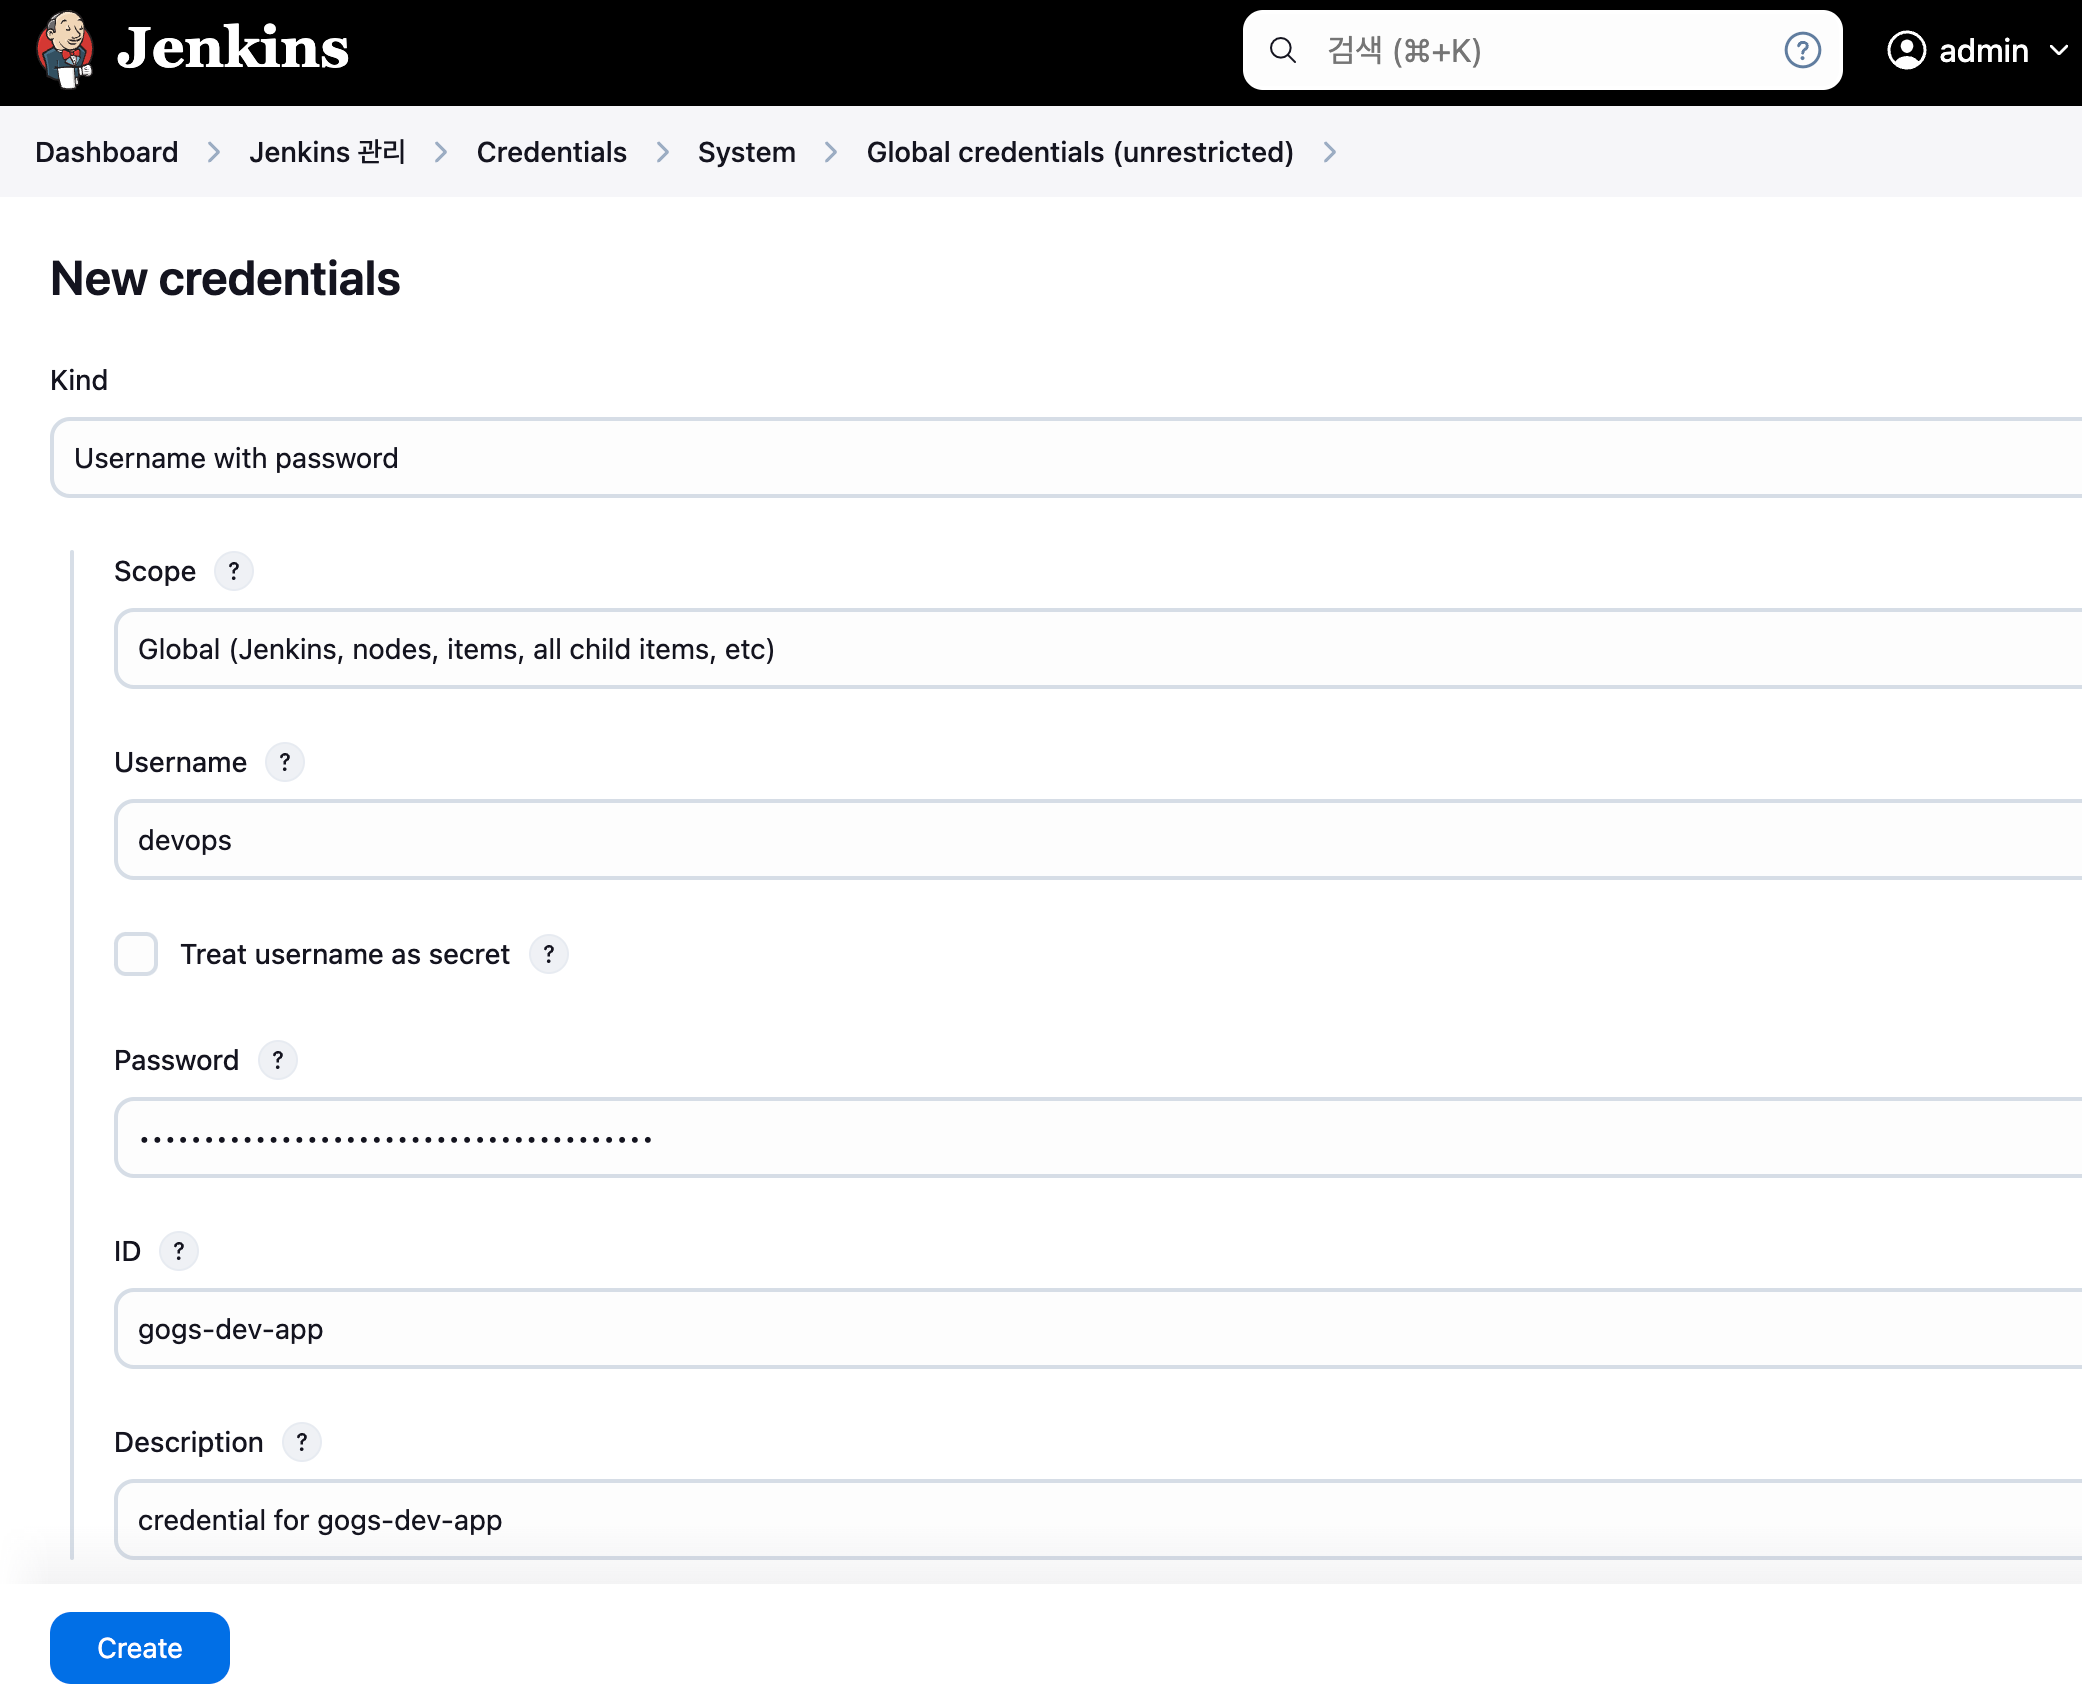
4.4 Gogs Repo 자격증명 설정(gogs-dev-app)
- Jenkins 관리 → Credentials → Globals → Add Credentials
- Kind : Username with password
- Username : devops
- Password : <Gogs dev-app 토큰>
- ID : gogs-dev-app
4.5 Jenkins Item 생성
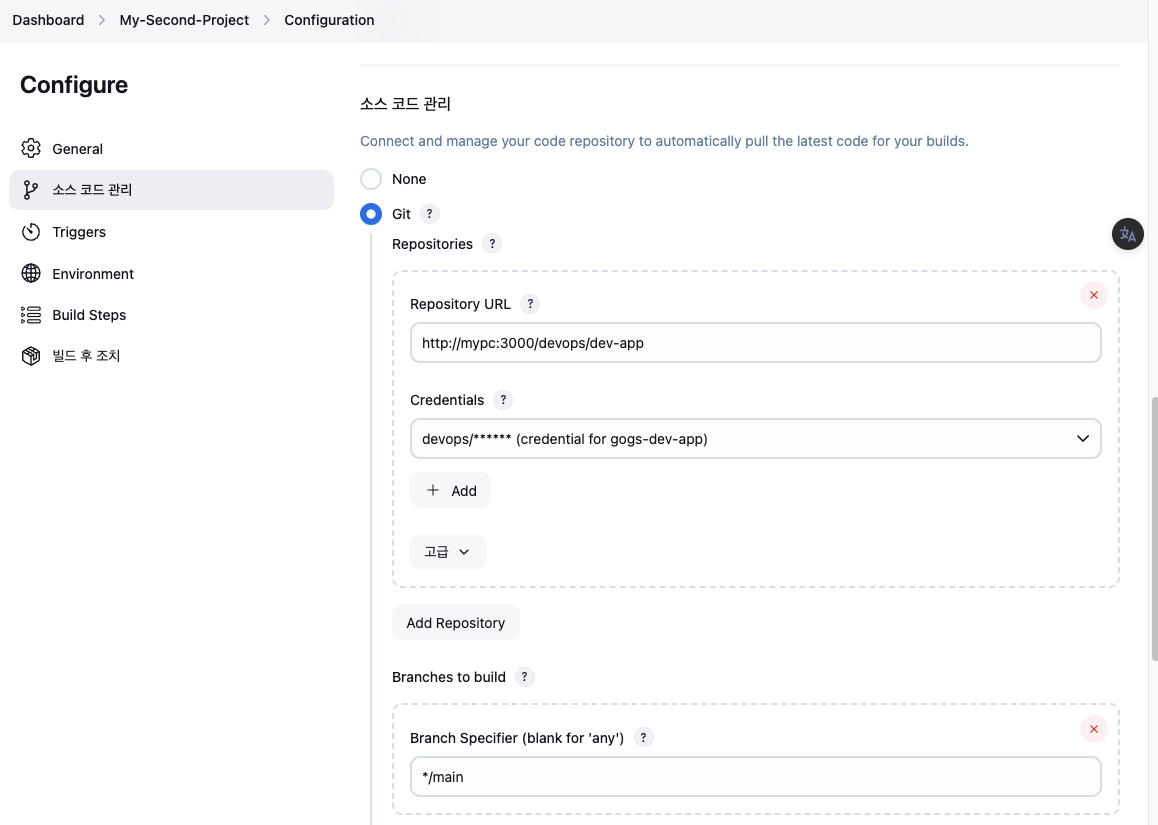
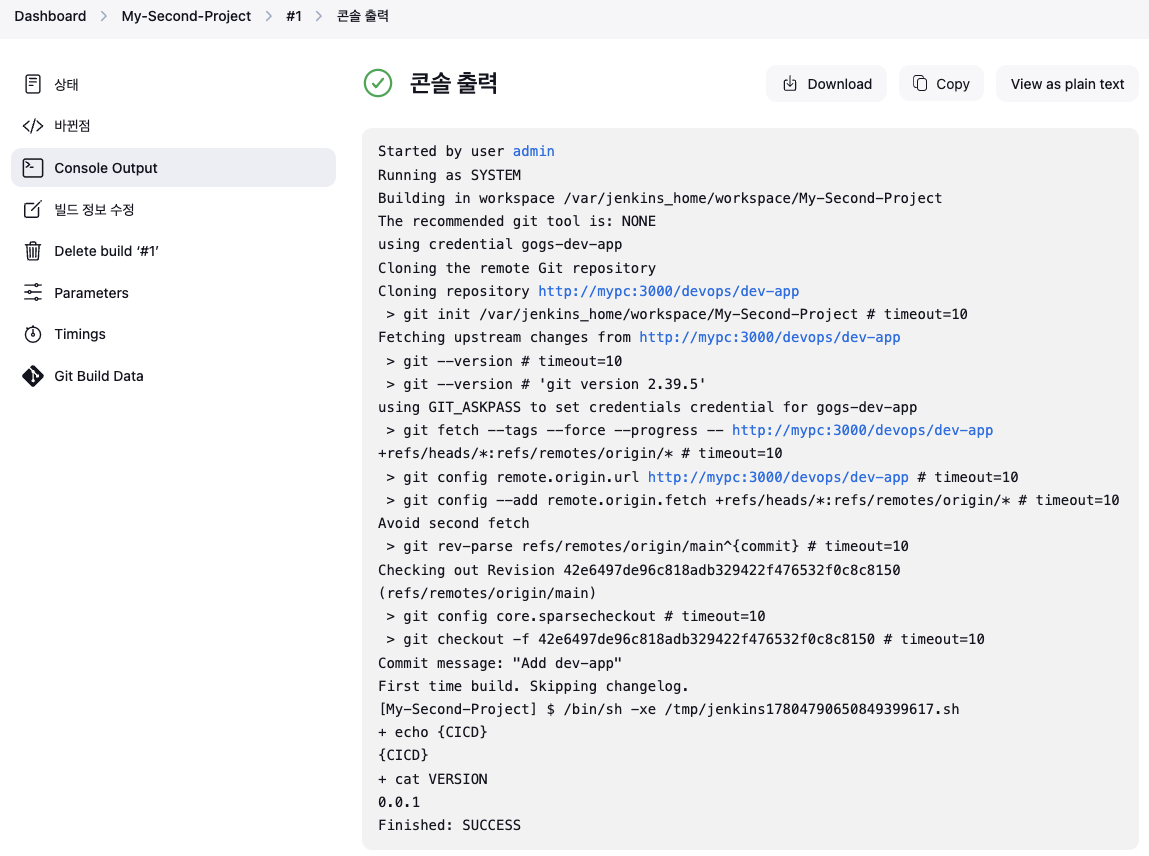
- item name(second) - 소스코드관리(Git) 설정 + 빌드 파라미터
- 이 빌드는 매개변수가 있습니다 String Parameter 클릭 : 매개변수 명(FirstPara) , Default Value(CICD)
- 소스코드관리 : Git 선택
- Repository URL :
http://***<mac IP>***:3000/***<Gogs 계정명>***/dev-app← .git 은 제거 - Credentials +Add 클릭(Jenkins :
- Branches to build (Branch Specifier) :
*/main
- Repository URL :
- Build Steps : Execute shell
echo "{$FirstPara}"
cat VERSION-
Save 후 ‘파라미터와 함께 빌드’
-
Console Output 확인 : 과정 동작 확인
-
Item 이름별 작업 공간 workspace 확인
docker compose exec jenkins ls /var/jenkins_home/workspace
docker compose exec jenkins tree /var/jenkins_home/workspace/second
docker compose exec jenkins ls -l /var/jenkins_home/workspace/second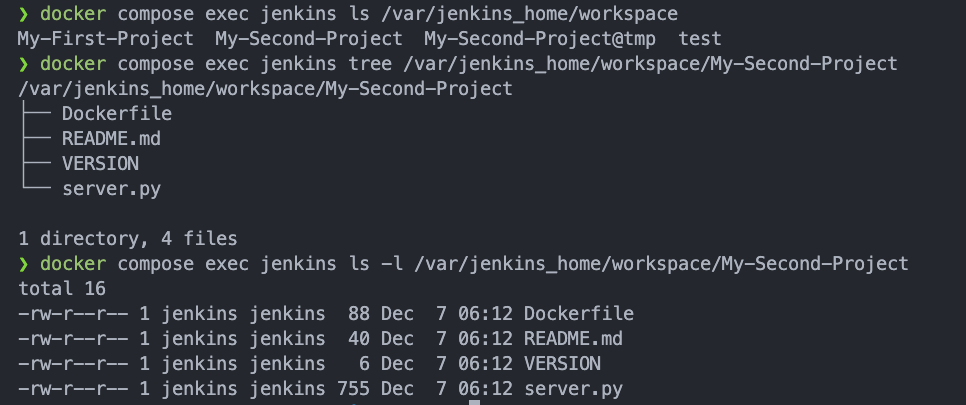
4.6 Jenkins 파이프라인 설정
- Jenkins Plugin 설치 , Jenkins 도커 계정/암호 자격 증명 설정
- Jenkins Plugin 설치
해결방법
$ docker compose exec gogs sh
$ vi /data/gogs/conf/app.ini 구성 파일을 수정하고
LOCAL_NETWORK_ALLOWLIST Local IP 주소를 콤마로 구분하여 추가한 후 서비스를 다시 시작하세요.
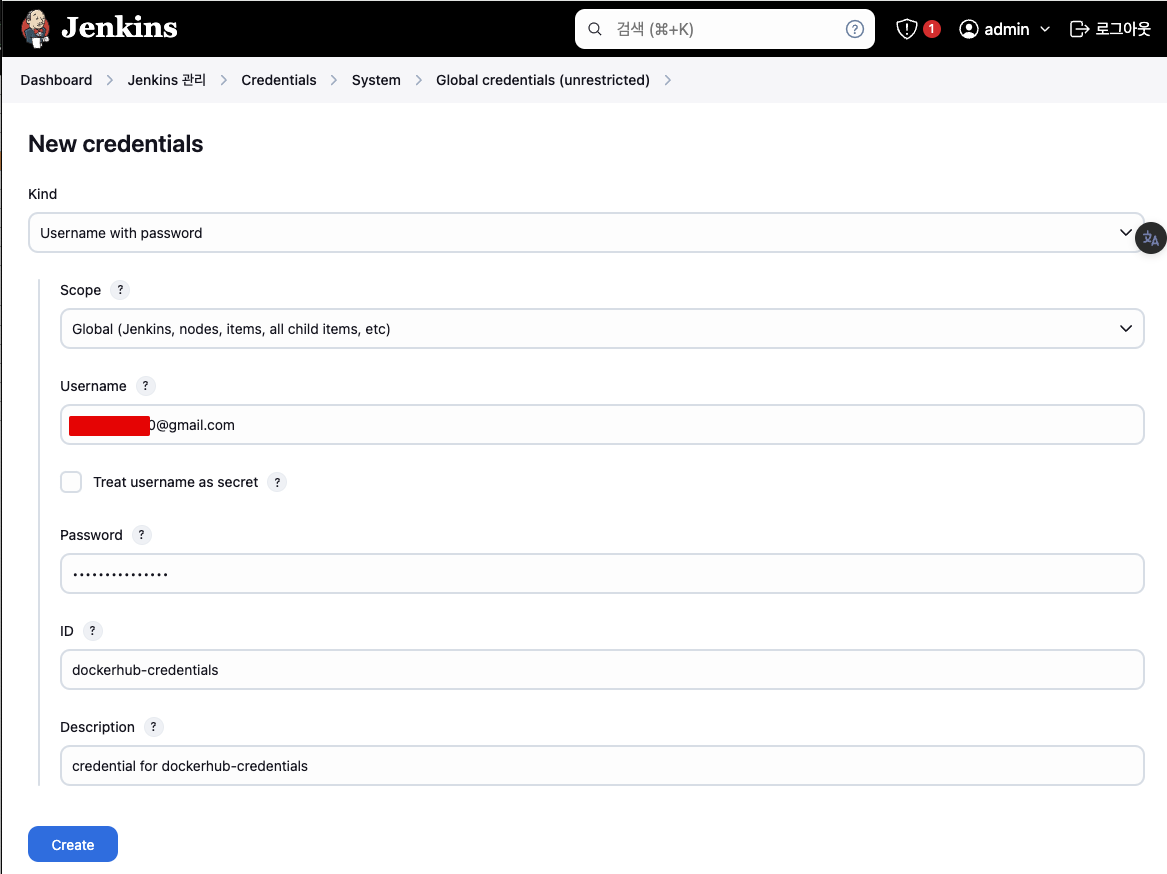
- Jenkins 도커 계정/암호 자격 증명 설정 : Add Credentials(Global) - Kind(Username with password)
- Username : <도커 계정명>
- Password : <도커 계정 암호
혹은 토큰> - ID : dockerhub-credentials ⇒ 자격증명 이름으로, pipeline 사용 예정
4.7 파이프라인 설정
-
CD 파이프라인을 구현하고 통합할 때 사용하는 플러그인 스크립트 모음
-
파이프라인 장점
- 코드 : 애플리케이션 CI/CD 프로세스를 코드 형식으로 작성할 수 있고, 해당 코드를 중앙 리포지터리에 저장하여 팀원과 공유 및 작업 가능
- 내구성 : 젠킨스 서비스가 의도적으로 또는 우발적으로 재시작되더라도 문제없이 유지됨
- 일시 중지 가능 : 파이프라인을 실행하는 도중 사람의 승인이나 입력을 기다리기 위해 중단하거나 기다리는 것이 가능
- 다양성 : 분기나 반복, 병렬 처리와 같은 다양한 CI/CD 요구 사항을 지원
-
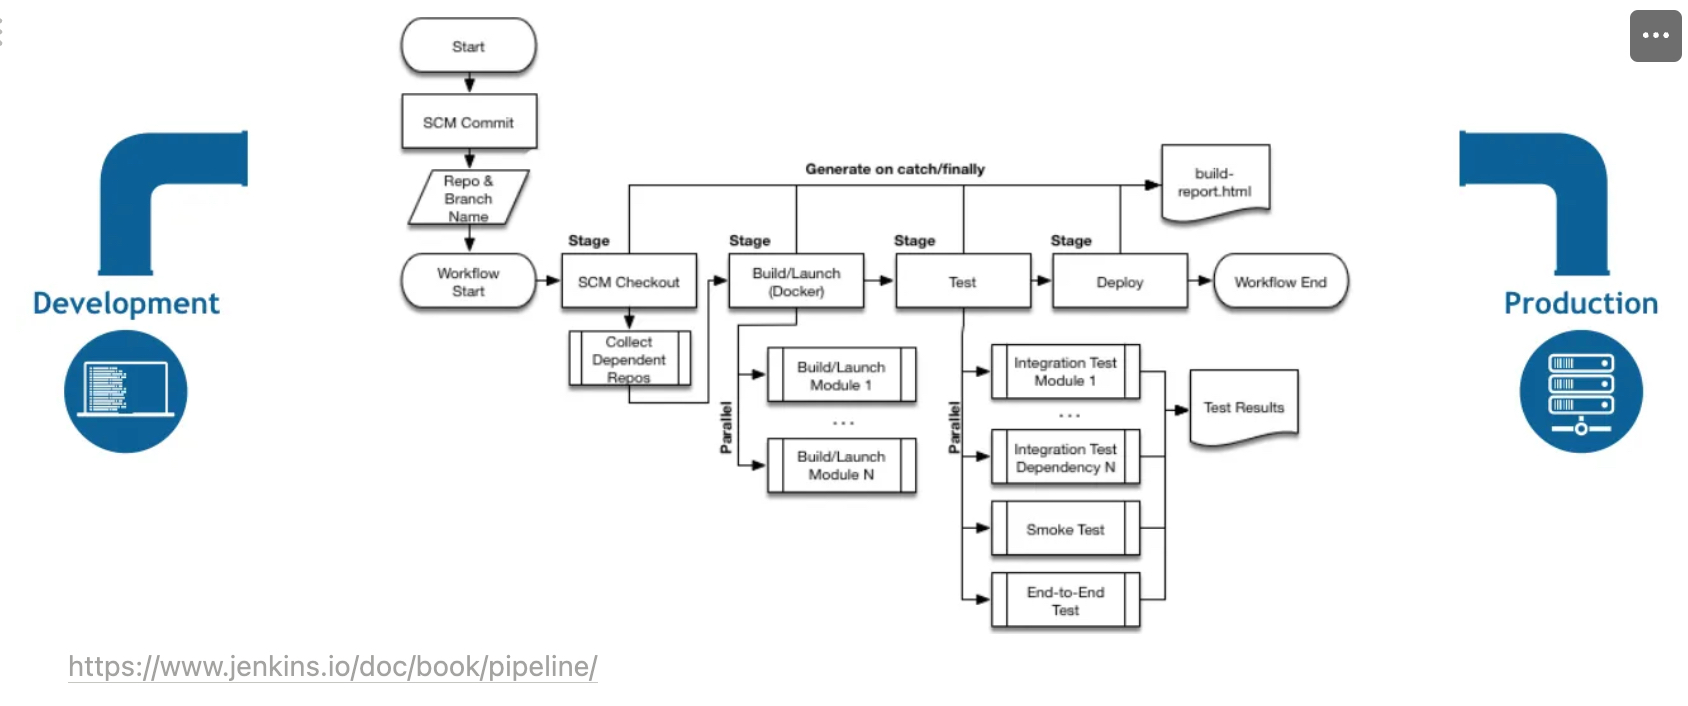
파이프라인 용어
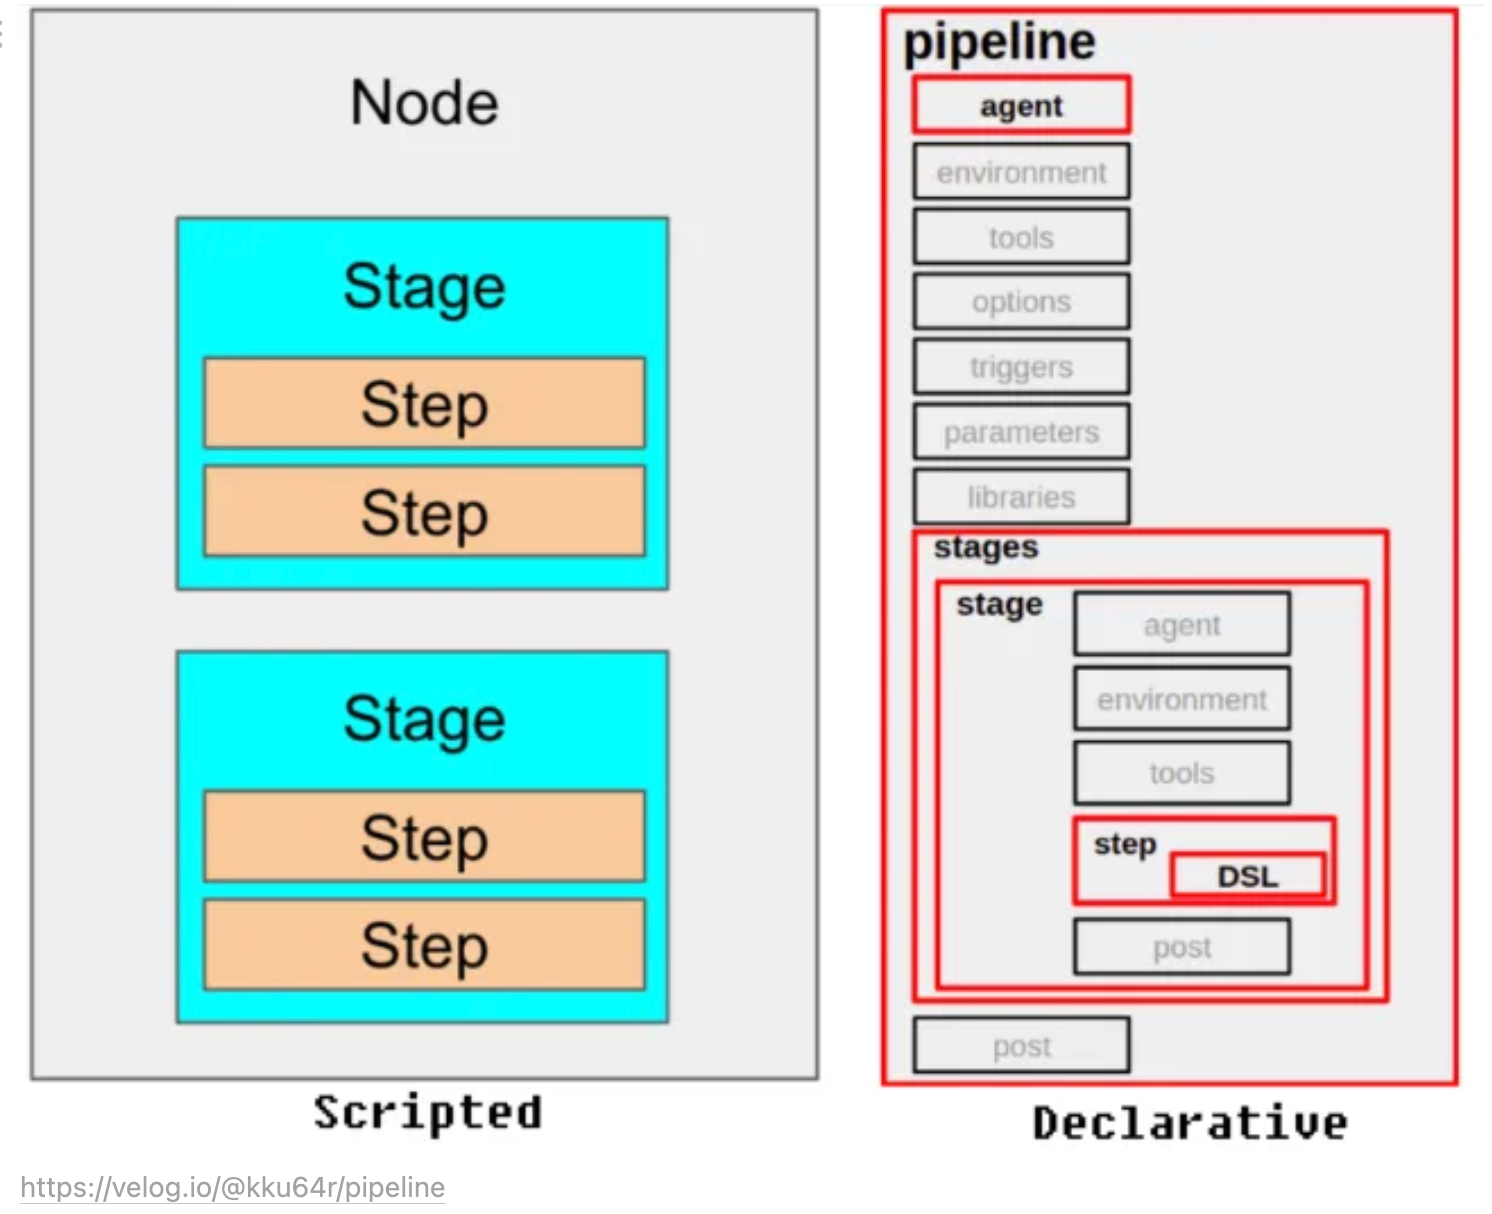
- 파이프라인 : 전체 빌드 프로세스를 정의하는 코드.
- 노드 node = Agent : 파이프라인을 실행하는 시스템
- Stages : 순차 작업 명세인 stage 들의 묶음
- stage : 특정 단계에서 수행되는 작업들의 정의. (옵션) agents 설정
- steps : 파이프라인의 특정 단계에서 수행되는 단일 작업을 의미.
- post : 빌드 후 조치, 일반적으로 stages 작업이 끝난 후 추가적인 steps/step
- Directive : environment, parameters, triggers, input, when Docs
- environment (key=value) : 파이프라인 내부에서 사용할 환경변수
- parameters : 입력 받아야할 변수를 정의 - Type(string, text, choice, password …)
- when : stage 를 실행 할 조건 설정
-
파이프라인 3가지 구성 형태
- Pipeline script : 일반적인 방식으로 Jenkins 파이프라인을 생성하여 Shell Script를 직접 생성하여 빌드하는 방식
- Through the classic UI - you can enter a basic Pipeline directly in Jenkins through the classic UI.
- Pipeline script from SCM : 사전 작성한 JenkinsFile을 형상관리 저장소에 보관하고, 빌드 시작 시 파이프라인 프로젝트에서 호출 실행하는 방식
- In SCM - you can write a
Jenkinsfilemanually, which you can commit to your project’s source control repository.
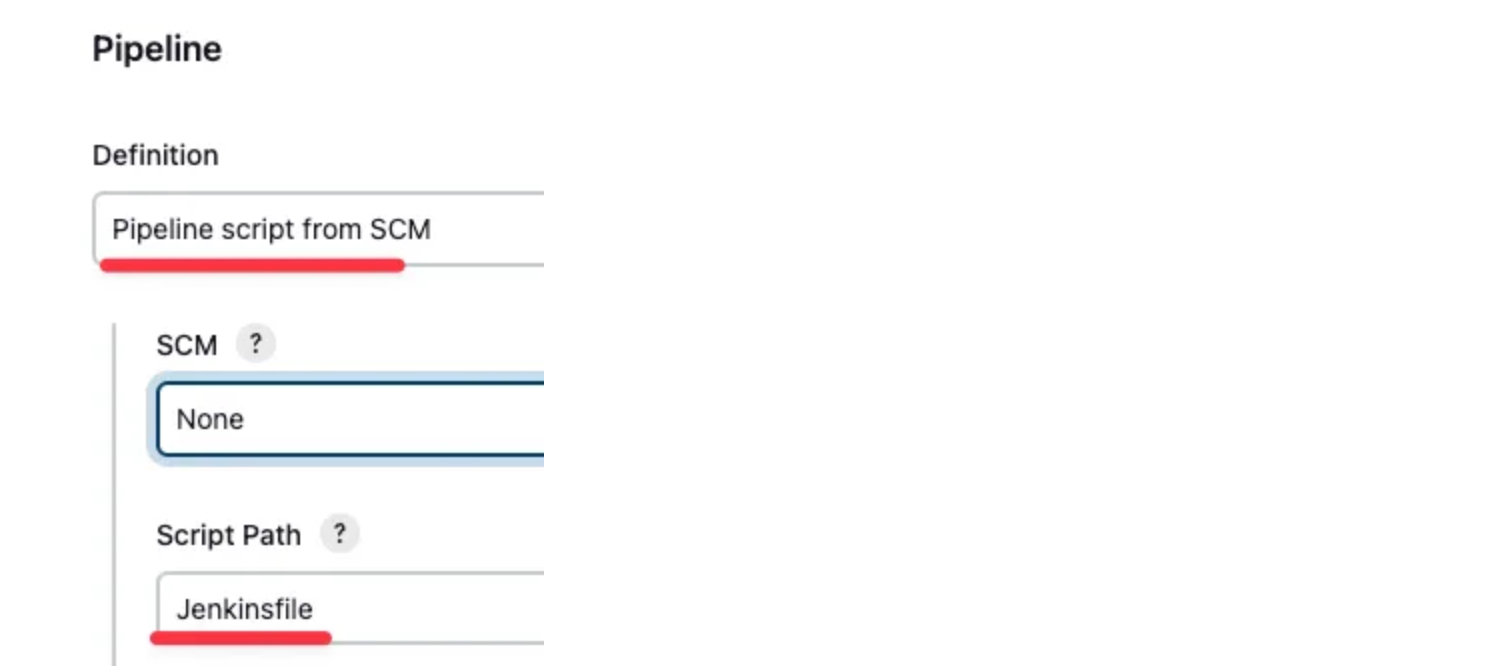
- In SCM - you can write a
- Blue Ocean 기반 : UI기반하여 시각적으로 파이프라인을 구성하면, JenkinsFile이 자동으로 생성되어 실행되는 방식
- Through Blue Ocean - after setting up a Pipeline project in Blue Ocean, the Blue Ocean UI helps you write your Pipeline’s
Jenkinsfileand commit it to source control.
- Through Blue Ocean - after setting up a Pipeline project in Blue Ocean, the Blue Ocean UI helps you write your Pipeline’s
- Pipeline script : 일반적인 방식으로 Jenkins 파이프라인을 생성하여 Shell Script를 직접 생성하여 빌드하는 방식
-
파이프라인 2가지 구문 : 선언형 파이프라인(권장)과 스크립트형 파이프라인
- 선언형 파이프라인 : 쉽게 작성 가능, 최근 문법이고 젠킨스에서 권장하는 방법, step 필수!
- 스크립트형 파이프라인 : 커스텀 작업에 용이, 복잡하여 난이도가 높음, step은 필수 아님
-
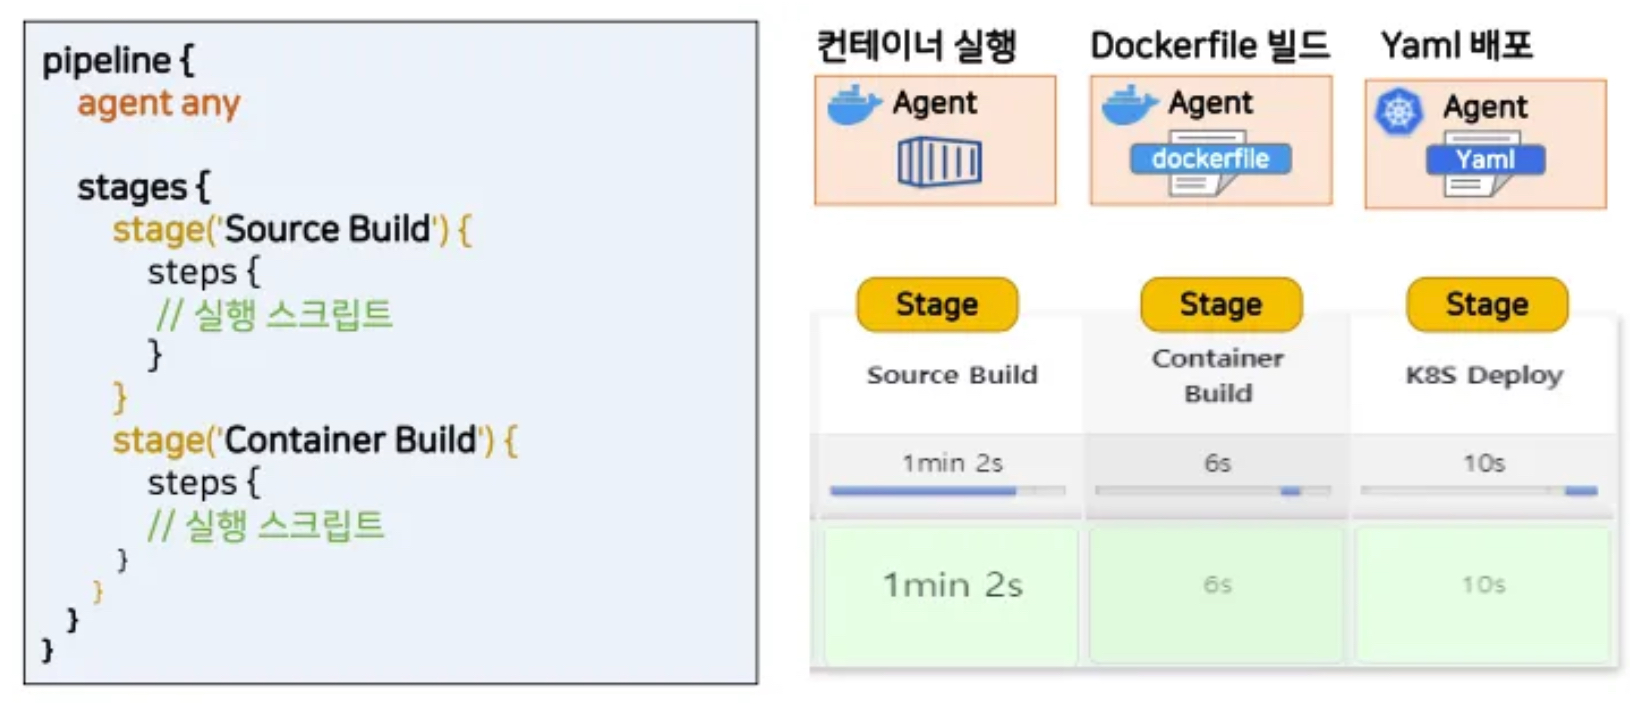
선언형 Declarative 파이프라인
pipeline {
    agent any     # Execute this Pipeline or any of its stages, on any available agent.
    stages {
        stage('Build') {   # Defines the "Build" stage.
            steps {
                //         # Perform some steps related to the "Build" stage.
            }
        }
        stage('Test') {
            steps {
                //
            }
        }
        stage('Deploy') {
            steps {
                //
            }
        }
    }
}- 스크립트형 Scripted 파이프라인
node {          # 	Execute this Pipeline or any of its stages, on any available agent.
    stage('Build') {    # Defines the "Build" stage. stage blocks are optional in Scripted Pipeline syntax. However, implementing stage blocks in a Scripted Pipeline provides clearer visualization of each stage's subset of tasks/steps in the Jenkins UI.
        //              # Perform some steps related to the "Build" stage.
    }
    stage('Test') {
        //
    }
    stage('Deploy') {
        //
    }
}
4.8 Jenkins Pipeline
-
Item : First-Pipeline -> Pipeline (Pipeline script - 아래 내용 복붙)
-
먼저 샘플 파이프라인 테스트
-
아래 처럼 수정 후 확인: 환경변수 사용, 문자열 보간 → Console Output 확인
 pipeline {
  agent any
  environment {
      CC = 'clang'
  }

  stages {
      stage('Example') {
          environment {
              AN_ACCESS_KEY = 'abcdefg'
          }
          steps {
              echo "${CC}";
              sh 'echo ${AN_ACCESS_KEY}'
          }
      }
  }
}
-
아래 처럼 수정 후 확인: 파이프라인 빌드 시작(트리거) → Console Output 확인
pipeline { agent any triggers { cron('H */4 * * 1-5') } stages { stage('Example') { steps { echo 'Hello World' } } } } -
아래 처럼 수정 후 확인: 파라미터와 함께 빌드 → Console Output 확인 ⇒ 다시 한번 더 빌드 클릭 (변수 입력 칸 확인)
pipeline { agent any parameters { string(name: 'PERSON', defaultValue: 'Mr Jenkins', description: 'Who should I say hello to?') text(name: 'BIOGRAPHY', defaultValue: '', description: 'Enter some information about the person') booleanParam(name: 'TOGGLE', defaultValue: true, description: 'Toggle this value') choice(name: 'CHOICE', choices: ['One', 'Two', 'Three'], description: 'Pick something') password(name: 'PASSWORD', defaultValue: 'SECRET', description: 'Enter a password') } stages { stage('Example') { steps { echo "Hello ${params.PERSON}" echo "Biography: ${params.BIOGRAPHY}" echo "Toggle: ${params.TOGGLE}" echo "Choice: ${params.CHOICE}" echo "Password: ${params.PASSWORD}" } } } } -
아래 처럼 수정 후 확인: post (빌드 후 조치) → Console Output 확인
- always: 항상 실행
- changed: 현재 빌드의 상태가 이번 빌드의 상태와 달라졌다면 실행
- success: 현재 빌드가 성공했다면 실행
- failure: 현재 빌드가 실패했다면 실행
- unstable: 현재 빌드의 상태가 불안하다면 실행
pipeline { agent any stages { stage('Example') { steps { echo 'Hello World' } } } post { always { echo 'I will always say Hello again!' } } } -
아래 처럼 수정 후 확인
pipeline {
  agent any
  stages {
      stage('Compile') {
          steps {
              echo "Compiled successfully!";
          }
      }

      stage('JUnit') {
          steps {
              echo "JUnit passed successfully!";
          }
      }

      stage('Code Analysis') {
          steps {
              echo "Code Analysis completed successfully!";
          }
      }

      stage('Deploy') {
          steps {
              echo "Deployed successfully!";
          }
      }
  }
}
-
-
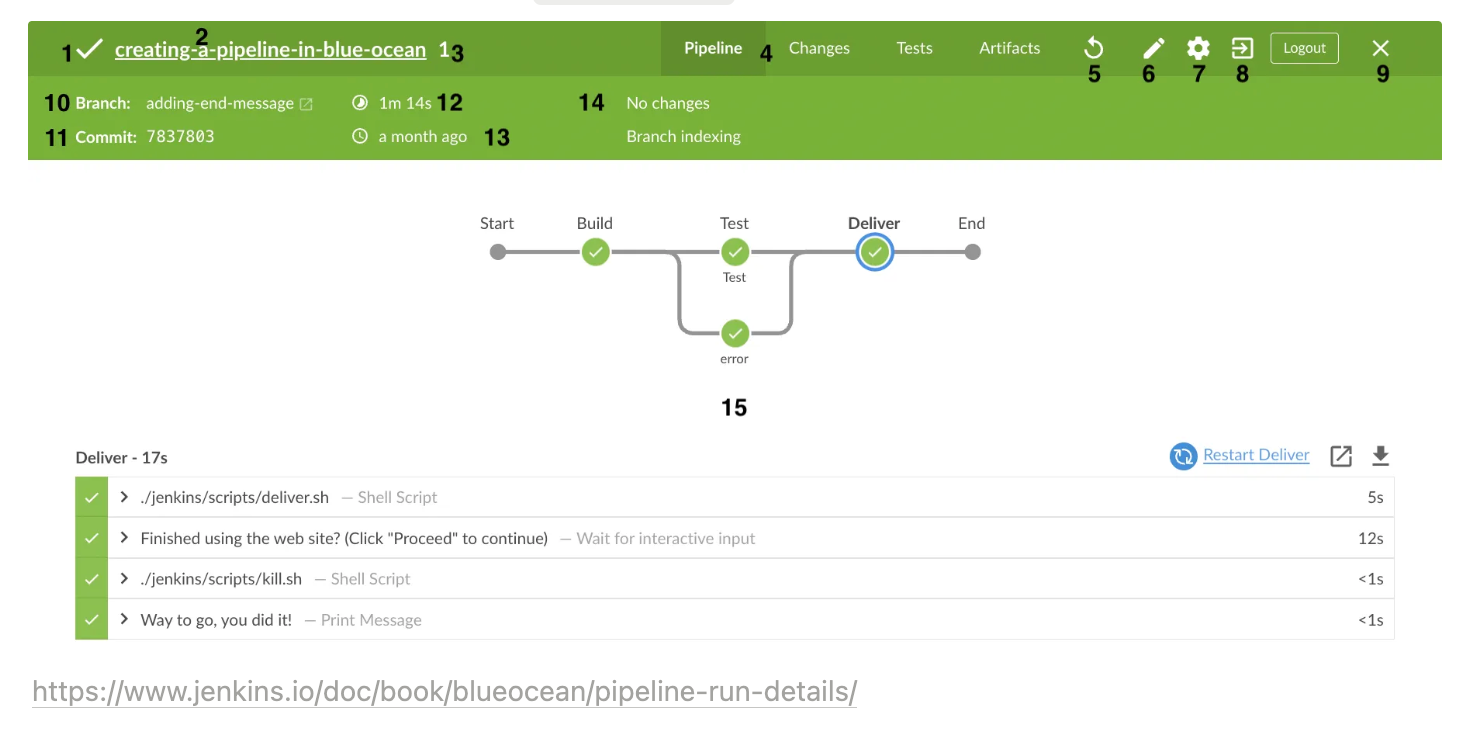
지금 빌드! : 빌드 단계 걸린 시간, 빌드 단계 별 로그
- Console Output 확인
-
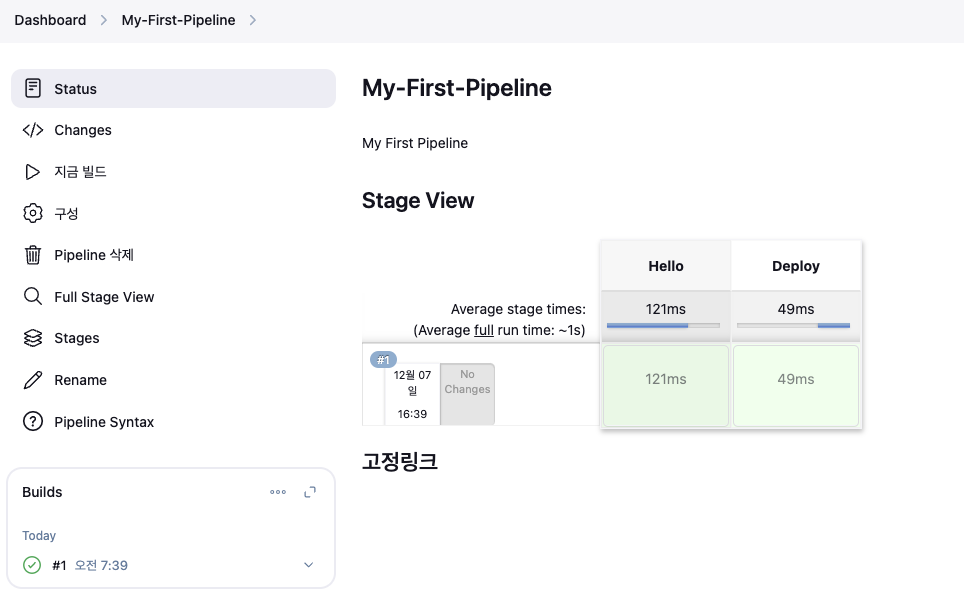
Item : My-First-Pipeline , Pipeline(Pipeline script - 아래 내용 추가 복붙) post 항목 : 빌드 성공 실패 등 메시지 출력
pipeline {
    agent any
    stages {
        stage('Compile') {
            steps {
                echo "Compiled successfully!";
            }
        }

        stage('JUnit') {
            steps {
                echo "JUnit passed successfully!";
            }
        }

        stage('Code Analysis') {
            steps {
                echo "Code Analysis completed successfully!";
            }
        }

        stage('Deploy') {
            steps {
                echo "Deployed successfully!";
            }
        }
    }

    post {
      always {
        echo "This will always run"
      }
      success {
        echo "This will run when the run finished successfully"
      }
      failure {
        echo "This will run if failed"
      }
      unstable {
        echo "This will run when the run was marked as unstable"
      }
      changed {
        echo "This will run when the state of the pipeline has changed"
      }
    }
}- 지금 빌드! : 빌드 실행 결과 정보 확인 - Declarative : Post Actions 항목 추가 확인 → 선택 후 logs 클릭 확인 ⇒ 상단에 결과 정보 확인
- Pipeline Syntax → Snippet Generator 스내펫 생성시 사용하기 ⇒ sample(sh), shell Script
4.9 Jenkins Item 생성(Pipeline) : item name(pipeline-ci)
- Pipeline script
pipeline {
agent any
environment {
DOCKER_IMAGE = '<자신의 도커 허브 계정>/dev-app' // Docker 이미지 이름
}
stages {
stage('Checkout') {
steps {
git branch: 'main',
url: 'http://mypc:3000/devops/dev-app.git', // Git에서 코드 체크아웃
credentialsId: 'gogs-dev-app' // Credentials ID
}
}
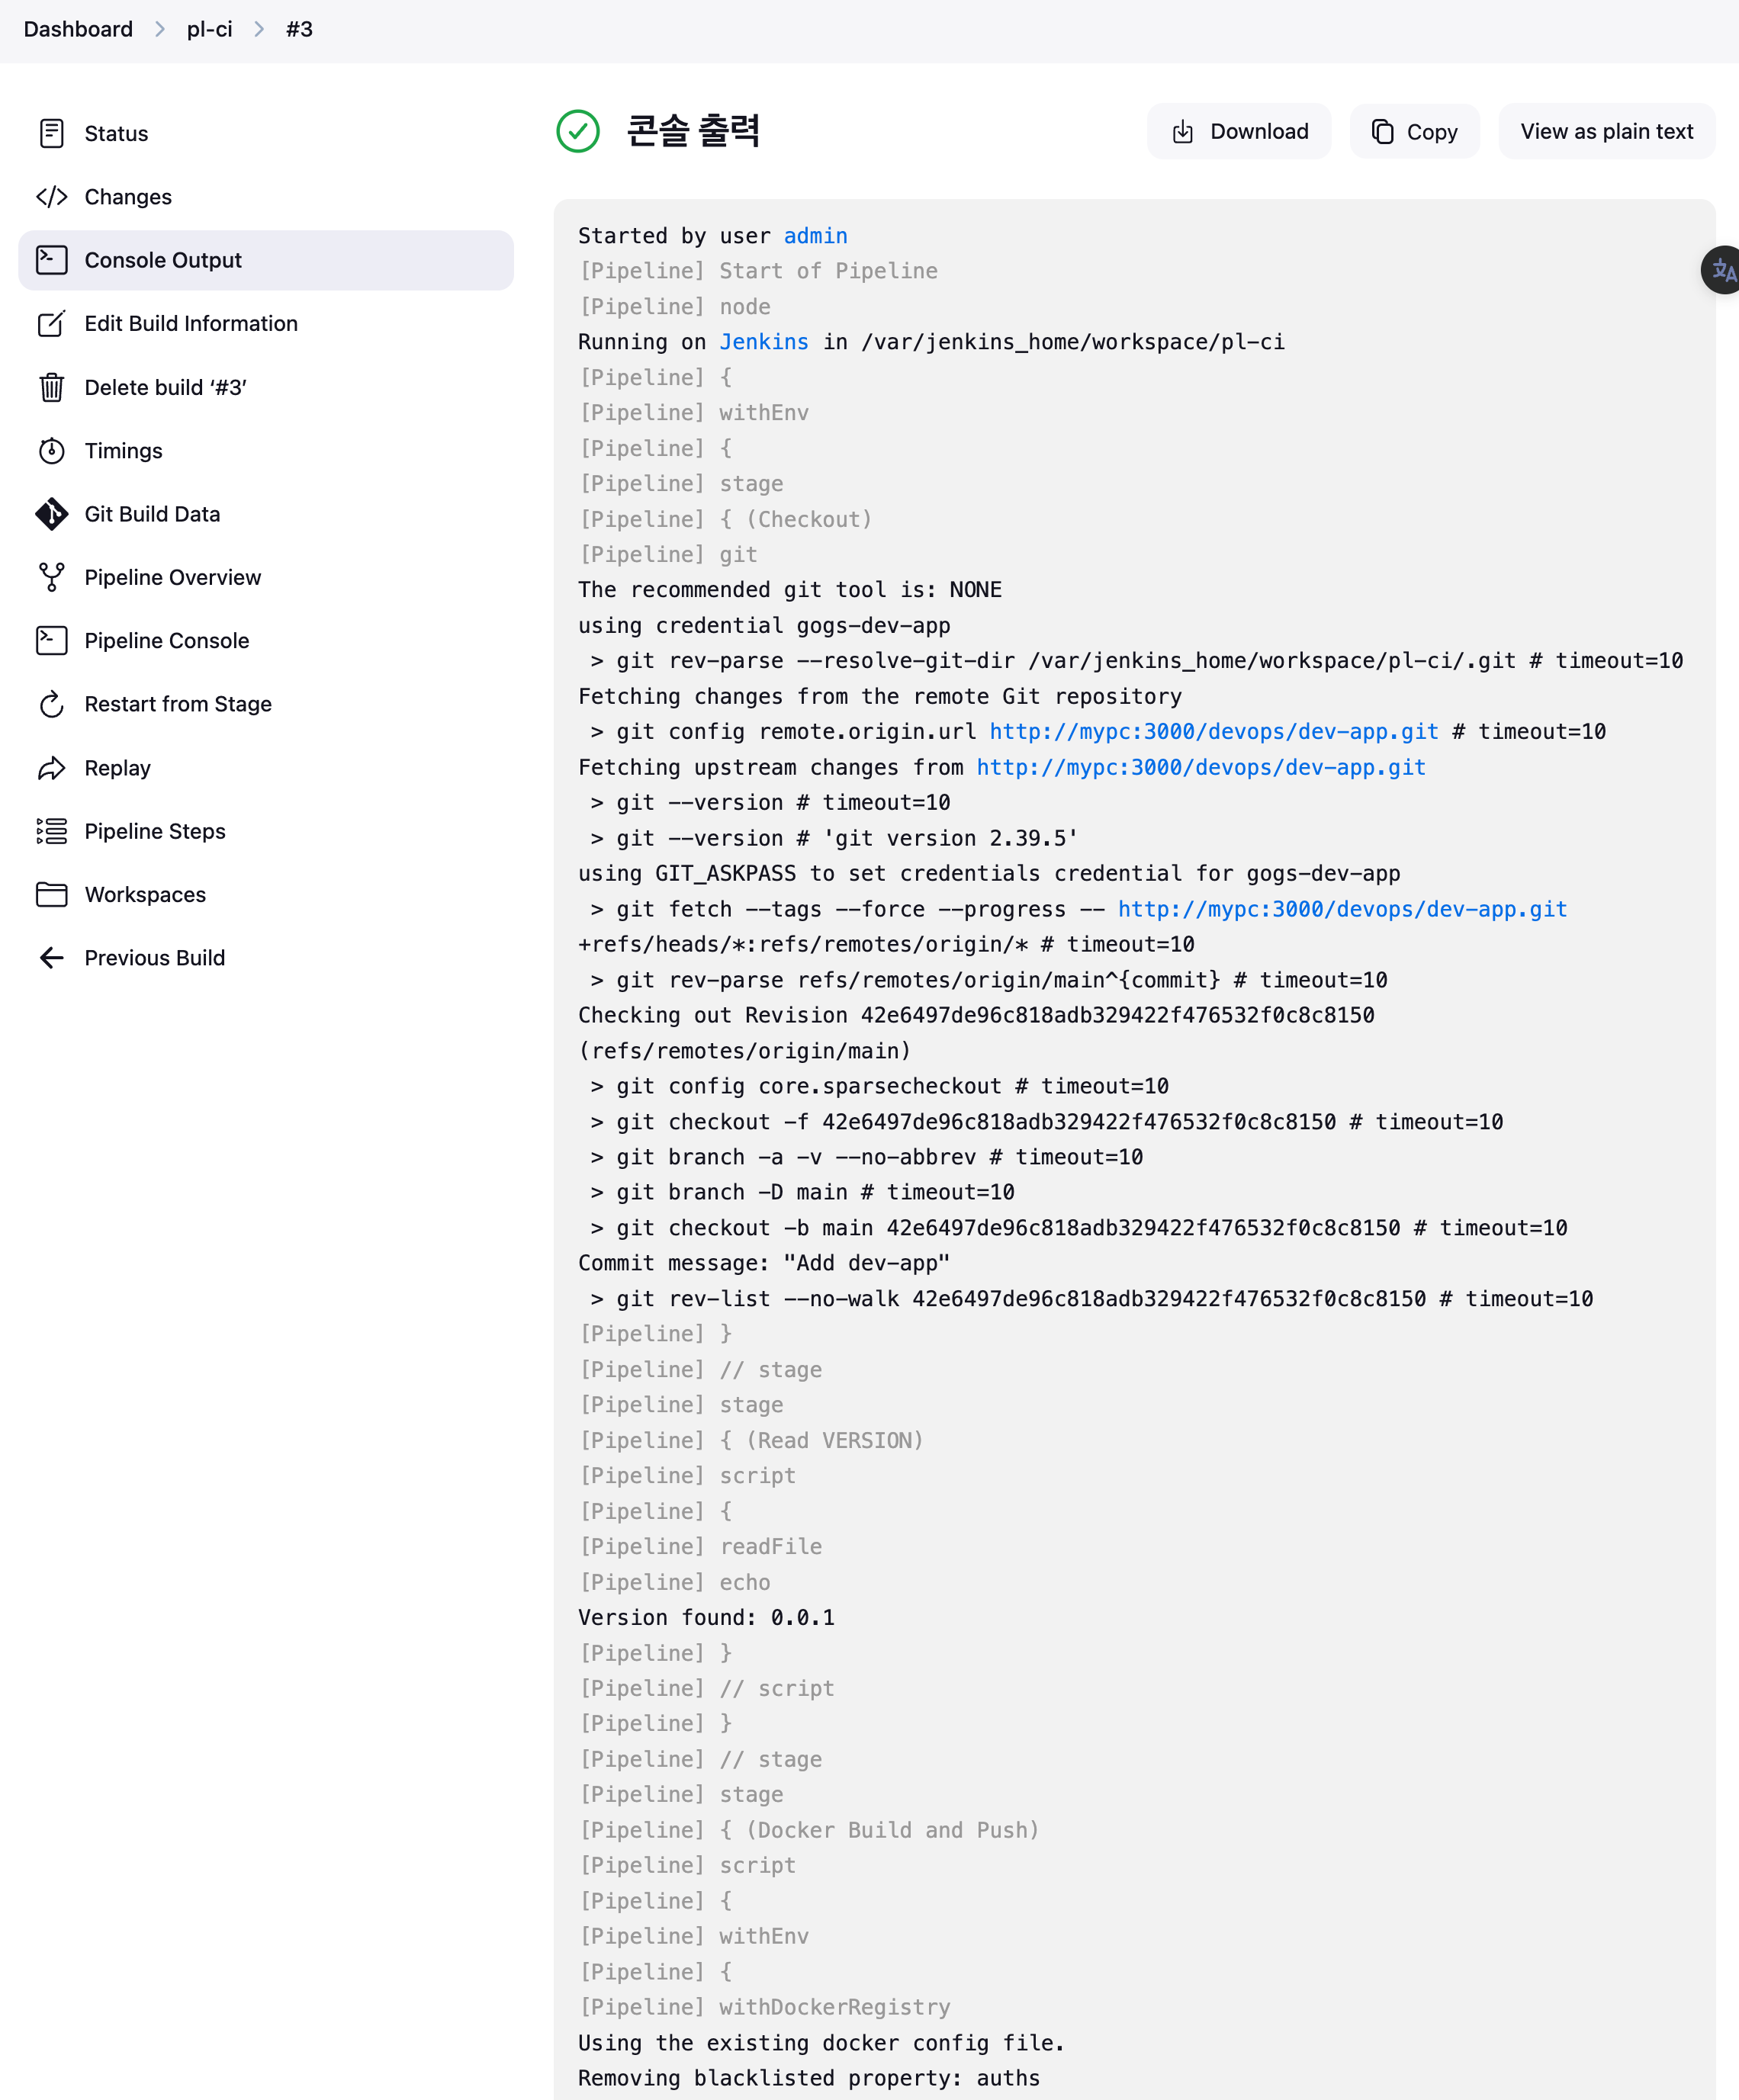
stage('Read VERSION') {
steps {
script {
// VERSION 파일 읽기
def version = readFile('VERSION').trim()
echo "Version found: ${version}"
// 환경 변수 설정
env.DOCKER_TAG = version
}
}
}
stage('Docker Build and Push') {
steps {
script {
docker.withRegistry('https://index.docker.io/v1/', 'dockerhub-credentials') {
// DOCKER_TAG 사용
def appImage = docker.build("${DOCKER_IMAGE}:${DOCKER_TAG}")
appImage.push()
}
}
}
}
}
post {
success {
echo "Docker image ${DOCKER_IMAGE}:${DOCKER_TAG} has been built and pushed successfully!"
}
failure {
echo "Pipeline failed. Please check the logs."
}
}
}
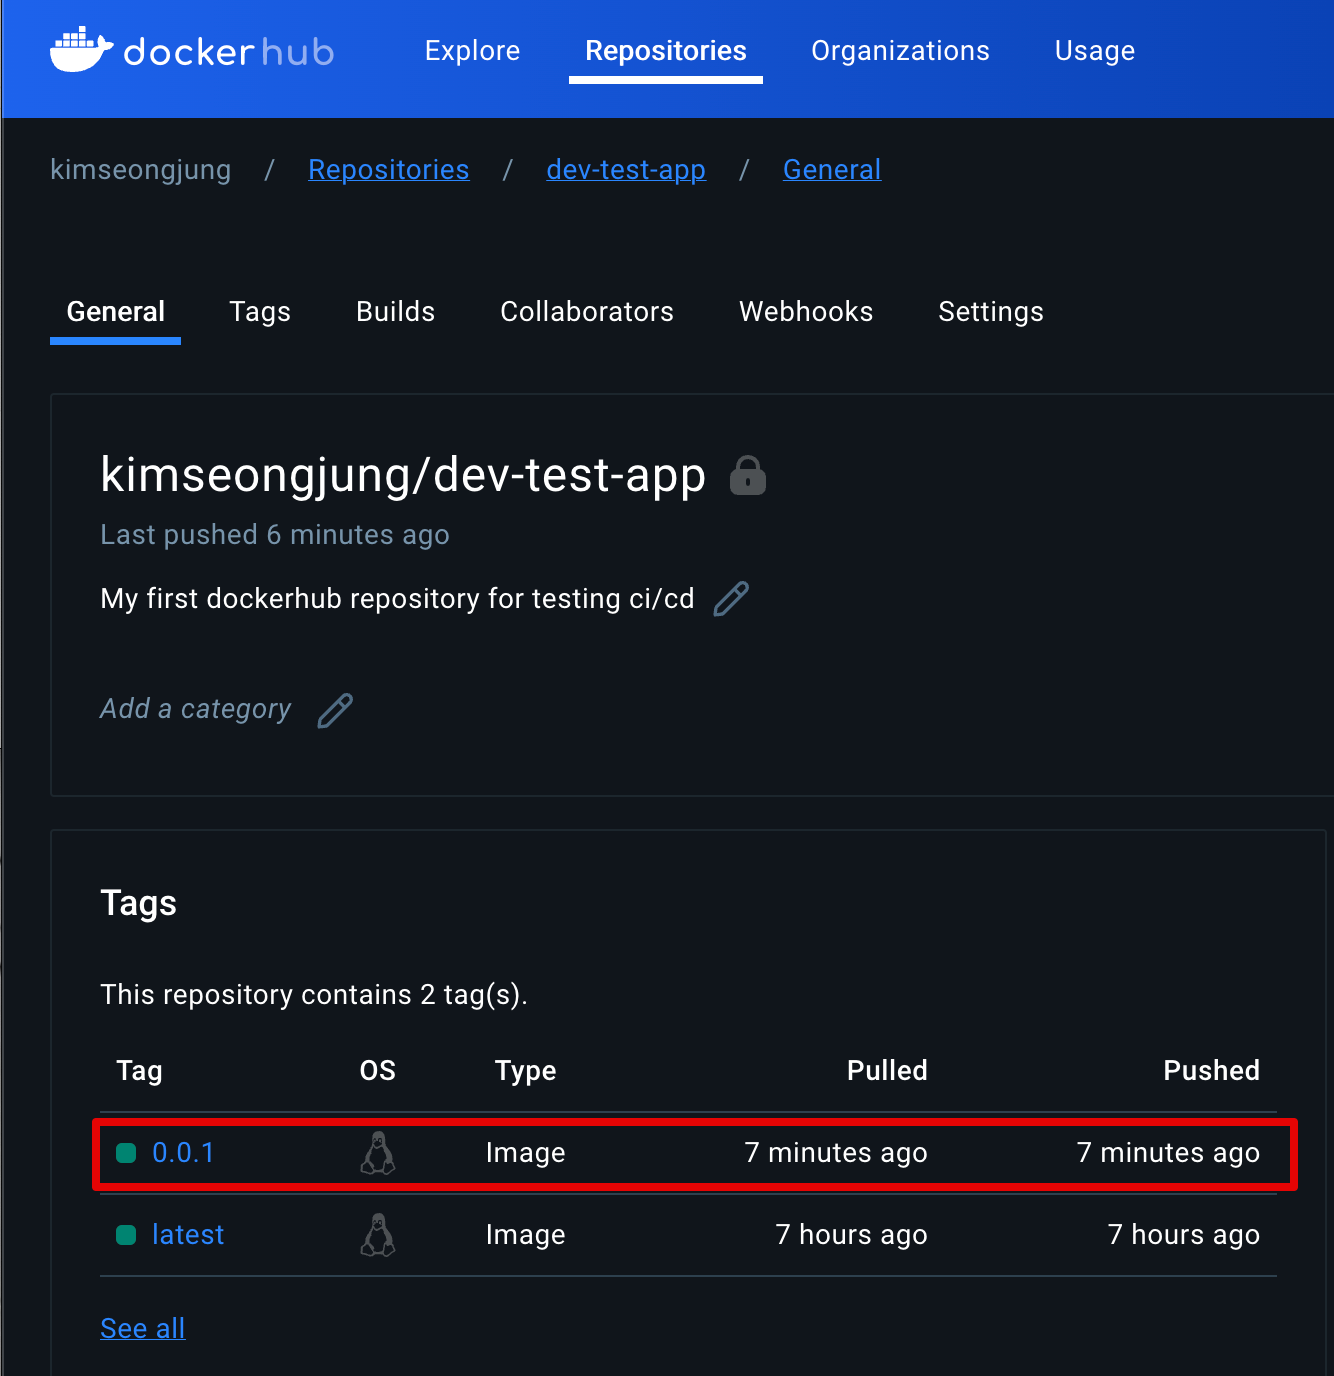
- 도커 허브 확인
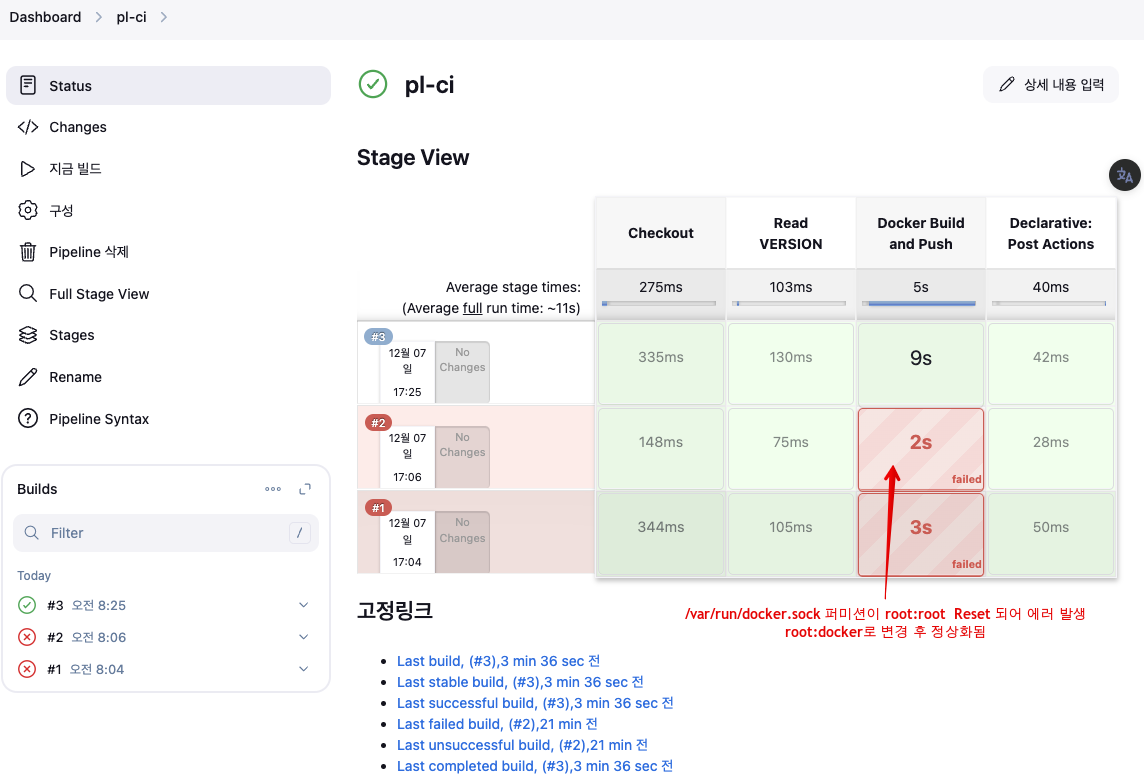
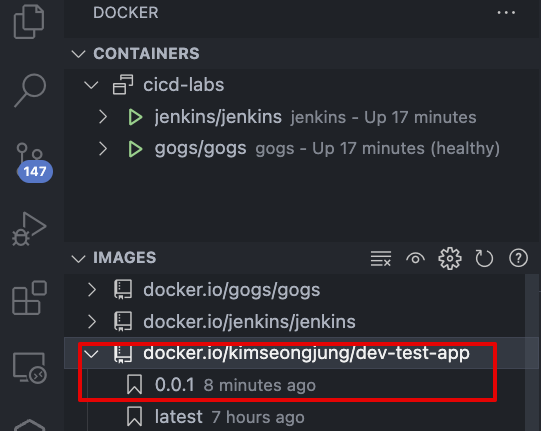
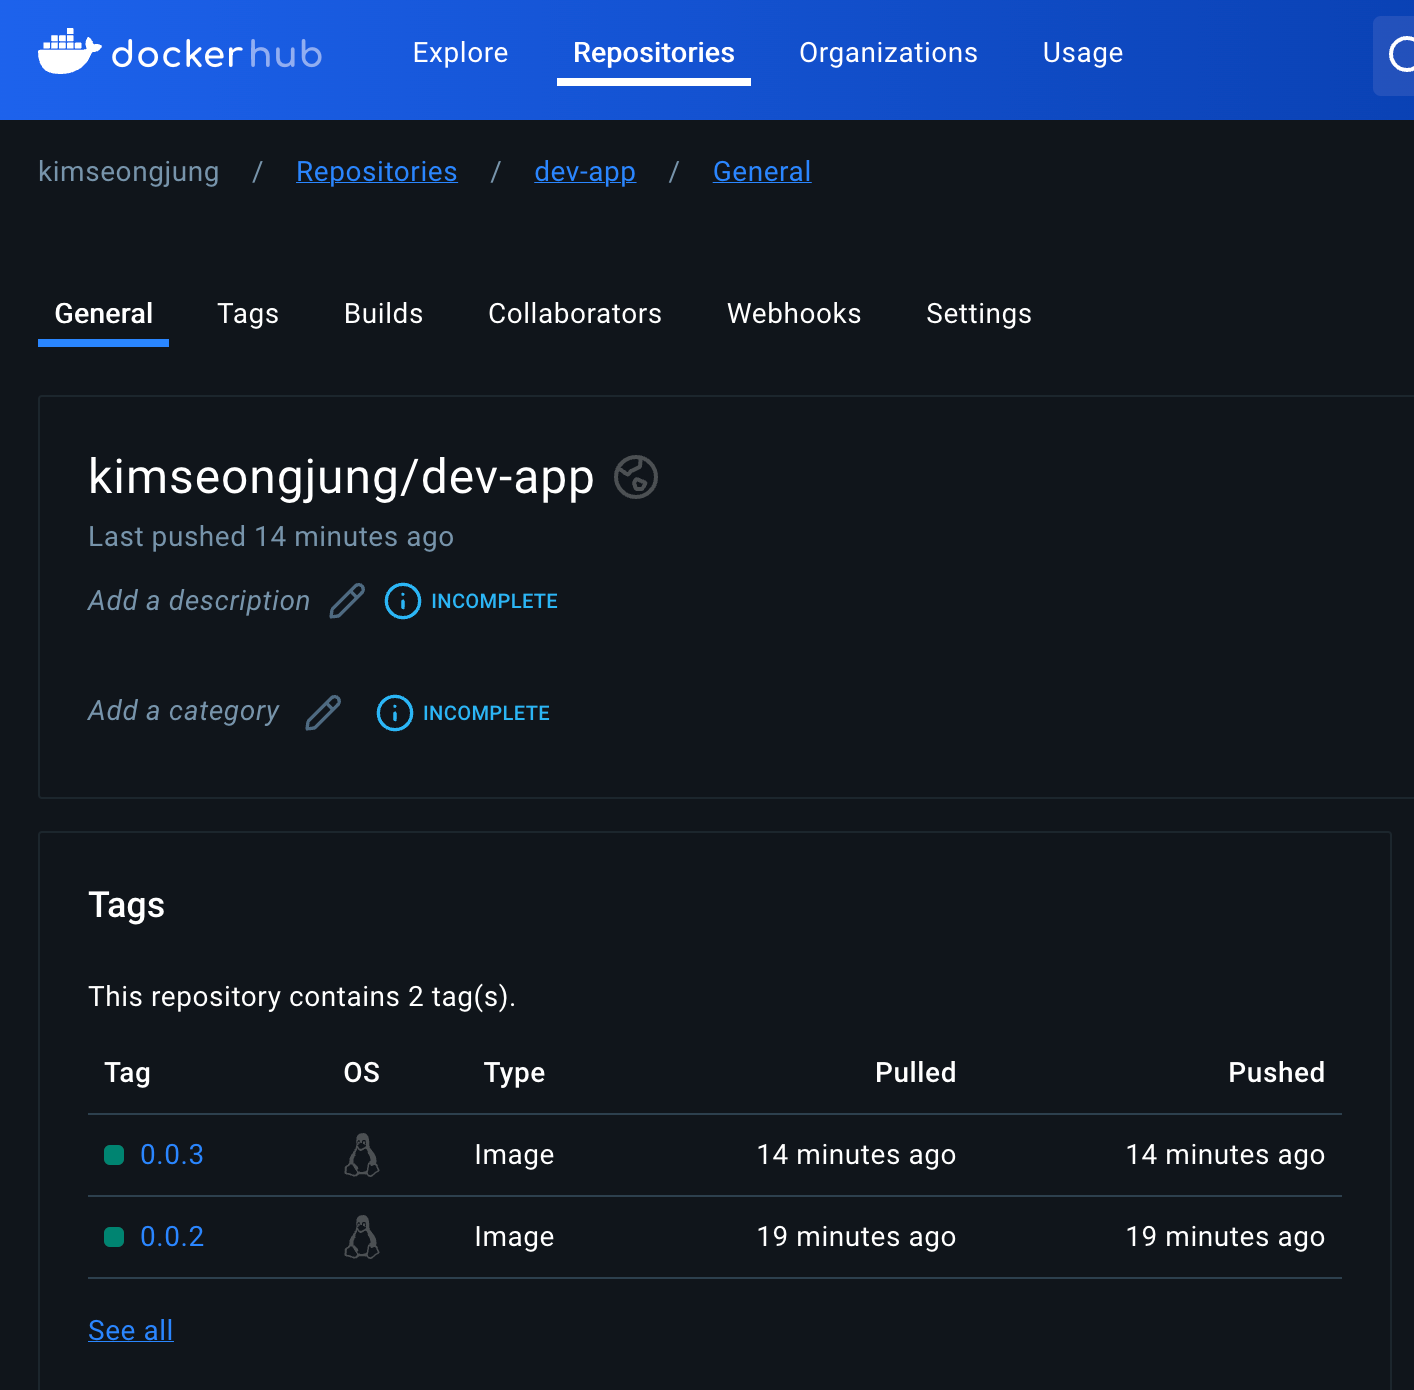
- Jenkins 컨테이너가 이미지 빌드하여, 호스트에서도 컨테이너 이미지 생성 확인
5. Docker 기반 애플리케이션 CI/CD 구성
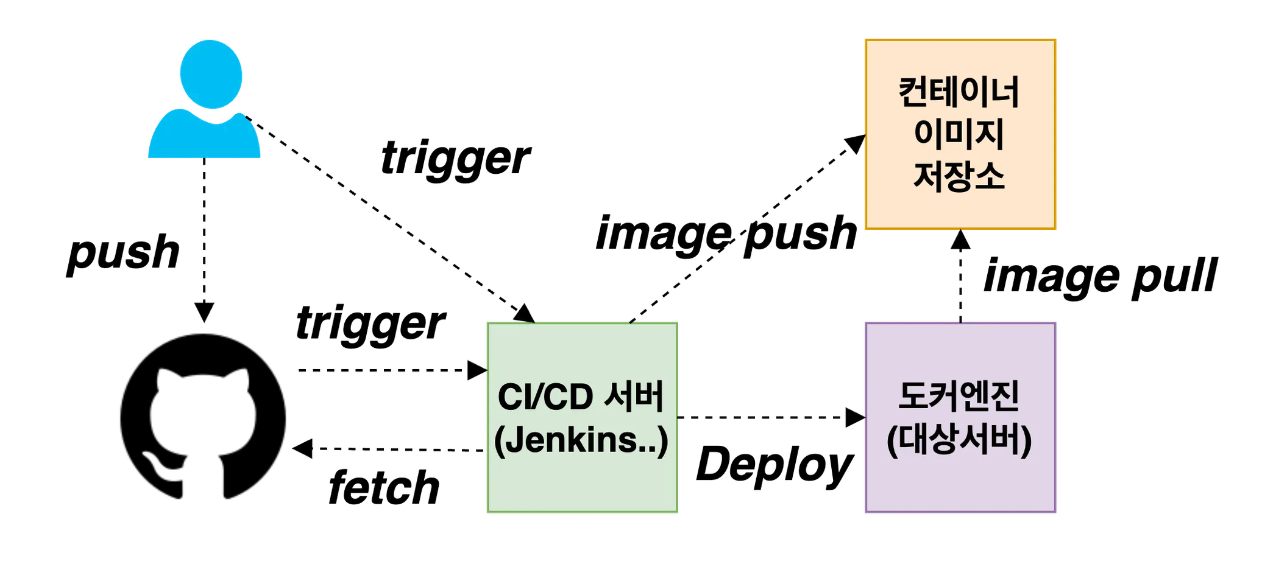
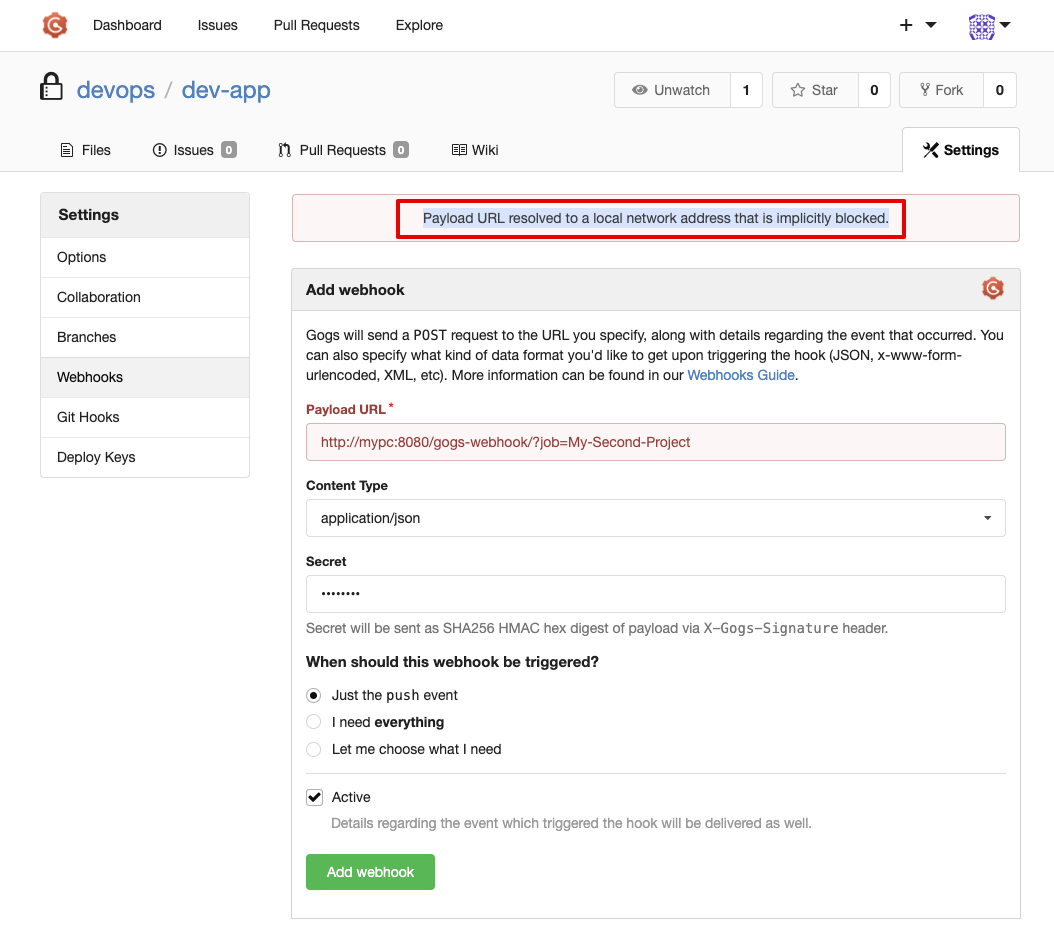
5.1 Gogs Webhooks 설정 : Jenkins Job Trigger
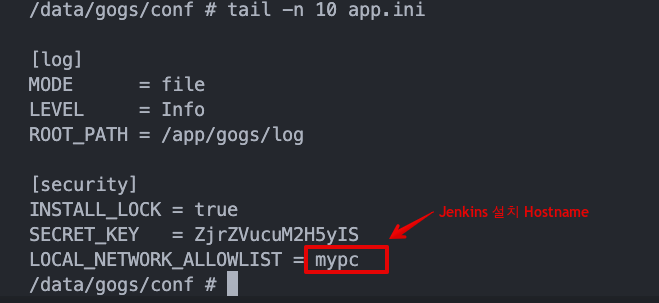
- gogs 에 app.ini 파일 수정 후 컨테이너 재기동 - issue
[security]
INSTALL_LOCK = true
SECRET_KEY   = ZjrZVucuM2H5yIS
LOCAL_NETWORK_ALLOWLIST = mypc   # 각자 자신의 PC IP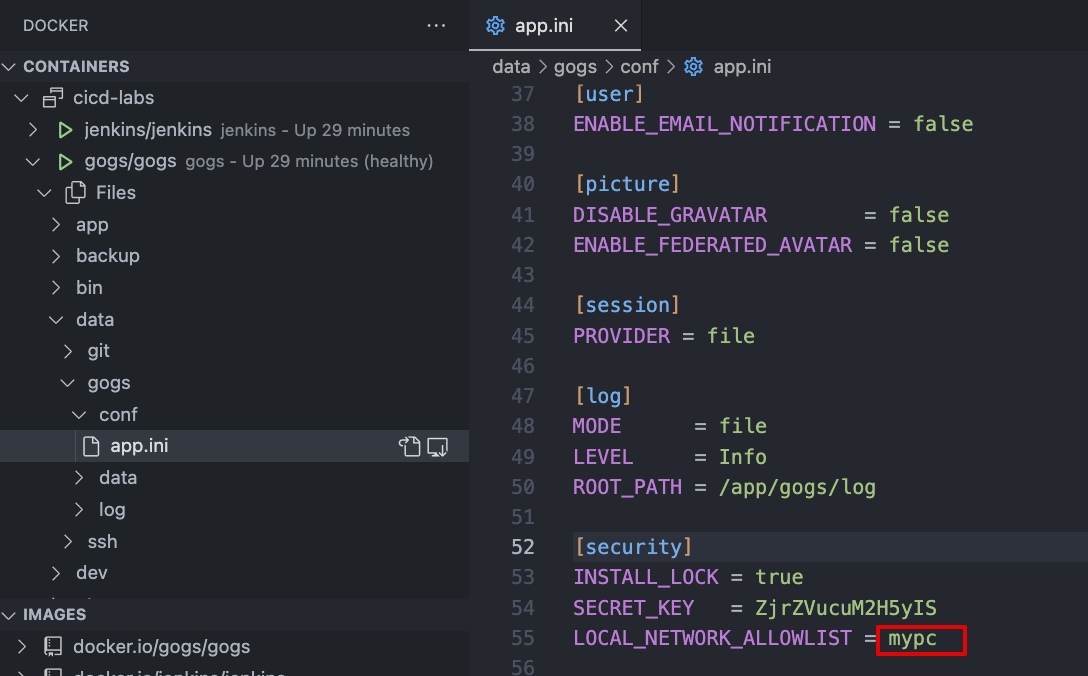
-
docker compose restart gogs
-
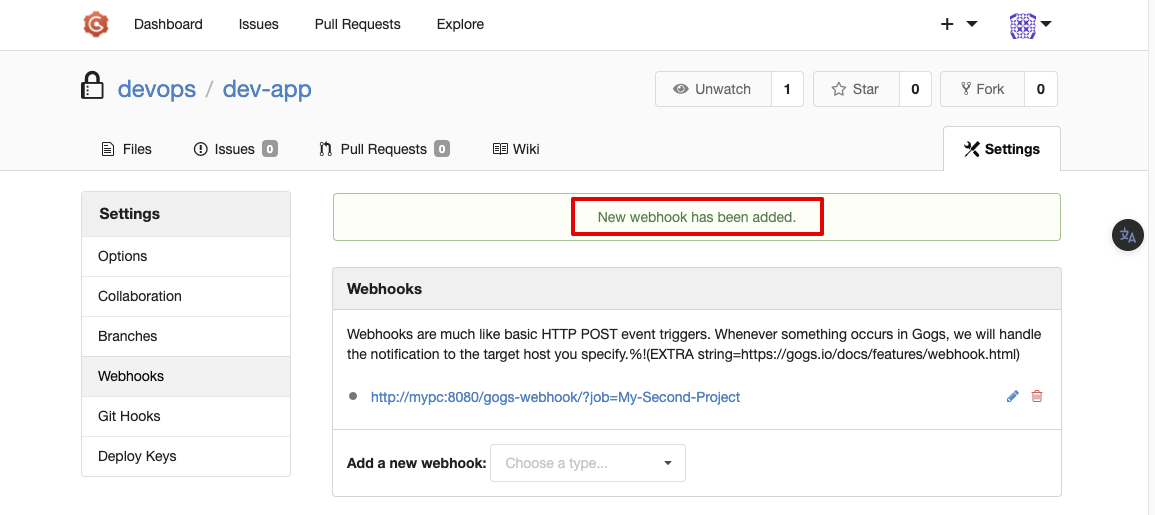
Webhooks are much like basic HTTP POST event triggers. Whenever something occurs in Gogs,
-
we will handle the notification to the target host you specify.
%!(EXTRA string=https://gogs.io/docs/features/webhook.html)
-
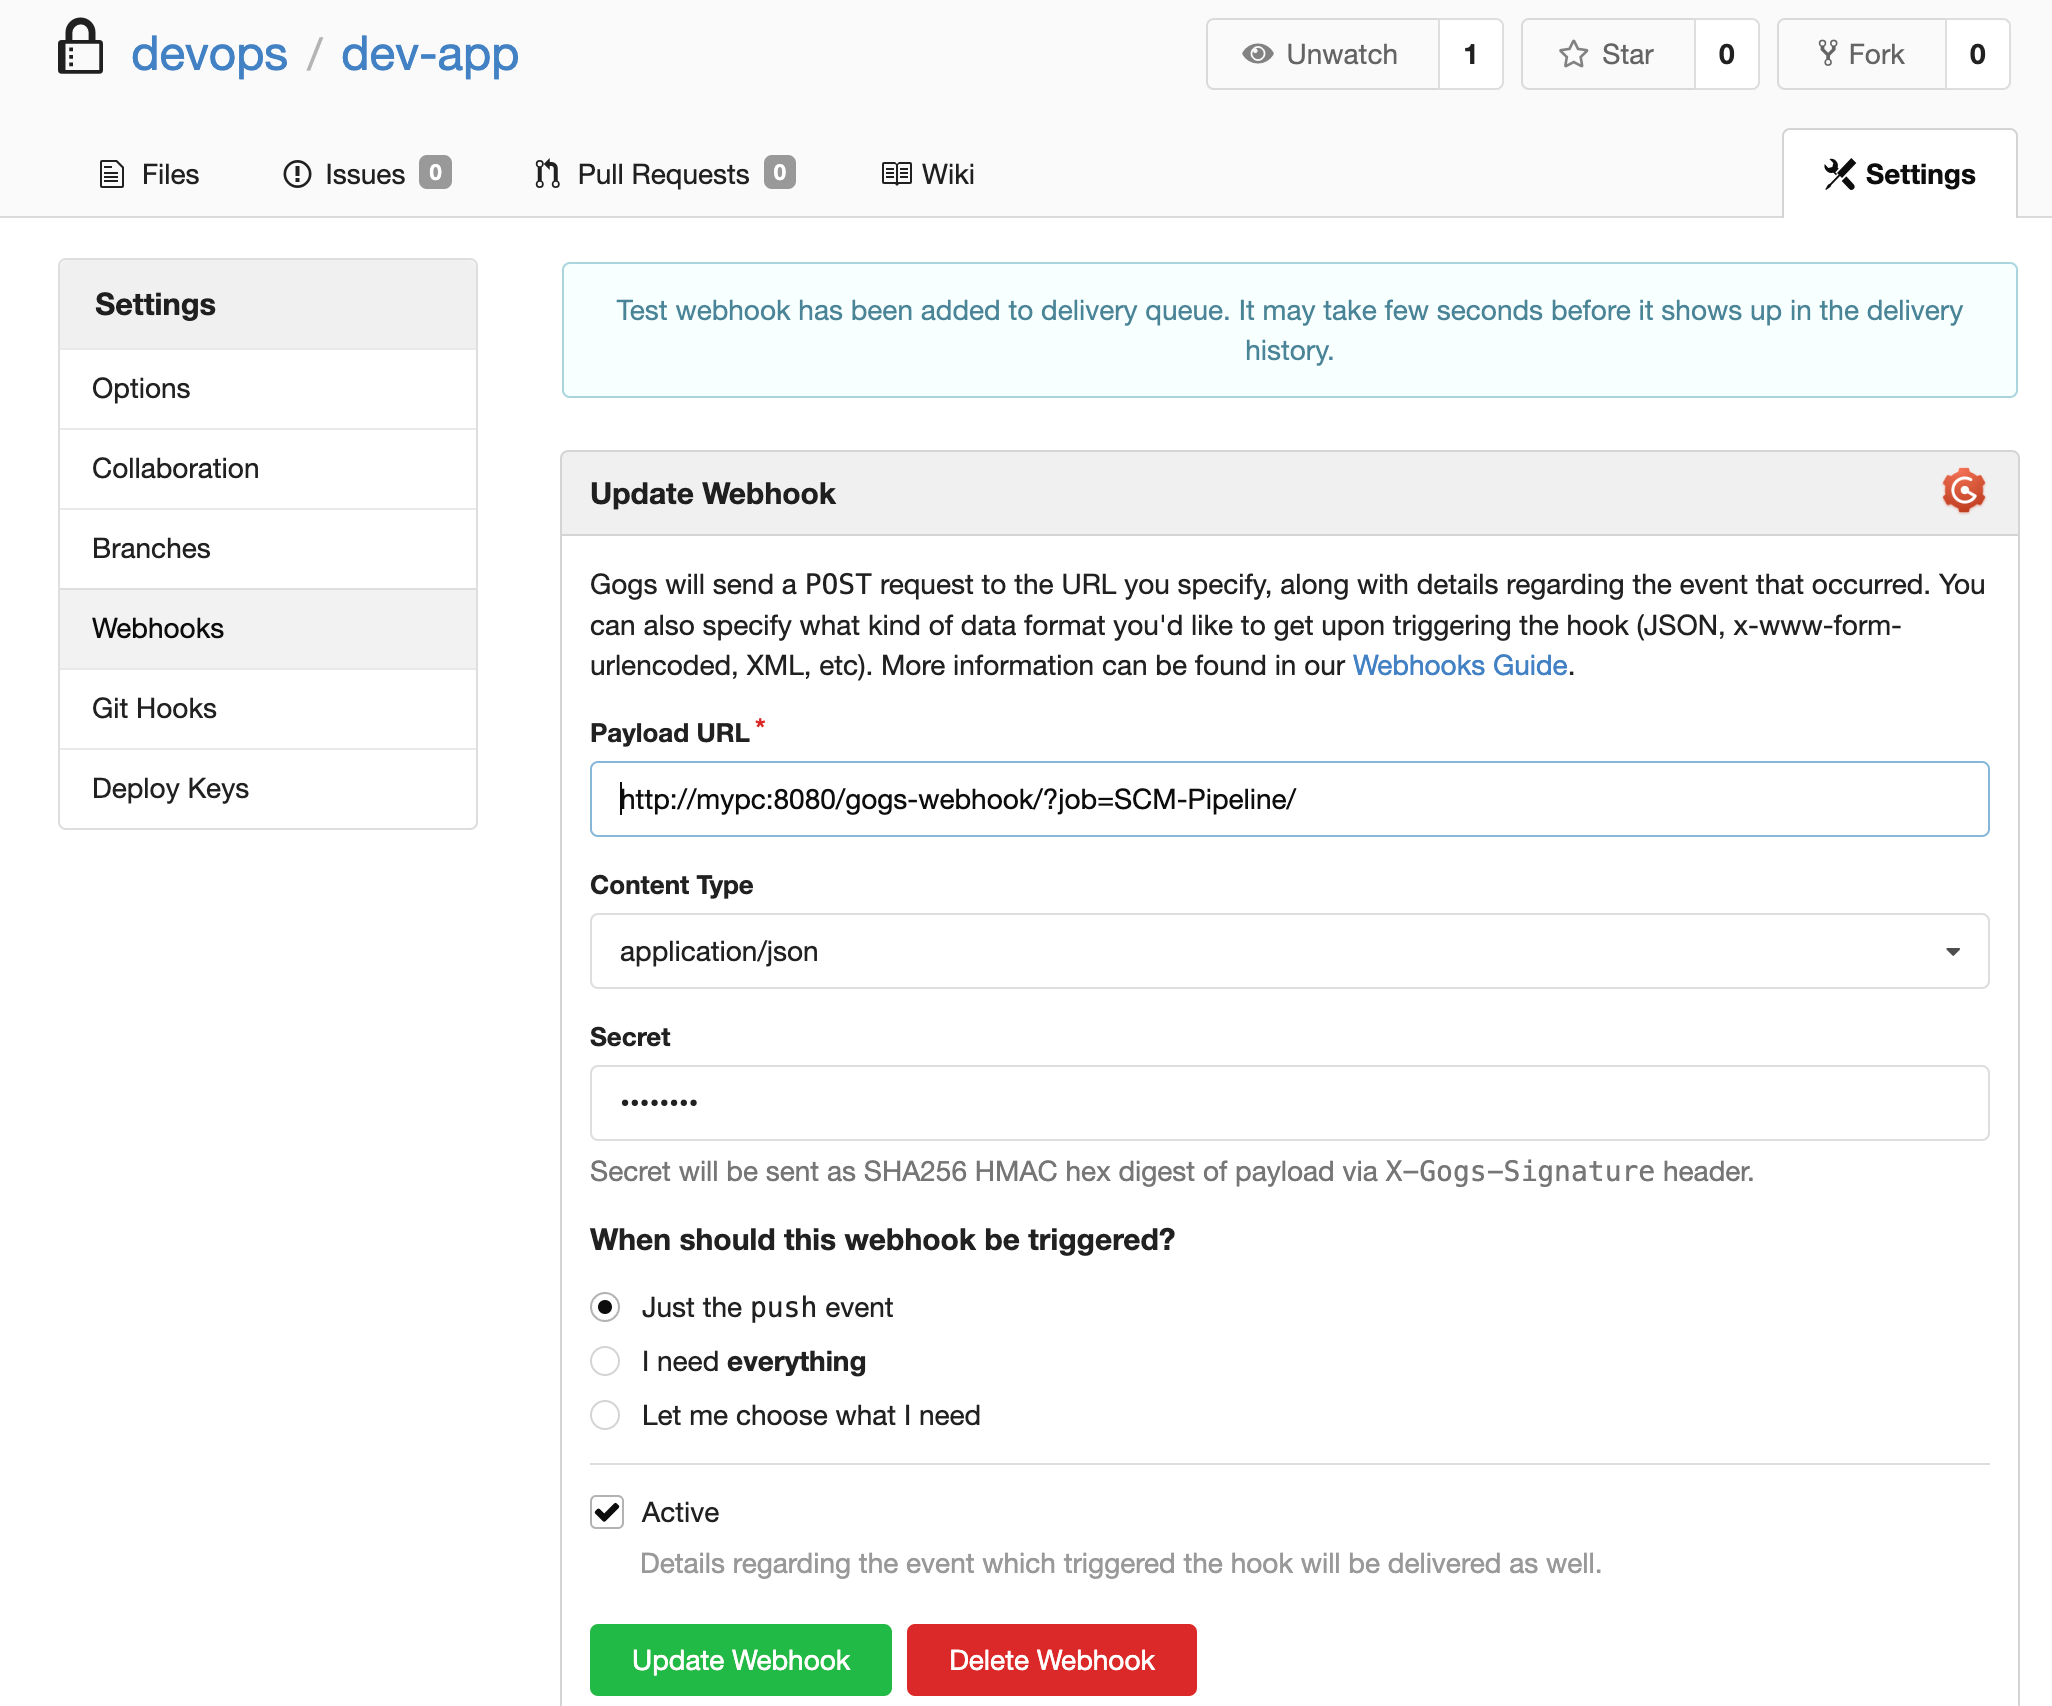
Payload URL :
http://mypc:8080/gogs-webhook/?job=**SCM-Pipeline**/ -
Content Type :
application/json -
Secret :
qwe123 -
When should this webhook be triggered? : Just the push event
-
Active : Check
⇒ Add webhook
5.2 Jenkins Item 생성(Pipeline) : item name(SCM-Pipeline)
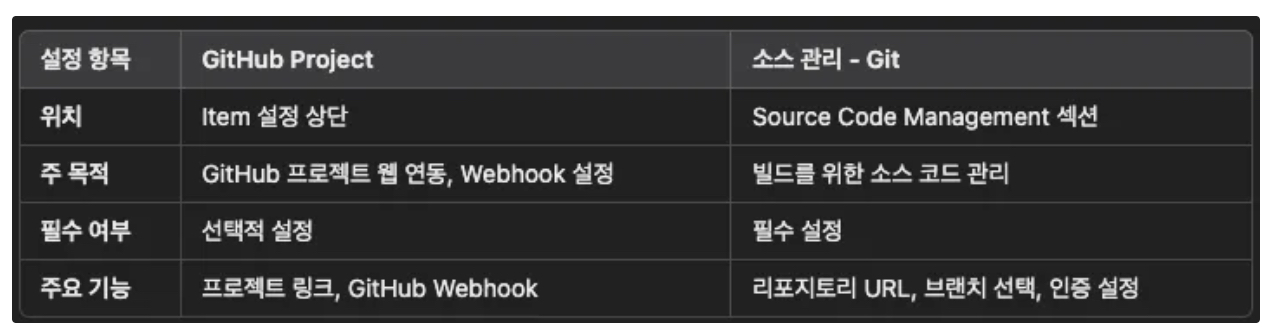
- GitHub project :
http://***<mac IP>***:3000/***<Gogs 계정명>***/dev-app← .git 은 제거 - Use Gogs secret : qwe123
- Build Triggers : Build when a change is pushed to Gogs 체크
- Pipeline script from SCM
- SCM : Git
- Repo URL(
http://***<mac IP>***:3000/***<Gogs 계정명>***/dev-app) - Credentials(devops/***)
- Branch(*/main)
- Repo URL(
- Script Path : Jenkinsfile
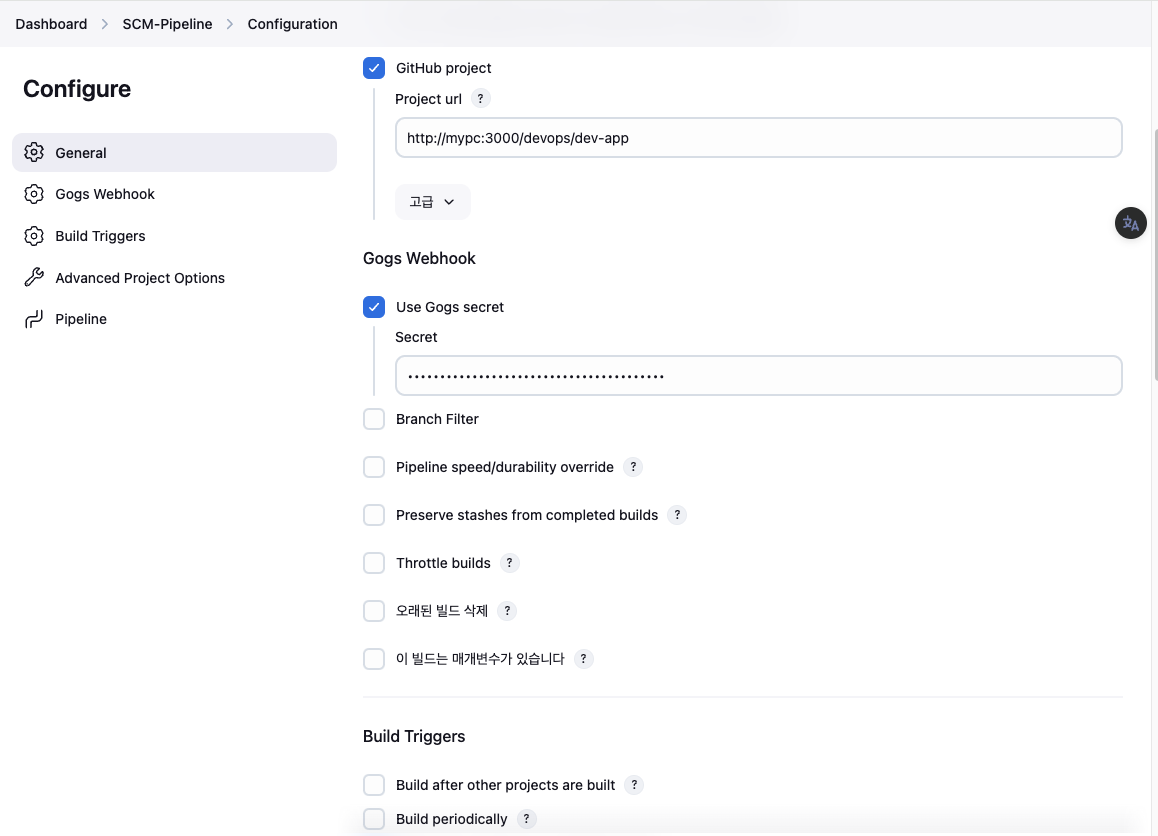
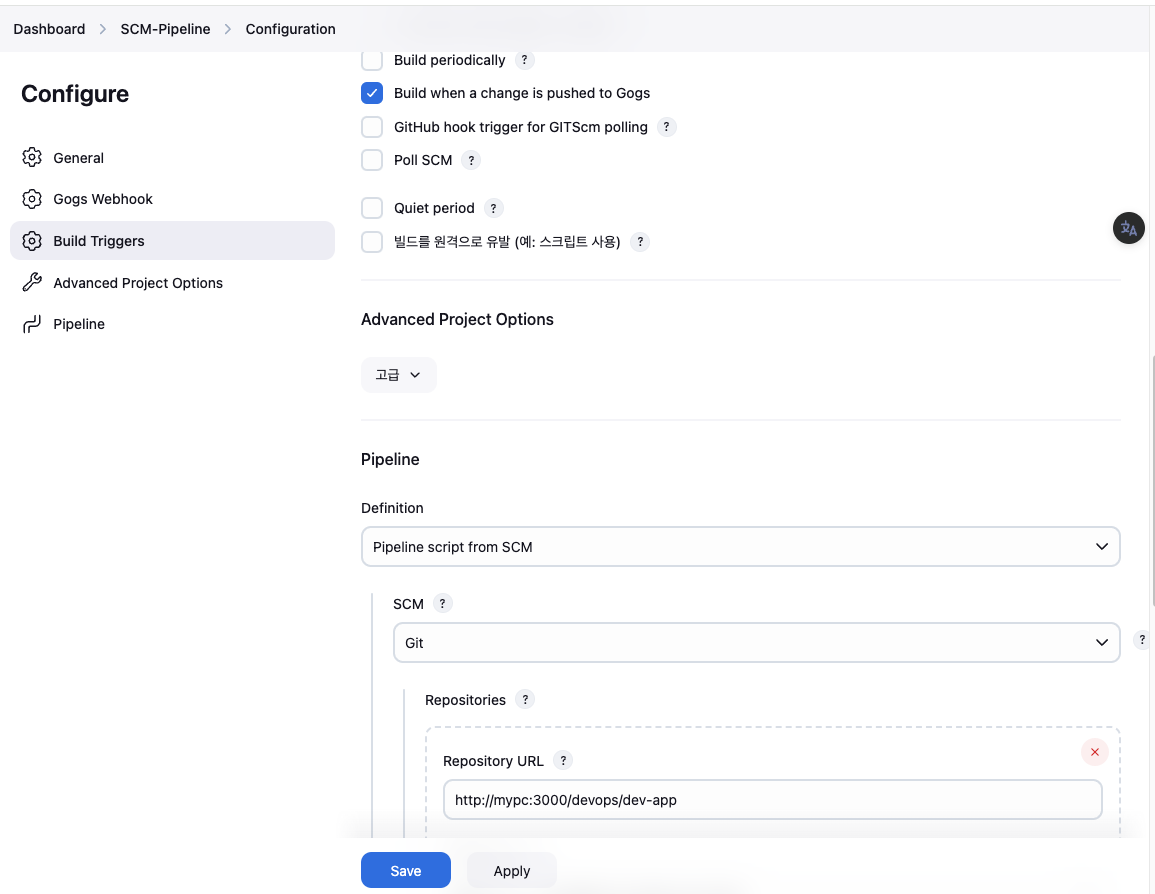
- SCM : Git
5.3 Jenkinsfile 작성 후 Git push
- jenkins 컨테이너(혹은 로컬에서 git 작업)에서 아래 작업
# Jenkinsfile 빈 파일 작성
docker compose exec jenkins touch /var/jenkins_home/dev-app/Jenkinsfile

# 버전 0.0.2 수정 : 아래 입력 잘 안될 경우 VSCODE(Docker플러그인)에서 직접 수정
docker compose exec jenkins sh -c 'echo "0.0.2" > /var/jenkins_home/dev-app/VERSION' - VSCODE 로 jenkins 컨테이너 내부 파일 Open 후 작성
pipeline {
    agent any
    environment {
        DOCKER_IMAGE = 'kimseongjung/dev-app' // Docker 이미지 이름
    }
    stages {
        stage('Checkout') {
            steps {
                 git branch: 'main',
                 url: 'http://mypc:3000/devops/dev-app.git',  // Git에서 코드 체크아웃
                 credentialsId: 'gogs-dev-app'  // Credentials ID
            }
        }
        stage('Read VERSION') {
            steps {
                script {
                    // VERSION 파일 읽기
                    def version = readFile('VERSION').trim()
                    echo "Version found: ${version}"
                    // 환경 변수 설정
                    env.DOCKER_TAG = version
                }
            }
        }
        stage('Docker Build and Push') {
            steps {
                script {
                    docker.withRegistry('https://index.docker.io/v1/', 'dockerhub-credentials') {
                        // DOCKER_TAG 사용
                        def appImage = docker.build("${DOCKER_IMAGE}:${DOCKER_TAG}")
                        appImage.push()
                    }
                }
            }
        }
    }
    post {
        success {
            echo "Docker image ${DOCKER_IMAGE}:${DOCKER_TAG} has been built and pushed successfully!"
        }
        failure {
            echo "Pipeline failed. Please check the logs."
        }
    }
}- 작성된 파일 push : jenkins 컨테이너 bash 내부 진입해서 작업 진행 ← 호스트에서 직접 작업하셔도 됩니다.
#
docker compose exec jenkins bash
---------------------------------
cd /var/jenkins_home/dev-app/
git add . && git commit -m "Jenkinsfile add & VERSION 0.0.2 Changed" && git push -u origin main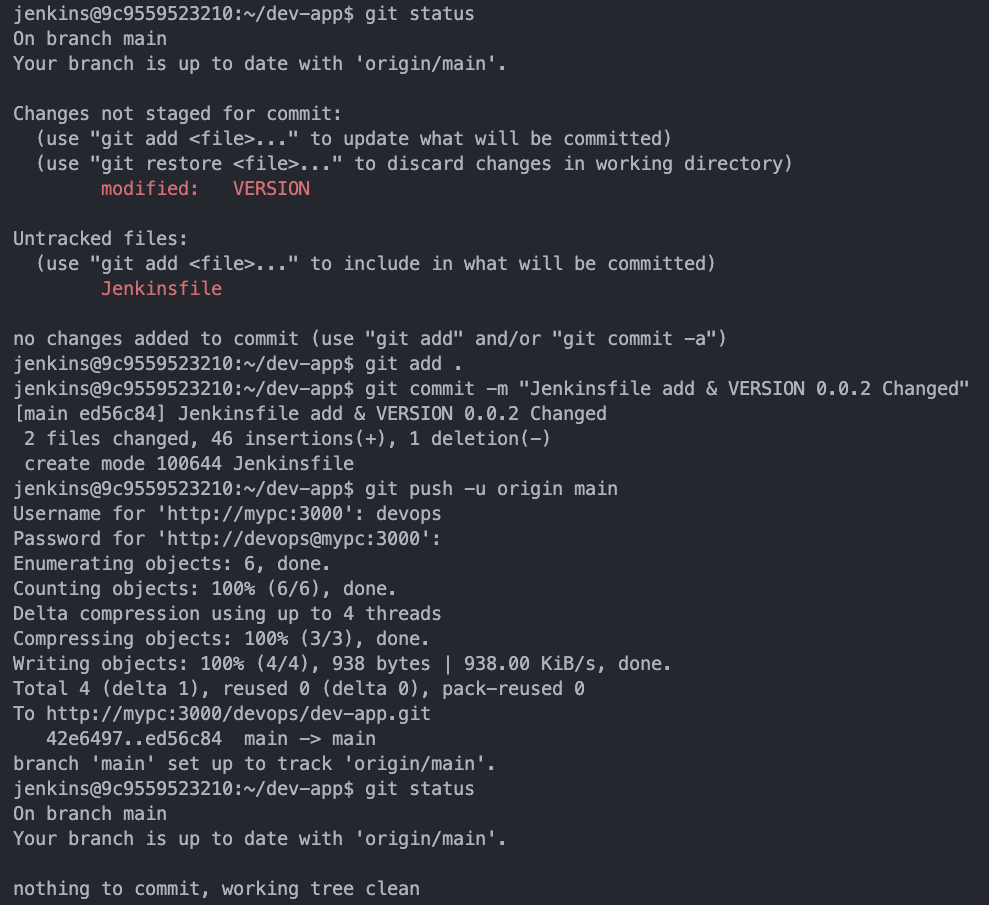
-
Jenkins 트리거 빌드 확인
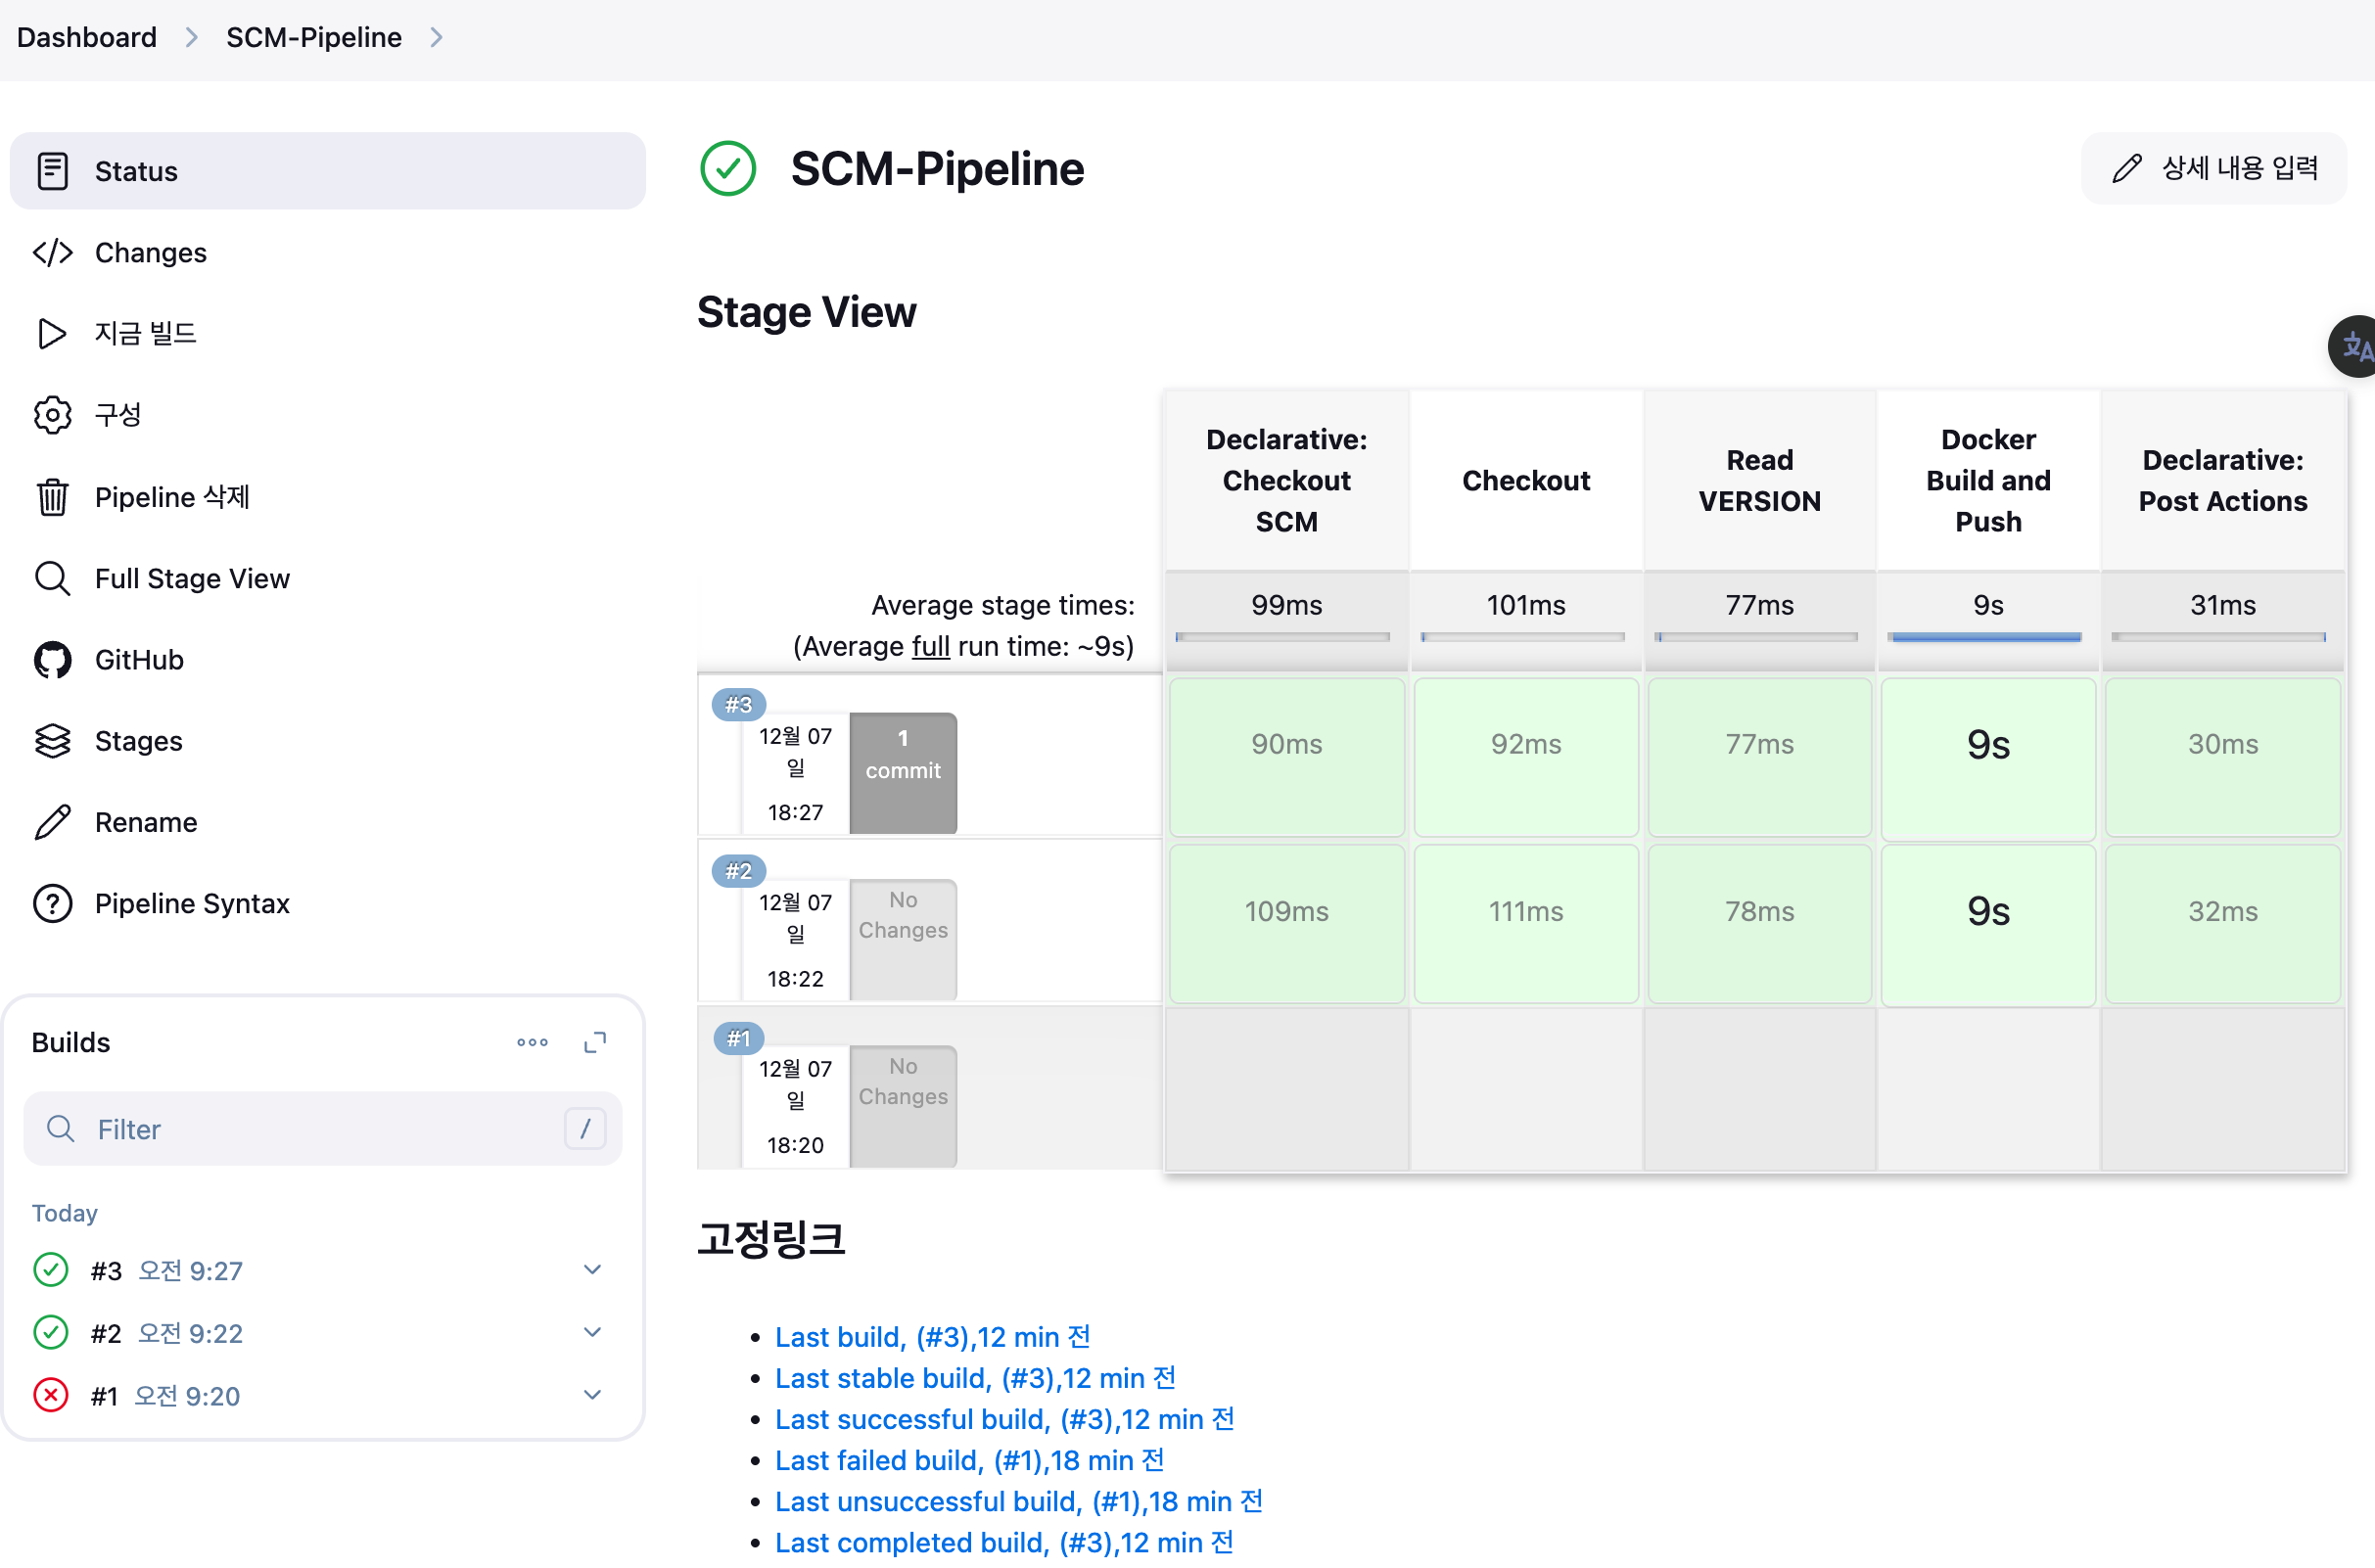
-
도커 저장소 확인
-
Gogs WebHook 기록 확인

5-4 Final : 도커 빌드 후 기존 컨테이너 중지/제거 후 신규 컨테이너 실행 Jenkinsfile pipeline 수정 후 빌드 (SCM-Pipeline)
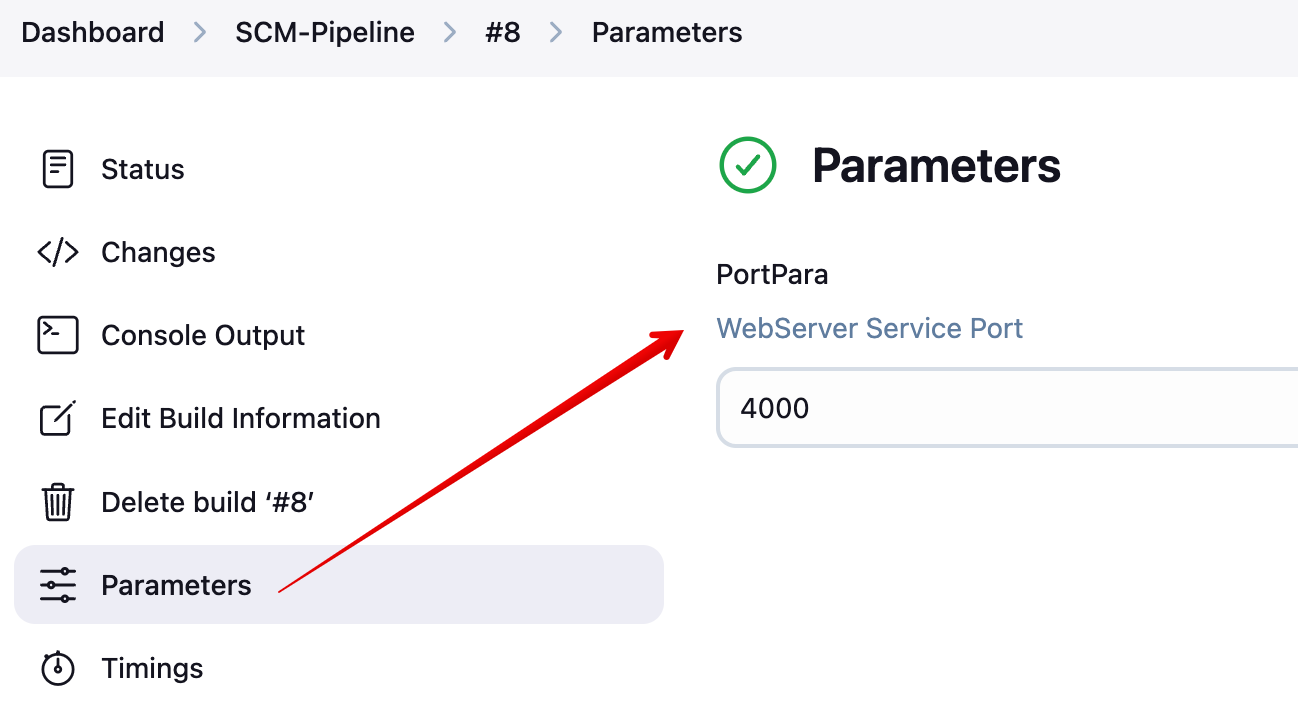
- Jenkinsfile 수정 후 git push → tcp (기본값:4000) 는 파라미터로 입력 받게 설정하게 해볼것
pipeline {
    agent any
    environment {
        DOCKER_IMAGE = 'kimseongjung/dev-app' // Docker 이미지 이름
        CONTAINER_NAME = 'dev-app' // 컨테이너 이름
    }
    stages {
        stage('Checkout') {
            steps {
                 git branch: 'main',
                 url: 'http://mypc:3000/devops/dev-app.git',  // Git에서 코드 체크아웃
                 credentialsId: 'gogs-dev-app'  // Credentials ID
            }
        }
        stage('Read VERSION') {
            steps {
                script {
                    // VERSION 파일 읽기
                    def version = readFile('VERSION').trim()
                    echo "Version found: ${version}"
                    // 환경 변수 설정
                    env.DOCKER_TAG = version
                }
            }
        }
        stage('Docker Build and Push') {
            steps {
                script {
                    docker.withRegistry('https://index.docker.io/v1/', 'dockerhub-credentials') {
                        // DOCKER_TAG 사용
                        def appImage = docker.build("${DOCKER_IMAGE}:${DOCKER_TAG}")
                        appImage.push()
                        appImage.push("latest")  // 빌드 이미지 push 할 때, 2개의 버전(현재 버전, latest 버전)을 업로드
                    }
                }
            }
        }
        stage('Check, Stop and Run Docker Container') {
            steps {
                script {
                    // 실행 중인 컨테이너 확인
                    def isRunning = sh(
                        script: "docker ps -q -f name=${CONTAINER_NAME}",
                        returnStdout: true
                    ).trim()

                    if (isRunning) {
                        echo "Container '${CONTAINER_NAME}' is already running. Stopping it..."
                        // 실행 중인 컨테이너 중지
                        sh "docker stop ${CONTAINER_NAME}"
                        // 컨테이너 제거
                        sh "docker rm ${CONTAINER_NAME}"
                        echo "Container '${CONTAINER_NAME}' stopped and removed."
                    } else {
                        echo "Container '${CONTAINER_NAME}' is not running."
                    }

                    // 5초 대기
                    echo "Waiting for 5 seconds before starting the new container..."
                    sleep(5)

                    // 신규 컨테이너 실행
                    echo "Starting a new container '${CONTAINER_NAME}'..."
                    sh """
                    // PortPara 미터 변수 처리
                    docker run -d --name ${CONTAINER_NAME} -p ${PortPara}:80 ${DOCKER_IMAGE}:${DOCKER_TAG}
                    """
                }
            }
        }
    }
    post {
        success {
            echo "Docker image ${DOCKER_IMAGE}:${DOCKER_TAG} has been built and pushed successfully!"
        }
        failure {
            echo "Pipeline failed. Please check the logs."
        }
    }
}- 생성된 컨테이너 접속 확인
docker image
docker ps
curl http://127.0.0.1:4000- server.py 수정 후 VERSION 수정 후 push 후 생성된 컨테이너 접속 후 반영 확인
# server.py 수정
response_string = now.strftime("The time is %-I:%M:%S %p, Study 1week End.\n")

# VERSION 수정

# Jenkins 컨테이너 내부에서 git push
jenkins@5c1ba7016f9e:~/dev-app$ git add . && git commit -m "VERSION $(cat VERSION) Changed" && git push -u origin main

# 호스트 PC에서 반복 접속 실행 : 서비스 중단 시간 체크!
while true; do curl -s --connect-timeout 1 http://127.0.0.1:4000 ; date; sleep 1 ; done
6. 학습 후기
CloudNet@ 가시다님 주관 CI/CD 1주차 Study를 통해
심도 있게 이론과 실습위주로 Jenkins에 대해 학습을 하였고,
Dockerhub연동, Gogs를 통해 소스 형상관리 및 Build 트리거 하는 과정 전반에 대해
학습을 할 수 있어서 막연하게 인식했던 CI/CD를 몸소 체험할 수 있어서 매우 좋았다.
감사합니다.