
가시다(gasida) 님이 진행하는 AEWS(Amazon EKS Workshop Study) 3기 과정으로 학습한 내용을 정리 또는 실습한 내용을 정리한 게시글입니다. 1주차는 K8S와 Amazon EKS 소개, EKS Cluster를 CloudFormation 통해 VPC와 EC2 생성 후 eksctl 이용하여 직접 처음부터 EKS를 배포하는 전 과정을 Study 하였습니다.
1주차도 매우 유익한 내용으로 2시간 40분에 걸쳐서 설명과 실습을 하였는데 내용을 옮기기 보단 EKS 실무 운영하면서 경험한 부분과 실습한 내용을 1주차 내용과 맞게 정리하고자 합니다.
주요 실습한 내용
- eksctl로 al2, al2023 노드그룹 생성하여 Cluster Join 차이점 확인
- 커스텀 WorkerNode를 스크립트로 제작하기 위해 Userdata를 eksctl manifest로 하고자 하였으나 원활하지 않아 custom-ami 또는 LanchTemplate으로 수행 필요성 확인
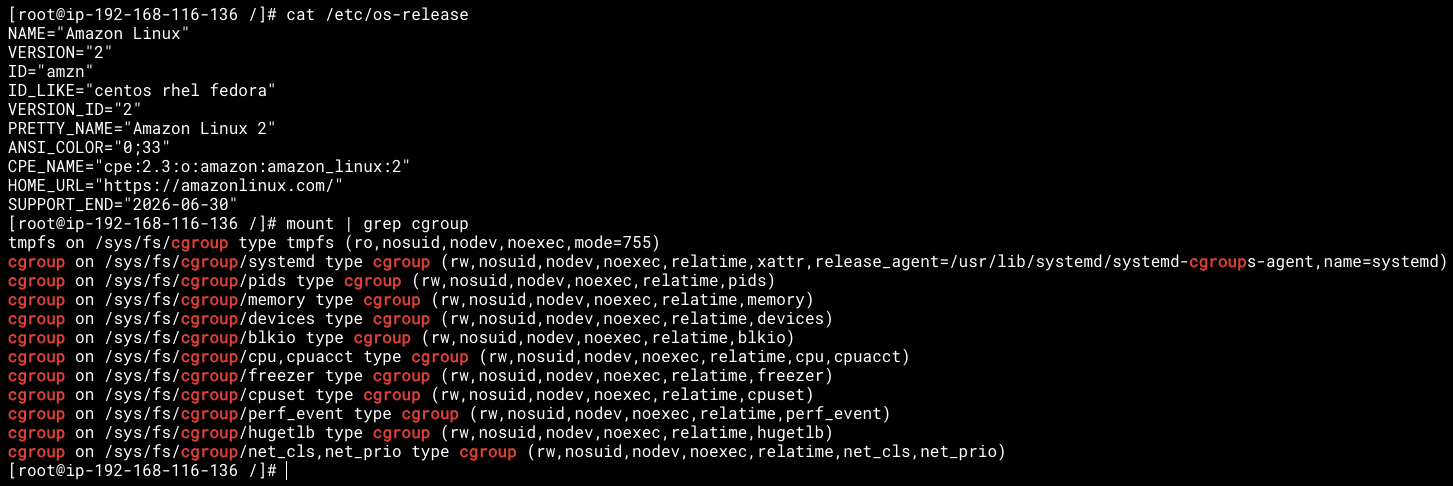
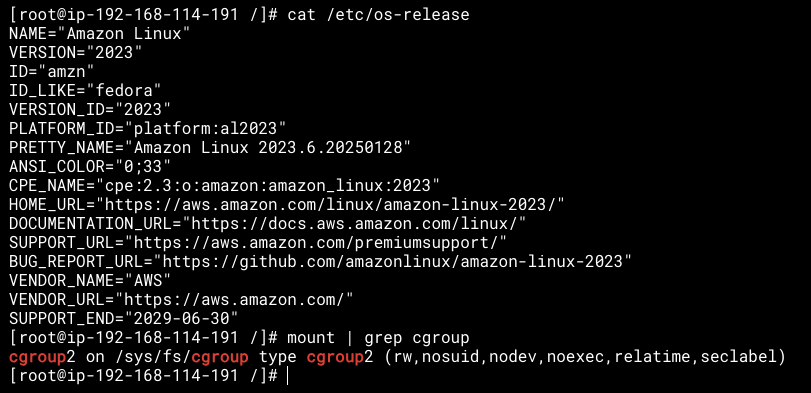
(Terraform 은 보다 더 쉽게 처리 가능한데...)- al2(cgroup v1), al2023(cgroup v2) 확인
- EKS관련 SecurityGroup 종류 이해와 사용법 정리
- API Service Endpoint를 Private 전환 후 지속적으로 접속하기 위해 EC2 Connect Endpoint 생성/활용과정 정리
- Private ECR 생성, nginx push, deployment로 배포하여 LoadBalancer로 서비스하는 과정 정리
참고 자료
EKS 소개와 Terraform 이용하여 EKS 배포는 본인 앞전 Study 작성 글 Terraform 1014기_7주차 참고 바랍니다.
1. macOS 환경에서 실습환경 구성
1.1 Tool 설치하기
- awscli :
$ brew install awscli
$ aws --version
aws-cli/2.23.15 Python/3.12.9 Darwin/24.3.0 source/arm64 - eksctl : Amazon Elastic Kubernetes Service (EKS) 클러스터를 쉽게 생성, 관리 및 삭제할 수 있도록 설계된 명령줄 도구입니다. 이 도구는 Weaveworks와 AWS가 협력하여 개발되었습니다. eksctl은 Kubernetes 클러스터의 자동화된 네트워크 설정, 노드 그룹 생성, IAM 역할 구성 등의 작업을 간단한 명령으로 수행할 수 있습니다
$ brew install eksctl
$ eksctl version 0.203.0-dev+00788c837.2025-02-01T22:02:34Z - kubectl : 쿠버네티스 클러스터와 상호작용하기 위한 명령줄 도구입니다. 이 도구는 쿠버네티스 클러스터에 명령을 전달하고, 리소스를 관리하며, 애플리케이션을 배포하는 데 사용
$ brew install kubectl
$ kubectl version --client=true
Client Version: v1.32.1
Kustomize Version: v5.5.0 - helm
$ brew install helm
$ helm version
version.BuildInfo{Version:"v3.17.0", GitCommit:"301108edc7ac2a8ba79e4ebf5701b0b6ce6a31e4", GitTreeState:"clean", GoVersion:"go1.23.4"}
1.2 AWS Credential 설정
IAM Console에서 aews 계정 생성시 AdministratorAccess 권한부여, Access key 생성
-
CLI Credential 구성
❯ aws configure --profile aews
AWS Access Key ID [*]:
AWS Secret Access Key [****]:
Default region name [ap-northeast-2]:
Default output format [json]: -
호출하고 있는 Identity 확인
❯ aws sts get-caller-identity --aews
{
"UserId": "AIDA",
"Account": "53**617837",
"Arn": "arn:aws:iam::53****617837:user/aews"
} -
AWS_DEFAULT_PROFILE 설정으로 매번 --profile=aews 지정 없이 사용하기
❯ export AWS_DEFAULT_PROFILE=aews
2. eksctl로 Cluster와 AL2, AL2023 노드 배포
2.1 Self-NodeGroup으로 al2 버전 Node 생성
-
eks cluster v1.31 생성위한 Manifest
-
eks 1.31 버전으로
-
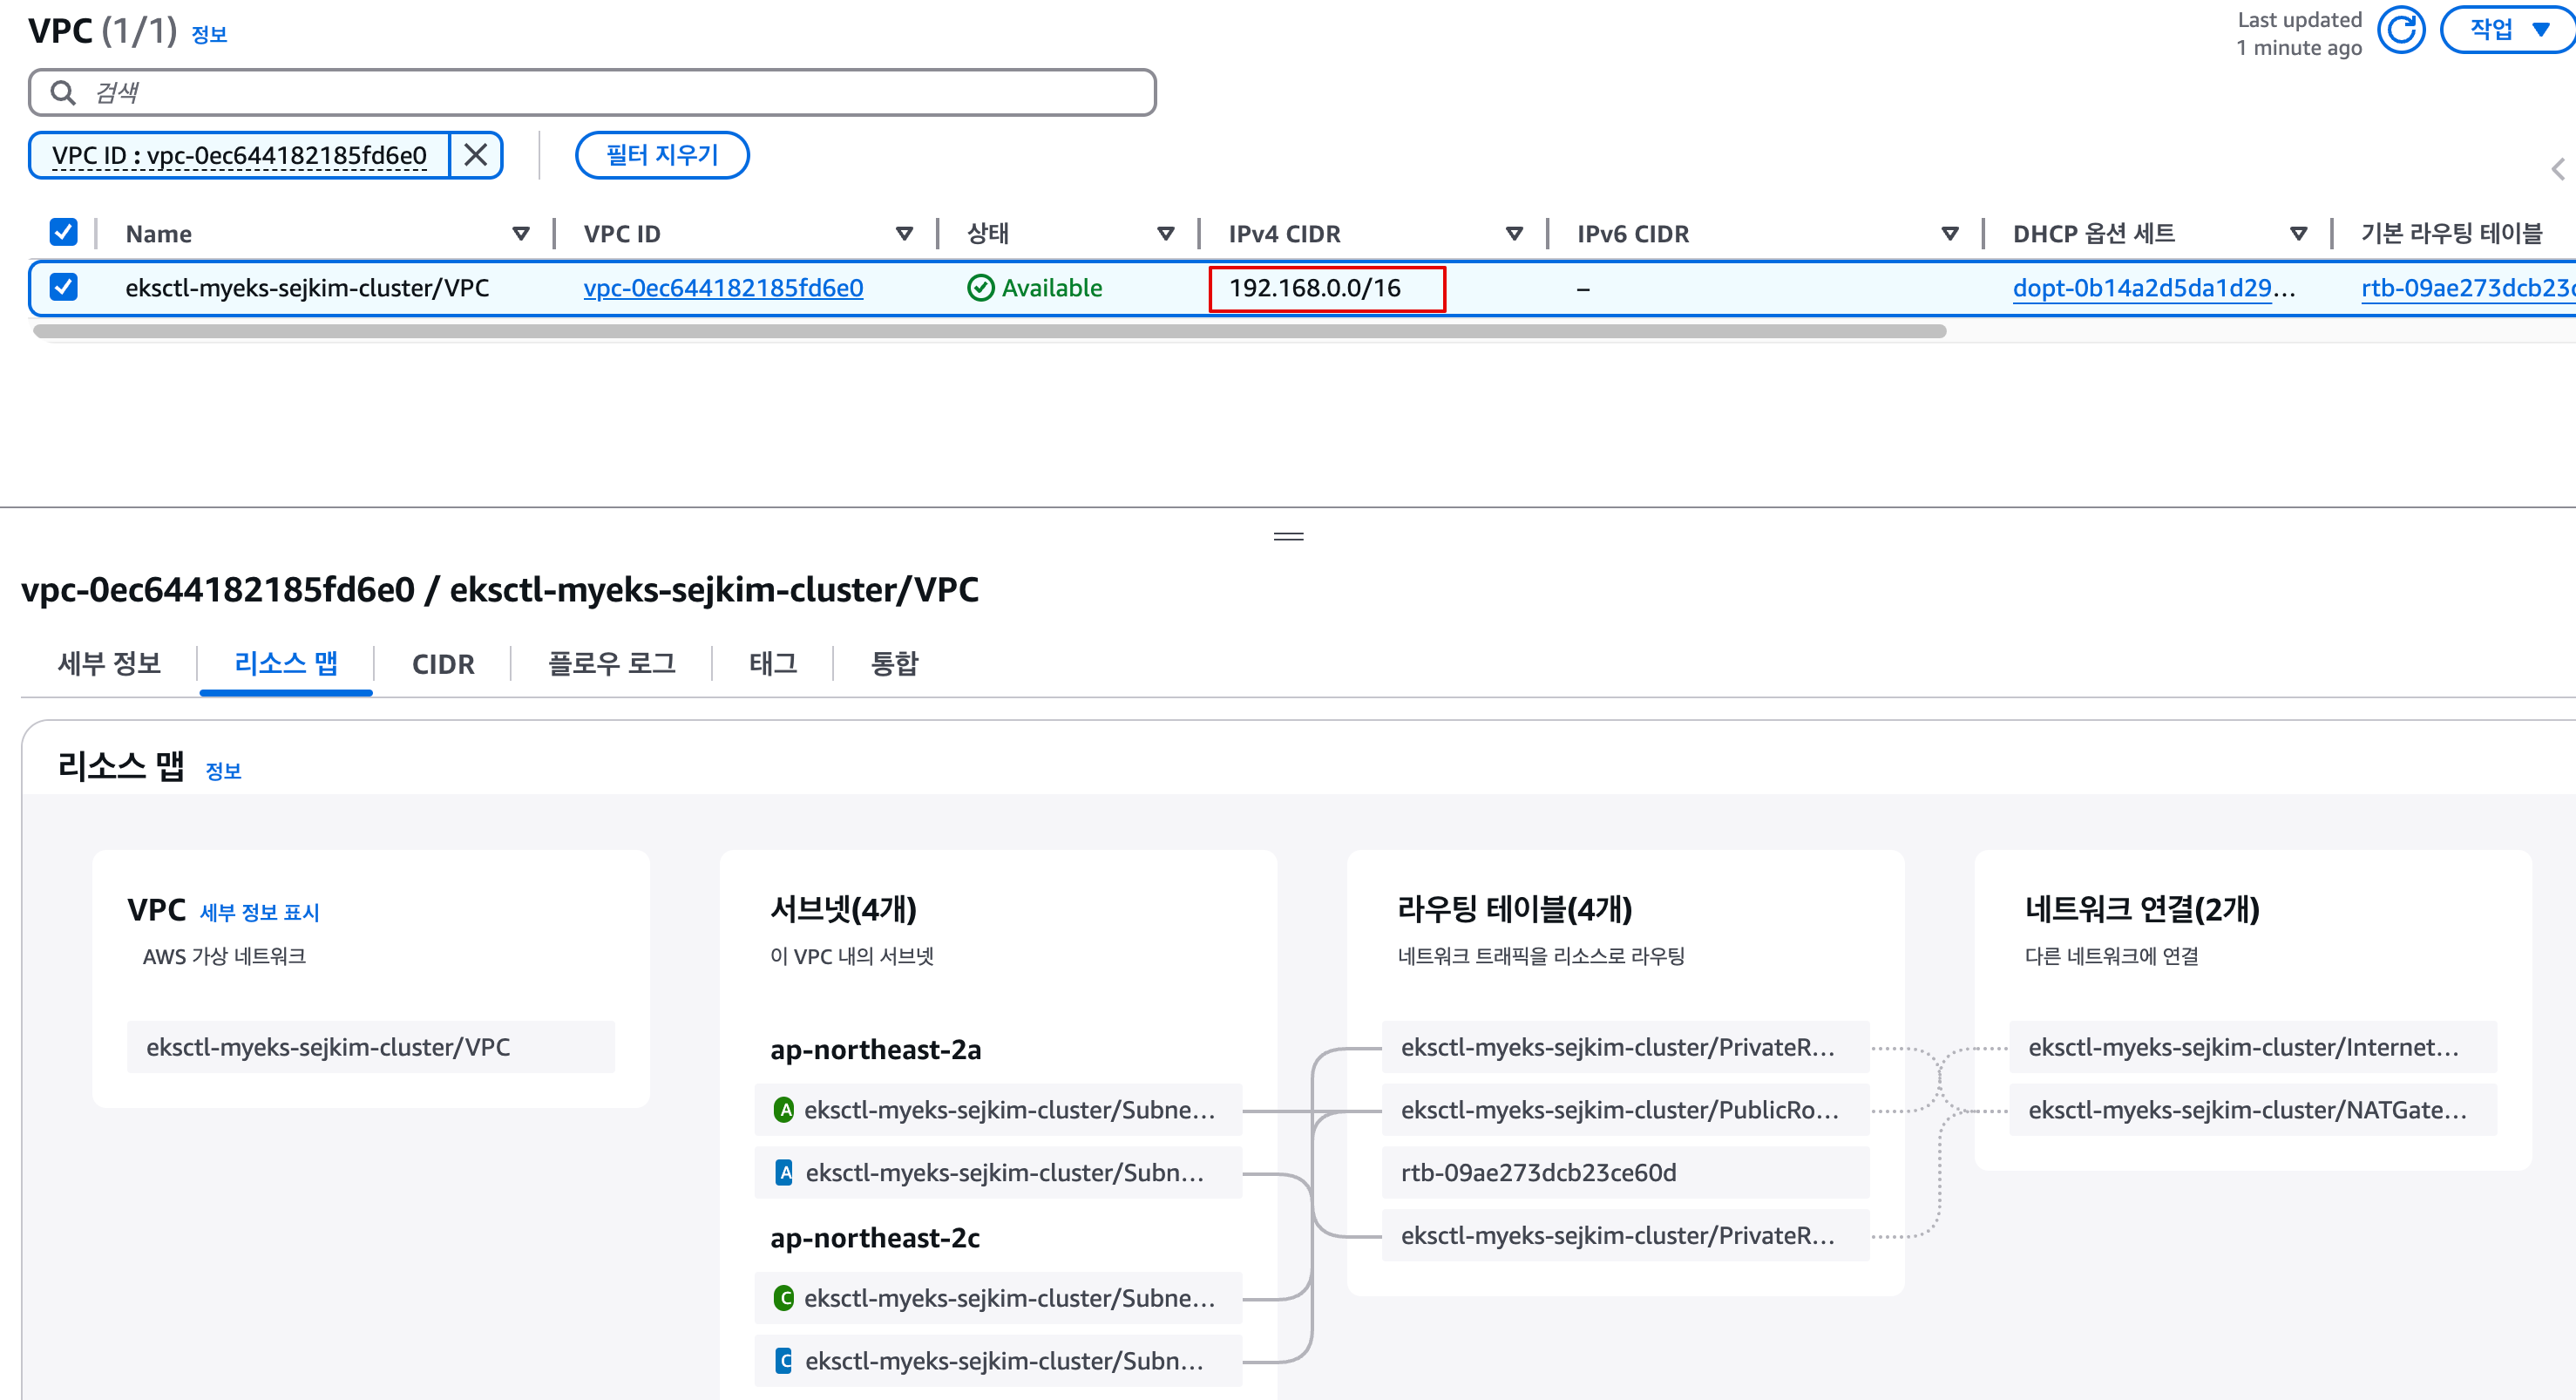
서울리전 ap-northeast-2a, ap-norteast-2c에 vpc 생성(192.168.0.0/16)
$ cat <<EOF> eks-1-31.yaml
apiVersion: eksctl.io/v1alpha5
kind: ClusterConfig
metadata:
  name: myeks-sejkim
  region: ap-northeast-2
  version: "1.31"
  tags:
    Environment: dev
    Owner: sejkim

availabilityZones: ["ap-northeast-2a", "ap-northeast-2c"]

vpc:
  nat:
    gateway: Single # other options: HighlyAvailable, Disable, Single (default)
  cidr: 192.168.0.0/16
  autoAllocateIPv6: false
  clusterEndpoints:
    publicAccess: true
    privateAccess: true

nodeGroups:
  - name: al2
    instanceType: t3.small
    minSize: 2
    maxSize: 2
    desiredCapacity: 2
    labels:
      role: worker
    amiFamily: AmazonLinux2
    volumeSize: 25
    volumeType: gp3
    volumeEncrypted: true
    privateNetworking: true
    availabilityZones: ["ap-northeast-2a", "ap-northeast-2c"]
    ssh:
      publicKeyName: sejkim

addons:
  - name: vpc-cni
  - name: coredns
  - name: kube-proxy

iam:
  withOIDC: true

cloudWatch:
  clusterLogging:
    enableTypes: ["audit", "authenticator", "controllerManager"]
    logRetentionInDays: 7
EOF
-
-
eksctl로 cluster와 nodegroup 생성 (기본 amazon linux2)
  $ eksctl create cluster -f eks-1-31.yaml
  2025-02-08 08:27:55 [ℹ]  eksctl version 0.203.0-dev+00788c837.2025-02-01T22:02:34Z
  2025-02-08 08:27:55 [ℹ]  using region ap-northeast-2
  2025-02-08 08:27:55 [ℹ]  subnets for ap-northeast-2a - public:192.168.0.0/19 private:192.168.64.0/19
  2025-02-08 08:27:55 [ℹ]  subnets for ap-northeast-2c - public:192.168.32.0/19 private:192.168.96.0/19
  2025-02-08 08:27:55 [ℹ]  nodegroup "al2" will use "ami-005cddfeed40e0e49" [AmazonLinux2/1.31]
  2025-02-08 08:27:55 [ℹ]  using EC2 key pair "sejkim"
  2025-02-08 08:27:55 [ℹ]  using Kubernetes version 1.31
  2025-02-08 08:27:55 [ℹ]  creating EKS cluster "myeks-sejkim" in "ap-northeast-2" region with un-managed nodes
  2025-02-08 08:27:55 [ℹ]  1 nodegroup (al2) was included (based on the include/exclude rules)
  2025-02-08 08:27:55 [ℹ]  will create a CloudFormation stack for cluster itself and 1 nodegroup stack(s)
  2025-02-08 08:27:55 [ℹ]  if you encounter any issues, check CloudFormation console or try 'eksctl utils describe-stacks --region=ap-northeast-2 --cluster=myeks-sejkim'
  2025-02-08 08:27:55 [ℹ]  Kubernetes API endpoint access will use provided values {publicAccess=true, privateAccess=true} for cluster "myeks-sejkim" in "ap-northeast-2"
  2025-02-08 08:27:55 [ℹ]  configuring CloudWatch logging for cluster "myeks-sejkim" in "ap-northeast-2" (enabled types: audit, authenticator, controllerManager & disabled types: api, scheduler)
  2025-02-08 08:27:55 [ℹ]  default addons metrics-server were not specified, will install them as EKS addons
  2025-02-08 08:27:55 [ℹ]
  2 sequential tasks: { create cluster control plane "myeks-sejkim",
      2 sequential sub-tasks: {
          6 sequential sub-tasks: {
              1 task: { create addons },
              wait for control plane to become ready,
              associate IAM OIDC provider,
              no tasks,
              update VPC CNI to use IRSA if required,
              update CloudWatch log retention,
          },
          create nodegroup "al2",
      }
  }
  2025-02-08 08:27:55 [ℹ]  building cluster stack "eksctl-myeks-sejkim-cluster"
  2025-02-08 08:27:56 [ℹ]  deploying stack "eksctl-myeks-sejkim-cluster"
  2025-02-08 08:28:26 [ℹ]  waiting for CloudFormation stack "eksctl-myeks-sejkim-cluster"
  2025-02-08 08:28:56 [ℹ]  waiting for CloudFormation stack "eksctl-myeks-sejkim-cluster"
  2025-02-08 08:29:56 [ℹ]  waiting for CloudFormation stack "eksctl-myeks-sejkim-cluster"
  2025-02-08 08:30:56 [ℹ]  waiting for CloudFormation stack "eksctl-myeks-sejkim-cluster"
  2025-02-08 08:31:56 [ℹ]  waiting for CloudFormation stack "eksctl-myeks-sejkim-cluster"
  2025-02-08 08:32:57 [ℹ]  waiting for CloudFormation stack "eksctl-myeks-sejkim-cluster"
  2025-02-08 08:33:57 [ℹ]  waiting for CloudFormation stack "eksctl-myeks-sejkim-cluster"
  2025-02-08 08:34:57 [ℹ]  waiting for CloudFormation stack "eksctl-myeks-sejkim-cluster"
  2025-02-08 08:35:57 [ℹ]  waiting for CloudFormation stack "eksctl-myeks-sejkim-cluster"
  2025-02-08 08:36:57 [ℹ]  waiting for CloudFormation stack "eksctl-myeks-sejkim-cluster"
  2025-02-08 08:36:59 [!]  recommended policies were found for "vpc-cni" addon, but since OIDC is disabled on the cluster, eksctl cannot configure the requested permissions; the recommended way to provide IAM permissions for "vpc-cni" addon is via pod identity associations; after addon creation is completed, add all recommended policies to the config file, under `addon.PodIdentityAssociations`, and run `eksctl update addon`
  2025-02-08 08:36:59 [ℹ]  creating addon
  2025-02-08 08:37:00 [ℹ]  successfully created addon
  2025-02-08 08:37:00 [ℹ]  creating addon
  2025-02-08 08:37:01 [ℹ]  successfully created addon
  2025-02-08 08:37:01 [ℹ]  creating addon
  2025-02-08 08:37:01 [ℹ]  successfully created addon
  2025-02-08 08:37:02 [ℹ]  creating addon
  2025-02-08 08:37:02 [ℹ]  successfully created addon
  2025-02-08 08:39:05 [ℹ]  addon "vpc-cni" active
  2025-02-08 08:39:05 [ℹ]  deploying stack "eksctl-myeks-sejkim-addon-vpc-cni"
  2025-02-08 08:39:05 [ℹ]  waiting for CloudFormation stack "eksctl-myeks-sejkim-addon-vpc-cni"
  2025-02-08 08:39:35 [ℹ]  waiting for CloudFormation stack "eksctl-myeks-sejkim-addon-vpc-cni"
  2025-02-08 08:39:35 [ℹ]  updating addon
  2025-02-08 08:39:46 [ℹ]  addon "vpc-cni" active
  2025-02-08 08:39:46 [ℹ]  set log retention to 7 days for CloudWatch logging
  2025-02-08 08:39:46 [ℹ]  building nodegroup stack "eksctl-myeks-sejkim-nodegroup-al2"
  2025-02-08 08:39:47 [ℹ]  deploying stack "eksctl-myeks-sejkim-nodegroup-al2"
  2025-02-08 08:39:47 [ℹ]  waiting for CloudFormation stack "eksctl-myeks-sejkim-nodegroup-al2"
  2025-02-08 08:40:17 [ℹ]  waiting for CloudFormation stack "eksctl-myeks-sejkim-nodegroup-al2"
  2025-02-08 08:40:52 [ℹ]  waiting for CloudFormation stack "eksctl-myeks-sejkim-nodegroup-al2"
  2025-02-08 08:42:40 [ℹ]  waiting for CloudFormation stack "eksctl-myeks-sejkim-nodegroup-al2"
  2025-02-08 08:42:40 [ℹ]  waiting for the control plane to become ready
  2025-02-08 08:42:41 [✔]  saved kubeconfig as "/Users/sjkim/.kube/config"
  2025-02-08 08:42:41 [ℹ]  no tasks
  2025-02-08 08:42:41 [✔]  all EKS cluster resources for "myeks-sejkim" have been created
  2025-02-08 08:42:41 [ℹ]  nodegroup "al2" has 2 node(s)
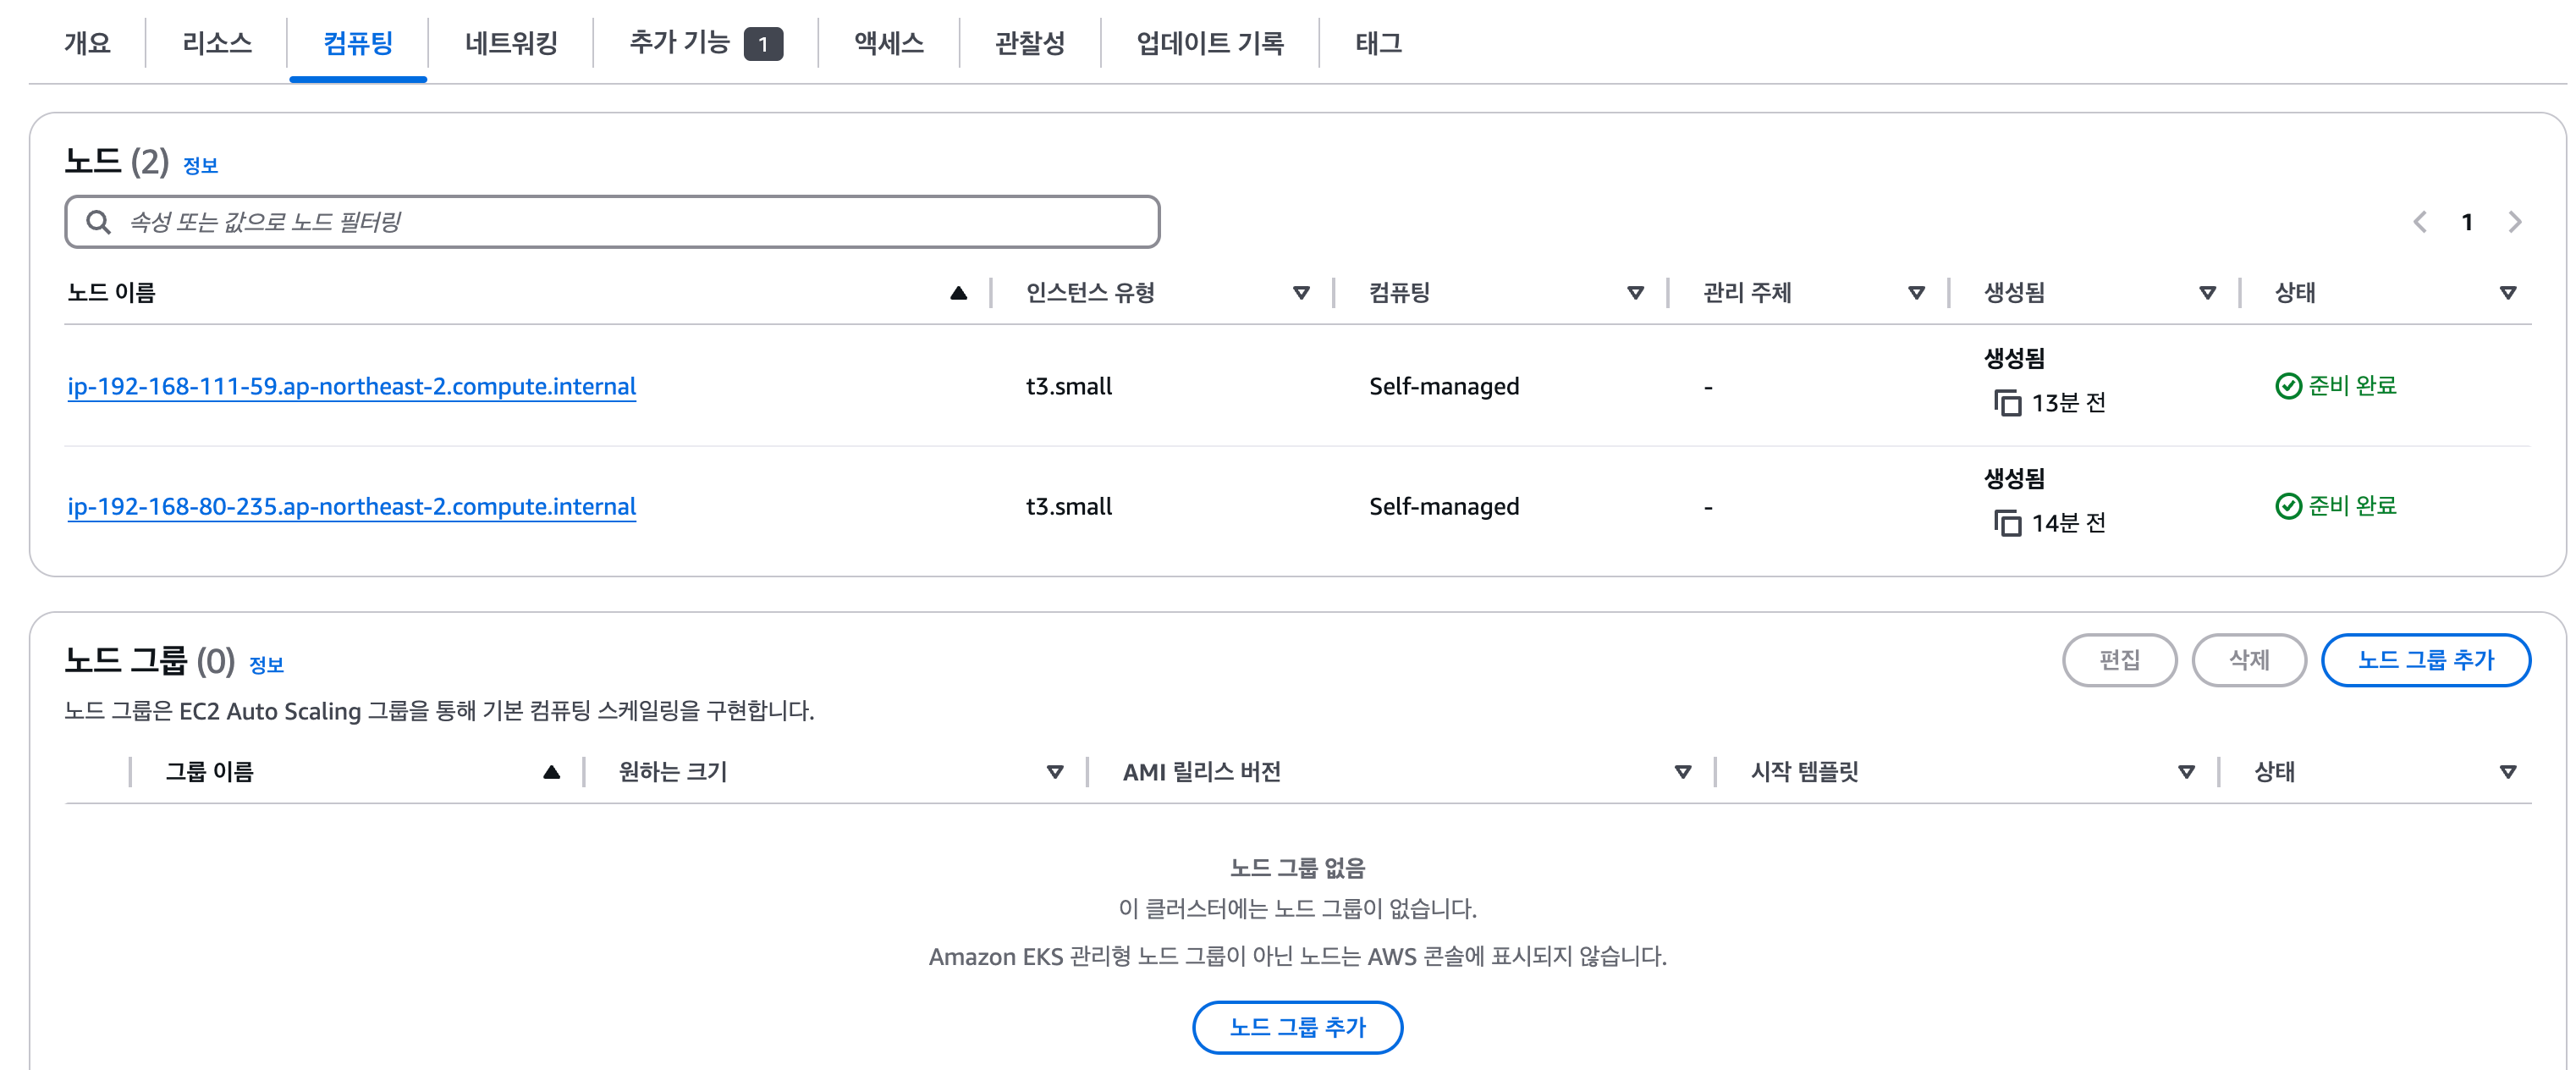
  2025-02-08 08:42:41 [ℹ]  node "ip-192-168-111-59.ap-northeast-2.compute.internal" is ready
  2025-02-08 08:42:41 [ℹ]  node "ip-192-168-80-235.ap-northeast-2.compute.internal" is ready
  2025-02-08 08:42:41 [ℹ]  waiting for at least 2 node(s) to become ready in "al2"
  2025-02-08 08:42:41 [ℹ]  nodegroup "al2" has 2 node(s)
  2025-02-08 08:42:41 [ℹ]  node "ip-192-168-111-59.ap-northeast-2.compute.internal" is ready
  2025-02-08 08:42:41 [ℹ]  node "ip-192-168-80-235.ap-northeast-2.compute.internal" is ready
  2025-02-08 08:42:41 [✔]  created 1 nodegroup(s) in cluster "myeks-sejkim"
  2025-02-08 08:42:42 [ℹ]  kubectl command should work with "/Users/sjkim/.kube/config", try 'kubectl get nodes'
2025-02-08 08:42:42 [✔] EKS cluster "myeks-sejkim" in "ap-northeast-2" region is ready-
vpc 구성된 모습
-
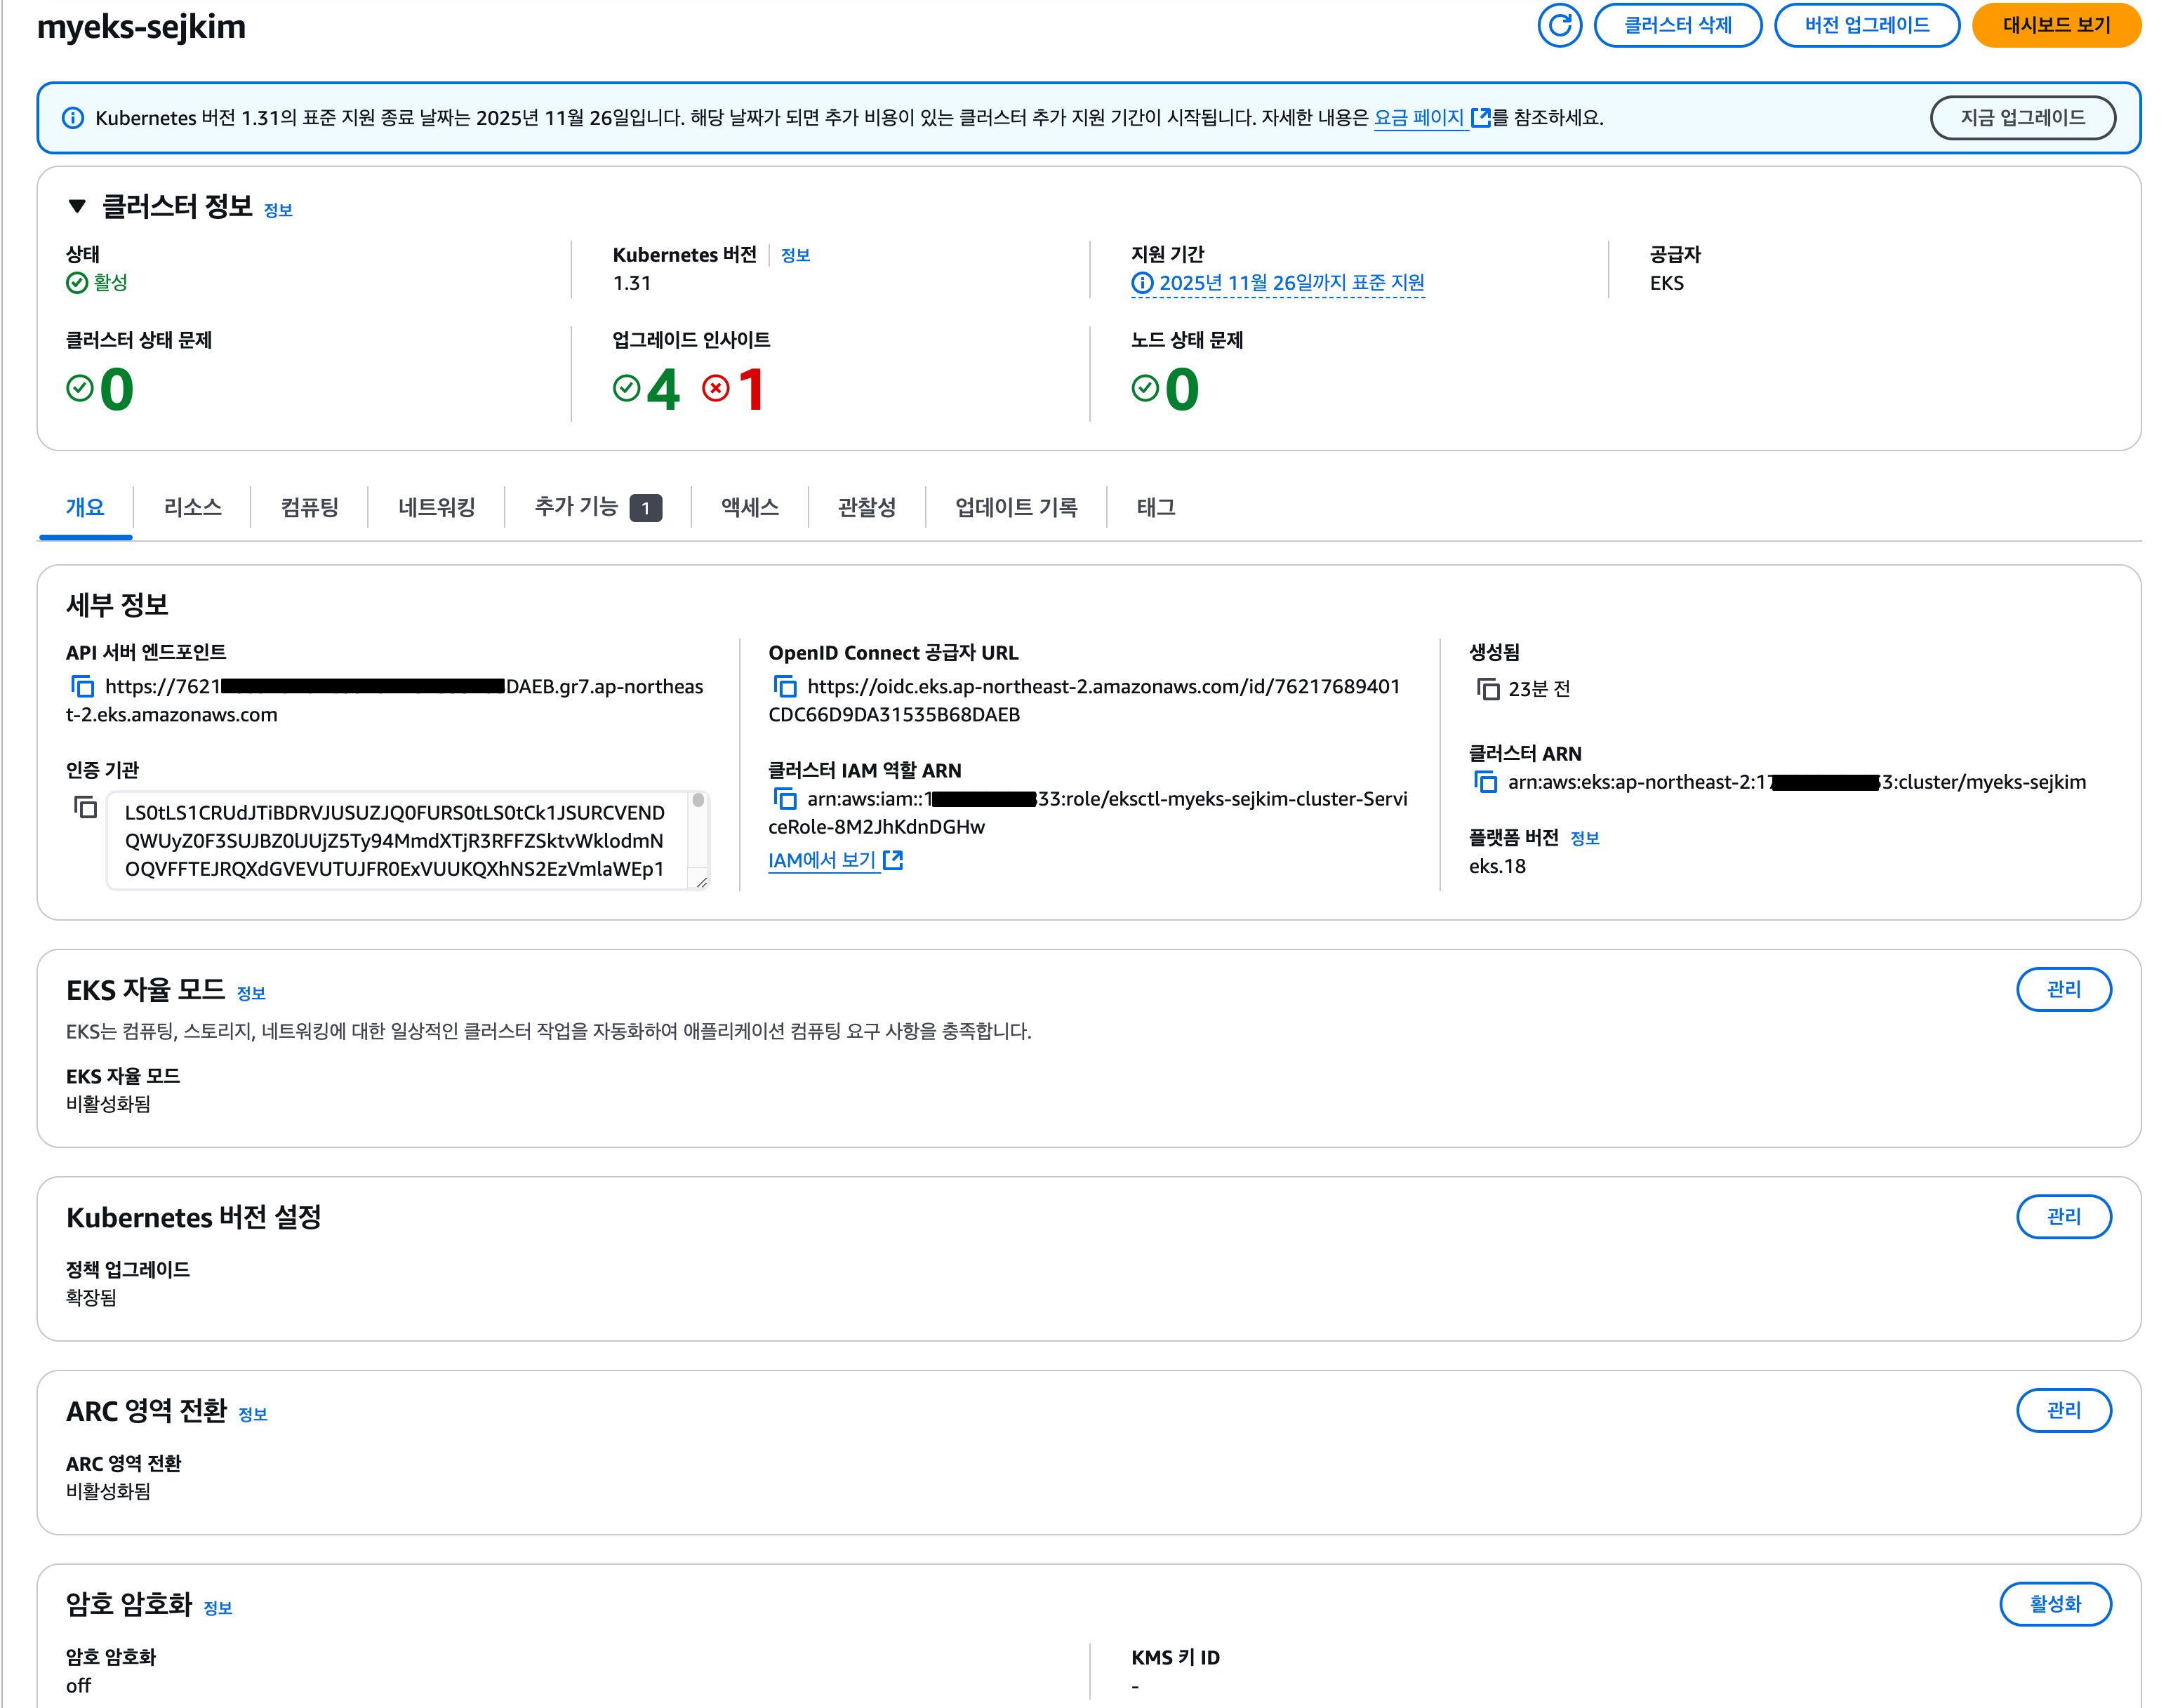
eks cluster 생성된 모습
- cluster 개요
- worker node
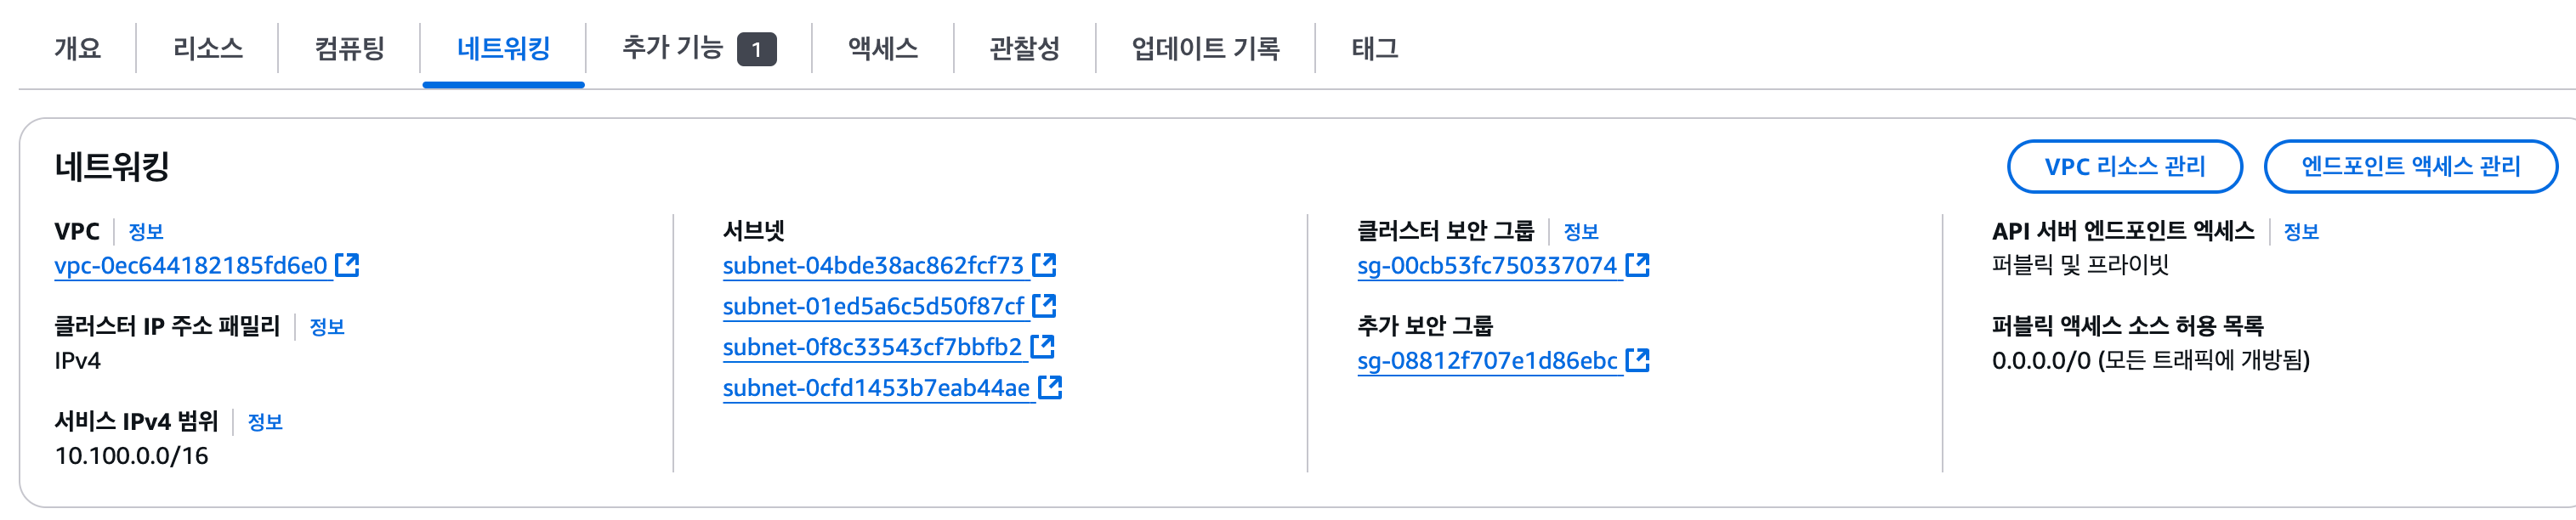
- networking : public any open으로 외부에서 접속가능. private으로 제한 필요함
- kubectl로 node와 내용 확인
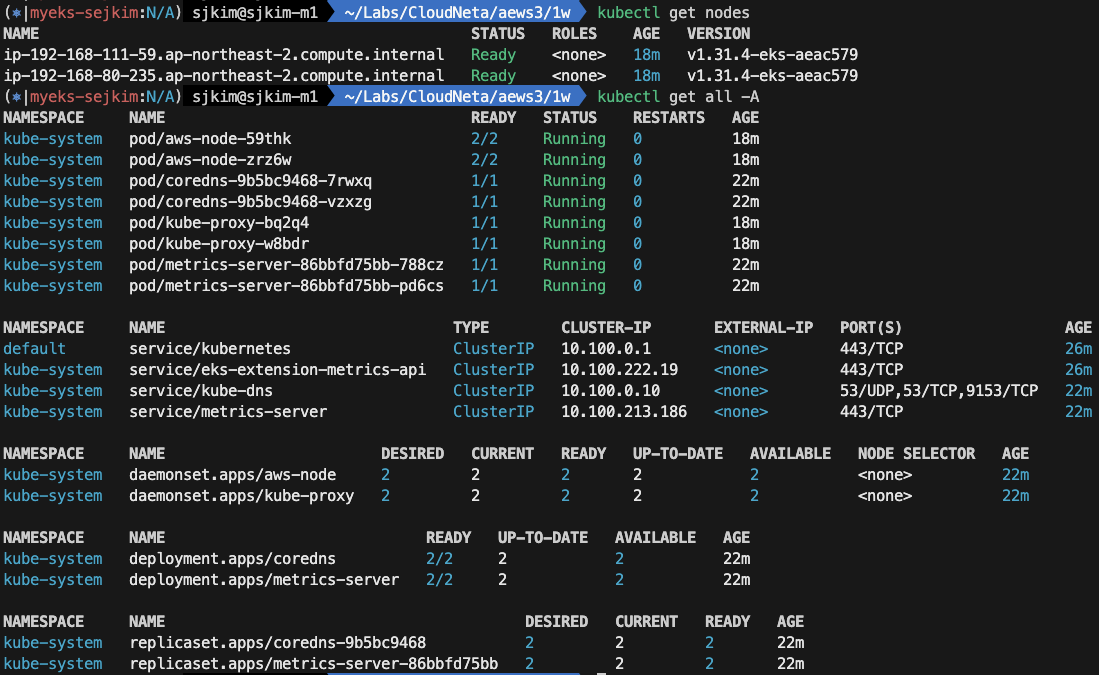
- cluster 개요
2.2 ManagedNodeGroup al2, al2023 생성
- 수정된 eksctl nodegroup용 Manifest
managedNodeGroups: - name: al2 instanceType: t3.small minSize: 2 maxSize: 2 desiredCapacity: 2 labels: role: worker amiFamily: AmazonLinux2 # overrideBootstrapCommand: | # #!/bin/bash # /etc/eks/bootstrap.sh myeks-sejkim # echo "user-script run" > /var/log/user-script.log volumeSize: 25 volumeType: gp3 volumeEncrypted: true privateNetworking: true availabilityZones: ["ap-northeast-2a", "ap-northeast-2c"] ssh: publicKeyName: sejkim - name: al2023 instanceType: t3.small minSize: 2 maxSize: 2 desiredCapacity: 2 labels: role: worker amiFamily: AmazonLinux2023 volumeSize: 25 volumeType: gp3 volumeEncrypted: true privateNetworking: true availabilityZones: ["ap-northeast-2a", "ap-northeast-2c"] ssh: publicKeyName: sejkim - NodeGroup 생성
$ eksctl create nodegroup -f eks-1-31.yaml
2025-02-08 14:38:34 [ℹ]  nodegroup "al2" will use "" [AmazonLinux2/1.31]
2025-02-08 14:38:34 [ℹ]  using EC2 key pair "sejkim"
2025-02-08 14:38:34 [ℹ]  nodegroup "al2023" will use "" [AmazonLinux2023/1.31]
2025-02-08 14:38:34 [ℹ]  using EC2 key pair "sejkim"
2025-02-08 14:38:34 [ℹ]  2 nodegroups (al2, al2023) were included (based on the include/exclude rules)
2025-02-08 14:38:34 [ℹ]  will create a CloudFormation stack for each of 2 managed nodegroups in cluster "myeks-sejkim"
2025-02-08 14:38:35 [ℹ]
2 sequential tasks: { fix cluster compatibility, 1 task: {
2 parallel tasks: { create managed nodegroup "al2", create managed nodegroup "al2023"
} }
}
2025-02-08 14:38:35 [ℹ]  checking cluster stack for missing resources
2025-02-08 14:38:35 [ℹ]  cluster stack has all required resources
2025-02-08 14:38:35 [ℹ]  building managed nodegroup stack "eksctl-myeks-sejkim-nodegroup-al2023"
2025-02-08 14:38:35 [ℹ]  building managed nodegroup stack "eksctl-myeks-sejkim-nodegroup-al2"
2025-02-08 14:38:36 [ℹ]  deploying stack "eksctl-myeks-sejkim-nodegroup-al2023"
2025-02-08 14:38:36 [ℹ]  waiting for CloudFormation stack "eksctl-myeks-sejkim-nodegroup-al2023"
2025-02-08 14:38:36 [ℹ]  deploying stack "eksctl-myeks-sejkim-nodegroup-al2"
2025-02-08 14:38:36 [ℹ]  waiting for CloudFormation stack "eksctl-myeks-sejkim-nodegroup-al2"
2025-02-08 14:39:06 [ℹ]  waiting for CloudFormation stack "eksctl-myeks-sejkim-nodegroup-al2023"
2025-02-08 14:39:06 [ℹ]  waiting for CloudFormation stack "eksctl-myeks-sejkim-nodegroup-al2"
2025-02-08 14:40:00 [ℹ]  waiting for CloudFormation stack "eksctl-myeks-sejkim-nodegroup-al2"
2025-02-08 14:40:01 [ℹ]  waiting for CloudFormation stack "eksctl-myeks-sejkim-nodegroup-al2023"
2025-02-08 14:41:19 [ℹ]  waiting for CloudFormation stack "eksctl-myeks-sejkim-nodegroup-al2023"
2025-02-08 14:41:53 [ℹ]  waiting for CloudFormation stack "eksctl-myeks-sejkim-nodegroup-al2"
2025-02-08 14:41:53 [ℹ]  no tasks
2025-02-08 14:41:53 [✔]  created 0 nodegroup(s) in cluster "myeks-sejkim"
2025-02-08 14:41:53 [ℹ]  nodegroup "al2" has 2 node(s)
2025-02-08 14:41:53 [ℹ]  node "ip-192-168-116-136.ap-northeast-2.compute.internal" is ready
2025-02-08 14:41:53 [ℹ]  node "ip-192-168-76-0.ap-northeast-2.compute.internal" is ready
2025-02-08 14:41:53 [ℹ]  waiting for at least 2 node(s) to become ready in "al2"
2025-02-08 14:41:53 [ℹ]  nodegroup "al2" has 2 node(s)
2025-02-08 14:41:53 [ℹ]  node "ip-192-168-116-136.ap-northeast-2.compute.internal" is ready
2025-02-08 14:41:53 [ℹ]  node "ip-192-168-76-0.ap-northeast-2.compute.internal" is ready
2025-02-08 14:41:53 [ℹ]  nodegroup "al2023" has 2 node(s)
2025-02-08 14:41:53 [ℹ]  node "ip-192-168-114-191.ap-northeast-2.compute.internal" is ready
2025-02-08 14:41:53 [ℹ]  node "ip-192-168-88-26.ap-northeast-2.compute.internal" is ready
2025-02-08 14:41:53 [ℹ]  waiting for at least 2 node(s) to become ready in "al2023"
2025-02-08 14:41:53 [ℹ]  nodegroup "al2023" has 2 node(s)
2025-02-08 14:41:53 [ℹ]  node "ip-192-168-114-191.ap-northeast-2.compute.internal" is ready
2025-02-08 14:41:53 [ℹ]  node "ip-192-168-88-26.ap-northeast-2.compute.internal" is ready
2025-02-08 14:41:53 [✔]  created 2 managed nodegroup(s) in cluster "myeks-sejkim"
2025-02-08 14:41:53 [ℹ]  checking security group configuration for all nodegroups
2025-02-08 14:41:53 [ℹ] all nodegroups have up-to-date cloudformation templates- NodeGroup 생성된 모습
- EKS Console에서 NodeGroup과 EC2 조회 됨
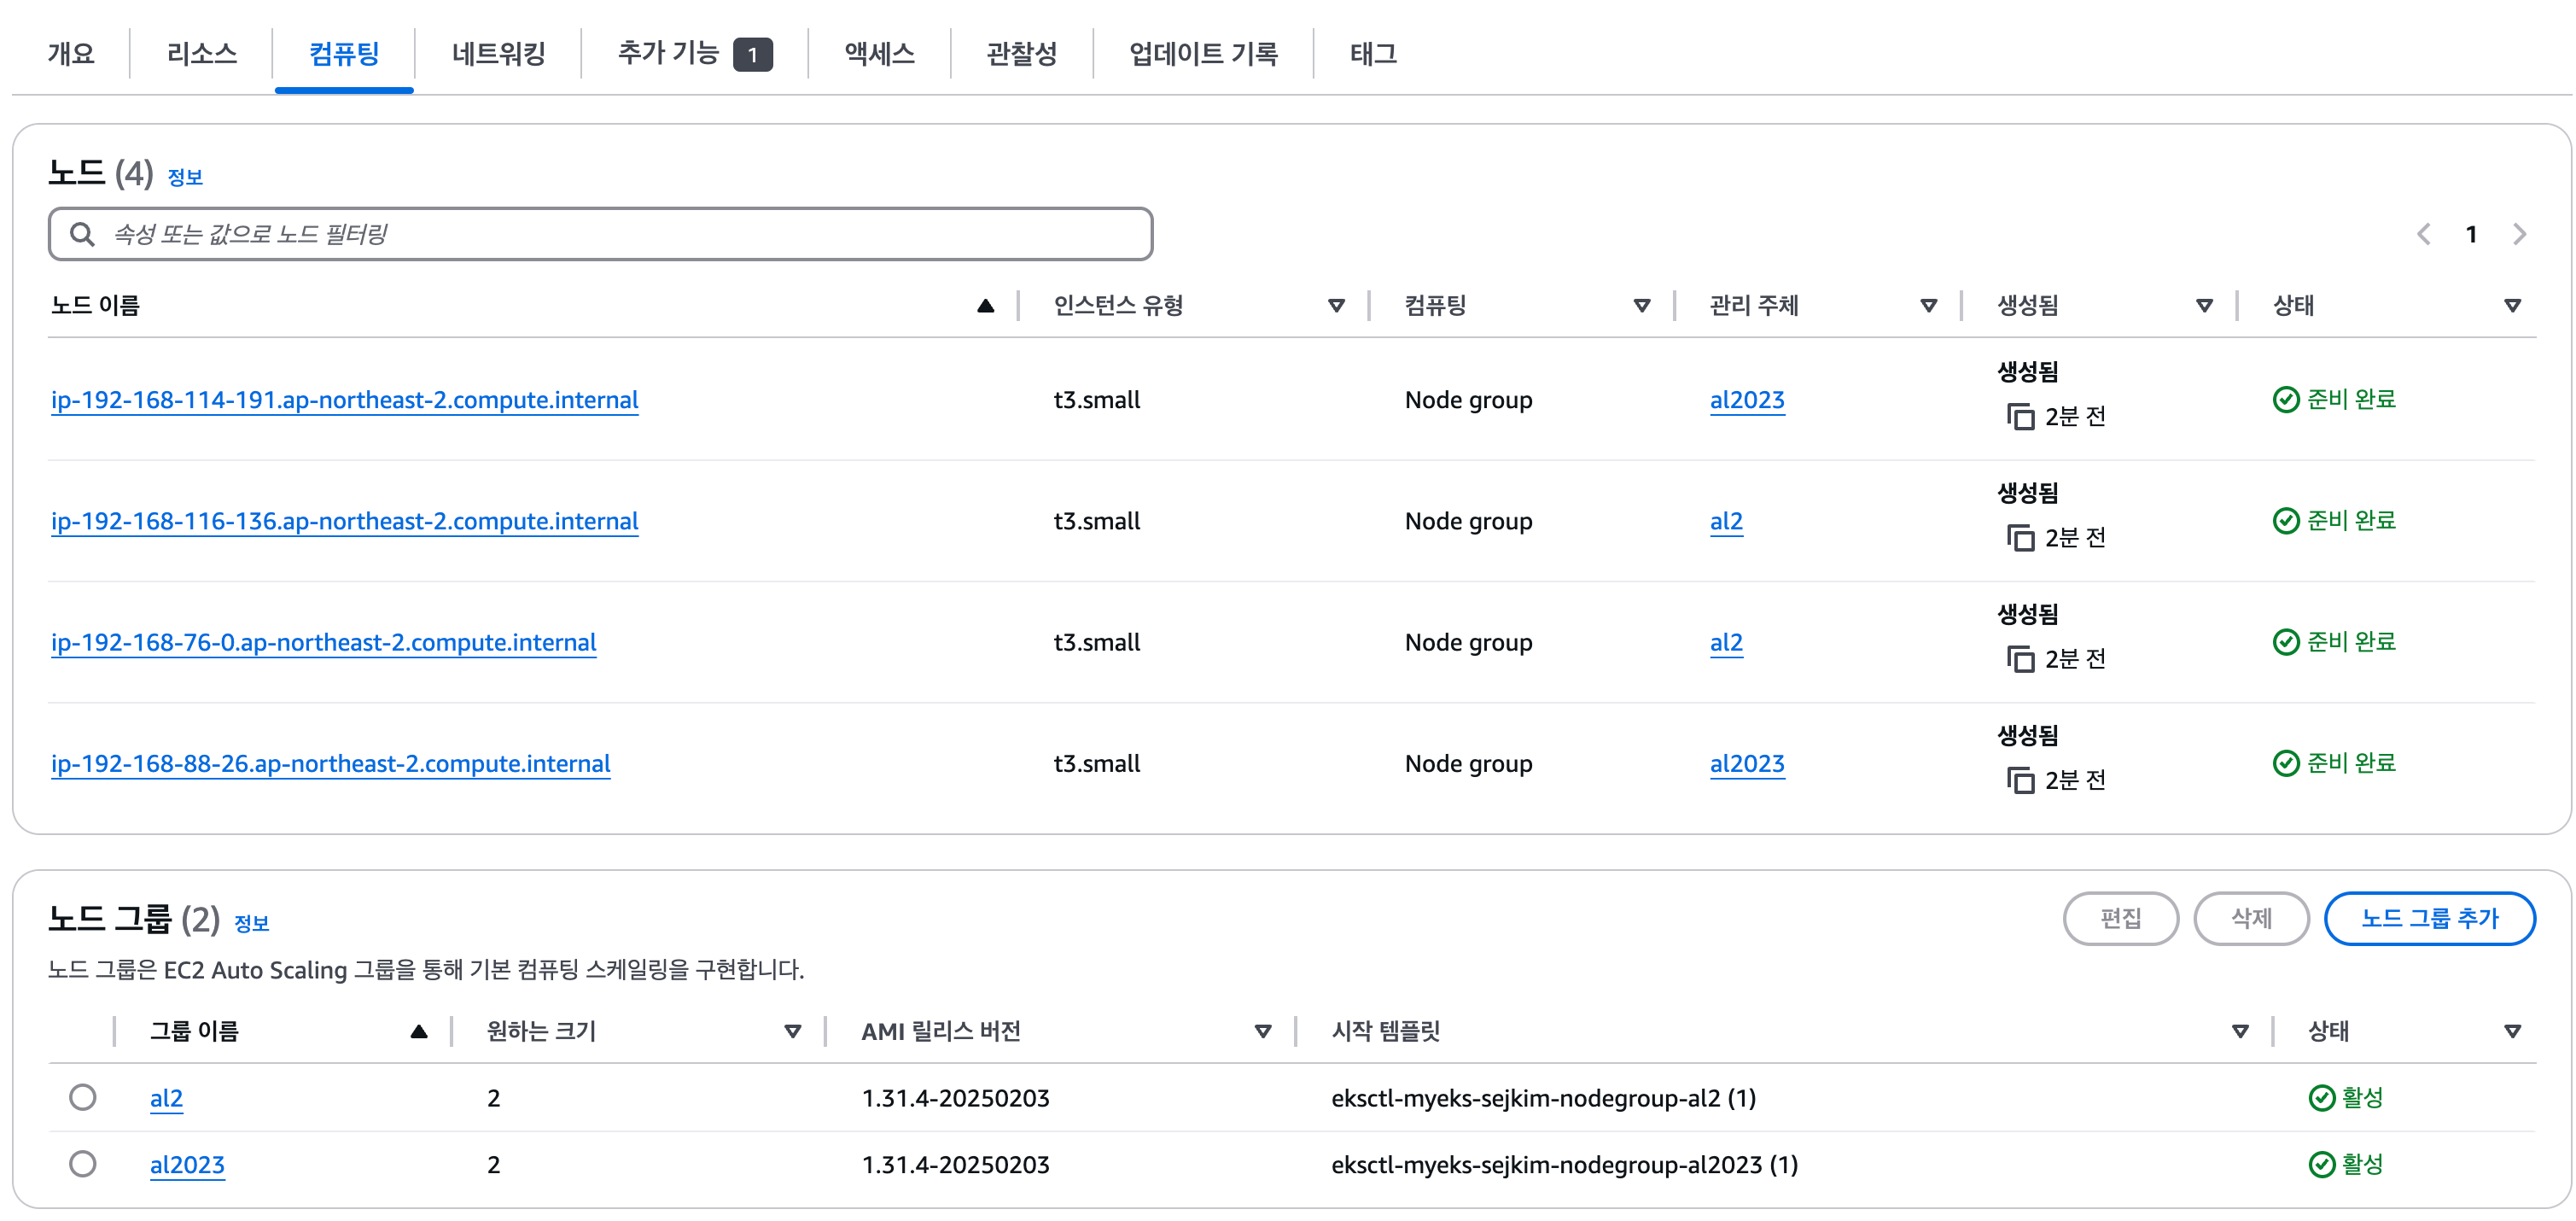
- AutoScaling Group에 생성된 모습

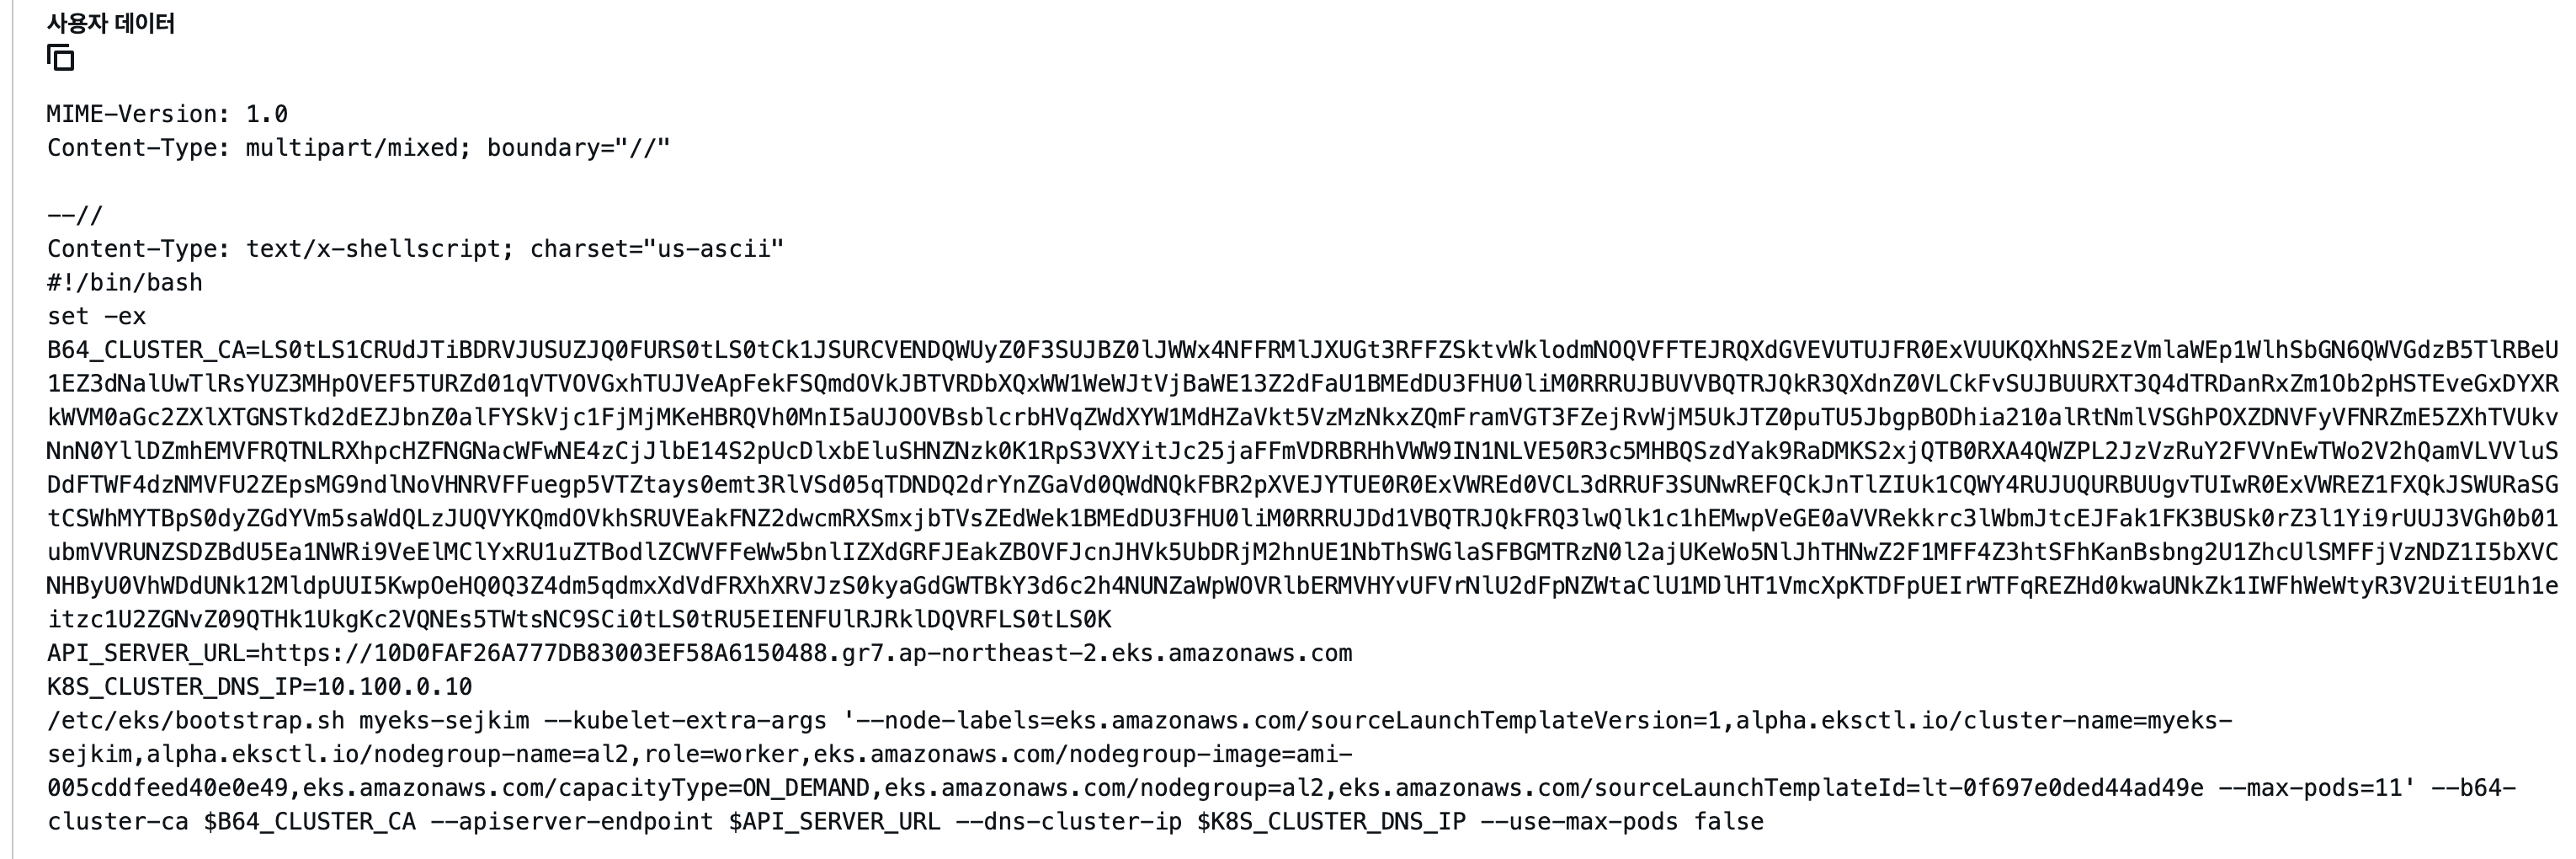
- AL2 NodeGroup Userdata : /etc/eks/bootstrap.sh 명령어로 Cluster Join
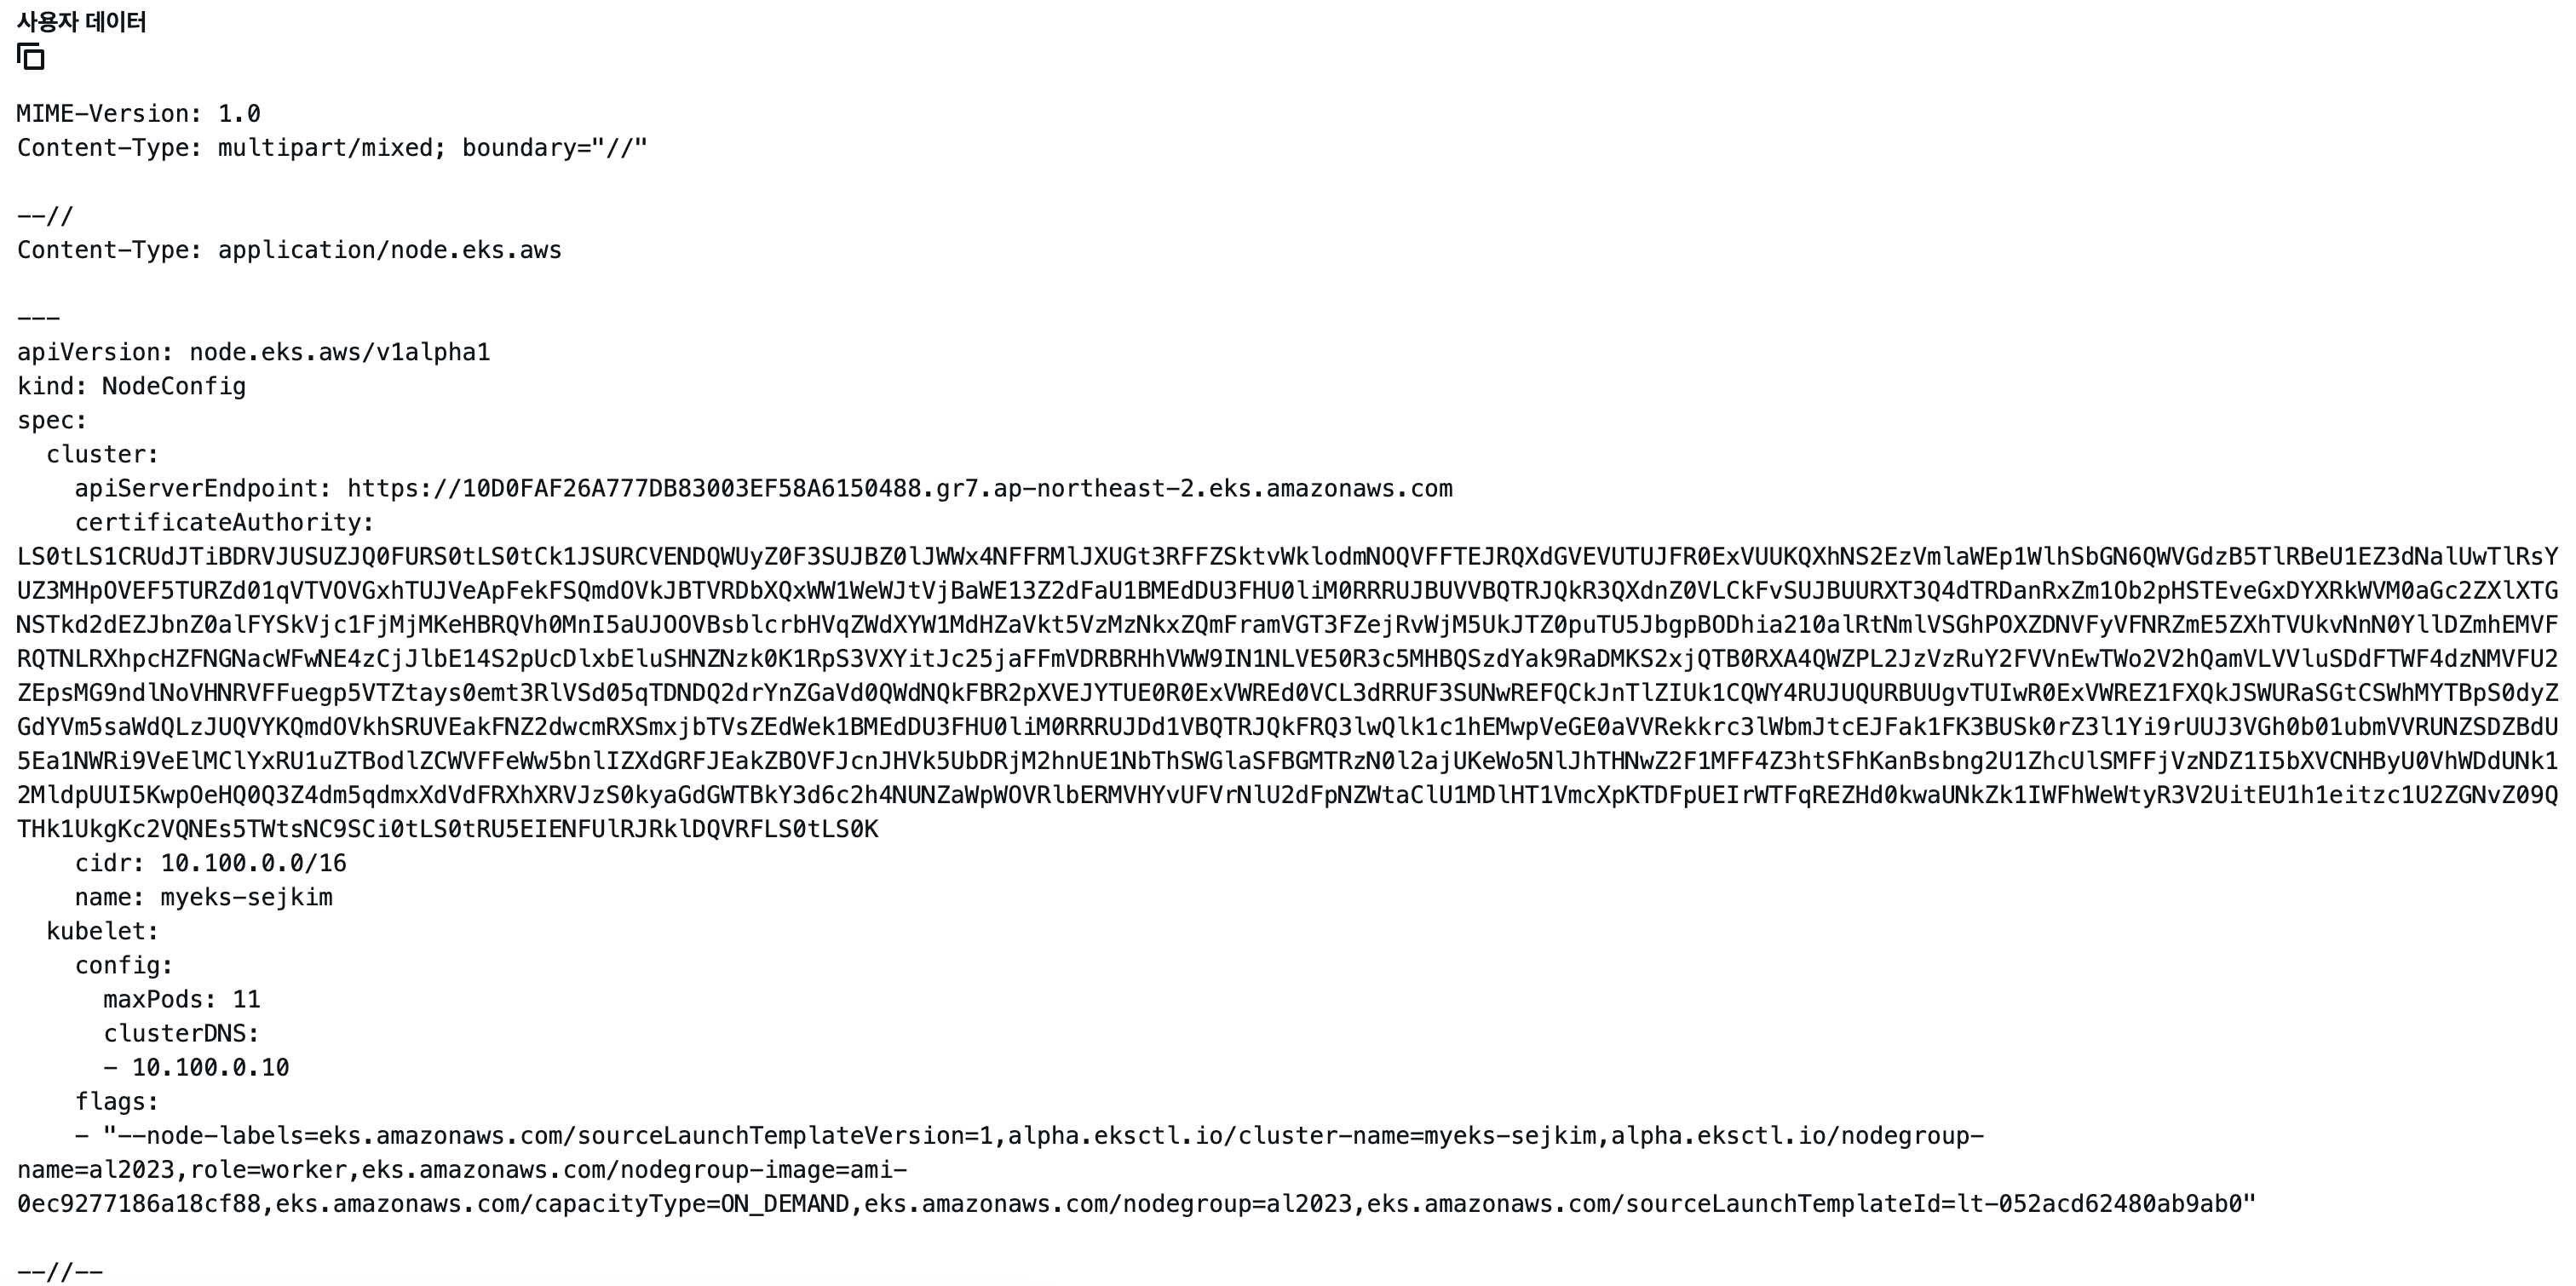
- AL2023 NodeGroup Userdata : NodeConfig 형식으로 변경, 내부적으로 nodeadm init 명령어 실행되어 Cluster Join
- EKS Console에서 NodeGroup과 EC2 조회 됨
- cgroup 버전 확인
- al2 : cgroup v1
- al2023 : cgroup v2
- al2 : cgroup v1
3. EKS 관련 SecurityGroup
3.1 EKS Cluster/NodeGroup Security Group
EKS Cluster와 NodeGroup 생성 시 다양한 Security Group이 생성 됨
올바르게 이해하지 않고 정책을 추가하다 보면 여러 곳에 중복되거나 과도하게 정책 추가되어 보안상 이슈발생되고 관리에 어려움이 발생 됨
-
eks cluster와 2개 노드그룹 생성 시 자동 생성 된 Security Group

-
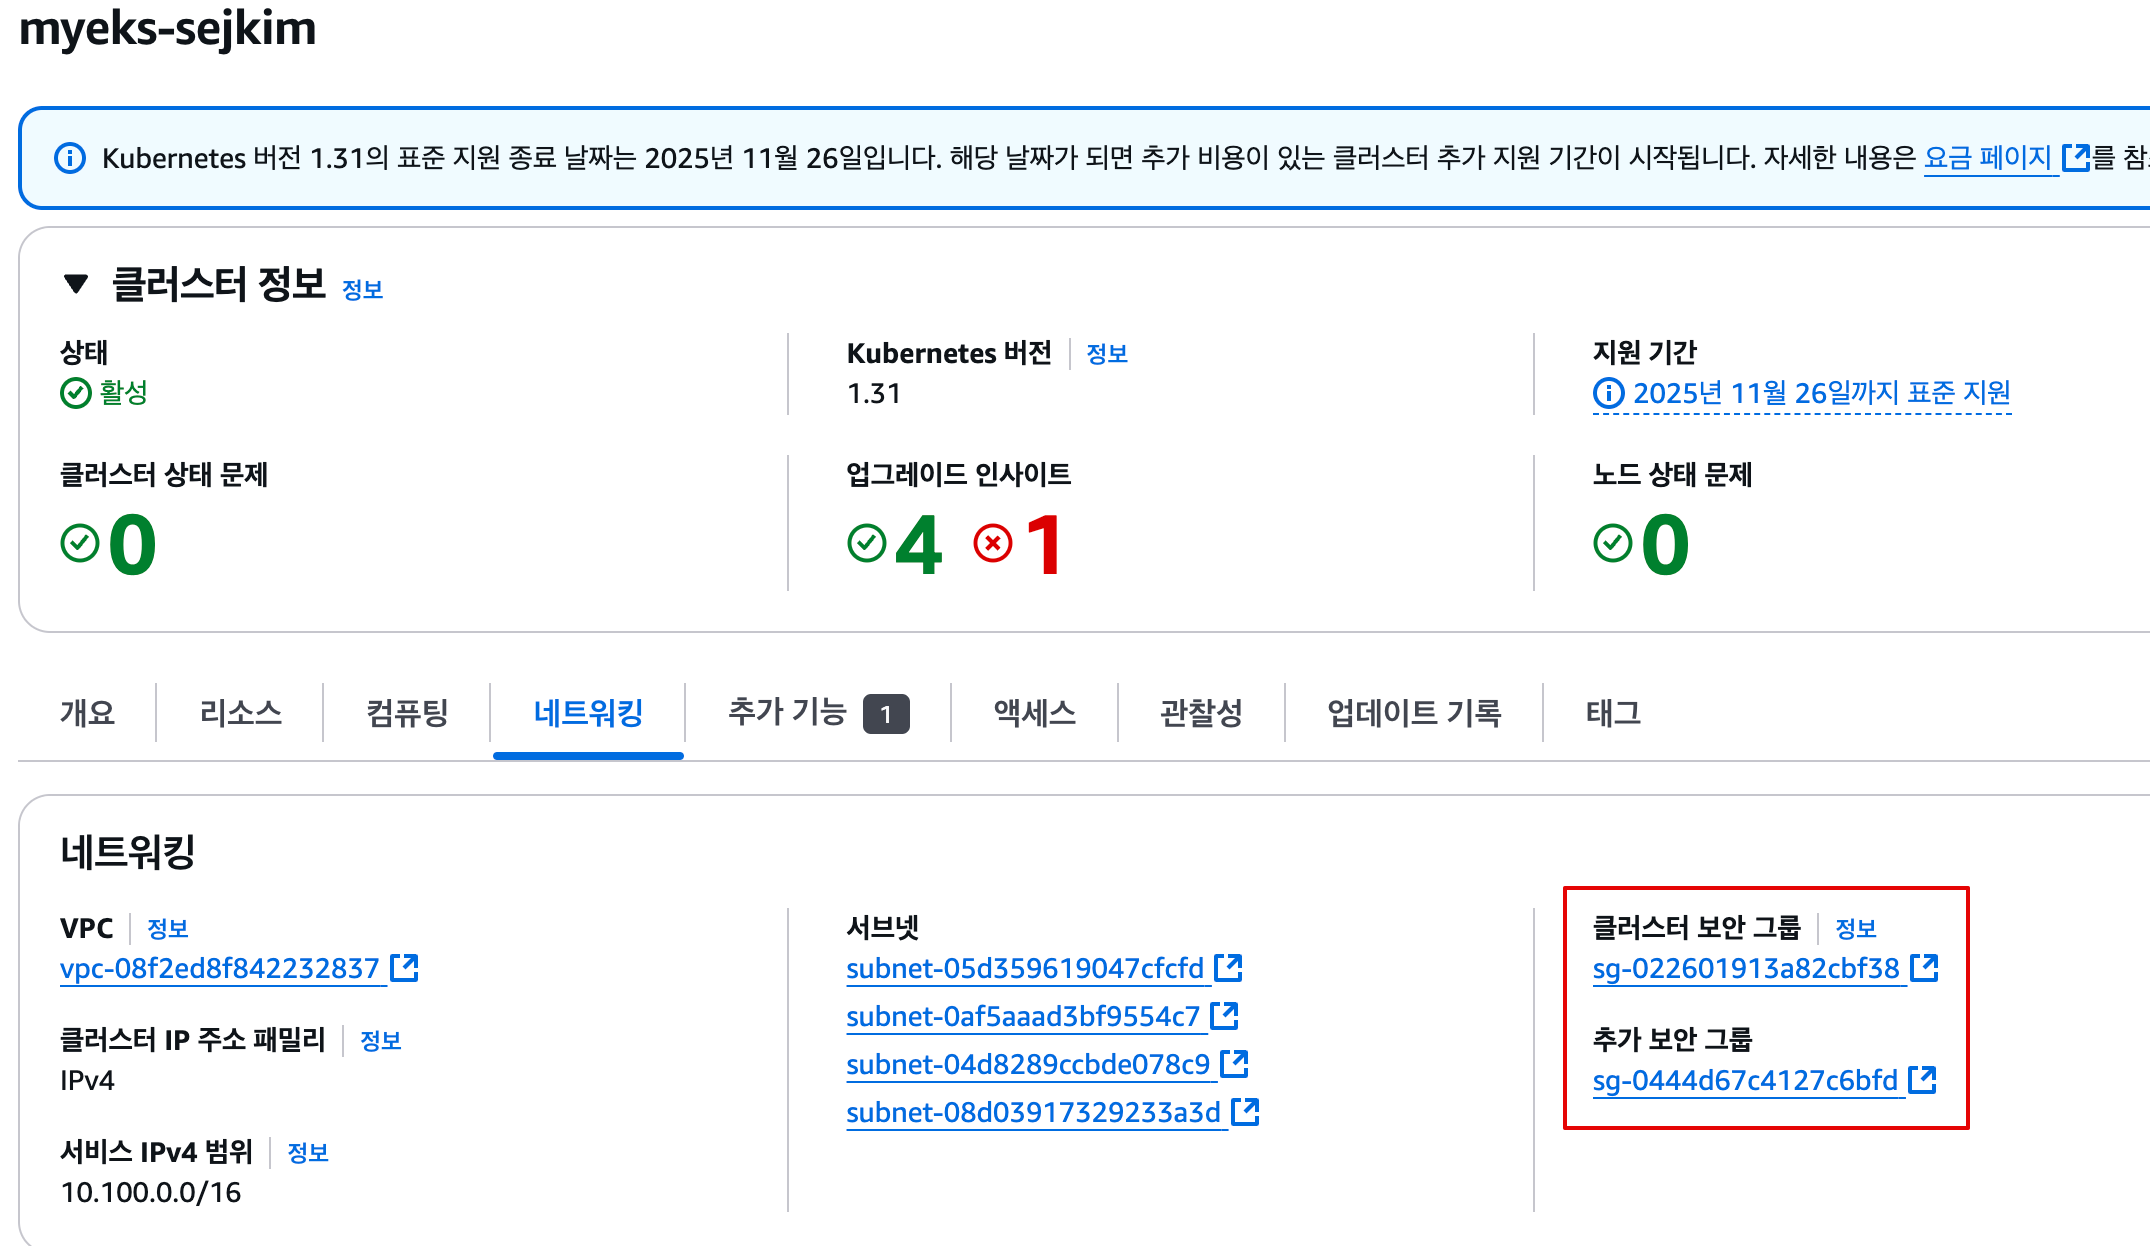
Control Plane에서 조회되는 Security Group
-
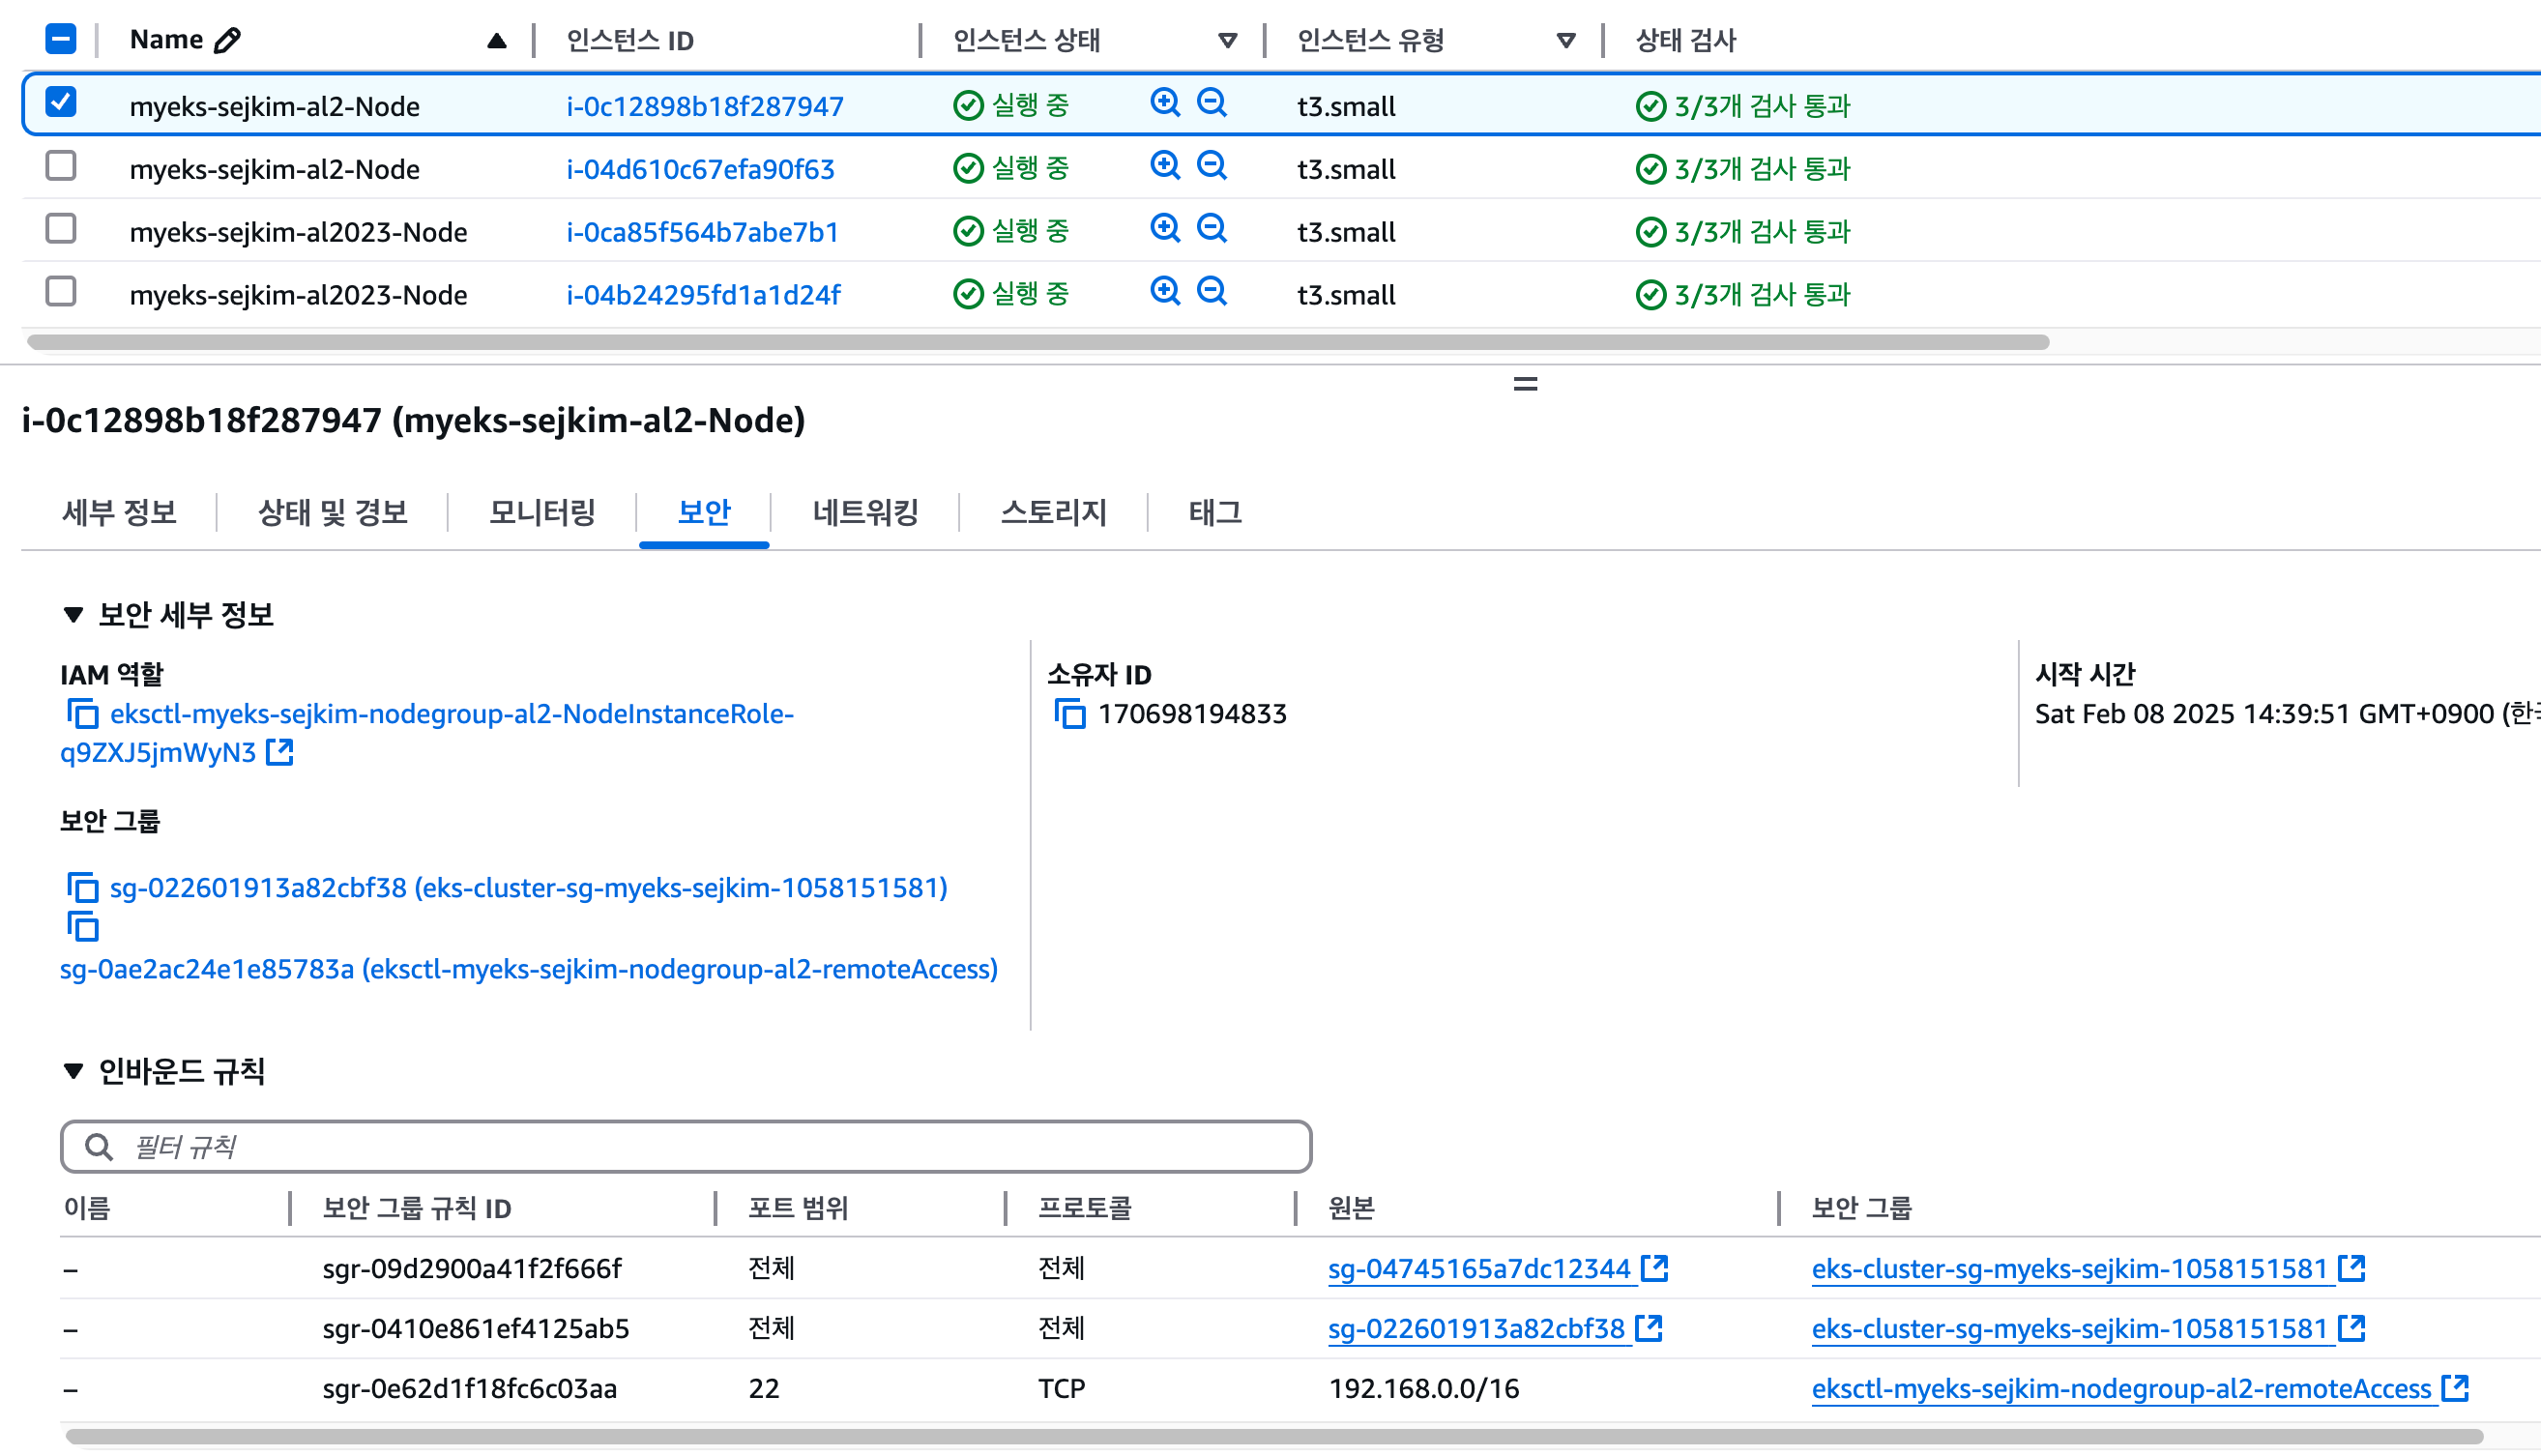
NodeGroup에서 조회되는 Security Group
- al2
- al2023
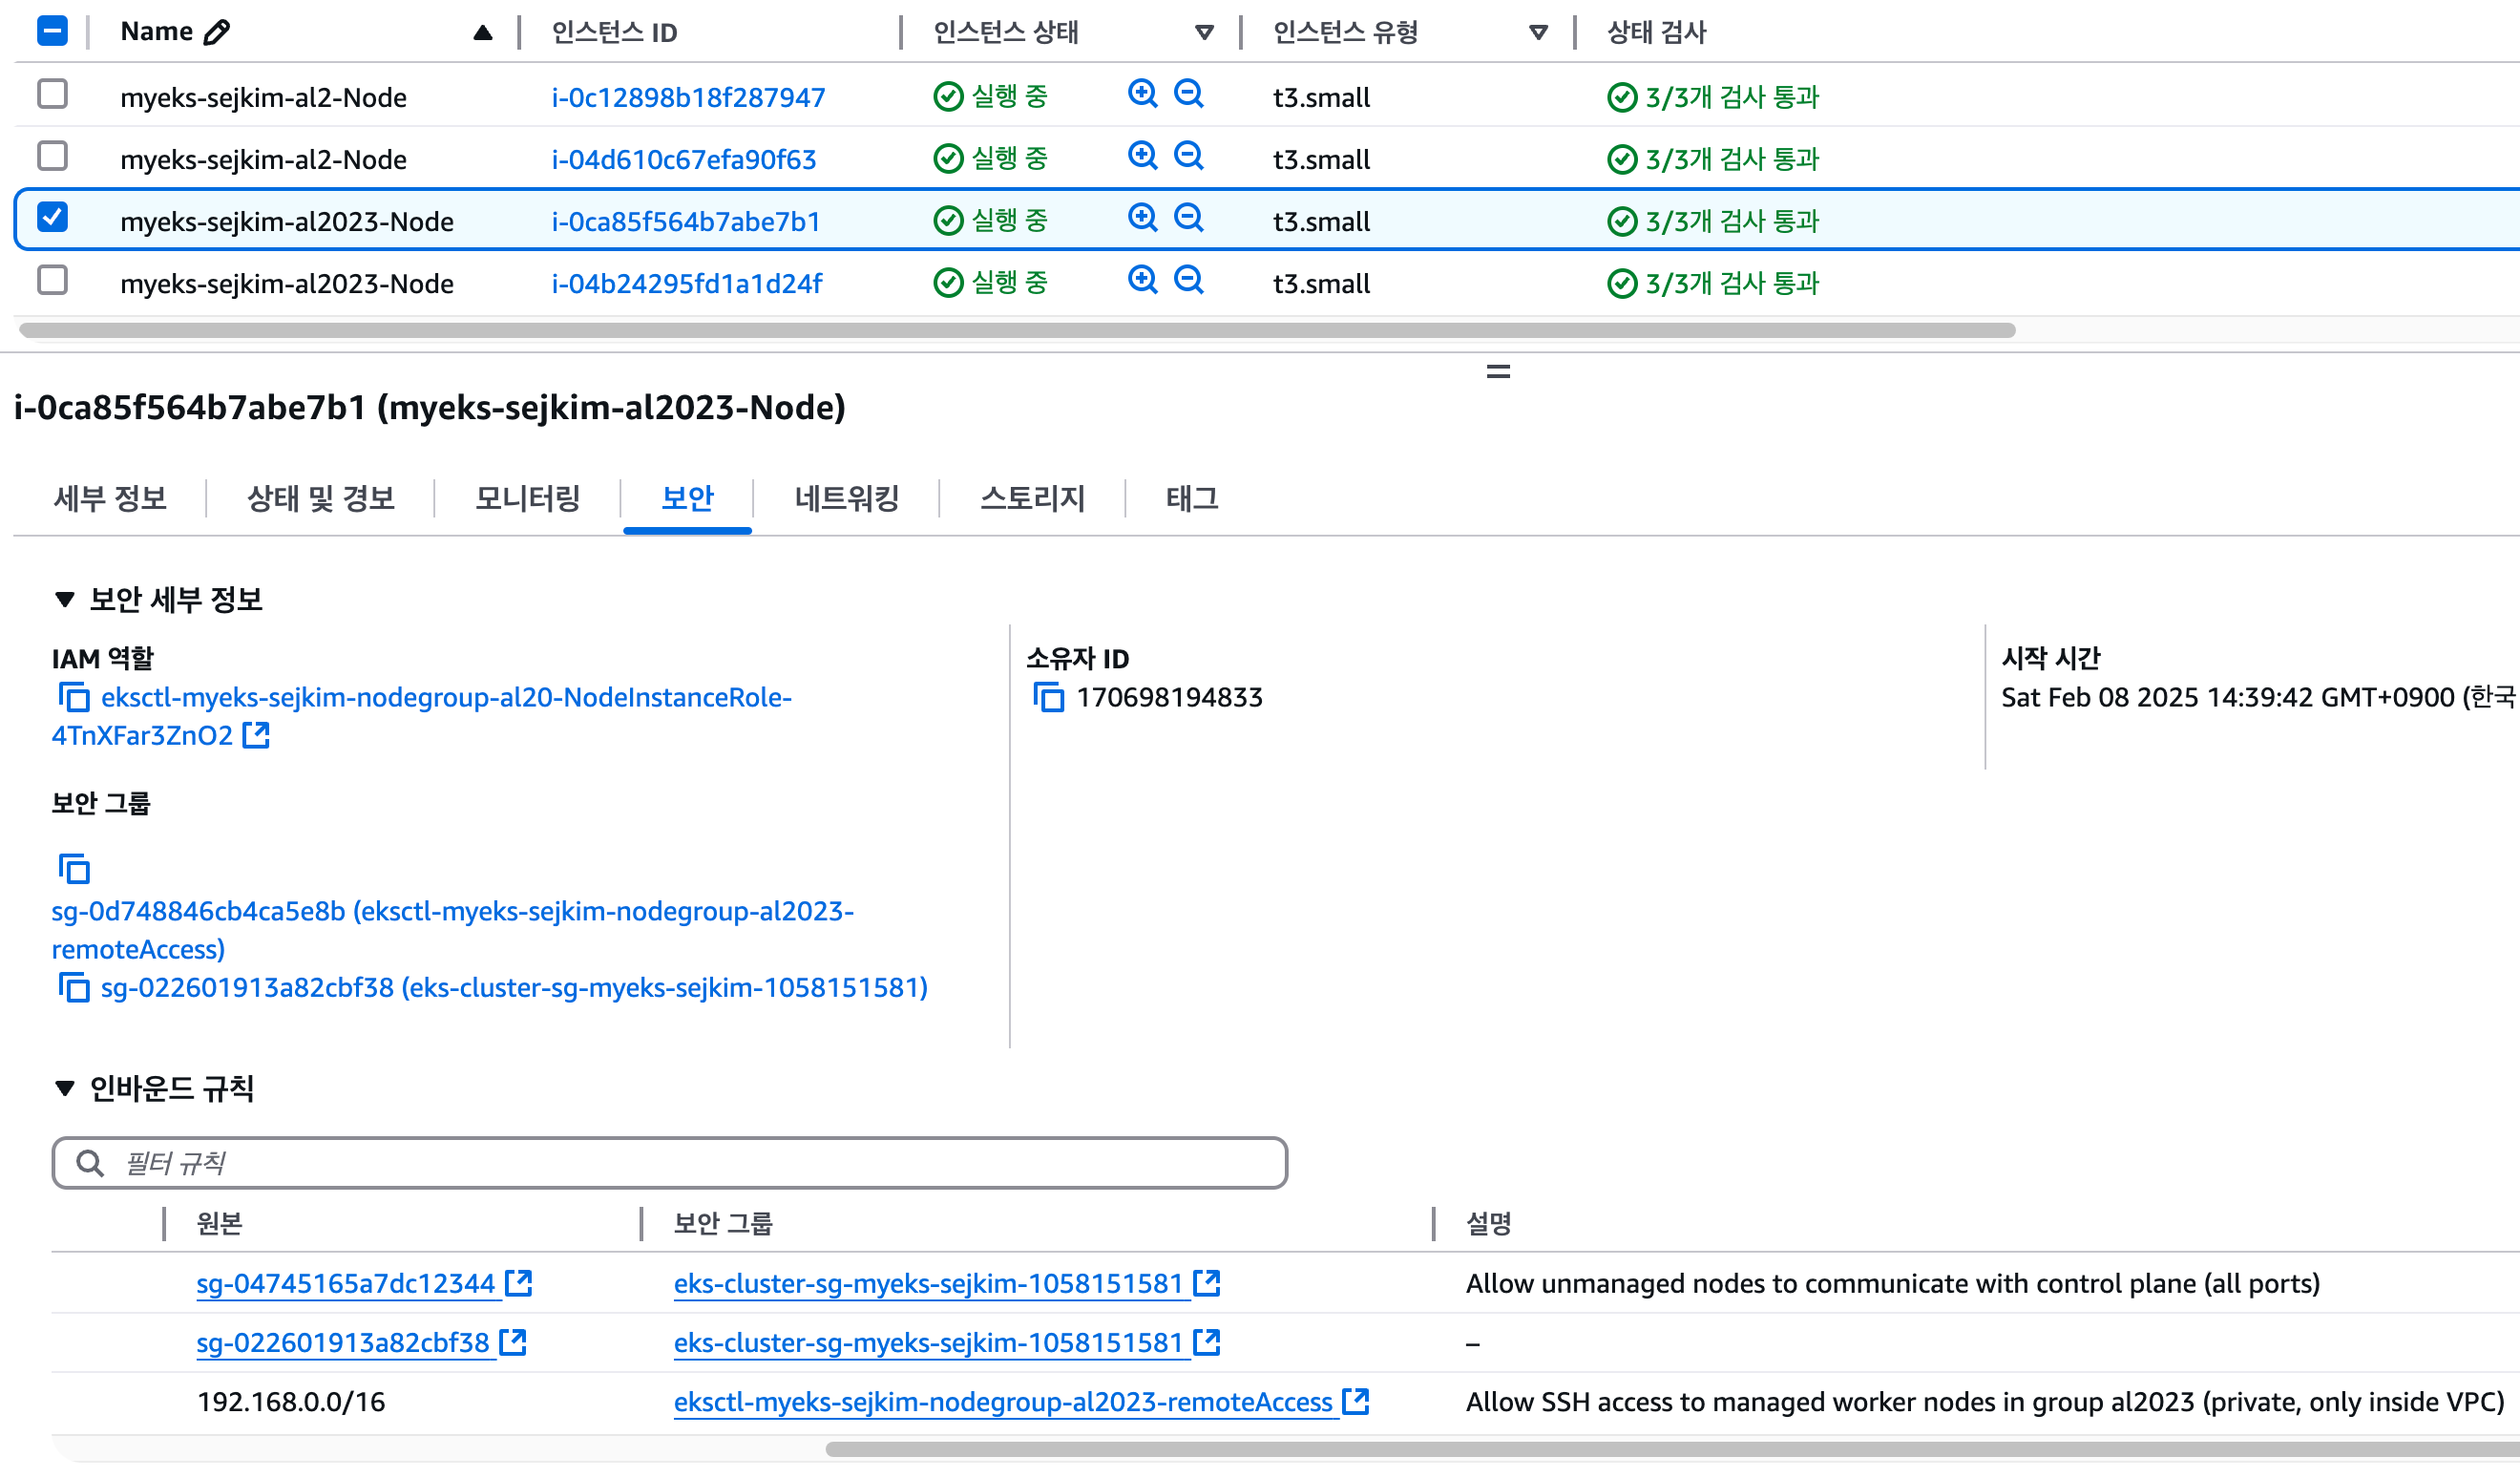
- al2
3.2 Security Group별 용도
-
클러스터 보안 그룹 (eks-cluster-sg-myeks-sejkim-1058151581)
- eks-cluster-sg-myeks-sejkim Inbound 모두 허용
- eksctl-myeks-sejkim-cluster-ClusterSharedSecurityGroup Inbound 모두 허용
- 각 node eni와 control plane eni에서 사용
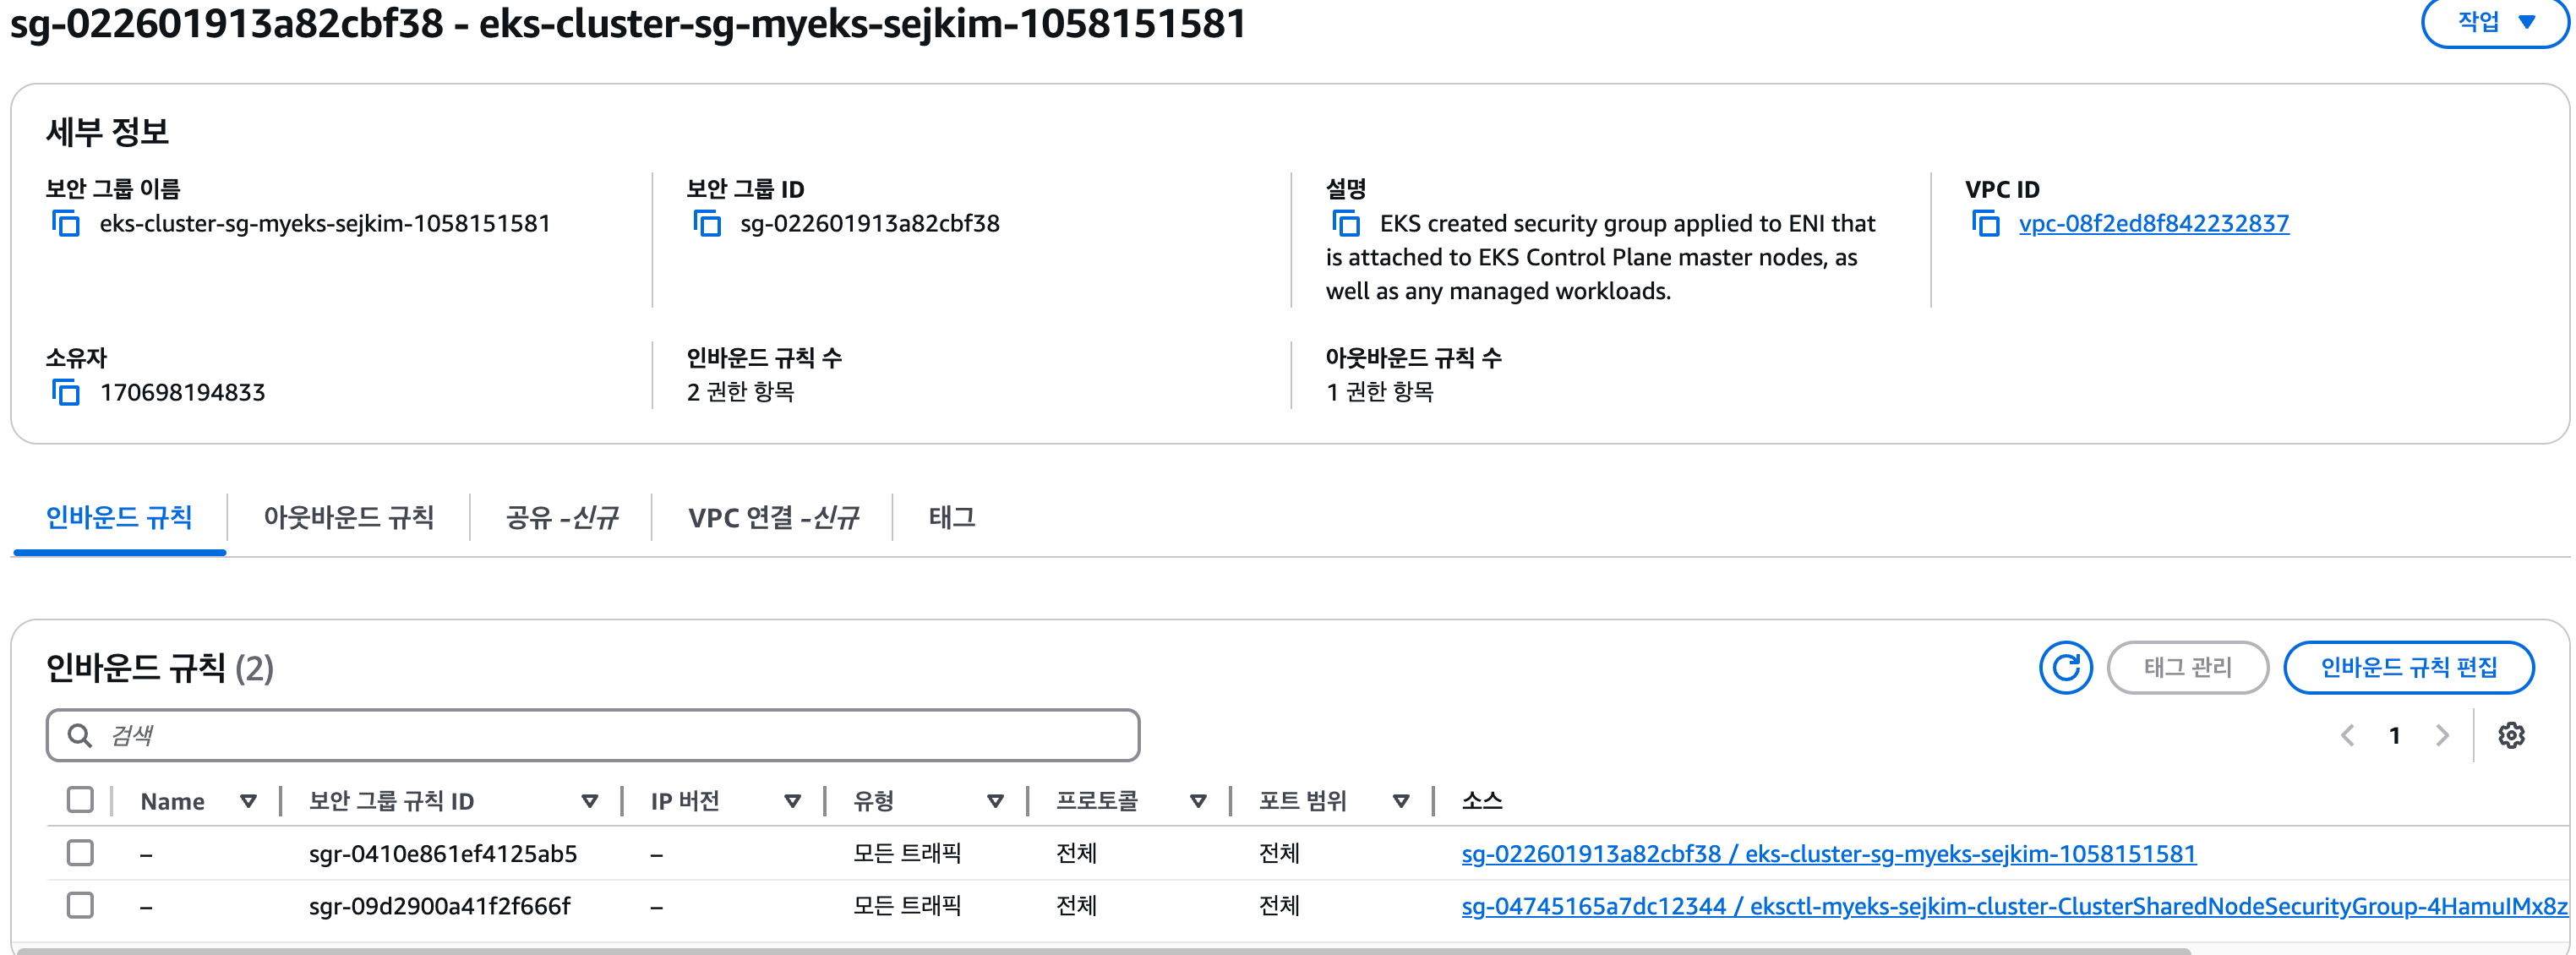
-
추가 보안 그룹 (eksctl-myeks-sejkim-cluster-ControlPlaneSecurityGroup-7Fkr9kGaCWLx)
- 초기 비워 있음
- eks management 콘솔, ci/cd에서 api-service 접속 필요 시 정책 추가
- control plane eni에서 사용
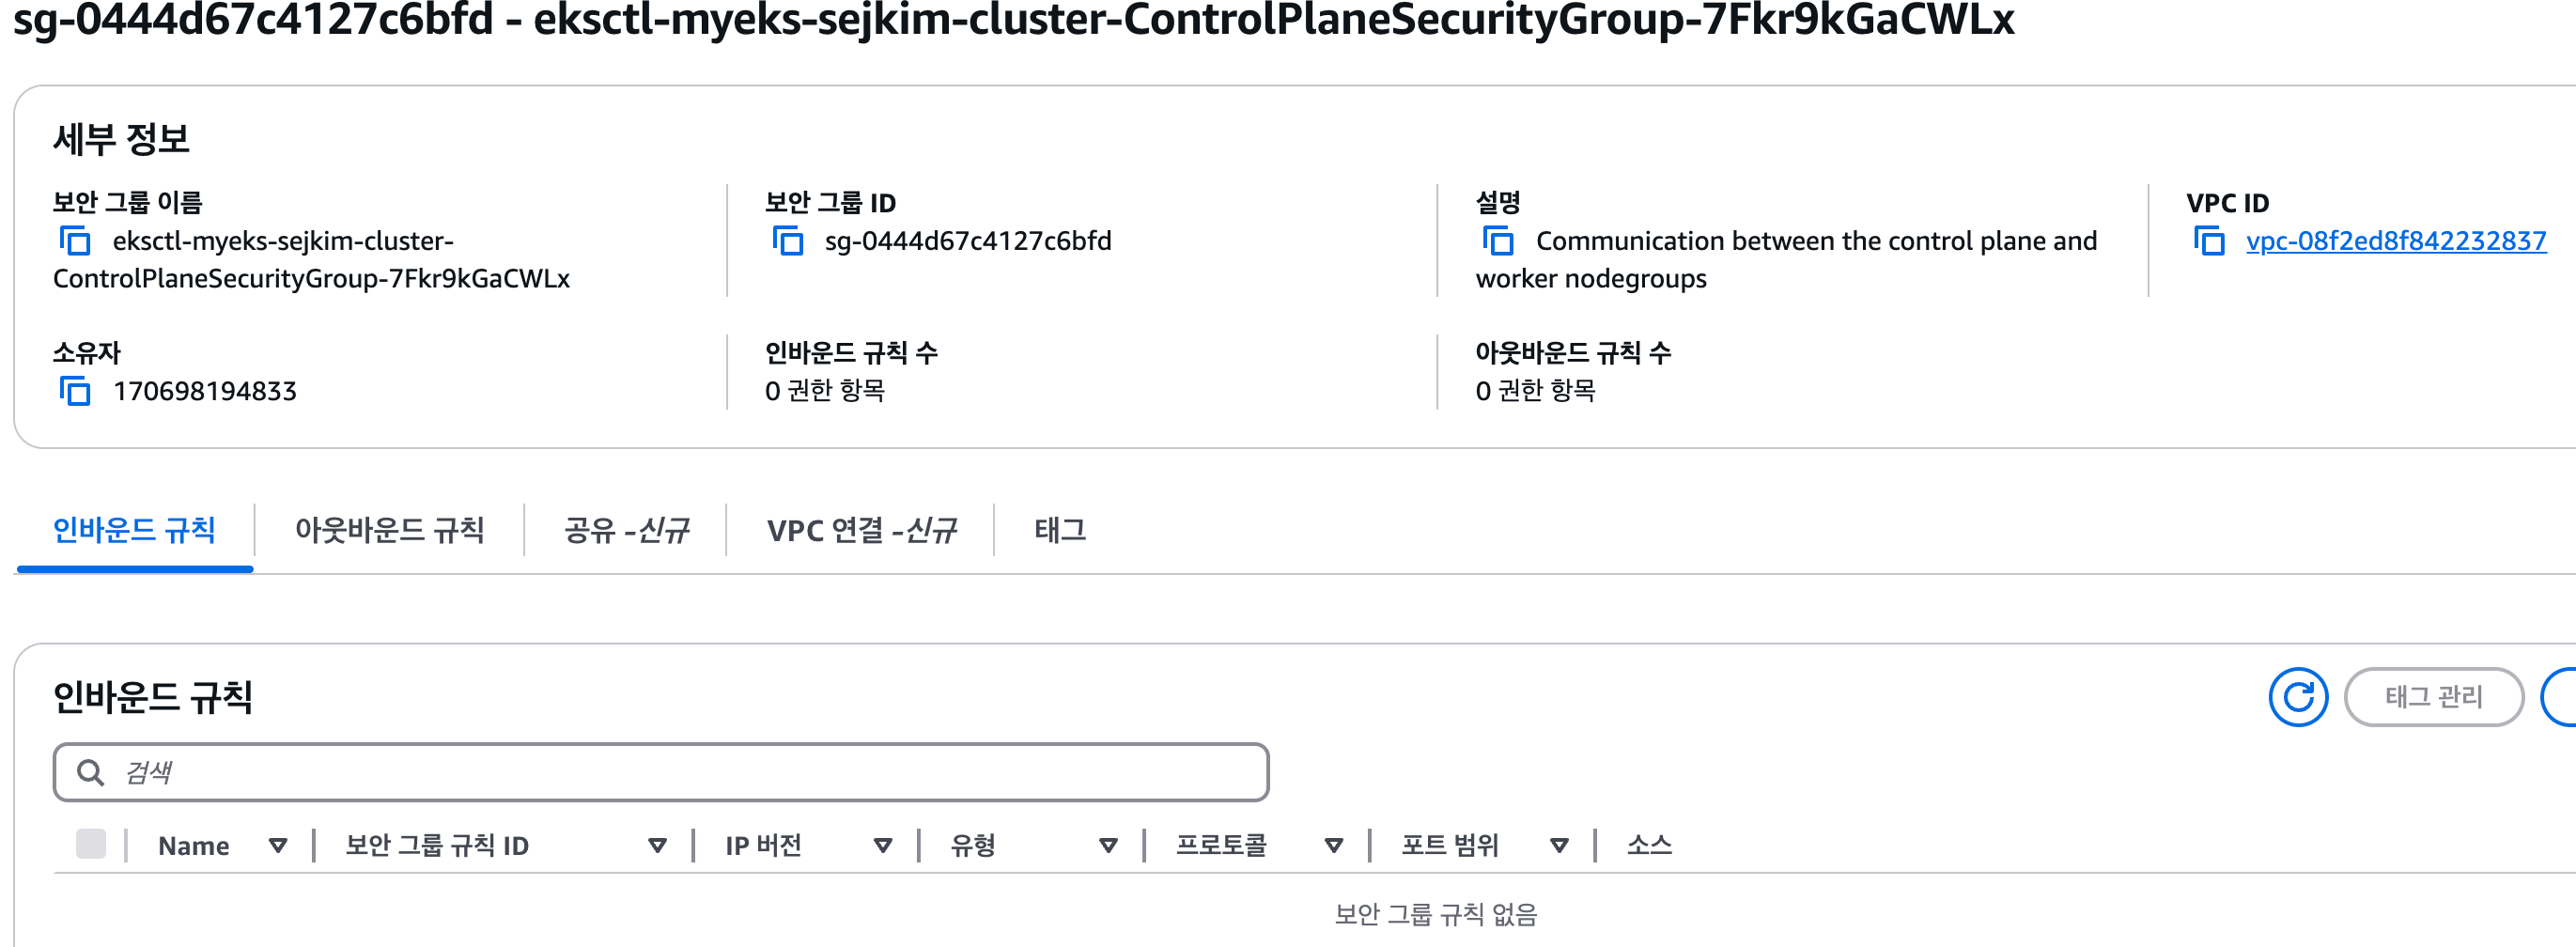
-
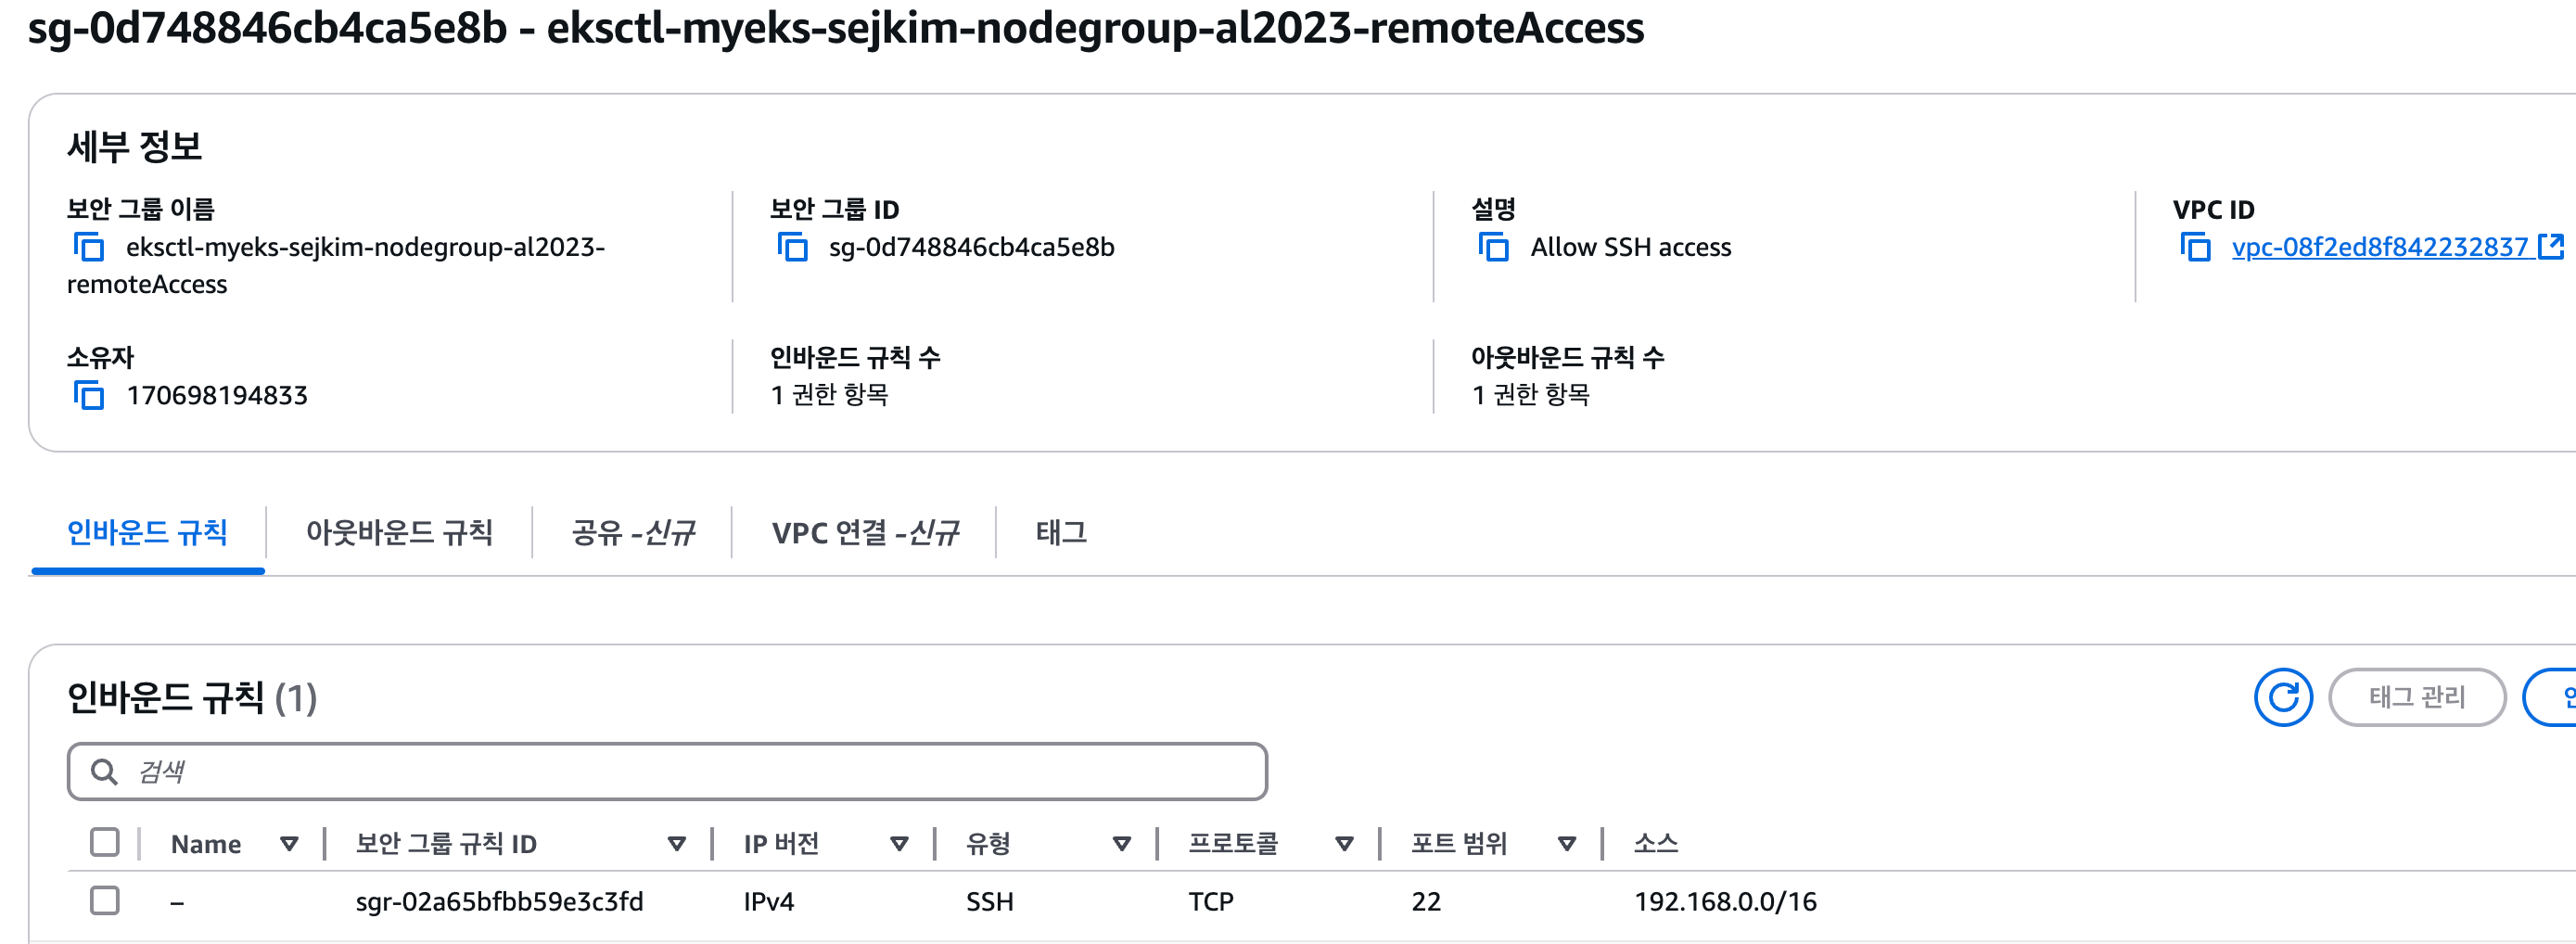
node 보안 그룹 (eksctl-myeks-sejkim-nodegroup-al2-remoteAccess, eksctl-myeks-sejkim-nodegroup-al2023-remoteAccess)
- NodeGroup별로 생성 됨
- remote Access 허용 체크로 vpc 대역에서 ssh 접속 되도록 Rule 추가 됨
- 보안 툴(TrendMicro DeepSecurity)과 같이 Node에 원격접속 시 정책 추가
- 각 노드그룹 EC2 eni에서 사용
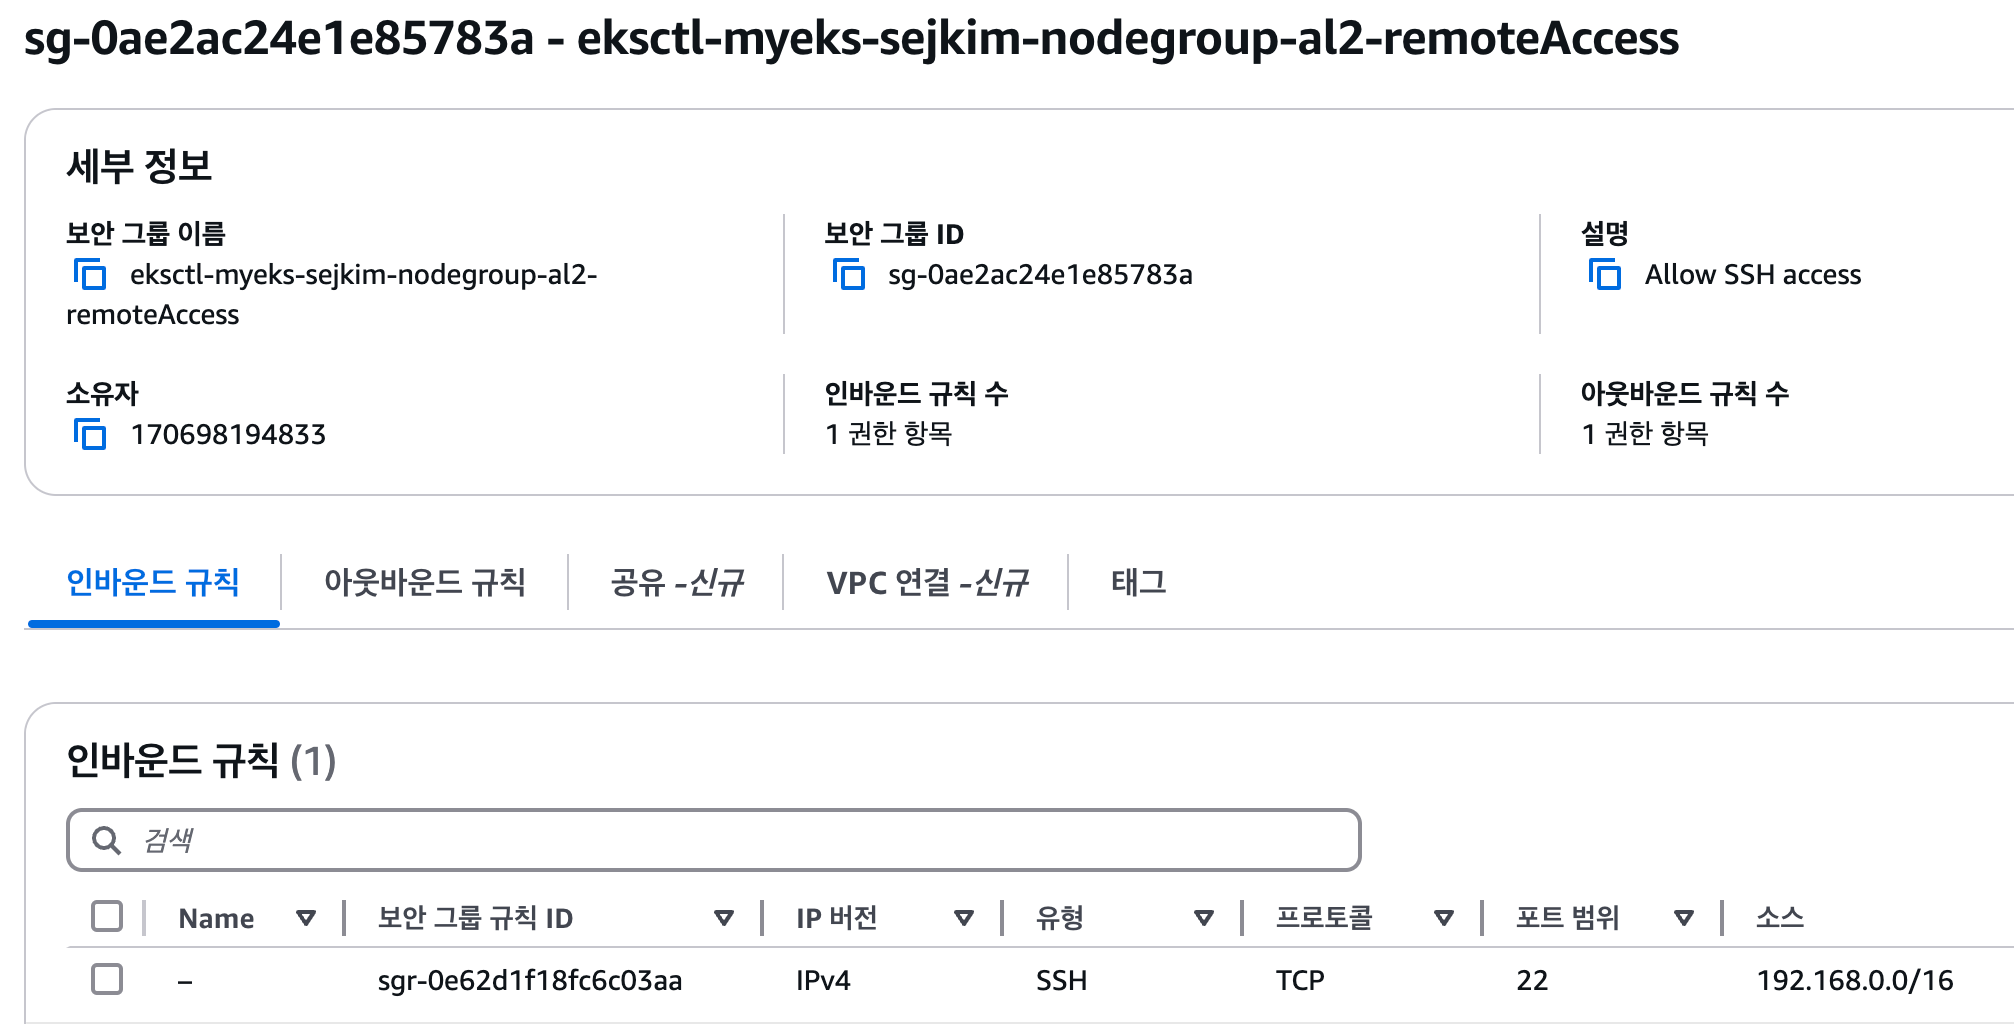
-
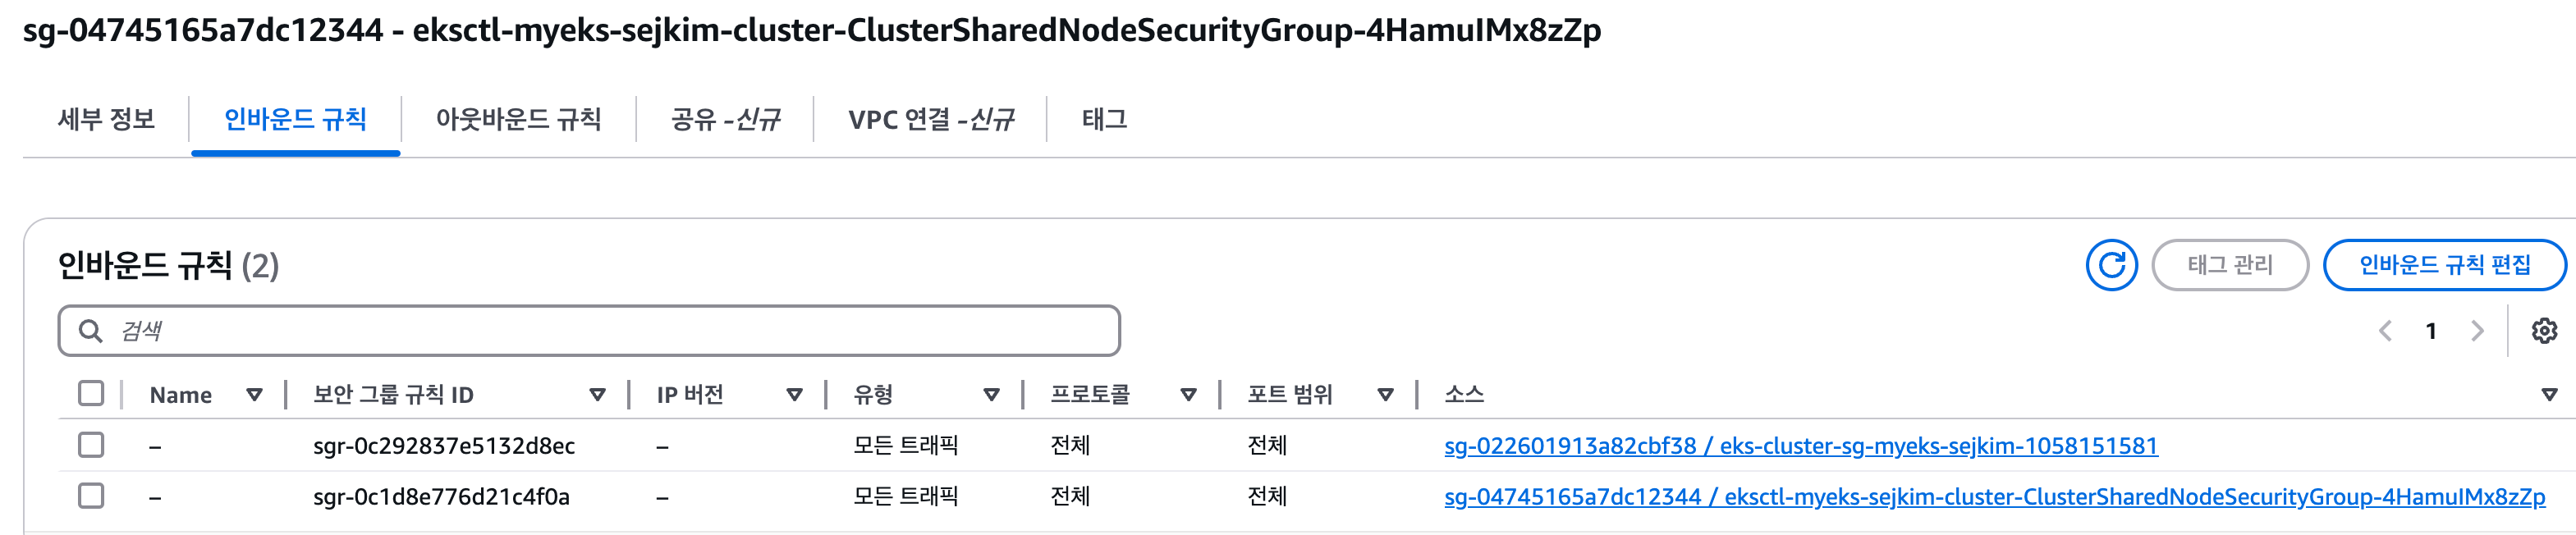
eksctl-myeks-sejkim-cluster-ClusterSharedNodeSecurityGroup
- Inbound 모든 허용 정책으로 자기 자신과 클러스터 보안그룹이 정책 존재
- 연결된 ENI 없음
4. EKS운영환경 Private으로 구성
4.1 Inatance Connect Endpoint 생성
eks를 관리하기 위한 콘솔 서버의 경우 보통 system:masters 준하는 권한으로 eks를 제어하고 있으며 경우에 따라서는 Administrator 권한에 해당하는 access-key 또는 role을 가지고 있어서 인터넷망에 노출되어 있는 경우 그만큼 보안에 취약하게 된다.
기업의 경우 On-Premise와의 Direct Connext 구성 또는 VPN을 활용하여 폐쇄된 내부망으로 접근제한을 한다. 개인 또는 소기업의 경우 VPN 구성 또한 비용 부담으로 쉽게 구성할 수 없다. 이를 해소하기 위한 방법으로 Amazon EC2 Instace Connect Endpoint를 활용하면 EC2를 외부에 노출하지 않고도(EIP없음) eks management console을 접근할 수 있다.
EC2 Instance Connect Endpoint는 Amazon EC2를 사용하면 다양한 방법으로 EC2에 접근이 가능합니다. EC2가 Public Subnet에 노출되어 있다면 Public IP로 바로 접근 하거나, 일반적으로는 Bastion Host를 별도로 구성하여 한 번 거쳐서 접근을 하게 됩니다. 최근에 들어서는 keypair 관리에 들어가는 Effort와 보안적인 Risk를 줄이기 위해 IAM 기반의 사용자 접근 제어를 통한 AWS System Manager Session Manager를 사용하기도 합니다. 하지만 폐쇄된 VPC(IGW, NGW 가 없는 Private Subnet만 존재하는) 환경일 경우 AWS System Manager Session Manager를 사용할 수 없는 상황이 발생할 수 있습니다.
Amazon EC2 Instance Connect Endpoint는 이러한 폐쇄된 VPC 환경에 존재하는 Amazon EC2 인스턴스로 접근 가능하도록 하는 서비스 입니다.
<출처: LGCNS 기술블로그 - Amazon EC2 Instance Connect Endpoint 를 활용한 폐쇄된 VPC 환경의 AWS EC2 접근>
-
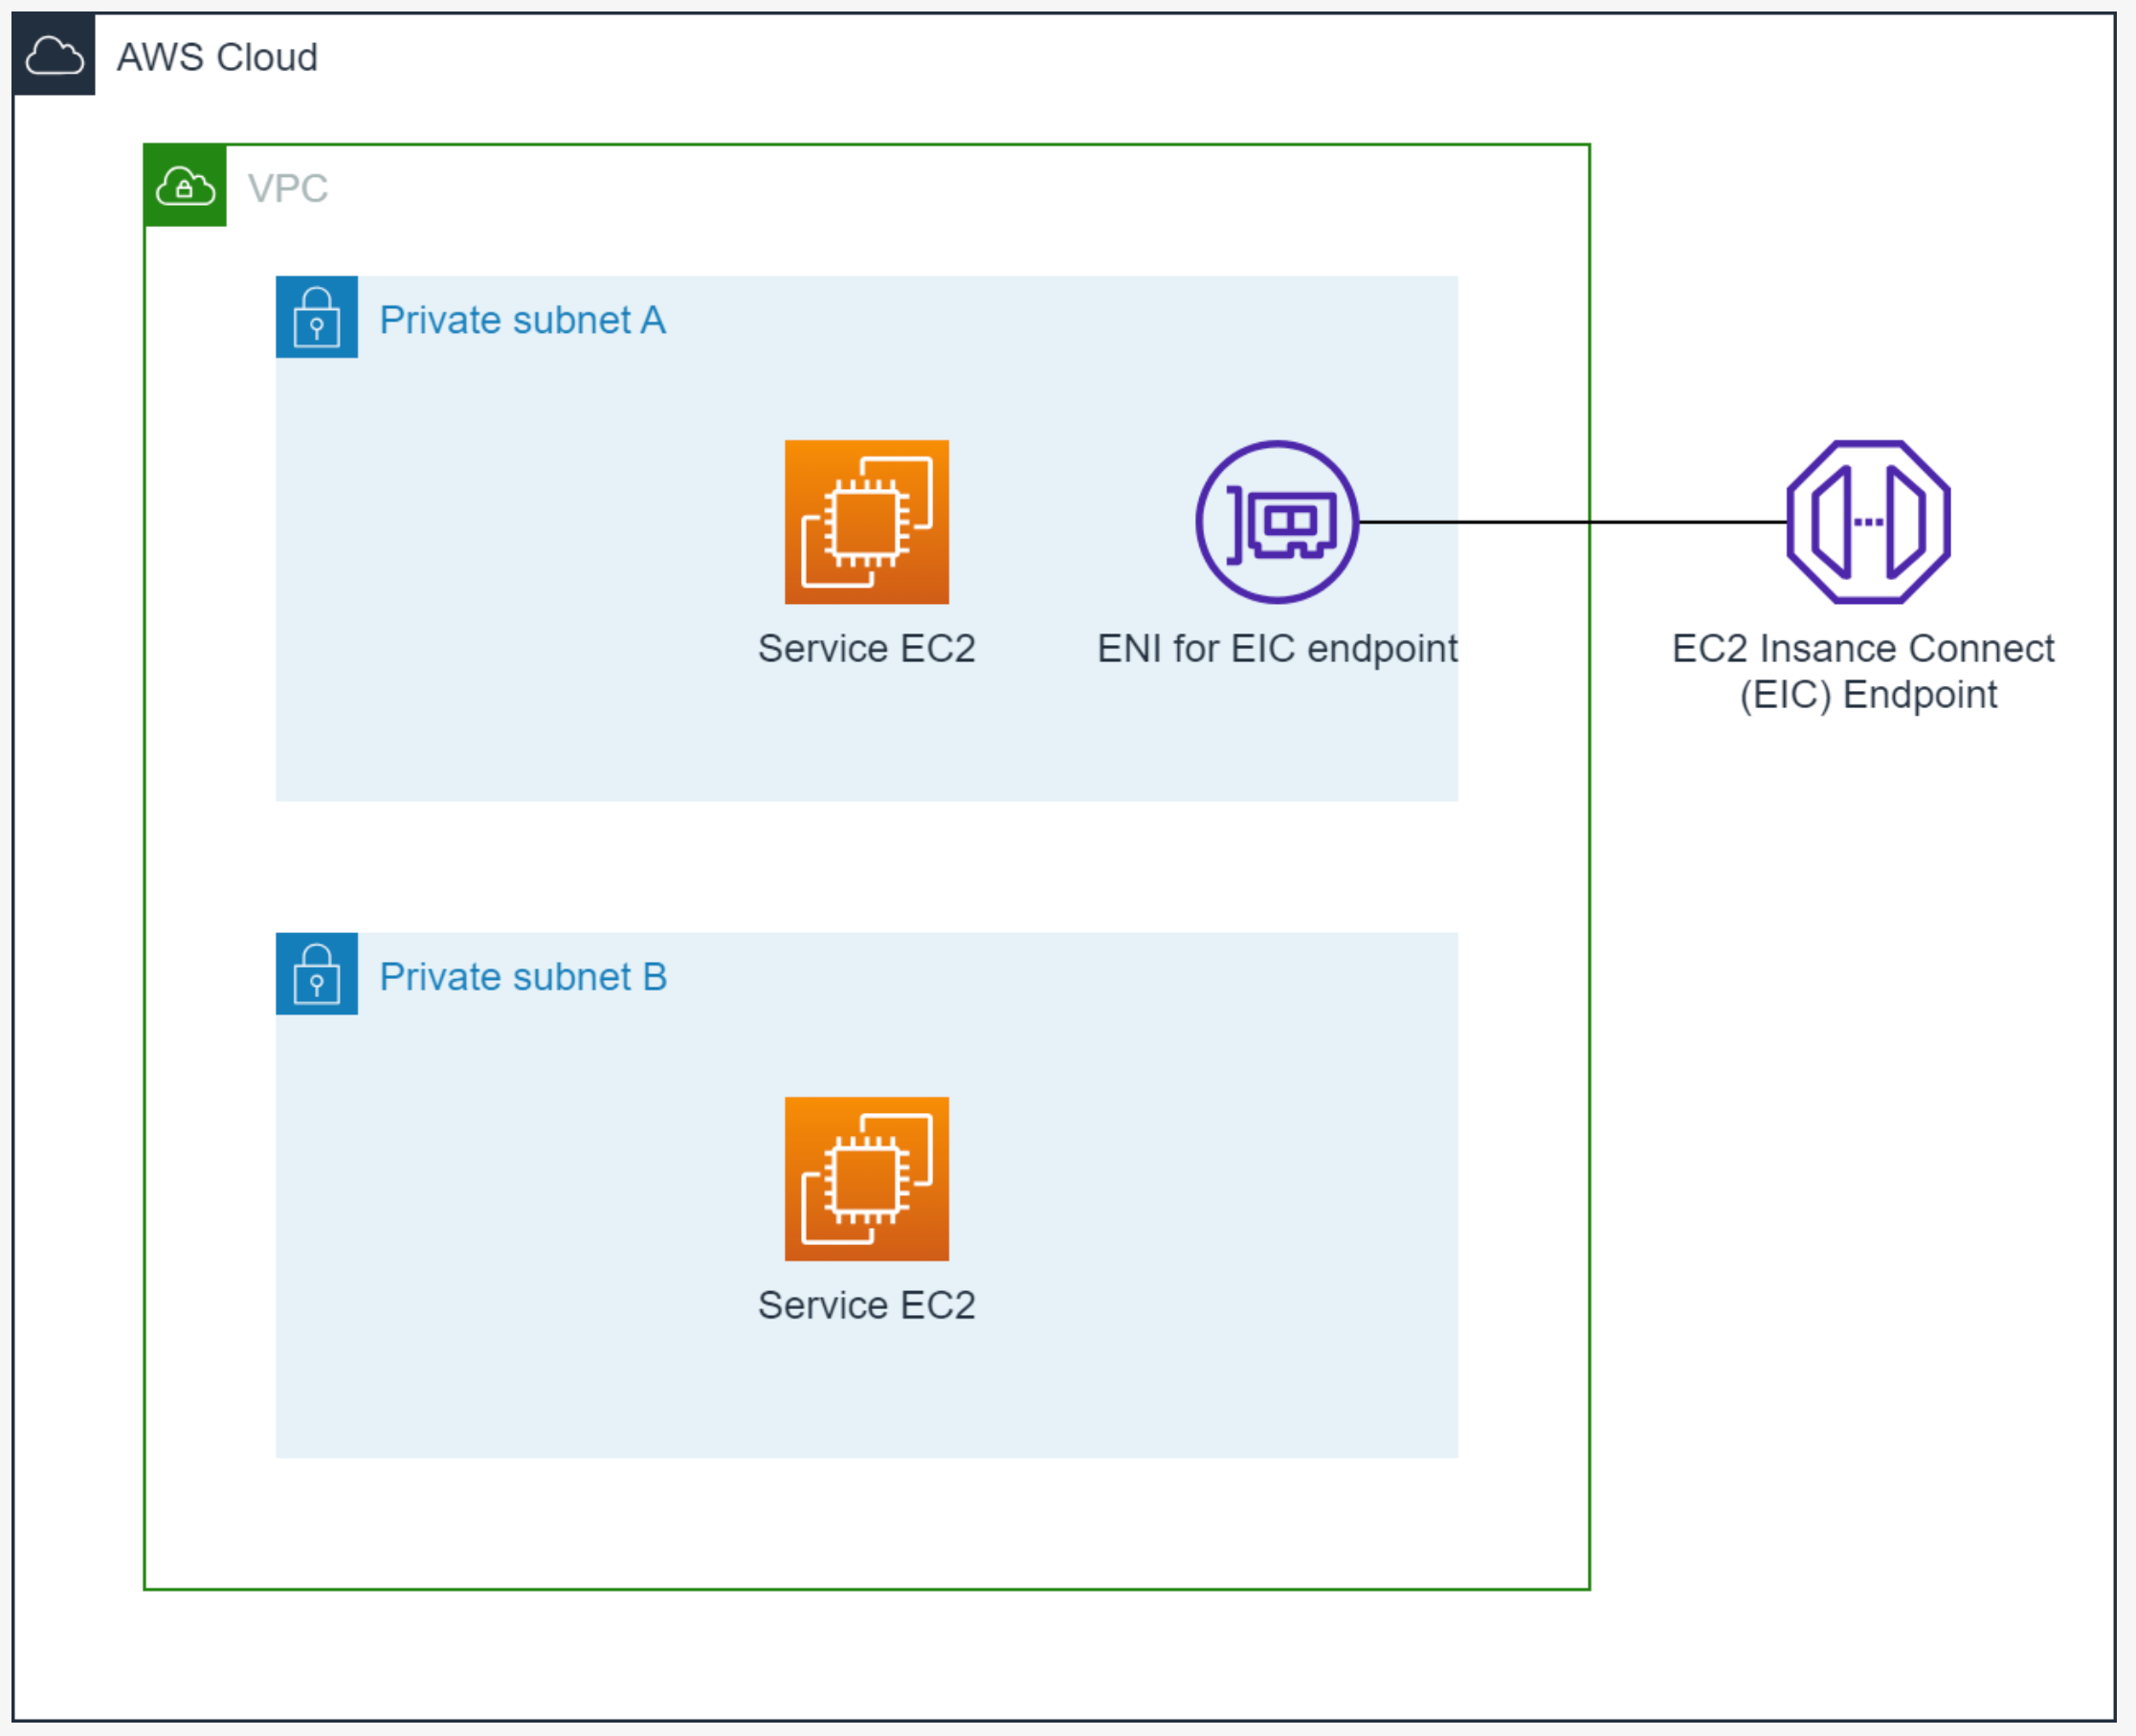
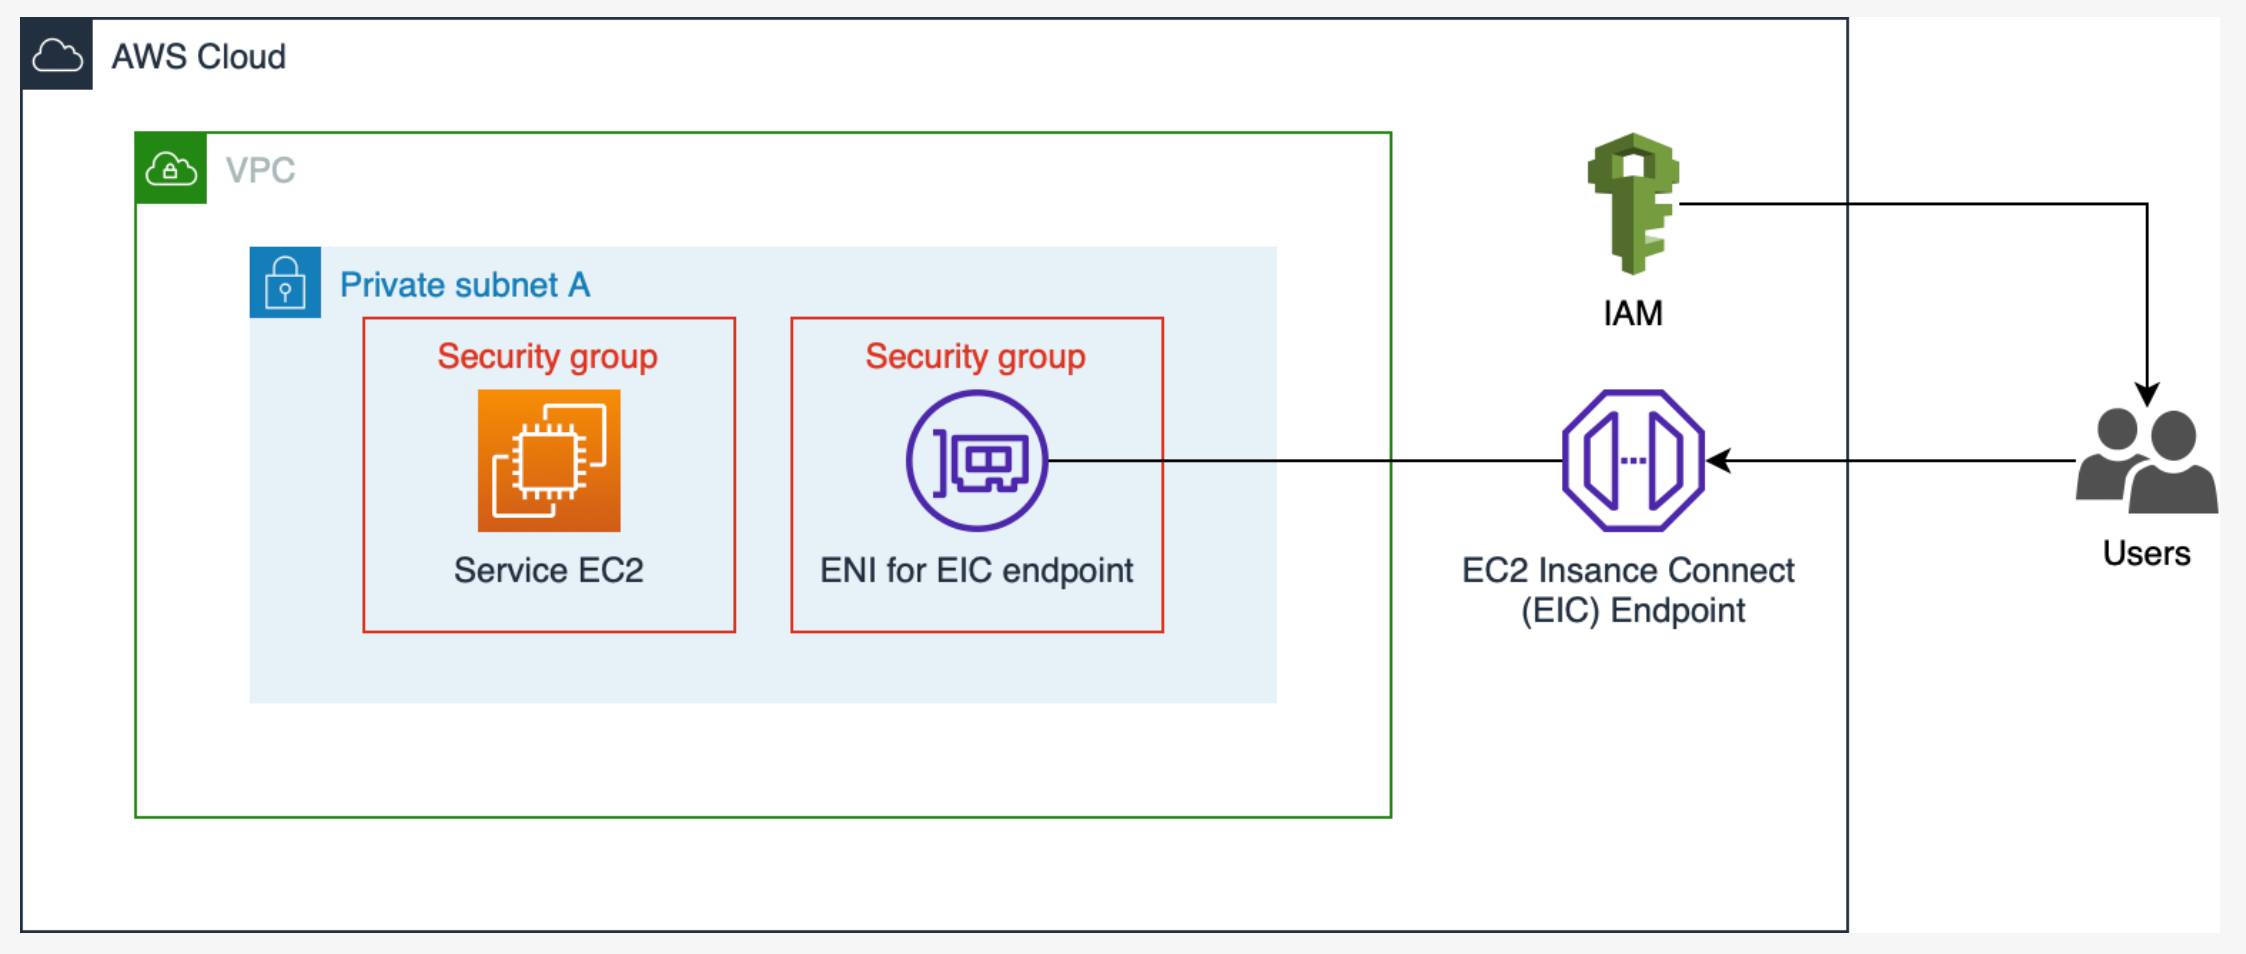
Amazon EC2 Instance Connect Endpoint Architecture diagram
- EC2 Instance Connect(EIC) Endpoint를 사용하여 외부와의 접근이 차단된 폐쇄망의 EC2 Instance에 접근
- System Manager Session Manager 보다 쉽고 간결한 구성
- EC2 접근 만을 위한 권한 및 구성 관리
- System Manager 는 Session Manager 외에도 다양한 기능을 제공
-
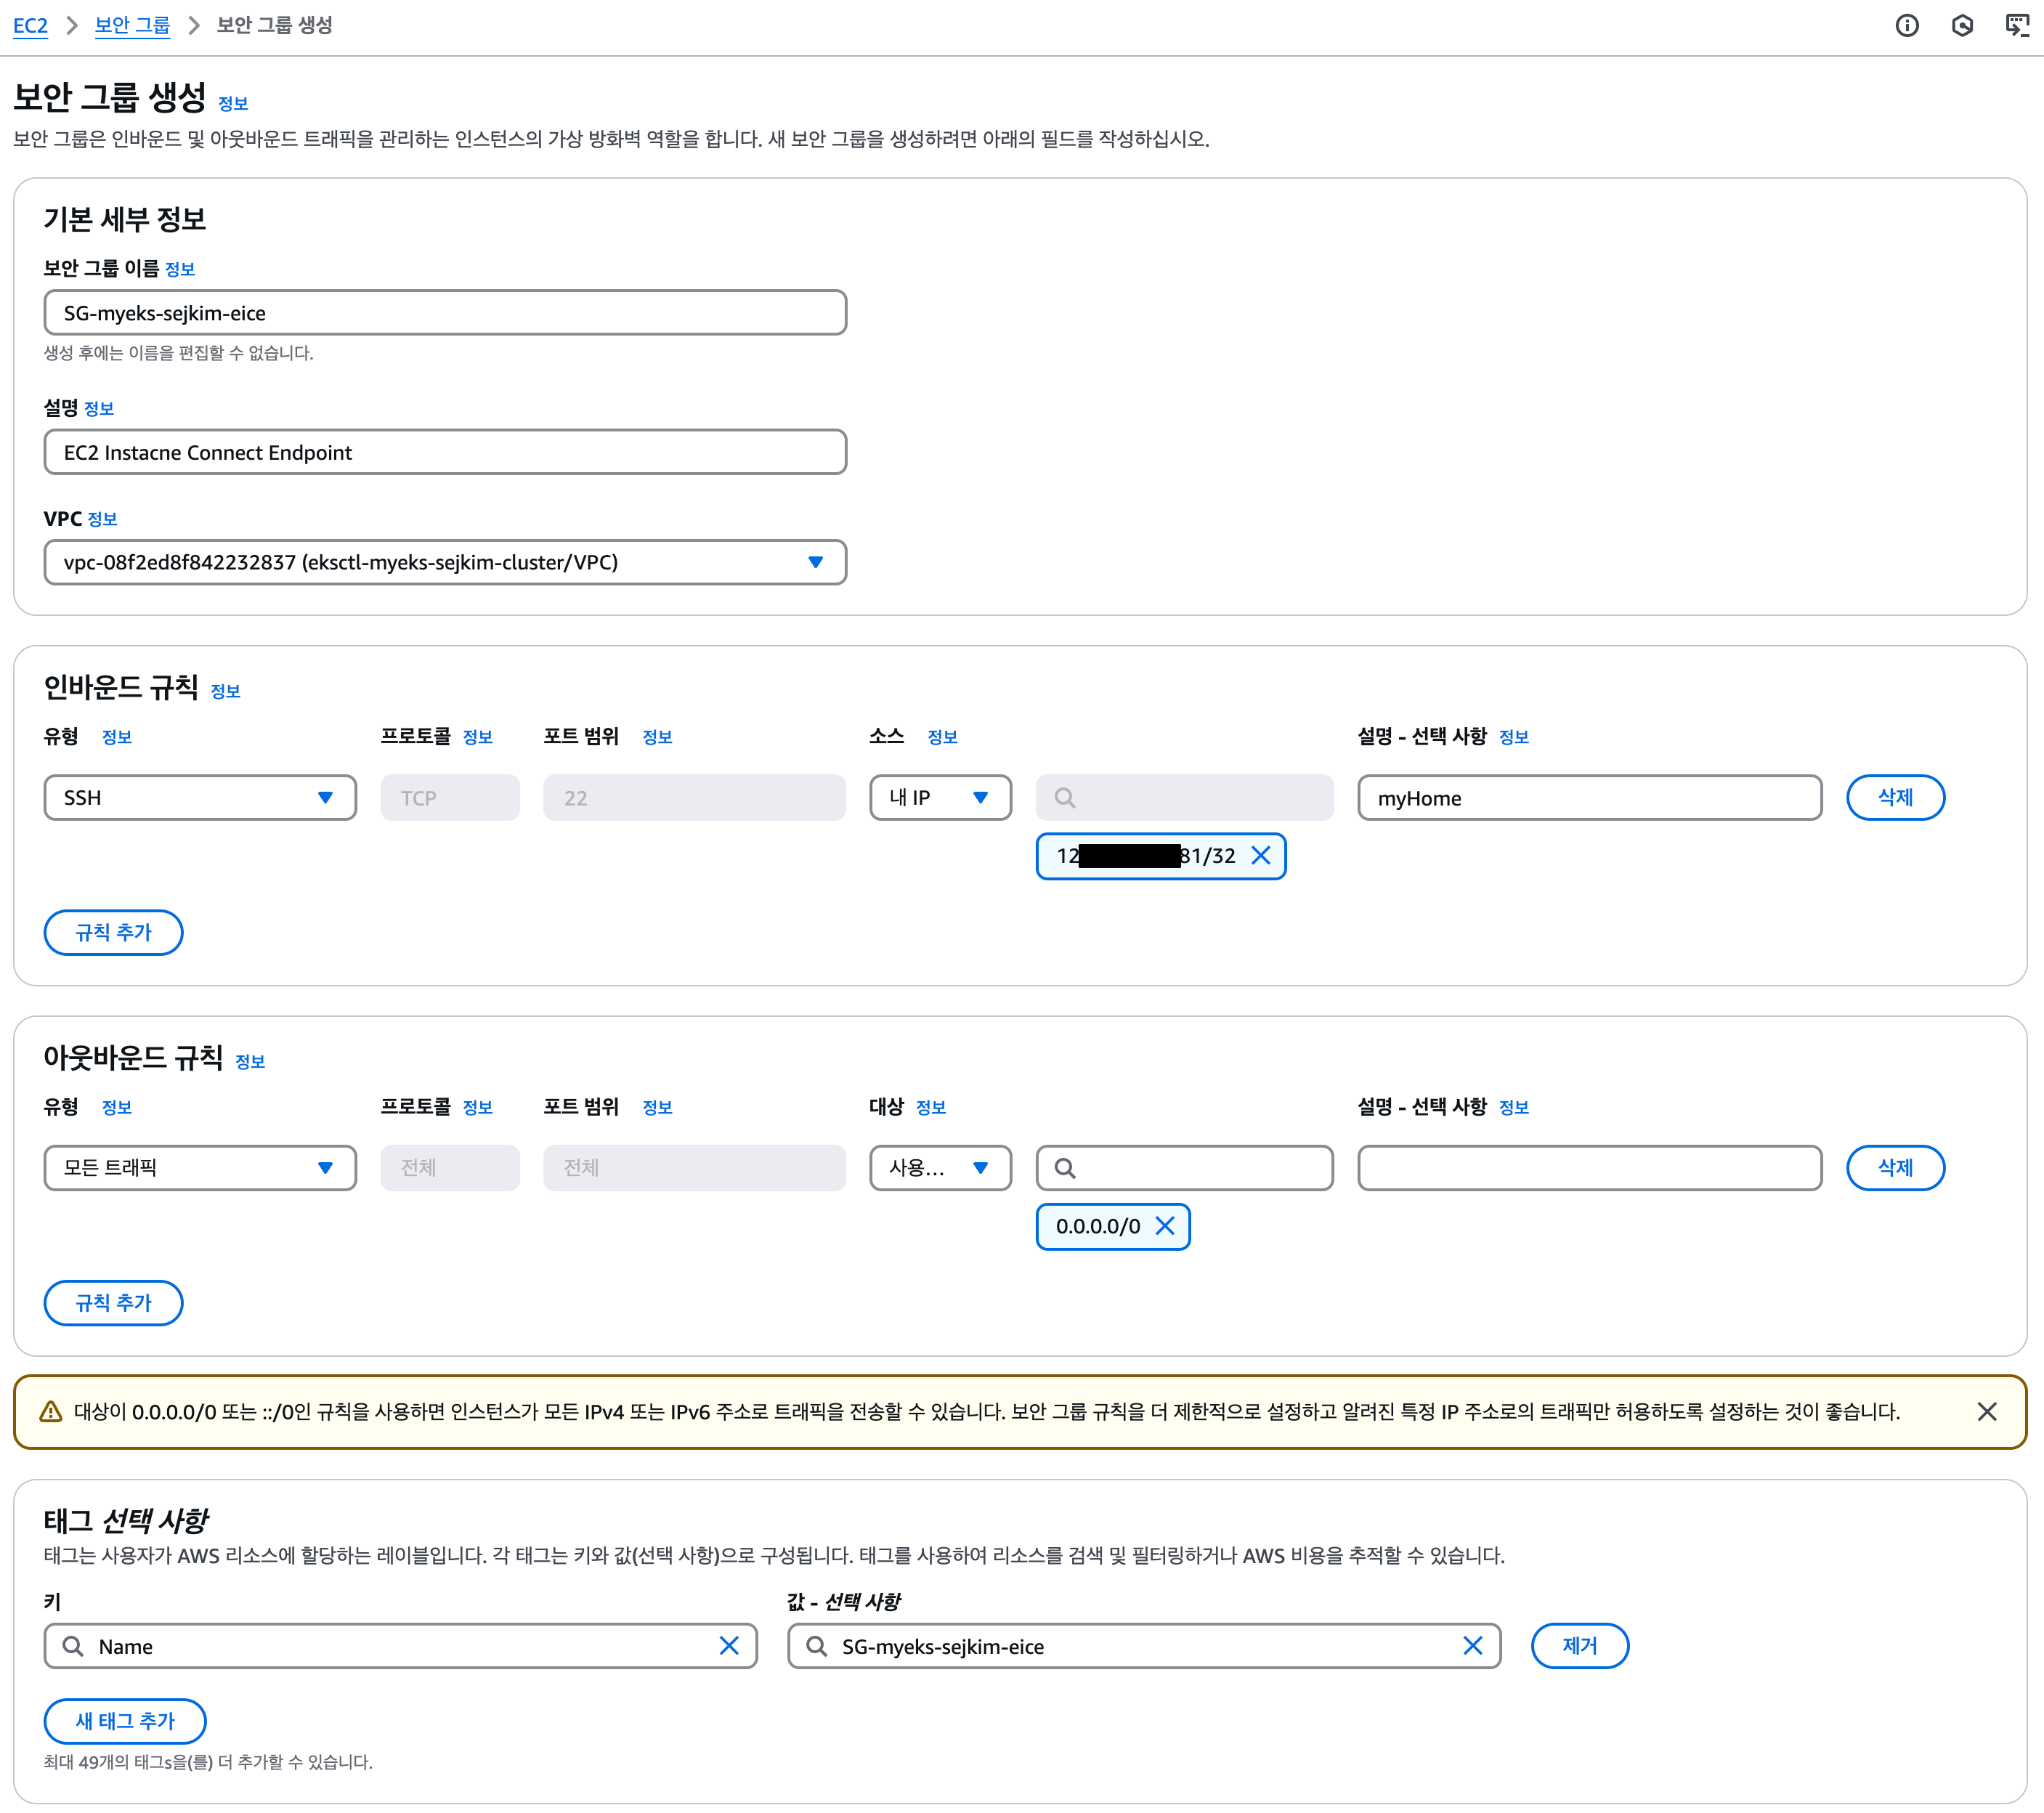
EICE용 Security Group 생성
-
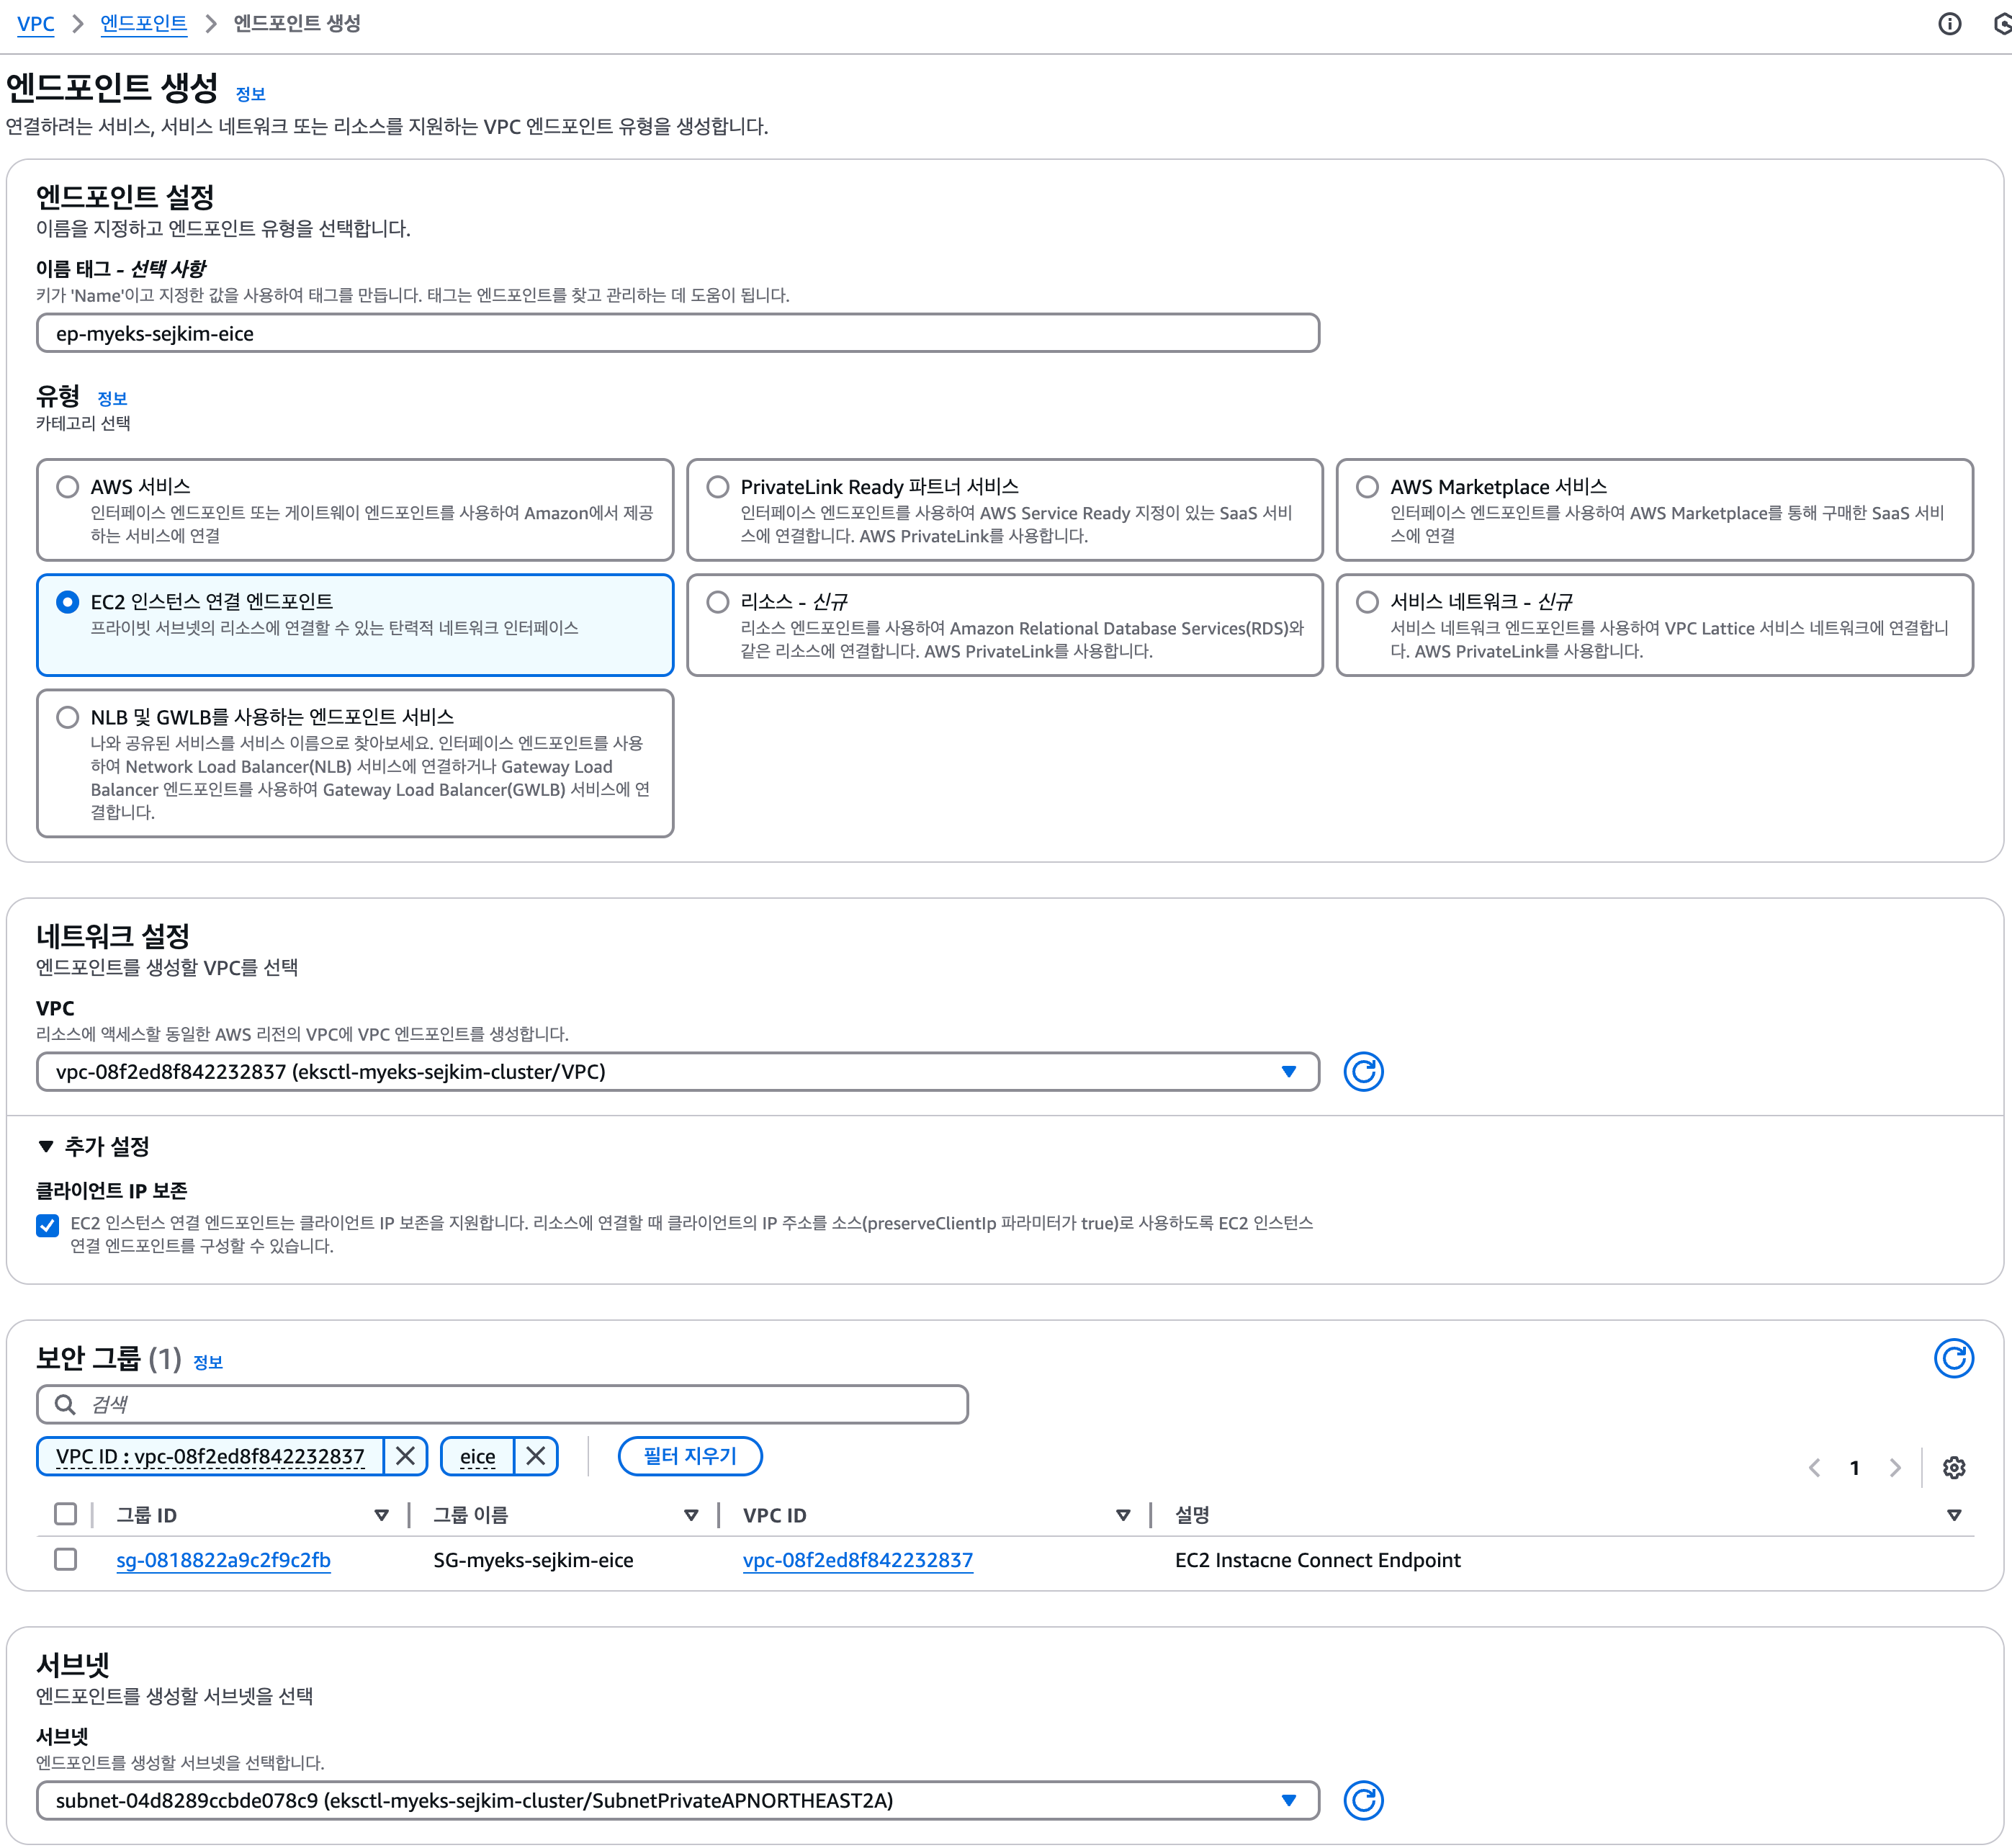
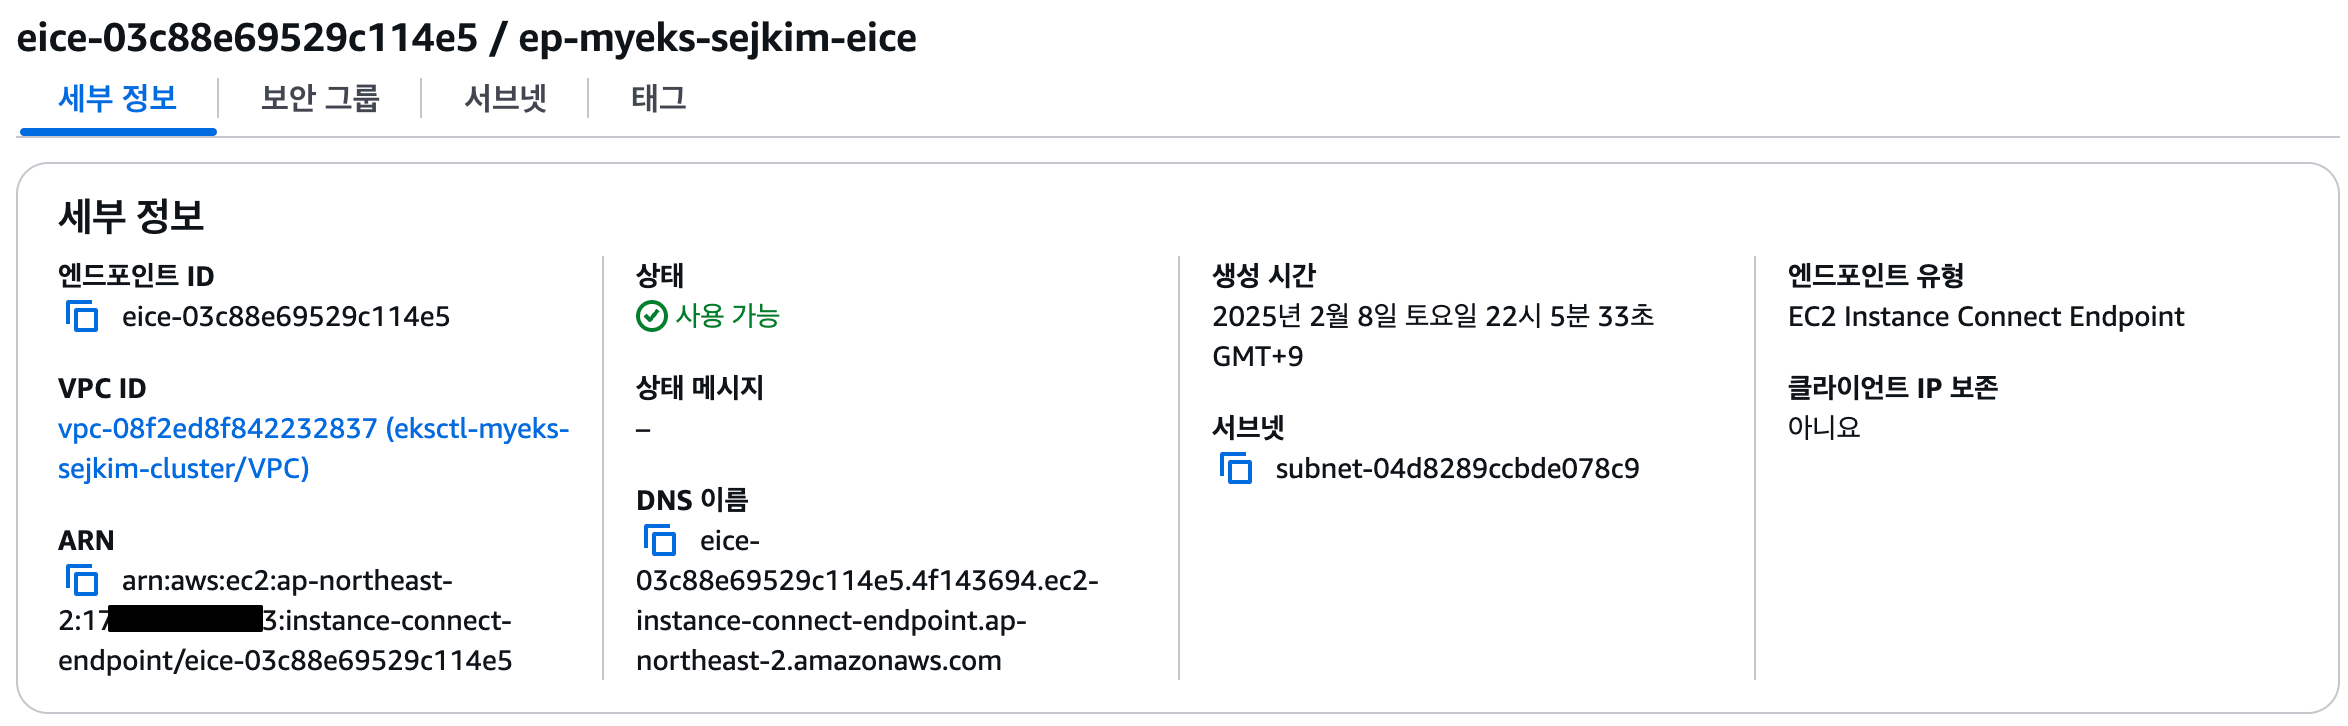
EC2 Instance Connect Endpoint 생성
- VPC > 엔드포인트 메뉴에서 엔드포인트 생성 클릭
- 클라이언트 IP 보존 선택 : 미선택 시 Websocket Closure Reason: Unable to connect to target, Connection closed by UNKNOWN port 65535 에러 발생
- VPC > 엔드포인트 메뉴에서 엔드포인트 생성 클릭
- EC2 Instance Connect Endpoint 접속된 모습
4.2 eks-mgmt서버 Private Subnet에 구성
- Userdata
#!/bin/bash
hostnamectl --static set-hostname ec2-myeks-sejkim-mgmt

# Config Root account
echo 'root:qwe123' | chpasswd
sed -i "s/^#PermitRootLogin yes/PermitRootLogin yes/g" /etc/ssh/sshd_config
sed -i "s/^PasswordAuthentication no/PasswordAuthentication yes/g" /etc/ssh/sshd_config
rm -rf /root/.ssh/authorized_keys
systemctl restart sshd

# Config convenience
echo 'alias vi=vim' >> /etc/profile
echo "sudo su -" >> /home/ec2-user/.bashrc
sed -i "s/UTC/Asia\/Seoul/g" /etc/sysconfig/clock
ln -sf /usr/share/zoneinfo/Asia/Seoul /etc/localtime

# Install Packages
yum -y install tree jq git htop

# Install YAML Highlighter
wget https://github.com/andreazorzetto/yh/releases/download/v0.4.0/yh-linux-amd64.zip
unzip yh-linux-amd64.zip
mv yh /usr/local/bin/

# Install kubectl & helm
cd /root
curl -O https://s3.us-west-2.amazonaws.com/amazon-eks/1.31.2/2024-11-15/bin/linux/amd64/kubectl
install -o root -g root -m 0755 kubectl /usr/local/bin/kubectl
curl -s https://raw.githubusercontent.com/helm/helm/master/scripts/get-helm-3 | bash

# Install eksctl
curl -sL "https://github.com/eksctl-io/eksctl/releases/latest/download/eksctl_Linux_amd64.tar.gz" | tar xz -C /tmp
mv /tmp/eksctl /usr/local/bin

# Install aws cli v2
curl "https://awscli.amazonaws.com/awscli-exe-linux-x86_64.zip" -o "awscliv2.zip"
unzip awscliv2.zip >/dev/null 2>&1
./aws/install
complete -C '/usr/local/bin/aws_completer' aws
echo 'export AWS_PAGER=""' >>/etc/profile
export AWS_DEFAULT_REGION=ap-northeast-2
echo "export AWS_DEFAULT_REGION=ap-northeast-2" >> /etc/profile

# Install krew
curl -L https://github.com/kubernetes-sigs/krew/releases/download/v0.4.4/krew-linux_amd64.tar.gz -o /root/krew-linux_amd64.tar.gz
tar zxvf krew-linux_amd64.tar.gz
./krew-linux_amd64 install krew
export PATH="$PATH:/root/.krew/bin"
echo 'export PATH="$PATH:/root/.krew/bin"' >> /etc/profile

# Install kube-ps1
echo 'source <(kubectl completion bash)' >> /etc/profile
echo 'alias k=kubectl' >> /etc/profile
echo 'complete -F __start_kubectl k' >> /etc/profile

git clone https://github.com/jonmosco/kube-ps1.git /root/kube-ps1
cat <<"EOT" >> /root/.bash_profile
source /root/kube-ps1/kube-ps1.sh
KUBE_PS1_SYMBOL_ENABLE=false
function get_cluster_short() {
  echo "$1" | cut -d . -f1
}
KUBE_PS1_CLUSTER_FUNCTION=get_cluster_short
KUBE_PS1_SUFFIX=') '
PS1='$(kube_ps1)'$PS1
EOT

# CLUSTER_NAME
export CLUSTER_NAME=myeks-sejkim
echo "export CLUSTER_NAME=myeks-sejkim" >> /etc/profile

# Create SSH Keypair
ssh-keygen -t rsa -N "" -f /root/.ssh/id_rsa

# Install krew plugin
kubectl krew install ctx ns get-all neat # ktop df-pv mtail tree

# Install Docker
amazon-linux-extras install docker -y
systemctl start docker && systemctl enable docker

# Install Kubecolor
wget https://github.com/kubecolor/kubecolor/releases/download/v0.5.0/kubecolor_0.5.0_linux_amd64.tar.gz
tar -zxvf kubecolor_0.5.0_linux_amd64.tar.gz
mv kubecolor /usr/local/bin/-
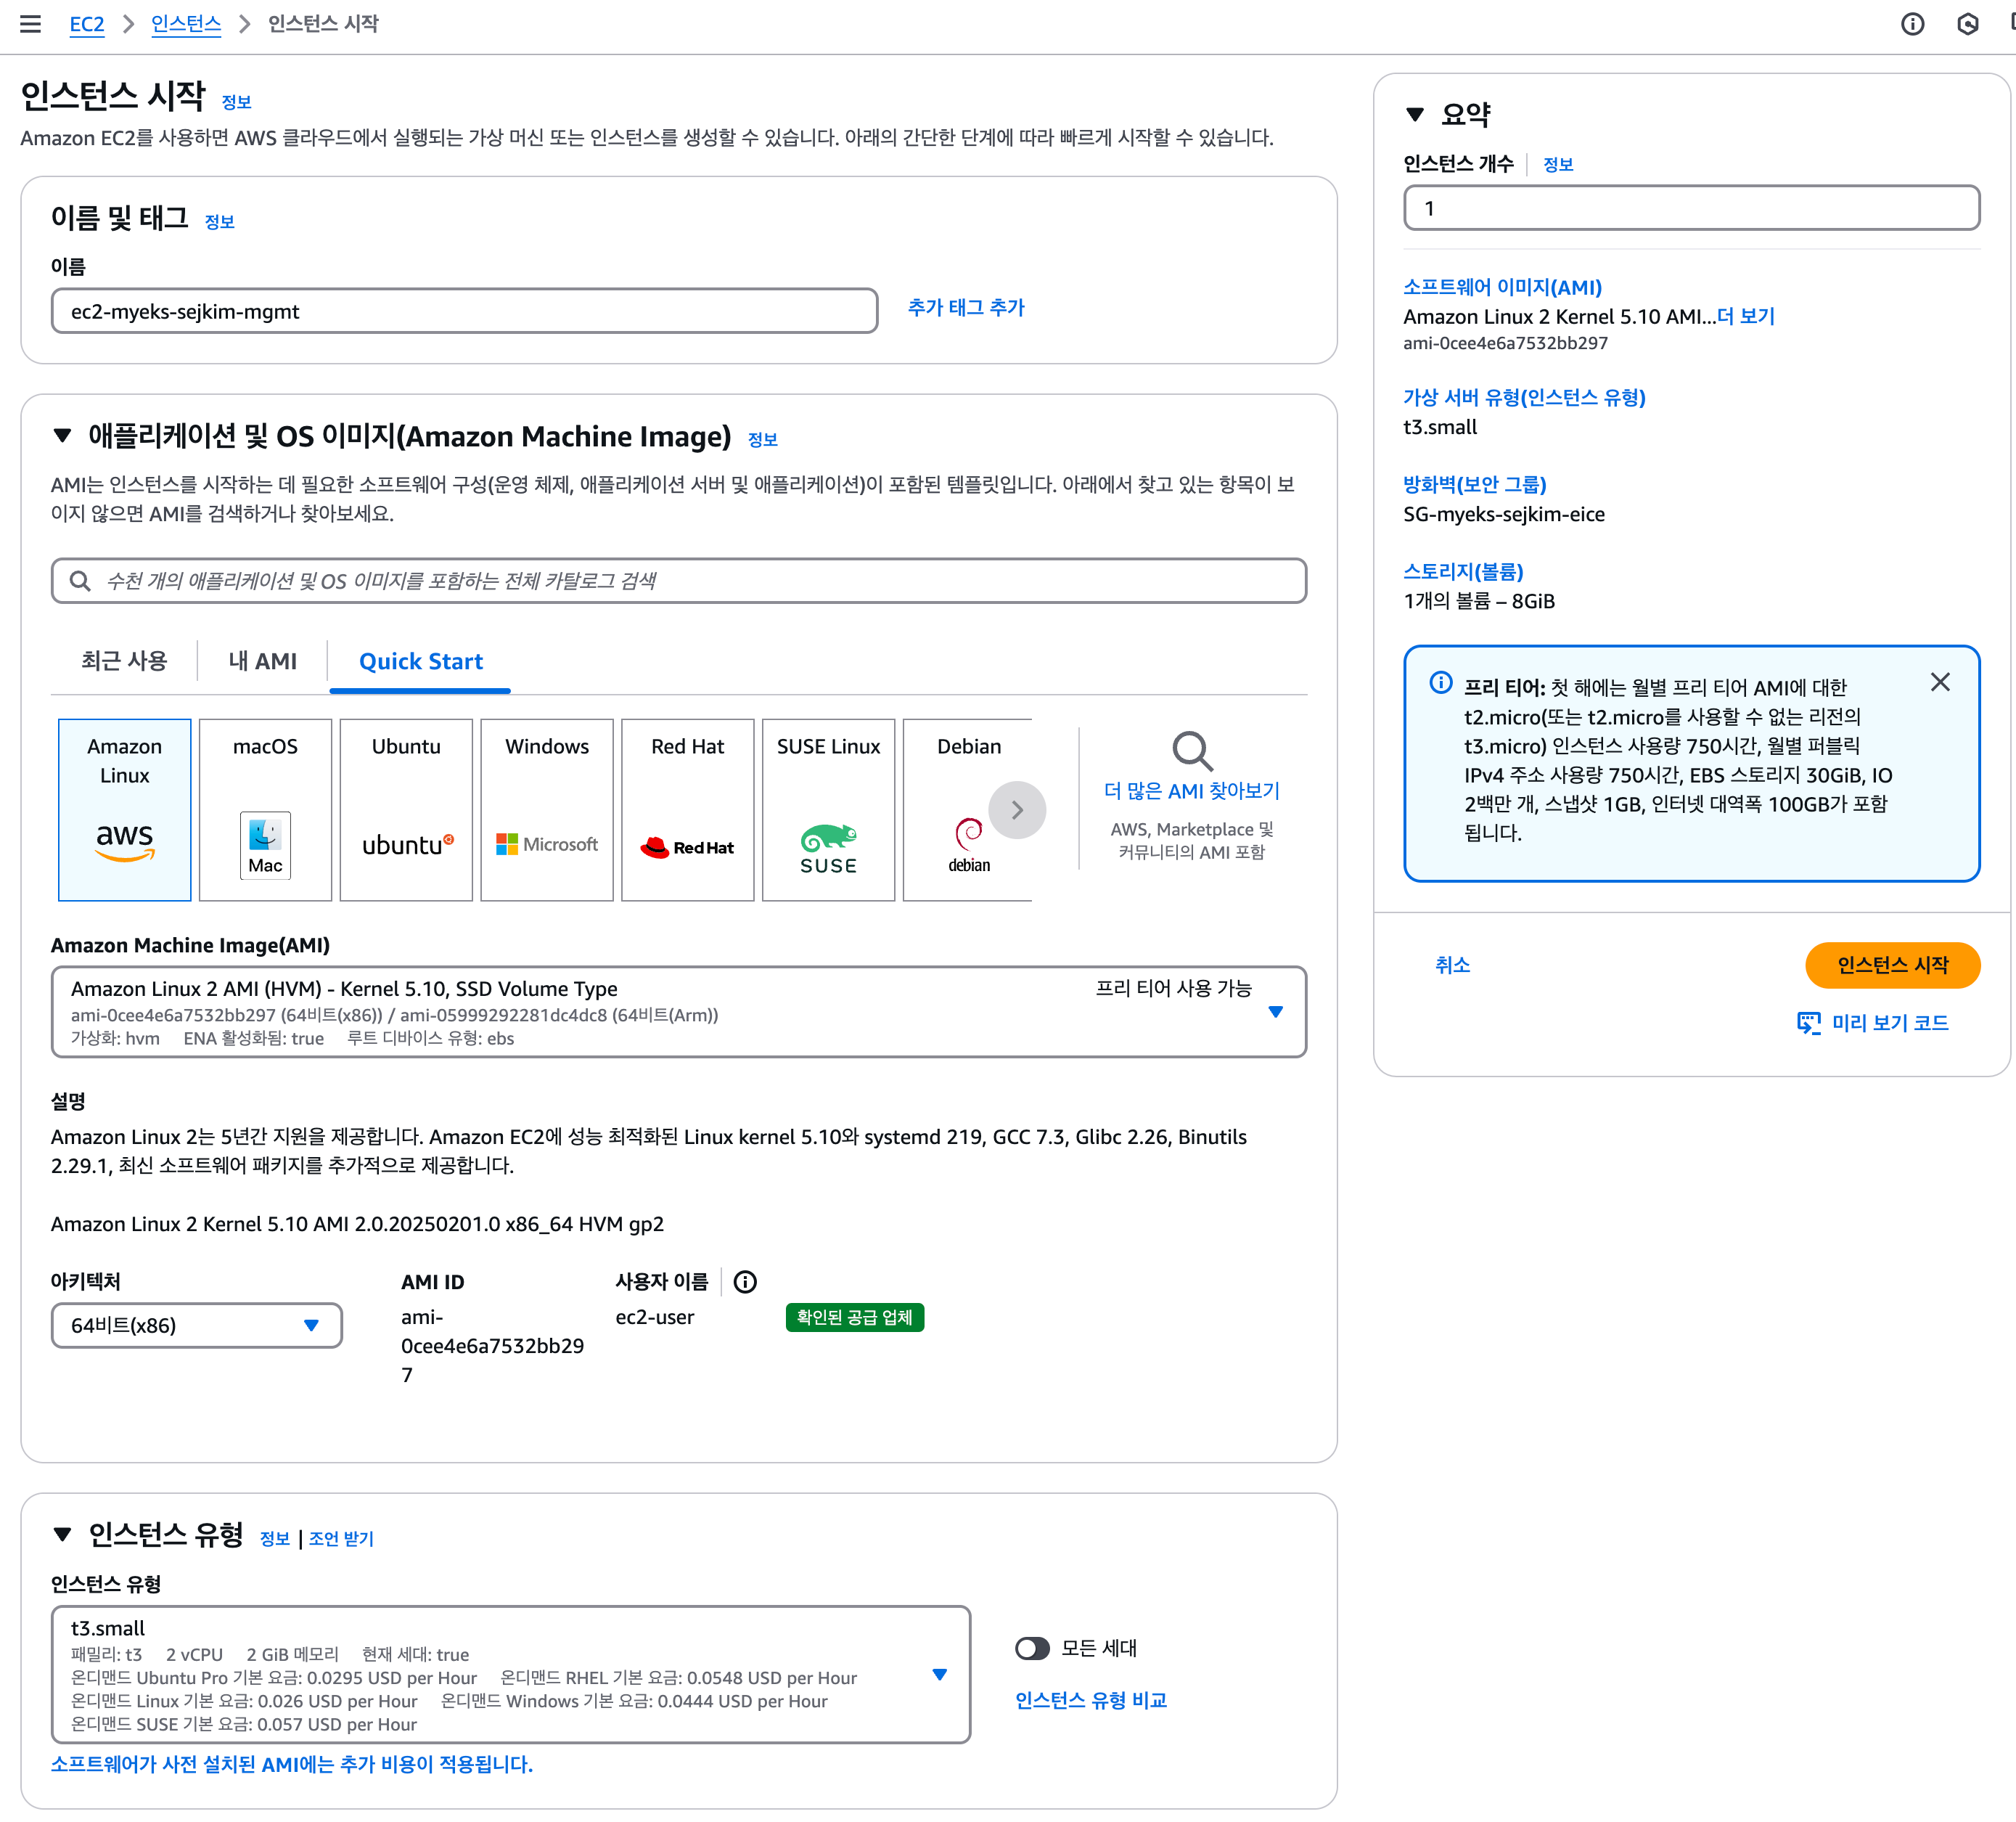
EC2 콘솔에서 EC2 생성
- keypair 없이 Private Subnet에 생성
- keypair 없이 Private Subnet에 생성
-
ec2-myeks-sejkim-mgmt 접속
- ec2 콘솔에서 접속
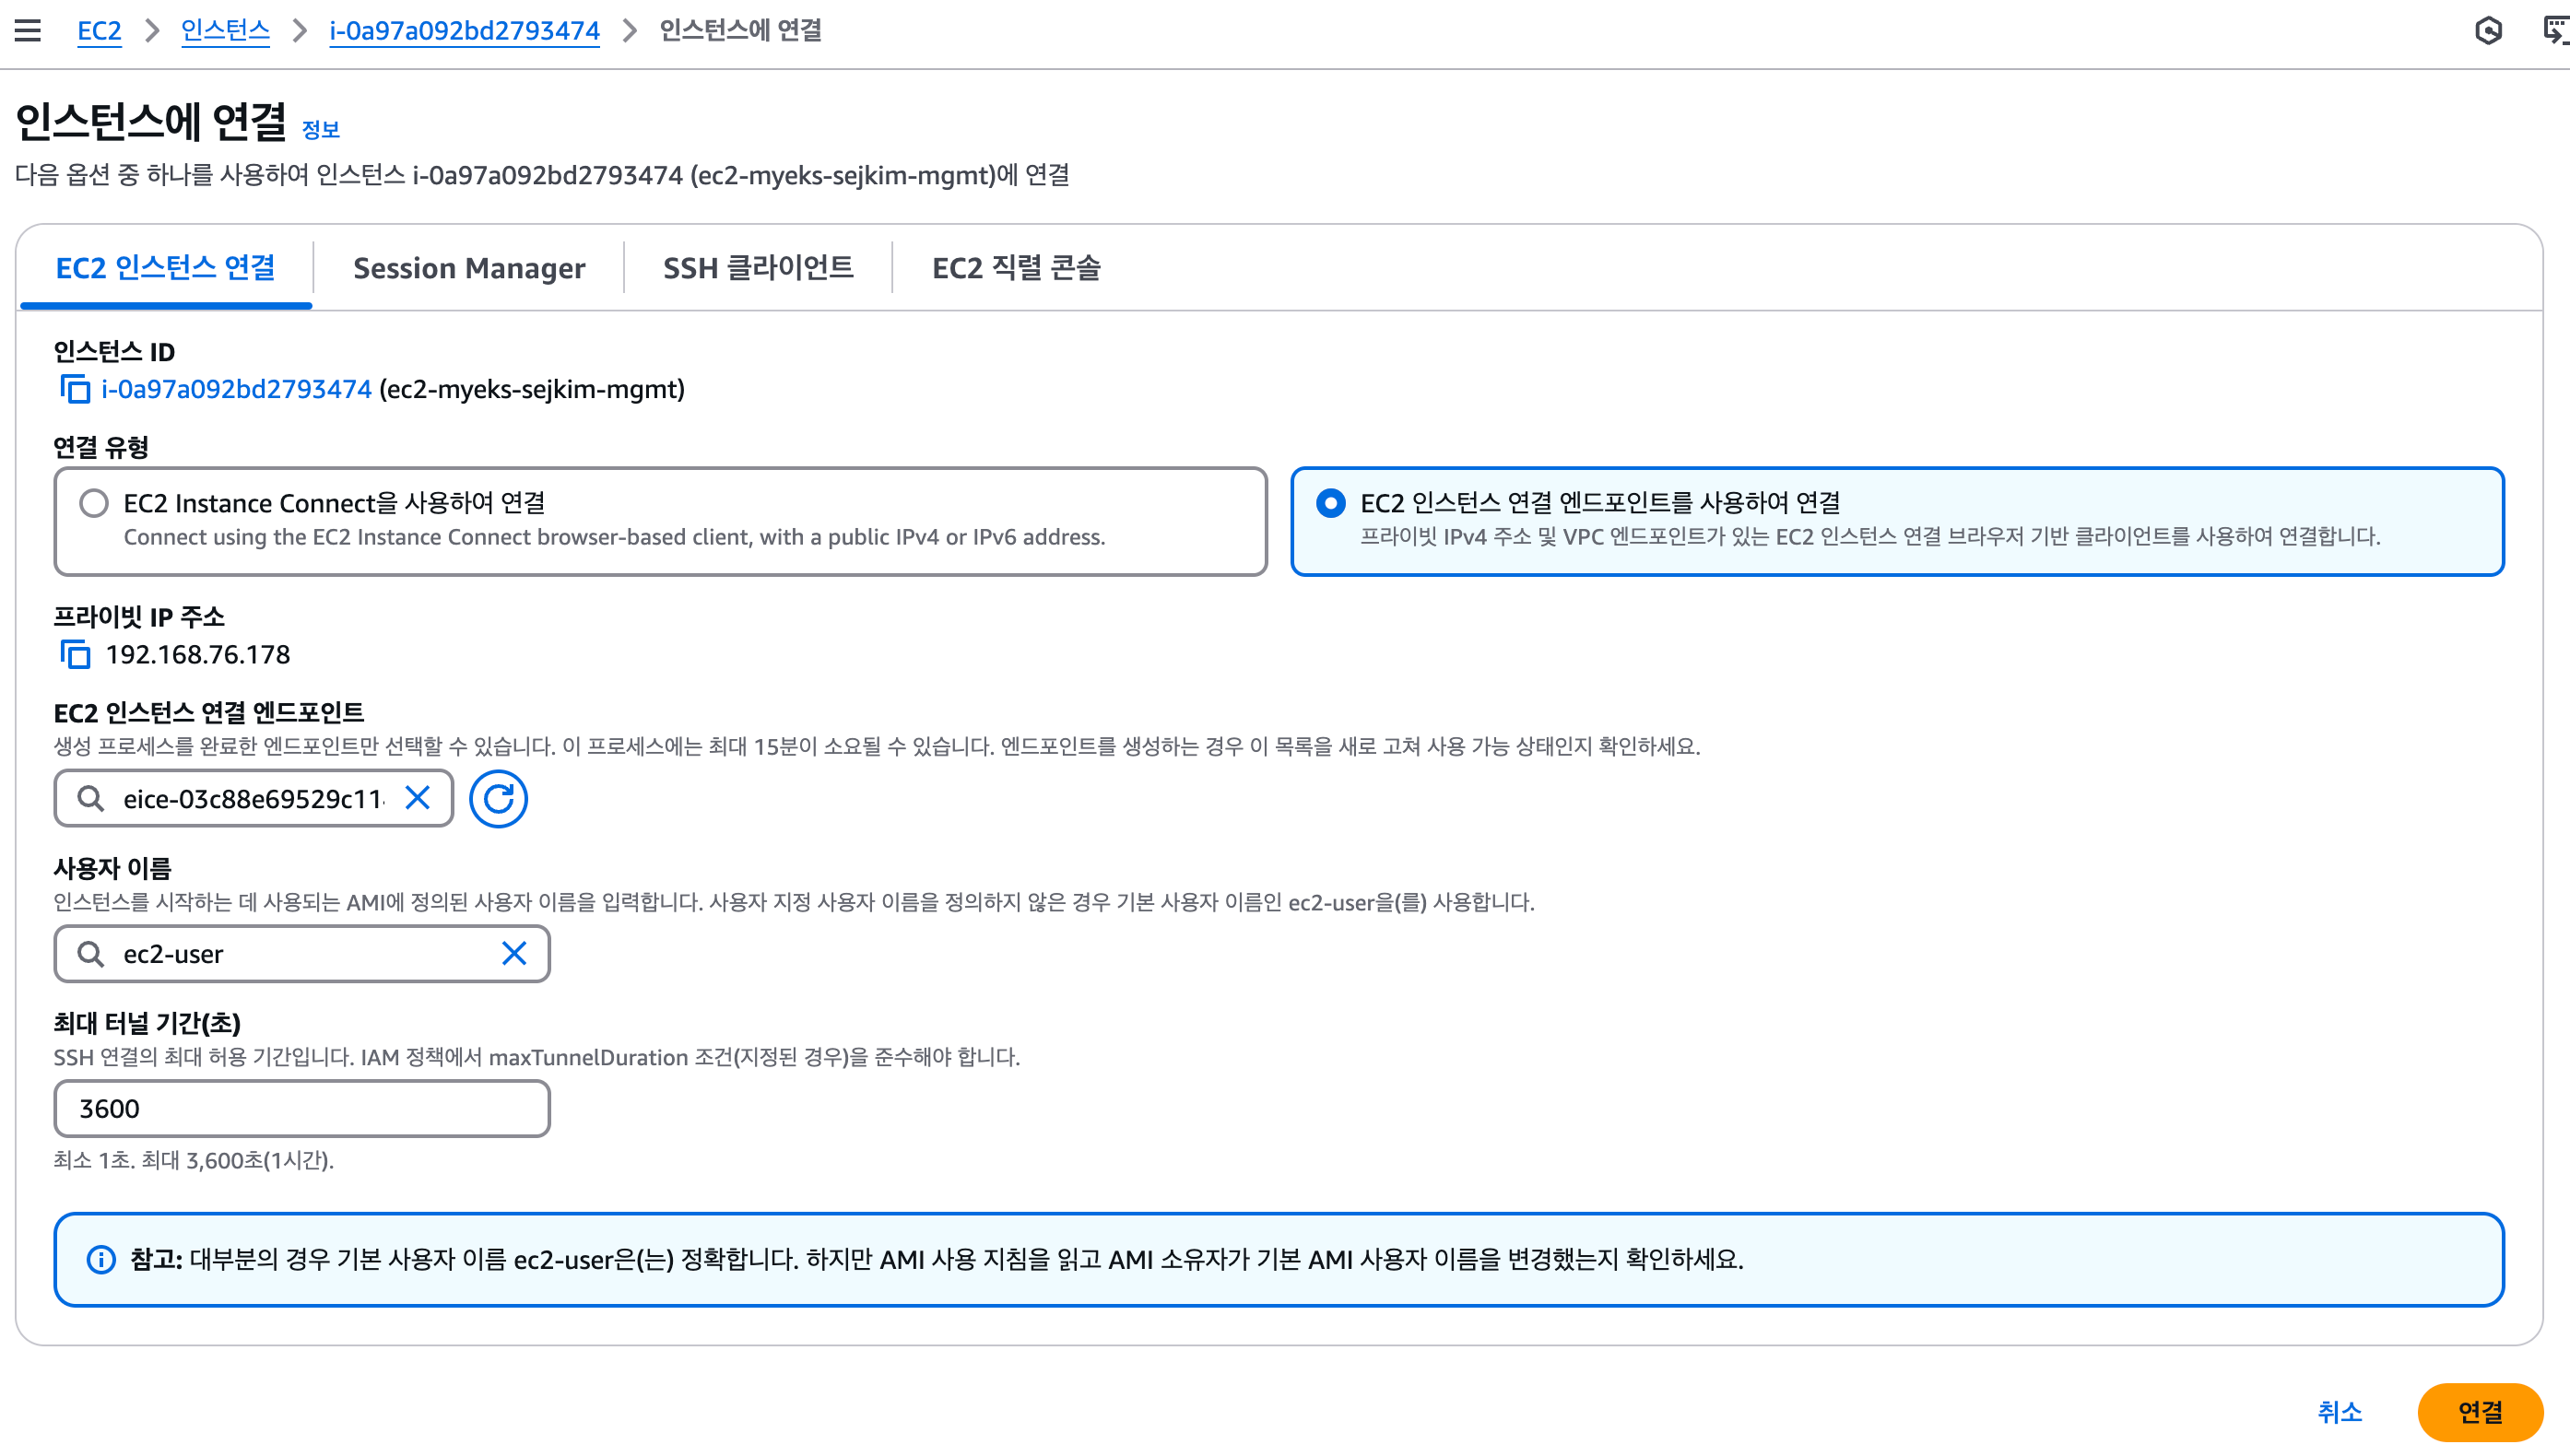
- aws cli로 접속
- ec2 콘솔에서 접속
$ aws ec2-instance-connect ssh --instance-id i-0a97a092bd2793474
The authenticity of host '192.168.76.178 (<no hostip for proxy command>)' can't be established.
ED25519 key fingerprint is SHA256:pG1/k6xAQeTogxON80wZkgr/ZloBWKRukf3yOnKZTn4.
This key is not known by any other names.
Are you sure you want to continue connecting (yes/no/[fingerprint])? yes
Warning: Permanently added '192.168.76.178' (ED25519) to the list of known hosts.
Last login: Sat Feb  8 22:37:07 2025
   ,     #_
   ~\_  ####_        Amazon Linux 2
  ~~  \_#####\
  ~~     \###|       AL2 End of Life is 2026-06-30.
  ~~       \#/ ___
   ~~       V~' '->
    ~~~         /    A newer version of Amazon Linux is available!
      ~~._.   _/
         _/ _/       Amazon Linux 2023, GA and supported until 2028-03-15.
       _/m/'           https://aws.amazon.com/linux/amazon-linux-2023/

Last login: Sat Feb  8 22:37:08 KST 2025 on ttyS0
[root@ec2-myeks-sejkim-mgmt ~]#- ec2 접속 후 credential 설정
- eks kube 인증서 생성
$ aws eks update-kubeconfig --name myeks-sejkim - kubectl 실행, Control Plane API Server 접속 오류 발생
[ec2-user@ec2-myeks-sejkim-mgmt ~]$ kubectl get nodes
E0208 23:19:04.806097    3212 memcache.go:265] "Unhandled Error" err="couldn't get current server API group list: Get \"https://10D0FAF26A777DB83003EF58A6150488.gr7.ap-northeast-2.eks.amazonaws.com/api?timeout=32s\": dial tcp 192.168.118.181:443: i/o timeout"
E0208 23:19:34.808151    3212 memcache.go:265] "Unhandled Error" err="couldn't get current server API group list: Get \"https://10D0FAF26A777DB83003EF58A6150488.gr7.ap-northeast-2.eks.amazonaws.com/api?timeout=32s\": dial tcp 192.168.92.226:443: i/o timeout"
E0208 23:20:04.810435    3212 memcache.go:265] "Unhandled Error" err="couldn't get current server API group list: Get \"https://10D0FAF26A777DB83003EF58A6150488.gr7.ap-northeast-2.eks.amazonaws.com/api?timeout=32s\": dial tcp 192.168.118.181:443: i/o timeout"
E0208 23:20:34.812067    3212 memcache.go:265] "Unhandled Error" err="couldn't get current server API group list: Get \"https://10D0FAF26A777DB83003EF58A6150488.gr7.ap-northeast-2.eks.amazonaws.com/api?timeout=32s\": dial tcp 192.168.92.226:443: i/o timeout"
E0208 23:21:04.814091    3212 memcache.go:265] "Unhandled Error" err="couldn't get current server API group list: Get \"https://10D0FAF26A777DB83003EF58A6150488.gr7.ap-northeast-2.eks.amazonaws.com/api?timeout=32s\": dial tcp 192.168.118.181:443: i/o timeout"
Unable to connect to the server: dial tcp 192.168.118.181:443: i/o timeout-
추가 보안 그룹에 ec2-myeks-sejkim-mgmt Inbound 허용 정책 추가
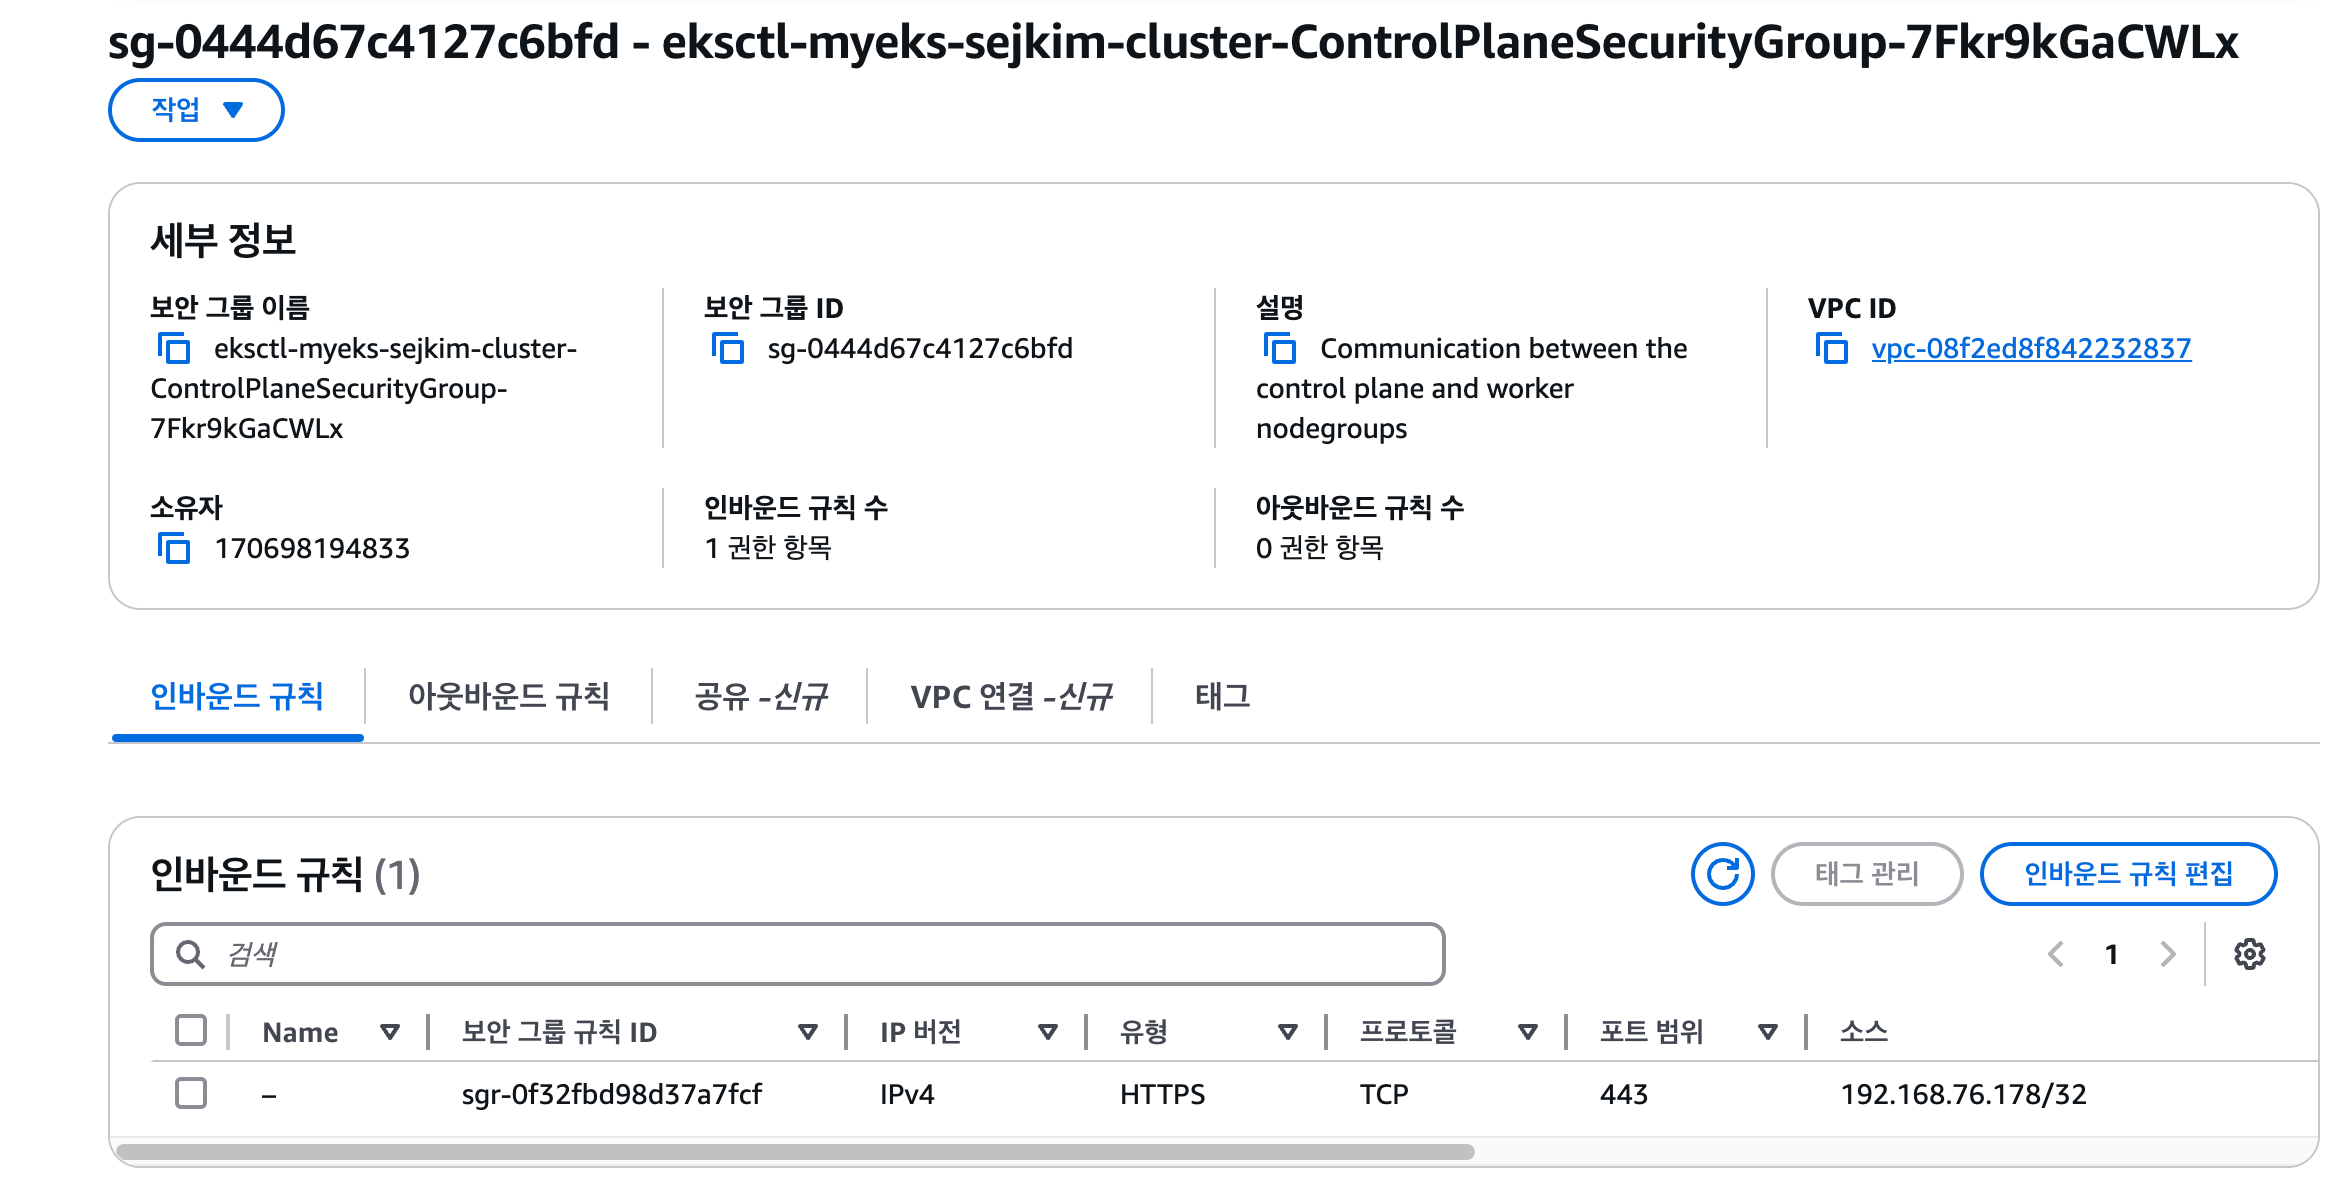
-
다시 kubectl get node 실행

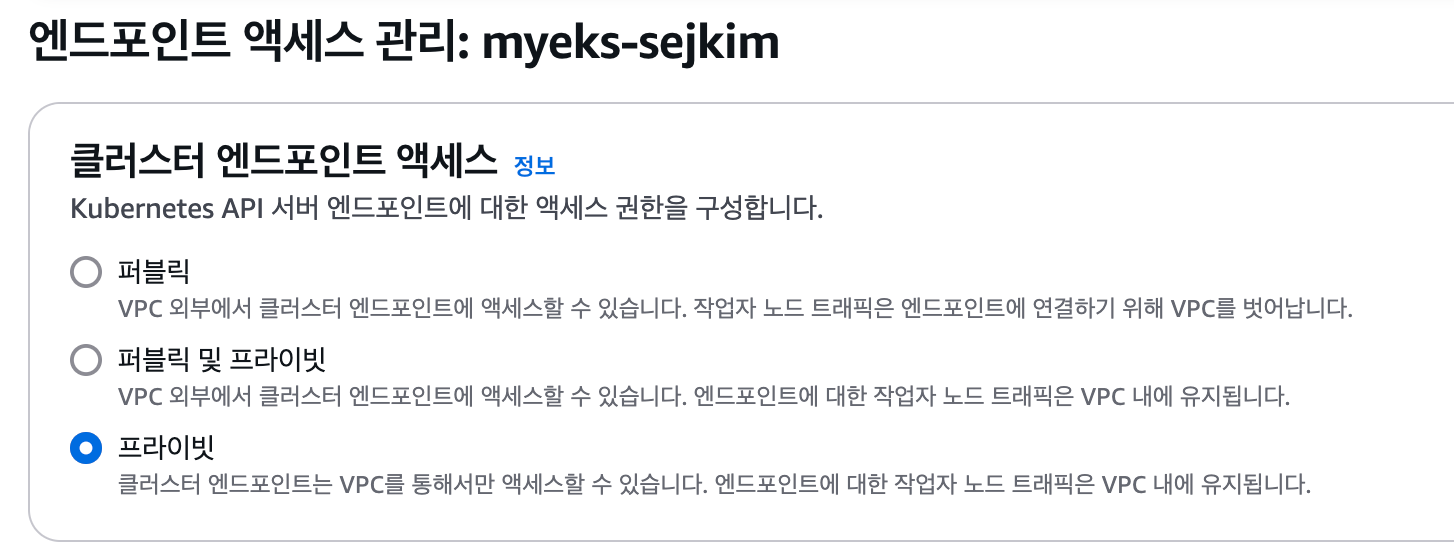
4.3 API 서버 엔드포인트 엑세스 변경
-
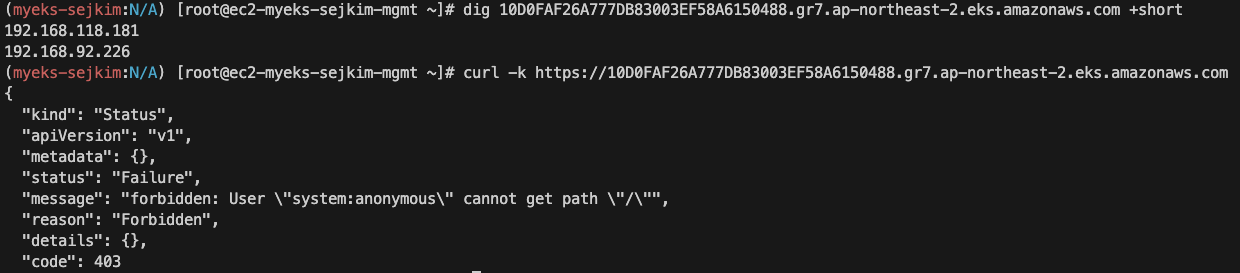
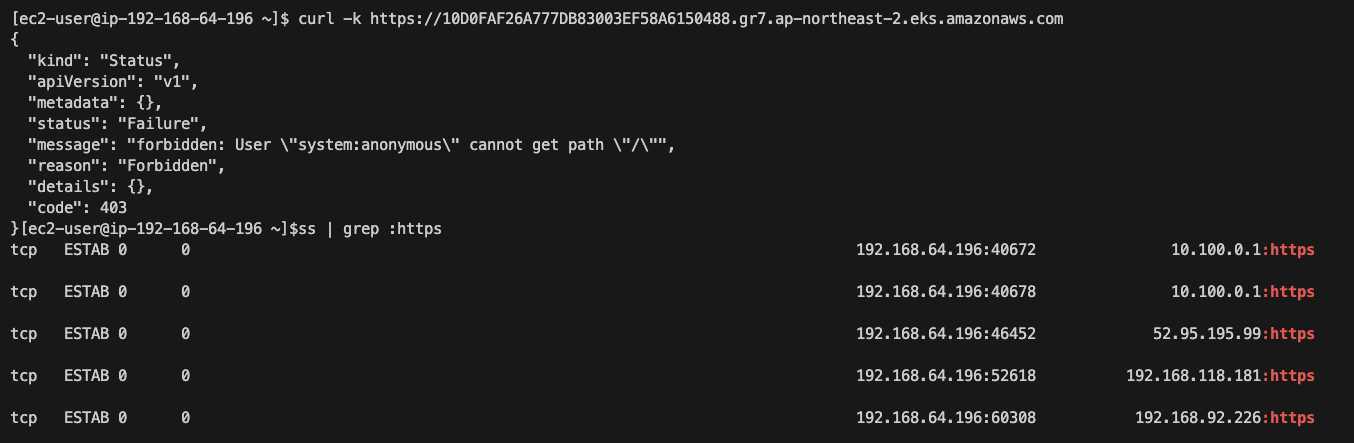
Control Plane API 서버 엔드포인트가 퍼블릭과 프라이빗 모두 접근가능하도록 설정되어 있으면 해킹위험 요소가 있어서 프라이빗 전용으로 변경 필요 함
-
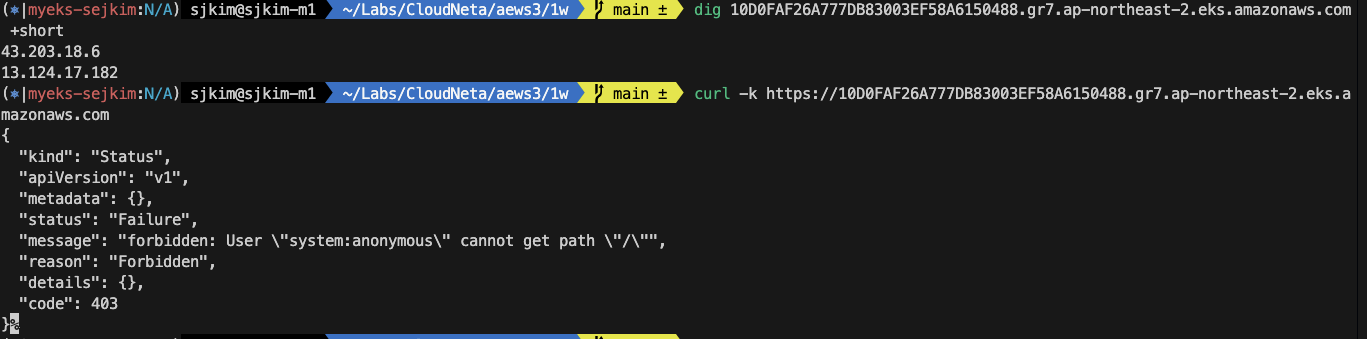
변경전 :
- 퍼블릭과 프라이빗에서 API 서버 엔드포인트 엑세스 가능
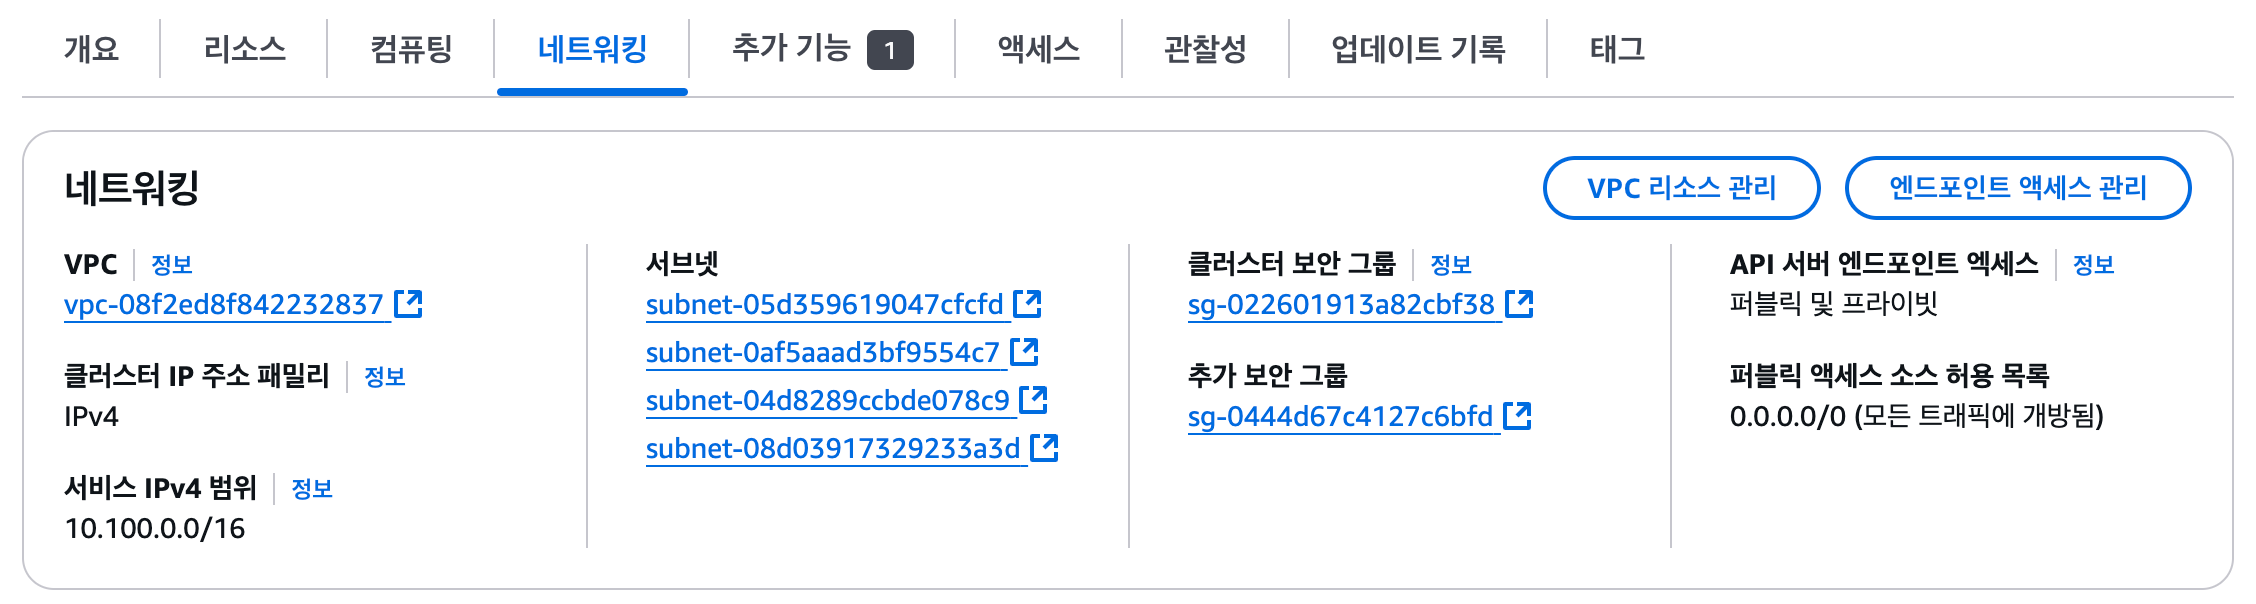
- mac에서 확인 시 외부IP로 접속 가능
- ec2-myeks-sejkim-mgmt에서 확인 시 내부IP로 접속 됨
- worker-node에서 확인 시 내부IP로 접속 됨
- 퍼블릭과 프라이빗에서 API 서버 엔드포인트 엑세스 가능
-
변경중 :
-
변경후 :
- 프라이빗 전용으로 변경 됨
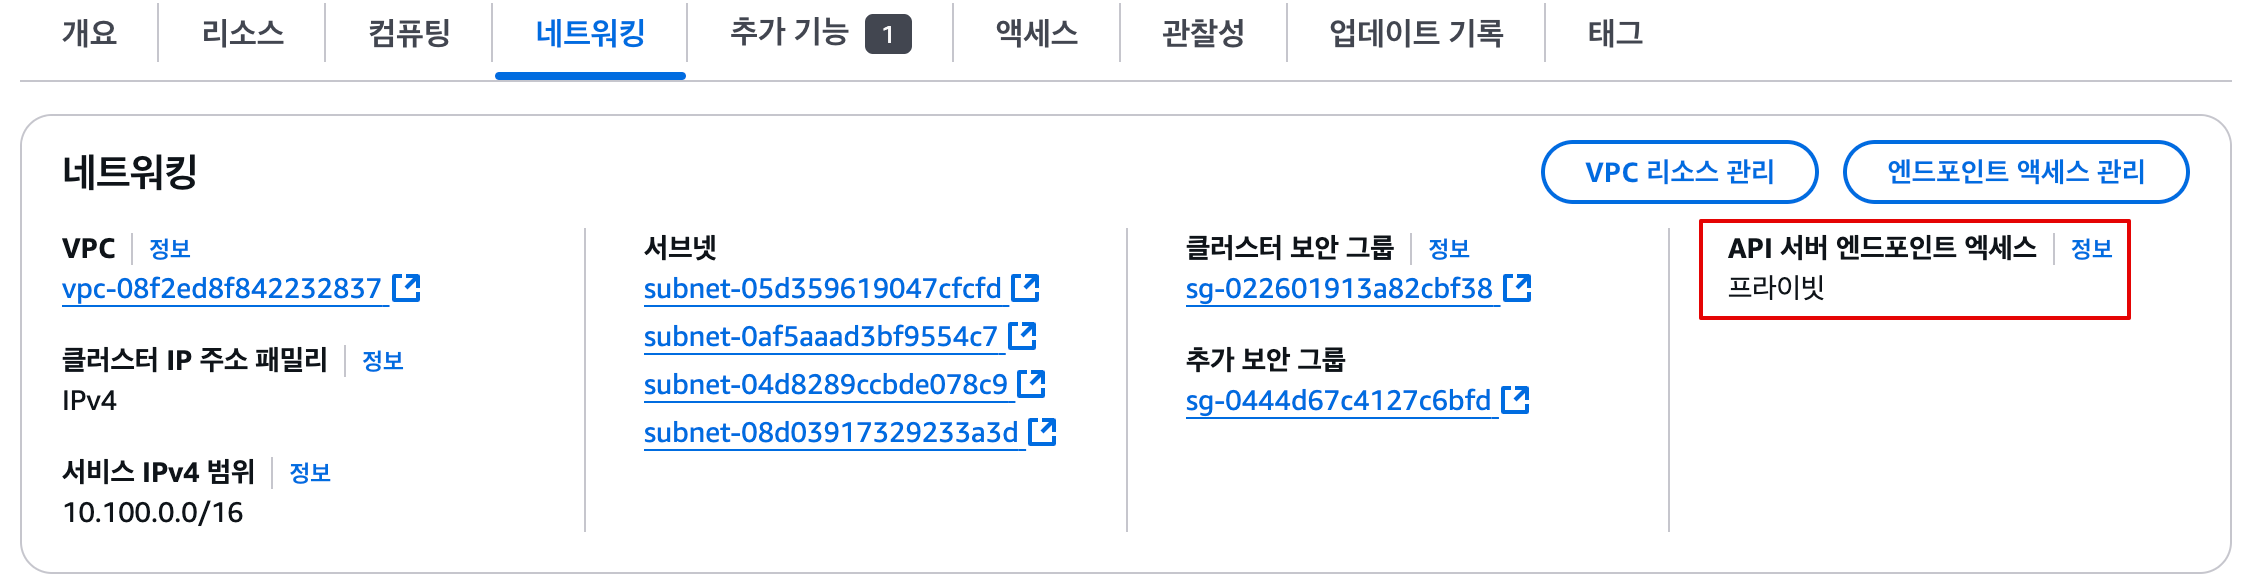
- mac에서 확인 시 내부IP로 전환되어 접속불가

- ec2-myeks-sejkim-mgmt에서 확인 시 내부IP로 접속 됨
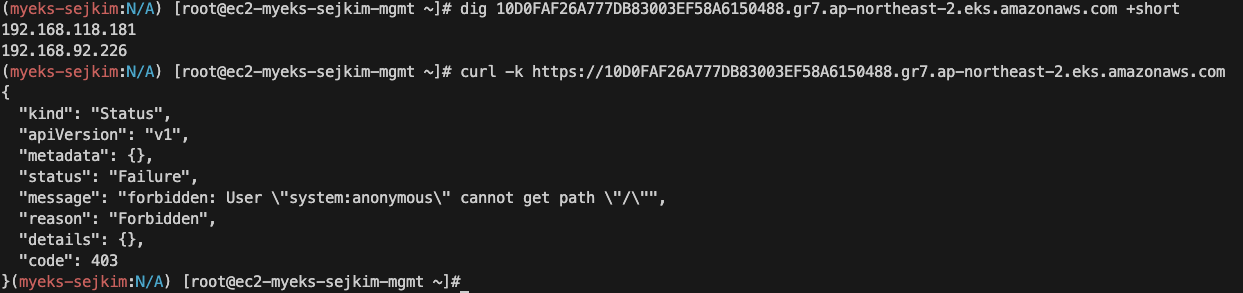
- worker-node에서 확인시 내부IP로 접속 됨
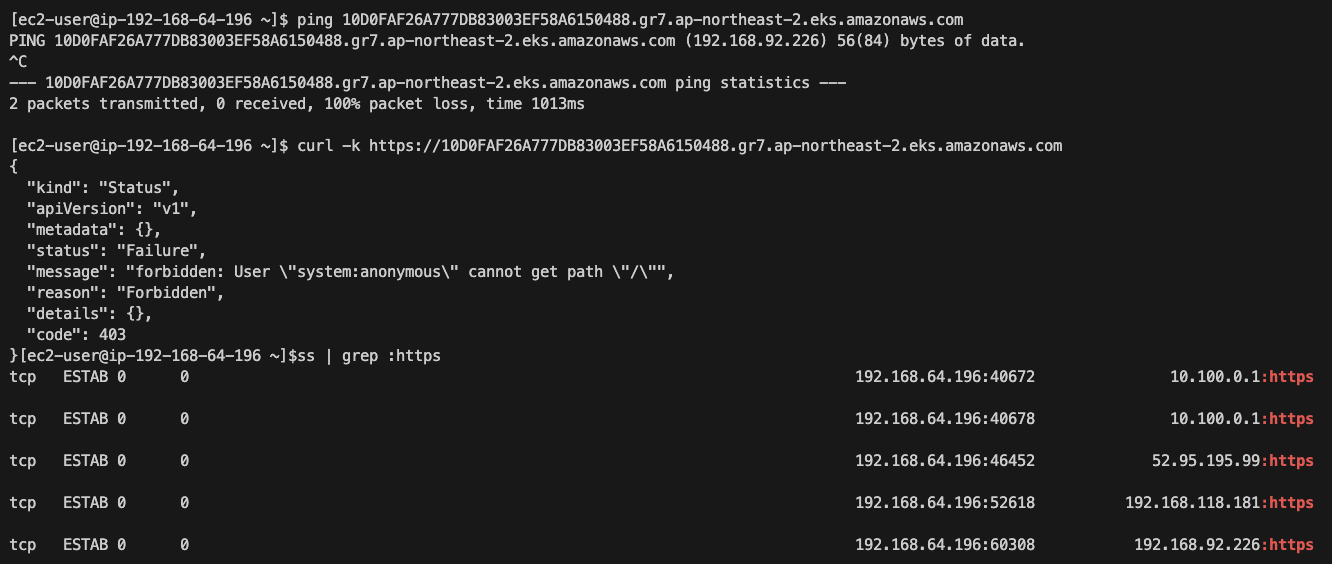
- 프라이빗 전용으로 변경 됨
5. ECR 구성 및 Container Image 업로드/배포하기
5.1 Private ECR 생성
-
myeks-sejkim/nginx Private Repository 생성
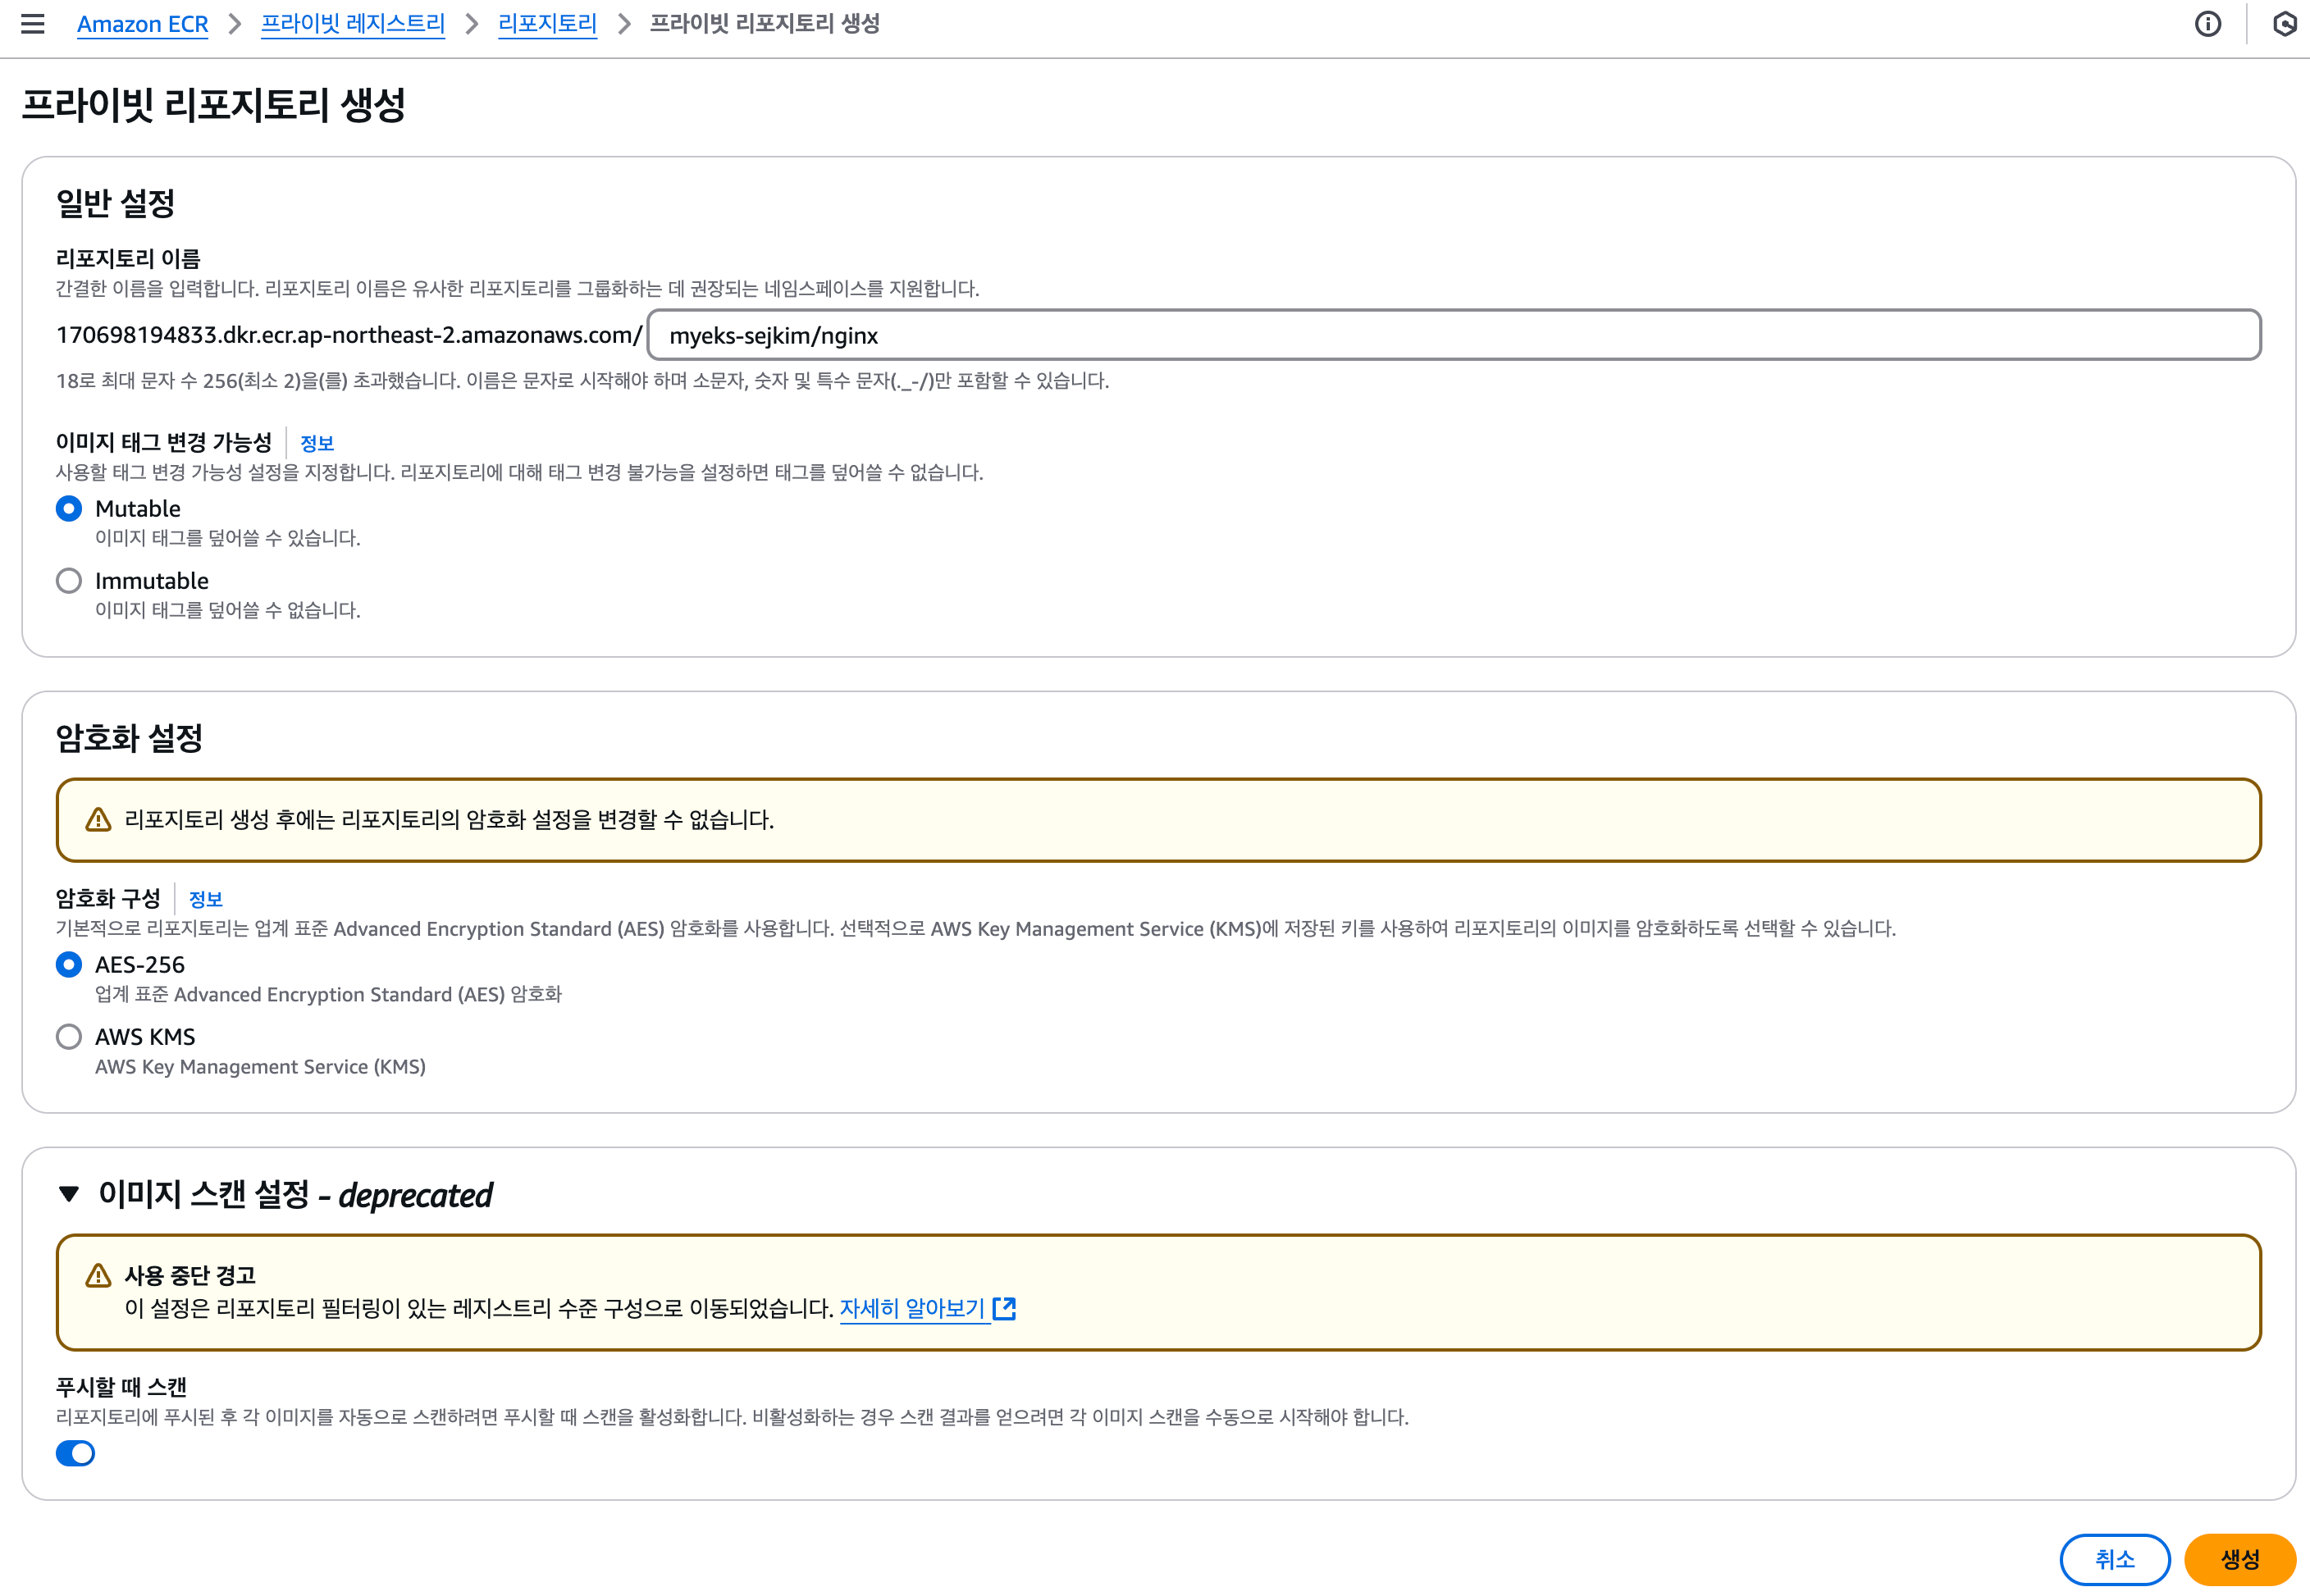
-
myeks-sejkim/nginx에 대한 푸시 명령
최신 버전의 AWS CLI 및 Docker이(가) 설치되어 있는지 확인합니다. 자세한 내용은 Amazon ECR 시작하기 을(를) 참조하세요.
다음 단계를 사용하여 이미지를 인증하고 리포지토리에 푸시합니다. Amazon ECR 자격 증명 헬퍼를 비롯한 추가 레지스트리 인증 방법은 레지스트리 인증 을(를) 참조하십시오.

1. 인증 토큰을 검색하고 레지스트리에 대해 Docker 클라이언트를 인증합니다. 다음 AWS CLI을(를) 사용하세요.
aws ecr get-login-password --region ap-northeast-2 | docker login --username AWS --password-stdin 1**********3.dkr.ecr.ap-northeast-2.amazonaws.com
참고: AWS CLI을(를) 사용하는 중 오류가 발생하면 최신 버전의 AWS CLI 및 Docker가 설치되어 있는지 확인하세요.

2. 다음 명령을 사용하여 도커 이미지를 빌드합니다. 도커 파일을 처음부터 새로 빌드하는 방법에 대한 자세한 내용은 여기  지침을 참조하십시오. 이미지를 이미 빌드한 경우에는 이 단계를 건너뛸 수 있습니다.
docker build -t myeks-sejkim/nginx .

3. 빌드가 완료되면 이미지에 태그를 지정하여 이 리포지토리에 푸시할 수 있습니다.
docker tag myeks-sejkim/nginx:latest 170698194833.dkr.ecr.ap-northeast-2.amazonaws.com/myeks-sejkim/nginx:latest

4. 다음 명령을 실행하여 이 이미지를 새로 생성한 AWS 리포지토리로 푸시합니다.
docker push 170698194833.dkr.ecr.ap-northeast-2.amazonaws.com/myeks-sejkim/nginx:latest
5.2 eks-mgmt에서 nginx ecr로 push
- docker 명령어로 nginx down, tagging, ecr로 push
(myeks-sejkim:N/A) [root@ec2-myeks-sejkim-mgmt ~]# aws ecr get-login-password --region ap-northeast-2 | docker login --username AWS --password-stdin 1**********3.dkr.ecr.ap-northeast-2.amazonaws.com
WARNING! Your password will be stored unencrypted in /root/.docker/config.json.
Configure a credential helper to remove this warning. See
https://docs.docker.com/engine/reference/commandline/login/#credentials-store

Login Succeeded
(myeks-sejkim:N/A) [root@ec2-myeks-sejkim-mgmt ~]# docker pull nginx
Using default tag: latest
latest: Pulling from library/nginx
c29f5b76f736: Pull complete
e19db8451adb: Pull complete
24ff42a0d907: Pull complete
c558df217949: Pull complete
976e8f6b25dd: Pull complete
6c78b0ba1a32: Pull complete
84cade77a831: Pull complete
Digest: sha256:91734281c0ebfc6f1aea979cffeed5079cfe786228a71cc6f1f46a228cde6e34
Status: Downloaded newer image for nginx:latest
docker.io/library/nginx:latest
(myeks-sejkim:N/A) [root@ec2-myeks-sejkim-mgmt ~]# dokcer images
-bash: dokcer: command not found
(myeks-sejkim:N/A) [root@ec2-myeks-sejkim-mgmt ~]# docker images
REPOSITORY   TAG       IMAGE ID       CREATED      SIZE
nginx        latest    97662d24417b   2 days ago   192MB
(myeks-sejkim:N/A) [root@ec2-myeks-sejkim-mgmt ~]# docker tag nginx:latest 1**********3.dkr.ecr.ap-northeast-2.amazonaws.com/myeks-sejkim/nginx:latest
(myeks-sejkim:N/A) [root@ec2-myeks-sejkim-mgmt ~]# docker tag nginx:latest 1**********3.dkr.ecr.ap-northeast-2.amazonaws.com/myeks-sejkim/nginx:1
(myeks-sejkim:N/A) [root@ec2-myeks-sejkim-mgmt ~]# docker images
REPOSITORY                                                             TAG       IMAGE ID       CREATED      SIZE
1**********3.dkr.ecr.ap-northeast-2.amazonaws.com/myeks-sejkim/nginx   1         97662d24417b   2 days ago   192MB
1**********3.dkr.ecr.ap-northeast-2.amazonaws.com/myeks-sejkim/nginx   latest    97662d24417b   2 days ago   192MB
nginx                                                                  latest    97662d24417b   2 days ago   192MB
(myeks-sejkim:N/A) [root@ec2-myeks-sejkim-mgmt ~]# docker push 1**********3.dkr.ecr.ap-northeast-2.amazonaws.com/myeks-sejkim/nginx:1
The push refers to repository [1**********3.dkr.ecr.ap-northeast-2.amazonaws.com/myeks-sejkim/nginx]
1fb7f1e96249: Pushed
d6266720b0a6: Pushed
2ef6413cdcb5: Pushed
320c70dd6b6b: Pushed
17129ef2de1a: Pushed
9574fd0ae014: Pushed
7914c8f600f5: Pushed
1: digest: sha256:d2f1bb1fa588bd0e730d45736e5b60fb182d194fe52f3264074bacb1d0c97037 size: 1778
(myeks-sejkim:N/A) [root@ec2-myeks-sejkim-mgmt ~]# docker push 1**********3.dkr.ecr.ap-northeast-2.amazonaws.com/myeks-sejkim/nginx:latest
The push refers to repository [1**********3.dkr.ecr.ap-northeast-2.amazonaws.com/myeks-sejkim/nginx]
1fb7f1e96249: Layer already exists
d6266720b0a6: Layer already exists
2ef6413cdcb5: Layer already exists
320c70dd6b6b: Layer already exists
17129ef2de1a: Layer already exists
9574fd0ae014: Layer already exists
7914c8f600f5: Layer already exists
latest: digest: sha256:d2f1bb1fa588bd0e730d45736e5b60fb182d194fe52f3264074bacb1d0c97037 size: 1778- ecr에 push된 모습
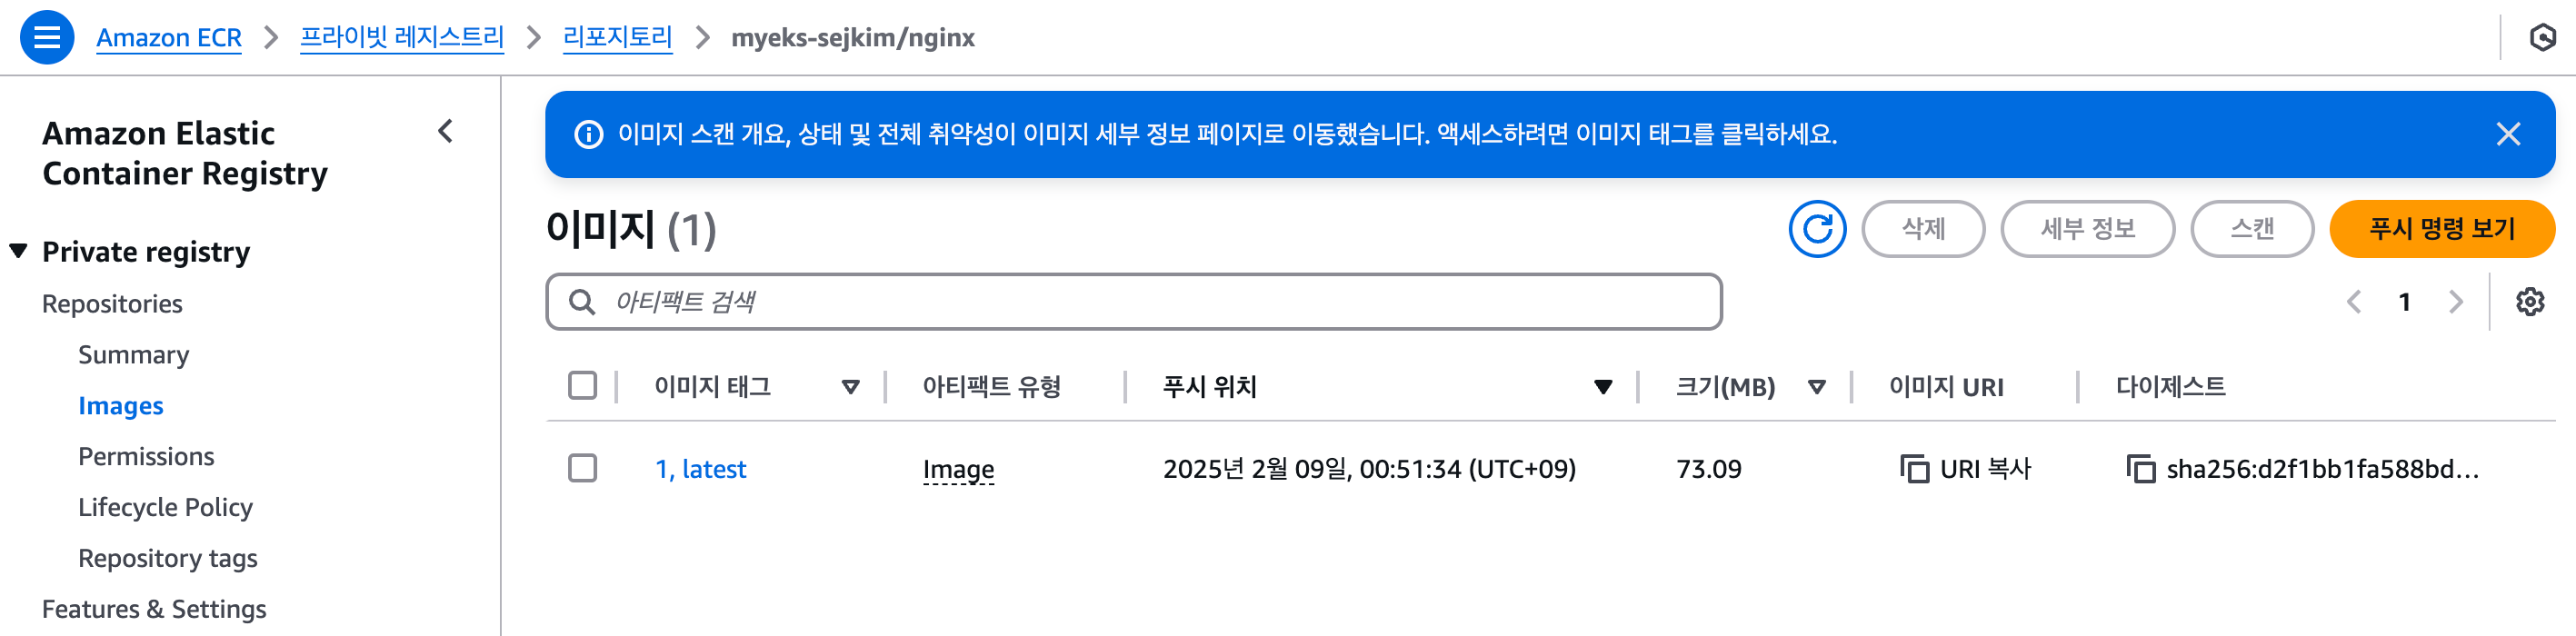
5.3 nginx 배포
- kubectl 명령어로 deployment 생성
(myeks-sejkim:N/A) [root@ec2-myeks-sejkim-mgmt ~]# kubectl create deployment nginx --image=1**********3.dkr.ecr.ap-northeast-2.amazonaws.com/myeks-sejkim/nginx:1 --replicas=2
deployment.apps/nginx created
(myeks-sejkim:N/A) [root@ec2-myeks-sejkim-mgmt ~]# kubectl get deployment,pod
NAME                    READY   UP-TO-DATE   AVAILABLE   AGE
deployment.apps/nginx   2/2     2            2           20s

NAME                         READY   STATUS    RESTARTS   AGE
pod/nginx-7d9578ddf4-9jbw5   1/1     Running   0          20s
pod/nginx-7d9578ddf4-qmwh7 1/1 Running 0 20s- service 노출
(myeks-sejkim:N/A) [root@ec2-myeks-sejkim-mgmt ~]# kubectl expose deployment nginx --type=LoadBalancer --port=80
service/nginx exposed
(myeks-sejkim:N/A) [root@ec2-myeks-sejkim-mgmt ~]# kubectl get svc,ep
NAME                 TYPE           CLUSTER-IP      EXTERNAL-IP                                                                    PORT(S)        AGE
service/kubernetes   ClusterIP      10.100.0.1      <none>                                                                         443/TCP        13h
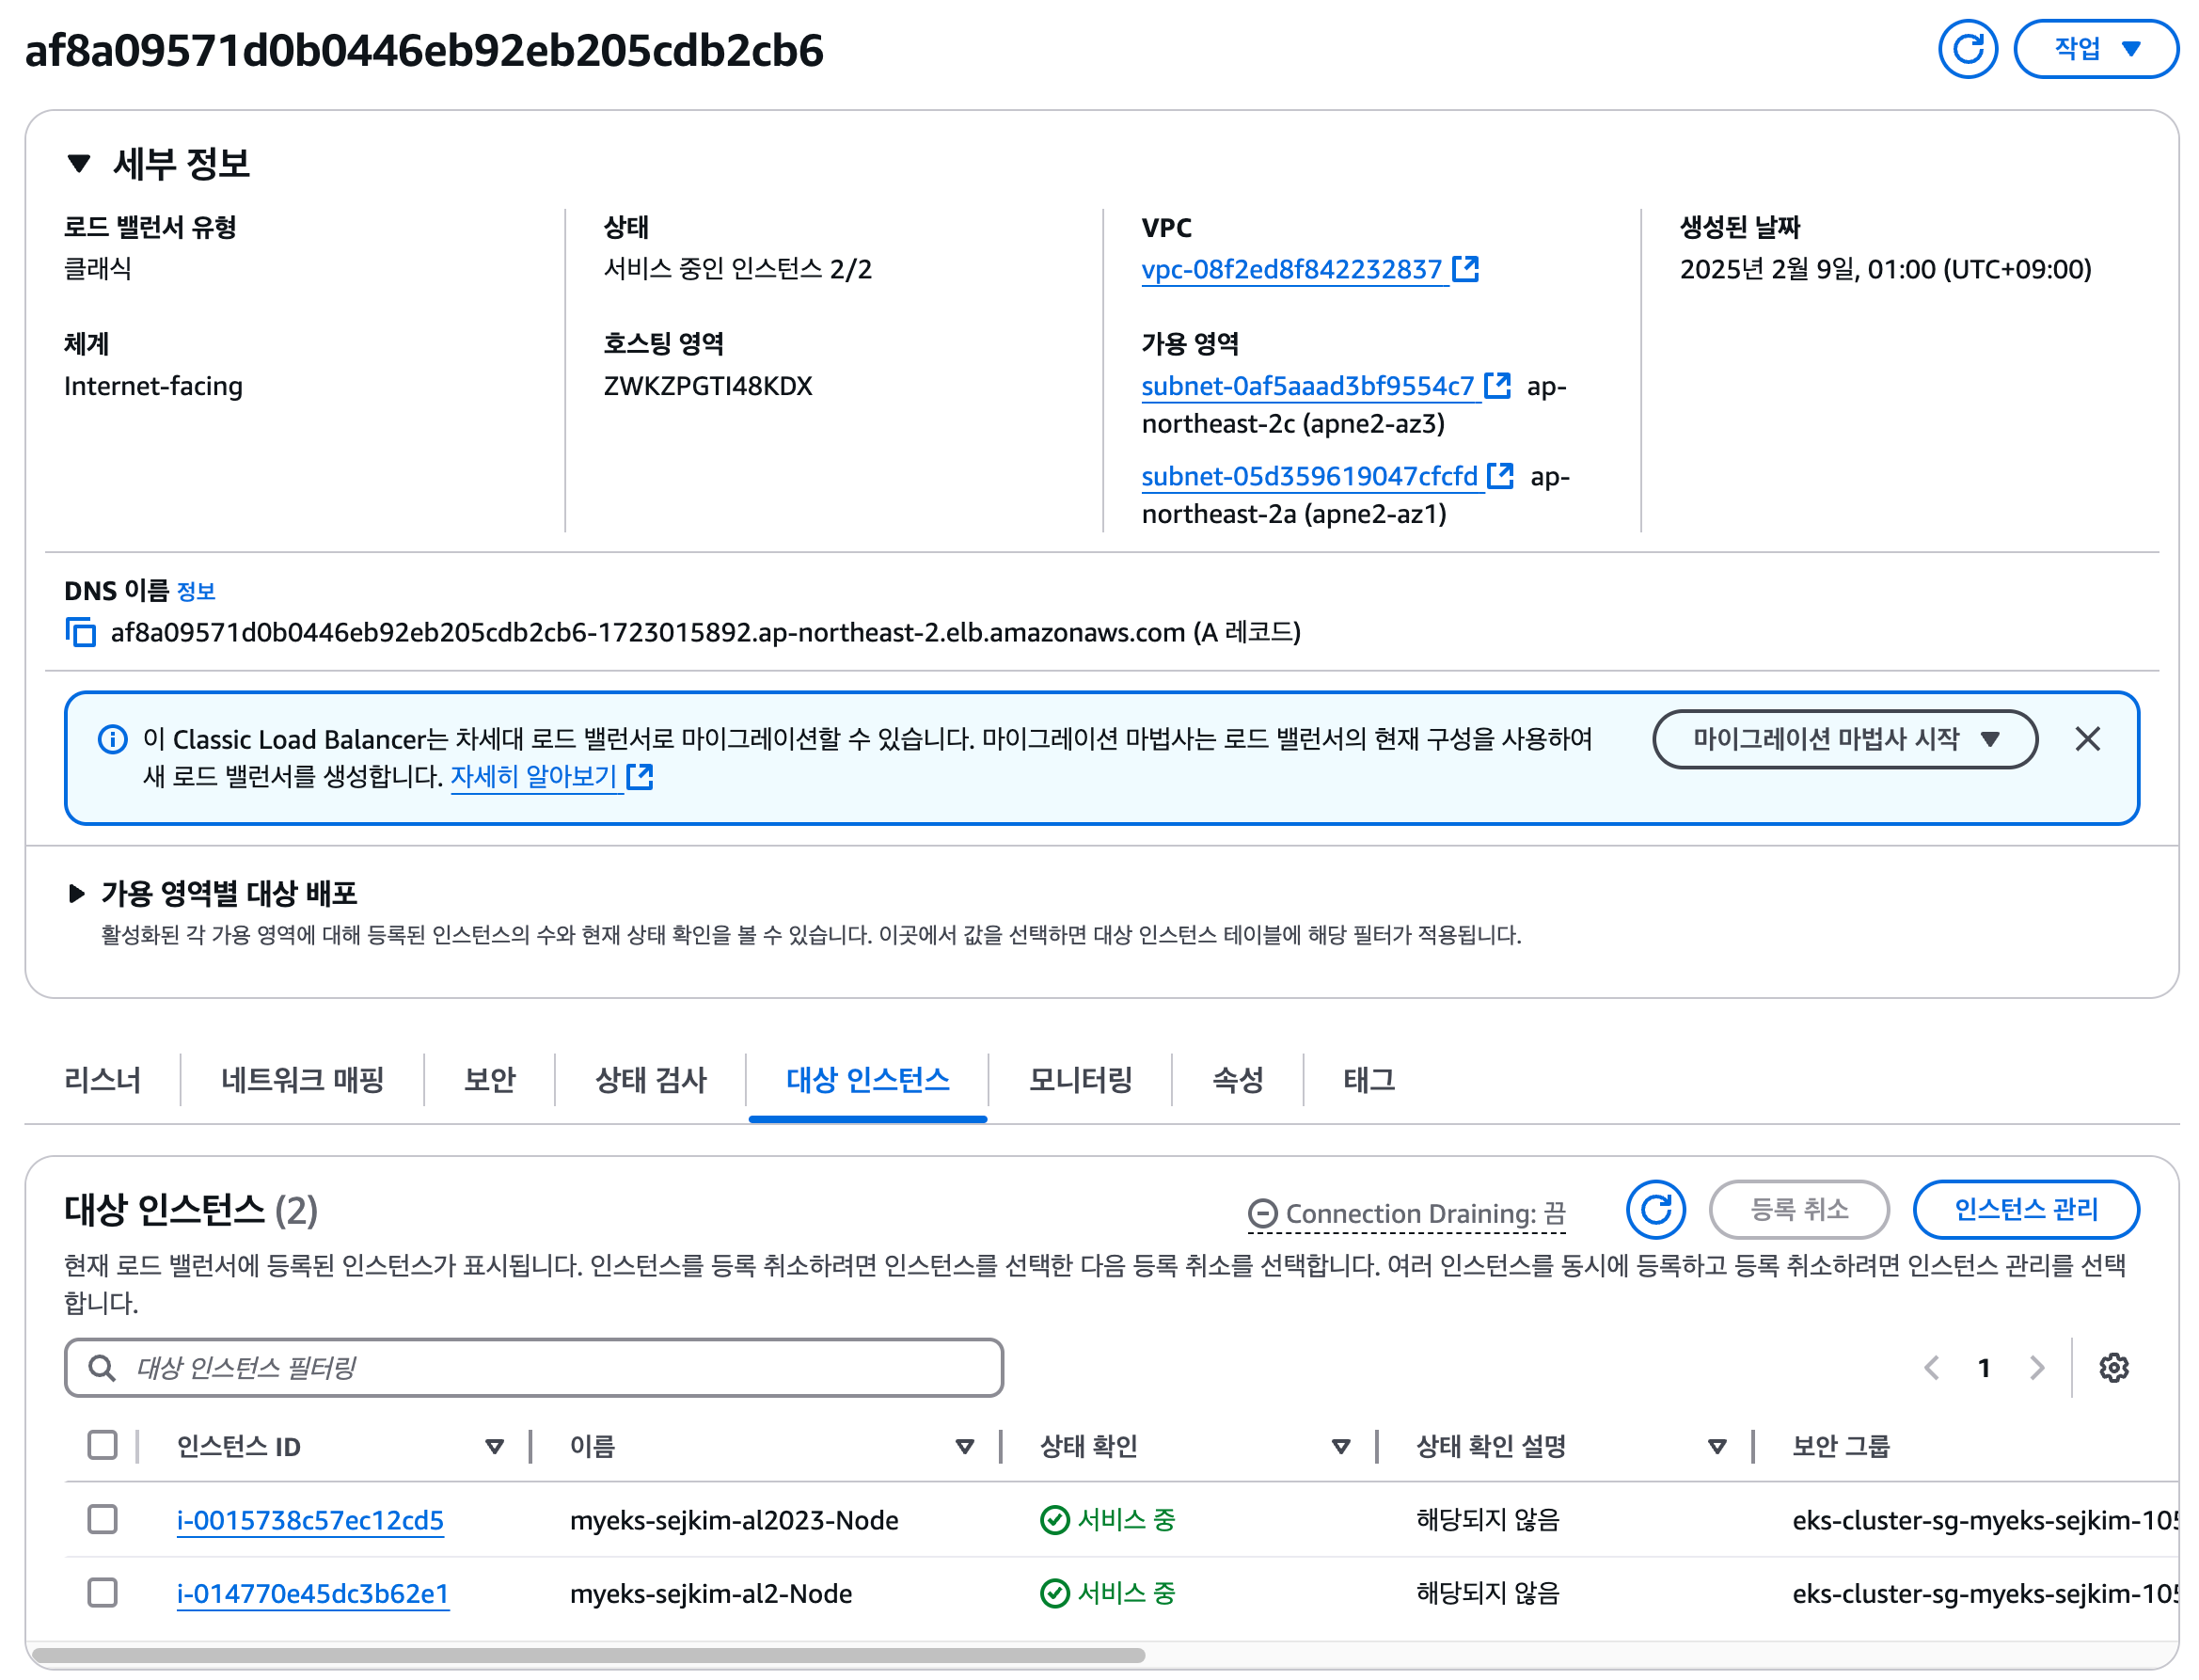
service/nginx        LoadBalancer   10.100.171.22   af8a09571d0b0446eb92eb205cdb2cb6-1723015892.ap-northeast-2.elb.amazonaws.com   80:30636/TCP   10s

NAME                   ENDPOINTS                                AGE
endpoints/kubernetes   192.168.118.181:443,192.168.92.226:443   13h
endpoints/nginx 192.168.79.1:80,192.168.90.141:80 10s-
LoadBalancer 확인
-
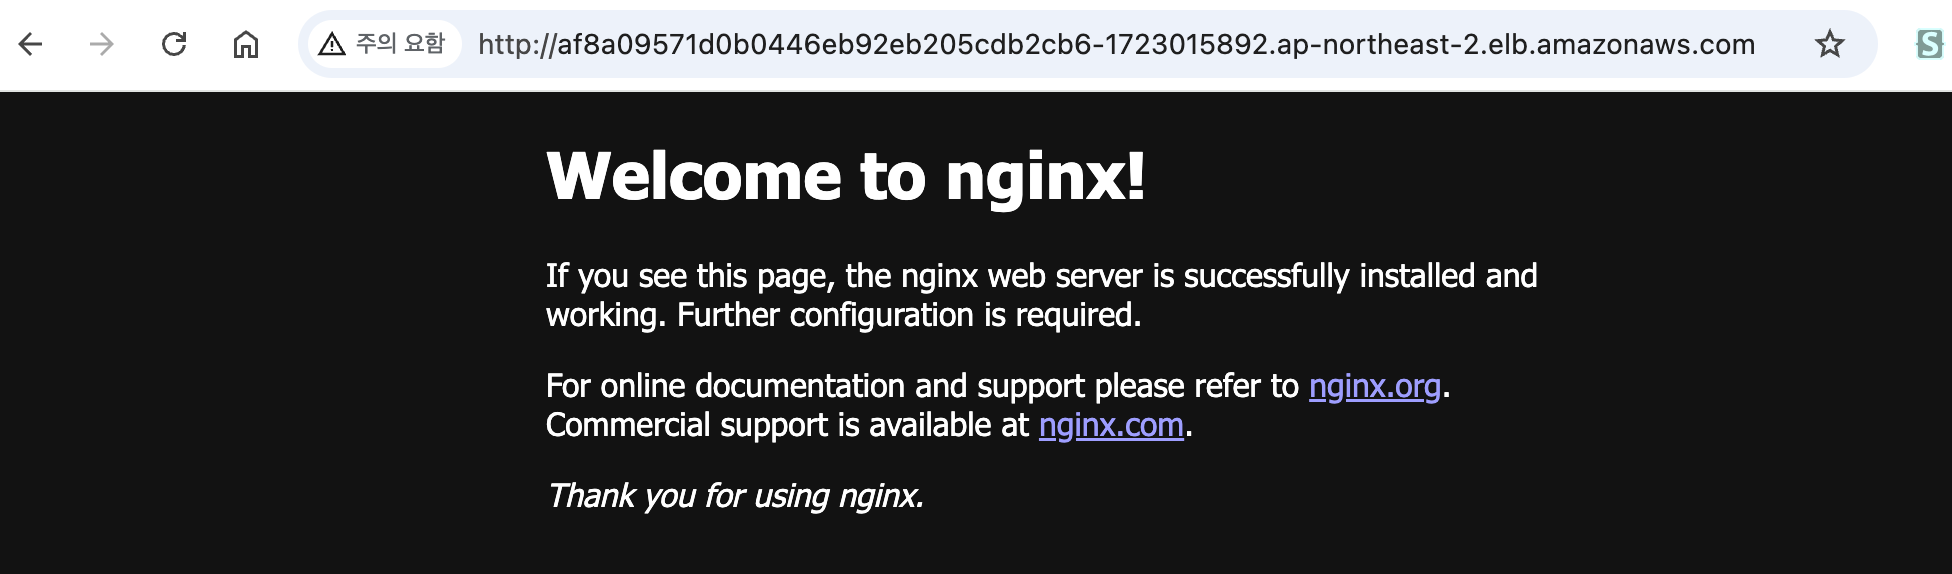
웹브라우저에서 접속
6. 자원삭제
- nginx svc, deployment
$ kubectl delete svc nginx
$ kubectl delete deployment nginx - ecr 삭제
$ aws ecr delete-repository --repository-name myeks-sejkim/nginx --force - Amazon EC2 Instance Connect Endpoint 삭제
- nodegroup 삭제
$ eksctl delete nodegroup --cluster myeks-sejkim --name al2023
$ eksctl delete nodegroup --cluster myeks-sejkim --name al2 - ec2-myeks-sejkim-mgmt 삭제
- eks cluster 삭제
$ eksctl delete cluster --name myeks-sejkim

좋은 글 남겨주셔서 감사합니다.
실무에 큰 도움이 됩니다~!