멀티 스레드란?
운영체제는 실행 중인 프로그램을 프로세스(process)로 관리한다.
멀티 태스킹은 두 가지 이상의 작업을 동시에 처리하는 것을 말하는데, 이 때 운영체제는 멀티 프로세스를 생성하여 처리한다.
하나의 프로세스에서 멀티 스레드를 이용하여 두 가지 이상의 작업을 처리할 수 있다.
스레드는 코드의 실행 흐름을 말하는데, 프로세스 내에 스레드가 두 개라면 두 개의 코드 실행 흐름이 생긴다는 의미이다.
멀티 프로세스들은 서로 독립적이므로 하나의 프로세스에서 오류가 발생해도 다른 프로세스에게 영향을 미치지 않는다.
하지만 멀티 스레드는 프로세스 내부에서 생성되기 때문에 하나의 스레드가 예외를 발생시키면 프로세스가 종료되므로 다른 스레드에게 영향을 미친다.
Thread 클래스 생성
package ch14.sec03.exam01;

import java.awt.*;

public class BeepPrintExample {
    public static void main(String[] args) {
        Toolkit toolkit = Toolkit.getDefaultToolkit();
        for(int i = 0; i<5; i++){
            toolkit.beep();
            try{Thread.sleep(500);} catch (Exception e){}
        }
        for(int i = 0; i<5; i++){
            System.out.println("띵");
            toolkit.beep();
            try{Thread.sleep(500);} catch (Exception e){}
        }
    }
}
이렇게 만들면 싱글 스레드의 흐름으로, main() 함수 안에 단일 스레드가 비프음을 5번 실행 하고 그 후에 프린팅을 진행한다.
package ch14.sec03.exam02;

import java.awt.*;

public class BeepPrintExample {
    public static void main(String[] args) {
        Thread thread = new Thread(new Runnable() {
            @Override
            public void run() {
                Toolkit toolkit = Toolkit.getDefaultToolkit();
                for(int i = 0; i<5; i++){
                    toolkit.beep();
                    try{Thread.sleep(500);} catch (Exception e){}
                }
            }
        });
        thread.start();
    	for(int i = 0 ; i<5; i++){
        System.out.println("띵");
        try{Thread.sleep(500);} catch (Exception e){}
        }
    }
}
Thread객체를 생성할 때 매개값으로 Runnable() 구현체를 넣으면 이렇게 run() 함수를 구현할 수 있는데, run() 함수는 멀티 스레드 환경에서 돌아가며 start();에 의해 비프음을 5번 실행함과 동시에 프린팅을 동시에 수행해 비프음과 프린팅이 뒤죽박죽으로 실행되는걸 볼 수 있다.
쓰레드 이름 변경
스레드는 자신의 이름을 가진다. 메인 스레드는 'main'이라는 이름을 가지고 작업 스레드는 자동적으로 'Thread-n'이라는 이름을 가진다. 자동 설정된 이름 말고 다른 이름으로 설정하고 싶으면 setName() 메소드를 써보자.
package ch14.sec04;

public class ThreadNameExample {
    public static void main(String[] args) {
        Thread mainThread = Thread.currentThread();
        System.out.println(mainThread.getName()+"실행");

        for(int i = 0; i<3; i++){
            Thread threadA = new Thread(){
                @Override
                public void run() {
                    System.out.println(getName()+" 실행");
                }
            };
            threadA.start();

            Thread chatThread = new Thread(){
                @Override
                public void run() {
                    System.out.println(getName()+" 실행");
                }
            };
            chatThread.setName("chat-Thread");
            chatThread.start();
        }
    }
}
스레드 상태
스레드 객체를 생성하고 start() 메소드를 호출하면 곧바로 스레드가 실행되는 것이 아니라 실행 대기 상태(RUNNABLE)가 된다.
실행 대기 상태란 실행을 기다리고 있는 상태를 말한다.
실행 대기하는 스레드는 CPU 스케줄링에 따라 CPU를 점유하고 run() 메소드를 실행한다. 이때를 실행(RUNNING) 상태라고 한다.
실행 스레드는 run() 메소드를 모두 실행하기 전에 스케줄링에 의해 다시 실행 대기 상태로 돌아갈 수 있다. 그리고 다른 스레드가 실행상태가 된다.
이렇게 스레드는 실행 대기 상태와 실행 상태를 번갈아 가면서 자신의 run() 메소드를 조금씩 실행한다.
실행 상태에서 run() 메소드가 종료되면 더 이상 실행할 코드가 없기 때문에 스레드의 실행은 멈추게 된다. 이 상태를 종료상태(TERMINATED) 라고 한다.
실행 상태에서 일시 정지 상태로 가기도 하는데, 일시 정지 상태는 스레드가 실행할 수 없는 상태를 말한다.
주어진 시간 동안 일시 정지
package ch14.sec05.exam01;

import java.awt.*;

public class SleepExample {
    public static void main(String[] args) {
        Toolkit toolkit = Toolkit.getDefaultToolkit();
        for(int i = 0; i<10; i++){
            toolkit.beep();
            try{
                Thread.sleep(3000);
            }catch (Exception e){

            }
        }
    }
}
sleep() 으로 3초동안 정지했다가 다시 실행된다.
다른 스레드의 종료를 기다림
package ch14.sec05.exam02;

public class SumThread extends Thread{
    private long sum;

    public long getSum() {
        return sum;
    }

    public void setSum(long sum) {
        this.sum = sum;
    }

    @Override
    public void run() {
        for(int i = 1; i<=100; i++){
            sum+=i;
        }
    }
}
package ch14.sec05.exam02;

public class JoinExample {
    public static void main(String[] args) {
        SumThread sumThread = new SumThread();
        sumThread.start();
        try{
            sumThread.join();
        }catch (Exception e){}
        System.out.println("1~100 합 : "+sumThread.getSum());
    }
}
join() 으로 다른 스레드의 종료까지 기다린 후 다음 스레드를 실행 할 수 있다.
스레드 동기화
멀티스레드는 하나의 객체를 공유해서 작업할 수도 있다. 이경우 다른 스레드에 의해 객체 내부 데이터가 쉽게 변경될 수 있기 때문에 의도했던 것과는 다른 결과가 나올 수 있다. 이를 방지하기 위해 동기화 메소드 및 블록을 지원한다.
public synchronized void method(){
	// 단 하나의 스레드만 실행하는 영역
}
public void method(){
synchronized(공유객체){ ... /*단 하나의 스레드만 실행하는 영역*/ }
// 여러 스레드를 실행 할 수 있는 영역
}wait()과 notify()를 이용한 스레드 제어
wait()과 notify()는 말 그대로 정지와 재생이다. 경우에 따라 두 개의 스레드를 교대로 번갈아 가며 실행 할 때가 있는데, wait()으로 일시정지를 걸고 nofity()로 정지된 스레드를 다시 실행하는 기능을 한다.
public class WorkObject {
    public synchronized void methodA(){
        Thread thread = Thread.currentThread();
        System.out.println(thread.getName()+" : methodA 작업 실행");
        notify();
        try{
            wait();
        }catch (Exception e){}
    }

    public synchronized void methodB(){
        Thread thread = Thread.currentThread();
        System.out.println(thread.getName()+" : methodB 작업 실행");
        notify();
        try{
            wait();
        }catch (Exception e){}
    }


}
스레드 안전종료
스레드는 run() 메소드가 모두 실행되면 자동으로 종료되지만 경우에 따라 실행 중인 스레드를 즉시 종료할 필요가 있다. stop() 메소드가 존재하긴 하나 이는 deprecated(더이상 사용하지 않음) 처리 되었다. 그 이유는 갑자기 스레드를 종료하면 리소스들이 불안정한 상태로 남겨지기 때문이다.
조건문 이용
package ch14.sec07;

public class PrintThread extends Thread{
    private boolean stop;

    public void setStop(boolean stop) {
        this.stop = stop;
    }

    @Override
    public void run() {
        while (!stop){
            System.out.println("실행 중");
        }
        System.out.println("리소스 정리");
        System.out.println("실행 종료");
    }
}
스레드가 while문으로 반복 실행 될 경우, 조건문을 통해 run() 메소드의 종료를 유도할 수 있다.
interrupt() 메소드 이용
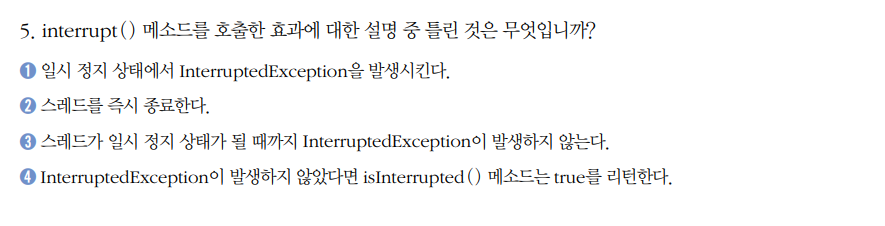
interrupt()는 스레드가 일시정지 상태일 때 InterruptedException 예외를 발생시키는 역할을 한다. 이걸 이용해 예외처리로 넘겨 run()을 정상종료 할 수 있다.
package ch14.sec07.exam02;

public class PrintThread extends Thread{
    @Override
    public void run() {
        try{
            while (true){
                System.out.println("실행 중");
                Thread.sleep(1);
            }
        }catch (InterruptedException e){
            System.out.println("리소스 정리");
            System.out.println("정상 종료");
        }
    }
}
package ch14.sec07.exam02;

public class InterruptExample {
    public static void main(String[] args) {
        Thread thread = new PrintThread();
        thread.start();

        try{
            Thread.sleep(1000);
        }catch (InterruptedException e){

        }
        thread.interrupt();
    }
}
데몬 스레드
데몬 스레드는 주 스레드의 작업을 돕는 보조 스레드이이다.
주 스레드가 종료되면 데몬 스레드도 자동으로 종료된다.
데몬 스레드를 적용한 예로는 워드프로세서의 자동 저장, 가비지 컬렉터 등이 있다.
스레드를 데몬으로 만들기 위해서는 주 스레드가 데몬이 될 스레드의 setDaemon(true)를 호출하면 된다.
package ch14.sec08;

public class AutoSaveThread extends Thread{
    public void save(){
        System.out.println("작업 내용을 저장함");
    }

    @Override
    public void run() {
        while (true){
            try{
                Thread.sleep(1000);
            }catch (Exception e){ break;}
            save();
        }

    }
}
package ch14.sec08;

public class DaemonExample {
    public static void main(String[] args) {
        AutoSaveThread autoSaveThread = new AutoSaveThread();
        autoSaveThread.setDaemon(true);
        autoSaveThread.start();

        try{
            Thread.sleep(3000);
        }catch (Exception e){

        }
        System.out.println("메인 스레드 종료");
    }
}
스레드 풀
병렬 작업 처리가 많아지면 스레드의 개수가 폭증하여 CPU가 바빠지고 메모리 사용량이 늘어난다.
이에 따라 애플리케이션의 성능 또한 급격히 저하된다. 이렇게 병렬 작업 증가로 인한 스레드의 폭증을 막으려면 스레드풀을 사용하는 것이 좋다.
스레드풀은 작업 처리에 사용되는 스레드를 제한된 개수만큼 정해놓고 작업 큐에 들어오는 작업들을 스레드가 하나씩 맡아 처리하는 방식이다.
작업 처리가 끝난 스레드는 다시 작업 큐에서 새로운 작업을 가져와 처리한다.
솔직히 무슨 말인지 이해가 안된다. 여긴 더 공부해야겠다.
어떻게 쓰는지 알고 문법을 이해하는 것은 사실 아무것도 아니다.
본질적인 개념에 대한 이해가 없으면 아무리 코드 짜봤자 실전에서 못쓴다.
package ch14.sec09.exam03;

import java.util.concurrent.Callable;
import java.util.concurrent.ExecutorService;
import java.util.concurrent.Executors;
import java.util.concurrent.Future;

public class CallableSubmitExample {
    public static void main(String[] args) {
        ExecutorService executorService = Executors.newFixedThreadPool(5);

        for(int i = 1; i<=100; i++){
            final int idx = i;
            Future<Integer> future = executorService.submit(new Callable<Integer>() {
                @Override
                public Integer call() throws Exception {
                    int sum = 0;
                    for(int i = 1; i<=idx; i++){
                      sum+=i;
                    }
                    Thread thread = Thread.currentThread();
                    System.out.println("["+thread.getName()+"] 1~"+idx+" 합 계산");
                    return sum;
                }
            });
            try{
                int result = future.get();
                System.out.println("\t리턴값: "+result);
            }catch (Exception e){}
        }
    executorService.shutdown();
    }

}
1에서 100까지의 합을 어섬하게 셀 수 있는 코드다.
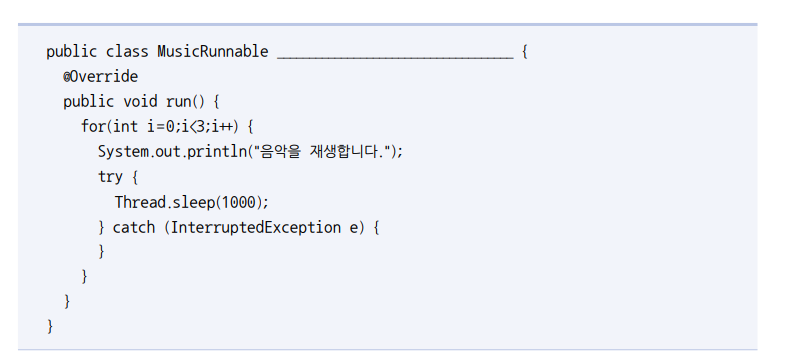
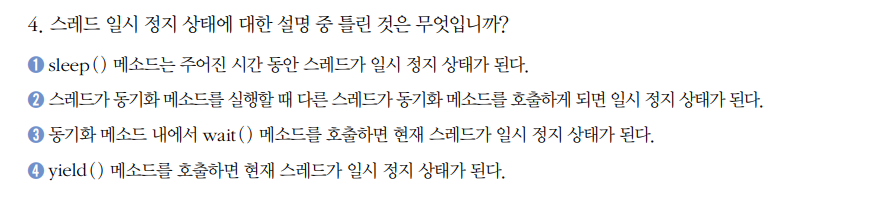
연습문제
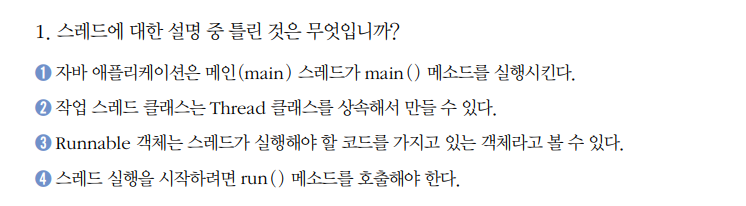
4번
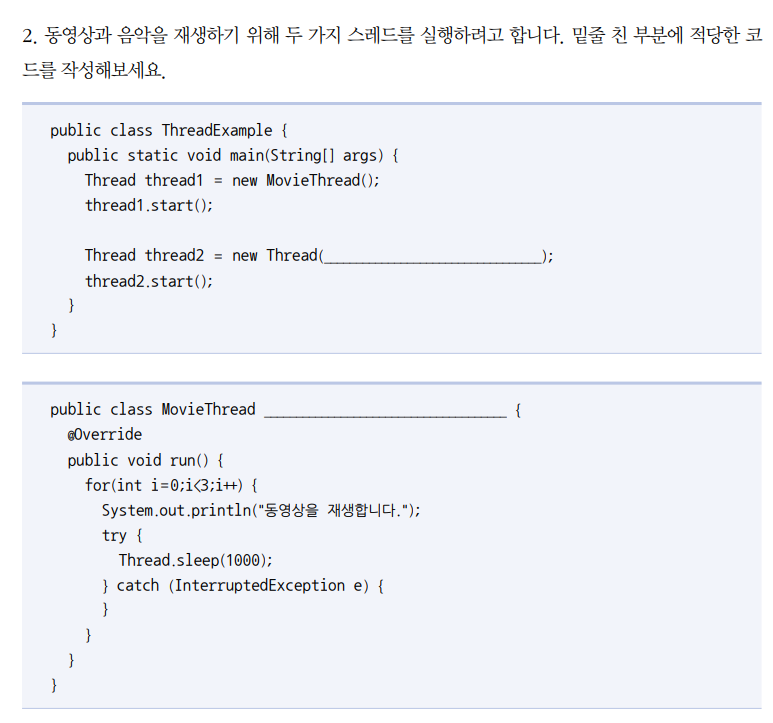
new Runnable() { ... }
extends Thread
implements Runnable

2번
4번
2번
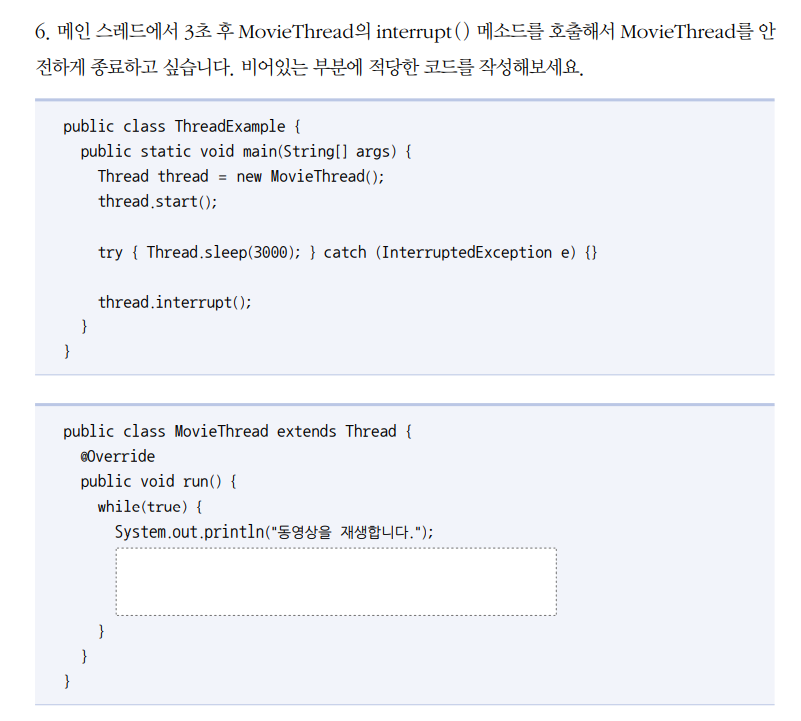
if(this.isInterrupted()) break;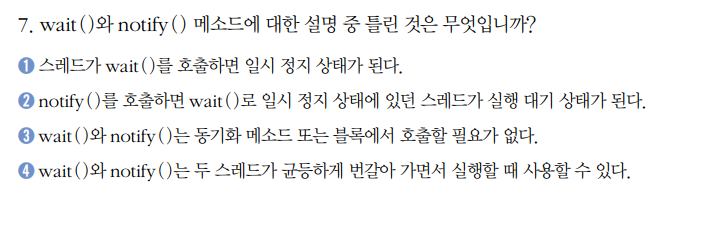
3번
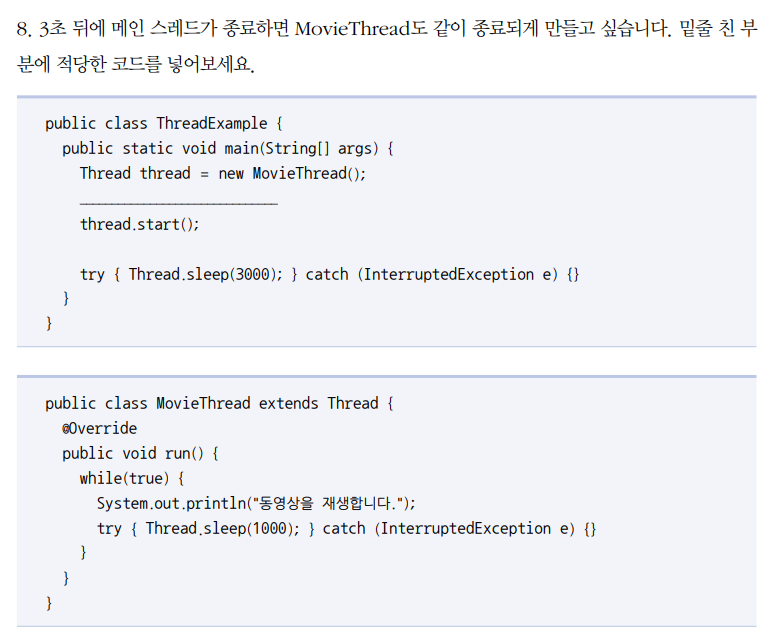
thread.setDaemon(true);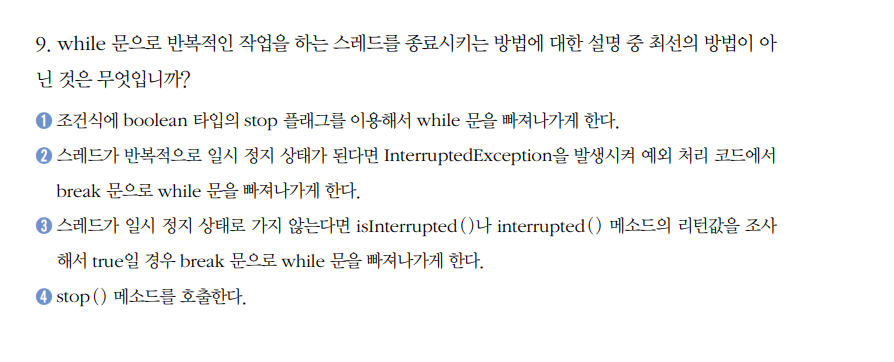
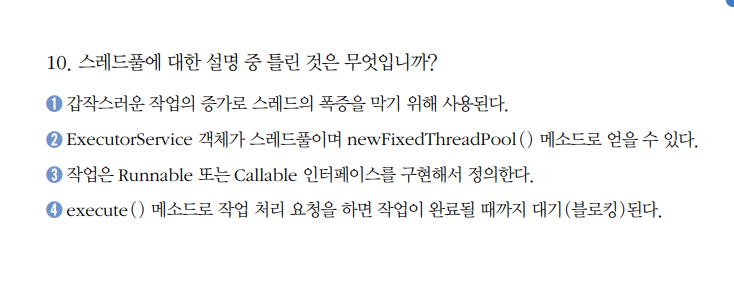
4번
4번