HttpURLConnection
URLConnection
- 사용자 인증이나 보안이 설정되어 있지 않은 웹 서버에 접속하여 파일 등을 다운로드 하는데 많이 사용
- URLConnection은 리소스에 연결하기 전에 구성해야 함
- URLConnection 인스턴스는 재사용 될 수 없음
- 각 리소스에 대한 커넥션마다 인스턴스를 사용해야함
HttpURLConnection
- URLConnection에 HTTP 고유 기능에 대한 추가 지원
- HttpURLConnection은 Connection Reuse(OOM 문제)를 피하려면 반드시 Stream close 필요
- keep-alive 기본 활성화
- timeouts 기본 설정하지 않으면 무한대
setConnectTimeout,setReadTimeout매우 중요
- HttpURLConnection은 기본적으로 GET 메서드 사용 (요청방식은 대문자로 전달)
- setRequestMethod()메서드를 사용해서 메서드 변경 가능
- 요청 방식을 확인 or 설정, redirect 여부 결정
- 응답 코드와 메시지를 Read, 프록시 서버가 사용되었는지 여부 확인 메서드 등을 가짐
구현 단계
- URL 객체 만들기
- URL에서 URLConnection 객체 얻기
- URL 연결 구성
- 헤더 필드 읽기
- 입력 스트림 가져오기 및 데이터 읽기 출력 스트림 가져오기 및 데이터 쓰기
- 연결 닫기
예시 (과거 테스트 한 코드)
@SpringBootTest
public class ApplicationTestsURLConnection {

	//데이터를 저장하기 위한 String
	StringBuilder sb = new StringBuilder();

	@BeforeEach
	void setUp() {
		try {
			//URL을 만들기 위한 stringUrl과 id
			String stringUrl = "http://localhost:8080/member?id=";
			String id = "TEST1";

			/*	URL 객체 생성
			 *	URL과 통신하기 위한 Connection 객체 생성
			 *	GET으로 통신
			 *	ContentType은 application/json 으로 설정
			 */
			URL url = new URL(stringUrl + id);
			HttpURLConnection conn = (HttpURLConnection)url.openConnection();
			conn.setRequestMethod("GET");
			conn.setRequestProperty("Content-Type", "application/json");

			//통신 응답 코드 확인
			System.out.println("Response code : " + conn.getResponseCode());
			BufferedReader rd;	//데이터를 BufferedReader 객체로 저장. StringBulider로 옮길 예정
			//응답 코드 성공이면 데이터 저장
			if(conn.getResponseCode() >= 200 && conn.getResponseCode() <= 300) {
				rd = new BufferedReader(new InputStreamReader(conn.getInputStream()));
			} else {
				rd = new BufferedReader(new InputStreamReader(conn.getErrorStream()));
			}

			//데이터를 한 줄씩 읽어 StringBuilder sb로 저장
			String line;
			while ((line = rd.readLine()) != null) {
				sb.append(line);
			}
			rd.close();
			conn.disconnect();
		} catch (IOException e) {
			e.printStackTrace();
		}
	}

	@Test
	void testJsonParsing() throws JSONException {
		//문자열 형태 JSON을 파싱
		JSONObject obj = new JSONObject(sb.toString());
		String id = obj.getString("id");
		String name = obj.getString("name");
		String age = obj.getString("age");
		System.out.println("id : " + id);
		System.out.println("name : " + name);
		System.out.println("age : " + age);
	}
}
OkHttp
- RestAPI, HTTP통신을 간편하게 구현할 수 있도록 다양한 기능을 제공
- 기본적으로 비동기/동기 모두 지원
- http/2지원, 커넥션 풀링 캐싱 등의 기능을 제공하여 네트워크 성능을 최적화
- 커넥션 풀은 클라이언트 단위, 클라이언트를 재사용하는 것이 강력한 장점
- 동일한 호스트에 대한 모든 요청이 소켓을 공유할 수 있음
- 응답 캐싱을 통해 네트워크에 대한 반복 요청을 피함
예시
@SpringBootTest
public class ApplicationTestsOKHttp {

	//URL 생성
	String url = "http://localhost:8080/member?id=TEST1";
	@Test
	void testOKHttp() {
		try {
			//OKHttpClient 생성
			OkHttpClient okHttpClient = new OkHttpClient().newBuilder().build();

			//응답 요청을 위한 객체 url, get, json 형식으로 생성
			Request request = new Request.Builder()
					.url(url)
					.get()
					.addHeader("Content-Type", "application/json")
					.build();

			//비동기 요청으로 실행.
			okHttpClient.newCall(request).enqueue(new Callback() {
				@Override
				public void onFailure(Call call, IOException e) {
					System.err.print("ERROR");
				}
				@Override
				public void onResponse(Call call, Response response2) throws IOException {
					ResponseBody responseBody = response2.body();
					if(responseBody != null) {
						System.out.println("비동기 방식 : " + responseBody.string());
						response2.close();
					}
				}
			});

			//동기 요청으로 실행.
			Response response = okHttpClient.newCall(request).execute();
			if(response.isSuccessful()) {
				ResponseBody responseBody = response.body();
				if(responseBody != null) {
					String responseString = responseBody.string();
					System.out.println("동기 방식 : " + responseString);
					//ResponseBody JSON을 파싱
					JSONObject obj = new JSONObject(responseString);
					String id = obj.getString("id");
					String name = obj.getString("name");
					String age = obj.getString("age");
					System.out.println("id(동기) : " + id);
					System.out.println("name(동기) : " + name);
					System.out.println("age(동기) : " + age);
				}
			} else {
				System.out.println("ERROR");
			}
		} catch (Exception e) {
			e.printStackTrace();
		}
	}
}
OKHttpCallBack
설정
public class OkhttpCallback implements Callback {

	int num=0;

	public void setNum(int _num) {
		num = _num;
	}

	@Override
	public void onFailure(Call call, IOException e) {
		System.out.println("error + Connect Server Error is " + e.toString());
	}

	@Override
	public void onResponse(Call call, Response response) throws IOException {
		System.out.println(num +" >>>>ping "+response);
		response.body().close();	//response.body를 close 해주어야 connectionPool을 다른 쓰레드가 재사용할 수 있음.
	}
}
예시 (과거 테스트 한 코드)
@Component
public class okhttpTest  implements CommandLineRunner  {
	/*
	 * ConnectionPool 최대 10개의 커넥션 유지, 1로 설정, 두번째 인자의 단위 설정(분)
	 */
	SimpleDateFormat format1 = new SimpleDateFormat ( "YYYY/MM/dd  HH:mm:ss:SSS");
	ConnectionPool connectionPool = new ConnectionPool(10,1,TimeUnit.MINUTES);

	@Override
	public void run(String... args) throws Exception {
		okhttpenqueueEx("http://push.tigensoft.co.kr:82/test.html");

		check();
	}


	public void okhttpenqueueEx(String urlA) {

		//메소드 시작 시각 넣기, SYSOUT으로 현재 시간 출력
		Long s= System.currentTimeMillis();
		 System.out.println("====>"+ getTime());

		 for(int i=0; i<100;i++) {
			 OkHttpClient client = new OkHttpClient().newBuilder().connectionPool(connectionPool).build();
			 Long start =  System.currentTimeMillis();	//시작 시간
			 Request request = new Request.Builder().url(urlA)
					 .get()
					 .build();

			 OkhttpCallback ok = new OkhttpCallback();
			 ok.setNum(i);
			 client.newCall(request).enqueue(ok);		//비동기로 처리
			 Long end =  System.currentTimeMillis();	//끝 시간
			 System.out.println("====>"+connectionPool.connectionCount()+","+connectionPool.idleConnectionCount()+", 걸린 시각(ms) :" + (end-start));
			 client.connectionPool().evictAll();       //connectionPool 닫기
		 }
		 System.out.println("시작 시각(ms) "+ s+"====>>"+ "현재 시각(ms) "+System.currentTimeMillis() +", "+(System.currentTimeMillis()-s)+ "(ms) 차이");
	}
}
RestTemplate
- 동기식 호출을 사용하며, 멀티 쓰레드 Blocking 방식
- 웹 클라이언트가 응답을 수신할 때까지 쓰레드가 Blocking
- Spring5부터 Deprecated 권장, WebClient로 대체
동작 순서
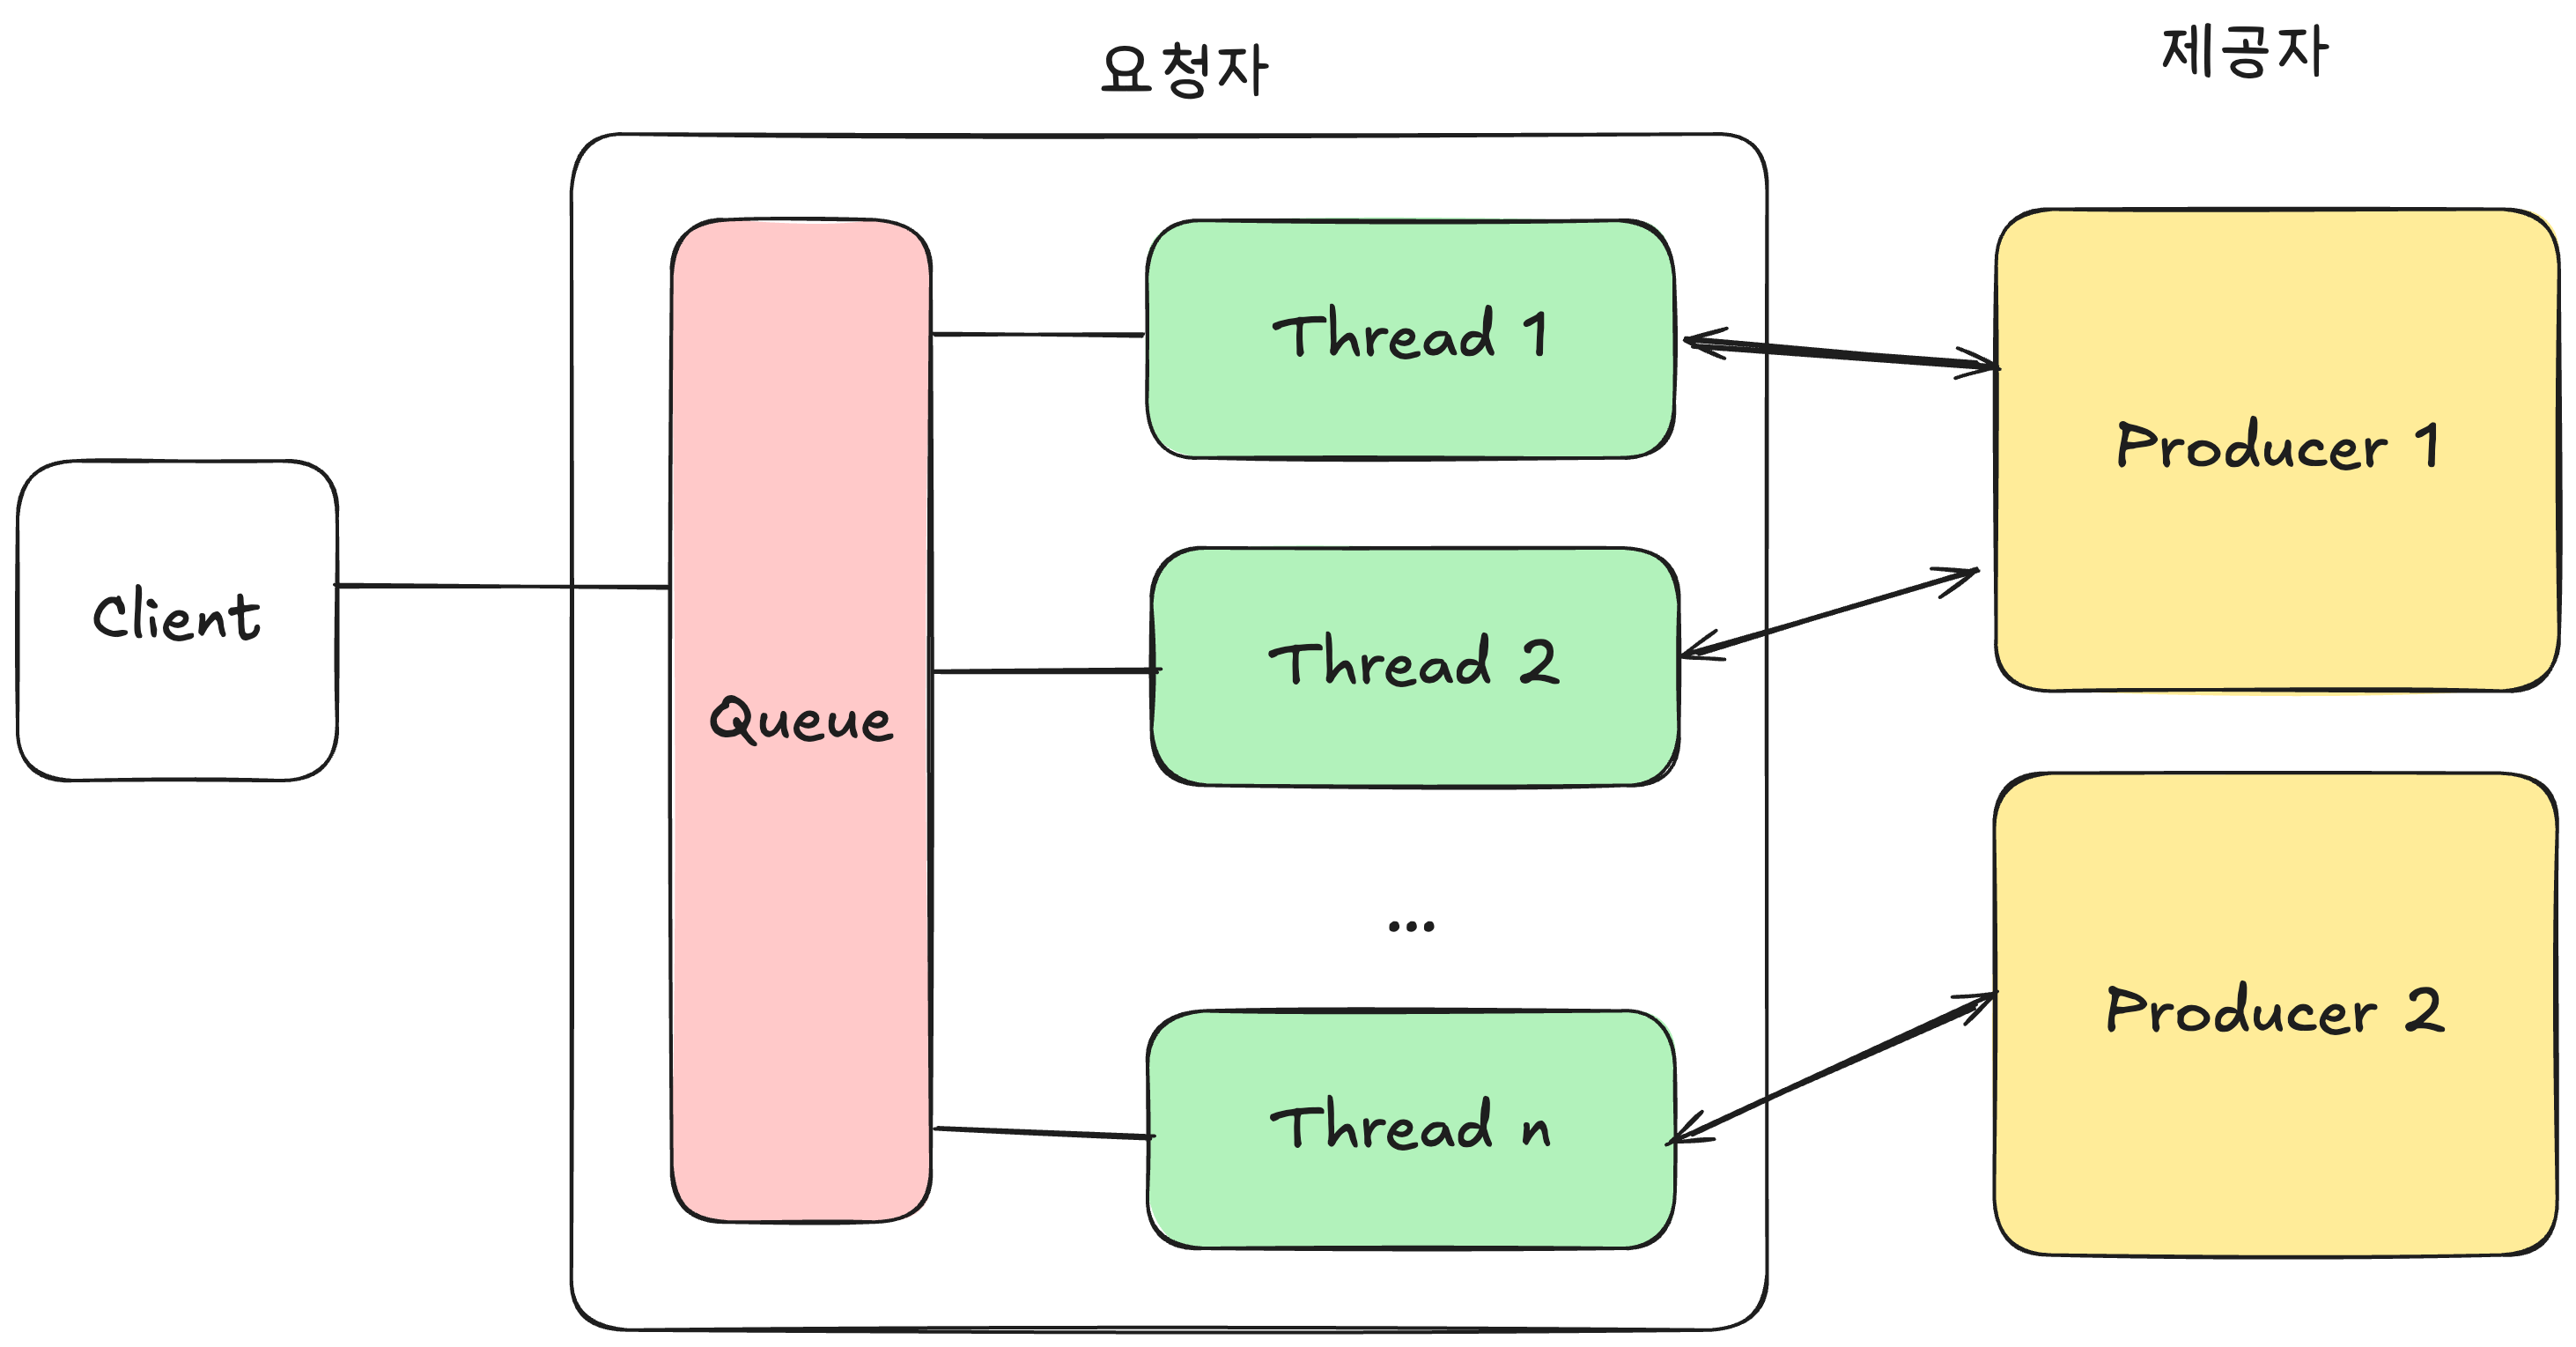
- 클라이언트 애플리케이션 구동 시 쓰레드 풀 생성
- Request는 먼저 Queue에 쌓이고 가용 쓰레드가 있으면 해당 쓰레드에 할당됨
- 각 쓰레드는 블로킹 방식이기 때문에 완료 응답이 올 때까지 다른 요청에 할당될 수 없음
- 쓰레드가 다 찼으면 이후 요청은 Queue에 대기하게 됨
예시 (과거 테스트 한 코드)
@SpringBootTest
public class ApplicationTestsRestTemplate {
	@Test
	void testRestTemplate() {
		//url 생성
		String url = "http://localhost:8080/searchmember?id=TEST1";
		/*	사용자의 HttpRequest에 대한 응답 데이터를 저장.
		*	HttpStatus, HttpHeaders, HttpBody를 포함한 ResponseEntity 생성.
		*/
		ResponseEntity<MemberVo> res = new RestTemplate().getForEntity(url, MemberVo.class);
		System.out.println(res);
		System.out.println("id : " + res.getBody().getId());
		System.out.println("name : " + res.getBody().getName());
		System.out.println("age : " + res.getBody().getAge());
	}
}
WebClient
- 비동기식 호출을 사용하며, 싱글 쓰레드 Non-Blocking 방식
- Reactor 기반 → Netty 기반의 비동기 Non-Blocking
- 각 이벤트에 대해 Task 같은 각각 이벤트를 만듦
- Task를 대기열에 넣고 적절한 응답 할 수 있을 때 실행
.block()사용 시 동기 Blocking- 커넥션 풀링 기본 제공
동작 원리
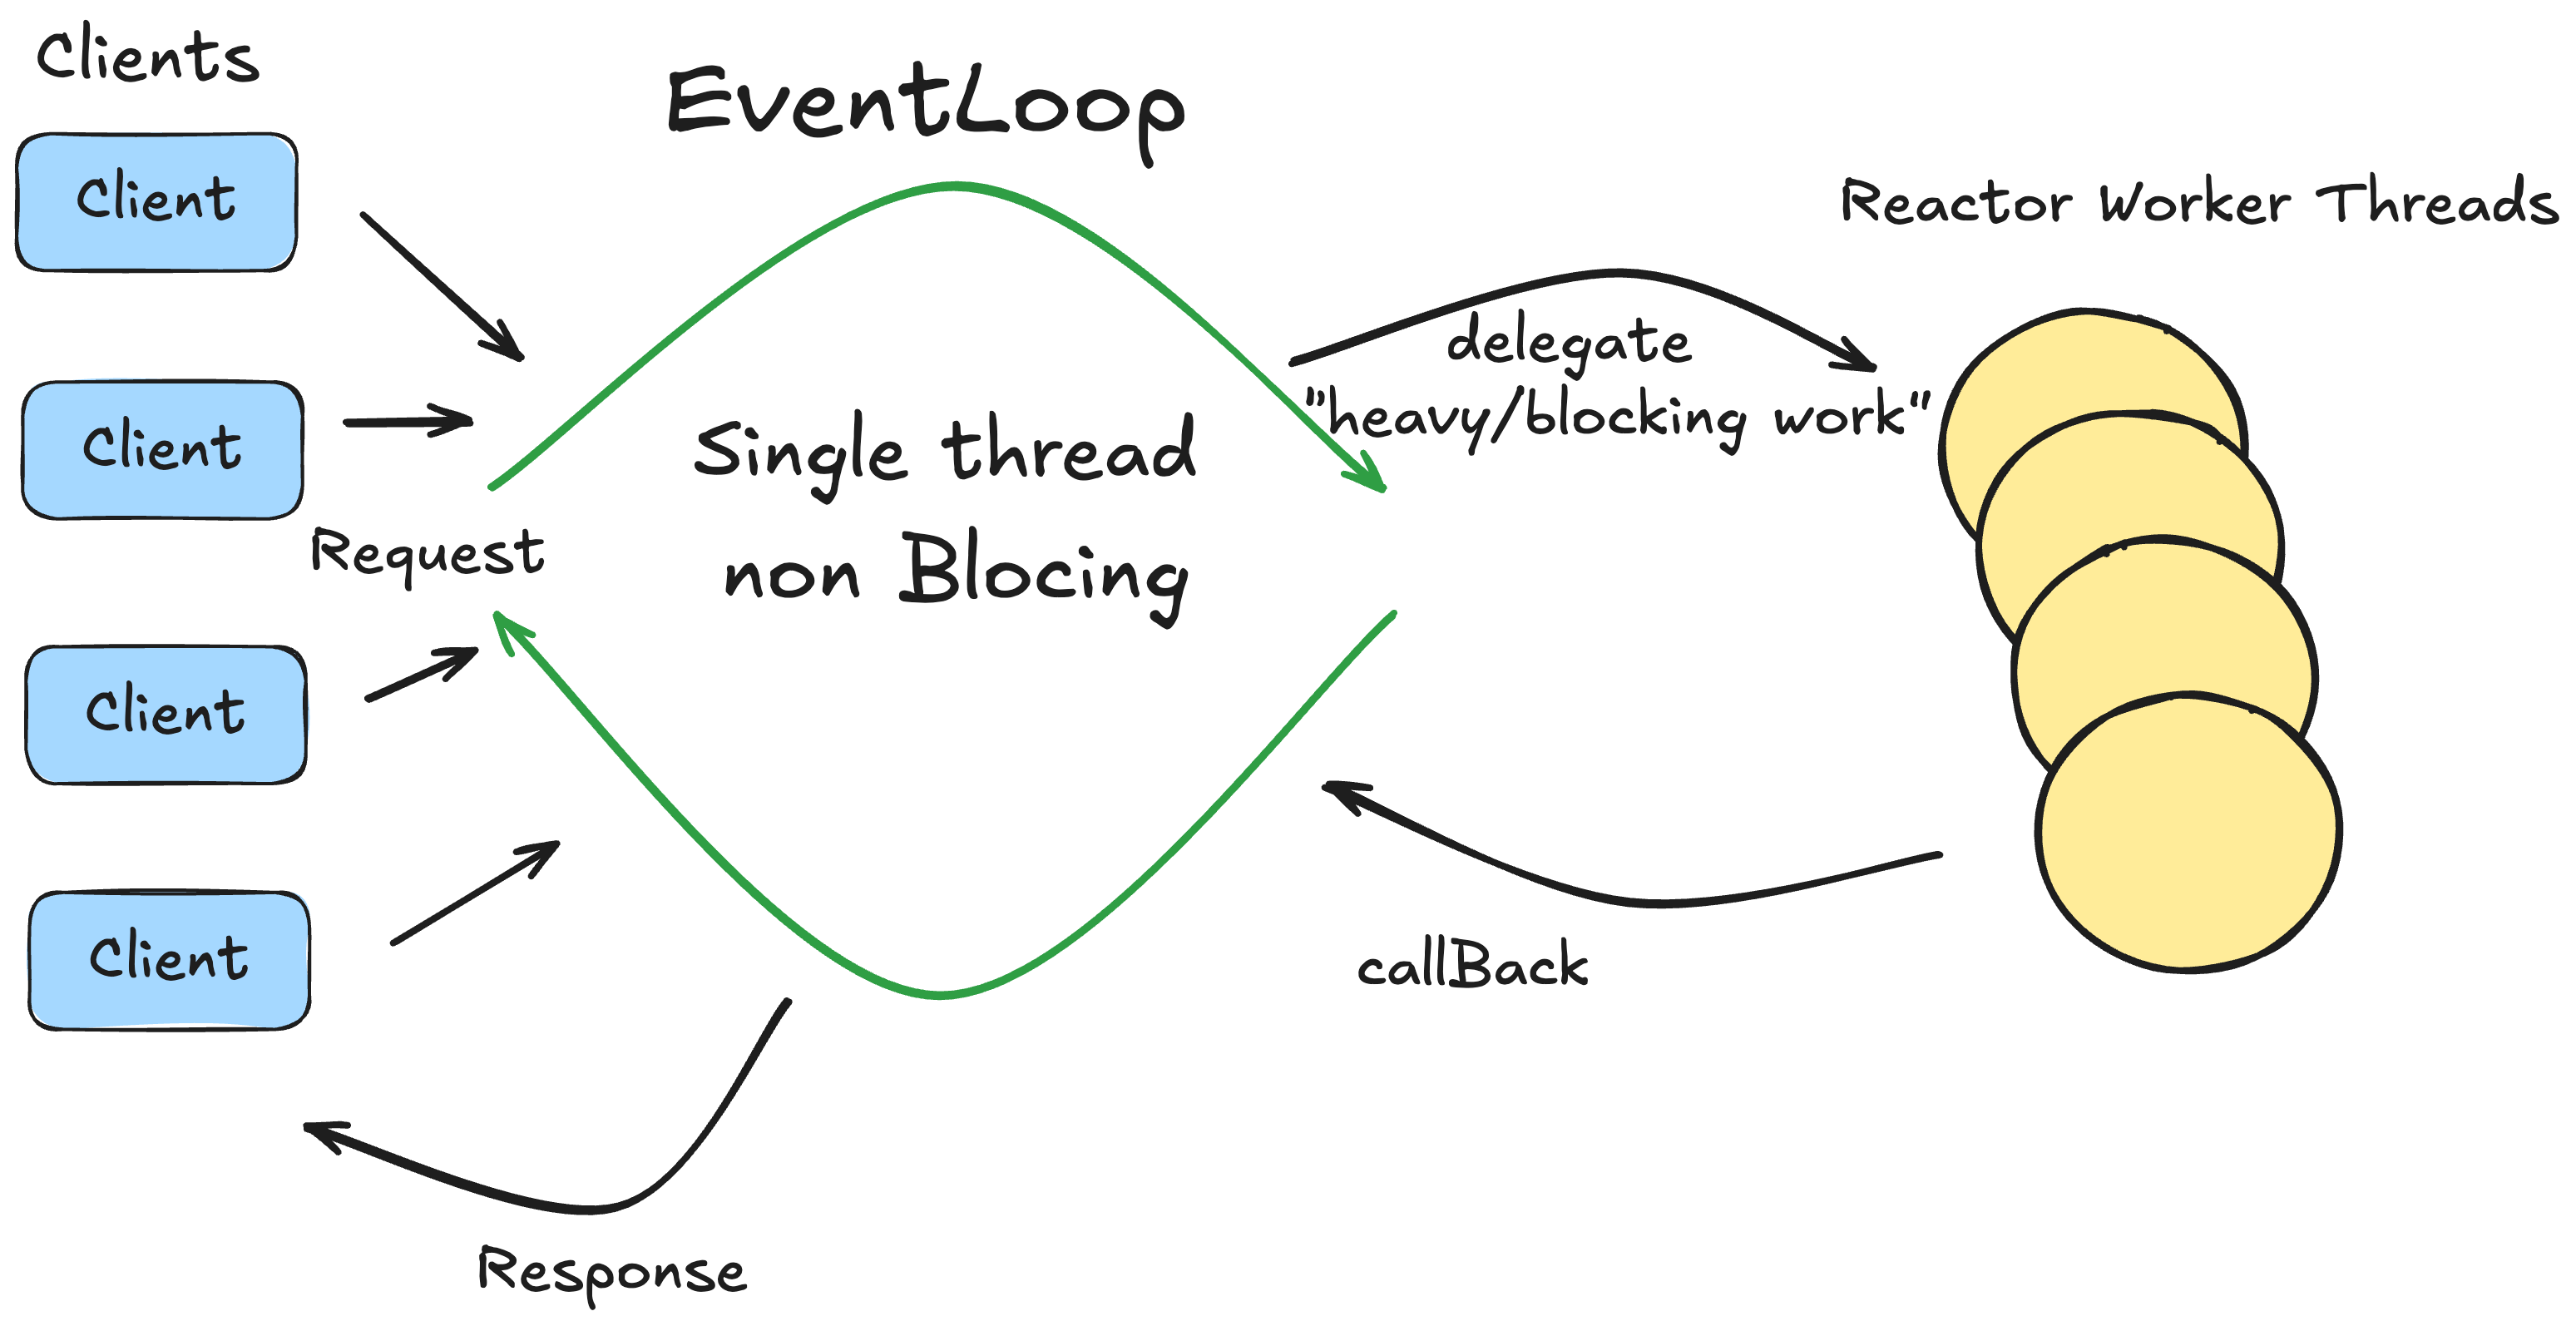
- 각 요청은 event loop내에 job으로 등록이 되고, job을 제공자에게 요청한 후 응답 결과를 기다리지 않고 다른 job을 처리
- callBack을 통해 제공자에게 응답 결과가 오면 그 결과를 요청자에게 제공
Webclient 설정
create()
- WebClient를 만드는 가장 간단한 방법
- 예시
webClient.create()webClient.create(String baseUrl)
builder()
- WebClient에 추가 옵션을 설정 할 수 있음
- defaultHeader : 모든 요청에 대한 헤더
- defaultCookie : 모든 요청에 대한 쿠키
- filter : 모든 요청에 대한 클라이언트 필터
- 빌드 된 WebClinet는 변경이 불가능하지만 복사는 가능
//예시
WebClient clone = webClient.mutate().build();
WebClient clone2 = clone.mutate().filter(filterA).filter(filterD).build();
retrieve()
- 응답을 추출할 수 있는 메서드
onStatus()사용으로 특정 응답에 세분화 가능
MemberVo memberVo = webClient.get()
	.uri("/searchmember?id={id}", id)
	.retrieve() //body를 받아 디코딩하는 간단한 메소드
	.bodyToMono(MemberVo.class)
	.block();
exchange()
- 응답 상태에 따라 응답을 다르게 가능
Mono<MemberVo> monoMemberVo = webClient2.get()
			.uri("/searchmember?id={id}", id)
			.exchangeToMono(response -> {
			if(response.statusCode().equals(HttpStatus.OK)) {
				return response.bodyToMono(MemberVo.class);
			} else {
				return response.createException().flatMap(Mono::error);
			}});
예시 (과거 테스트 한 코드)
@SpringBootTest
public class ApplicationTestsWebClient {

	String url = "http://localhost:8080";
	String id = "TEST1";

	@Test
	@DisplayName("동기식 사용")
	void testWebClient() {
		//create() 사용 - 공통 WebClient 생성
		WebClient webClient = WebClient.create(url);
		//body의 데이터로만 받기 bodyToMono사용
		MemberVo memberVo = webClient.get()
				.uri("/member?id={id}", id)
				.retrieve() //body를 받아 디코딩하는 간단한 메소드
				.bodyToMono(MemberVo.class)
				.block();	//block방식으로 mono로 가져오기 (한 번에 받아옴)
		System.out.println("=============동기식  사용=============");
		System.out.println("id : " + memberVo.getId());
		System.out.println("name : " + memberVo.getName());
		System.out.println("age : " + memberVo.getAge());
	}

	@Test
	@DisplayName("비동기식 사용")
	void testWebClient2() throws InterruptedException, ExecutionException {
		//Bulder() 사용 - 커스터마이징
		WebClient webClient2 = WebClient.builder()
				.defaultHeader(HttpHeaders.CONTENT_TYPE, MediaType.APPLICATION_JSON_VALUE)
				.baseUrl(url)
				.build();
		//status, header, body를 포함하는 ResponseEntity타입으로 받기
		Mono<MemberVo> monoMemberVo = webClient2.get()
				.uri("/member?id={id}", id)
				.exchangeToMono(response -> {
					if(response.statusCode().equals(HttpStatus.OK)) {
						return response.bodyToMono(MemberVo.class);
					}
					else {
						return response.createException().flatMap(Mono::error);
					}
				});
		System.out.println("=============비동기식 사용=============");
		monoMemberVo.subscribe(response -> System.out.format("id : " + response.getId() +"\n"
				+ "name : " + response.getName() + "\n"
				+ "age : " + response.getAge() + "\n"));
	}
}
과거에 내가 사용하거나 정리했던 여러 문서들을 한 곳에 정리함
RestTemplate의 대체 -> RestClient
추후 RestClinet 도 정리해서 적을 예정 To Be Continued...

Allons-y