NextJS 국제화(i18n) 구현하기:next-intl 완벽 가이드
1. 국제화(i18n)이란?
국제화(Internationalization, 줄여서 i18n)는 애플리케이션을 다양한 언어와 지역에 맞게 적응시킬 수 있도록 설계하고 개발하는 프로세스를 말합니다.
여기서 'i18n'이라는 용어는 'internationalization'의 첫 글자 'i'와 마지막 글자 'n' 사이에 18개의 문자가 있다는 의미에서 유래했습니다.
2. 왜 국제화가 필요한가?
비즈니스적 가치
- 시장 확장: 더 많은 국가와 지역의 사용자에게 도달
- 사용자 경험 향상: 사용자의 모국어로 서비스 제공
- 경쟁 우위: 글로벌 시장에서의 경쟁력 확보
- 신뢰도 향상: 현지화된 콘텐츠는 브랜드 신뢰도 증가
기술적 필요성
- 확장성: 새로운 언어 추가가 용이한 구조
- 유지보수: 텍스트 관리의 중앙화
- 일관성: 번역과 형식의 일관된 적용
- 자동화: 번역 프로세스의 자동화 가능
3. next-intl
next-intl은 Next.js를 위한 완벽한 국제화 솔루션입니다.
주요 장점
- TypeScript 완벽 지원
- Next.js 13+ App Router 지원
- 서버 컴포넌트(RSC) 지원
- 뛰어난 개발자 경험
- 번들 크기 최적화
핵심 기능
- 메시지 번역 및 포맷팅
- 날짜, 시간, 숫자 포맷팅
- 타임존 관리
- 라우팅 통합
- SEO 최적화
4. 구현하기
1. 라이브러리 설치
npm install next-intl2. 파일 구조
├── messages
│   ├── ko.json (1)
│   └── en.json
├── next.config.ts (2)
└── src
    ├── i18n
    │   ├── routing.ts (3)
    │   └── request.ts (5)
    ├── middleware.ts (4)
    └── app
        └── [locale]
            ├── layout.tsx (6)
            └── page.tsx (7)
*중요 - app 밑에 [locale] 폴더에서 모든 페이지가 관리됩니다. 꼭 [locale] 폴더를 만들어줘야 합니다.
3. next.config.ts
import type { NextConfig } from "next";
import createNextIntlPlugin from "next-intl/plugin";

const withNextIntl = createNextIntlPlugin();

const nextConfig: NextConfig = {
  /* config options here */
};

export default withNextIntl(nextConfig);
4. routing.ts
src/i18n/routing.ts
import { defineRouting } from "next-intl/routing";
import { createNavigation } from "next-intl/navigation";

export const routing = defineRouting({
  // A list of all locales that are supported
  locales: ["ko", "en"],

  // Used when no locale matches
  defaultLocale: "ko",
});

// Lightweight wrappers around Next.js' navigation APIs
// that will consider the routing configuration
export const { Link, redirect, usePathname, useRouter, getPathname } =
  createNavigation(routing);
locales: ["ko", "en"] -> 한국어와 영어
defaultLocale: "ko" -> 한국어를 기본 설정으로
5.middleware.ts
src/middleware.ts
import createMiddleware from 'next-intl/middleware';
import {routing} from './i18n/routing';

export default createMiddleware(routing);

export const config = {
  // Match only internationalized pathnames
  matcher: ['/', '/(ko|en)/:path*']
};
6. request.ts
src/i18n/request.ts
import { getRequestConfig } from "next-intl/server";
import { routing } from "./routing";

export default getRequestConfig(async ({ requestLocale }) => {
  // This typically corresponds to the `[locale]` segment
  let locale = await requestLocale;

  // Ensure that a valid locale is used
  if (!locale || !routing.locales.includes(locale as any)) {
    locale = routing.defaultLocale;
  }

  return {
    locale,
    messages: (await import(`../../messages/${locale}.json`)).default,
  };
});
7. 루트 레이아웃 설정
app/[locale]/layout.tsx
import type { Metadata } from "next";
import localFont from "next/font/local";
import "./globals.css";
import Header from "@/components/Header";

import { NextIntlClientProvider } from "next-intl";
import { getMessages } from "next-intl/server";
import { notFound } from "next/navigation";
import { routing } from "@/i18n/routing";

// 폰트 설정
const pretendard = localFont({
  src: "./fonts/PretendardVariable.woff2",
  display: "swap",
  weight: "45 920",
});

export const metadata: Metadata = {
  title: "Create Next App",
  description: "Generated by create next app",
};

export default async function RootLayout({
  children,
  params,
}: Readonly<{
  children: React.ReactNode;
  params: Promise<{ locale: string }>;
}>) {

  const { locale } = await params;

  // Ensure that the incoming `locale` is valid
  if (!routing.locales.includes(locale as any)) {
    notFound();
  }

  // Providing all messages to the client
  // side is the easiest way to get started
  const messages = await getMessages();

  return (
    <html lang={locale}>
      <body className={pretendard.className}>
        <NextIntlClientProvider messages={messages}>
          <Header />
          {children}
        </NextIntlClientProvider>
      </body>
    </html>
  );
}
이렇게 하면 설정이 완료가 됩니다.
5. 적용하기
설정했으니까 웹에서 변경하는 방법을 알아보겠습니다.
next-intl에서는 import Link from "next/link"; 대신 import { Link } from "@/i18n/routing";를 사용해야 합니다.
1. ko.json, en.json 생성
한국어 버전, 영어 버전을 만들어줘야 적용이 가능합니다.
예시입니다.
messages/ko.json
{
  "LocaleSwitcher": {
    "locale": "{locale, select, ko {KOR} en {ENG} other {Unknown}}"
  },
  "NavBar": {
    "business": "비즈니스",
    "solution": "솔루션",
    "company": "회사소개",
    "support": "고객지원"
  }
}
messages/en.json
{
  "LocaleSwitcher": {
    "locale": "{locale, select, ko {KOR} en {ENG} other {Unknown}}"
  },
  "NavBar": {
    "business": "Business",
    "solution": "Solutions",
    "company": "About Us",
    "support": "Supports"
  }
}
2. LocaleSwicher.tsx
select 태그를 이용해서 변경 박스를 만들어주겠습니다.
import { useLocale, useTranslations } from "next-intl";
import { routing, usePathname, useRouter } from "@/i18n/routing";
import Global from "../../public/svg/Global";

const LocaleSwicher = () => {
  const t = useTranslations("LocaleSwitcher");
  const router = useRouter();
  const pathName = usePathname();
  const locale = useLocale();

  const onSelectChange = (e: React.ChangeEvent<HTMLSelectElement>) => {
    const nextLocale = e.target.value;
    router.replace(`/${pathName}`, { locale: nextLocale });
  };

  return (
    <div className="flex items-center">
      // 지구본 svg
      <Global />
      <select
        defaultValue={locale}
        aria-label="language"
        onChange={onSelectChange}
      >
        {routing.locales.map((cur) => (
          <option key={cur} value={cur}>
            {t("locale", { locale: cur })}
          </option>
        ))}
      </select>
    </div>
  );
};
export default LocaleSwicher;
3. NavBar.tsx
"use client";

import Link from "next/link";
import NavMenu from "./NavMenu";
import { useState } from "react";
import Image from "next/image";
import LocaleSwicher from "./LocaleSwicher";
import { useTranslations } from "next-intl";

const NavBar = () => {
  const t = useTranslations("NavBar");

  const [isOpenNavMenu, setIsOpenNavMenu] = useState(false);

  const mouseEnterHandler = () => {
    setIsOpenNavMenu(true);
  };
  return (
    <div
      className={`absolute z-10 w-full ${isOpenNavMenu ? "bg-white text-black" : "text-white"}`}
    >
      <div className="mx-auto flex max-w-4xl items-center justify-between py-5 xl:max-w-[90rem]">
        <Link href={"/"}>
          <Image
            src="/image/ci.png"
            alt=""
            width={420}
            height={127}
            className="w-40"
          />
        </Link>
        <div
          className="flex items-center space-x-8 text-[1.2rem] font-semibold"
          onMouseEnter={mouseEnterHandler}
        >
          <Link href={"/"}>{t("business")}</Link>
          <Link href={"/"}>{t("solution")}</Link>
          <Link href={"/"}>{t("company")}</Link>
          <Link href={"/"}>{t("support")}</Link>
          <LocaleSwicher />
        </div>
      </div>
      {isOpenNavMenu && <NavMenu setIsOpenNavMenu={setIsOpenNavMenu} />}
    </div>
  );
};
export default NavBar;
4. 결과물
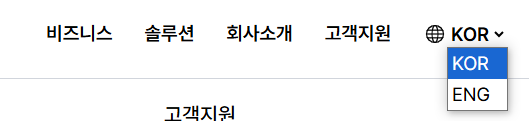

잘 적용된 것을 볼 수 있습니다.

느려도 꾸준하게, 나를 의심하지 말자