Next로 api연결 해보기
오늘은 싱글벙글 나만의 영화 상점을 만들것이다
전체코드
// (home)/page.tsx
import Navigation from "../Navigation";
import Link from "next/link";

async function getItem() {
    const response = await fetch('https://dummyjson.com/products');
    return await response.json();
}

interface Item {
    id: number;
    title: string;
    description: string;
    map(element: (product) => JSX.Element): any;
}

export default async function Anything() {
    const items = await getItem();
    const products: Item[] = items.products
    return (
        <div>
            <ul>
                {products && products.map((product) => (
                    <li style={{marginTop: '10px', listStyleType: 'none'}}>
                        <Link href={`/server/${product.id}`}>
                            <button style={{
                                width: '80px',
                                height: '40px',
                                border: 'none',
                                borderRadius: '8px',
                                backgroundColor: '#007cff',
                                color: '#FFFFFF',
                                textDecoration: 'none',
                                fontSize: '16px',
                                cursor: 'pointer'
                            }}>
                                {product.id}
                            </button>
                        </Link>
                    </li>
                ))}
            </ul>
        </div>
    )
}
// components/Get-Item.tsx
async function getItems(id:string) {
await new Promise((res) => setTimeout(res,3000))
const response = await fetch(`https://dummyjson.com/products/${id}`)//템플릿 리터럴로 주소에 id 넣기
return await response.json()
}
export default async function GetItem({id}: {id:string}) {
const item = await getItems(id);
return <h6>{JSON.stringify(item.title)}</h6>
}
// components/Get-NextItem.tsx
async function getNextItems(id:string) {
await new Promise((res) => setTimeout(res,5000))
const nextId:number = parseInt(id,10) + 1
const response = await fetch(`https://dummyjson.com/products/${nextId.toString()}`);
return response.json()
}
export default async function GetNextItem({id}: {id:string}) {
const item = await getNextItems(id);
return <h6>{JSON.stringify(item.title)}</h6>
}
// items/[id]/page.tsx
import GetItem from "../../components/Get-Item";
import GetNextItem from "../../components/Get-NextItem";
import {Suspense} from "react";
export default async function Items({params}: { params: { id: string } }) {
return (
<div>
<h1>성훈이 상점</h1>
<Suspense fallback={<div>Loading 1</div>}>
<GetItem id={params.id}/>
</Suspense>
<Suspense fallback={<div>Loading 2</div>}>
<GetNextItem id={params.id}/>
</Suspense>
</div>
);
}
// {params:{id:'2020'}, searchParams: {}}
//http://localhost:3000/items/5?lang=kr코드 뜯어보기
1. fetch를 통한 api를 연결해 상점에 있는 영화들을 받아오는 코드
export default async function Anything() {
    const items = await getItem();
    const products: Item[] = items.products
    //...
}- 여기선 처음 페이지가 로드되었을 때 const items = await getItem() 변수가 실행되면서 api가 호출이 된다.
async function getItems(id:string) {
    await new Promise((res) => setTimeout(res,3000))
    const response = await fetch(`https://dummyjson.com/products/${id}`)//템플릿 리터럴로 주소에 id 넣기
    return await response.json()
}-
fetch : fetch 함수는 브라우저에서 제공하는 API로, 네트워크 요청을 만들어 서버에서 데이터를 가져오는 역할
-
response.json(): 응답을 JSON 형식으로 변환
2. 1번 과정에서 불러온 데이터값을 화면에 표시하기 위한 코드
return (
        <div>
            <ul>
                {products && products.map((product) => (
                    <li key={product.id} style={{marginTop: '10px', listStyleType: 'none'}}>
                        <Link href={`/server/${product.id}`}>
                            <button style={{
                                width: '80px',
                                height: '40px',
                                border: 'none',
                                borderRadius: '8px',
                                backgroundColor: '#007cff',
                                color: '#FFFFFF',
                                textDecoration: 'none',
                                fontSize: '16px',
                                cursor: 'pointer'
                            }}>
                                {product.id}
                            </button>
                        </Link>
                    </li>
                ))}
            </ul>
        </div>
)- products && 을 통해 products에 값이 들어와있을때 (= True)일때만 product들을 보여주게 하였다.
- products는 상품들이 들어있는 배열이므로, 값들을 전부 보여주기 위해서 map 메서드를 사용하였다.
key={product.id}는 map매서드 안에 (ex)li) 배열끼리 엉키지않게 해당 map의 배열만이 갖는 유니크한 고유값을 넣어주는 것이다.
promise 와 await
async function getItems(id:string) {
    await new Promise((res) => setTimeout(res,3000))
    const response = await fetch(`https://dummyjson.com/products/${id}`)//템플릿 리터럴로 주소에 id 넣기
    return await response.json()
}

export default async function GetItem({id}: {id:string}) {
    const item = await getItems(id);
    return <h6>{JSON.stringify(item.title)}</h6>
}
이 코드를 한번만 더 보자.
새로운 문법이 생겼다. Promise?? await???
promise & await
비동기 처리를 쉽게 다루기 위해 사용되는 문법들이다.
- Promise는 자바스크립트에서 비동기 처리에 사용되는 객체이다.
내용은 실행 되었지만 결과를 아직 반환하지 않은 객체라고 이해해도 무방하다. - async/await은 가장 최근의 나온 비동기 처리 문법으로 기존의 callback 이나 Promise 의 단점을 해소하고자 만들어졌다.
promise의 3가지 상태
- Pending (대기)
- Fulfilled (이행)
- Rejected (실패)
비동기 처리가 완료 되지 않았다면 Pending, 완료 되었다면 Fulfilled, 실패하거나 오류가 발생하였다면 Rejected 상태를 갖는다.
Suspense
Suspense는 아직 렌더링이 준비되지 않은 컴포넌트가 있을때 로딩 화면을 보여주고 로딩이 완료되면 해당 컴포넌트를 보여주는 React에 내장되어 있는 기능이다.
SPA(Single-Page-Application)의 단점은 한번에 사용하지 않는 모든 컴포넌트까지 불러오기 때문에 첫 화면이 렌더링 될때까지의 시간이 오래걸리는 것이다. React는 lazy를 통해 컴포넌트를 동적으로 import를 할 수 있기 때문에 이를 사용하면 초기 렌더링 지연시간을 어느정도 줄일 수 있다.
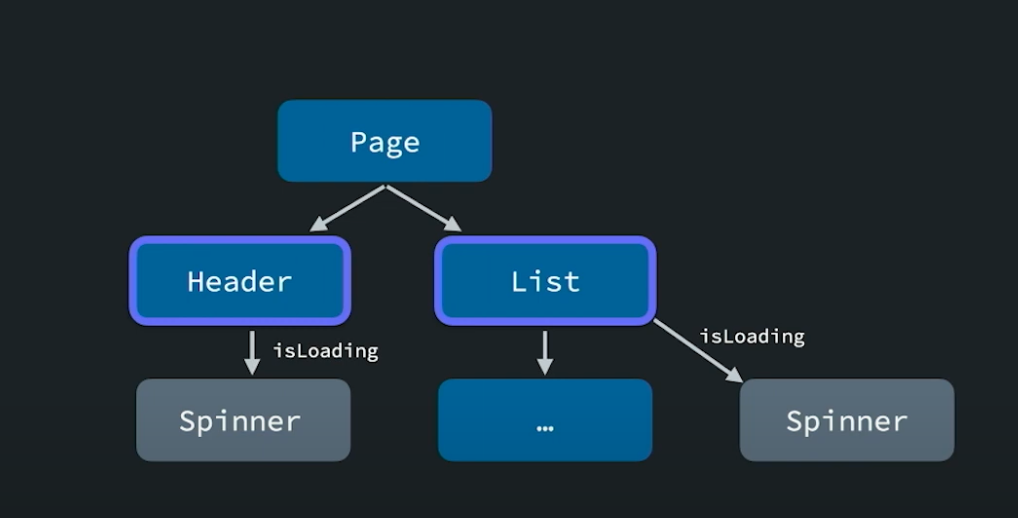
이렇게 각 컴포넌트에 다 로딩상태를 가지고있는것 보다는,
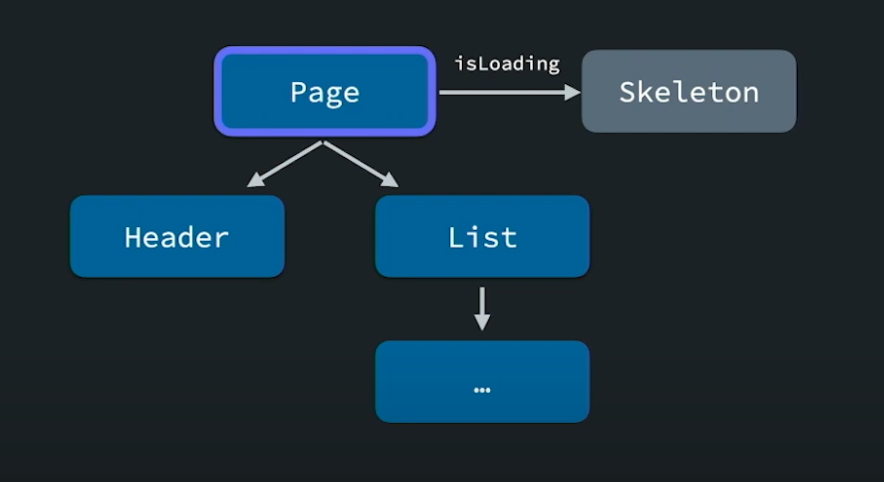
이렇게 상위 컴포넌트의 로딩상태를 지정해줌으로써 상위 컴포넌트에서 로딩 상태를 갖도록 수정하기 위해 자식 컴포넌트들에서 로딩 상태 관련 코드를 지워야하는 번거로움을 해결할 수 있다.
예시 코드
import React, { Suspense } from 'react';

const LazyComponent = React.lazy(() => import('./LazyComponent'));

function MyApp() {
  return (
    <Suspense fallback={<div>Loading...</div>}> //Suspense 사용
      <LazyComponent />
    </Suspense>
  );
}

export default MyApp;
이 예시에서 Suspense는 LazyComponent를 비동기적으로 가져오고,
해당 컴포넌트가 준비되기 전까지 fallback에 정의된 "Loading..." 문구를 화면에 보여준다. 또한 실제 컴포넌트가 준비가 되면 그 컴포넌트를 보여준다
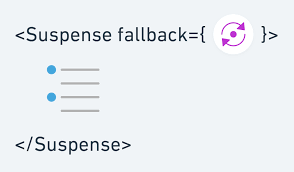
Fallback
<Suspense fallback={<div>Loading...</div>}>Suspense와 함께 사용한 fallback은 어떤 개념일까?
fallback이란?
어떤 기능이 약해지거나 제대로 동작하지 않을 때, 이에 대처하는 기능 또는 동작이다
- Next의 동적라우팅으로 존재하는 getStaticPaths의 설정 중 하나이다.