0714-ECS, Kubernetes

복습
- Docker
-build
-push
-run
Amazon ECS
- AWS : EKS, ECS(도커 스웜과 유사)
- Azure : AKS
- GCP : GKE
작업 정의
-
새 작업 정의 생성
-
시작 유형 EC2 선택
-
태스크 역할 : 사람의 오더받아서 ECS가 다 꾸며줌, ECS에 권한 부여해주어야 함(role), ECS는 자동으로 권한 생성
-
컨테이너 추가 => webserver, nginx(자동으로 도커이미지로), 128mb, 포트 매핑 80:80
-
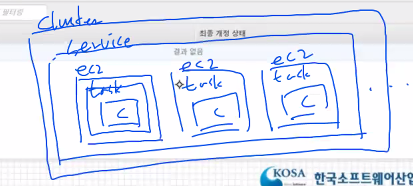
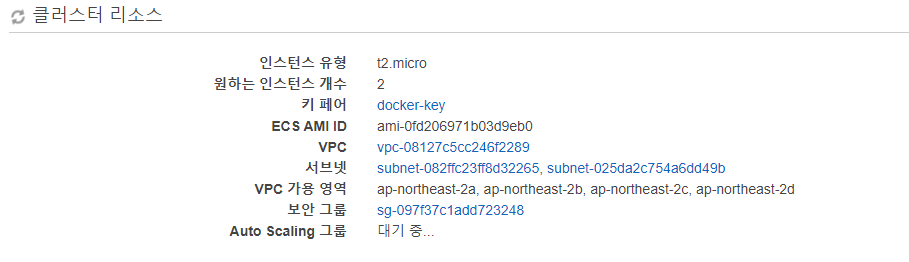
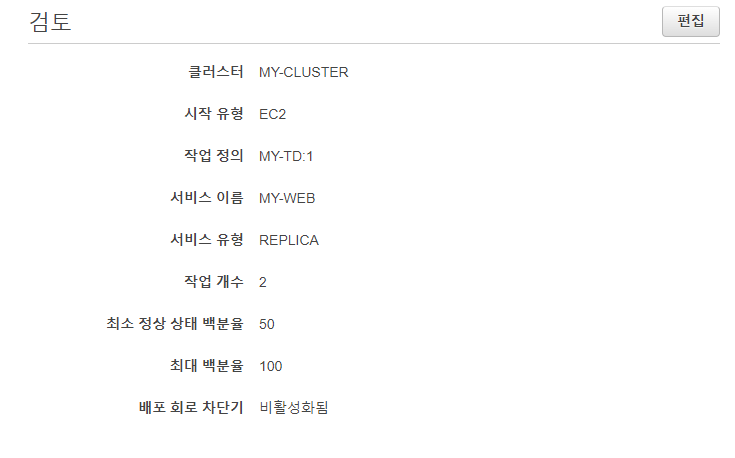
클러스터 생성
-
EC2 Linux + 네트워킹 선택
-
MY-CLUSTER, 온디맨드 인스턴스, t2.micro, 2개, docker-key, My-VPC, 서브넷(2a,2c), 활성화됨, MY-SG-WEB
-
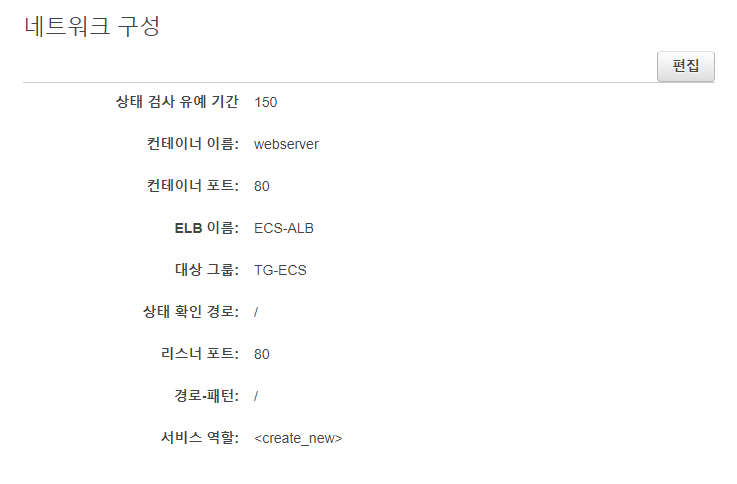
클러스터 서비스 생성
-
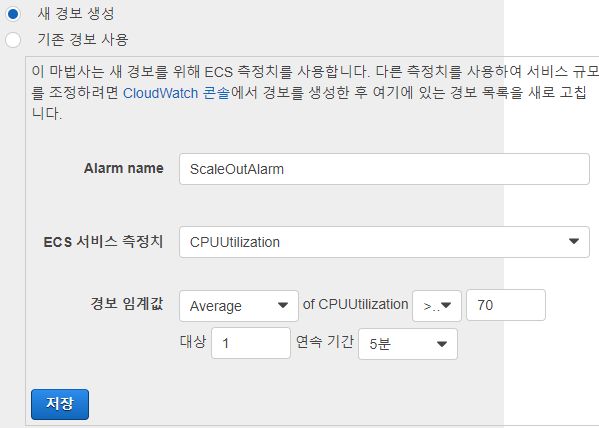
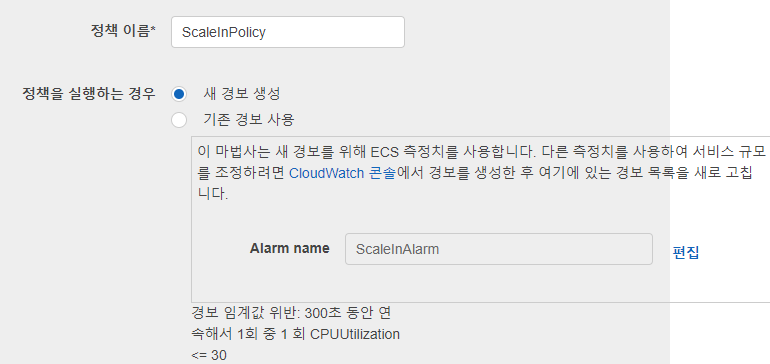
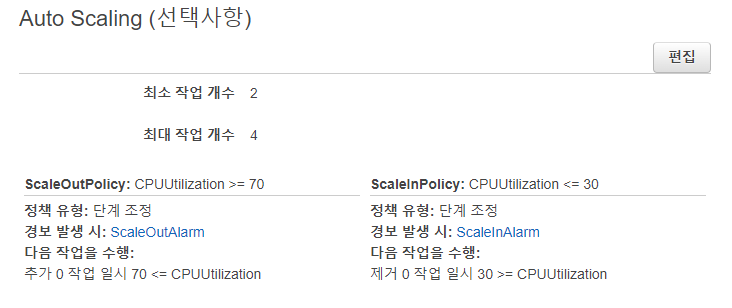
EC2, MY-WEB, 2개, 50, 100, 상태 검사 유예 기간-150, Application Load Balancer, 새 역할 생성, TG-ECS, 80:HTTP, TG-ECS, Auto Scaling(2,2,4), 단계조정(ScaleOutAlarm, >=70, 추가, ScaleInAlarm, <=30, 제거)
-
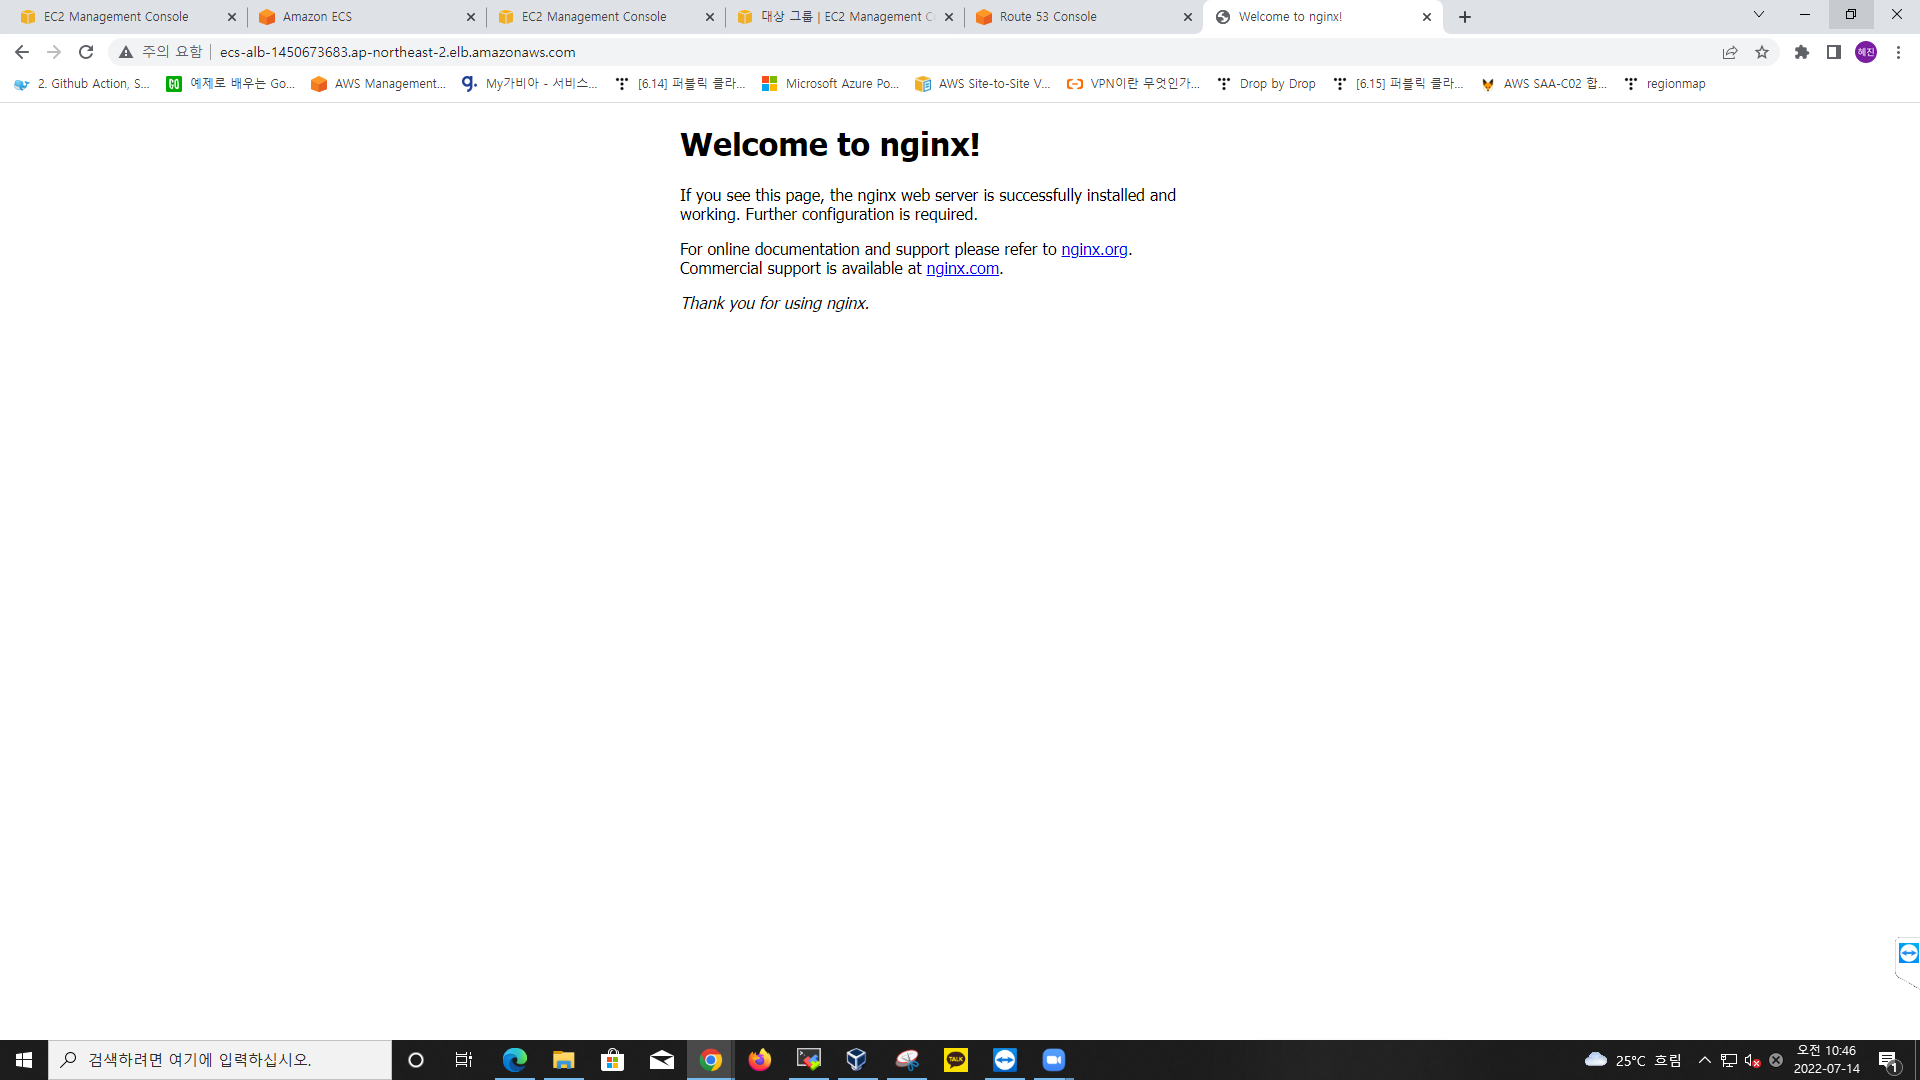
DNS 이름으로 접속
-
route53 레코드 생성
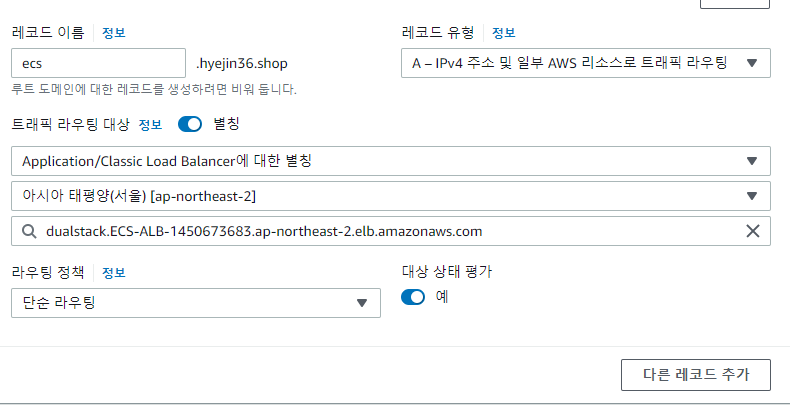
-
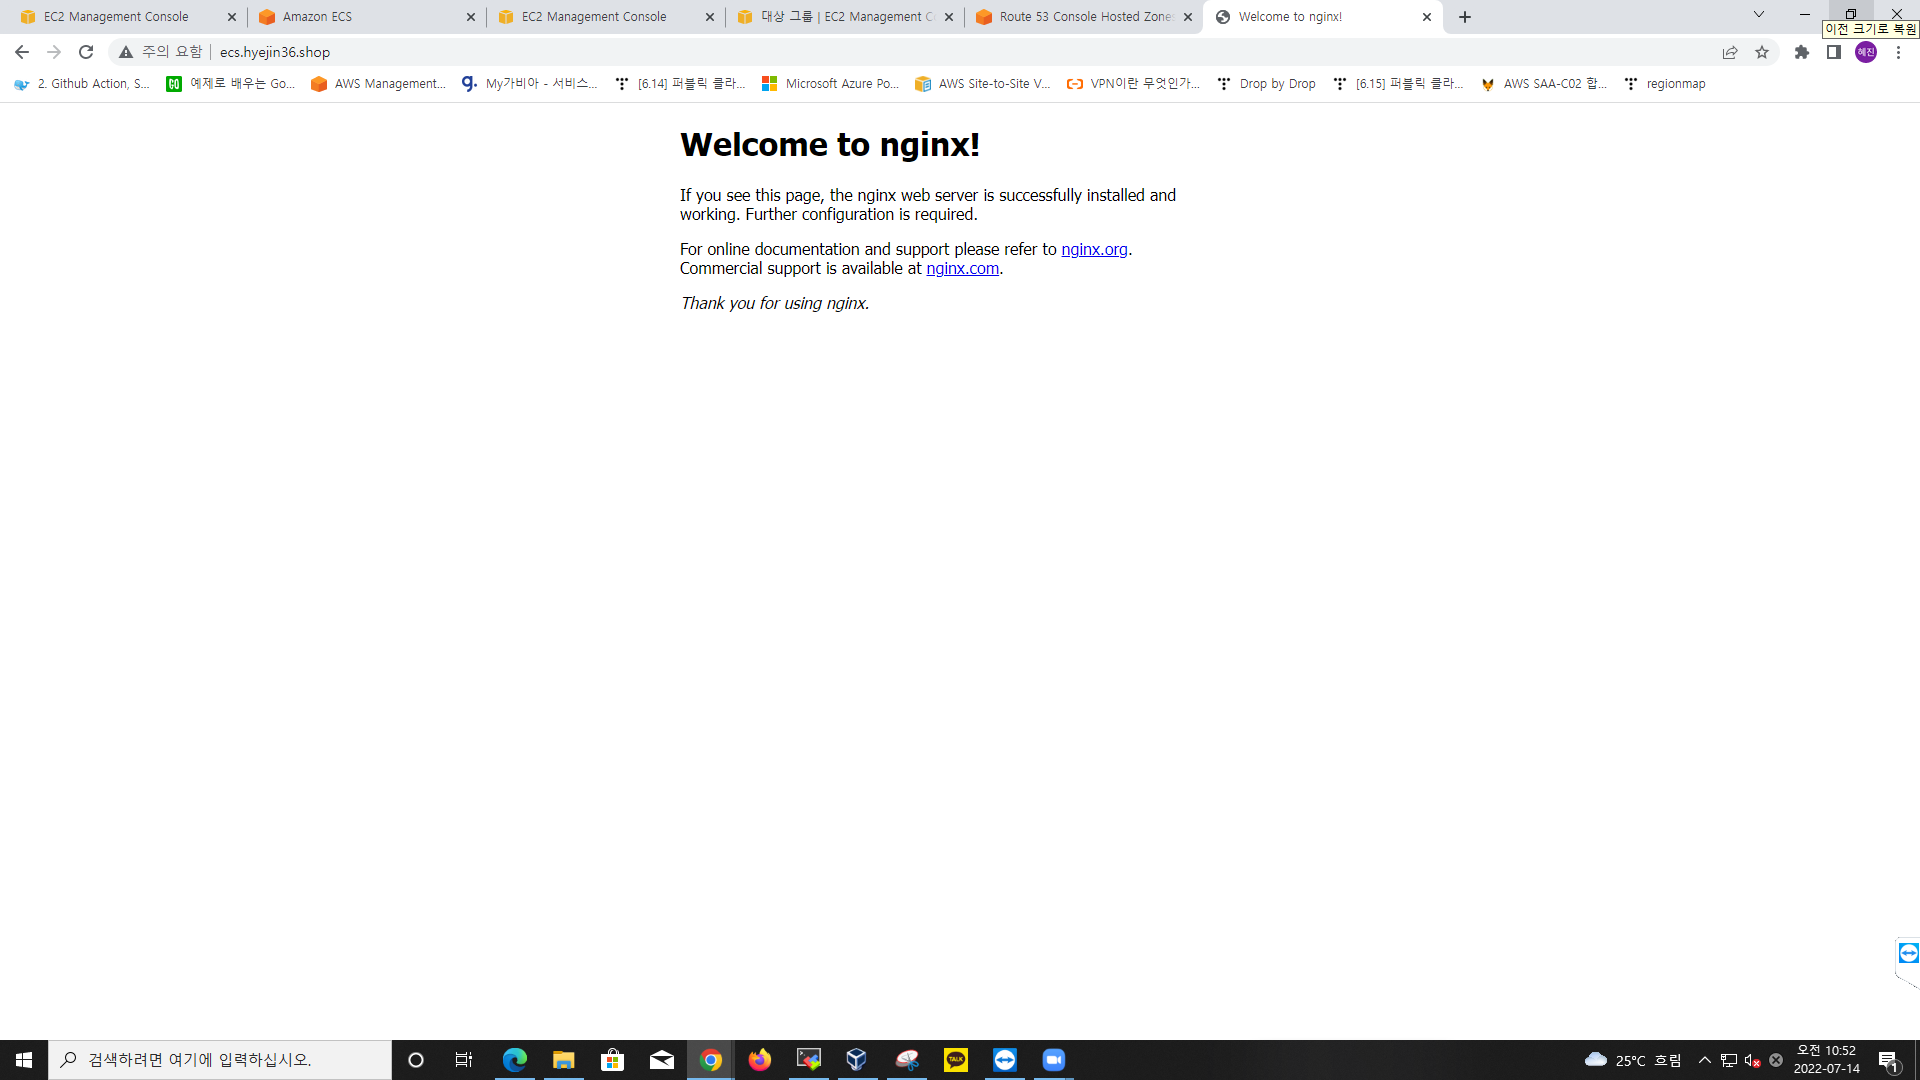
ecs.hyejin36.shop으로 접속
페이지 교체
-
작업정의 > MY-TD
-
컨테이너 편집 > 이미지 seozzang3/web-site:v1.0
-
MY-CLUSTER > MY-WEB > 작업 정의 개정 2, 새 배포 적용 체크
-
로드밸런서 생성 - Application, ECS-ALB, MY-VPC, TG-ECS
-
대상그룹 생성 - TG-ECS
Kubernetes
Minikube 설치(Single Node: Master Node + Worker Node)
# curl -fsSL https://get.docker.com/ | sudo sh
# systemctl enable --now docker
# yum install -y conntrack git
# curl -Lo minikube https://storage.googleapis.com/minikube/releases/v1.23.2/minikube-linux-amd64 && chmod +x minikube
# mkdir -p /usr/local/bin/
# install minikube /usr/local/bin/
# minikube version
# minikube start --driver=none
# minikube status
kubectl 설치
# curl -LO https://dl.k8s.io/release/v1.22.2/bin/linux/amd64/kubectl
# install -o root -g root -m 0755 kubectl /usr/local/bin/kubectl
# source <(kubectl completion bash)
# echo "source <(kubectl completion bash)" >> ~/.bashrc
# kubectl version
Pod
# mkdir workspace && cd $_
# kubectl get node
# kubectl run nginx-pod --image=nginx
# kubectl get pod
# kubectl expose pod nginx-pod --name clusterip --type ClusterIP --port 80
# kubectl expose pod nginx --name nodeport --type=NodePort --port 80
# kubectl expose pod nginx --name loadbalancer --type=LoadBalancer --external-ip 192.168.0.144 --port 80
# kubectl get pod
# kubectl get svc
# kubectl get all    //자원 다 보는 명령어
# kubectl delete svc --all
# kubectl delete pod nginx
두개 다 가능
- node port
-> node port = host port
-> cluster IP
세 개 다 가능
- LoadBalancer
-> CLUSTERIP
-> EXTERNAL-IP
-> nodeport
--- Service
# vi nginx-pod.yaml
apiVersion: v1
kind: Pod
metadata:
  name: nginx-pod
  labels:
    app: nginx-pod
spec:
  containers:
  - name: nginx-pod-container
    image: nginx

  - name: mysql-pod-container
    image: mysql

# kubectl apply -f nginx-pod.yaml
# kubectl get pod -o wide
# kubectl describe pod nginx-pod

# vi clusterip-pod.yaml
apiVersion: v1
kind: Service
metadata:
  name: clusterip-service-pod
spec:
  type: ClusterIP
  selector:                //labels에 정의된 부분과 동일해야함
    app: nginx-pod
  ports:
  - protocol: TCP
    port: 80         //cluster ip로 접속하기 위한 포트번호
    targetPort: 80     // 정보성 포트

# kubectl apply -f clusterip-pod.yaml
# kubectl get svc -o wide
# kubectl describe svc clusterip-service-pod

# vi nodeport-pod.yaml
apiVersion: v1
kind: Service
metadata:
  name: nodeport-service-pod
spec:
  type: NodePort
  selector:
    app: nginx-pod
  ports:
  - protocol: TCP
    port: 80
    targetPort: 80
    nodePort: 30080
# kubectl apply -f nodeport-pod.yaml
# kubectl get svc -o wide
# kubectl describe svc nodeport-service-pod
# kubectl edit svc clusterip-service-pod

# vi loadbalancer-pod.yaml
apiVersion: v1
kind: Service
metadata:
  name: loadbalancer-service-pod
spec:
  type: LoadBalancer
  externalIPs:
  - 192.168.56.119
  selector:
    app: nginx-pod
  ports:
  - protocol: TCP
    port: 80
    targetPort: 80
# kubectl apply -f loadbalancer-pod.yaml
# kubectl get svc -o wide
# kubectl describe svc loadbalancer-service-pod
-> selector와 lables가 연결고리로 같아야함 (apply는 되지만 curl은 안됨)
-> 포트번호를 바꾸면 curl ip번호:포트번호 해주어야 함
-> targetport는 컨테이너 포트
