
Socket.IO란
socket.IO는 실시간으로 양방향, event 기반의 통신을 가능하게 해줍니다.
보기에는 실시간으로 양방향으로 통신하는 webSocket 과 비슷해 보이지만 Socket.IO는 webSocket을 실행하는 것이 아닙니다.
Socket.IO 는 webSocket 보다 탄력성이 더 뛰어나며 webSocket은 그저 Socket.IO가 실시간, 양방향, event 기반 통신을 제공하는 방법 중 하나입니다.
Socket.IO는 그 브라우저가 webSocket을 지원을 안한다고 해도 (webSocket에 문제가 생겨도) Socket.IO는 계속 작동을 합니다.
다시 설명을 하자면 Socket.IO는 WebSocket의 부가기능이 아닙니다.
Socket.IO는 가끔 webSocket을 이용해서 실시간, 양방향, event 기반 통신을 제공하는 framework인데, webSocket 이용이 불가능하다면 socket.IO는 HTTP long polling 등 다른 방법을 이용해서 계속 작동합니다.
심지어 Socket.IO는 방화벽, proxy가 있어도 계속 작동을 합니다.

Socket.IO는 프론트와 서버 간의 통신이 끊겨도 자동으로 재연결을 시도 하고, 계속 시도를 합니다. 또한 연결 끊김 확인, 바이너리 지원 등 여러가지를 제공해주고 있습니다.
Polling vs SSE vs webSocket
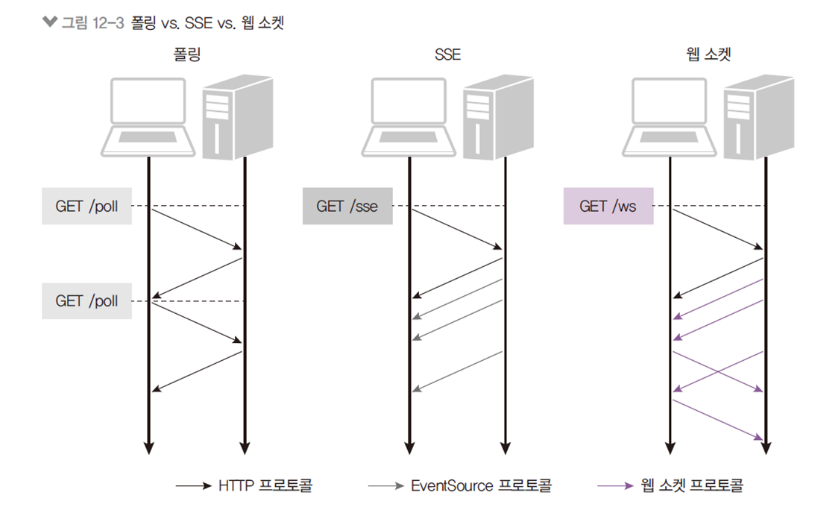
소켓이 나오기 이전에는 폴링이라는 방식을 사용했었습니다.
HTTP가 Client 에서 서버로만 요청이 가기 때문에 주기적으로 서버에 요청을 보내 업데이트가 있는지 확인을 했었지만 이런 경우엔 서버에 부담이 되기 때문에 SSE 라는 기술이 나왔습니다.
따로 클라이언트에서 요청없이 서버가 주체적으로 클라이언트에게 데이터를 전송할 수 있게 하는 기술입니다.
하지만 이 기술은 데이터를 서버로 보낼수는 없고 받기만 할 수 있기 때문에 양방향 통신을 구현하기에는 한계가 있었습니다.
그 뒤에 나온 webSocket 은 이벤트 방식으로 동작하여 한번 연결을 하면 HTTP와 포트 공유 등 많은 성능이 업그레이드 되어 서버와 양방향으로 통신할 상황이 생긴다면 거의 다 이 기술을 사용하는 편입니다.
Socket.IO 의 사용법
Socket.IO 설치
$ npm install socket.ioServer Initialization
const httpServer = require("http").createServer();
const io = require("socket.io")(httpServer, {
  // ...
});

io.on("connection", (socket) => {
  // ...
});

httpServer.listen(3000);
Socket Instance - Server
ID
새 연결을 할 때마다 임의의 socket.id 가 발급됩니다.
이 id는 클라이언트 측의 값과 동기화 됩니다.
// server-side
io.on("connection", (socket) => {
  console.log(socket.id); // ojIckSD2jqNzOqIrAGzL
});

// client-side
socket.on("connect", () => {
  console.log(socket.id); // ojIckSD2jqNzOqIrAGzL
});
이 아이디들은 자체ID로 개인메세지 등에 사용할 수 있습니다.
io.on("connection", socket => {
  socket.on("private message", (anotherSocketId, msg) => {
    socket.to(anotherSocketId).emit("private message", socket.id, msg);
  });
});
Room
현재 소켓이 있는 방에 대한 정보입니다.
join 을 사용하면 방에 참가할 수 있습니다.
io.on("connection", (socket) => {
  console.log(socket.rooms); // Set { <socket.id> }
  socket.join("room1");
  console.log(socket.rooms); // Set { <socket.id>, "room1" }
});
Middleware
socket.use(([event, ...args], next) => {
  // do something with the packet (logging, authorization, rate limiting...)
  // do not forget to call next() at the end
  next();
});
next()는 에러와 함께 호출할 수도 있습니다. 이 경우엔 event 핸들러에 가지 않고 Error 대신 이벤트가 발생합니다.
io.on("connection", (socket) => {
  socket.use(([event, ...args], next) => {
    if (isUnauthorized(event)) {
      return next(new Error("unauthorized event"));
    }
    next();
  });

  socket.on("error", (err) => {
    if (err && err.message === "unauthorized event") {
      socket.disconnect();
    }
  });
});
disconnect
연결 해제 시 Socket Instance에 의해 시작됩니다.
io.on("connection", (socket) => {
  socket.on("disconnect", (reason) => {
    // ...
  });
});
disconnecting
io.on("connection", (socket) => {
  socket.on("disconnecting", (reason) => {
    for (const room of socket.rooms) {
      if (room !== socket.id) {
        socket.to(room).emit("user has left", socket.id);
      }
    }
  });
});
disconnect와의 차이는 disconnect는 아예 소켓과 끊어졌을 때 발생하는 것이고 disconnecting은 Room에 나가는 등 소켓이 연결이 되어있을 때 발생하는 event 입니다.
서버 배포시
NginX.conf
http {
  server {
    listen 3000;
    server_name io.yourhost.com;

    location / {
      proxy_set_header X-Forwarded-For $proxy_add_x_forwarded_for;
      proxy_set_header Host $host;

      proxy_pass http://nodes;

      # enable WebSockets
      proxy_http_version 1.1;
      proxy_set_header Upgrade $http_upgrade;
      proxy_set_header Connection "upgrade";
    }
  }

  upstream nodes {
    # enable sticky session with either "hash" (uses the complete IP address)
    hash $remote_addr consistent;
    # or "ip_hash" (uses the first three octets of the client IPv4 address, or the entire IPv6 address)
    # ip_hash;
    # or "sticky" (needs commercial subscription)
    # sticky cookie srv_id expires=1h domain=.example.com path=/;

    server app01:3000;
    server app02:3000;
    server app03:3000;
  }
}
Socket.IO 이벤트 통신
//이벤트 명을 지정하고 메세지를 보냅니다. 보낼 때 String, Object, function 등 여러가지를
//한꺼번에 보낼 수 있습니다. 주의할 점은 함수는 항상 마지막에 보내줘야 하며,
//그 함수는 backend에서 실행되는 함수가 아니라 Front 쪽에서 실행되는 함수입니다.
socket.emit("보낼 이벤트 이름", message,{key:value}, () => {console.log('done')})

//해당 이벤트 명을 받고 콜백함수를 실행합니다. 이벤트 명은 보내는 쪽과 받는쪽이 같아야 받을수 있습니다.
socket.on("받을 이벤트 이름", (message,data,done) => {
console.log(message), console.log(data.value), done();
})
수신
//접속된 모든 사람에게 전송
io.emit('eventName', message);

//메세지를 전송한 클라이언트에게만 전송
socket.emit('eventName', message);

//메세지를 전송한 클라이언트를 제외한 모든 접속자에게 메세지 전송
socket.broadcast.emit('eventName', message);

//특정 클라이언트에게만 메세지 전송
io.to(id).emit('eventName', message);
송신
// 클라이언트와 소켓이 연결되었는지의 여부에 관한 이벤트
io.on('connection/disconnection', (socket) => {
});

//지정한 이벤트가 emit 되면 수신 발생
socket.on('eventName', (data) => {
});
참고 자료
https://socket.io/docs/v4/
https://inpa.tistory.com/entry/SOCKET-%F0%9F%93%9A-SocketIO-%EC%82%AC%EC%9A%A9-%ED%95%B4%EB%B3%B4%EA%B8%B0