기초1. 자바 GUI 란?
자바 GUI(그래픽 사용자 인터페이스) 와 awt 는 자바를 이용해 사용자가 직접 그래픽 애플리케이션을 개발할 수 있도록 만든 라이브러리와 기술이다.
기초2. awt 는?
awt 는 java 의 초기 GUI 라이브러리이다. awt 는 플랫폼에 독립적이고, 기본적인 GUI 구성을 제공하며, 윈도우, 버튼, 텍스트 상자 등 기본적인 GUI 요소를 만들고 제어할 수 있다.
1. awt 기본 코드
// 기본적인 코드로 사용할 것이다
import java.awt.*;

class AwtStudy_01 extends Frame{
	public AwtStudy_01(String title) {
		super(title);

		super.setSize(400, 300);
		Dimension screen = Toolkit.getDefaultToolkit().getScreenSize();
		int xpos = (int)(screen.getWidth()/2 - this.getWidth()/2);
		int ypos = (int)(screen.getHeight()/2 - this.getHeight()/2);

		this.setLocation(xpos, ypos);
		this.setResizable(false);
		this.setVisible(true);
	}
}
public class Study_01 {
	public static void main(String[] args) {
		AwtStudy_01 frame = new AwtStudy_01("awt예제");
	}
}
 내가 만든 awt 예제.
Frame 이라는 클래스를 상속받은 AwtStudy_* 클래스를 만들어 생성자로 값을 주고, 객체로 불러들여 계속 사용할 것이다.
코드를 읽어 보면 직관적으로 알겠지만, 모니터의 픽셀값을 구하고 그것을 xpos, ypos 라는 변수로 잡아 gui 를 가운데로 고정한다.
이후 gui 를 보이게 만들어 주고, 사이즈를 조정할 수 없도록 처리하였다.
이 위에 기능들을 덧입히며 gui 공부를 할 것이다.
2. GUI 컴포넌트
자바 GUI 컴포넌트는 그래픽 애플리케이션에서 사용되는 구성 요소나 객체로, 사용자 인터페이스를 구성하고 상호 작용할 수 있도록 도와준다.
아래 코드처럼 사용된다.
import java.awt.*;

class AwtStudy_01 extends Frame{

	private Button bt = new Button("Hello AWT");

	public AwtStudy_01(String title) {
		super(title);
		this.add(bt);

		super.setSize(400, 300);
		Dimension screen = Toolkit.getDefaultToolkit().getScreenSize();
		int xpos = (int)(screen.getWidth()/2 - this.getWidth()/2);
		int ypos = (int)(screen.getHeight()/2 - this.getHeight()/2);

		this.setLocation(xpos, ypos);
		this.setResizable(false);
		this.setVisible(true);
	}
}
public class Study_01 {
	public static void main(String[] args) {
		AwtStudy_01 frame = new AwtStudy_01("awt예제");
	}
}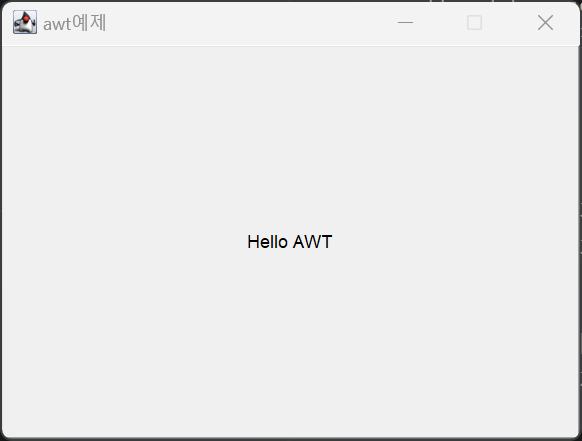
그럼 GUI 전체에 이렇게 버튼이 생성된다.
- 버튼 (Button): 사용자가 클릭하거나 누를 수 있는 기본적인 컴포넌트
private Button bt = new Button("버튼 이름");- 레이블 (Label): 텍스트 또는 이미지를 표시하기 위한 컴포넌트. 정보를 표시하거나 사용자들에게 안내한다.
중요한 것은 다른 레이아웃들과 함께 사용이 가능하다는 것이다.
private Label lb = new Label("텍스트 표시");- 텍스트 상자 (Text Field): 사용자가 텍스트를 입력할 수 있는 입력 필드 컴포넌트
private TextField tx = new TextField();- 텍스트 영역 (Text Area): 여러 줄의 텍스트를 입력하고 표시할 수 있는 컴포넌트
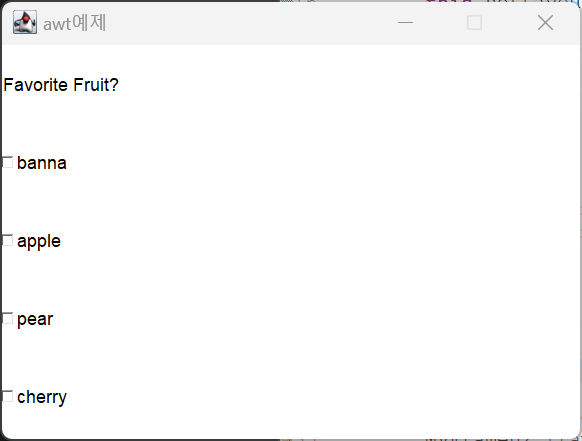
private TextArea ta = new TextArea();- 체크 박스 (Check Box): 사용자가 선택 또는 해제할 수 있게 만들어진 컴포넌트이다.
(1) check box
import java.awt.*;


class MyFrame02 extends Frame{
	private Label lb = new Label("Favorite Fruit?");
	private Checkbox a_cb = new Checkbox("banna");
	private Checkbox b_cb = new Checkbox("apple");
	private Checkbox c_cb = new Checkbox("pear");
	private Checkbox d_cb = new Checkbox("cherry");

	private GridLayout gl = new GridLayout(5, 1);

	public MyFrame02(String title) {
		super(title);

		this.setLayout(gl);
		this.add(lb);
		this.add(a_cb);
		this.add(b_cb);
		this.add(c_cb);
		this.add(d_cb);

		super.setSize(400, 300);
		Dimension screen = Toolkit.getDefaultToolkit().getScreenSize();
		int xpos = (int)(screen.getWidth()/2 - this.getWidth()/2);
		int ypos = (int)(screen.getHeight()/2 - this.getHeight()/2);

		this.setLocation(xpos, ypos);
		this.setResizable(false);
		this.setVisible(true);
	}
}
public class Study_02 {
	public static void main(String[] args) {
		MyFrame02 frame = new MyFrame02("awt예제");
	}
}
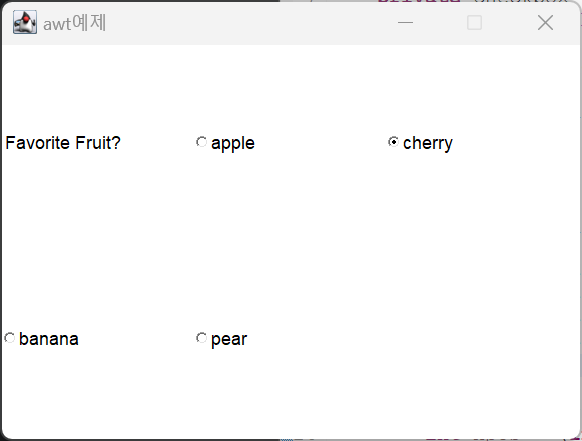
(2)
import java.awt.*;
class MyFrame02 extends Frame{
	private Label lb = new Label("Favorite Fruit?");
	private CheckboxGroup cg = new CheckboxGroup();
	private Checkbox a_lb = new Checkbox("apple", cg, false);
	private Checkbox b_lb = new Checkbox("cherry", cg, true);
	private Checkbox c_lb = new Checkbox("banana", cg, false);
	private Checkbox d_lb = new Checkbox("pear", cg, false);

	private GridLayout gl = new GridLayout(2, 5);

	public MyFrame02(String title) {
		super(title);

		this.setLayout(gl);
		this.add(lb);
		this.add(a_lb);
		this.add(b_lb);
		this.add(c_lb);
		this.add(d_lb);

		super.setSize(400, 300);
		Dimension screen = Toolkit.getDefaultToolkit().getScreenSize();
		int xpos = (int)(screen.getWidth()/2 - this.getWidth()/2);
		int ypos = (int)(screen.getHeight()/2 - this.getHeight()/2);

		this.setLocation(xpos, ypos);
		this.setResizable(false);
		this.setVisible(true);
	}
}
public class Study_02 {
	public static void main(String[] args) {
		MyFrame02 frame = new MyFrame02("awt예제");
	}
}
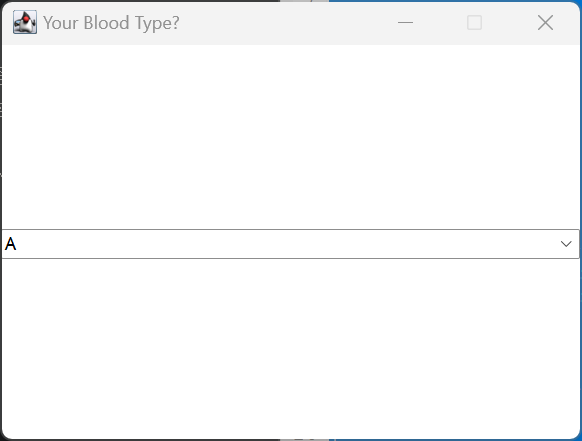
- 선택 버튼 (Choice) : 사용자가 드래그로 선택할 수 있게 만듦
import java.awt.*;


class MyFrame02 extends Frame{

	private Choice ch = new Choice();

	public MyFrame02(String title) {
		super(title);

		ch.add("A");
		ch.add("b");
		ch.add("o");
		ch.add("ab");
		this.add(ch);

		super.setSize(400, 300);
		Dimension screen = Toolkit.getDefaultToolkit().getScreenSize();
		int xpos = (int)(screen.getWidth()/2 - this.getWidth()/2);
		int ypos = (int)(screen.getHeight()/2 - this.getHeight()/2);

		this.setLocation(xpos, ypos);
		this.setResizable(false);
		this.setVisible(true);
	}
}
public class Study_02 {
	public static void main(String[] args) {
		MyFrame02 frame = new MyFrame02("Your Blood Type?");
	}
}
-
라디오 버튼 (Radio Button): 사용자가 여러 옵션 중 하나를 선택할 수 있게 만든 컴포넌트이며, 그룹으로 묶일 수 있다. (ex. 성별 선택)
-
콤보 박스 (Combo Box): 드롭다운 목록을 제공하고 사용자가 항목을 선택할 수 있도록 한다.
-
리스트 (List): 여러 항목의 목록을 표시하고 선택할 수 있게 한다. 다중 선택이 가능하게 할 수도 있다.
3. Layout
레이아웃이란?
자바의 GUI 레이아웃(Layout)은 컴포넌트(버튼, 텍스트 상자, 레이블 등)를 프레임 또는 패널과 같은 컨테이너에 배치하는 방법을 관리하는데 사용된다. GUI 레이아웃은 컴포넌트의 위치와 크기를 지정하고, 창 크기가 조절될 때 어떻게 동작할지를 정의한다. Java에서는 다양한 레이아웃 관리자(Layout Manager) 클래스가 제공되며, 이러한 관리자들을 사용하여 GUI를 구성한다.
(1) FlowLayout
: 컴포넌트를 왼쪽에서 오른쪽으로 나열하며, 공간이 부족하면 다음 줄로 이동한다.
import java.awt.*;

class AwtStudy_02 extends Frame{

	private Button bt1 = new Button("Button 1");
	private Button bt2 = new Button("Button 2");

	private FlowLayout fl = new FlowLayout(FlowLayout.LEFT);
	// 매개변수로 LEFT, CENTER(default), RIGHT 를 지정할 수 있다

	public AwtStudy_02(String title) {
		super(title);

		this.setLayout(fl); // 프레임에 Layout을 설정하겠다

		this.add(bt1);
		this.add(bt2);

		super.setSize(400, 300);
		Dimension screen = Toolkit.getDefaultToolkit().getScreenSize();
		int xpos = (int)(screen.getWidth()/2 - this.getWidth()/2);
		int ypos = (int)(screen.getHeight()/2 - this.getHeight()/2);

		this.setLocation(xpos, ypos);
		this.setResizable(false);
		this.setVisible(true);
	}
}
public class Study_02 {
	public static void main(String[] args) {
		AwtStudy_02 frame = new AwtStudy_02("awt예제");
	}
}

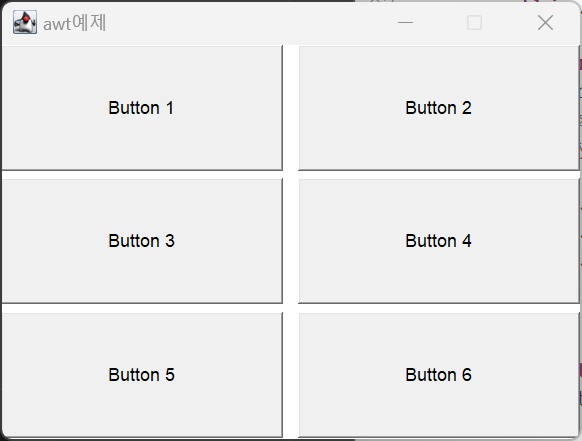
(2) GridLayout
GridLayout은 격자 형태로 컴포넌트를 배치한다. 모든 컴포넌트의 크기가 동일하고, 주로 그리드 모양의 레이아웃이 필요한 경우 사용한다.
import java.awt.*;

class AwtStudy_02 extends Frame{

	private Button bt1 = new Button("Button 1");
	private Button bt2 = new Button("Button 2");
	private Button bt3 = new Button("Button 3");
	private Button bt4 = new Button("Button 4");
	private Button bt5 = new Button("Button 5");
	private Button bt6 = new Button("Button 6");

	private GridLayout gl = new GridLayout(3,2,10,5);
	// 매개 변수는 행과 열의 개수를 나타낸다.
	// 좌우 간격, 상하 간격을 설정하고 싶다면 3, 4 번째 매개 변수를 설정한다
	// 간격 값은 픽셀 값이다.

	public AwtStudy_02(String title) {
		super(title);

		this.setLayout(gl); // 프레임에 Layout을 설정하겠다

		this.add(bt1);
		this.add(bt2);
		this.add(bt3);
		this.add(bt4);
		this.add(bt5);
		this.add(bt6);

		super.setSize(400, 300);
		Dimension screen = Toolkit.getDefaultToolkit().getScreenSize();
		int xpos = (int)(screen.getWidth()/2 - this.getWidth()/2);
		int ypos = (int)(screen.getHeight()/2 - this.getHeight()/2);

		this.setLocation(xpos, ypos);
		this.setResizable(false);
		this.setVisible(true);
	}
}
public class Study_02 {
	public static void main(String[] args) {
		AwtStudy_02 frame = new AwtStudy_02("awt예제");
	}
}
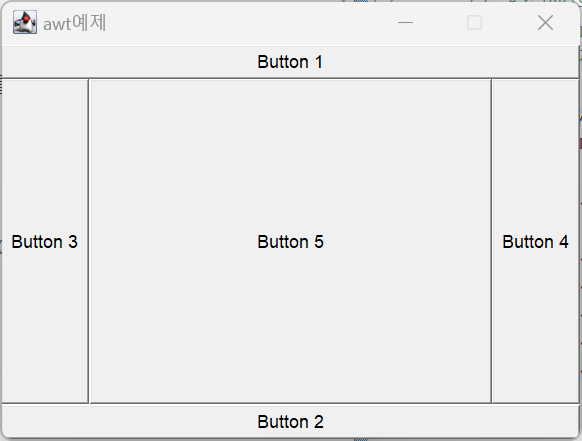
(3) BorderLayout
BorderLayout은 컴포넌트를 동, 서, 남, 북, 가운데 5개의 영역으로 나누어 배치한다. 주로 프레임에 메뉴 바, 툴바, 버튼 패널, 중앙 콘텐츠 등을 배치할 때 사용된다.
import java.awt.*;

class AwtStudy_02 extends Frame{

	private Button bt1 = new Button("Button 1");
	private Button bt2 = new Button("Button 2");
	private Button bt3 = new Button("Button 3");
	private Button bt4 = new Button("Button 4");
	private Button bt5 = new Button("Button 5");

	private BorderLayout bl = new BorderLayout();
	// Frame의 default Layout 은 BorderLayout이다.
	// BorderLayout은 위, 아래, 왼쪽, 오른쪽, 가운데를 지정해서 컴포넌트를 나타낸다.
	// 위치를 지정하지 않으면 default 값인 Center에 들어간다.

	public AwtStudy_02(String title) {
		super(title);

		this.setLayout(bl); // 프레임에 Layout을 설정하겠다

		this.add(bt1);
		this.add(bt2);
		this.add(bt3);
		this.add(bt4);
		this.add(bt5);


		super.setSize(400, 300);
		Dimension screen = Toolkit.getDefaultToolkit().getScreenSize();
		int xpos = (int)(screen.getWidth()/2 - this.getWidth()/2);
		int ypos = (int)(screen.getHeight()/2 - this.getHeight()/2);

		this.setLocation(xpos, ypos);
		this.setResizable(false);
		this.setVisible(true);
	}
}
public class Study_02 {
	public static void main(String[] args) {
		AwtStudy_02 frame = new AwtStudy_02("awt예제");
	}
}
4. Panel
panel 이란?
패널은 다른 컴포넌트를 나누고 배치하기 위해 사용되는 컨테이너이다. 주로 Layout 과 함께 사용된다.
import java.awt.*;

class AwtStudy_02 extends Frame{

	private Button bt1 = new Button("confirm");
	private Button bt2 = new Button("cancel 1");
	private Button bt3 = new Button("cancel 2");

	private Panel p1 = new Panel();
	private GridLayout gl1 = new GridLayout(1,2);
	private Panel p2 = new Panel();
	private GridLayout gl2 = new GridLayout();

	private BorderLayout bl = new BorderLayout();

	public AwtStudy_02(String title) {
		super(title);

		this.setLayout(bl); 	// 전체 Layout 을 Border 로 설정

		p1.setLayout(gl1); 		// Frame South 에 들어갈 panel layout 설정
		p1.add(bt1);			// 첫 번째 Panel에 bt1 입력

		p2.setLayout(gl2); 		// 두 번째 panel 에 bt2, bt3 입력
		p2.add(bt2);
		p2.add(bt3);

		p1.add(p2);				// 첫 번재 panel에 두 번째 panel 삽입

		this.add("South", p1); 	// Frame에 South에 첫 번째 패널 삽입


		super.setSize(400, 300);
		Dimension screen = Toolkit.getDefaultToolkit().getScreenSize();
		int xpos = (int)(screen.getWidth()/2 - this.getWidth()/2);
		int ypos = (int)(screen.getHeight()/2 - this.getHeight()/2);

		this.setLocation(xpos, ypos);
		this.setResizable(false);
		this.setVisible(true);
	}
}
public class Study_02 {
	public static void main(String[] args) {
		AwtStudy_02 frame = new AwtStudy_02("awt예제");
	}
}

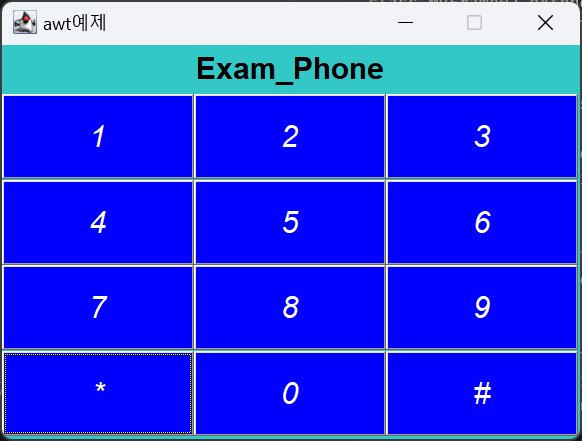
3. 글씨체와 백 그라운드 설정
import java.awt.*;


class MyFrame02 extends Frame{
	private Label title_lb = new Label("Exam_Phone", Label.CENTER);

	private Button bt[] = new Button[12];
	private String[] str = new String[] {"*", "0", "#"};
	private Font font = new Font("", Font.BOLD, 20);
	private Color color = new Color(50, 200, 200);
	private Cursor cursor = new Cursor(Cursor.HAND_CURSOR);

	private Panel p = new Panel();
	private GridLayout gl_p = new GridLayout(4,3);
	private BorderLayout bl = new BorderLayout();

	public void init() {
		this.setLayout(bl);
		this.setCursor(cursor);			// 커서 지정
		title_lb.setCursor(new Cursor(Cursor.CROSSHAIR_CURSOR));

		this.setBackground(color); 		// Frame 바탕색을 지정
		this.add("North", title_lb);	// 각 컴포넌트는
		this.add("Center", p);
		p.setLayout(gl_p);
		for (int i = 0; i<bt.length; ++i) {
			if (i<9) bt[i] = new Button(String.valueOf(i+1));
			else bt[i] = new Button(str[i-9]);
			bt[i].setFont(new Font("", Font.ITALIC, 20));	// 폰트 설정
			bt[i].setBackground(color.blue);				// 버튼 뒤 컬러 설정
			bt[i].setForeground(color.white);				// 숫자 컬러 설정
			p.add(bt[i]);
		}
	}

	public MyFrame02(String title) {
		super(title);

		title_lb.setFont(font);		// 각 컴포넌트는 글꼴을 설정하기 위해 setFont() 메서드를 가진다.
		this.init();

		super.setSize(400, 300);
		Dimension screen = Toolkit.getDefaultToolkit().getScreenSize();
		int xpos = (int)(screen.getWidth()/2 - this.getWidth()/2);
		int ypos = (int)(screen.getHeight()/2 - this.getHeight()/2);

		this.setLocation(xpos, ypos);
		this.setResizable(false);
		this.setVisible(true);
	}
}
public class Study_02 {
	public static void main(String[] args) {
		MyFrame02 frame = new MyFrame02("awt예제");
	}
}