1. Object Detection
분류와 위치 지정을 동시에 수행해 여러 객체를 탐지하고 경계 상자를 그리는 방법
(객체 분류와 객체 위치 지정을 합친 방식)
- Classification (객체 분류)
: 이미지에 어떤 객체가 있는지 파악 - Localization (객체 위치 지정)
: 객체가 이미지 내 어디에 존재하는지 좌표로 표시
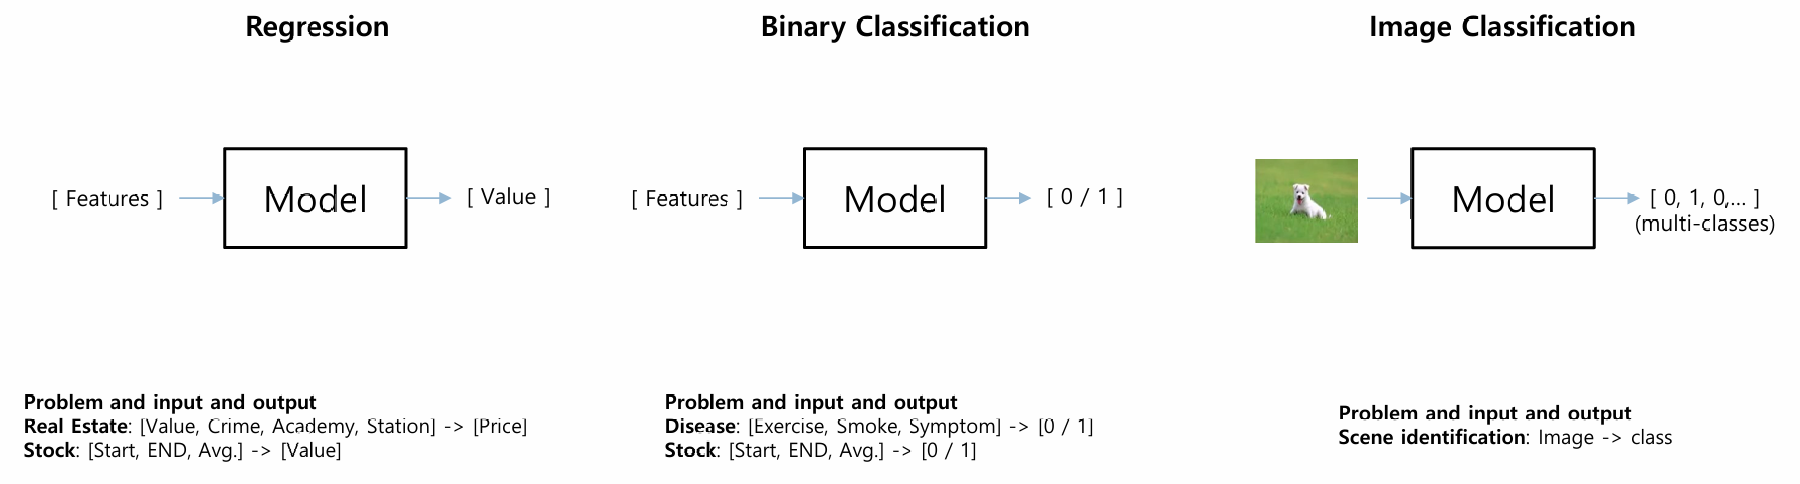
Regression vs Binary Classification vs Image Classification
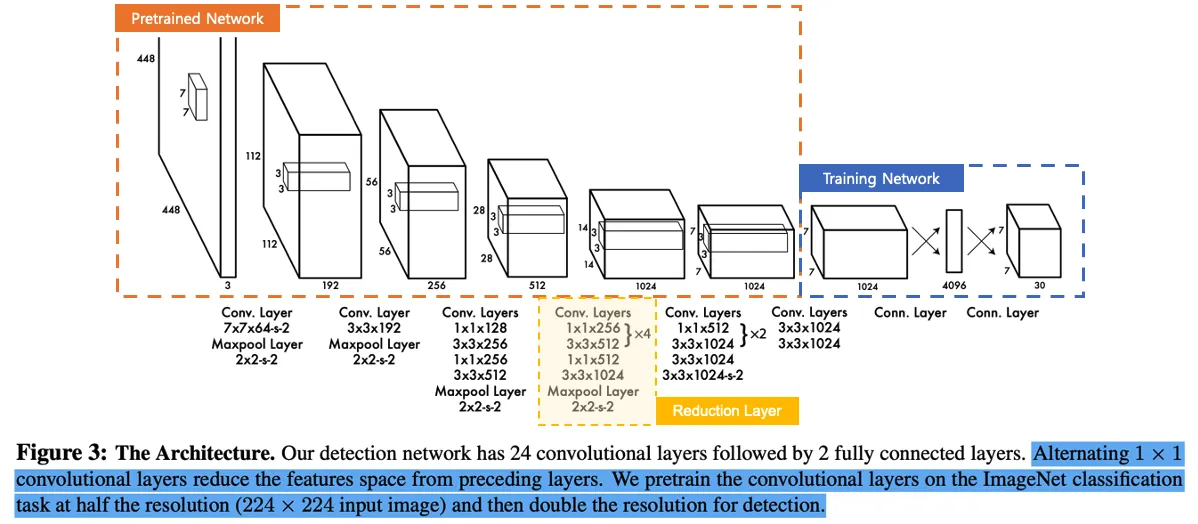
2. YOLO : You Only Look Once
Label, Bounding box, 신뢰도(Confidence 확률)을 예측하는 CNN 모델
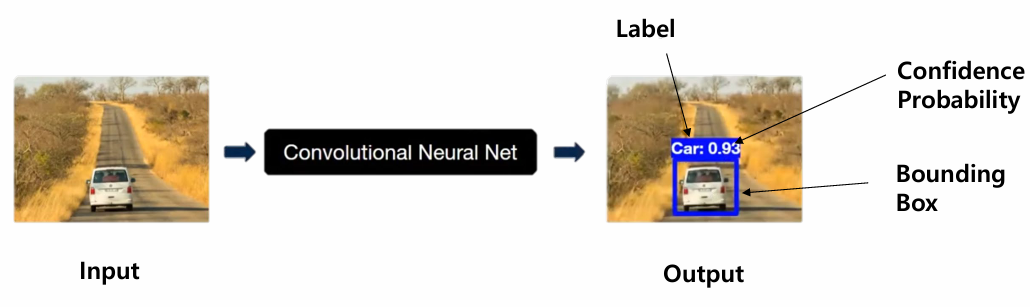
Input & Output
- Input : Image
- Output : Label, Bounding box, 신뢰도(Confidence 확률)
Bounding Boxes
Input Image가 들어오면 7X7 격자무늬의 Grid Cell로 나눈 뒤,
각 셀별로 2개의 Bounding Box를 예측
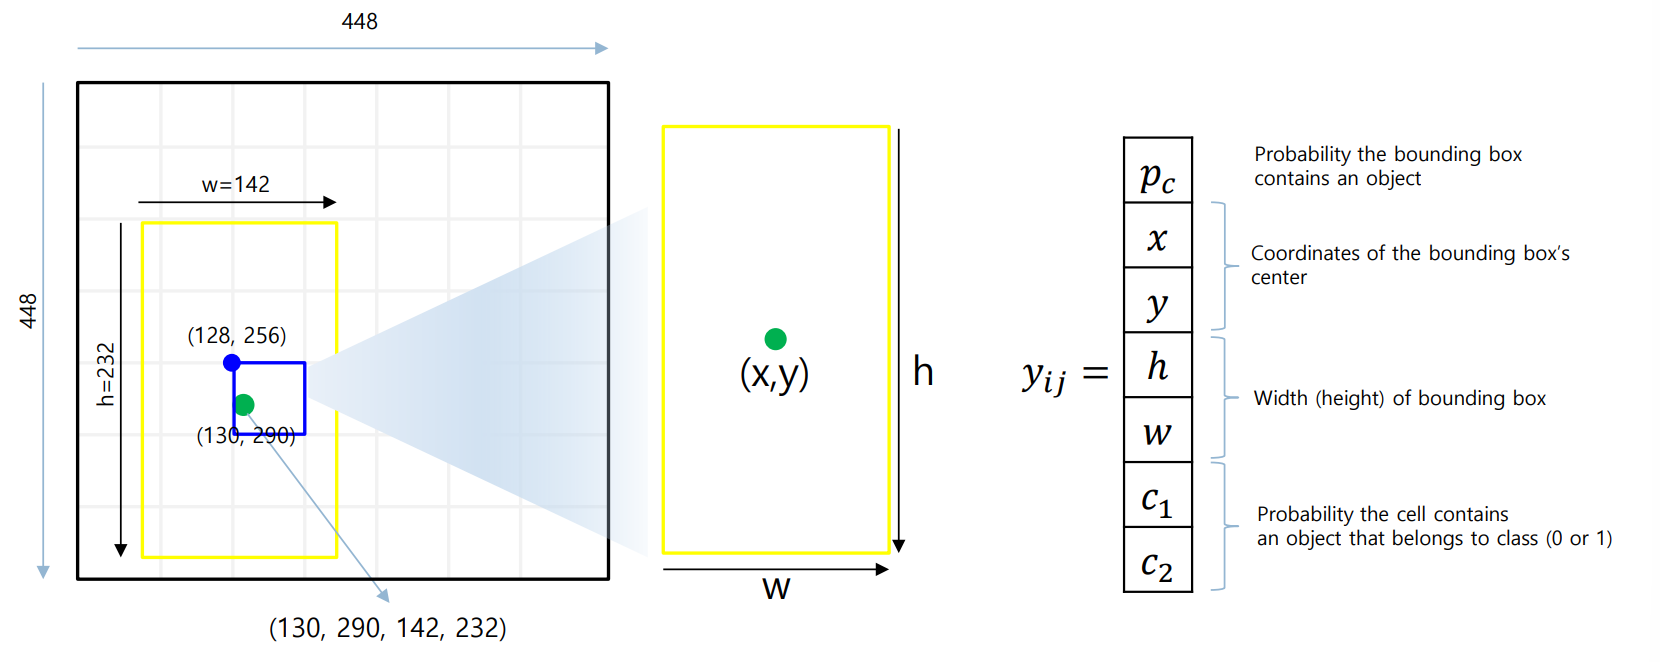
Label Encoding
Grid Cell은 다음과 같은 label은 와 Confidence Score를 가지고 있음
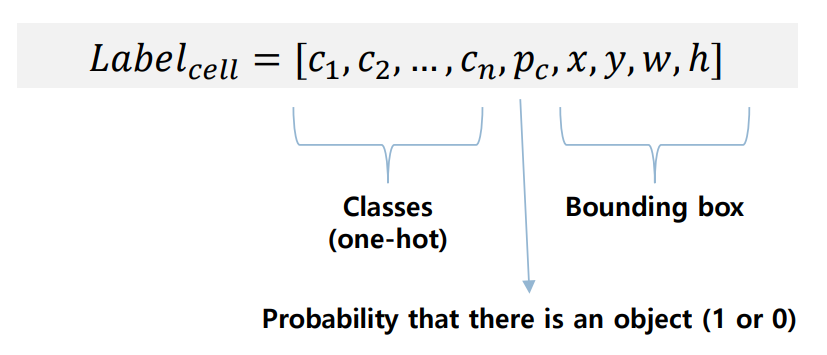
- : 클래스에 대한 One-hot Encoding
- Confidence Score : 클래스를 잘 예측하였는지 (ex. 고양이, 강아지)
- : 셀 안에서의 중심 좌표 (정규화 필요)
- : Bounding Box의 가로, 세로 크기 정보 (정규화 필요)
Prediction Vector
출력 벡터로, 한 셀당 여러 개의 Bounding Box(B=2)를 예측

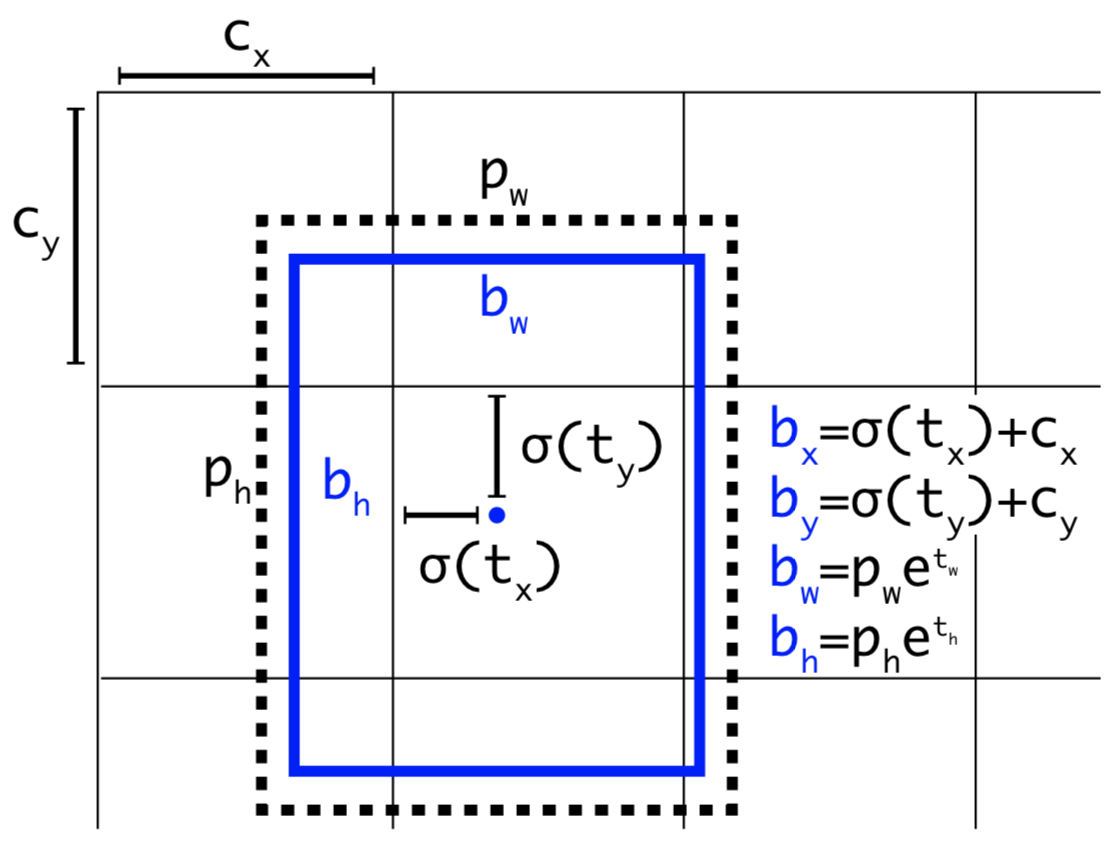
Output Parsing
출력 벡터를 실제 Bounding Box 좌표로 변환하는 과정
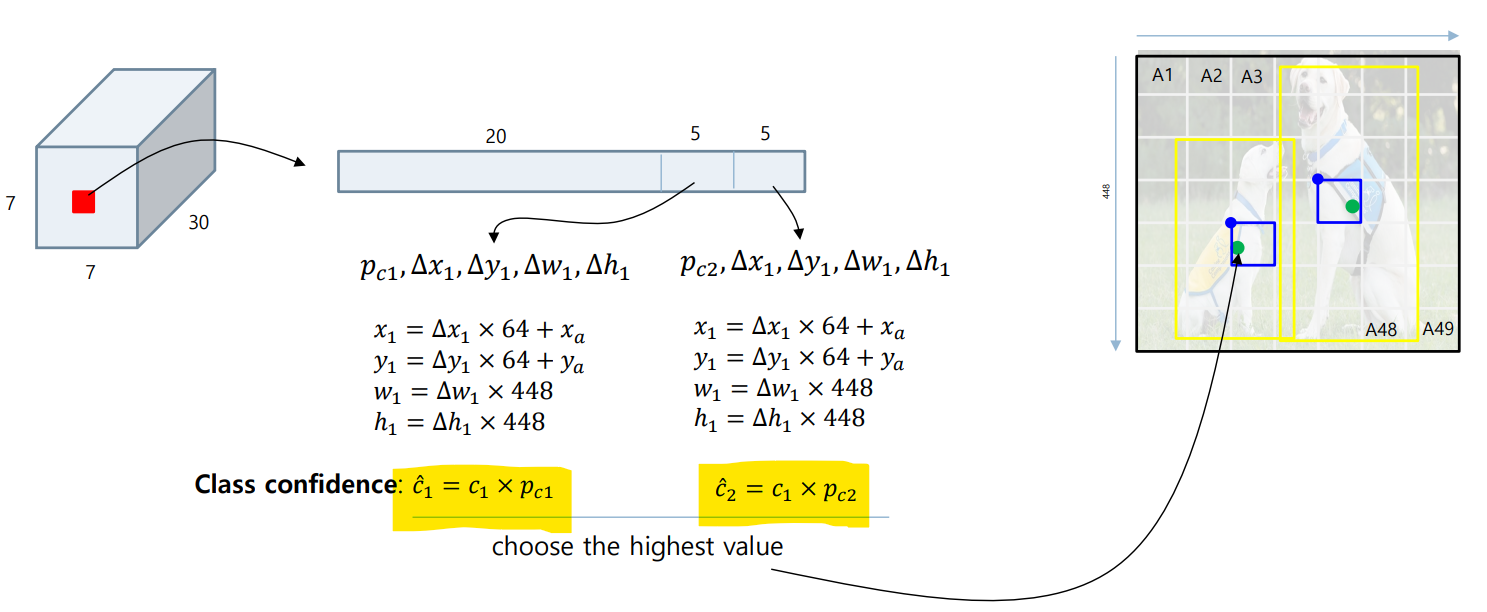
Class Confidence Score 를 계산하여 결정
(이 값이 더 높은 박스를 채택)
Confidence Score
수식 :
-
: 물체가 Bounding Box에 있을 확률
(ex. Bounding box가 배경만을 잡고 있는 경우 : score = 0) -
: 배경이 아닌 객체를 포함하는 경우, 각 클래스의 조건부 확률
-
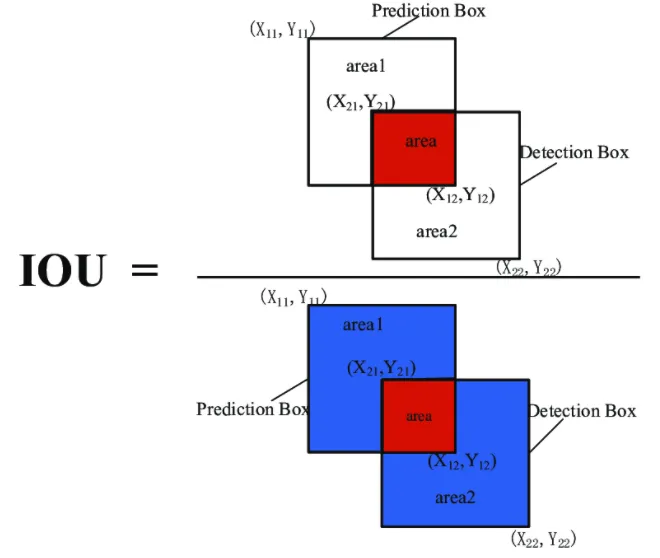
IOU(Intersection over Union) : 바운딩 박스와 예측한 바운딩 박스가 일치하는 정도
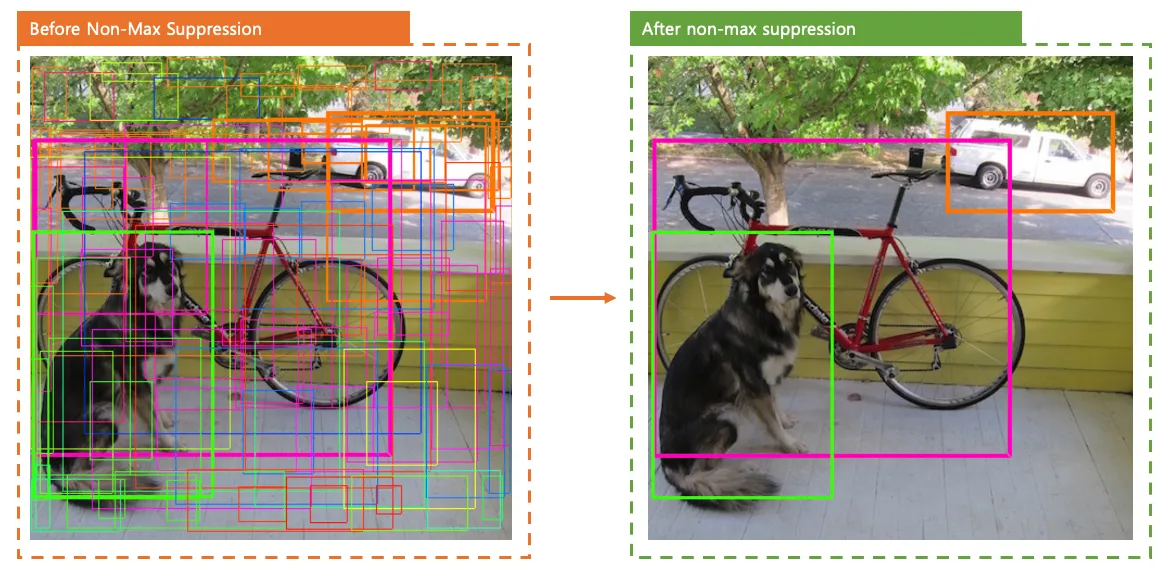
3. Non-Max Suppression (NMS)
: double counting objects
object detector가 예측한 bounding box 중에서 가장 정확한 것을 선택하도록 하는 기법
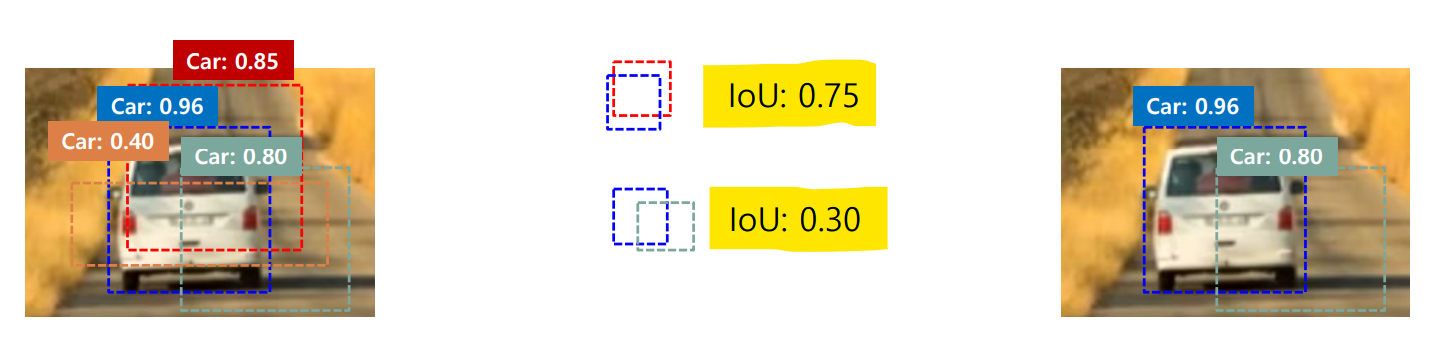
NMS 동작 과정
Step 1. 가장 높은 Confidence box 선택
일반적으로 인 박스들은 제거 (Noise제거)
Step 2. IoU 계산
가장 높은 박스와 다른 박스들과 계산
- 값이 1에 가까울 수록, 거의 완전히 겹침 (-> 같은 object를 봤을 가능성 올라감)
- 값이 0에 가까울 수록, 거의 안 겹침
Step 3. 겹침이 큰 박스 제거
IoU가 일정 threshold (ex. 0.3, 0.5) 보다 크면 해당 박스 제거
(threshold 보다 크면 같은 object를 인식했다고 판단)
4. Loss function
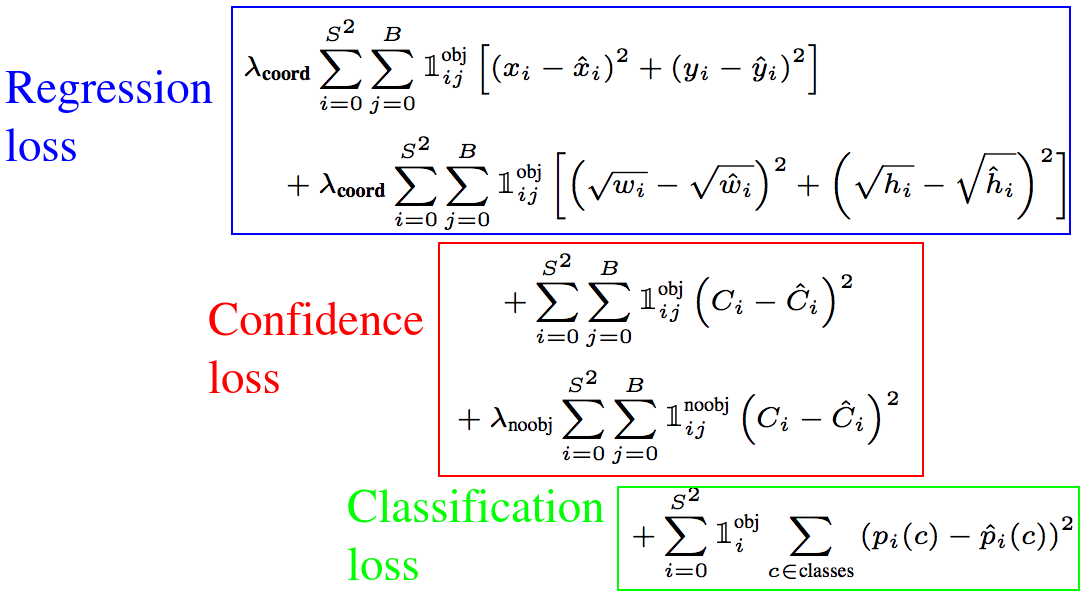
Regression Loss (=Localization Loss)
Bounding Box의 가 얼마나 정확한지 평가
값 관련, 루트 처리 -> 경계 상자 크기가 loss값에 미치는 영향을 줄이기
- :위치 손실에 대한 가중치 (일반적으로 5)
- : 해당 cell(i), box(j)에 객체가 있는 경우에만 계산
Confidence Loss
예측 프레임에 객체가 있는지 없는지에 대한 confidence 값의 정확도 평가
(Model이 그림의 배경과 전경 영역을 구별하는 방법을 학습할 수 있도록 함.)
- : 객체가 있는 셀만 손실 계산
- : 객체가 없는 셀만 손실 계산
- : 객체가 없는 경우의 손실 가중치 (일반적으로 0.5)
Classification Loss
클래스 예측 성공 여부를 평가
- Cross Entropy Loss 사용
Simple Project 1
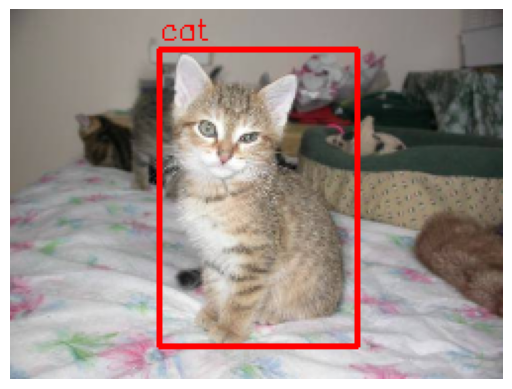
Step 1. 그림 불러오기 및 박스 그리기
img=cv2.imread("train_test_set_small\cats\cat.4045.jpg")
img=cv2.resize(img, (int(img.shape[1]/2), int(img.shape[0]/2)))
img=cv2.cvtColor(img, cv2.COLOR_BGR2RGB)
plt.imshow(img)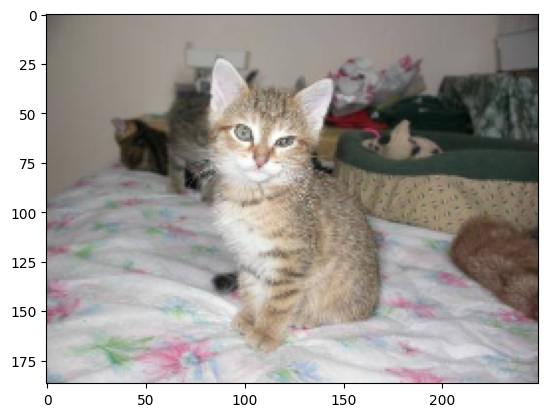
Step 2. 박스 그리기
img2=img.copy()
img2=cv2.rectangle(img2, (75, 20), (175, 170), (0,0,255), 2)

plt.imshow(img2)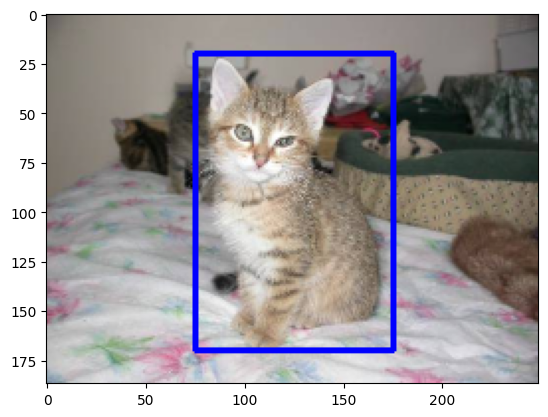
Step 3. 신경망 만들기
import torch
import torch.nn as nn
import torch.nn.functional as F

class SimpleNet(nn.Module):
    def __init__(self):
        super(SimpleNet, self).__init__()

        self.conv1 = nn.Conv2d(3, 16, kernel_size=3, padding=1)
        self.conv2 = nn.Conv2d(16, 32, kernel_size=3, padding=1)
        self.conv3 = nn.Conv2d(32, 64, kernel_size=3, padding=1)

        self.pool = nn.MaxPool2d(2, 2)
        self.relu=nn.ReLU()

        self.fc1 = nn.Linear(64 * 23 * 31, 128)
        self.fc2 = nn.Linear(128, 4)

    def forward(self, x):
        x=self.pool(self.relu(self.conv1(x)))
        x=self.pool(self.relu(self.conv2(x)))
        x=self.pool(self.relu(self.conv3(x)))

        x=x.view(-1, 64*23*31)

        x=self.relu(self.fc1(x))
        x=self.fc2(x)

        return x

model=SimpleNet()
print(model)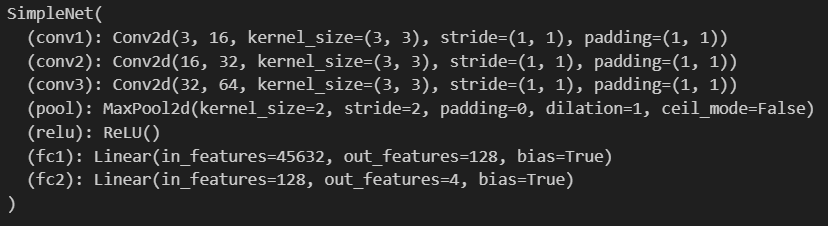
Step 4. 학습 준비하기
img_tensor=torch.from_numpy(img).permute(2, 0, 1).float()
img_tensor=img_tensor.unsqueeze(0)

true_box=torch.tensor([75, 20, 175, 170], dtype=torch.float32)

criterion=nn.MSELoss()
optimizer=torch.optim.Adam(model.parameters(), lr=0.001)

num_epochs=100
Step 5. Model 학습하기
for epoch in range(num_epochs):
    model.train()

    # Forward pass
    outputs = model(img_tensor)
    loss = criterion(outputs.squeeze(), true_box)

    # Backward pass 및 최적화
    optimizer.zero_grad()
    loss.backward()
    optimizer.step()

    if (epoch + 1) % 10 == 0:
        print(f'Epoch [{epoch+1}/{num_epochs}], Loss: {loss.item():.4f}')

model.eval()
with torch.no_grad():
    predicted_box = model(img_tensor).squeeze()
    print(f'예측된 바운딩 박스: {predicted_box}')
    print(f'실제 바운딩 박스: {true_box}')
Step 6. 검증하기
pred_box=model(img_tensor)
pred_box=pred_box.squeeze()
pred_box=pred_box.detach().numpy()
pred_box=np.round(pred_box).astype(int)
print(pred_box)

img2=img.copy()
img2=cv2.rectangle(img2, (pred_box[0], pred_box[1]), (pred_box[2], pred_box[3]), (255,0,0), 2)
plt.imshow(img2)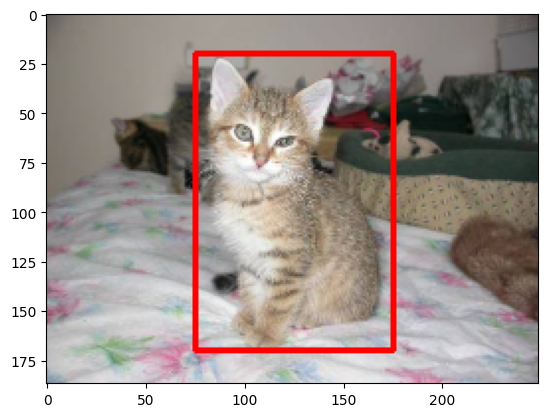
Simple Project 2
: Object Detection 모델로 확장하기
(Step 1,2는 동일)
Step 3. 신경망 만들기
class SimpleNet2(nn.Module):
    def __init__(self):
        super(SimpleNet2, self).__init__()

        self.conv1 = nn.Conv2d(3, 16, kernel_size=3, padding=1)
        self.conv2 = nn.Conv2d(16, 32, kernel_size=3, padding=1)
        self.conv3 = nn.Conv2d(32, 64, kernel_size=3, padding=1)

        self.pool = nn.MaxPool2d(2, 2)
        self.relu=nn.ReLU()

        self.fc1 = nn.Linear(64 * 23 * 31, 128)
        self.fc2 = nn.Linear(128, 6)

    def forward(self, x):
        x=self.pool(self.relu(self.conv1(x)))
        x=self.pool(self.relu(self.conv2(x)))
        x=self.pool(self.relu(self.conv3(x)))

        x=x.view(-1, 64*23*31)

        x=self.relu(self.fc1(x))
        x=self.fc2(x)

        return x

model=SimpleNet2()
print(model)
Step 4. 학습 준비하기
img_tensor=torch.from_numpy(img).permute(2, 0, 1).float()
img_tensor=img_tensor.unsqueeze(0)

true_box = torch.tensor([75, 20, 175, 170, 1, 0], dtype=torch.float32)

criterion=nn.MSELoss()
optimizer=torch.optim.Adam(model.parameters(), lr=0.001)

num_epochs=100
Step 5. Model 학습하기
for epoch in range(num_epochs):
    model.train()

    # Forward pass
    outputs = model(img_tensor)
    loss = criterion(outputs.squeeze(), true_box)

    # Backward pass 및 최적화
    optimizer.zero_grad()
    loss.backward()
    optimizer.step()

    if (epoch + 1) % 10 == 0:
        print(f'Epoch [{epoch+1}/{num_epochs}], Loss: {loss.item():.4f}')

model.eval()
with torch.no_grad():
    predicted = model(img_tensor).squeeze()
    coords = predicted[:4]
    class_logits = predicted[4:]
    class_idx = torch.argmax(class_logits).item()
    class_name = "cat" if class_idx == 0 else "dog"
Step 6. 검증하기
pred_box=model(img_tensor)
pred_box=pred_box.squeeze()

coords = pred_box[:4]

class_logits = pred_box[4:]
class_idx = torch.argmax(class_logits).item()
class_name = "cat" if class_idx == 0 else "dog"

img2 = img.copy()
img2 = cv2.rectangle(img2, (int(coords[0]), int(coords[1])), (int(coords[2]), int(coords[3])), (255, 0, 0), 2)
img2 = cv2.putText(img2, class_name, (int(coords[0]), int(coords[1] - 10)), cv2.FONT_HERSHEY_SIMPLEX, 0.5, (255, 0, 0), 2)
plt.imshow(img2)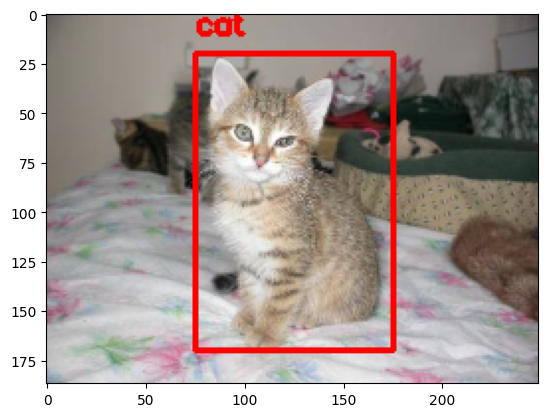
Simple Project 3
: Grid Cell 단위로 학습하기 위한 YOLO 학습 데이터 만들기
# 각 셀의 출력 벡터 (x1, y1, x2, y2, class_cat, class_dog)

s1 = [0.0, 0.0, 0.0, 0.0, 0.0, 0.0, 1.0]                     # 배경
s2 = [75, 20, 175, 170, 1.0, 0.0, 1.0]                       # 고양이 (중심이 이 셀에 해당)
s3 = [0.0, 0.0, 0.0, 0.0, 0.0, 0.0, 1.0]                     # 배경
s4 = [0.0, 0.0, 0.0, 0.0, 0.0, 0.0, 1.0]                     # 배경
s5 = [0.0, 0.0, 0.0, 0.0, 0.0, 0.0, 1.0]                     # 배경
s6 = [0.0, 0.0, 0.0, 0.0, 0.0, 0.0, 1.0]                     # 배경
s7 = [0.0, 0.0, 0.0, 0.0, 0.0, 0.0, 1.0]                     # 배경
s8 = [0.0, 0.0, 0.0, 0.0, 0.0, 0.0, 1.0]                     # 배경
s9 = [0.0, 0.0, 0.0, 0.0, 0.0, 0.0, 1.0]                     # 배경

# 3x3 셀 구조
S = [
    [s1, s2, s3],
    [s4, s5, s6],
    [s7, s8, s9]
]

# 텐서로 변환
true_box_S = torch.tensor(S, dtype=torch.float32)
print(true_box_S.shape)
Step 3. 신경망 만들기
class SimpleNet3(nn.Module):
    def __init__(self):
        super(SimpleNet3, self).__init__()

        self.conv1 = nn.Conv2d(3, 16, kernel_size=3, padding=1)
        self.conv2 = nn.Conv2d(16, 32, kernel_size=3, padding=1)
        self.conv3 = nn.Conv2d(32, 64, kernel_size=3, padding=1)

        self.pool = nn.MaxPool2d(2, 2)
        self.relu = nn.ReLU()

        self.fc1 = nn.Linear(64 * 23 * 31, 128)
        self.fc2 = nn.Linear(128, 3 * 3 * 7)  # 출력 63개

    def forward(self, x):
        x = self.pool(self.relu(self.conv1(x)))  # (94,125)
        x = self.pool(self.relu(self.conv2(x)))  # (47,62)
        x = self.pool(self.relu(self.conv3(x)))  # (24,32)

        x = x.view(-1, 64 * 23 * 31)
        x = self.relu(self.fc1(x))
        x = self.fc2(x)
        return x

model = SimpleNet3()
print(model)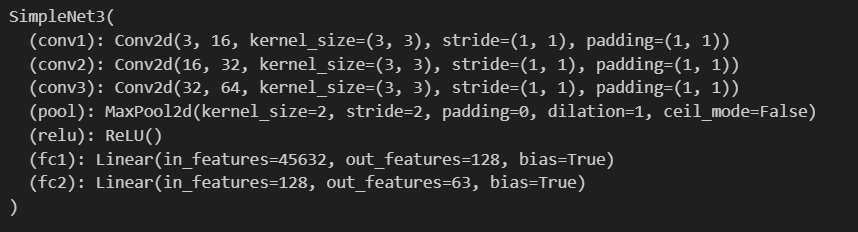
Step 4. 학습 준비하기
true_box_S = torch.tensor(S, dtype=torch.float32)

criterion = nn.MSELoss()
optimizer = torch.optim.Adam(model.parameters(), lr=0.001)

num_epochs = 100

img_tensor = torch.from_numpy(img).permute(2, 0, 1).float() / 255.0  # (H,W,C) → (C,H,W)
img_tensor = img_tensor.unsqueeze(0)  # (C,H,W) → (B,C,H,W)
Step 5. Model 학습하기
for epoch in range(num_epochs):
model.train()
outputs = model(img_tensor)
true_box_S2 = true_box_S.view(-1, 3 * 3 * 7)
loss = criterion(outputs.squeeze(), true_box_S2)
optimizer.zero_grad()
loss.backward()
optimizer.step()
if (epoch + 1) % 10 == 0:
print(f"Epoch [{epoch+1}/{num_epochs}], Loss: {loss.item():.4f}")
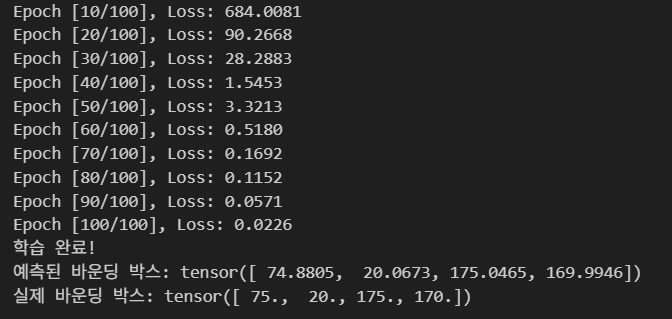
print("학습 완료!")
model.eval()
with torch.no_grad():
predicted_box = model(img_tensor).squeeze()
print(f"예측된 바운딩 박스: {predicted_box}")
print(f"실제 바운딩 박스: {true_box_S2}")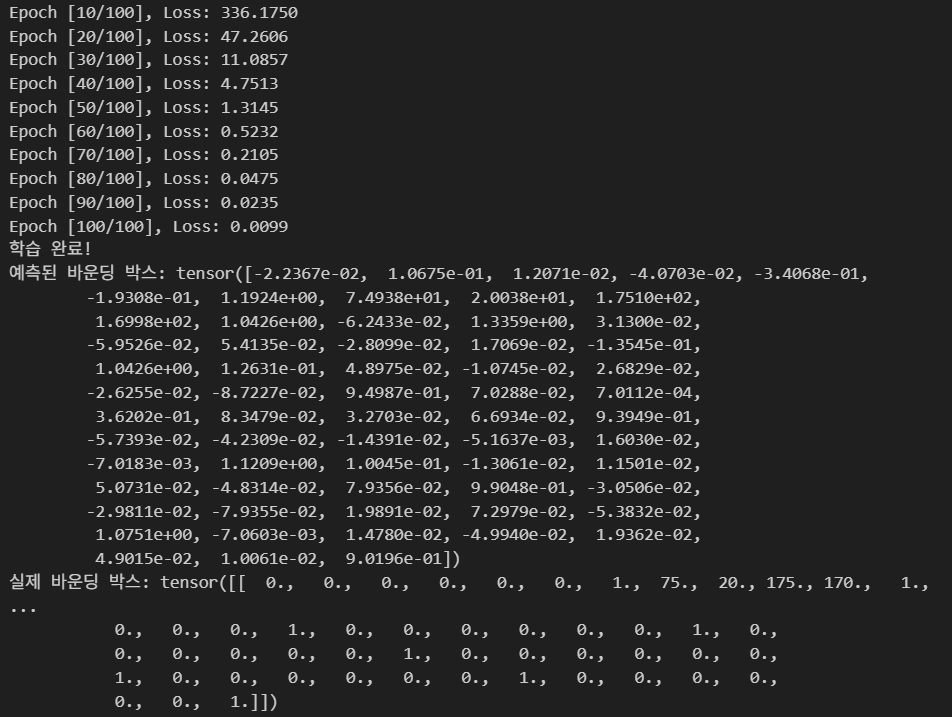
Step 6. 검증하기
predicted_box = predicted_box.view(3, 3, 7)
predicted_box = predicted_box.detach().numpy()
predicted_box = np.round(predicted_box).astype(int)
predicted_box[:, :, 4]  # 클래스 예측 결과만 추출
img2 = img.copy()
for i in range(predicted_box.shape[0]):
for j in range(predicted_box.shape[1]):
# 배경 클래스가 아니면 (예: [0,0,0,0,1,0] 또는 [0,0,0,0,0,1])
if predicted_box[i, j, 4] == 1:
# 바운딩 박스 그리기
img2 = cv2.rectangle(
img2,
(predicted_box[i, j, 0], predicted_box[i, j, 1]),
(predicted_box[i, j, 2], predicted_box[i, j, 3]),
(255, 0, 0),
2
)
# 클래스 텍스트 붙이기
if predicted_box[i, j, 5] == 1:
img2 = cv2.putText(
img2, 'cat',
(predicted_box[i, j, 0], predicted_box[i, j, 1] - 5),
cv2.FONT_HERSHEY_SIMPLEX, 0.5, (255, 0, 0), 1
)
else:
img2 = cv2.putText(
img2, 'dog',
(predicted_box[i, j, 0], predicted_box[i, j, 1] - 5),
cv2.FONT_HERSHEY_SIMPLEX, 0.5, (255, 0, 0), 1
)
# 배경 클래스일 경우 skip
if predicted_box[i, j, 4] == 0:
continue
plt.imshow(img2)
plt.axis("off")
plt.show()