📍 사용자와의 커뮤니케이션을 위한 폼 태그
1. Form
<form> : 데이터를 입력 받고 전송할 때 사용하는 태그.
form태그는 정보를 제출하기 위한 대화형 컨트롤을 포함하는 문서 구획을 나타낸다. 로그인 창이나, 회원가입 폼 등이 이에 해당된다.
| attribute | Value | Description |
|---|---|---|
| action | URL | 입력 데이터(form data)가 전송될 URL 지정 |
| method | get / post | 입력 데이터(form data) 전달 방식 지정 |
GET과 POST는 HTTP 프로토콜을 이용해서 사용자 입력 데이터를 서버에 전달하는 방식을 나타내며 HTTP request method라 한다. (web과 internet참고)
ex.
<!DOCTYPE html>
<html>
<body>
    <form action="http://aaa.com/users" method="get">
        ID: <input type="text" name="id" value="seul06"><br>
        username: <input type="text" name="username" value="Orange"><br>
        <input type="submit" value="Submit">
    </form>
</body>
</html>
- submit button이 클릭되면 input 태그에 입력된 데이터가 form 태그의 method 어트리뷰트에 지정된 방식으로 action 어트리뷰트에 지정된 서버측의 처리 로직에 전달된다. (즉, action속성으로 데이터가 전송될 스크립트 파일을 지정, method속성으로 보내질 데이터가 get방식이라는 것을 표시)
2. Input
-
기본적으로 input태그는 닫기 태그가 없는 독립적인 태그이다. (HTML5기준)
-
input 태그는 form 태그 중에서 가장 중요한 태그로 사용자로부터 데이터를 입력받기 위해 사용된다.
-
input 태그는 다양한 종류가 있는데 type 속성에 의해 구분된다. form 태그 내에 존재하여야 입력 데이터를 전송할 수 있으나 ajax를 사용할 시에는 form 태그 내에 존재하지 않아도 된다.
-
서버에 전송되는 데이터는 name 어트리뷰트를 키로, value 어트리뷰트를 값으로하여 key=value의 형태로 전송된다.
type: 입력 태그의유형.
name: 입력 태그의 초기값.(사용자가 변경 가능)
value: 서버로 전달되는 이름.(사용자 임의 지정)
Type attribute
2-1. button
: 버튼 생성.
2-2. checkbox
: 체크박스 생성. 클릭하면 선택되고, 다시 클릭하면 해제된다. 중복선택이 가능하다.
2-3. color
: 컬러 선택 생성.
2-4. date
: date control(년월일)생성.
2-5. datetime
: date & time control(년분일시분초)생성. HTML spec에서 drop되었다.
2-6. datetime-local
: 지역 date & time control(년분일시분초)생성.
2-7. email
: 이메일 입력 form생성. submit시 자동 검증한다.
2-8. file
: 파일 선택 form생성.
2-9. hidden
: 감추어진 입력 form생성. 사용자에게 보이지는 않지만 서버로 전송된다.
2-10. image
: 이미지로 된 submit button생성.
2-11. week
: 주 선택 입력 form생성.
2-12. month
: 월 선택 form생성.
2-13. number
: 숫자 입력 form생성.
2-14. password
: password입력 form생성.
2-15. radio
: radio button생성. 여러 개의 항목 중에서 하나만 선택하도록 하는 동그란 버튼이다. 중복선택은 불가능하다. 체크박스와는 달리 선택을 해제할 수 없으므로 초기화 버튼을 만들어두는 것이 좋다. 라디오 버튼 생성시 반드시 value값과 name값을 지정해야 하며 여기서 value속성은 임의로 하되 name속성은 동일한 이름을 넣어줘야 같은 그룹으로 인식이 된다.
2-16. range
: 범위 선택 form생성.
2-17. reset
: 초기화 button생성.
2-18. search
: 검색어 입력 form생성.
2-19. submit
: 제출, 전송하는 button생성.
2-20. tel
: 전화번호 입력 form생성.
2-21. text
: 텍스트 입력 form생성.
2-22. time
: 시간 선택 form생성.
2-23. url
: url입력 form생성.
<!DOCTYPE html>
<html>
<body>
    <form: action="http://aaa.com/users" method="get">
        ID: <input type="text" name="id" value="seul06"><br>
        username: <input type="text" name="username" value="Orange"><br>
        <input type="submit" value="Submit">
    </form>
<hr>
    <h3>button</h3>
    <input type="button" value="버튼 :)" onclick="alert('Hello world!')">
<hr>
    <h3>checkbox</h3>
    <input type="checkbox" name="music1" value="jazz" checked> 재즈<br>
    <input type="checkbox" name="music2" value="classic" checked> 클래식<br>
    <input type="checkbox" name="music3" value="pop music"> 팝송<br>
<hr>
    <h3>color</h3>
    <input type="color" name="mycolor">
<hr>
    <h3>date</h3>
    <input type="date" name="birthday">
<hr>
    <h3>datetime</h3>
    <input type="datetime" name="birthdaytime">
<hr>
    <h3>datetime-local</h3>
    <input type="datetime-local" name="birthdaytime">
<hr>
    <h3>email</h3>
    <input type="email" name="useremail">
<hr>
    <h3>file</h3>
    <input type="file" name="myfile">
<hr>
    <h3>hidden</h3>
    <input type="hidden" name="country" value="Norway">
    hidden filed는 사용자에 표시되지 않는다.
<hr>
    <h3>image</h3>
    <input type="image" src="ii.jpeg" alt="Submit" width="35%" height="35%">
<hr>
    <h3>week</h3>
    <input type="week" name="week_year">
<hr>
    <h3>month</h3>
    <input type="month" name="birthdaymonth">
<hr>
    <h3>number</h3>
    <input type="number" name="quantity" min="1" max="10" step="1" value="1">
<hr>
    <h3>password</h3>
    <input type="password" name="pwd">
<hr>
<h3>radio</h3>
    <input type="radio" name="front-end" value="HTML"> HTML<br>
    <input type="radio" name="front-end" value="CSS"> CSS<br>
    <input type="radio" name="front-end" value="JavaScript" checked> JavaScript<br>
<hr>
    <h3>range</h3>
    <input type="range" name="points" min="0" max="10" step="1" value="2">
<hr>
    <h3>reset</h3>
    <input type="reset">
<hr>
    <h3>search</h3>
    <input type="search" name="googlesearch" value="seul.log">
<hr>
    <h3>submit</h3>
    <input type="submit" value="Submit">
<hr>
    <h3>tel</h3>
    <input type="tel" name="mytel" value="123">
<hr>
    <h3>text</h3>
    <input type="text" name="myname" value="seul's study">
<hr>
    <h3>time</h3>
    <input type="time" name="mytime">
<hr>
    <h3>url</h3>
<input type="url" name="myurl" value="https://velog.io/@seul06">
<hr>
</body>
</html>
추가)❗️ onclick 이라는 속성에는 반드시 JS가 와야한다!
<label> 태그
- 사용자 인터페이스(UI) 요소의 라벨(label)을 정의할 때 사용한다.
- 라벨은 폼의 양식에 이름 붙이는 태그이다.
<label>태그는<input>태그를 도와주는 역할을 한다. input 태그가 디자인 하기 힘들 때 label태그로 연결해서 쉽게 디자인하거나 클릭 편의성을 높일 수 있다.- 주요 속성은 for이며, label의 for의 값과 양식의 id의 값이 같으면 연결된다.
- input 등 양식을 label로 감싸면, id와 for가 없이도 같은 결과를 얻을 수 있다.
- label을 클릭하면, 연결된 양식에 입력할 수 있도록 하거나 체크를 하거나 체크를 해제한다.
<!doctype html>
<html>
<body>
<p>
    <label for="jb-input-text">Input - Text</label>
    <input type="text" id="jb-input-text">
</p>
<p>
    <label for="jb-input-checkbox"> Input - checkbox</label>
    <input type="checkbox" id="jb-input-checkbox">
</p>
</body>
</html>
(좌측 텍스트를 누르면 우측 검색창이 활성화 되거나 체크라인이 자동 표시된다.)
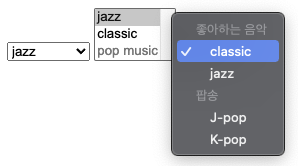
3. Select
-
복수개의 리스트에서 복수개의 아이템을 선택할 때 사용한다.
-
서버에 전송되는 데이터는 select 요소의 name 어트리뷰트를 키로, option 요소의 value 어트리뷰트를 값으로하여 key=value의 형태로 전송된다.
<!DOCTYPE html>
<html>
  <body>
   <select name="music1">
        <option value="jazz" selected>jazz</option>
        <option value="classic" disabled>classic</option>
        <option value="pop music" >pop music</option>
    </select>
        <select name="music2" size="3">
            <option value="jazz" selected>jazz</option>
            <option value="classic">classic</option>
            <option value="pop music" disabled>pop music</option>
    </select>
    <select name="my music">
        <optgroup label="좋아하는 음악">
            <option value="classic">classic</option>
            <option value="jazz" >jazz</option>
        </optgroup>
        <optgroup label="팝송">
                <option value="J-pop">J-pop</option>
                <option value="K-pop">K-pop</option>
        </optgroup>
    </select>
  </body>
</html>
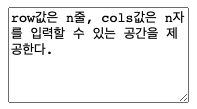
4. Textarea
- textarea 태그는 여러 줄의 글자를 입력할 때 사용한다.
<!DOCTYPE html>
<html>
  <body>
    <textarea name="message" rows="6" cols="20">row값은 n줄, cols값은 n자를 입력할 수 있는 공간을 제공한다.</textarea>
  </body>
</html>
5. Button
-
button 태그는 클릭할 수 있는 버튼을 생성한다.
<input type="button">과 유사하지만 input 태그는 빈 태그인 반면 button 태그는 그렇지 않다.
따라서 button 요소에는 텍스트나 이미지 같은 콘텐츠를 사용할 수 있다. -
type 어트리뷰트는 반드시 지정하는 것이 바람직하며 어트리뷰트값으로 button, reset, submit를 지정할 수 있다.
-
button태그는 어트리뷰트만을 받아들이는 input태그와 달리 콘텐츠로 문자열은 물론 HTML요소를 받을 수 있다는 장점이 있지만 IE의 경우, submit되는 값이 다를 수 있다. (따라서, 오래된 IE를 지원해야 한다면 input태그를 사용하자.)
<!DOCTYPE html>
<html>
  <body>
    <button type="button" onclick="alert('버트은:D')">Click</button>
    <input type="button" value="벝은!" onclick="alert('input type버튼은 빈태그')">
  </body>
</html>
6. Fieldset / Legend
- fieldset 태그는 관련된 입력 양식들을 그룹화할 때 사용한다.
- legend 태그는 fieldset 태그 내에서 사용되어야 하며 그룹화된 fieldset의 제목을 정의한다.
<!DOCTYPE html>
<html>
  <head>
    <meta charset="UTF-8">
  </head>
  <body>
      <fieldset>
        <legend>Login</legend>
        ID <input type="text" name="username" value="seul">
        PW <input type="text" name="password" value="1234">
      </fieldset>
  </body>
</html>
reference : https://developer.mozilla.org/ko/ https://poiemaweb.com/ http://webberstudy.com/


