Query String
사용되는 구조 ▼

- 특정한 웹의 주소부분에
?로 시작하는 속성과 값의 모음이Query String이다. - 결국
Query String은 특정한 주소로 접근을 할 때 기본적인 해당 페이지에 대한 옵션을 명시하는 용도로 활용되는 문자이다.
fetch() 알아보기
1. fetch 함수란?
fetch 함수는 XMLHttpRequest 객체와 마찬가지로 HTTP 요청 전송 기능을 제공하는 클라이언트 사이드 Web API 이다.
-
XMLHttpRequest 객체보다 사용법이 간단하고 프로미스를 지원하기 때문에 비동기 처리를 위한 콜백 패턴의 단점에서 자유롭다.
-
fetch 함수에는 HTTP 요청을 전송할 URL과 HTTP요청 메서드, HTTP요청 헤더, 페이로드 등을 설정한 객체를 전달한다.
const promise = fetch(url [, options]) -
fetch 함수는 HTTP응답을 나타내는 Response 객체를 래핑한 Promise 객체를 반환한다.
-
fetch 함수로 GET 요청 전송해보기 ▼
fetch 함수에 첫 번째 인수로 HTTP 요청을 전송할 URL만 전달하면 GET 요청을 전송한다.fetch('https://jsonplaceholder.typicode.com/todos/1') .then((response) => console.log(response))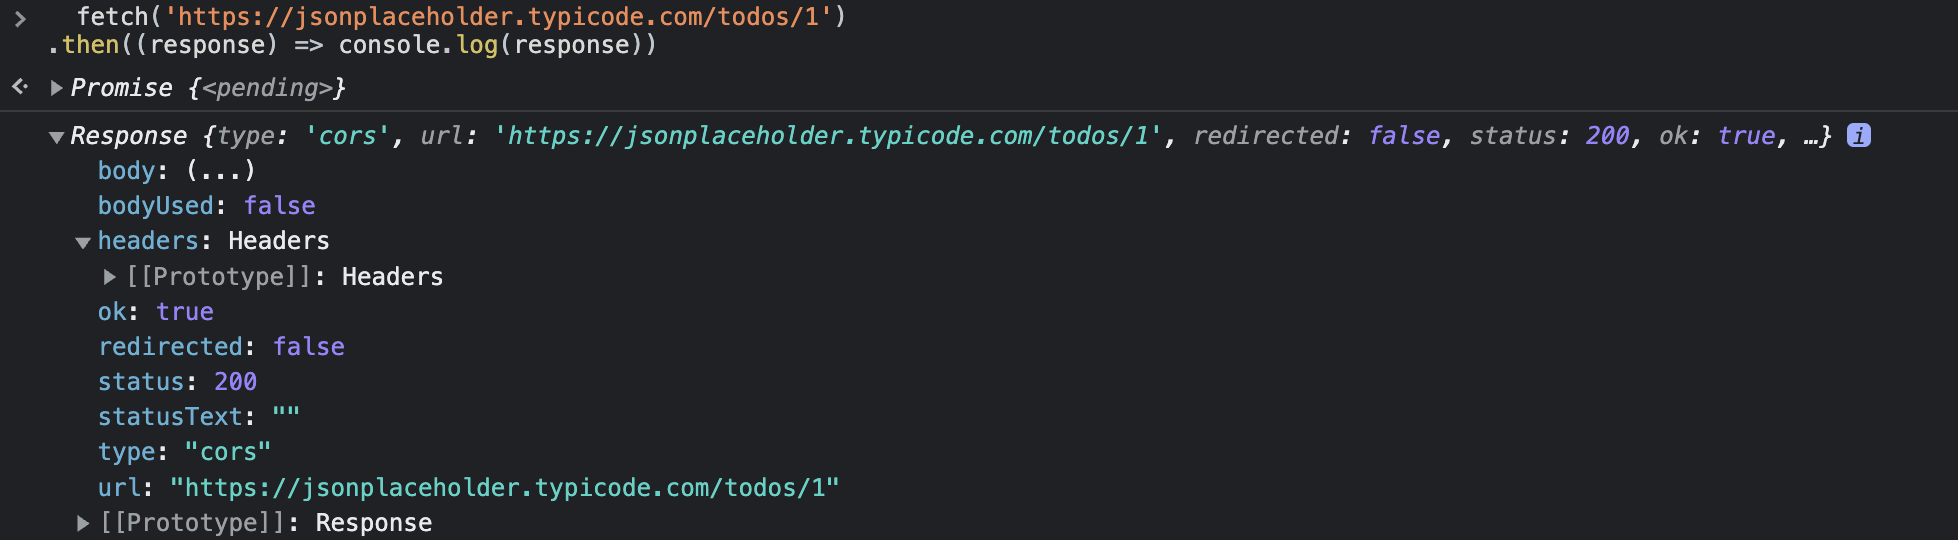
2. fecth 함수를 사용할 때 에러 처리
-
fetch 함수가 반환하는 프로미스는 기본적으로 404 Not Found나 500 Internal Server Error와 같은 HTTP 에러가 발생해도 에러를 reject 하지 않고 불리언 타입의 ok 상태를 false로 설정한 Response 객체를 resolve 한다.
오프라인 등의 네트워크 장애나 CORS(Cross-Origin Resource Sharing: 교차(다른) 출처 리소스 공유) 에러에 의해 요청이 완료되지 못한 경우에만 프로미스를 reject 한다.const wrongUrl = 'https://jsonplaceholder.typicode.com/XXX/1'; // 부적절한 URL이 지정되었으므로 404 Not Found 에러가 발생한다. fecth(wrongUrl) .then(() => console.log('ok')) .catch(() => console.log('error'))
-
따라서 fetch 함수가 반환한 프로미스가 resolve한 불리언 타입의 ok상태를 확인해 명시적으로 에러를 처리할 필요가 있다.
const wrongUrl = 'https://jsonplaceholder.typicode.com/XXX/1';

// 부적절한 URL이 지정되었으므로 404 Not Found 에러가 발생한다.
fecth(wrongUrl)
// response는 HTTP 응답을 나타내는 Response 객체이다.
.then(response =>{
  if (!response.ok) throw new Error(response.statusText);
  return response.json();
})
.then((todo) => console.log(todo))
.catch((err) => console.log(err))
3. Response.prototype.json
-
Response.prototype에는 Response 객체에 포함되어 있는 HTTP 응답 몸체를 위한 다양한 메서드를 제공한다.
-
fetch 함수가 반환한 프로미스가 래핑하고 있는 MIME 타입이 application/json인 HTTP응답 몸체를 취득하려면
Response.prototype.json메서드를 사용한다. -
Response.prototype.json메서드는 Response 객체에서 HTTP 응답 몸체를 취득하여 역직렬화 한다. -
ex.)
fetch('https://jsonplaceholder.typicode.com/todos/1')
.then((response) => response.json()) // 1)
.then((json) => console.log(json)) // 2)
// {userId: 1, id: 1, title: 'delectus aut autem', completed: false}
1) response는 HTTP 응답을 나타내는 Response 객체다. json 메서드를 사용해서 Response 객체에서 HTTP 응답 몸체를 취득하여 역직렬화 한다.
2) json은 역직렬화된 HTTP 응답 몸체이다.
fetch() 사용해보기
1. 지역정보 가져오기

- Geolocation.getCurrentPosition() : 현재 위치를 가져온다.
- 성공했을때와 실패했을때의 콜백함수를 전달한다.
function onGeoOk(position) {
  const lat = position.coords.latitude;
  const lon = position.coords.longitude;
  const url = `https://api.openweathermap.org/data/2.5/weather?lat=${lat}&lon=${lon}&appid=${API_KEY}`;
  console.log(url);
  fetch(url);
}
url을 갖게 되었다. fetch를 사용해서 URL을 얻어보자. ▼
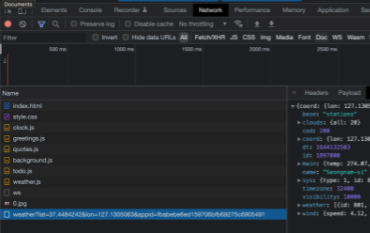
- 자바스크립트가 fetch를 사용해서 URL로 요청을 했다.
- 내가 그냥 console.log(url) 해서 console에 찍힌 url을 직접 눌러 들어갈 필요없이, 즉, 실제로 URL에 갈 필요없이 javascript가 대신 url을 불렀다.
- 오른쪽 Preview는 응답 결과이다. 지역이름이나 날씨를 찾아볼 수 있다. (전부 JSON이다.)
추가적으로 내가 있는 장소의 이름, 날씨를 얻어보자.▼
(1) 얻은 정보를 활용하기
javascript는 url을 불렀고, 정보를 아직 사용하지 않는 상태이다.
→ 이걸 얻었을 때, 자바스크립트에게 무언가를 하라고 말해줘야한다.
(2) fetch
fetch는 promise이다. fetch와 then() 을 사용한다.
→ URL을 fetch하고, 그 다음으로 Response를 받아야한다. 그리고 response의 json을 얻어야한다.
→ 내용을 추출했으면 data를 얻는다.
function onGeoOk(position) {
  const lat = position.coords.latitude;
  const lon = position.coords.longitude;
  const url = `https://api.openweathermap.org/data/2.5/weather?lat=${lat}&lon=${lon}&appid=${API_KEY}&units=metric`;
  fetch(url)
    .then((response) => response.json())
    .then((data) => {
      console.log(data.name, data.weather[0].main);
    });
}
(3) 변수와 함께 원하는 처리하기
function onGeoOk(position) {
  const lat = position.coords.latitude;
  const lon = position.coords.longitude;
  const url = `https://api.openweathermap.org/data/2.5/weather?lat=${lat}&lon=${lon}&appid=${API_KEY}&units=metric`;
  fetch(url)
    .then((response) => response.json())
    .then((data) => {
      const weather = document.querySelector("#weather span:first-child");
      const city = document.querySelector("#weather span:last-child");
      city.innerText = data.name;
      weather.innerText = `${data.main.temp} / ${data.weather[0].main}`;
    });
}

function onGeoError() {
  alert("Can't find you. No weather for you");
}

navigator.geolocation.getCurrentPosition(onGeoOk, onGeoError);
참고) nomadcoders
2. 이미지 가져오기

  <body>
    <img src="" id="stairs" width="300" />

    <!-- js -->
    <script>
      fetch(  // 1)
        "https://images.unsplash.com/photo-1606144330720-7ee2cec6c86b?ixlib=rb-1.2.1&ixid=MnwxMjA3fDB8MHxwaG90by1wYWdlfHx8fGVufDB8fHx8&auto=format&fit=crop&w=627&q=80"
      )
        .then((response) => {
          console.log(response);
          return response.blob();
        })
        .then((blob) => {
          console.log(blob);
          document.getElementById("stairs").src = URL.createObjectURL(blob); // 2)
        })
        .catch((error) => {  // 3)
          console.log("error!");
          console.error(error);
        });
    </script>
  </body>
-
1)
fetch()에 이미지 주소를 넣는다. (img파일을 같은 폴더안에 넣고 stairs.jpeg 로 작성해도 가져올 수 있었다.) -
.then을 통해서 성공적으로 받아온 데이터를 처리한다. -
2) blob으로 들어오는 해당 이미지의 데이터를 가져와서 이미지 Dom요소의 src 속성에 배치한다.
→ blob()이 이미지 Dom요소가 예상하는 형식이 아니므로 작동하지 않는다. -
URL.createObjectURL()
: 주어진 객체(여기서는 blob객체)를 가리키는 URL을 DOMString으로 반환한다. -
3)
.catch를 통해서 오류를 처리한다.
2-1. async / await 적용하기
    <script>
      const imgUrl =
        "https://images.unsplash.com/photo-1606144330720-7ee2cec6c86b?ixlib=rb-1.2.1&ixid=MnwxMjA3fDB8MHxwaG90by1wYWdlfHx8fGVufDB8fHx8&auto=format&fit=crop&w=627&q=80";

      Stairs()
        .then((response) => {
          console.log("hi");
        })
        .catch((error) => {
          console.log("error!");
          console.error(error);
        });

      async function Stairs() {
        const response = await fetch(imgUrl);
        const blob = await response.blob();
        document.getElementById("stairs").src = URL.createObjectURL(blob);
      }
</script>- fetch()는 비동기 함수이므로 await를 추가한다.
- async 함수를 만들고 해당함수를 호출하면 이미지를 얻을 수 있다.
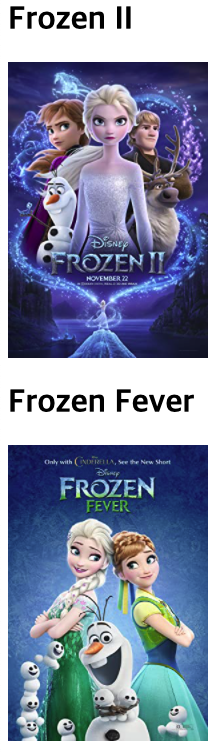
3. 영화정보 가져오기
import axios from "axios"; // 1)

function fetchMovies() {
  axios.get("https://www.omdbapi.com/?apikey=7035c60c&s=frozen").then((res) => {
    const h1El = document.querySelector("#h1_1");
    const imgEl = document.querySelector("#img_1");
    h1El.textContent = res.data.Search[1].Title;
    imgEl.src = res.data.Search[1].Poster;
  });
}
fetchMovies();- 1) axios 활용하기
npm install axios
function fetchMovies1() {
  const url = "https://www.omdbapi.com/?apikey=7035c60c&s=frozen";
  fetch(url)
    .then((res) => {
      console.log("응답 가져오기:", res);
      return res.json();
    })
    .then((data) => {
      console.log(data);
      const title = data.Search[6].Title;
      const poster = data.Search[6].Poster;

      const h1El = document.querySelector("#h1_2");
      const imgEl = document.querySelector("#img_2");
      h1El.innerHTML = title;
      imgEl.src = poster;
    });
}

fetchMovies1();- OMDb API API 주소를 얻는다.
http://www.omdbapi.com/?apikey=[yourkey]&에서 apikey를 넣고 속성 s를 입력, 값은 영화 제목으로 지정한다.- 영화의 title과 poster img 를 가져온다.
4. ISS 위치정보 가져오기
<body>
    <h1>Where is the ISS?</h1>
    <p>latitude: <span id="lat"></span></p>
    <p>longitude: <span id="lon"></span></p>

    <!-- js -->
    <script>
      const issApiUrl = "https://api.wheretheiss.at/v1/satellites/25544";

      async function getIss() {
        const response = await fetch(issApiUrl);
        const data = await response.json();
        const { latitude, longitude } = data;

        document.getElementById("lat").textContent = latitude;
        document.getElementById("lon").textContent = longitude;
      }
      setInterval(getIss, 2000);
    </script>
</body>- ISS(International Space Station, 국제우주정거장) 위도와 경도를 가져와보자.
- 해당 사이트에서 API 주소를 얻는다.
- async와 await를 이용해서 함수를 호출한다.
- 2초마다 업데이트 된 위치를 얻기 위해서
setInterval()메서드를 이용한다.
구조분해 할당(Destructuring Assignment)
ES6 문법중 하나인 구조 분해 할당 을 사용해보자.
예시)
const my = {
  name: "seul",
  age: 10,
  bloodType: "O",
};

const { name } = my;
console.log(name); // seul
const { age } = my;
console.log(age); // 10

const arr = ["a", "b", "c"];
const [first, second, third] = arr;
console.log(first);  // a
console.log(second);  // b
console.log(third);  // c
구조 분해 할당(destructuring assignment)은 어떤 배열이나 객체를 분해해서 내부의 값들을 변수에 할당하는 문법을 말한다.
배열의 원소나, 객체의 프로퍼티 값을 변수에 손쉽게 할당할 수 있는 문법이다.
처음보는 문법이라서 이게 왜 이렇게 표현되지..?🤔 했는데 구글링을 통해 알아보니 구조분해할당 이라고 한다. 일일이 변수를 따로 작성, 인덱스를 지정해서 가져오는 방식보다 훨씬 편해보였다 :)
예시2)
const user1 = {
  name: "seul",
  email: "seul@gmail.com",
  age: 10,
  bloodType: "O",
  // address: "USA",
};

const { name: seul, email, age, bloodType, address = "korea" } = user1;
console.log(name); // seul
console.log(age); // 10
console.log(user1.age); //10
console.log(address); // address값이 없는경우 기본값을 위처럼 지정할 수 있다.
console.log(seul); // 꺼내온 이름을 seul로 활용하겠다고 위처럼 만들어줄 수 있다 (name변수는 존재x)

const fruits1 = ["Apple", "Banana", "Cherry"];
const [v, vv, vvv, vvvv] = fruits1;
console.log(v, vv, vvv, vvvv);

const [, vv] = fruits1; // 1)
console.log(vv);
- 객체는 이름, 배열은 순서대로 추출하는것이 포인트이다.
- 구조분해하는 데이터 타입에 맞게 사용해야한다 (ex 배열의경우
[]) - 1) Banana만 꺼내고 싶을때 변수명 지우고 쉼표는 그대로 작성(순서는 지켜야 하므로)해서 가져올 수 있다.
reference
모던자바스크립트DeepDive
MDN_URL.createObjectURL()
MDN_blob()
구조분해할당
