✍️ 이번 클론코딩은 강의를 들으면서 새로 알게 된 지식이나 복습 및 기억해 두고 싶은 부분 위주로 작성해 보았다.😀
SEO
SEO(Search Engine Optimization) 검색 엔진 최적화
구글이나 네이버 등에 자신의 웹 사이트/페이지를 노출할 수 있도록 정보를 최적화 하는 작업
오픈그래프(The Open Graph protocol)
1. 오픈그래프란?
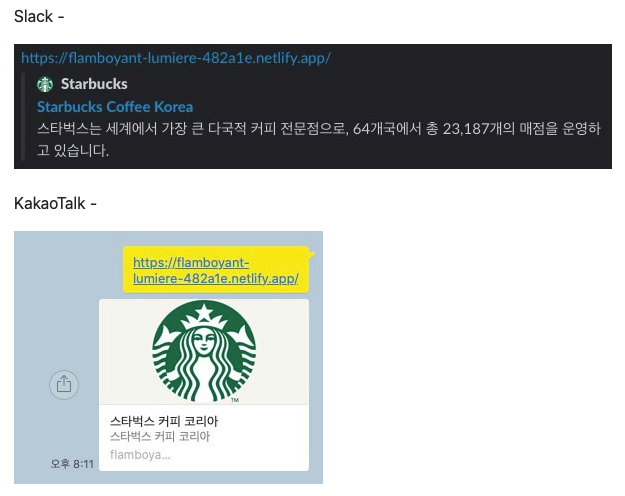
웹페이지가 소셜 미디어(카톡, 페이스북, 슬랙 등)로 공유될 때 우선적으로 활용되는 정보
<meta property="og:type" content="website" />
<meta property="og:site_name" content="Starbucks" />
<meta property="og:title" content="Starbucks Coffee Korea" />
<meta property="og:description" content="스타벅스는 세계에서 가장 큰 다국적 커피 전문점으로, 64개국에서 총 23,187개의 매점을 운영하고 있습니다." />
<meta property="og:image" content="./images/starbucks_seo.jpg" />
<meta property="og:url" content="https://starbucks.co.kr" />og:type: 페이지의 유형(E.g,website,video.movie)og:site_name: 속한 사이트의 이름og:title: 페이지의 이름(제목)og:description: 페이지의 간단한 설명og:image: 페이지의 대표 이미지 주소(URL)og:url: 페이지 주소(URL)
2. 트위터 카드(Twitter Cards)
- 오픈그래프와 비슷한 개념이며 트위터가 제공한다.
- 때에따라 트위터카드의 정보를 오픈그래프보다 우선시 하여 가져와 사용되기도 한다. 두개를 모두 HTML에서 사용해도 된다.
아이콘
구글폰트 아이콘 사용하기
- css링크 가져오기 [참고]
- head 부분에 복사 붙여넣기 ▼
<link rel="stylesheet" href="https://fonts.googleapis.com/icon?family=Material+Icons">- icon 가져오기 [google-fonts]
header
1. href='/'
<a href="/" class="logo">- 로고에 a태그를 이용, 여기서
/를 넣어주면 우리 페이지의 메인페이지(현재 index.html)로 이동한다는 의미로 쓰인다.
2. baseline
<img>태그와 같이 인라인 요소에서는 baseline이 있으므로 불필요한 하단 여백이 생기는 현상이 생길 수 있다.- 해결할 수 있는 방법으로 아래와 같이 태그 속성을 지정할 수 있다.
img { display: block; }3. absolute로 중앙배치하기
header .logo {
  display: flex;
  align-items: center;
}
header .logo {
height: 75px;
position: absolute;
top: 0;
bottom: 0;
margin: auto;
}- 내가 직접짠 코드로는 로고를 가운데 정렬하기 위해서 위와같이 flex를 활용했다.
absolute로 중앙배치 하는 방법
- 부모요소에
relative속성을 추가, logo에서는position속성의absolute를 주고 위치,마진 속성을 추가해서 헤더 영역 안에서 수직 가운데에 배치가 되었다. 이렇게absolute를 활용해서 같은 결과를 낼 수 있었다.🤔
❓ 어떻게 작동되는 원리일까?
margin:auto는 브라우저가 자동으로 값을 계산해야할 때, 요소의 상단과 하단을 측정하기 위해서 요소의 높이값(height)이 얼마인지를 정확하게 알려주어야 한다.- 수직 중앙 배치가 아닌 수평 중앙배치도 마찬가지로
margin:auto와 함께width사이즈를 알려주고,left,right의 기준점을 0으로 입력할 수 있다.
4. javascript:void(0)
<a href="javascript:void(0)">- a태그의 기본동작 대신 자바스크립트를 통해서 void 동작을 시킨다. void는 아무기능이 동작하지 않도록 명령하는 것이다.
- 링크가 준비되지 않았지만 (기능이 동작하지 않고도) 임시적으로 사용할 수 있게된다.
✍️ hash# 만 사용해왔는데, /와 자바스크립트 기능을 넣어서 원하는 결과를 각각 얻을 수 있다는 것을 새롭게 알게 되었다.
5. 가상요소 ::before
header .inner .sub-menu .menu li::before {
  /* 첫번째 요소 앞은 제외하기 */
  content: "";
  /* display: block; */
  width: 1px;
  height: 12px;
  background-color: #e5e5e5;
  position: absolute;
  top: 0;
  bottom: 0;
  margin: auto;
}- 마찬가지로 수직중앙 배치를 위해
height,top,bottom,margin속성을 추가한다. - 대표적으로
position속성의absolute나fixed는 디스플레이 속성이 block으로 바뀌므로display: block생략이 가능하다. - 첫번째 li 태그의 가상요소는 포함하지 않기. ▼
header .inner .sub-menu .menu li:first-child::before {
  display: none;
}
6. input태그 css스타일링
header .inner .sub-menu .search input {
  width: 36px;
  height: 34px;
  padding: 4px 10px;
  border: 1px solid #ccc;
  border-radius: 5px;
  outline: none;
  background-color: #fff;
  color: #777;
  font-size: 12px;
}background-color에서 바탕색상이 기본적으로 흰색으로 지원되지 않는 경우를 위해 직접 명시해준다.color에서 입력시 보여지는 글자 색상을 지정할 수 있다.outlineinput 태그를 클릭했을때(포커스 되었을때) 테두리에 보여지는 기본 속성(파란색박스)을 none으로 지정한다.
header .inner .sub-menu .search input:focus {
  width: 190px;
  border-color: #669900;
}- focus 되었을 때 사용할 속성을 명시한다.
- 이때 위의
input코드에transition: width 0.4s;를 추가해서 자연스러운 애니메이션 효과를 줄 수 있다.
7. HTMLElement.focus()
- 요소가 포커스가 되면 focus 이벤트가 발생한다.
search.addEventListener("click", () => {
  searchInput.focus();
});- addEventListener 에서 클릭 되었을때 input요소가 focus 되도록 한다.
searchInput.addEventListener("focus", () => {});- focus가 되면 뒤의 함수를 실행한다. focus의 반대는 blur이다.
8. hover 속성 추가 위치
header .inner .main-menu .item:hover .item__name {
}- 가장 뒷 부분에 hover를 붙이는 것이 아니고, 그 앞 요소에 붙인다. 즉,
.item에 호버 했을때.item__name이 바뀔 속성을 명시해 준다.
9. position: fixed;
header .inner .main-menu .item .item__contents {
  position: fixed;
  left: 0;
  width: 100%;
}- 여기서 만약 absolute를 사용하면 상위 부모요소를 기준으로 하므로 화면의 뷰포트 좌우의 끝까지 꽉 채울수 없게 되므로 fixed(뷰포트기준)를 사용한다.
10. hover시 드롭다운 메뉴 보이기
header .inner .main-menu .item .item__contents {
  position: fixed;
  left: 0;
  width: 100%;
  display: none;
}

header .inner .main-menu .item:hover .item__contents {
  display: block;
}- 기존 요소에 스타일을 다 지정한 후
display: none으로 평상시 보이지 않도록 설정한다. - 원하는 요소에 마우스를 hover 하면
display:block으로 보이도록 설정하면 된다.😀
11. inner 속성 분리
<li class="item">
  <div class="item__name">COFFEE</div>
  <div class="item__contents">
    <div class="contents__menu">
      <div class="inner">COFFEE</div>
    </div>
    <div class="contents__texture">
      <div class="inner">COFFEE</div>
    </div>
  </div>
</li>
.inner {
position: relative;
width: 1100px;
margin: 0 auto;
}
header > .inner {
height: 120px;
}- (1) html에서 헤더에 사용되었던 inner 스타일링을 필요로 하는 요소가 새롭게 html에 추가될 때, 클래스명을 inner로 넣는다.
- (2) inner css속성을 재사용 하기 위해 전역의 inner와 header에서 따로 사용될 inner에서 추가적인 속성을 줄 수 있다.
12. position: fixed; 주의할 점
header {
  /* position: relative; */
  position: fixed;
  top: 0px;
  width: auto;
  background-color: #f6f5f0;
  border-bottom: 1px solid #c8c8c8;
}- 스크롤이 되어도 요소가 그대로 고정될 수 있도록 position 속성의 fixed를 사용한다.
❗️ 레이아웃이 좌측 상단으로 붙어서 깨지는 것을 확인 할 수 있다. 이유가 무엇일까?
position: relative;→position: fixed;로 변경하면서 뷰포트를 기준으로 배치가 되기 때문에 헤더라는 요소의 기본값width:auto를 통해 브라우저가 자동으로 요소의 가로너비가 최소한으로 줄어들게 된다.
(block요소의 가로는 최대한으로 늘어나려고 하는데 이와 반대된다.)
fixed와 avsolute의 경우 이러한 특징이 있으므로 주의하자.
→ 기본값width:auto대신width: 100%;를 사용하면 해결 할 수 있다.
badge
1. 이미지와 overflow
header .badges .badge {
  border-radius: 10px;
  overflow: hidden;
  margin-bottom: 12px;
}- 현재 html에서는 badge 클래스 안에
<img>태그가 있고, 이미지 경로가 지정되어 있는 상태이다. - 여기서 위의 태그가 아닌
header .badges .badge img안에서 border-radius 값을 지정해야 속성이 적용되는 줄 알았는데, 위의 코드처럼 border-radius값을 주고 현재 이미지가 넘쳐있는 상태를 조정해 주는 overflow 속성을 같이 부여해주면 같은 결과를 얻을 수 있다는 것을 알았다.👍
2. js와 라이브러리
rodash 라이브러리를 스크립트로 연결한다.
_.throttle()라는 메소드는 화면에 스크롤시 필요한 작업을 수행할때 많이 사용된다.- 화면이 스크롤될때 실행되는 함수의 개수를 일정시간에 한번씩만 실행되도록 제한을 둔다.
- 첫번째 인수로는 함수, 두번째 인수로는 함수 실행간격에 대한 시간을 ms단위로 지정한다.
gsap 라이브러리를 스크립트로 연결한다.
- 애니메이션
gsap.to()gasp에서 제공하는 애니메이션 처리방법 중 to()라는 메소드의 기능을 사용한다.- 첫번째 인수로는 애니메이션 처리를 할 요소를 명시한다. 두번째 인수로는 지속시간, 세번째 인수로은 옵션을 추가한다.
const badgeEl = document.querySelector("header .badges");

window.addEventListener(
  "scroll",
  _.throttle(() => {
    console.log(window.scrollY);
    if (window.scrollY > 500) {

      gsap.to(badgeEl, 0.6, {
        opacity: 0,
        display: "none", // 문자데이터를 필요로하는 값에는 문자데이터로 입력되어야 한다.
      });
      //(1) badgeEl.style.display = "none";
    } else {
      gsap.to(badgeEl, 0.6, {
        opacity: 1,
        display: "block",
      });
      //(2) badgeEl.style.display = "block";
    }
  }, 300)
);- (1),(2) 같은 경우 요소가 뚝뚝끊기는 느낌을 받는다. 애니메이션 처리를 도와주는 라이브러리를 사용한다.
- opacity로 숫자 값을 사용하여 요소를 나타나게 하고 사라지게 하는 애니메이션을 적용시킨다면, display 속성으로 요소를 아예 존재하지 않도록 지정할 수 있다. 보이지 않는 영역이 선택되는 것을 방지하기 위함이라고 알고있다. 🤔
document.addEventListener("scroll", () => {
  if (window.scrollY > 300) {
    badgeEl.classList.add("hide");
  } else {
    badgeEl.classList.remove("hide");
  }
});
✍️ 라이브러리를 이용하기전, 순수 js로 classList를 이용해서 요소를 보이게 하거나 감추는 코드를 작성했는데, 여전히 보이지 않아도 클릭이 되어서 display 속성값도 none으로 지정했다. 하지만 그 이후 위와같은 이유로 애니메이션이 동작하지는 않았다.
(라이브러리를 사용해서 두 가지 기능을 손쉽게 사용할 수 있다는 것을 알았다.)
header .badges.hide {
  opacity: 0;
}
✍️ css에서 주의할 것은 .visible 앞에 공간을 두지 않고 붙여서 써야한다.

기억보단 기록을 ✨