
포스트 목적 소개
프로젝트 개발을 위해서 NextJS + Typescript + Emotion 기반 템플릿을 만들면서 이에 대한 설명을 다룬 내용들을 공유하기 위해 이 포스트를 올립니다.
해당 포스트의 코드는 아래 레포지토리를 참고해주세요.
템플릿 기능 소개
본 템플릿은 아래의 기술 스택들을 포함하고 있습니다.
NextJSTypeScriptESLint & Prettier(저장 시 포맷 자동 적용 + Google 스타일 가이드 반영)Husky(커밋 전 포맷 체크)EmotionStylelint- 본 포스트에서 다뤘으나 코드에는 반영되지 않았습니다.
NextJS App 생성
$ npx create-next-app code-like-google 실행
$ cd code-like-google 실행
$ code . 실행
api 폴더 제거
app.js 제거
💎 TypeScript 적용(Google TS Guide 적용)
tsconfig.json 라는 이름의 빈 파일을 프로젝트에 생성
$ npm install --save-dev @types/react @types/node 실행
$ npm run dev 실행
자동으로 채워진 tsconfig.json 대신 아래의 내용으로 변경 (Google Style Guide 적용)
{
"compilerOptions": {
    "allowJs": true,
    "allowUnreachableCode": false,
    "allowUnusedLabels": false,
    "declaration": true,
    "esModuleInterop": true,
    "forceConsistentCasingInFileNames": true,
    "isolatedModules": true,
    "jsx": "preserve",
    "lib": ["dom", "dom.iterable", "esnext"],
    "module": "esnext",
    "moduleResolution": "node",
    "noEmit": true,
    "noFallthroughCasesInSwitch": true,
    "noImplicitReturns": true,
    "pretty": true,
    "resolveJsonModule": true,
    "skipLibCheck": true,
    "sourceMap": true,
    "strict": true,
    "target": "es2018"
  },
  "include": ["next-env.d.ts", "**/*.ts", "**/*.tsx"],
  "exclude": ["node_modules"]
}
🟣 ESLint 적용
ESLint statically analyzes your code to quickly find problems. Many problems ESLint finds can be automatically fixed. ESLint fixes are syntax-aware so you won't experience errors introduced by traditional find-and-replace algorithms.
ESLint 에 설정해둔 사항이 알아서 수정되도록 이후 부분에서 설정할 것임
npm install eslint --save-dev 실행
npx eslint --init
- 아래와 같이 질문들에 대해 답변 선택 (Google 방식 대로 eslint 적용)
    # Interactive
    ? How would you like to use ESLint? ...
    > To check syntax, find problems, and enforce code style

    ? What type of modules does your project use? ...
    > JavaScript modules (import/export)

    ? Which framework does your project use? ...
    > React

    ? Does your project use TypeScript? » Yes

    ? Where does your code run? ...
    √ Browser

    ? How would you like to define a style for your project? ...
    > Use a popular style guide

    ? Which style guide do you want to follow? ...
    > Google: https://github.com/google/eslint-config-google

    ? What format do you want your config file to be in? ...
    > JavaScript

    eslint-plugin-react@latest @typescript-eslint/eslint-plugin@latest eslint-config-google@latest eslint@>=5.16.0 @typescript-eslint/parser@latest
? Would you like to install them now with npm? » Yes.eslintrc.json제거
.eslintrc.js를 아래와 같이 수정
    module.exports = {
      "env": {
        "browser": true,
        "es2021": true,
      },
      "extends": [
        "plugin:react/recommended",
        "google",
        "next/core-web-vitals", // next에서 제공; 이게 없으면 모든 파일에 React 모듈을 import 해야됨
      ],
      "parser": "@typescript-eslint/parser",
      "parserOptions": {
        "ecmaFeatures": {
          "jsx": true,
        },
        "ecmaVersion": "latest",
        "sourceType": "module",
      },
      "plugins": [
        "react",
        "@typescript-eslint",
      ],
      "rules": {
        "require-jsdoc": "off", // Google Guide로 인해 강제된 jsdoc 옵션 해제
        "quotes": ["error", "double"], // 문자열 들을 쌍따옴표로 감싸도록 강제
      },
    };
여기서 index.tsx 상에서 에러가 생기고 있다면, eslint가 잘 적용되고 있는 것
이후 index.tsx 에서 세미콜론이나 쌍따옴표가 없어 발생하는 에러를 없앤 뒤, $npm run dev 실행 확인
🔴 Prettier 적용하기
It removes all original styling and ensures that all outputted code conforms to a consistent style.
$ npm install --save-dev --save-exact prettier
여기서 —save-exact는 package.json에 정확한 버전(^4.0.0 말고 4.0.0 과 같은 형태로 설치)으로 prettier 설치 한다는 의미
$ npm install --save-dev eslint-config-prettier 실행
eslint-config-prettier 는 eslint와 prettier의 충돌을 막기 위해 설치
eslintrc.js 중 extends 항목에 prettier를 추가하도록 다음과 같이 수정
extends: ["plugin:react/recommended", "google", "prettier"],.prettierrc 파일 생성 후 다음의 내용으로 채우기(필요한 옵션들은 찾아서 알아서 추가하기)
{
    "printWidth": 100,
    "semi": true,
    "singleQuote": false,
    "tabWidth": 2,
    "trailingComma": "es5"
}
⚠️ prettier 일부 옵션들은 eslint에서 설정한 옵션들과 충돌할 수 있으니 주의할 것.
ex) Google Style에서는 semi 콜론을 강제하고 있으므로, prettier에서 semi를 false 로 할 경우 충돌 날 수 있음
.prettierignore 와 .eslintignore를 추가하고 아래의 내용을 적용하기
.next
next-env.d.ts
node_modules
yarn.lock
package-lock.json
public
다음의 항목들은 prettier와 eslint의 규칙들을 적용 받지 않음.
🆚 VSCode Extension 설치하기(ESLint, Prettier)
다음의 두 Extension을 설치 한 뒤, VSCode를 껏다가 다시 켜기
📎 저장 시 Format 자동 적용 설정하기
프로젝트 루트 경로에 .vscode 추가하기
.vscode 폴더 안에 settings.json 파일 생성 후 아래의 내용으로 작성
{
    "editor.formatOnPaste": true,
    "editor.formatOnSave": true,
    "editor.defaultFormatter": "esbenp.prettier-vscode",
    "editor.codeActionsOnSave": {
        "source.fixAll.eslint": true,
        "source.fixAll.format": true
    }
}
잘 적용된다면 포맷 적용 안된 파일을 저장할 시 아래처럼 prettier 에서 설정한 포맷에 맞게 자동 수정됨
🦊 Husky
Husky는 commit 이나 push 와 같은 Git 명령어를 시도할때 사용자가 설정한 규칙을 잘 지켰는지 확인하는 역할을 한다.
husky 초기화
아래 예시의 설정에서는 다음의 사항들을 확인한다.
- Code 상에
Prettier관련 경고 사항들은 없는지 확인한다. - Code 상에
ESLint관련 경고 사항들은 없는지 확인한다. - Code 상에
TypeScript로 컴파일 시 관련 에러는 없는지 확인한다. next build를 통해 프로젝트 빌드시 정상적으로 되는지 확인한다.
package.json 이 존재하는 곳에서 다음의 명령어를 실행하여 husky 관련 설정을 초기화 한다.
npm install husky --save-dev이렇게하게 되면 package.json에는 아래의 명령어 스크립트가 생성될 것이다.
{
	"scripts" : {
		"prepare" : "husky install",
		...
	},
	...
}
이후엔 아래 명령어를 실행하여 husky 관련 초기화를 진행한다.
npm run prepare위와 같이 했을 때 오류가 발생한 경우
간혹 하나의 프로젝트에서 frontend 와 backend 로 나누어지고 package.json 역시 폴더별로 따로 관리되는 경우가 있다.
```bash
│
├── frontend                     # 프론트엔드 폴더
│
├── backend                      # 백엔드 폴더
│
└── .git                         # git 관련 파일
```
이 때문에 /frontend 나 /backend 디렉토리로 이동해 npm install husky -—save-dev 를 실행했을 것이다. 이때 에러가 발생하게 될텐데 이는 husky 가 git과 연동되기 위해서는 .git 폴더와 같은 디렉토리 안에서 초기화 되어야 하기 때문이다. 따라서 앞서 생성된 package.json 의 명령어를 다음의 명령어로 변경해 주어야 한다.
 {
   // .git가 있는 root 디렉토리로 이동후 실행
   "prepare": "cd .." && husky install
 },
한편 위와 같이 frontend 와 backend 가 나뉘어져 있는 프로젝트의 경우라면 적용해야될 husky 작업이 다를 것이다. 이처럼 디렉토리 별로 다른 husky 를 생성하려면 한번 더 변형이 필요하다. 가령 frontend 만을 위한 husky 를 생성하려면 아래의 명령어로 바꾸면 된다.
{
	"prepare": "cd .." && husky install frontend/.husky
}
이는 frontend 의 폴더에만 husky를 초기화하겠다는 의미이다. 이렇게 수정해 준 뒤 npm run prepare 를 실행하면 정상적으로 초기화 된다.
Husky와 연동할 명령어 작성
husky 와 연동해서 사용할 명령어를 생성하기 위해 package.json의 scripts를 아래와 같이 수정한다.
"scripts": {
    "dev": "next dev",
    "build": "next build",
    "start": "next start",
    "check-types": "tsc --pretty --noEmit",
    "check-format": "prettier --check .",
    "check-lint": "eslint . --ext ts --ext tsx --ext js",
    "format": "prettier --write .",
    "test-all": "npm run check-format && npm run check-lint && npm run check-types && npm run build",
    "prepare": "husky install"
},-
check-types: 타입스크립트의[tsc](https://www.typescriptlang.org/docs/handbook/compiler-options.html)CLI 명령어를 실행한 뒤 그 결과 존재하는 warnings/errors를 출력한다. -
check-format:Prettier로 하여금 모든 파일에서.prettierrc에서 명시한 규칙들이 잘 적용되었는지 확인하도록 한다. (단,.prettierignore에 명시된 파일 이름들은 제외)
check-lint:ESLint로 하여금 Linting과 관련된 에러나 경고들을 표시한다.format:Prettier로 하여금 자동으로 포맷팅을 적용하도록 함.test-all: 위에서 명시했던 모든 명령어들을 실행하도록 한다.**prepare**는 husky 관련 설정들이 Git hooks에 연동하도록 함.
Git-hook 작성하기
이러한 명령어들이 Git 의 명령어와 연동하도록 작성하는 것이 Hook이다. 작성할 수 있는 Hook들은 아래와 같다.
| 분류 | 훅 | 설명 |
|---|---|---|
| 커밋 워크플로우 훅 | pre-commit | commit을 실행하기 전에 실행 |
| prepare-commit-msg | commit 메시지를 생성하고 편집기를 생성하기 전에 실행 | |
| commit-msg | commit 메시지를 완성한 후 commit을 완료하기 전에 실행 | |
| post-commit | commit을 완료한 후 실행 | |
| 기타 훅 | pre-rebase | rebase 하기 전에 실행 |
| post-rewrite | git commit -amend, git rebase 와 같이 커밋을 변경하는 명령을 실행한 후 실행 | |
| post-merge | Merge가 끝나고 나서 실행 | |
| pre-push | git push 명령 실행 시 동작하며 리모트 정보를 업데이트하고 난 후 리모트로 데이터를 전송하기 전에 실행. push를 중단 시킬 수 있음. |
가령 Commit 이전에 특정 명령어들이 연동되도록 pre-commit 훅을 생성할 수 있다. 또한 Push 이전에 특정 명령어들이 실행되어 모두 만족할때에만 push 가 이뤄지도록 구성할 수 있다.
pre-commit 훅 작성 예시
.husky 폴더 안에 pre-commit 이란 파일을 생성한다. 이후 해당 파일에 연동할 명령어와 실패시 실행할 명령어들을 작성한다. 참고로 일반적인 명령어 형식은 아래와 같다.
npm run format || # hook과 연동할 명령어
(
	echo 'Failure of formatting' # 실패 시 띄울 메세지
	false;
)
아래는 pre-commit 훅을 작성하는 예시이다. 아래와 같이 작성할 경우 commit 이루어지기 전에 formatting, linting, type checking, build 를 진행한다.
#!/bin/sh
. "$(dirname "$0")/_/husky.sh" # 이부분을 파일 앞에 붙여주는게 필요하다(아마도?)

echo '🏗️👷 Styling, testing and building your project before committing'

# Check Prettier standards
npm run check-format ||
(
    echo '🤢🤮🤢🤮 Its F**KING RAW - Your styling looks disgusting. 🤢🤮🤢🤮
            Prettier Check Failed. Run npm run format, add changes and try commit again.';
    false;
)

# Check ESLint Standards
npm run check-lint ||
(
        echo '😤🏀👋😤 Get that weak s**t out of here! 😤🏀👋😤
                ESLint Check Failed. Make the required changes listed above, add changes and try to commit again.'
        false;
)

# Check tsconfig standards
npm run check-types ||
(
    echo '🤡😂❌🤡 Failed Type check. 🤡😂❌🤡
            Are you seriously trying to write that? Make the changes required above.'
    false;
)

# If everything passes... Now we can commit
echo '🤔🤔🤔🤔... Alright... Code looks good to me... Trying to build now. 🤔🤔🤔🤔'

npm run build ||
(
    echo '❌👷🔨❌ Better call Bob... Because your build failed ❌👷🔨❌
            Next build failed: View the errors above to see why.
    '
    false;
)

# If everything passes... Now we can commit
echo '✅✅✅✅ You win this time... I am committing this now. ✅✅✅✅'Hook을 작성했는데 git 명령어와 연동이 안되는 경우
이는 pre-commit 이라는 파일에 실행권한이 없어서 git 명령어가 실행됐음에도 같이 실행되지 않는 경우일 것이다.
$ ls -al .husky

total 8
drwxr-xr-x   4 yangseungchan  staff  128 10 26 20:01 .
drwxr-xr-x  16 yangseungchan  staff  512 10 26 19:57 ..
drwxr-xr-x   4 yangseungchan  staff  128 10 26 19:57 _
-rw-r--r--   1 yangseungchan  staff  157 10 26 20:08 pre-commit # 실행 권한이 빠져있다.
이를 해결하기 위해서는 아래의 명령어를 실행하여 .husky 폴더 내 파일들이 실행 권한을 갖도록 해야한다.
$ chmod ug+x .husky/*실행 시 다음과 같은 결과가 나올 것이다.
1) 정상적인 경우
$ git commit -m "[Add] Husky setting"
🏗️👷 Styling, testing and building your project before committing

> next-ts-plate@0.1.0 check-format
> prettier --check .

Checking formatting...
All matched files use Prettier code style!

> next-ts-plate@0.1.0 check-lint
> eslint . --ext ts --ext tsx --ext js

> next-ts-plate@0.1.0 check-types
> tsc --pretty --noEmit

🤔🤔🤔🤔... Alright... Code looks good to me... Trying to build now. 🤔🤔🤔🤔

> next-ts-plate@0.1.0 build
> next build

info  - Checking validity of types
info  - Creating an optimized production build
info  - Compiled successfully
info  - Collecting page data
info  - Generating static pages (3/3)
info  - Finalizing page optimization

Page                                       Size     First Load JS
┌ ○ /                                      6.26 kB        82.1 kB
├   └ css/955229c28454e75a.css             668 B
└ ○ /404                                   193 B            76 kB
+ First Load JS shared by all              75.8 kB
  ├ chunks/framework-1f10003e17636e37.js   45 kB
  ├ chunks/main-fc7d2f0e2098927e.js        28.7 kB
  ├ chunks/pages/_app-02d0f4839caa4a8e.js  1.36 kB
  └ chunks/webpack-69bfa6990bb9e155.js     769 B

○  (Static)  automatically rendered as static HTML (uses no initial props)

✅✅✅✅ You win this time... I am committing this now. ✅✅✅✅
[main e85d3dd] [Add] Husky setting
 10 files changed, 112 insertions(+), 58 deletions(-)
 rewrite .eslintrc.js (87%)
 create mode 100755 .husky/pre-commit
2) 에러가 발생하는 경우
🏗️👷 Styling, testing and building your project before committing

> next-ts-plate@0.1.0 check-format
> prettier --check .

Checking formatting...
All matched files use Prettier code style!

> next-ts-plate@0.1.0 check-lint
> eslint . --ext ts --ext tsx --ext js

/Users/yangseungchan/Desktop/SCG/next-ts-plate/pages/index.tsx
  2:8  error  'styles' is defined but never used  no-unused-vars

✖ 1 problem (1 error, 0 warnings)

😤🏀👋😤 Get that weak s**t out of here! 😤🏀👋😤
                ESLint Check Failed. Make the required changes listed above, add changes and try to commit again.
husky - pre-commit hook exited with code 1 (error)
😃 Emotion 적용(SWC 기반) + _app.tsx 생성
1. Emotion 설치 및 Global CSS 적용하기
Emotion은 css-in-js기반으로 css를 적용하는 라이브러리 입니다. 이전에는 SSR이 지원되지 않아 babel 설정이 필요했지만, v10부터 SSR이 지원되어 설정이 따로 필요없어졌다.
To use emotion’s SSR with Next.js you need a custom
Documentcomponent inpages/_document.jsthat renders the styles and inserts them into the<head>.
An example of Next.js with emotion can be found in the Next.js repo
This only applies if you’re using vanilla Emotion or a version of Emotion prior to v10. For v10 and above, SSR just works in Next.js.
아래의 명령어를 실행하여emotion 관련 모듈을 설치한다.
npm i --save @emotion/styled @emotion/reactemotion연동을 위해 next.config.js 을 아래와 같이 수정한다.
const nextConfig = {
  reactStrictMode: true,
  compiler: {
    emotion: true,
  },
};

module.exports = nextConfig;
Emotion 은 전역스타일링을 지원한다. 아래의 코드를 작성하여 Emotion 을 이용해 전역 스타일링 컴포넌트를 생성해 줄 수 있다. 전역 스타일도 적용하고, css-in-js 방식으로 적용하기 위해 아래와 같이 수정한다.
- styles/global.tsx
import { css, Global } from "@emotion/react";

export const globalStyles = (
  <Global
    styles={css`
      html,
      body {
        padding: 0;
        margin: 0;
        font-family: -apple-system, BlinkMacSystemFont, Segoe UI, Roboto, Oxygen, Ubuntu, Cantarell,
          Fira Sans, Droid Sans, Helvetica Neue, sans-serif;
      }

      a {
        color: inherit;
        text-decoration: none;
      }

      * {
        box-sizing: border-box;
      }
    `}
  />
);- styles/home.tsx
import styled from "@emotion/styled";

export const Container = styled.div`
  min-height: 100vh;
  padding: 0 0.5rem;
  display: flex;
  flex-direction: column;
  justify-content: center;
  align-items: center;
  height: 100vh;
`;- styles내의 css 파일들은 제거하기
- pages/_app.tsx
import createCache from "@emotion/cache";
import { CacheProvider } from "@emotion/react";
import { AppProps } from "next/app";

import { globalStyles } from "../styles/global";

const cache = createCache({ key: "next" });

const App = ({ Component, pageProps }: AppProps) => (
  <CacheProvider value={cache}>
    {globalStyles}
    <Component {...pageProps} />
  </CacheProvider>
);

export default App;- pages/index.tsx
import Head from "next/head";
import { Container } from "../styles/home";

export default function Home() {
  return (
    <Container>
      <Head>
        <title>Create Next App</title>
        <meta name="description" content="Generated by create next app" />
        <link rel="icon" href="/favicon.ico" />
      </Head>
      Next TypeScript Template
    </Container>
  );
}
2. Emotion 기반 Theme 주입하기
이외에도 일부 css 공통 요소들을 Theme화 할 수도 있다. 아래의 코드를 작성하여 Theme를 생성해주도록 한다.
- styles/theme.tsx
import { Theme } from "@emotion/react";

const theme: Theme = {
  colors: {
    primiary: "hotpink",
  },
};

export default theme;
_app.tsx가 프로젝트의 진입점이기 때문에 Theme를 하위 컴포넌트나 페이지에서 사용할 수 있도록 Provider를 부여하기 위해 아래와 같이 해당 파일을 수정해준다.
- pages/_app.tsx
import createCache from "@emotion/cache";
import { CacheProvider, ThemeProvider } from "@emotion/react";
import { AppProps } from "next/app";

import { globalStyles } from "../styles/global";
import theme from "../styles/theme"; // 추가

const cache = createCache({ key: "next" });

const App = ({ Component, pageProps }: AppProps) => (
  <CacheProvider value={cache}>
    <ThemeProvider theme={theme}>
      {globalStyles}
      <Component {...pageProps} />
    </ThemeProvider>
  </CacheProvider>
);

export default App;
주요 색상이 hotpink 인 테마를 제공하였으니 적용을 해보도록 할 것이다.
Title 이라는 컴포넌트를 생성해 주어 Theme를 적용해 볼 것이다. 컴포넌트를 만들때에는 컴포넌트의 리액트 로직과 CSS로직을 코드상에서 분리시켜 놓기 위해 아래와 같은 패턴으로 컴포넌트를 만들어줄 것이다.
index.tsx에는 리액트 로직의 내용이 들어가게 되고 styles.tsx에는 css 로직들이 들어가게 될것이다.
기존에 pages/index.tsx 에서 Next TypeScript Template 라는 글자를 Title 라는 컴포넌트로 만들것이다. 아래와 같이 코드를 추가해준다.
- styles/theme.tsx - Theme 선언하기
import { Theme } from "@emotion/react";

const theme: Theme = {
  colors: {
    primary: "hotpink",
  },
};

export default theme;
다만, 현재 프로젝트는 타입스크립트 기반이므로, Theme 객체의 타입을 사용자가 정의해주어야 한다. 그렇지 않으면 Theme에 어떤 속성이 있는지 타입스크립트는 이해하지 못한다. 따라서, 다음과 같이 프로젝트 루트 디렉토리에 Theme 객체에 어떤 속성이 있는지 부여해준다.
- emotion.d.ts
/* Theme 타입 설정 파일 */

import "@emotion/react";

declare module "@emotion/react" {
  export interface Theme {
    colors: {
      primary: string;
    };
  }
}
Theme에 속성을 추가적으로 부여하고 싶다면, emotion.d.ts 파일과 styles/theme.tsx 에 모두 해당 속성을 추가해 주어야 한다.
이제 선언된 테마를 적용해보기 위해 Title이라는 컴포넌트를 완성시키고 시작페이지에 렌더링할 것 이다. 아래의 코드를 따라해보자.
- components/Title/styles.tsx - 색상이 primary인 h1 컴포넌트
import styled from "@emotion/styled";

export const TitleText = styled.h1`
  color: ${(props) => props.theme.colors.primary};
`;- components/Title/index.tsx - title이 prop인 컴포넌트
import { TitleText } from "./styles";

interface TitleProps {
  title: string;
}

const Title = ({ title }: TitleProps) => {
  return <TitleText>{title}</TitleText>;
};

export default Title;- pages/index.tsx - Title 컴포넌트 렌더링
import Head from "next/head";
import Title from "../components/Title";
import { Container } from "../styles/home";
export default function Home() {
return (
<Container>
<Head>
<title>Create Next App</title>
<meta name="description" content="Generated by create next app" />
<link rel="icon" href="/favicon.ico" />
</Head>
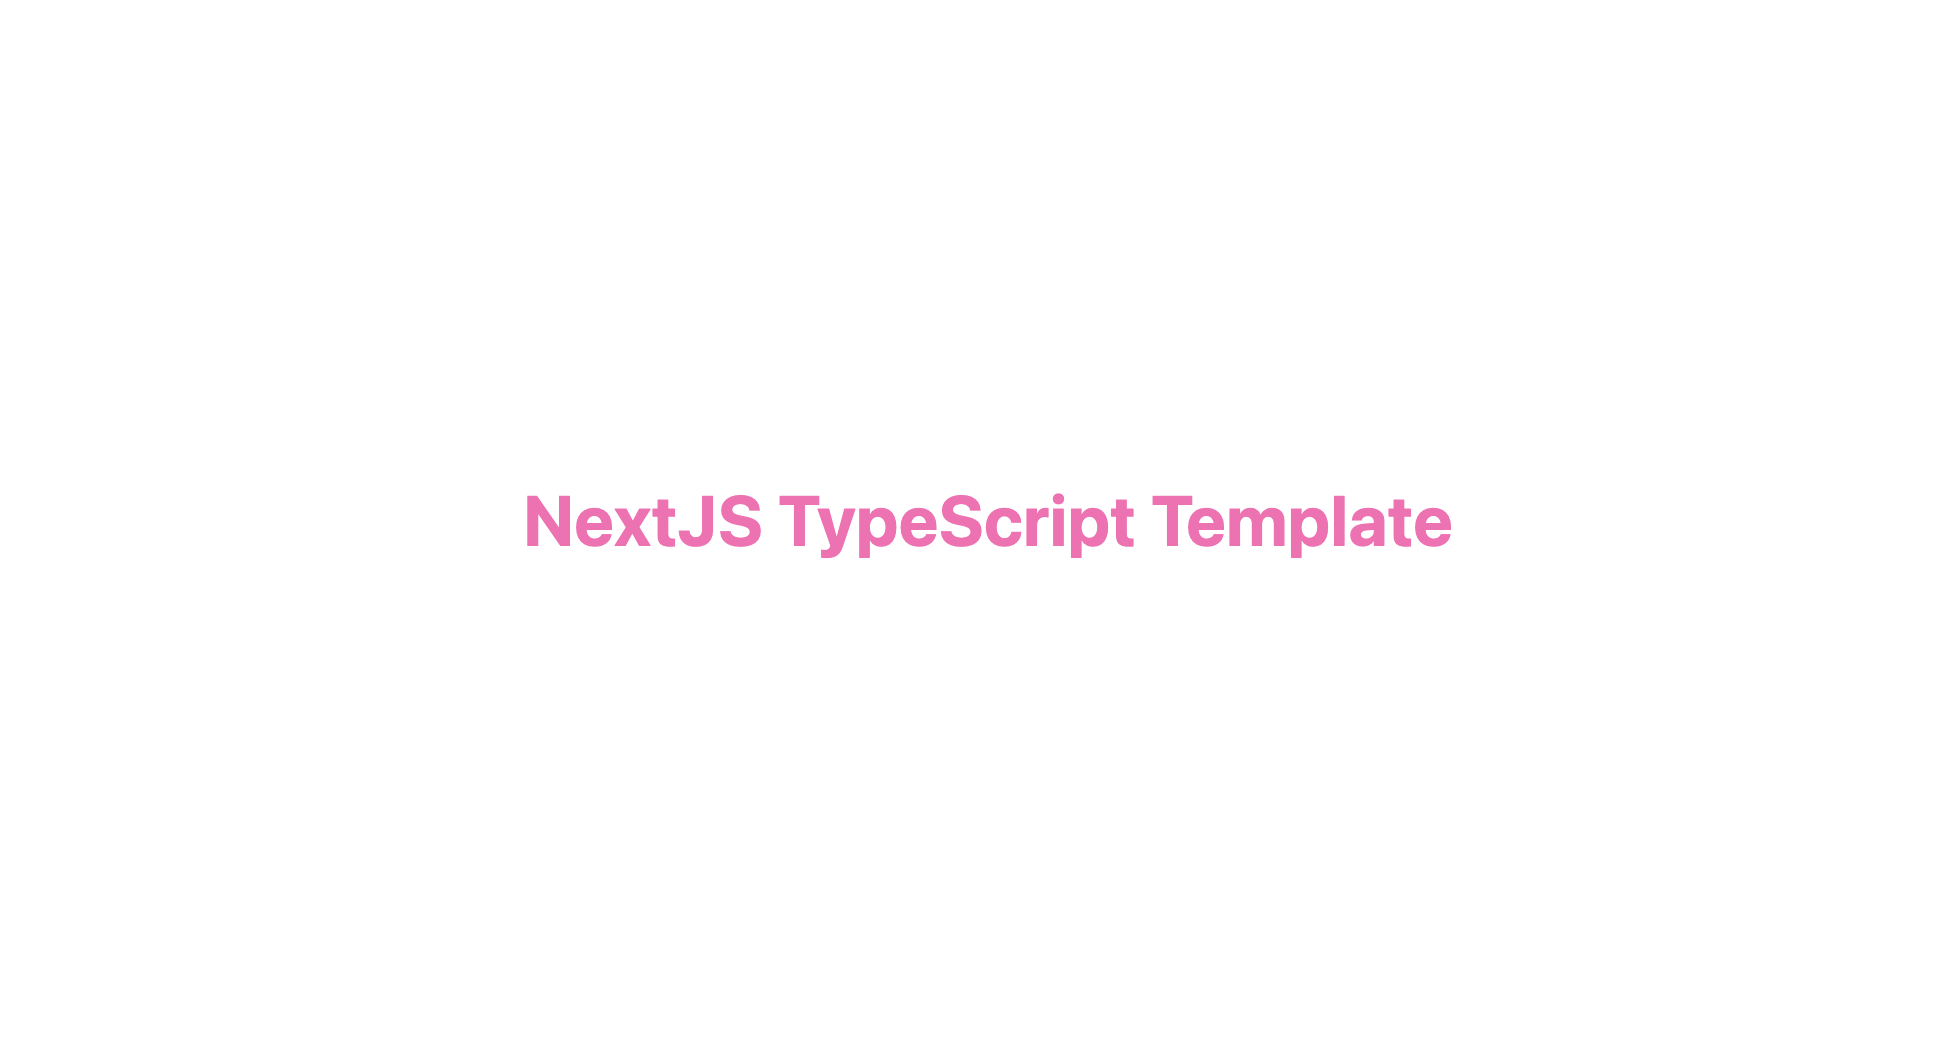
<Title title="NextJS TypeScript Template" />
</Container>
);
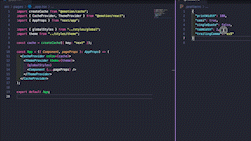
}결과는 다음과 같다.
또한 emotion의 css props 기능을 사용하려면 tsconfig.json을 아래와같이 수정해주어야 한다.
{
  "compilerOptions": {
    ...
    "jsxImportSource": "@emotion/react",
	...
  },
  "include": ["next-env.d.ts", "**/*.ts", "**/*.tsx"],
  "exclude": ["node_modules"]
}
🌟Stylelint 적용하기 - 권장x, 코드에 없음
Stylelint를 emotion과 같은 css-in-js 환경에서 사용하기 위해 사용되는 @stylelint/postcss-css-in-js가 depreceated 되면서, css-in-js에서는 Stylelint를 사용하기 매우 까다로워졌다. 특히나, 자동 Fix 기능이 적용되지 않기 때문에, css에 통일된 규칙을 적용하고 싶은 경우에만 추가하는 것이 좋겠다.
앞서 🆚 VSCode Extension 설치하기(ESLint, Prettier) 에서 포맷팅을 적용하였지만, 이는 타입스크립트를 위한 포맷터라 내재된 emtion에 내재된 css코드는 포맷이 일정하지 않을 수 있다. 따라서 css코드의 포맷팅이 따로 필요하다. Stylelint는 css 정적 분석 도구 중 하나로 css 코드의 포맷팅을 지원한다.
우선 필요한 모듈들을 아래의 명령어를 실행해 설치한다.
npm install --save-dev stylelint stylelint-config-standard stylelint-config-prettier postcss-syntax @stylelint/postcss-css-in-js설치한 모듈들이 어떤 기능을 하는지 살펴보면 다음과 같다.
stylelint: stylelint를 사용하기 위한 기본 모듈stylelint-config-standard: stylelint에서 제시한 규칙들 중 일부를 모아 적용해 놓은 써드파티 모듈이다. 기본적으로 설정되있는 규칙들은 이곳을 참고할 것.stylelint-config-prettier: 포맷팅 시 stylelint 규칙과 prettier 규칙이 충돌하지 않도록 방지해주는 모듈이다.postcss-syntax,@stylelint/postcss-css-in-js: css-in-js 모듈에서 stylelint가 작동하도록 하는 모듈이다.
이후에는 루트 디렉토리에 .stylelintrc.js 라는 파일을 생성해 다음의 내용을 채워준다.
module.exports = {
  extends: ["stylelint-config-standard", "stylelint-config-prettier"],
  overrides: [
    {
      files: ["**/*.tsx"],
      customSyntax: "@stylelint/postcss-css-in-js",
    },
  ],
};
이후 작동되는지 확인하기 위해 package.json의 script를 다음과 같이 수정하고 실행해본다.
...
"scripts": {
	"lint-css": "stylelint --ignore-path .gitignore '**/*.(css|tsx)'",
}
...
이처럼 stylelint에 의해서 css 코드 내에 규칙에 맞지 않는 것들을 지적해 내는 것을 확인할 수 있다. 다만, function-no-unknown 의 규칙의 경우 emotion의 코드방식과 충돌하는 것이므로 불필요한 규칙에 해당한다. 이처럼, 자신에게 불필요한 규칙은 없애거나 필요한 규칙은 추가해줄 수 있다. 다음과 같이 말이다.
- .stylelintrc.js
module.exports = {
  extends: ["stylelint-config-standard", "stylelint-config-prettier"],
  overrides: [
    {
      files: ["**/*.tsx"],
      customSyntax: "@stylelint/postcss-css-in-js",
    },
  ],
  rules: {
    "function-no-unknown": null, // emotion styled와 충돌나서 배제
    "color-hex-length": "long", // 16진수 색상에 대해 표기법 지정
    "unit-allowed-list": ["em", "rem", "vh", "vw"], // 사용가능한 단위 특정하기
  },
};
참고로, stylelint가 알아서 잘못된 내용들을 수정하기 원할텐데 이 경우 다음의 명령어를 사용하면 된다.
npm run lint-css --fix다만, AutoFix 기능은 극히 일부 규칙(Autofixable로 명시된 규칙)만 적용된다고 한다. 그래서 자동으로 고쳐주는 부분은 eslint나 prettier 만큼은 효과적이지 못하다. 공식 문서를 참고해 규칙들을 확인하며 적절히 커스텀하여 사용해야 한다.
🗂 폴더 구조 정리 및 import 개선
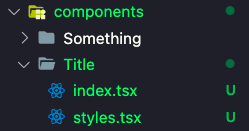
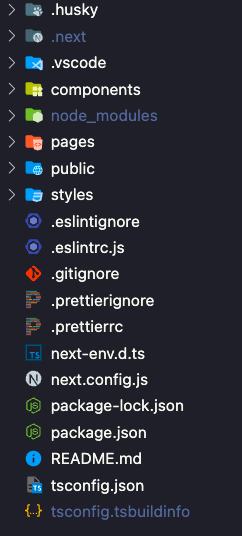
현재 프로젝트의 디렉토리 구조는 다음과 같이 되어있다.
이러한 상황에서 특정 컴포넌트나 파일을 import 해야하면 다음과 같은 상대경로를 작성해야 한다.
import Head from "next/head";
import Title from "../components/Title";
import { Container } from "../styles/home";
여기서 개선할 여지가 있는 두가지 문제점이 있다.
1. 프로젝트 구조가 너무 복잡하여 가독성이 떨어진다.
2. import 시 상대경로를 사용하여 역시 가독성이 떨어진다. (현재는 단순하지만 경로가 복잡해지면, import경로가 굉장히 보기 싫어진다)
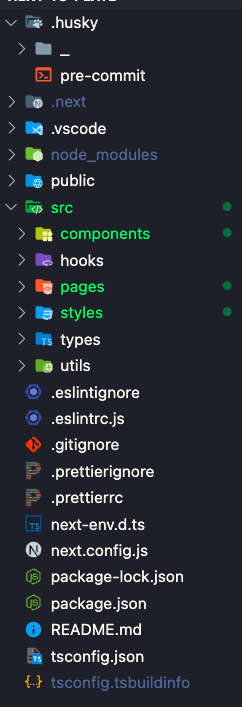
이를 해결하기 위해 디렉토리 구조를 다음과 같이 수정할 것이다.
수정한 디렉토리 구조를 바탕으로, import 시 상대경로 대신 절대경로를 사용하도록 다음과 같이 tsconfig.json을 수정해준다.
{
  "compilerOptions": {
	...
    "baseUrl": "src",
    ...
  },
  "include": ["next-env.d.ts", "**/*.ts", "**/*.tsx"],
  "exclude": ["node_modules"]
}
이렇게 수정하게 되면 import 경로가 얼마나 복잡하든 절대경로를 사용하여 다소 굉장히 깔끔해진다.
/* 적용 전
import Head from "next/head";
import Title from "../components/Title";
import { Container } from "../styles/home";
*/

// 적용 후
import Head from "next/head";
import Title from "@components/Title";
import { Container } from "@styles/home";
🚩 출처 및 참고자료