AWX에서 제공하는 RestAPI 사용방법
AWX API Reference Guide
- Shell version
< inventory 조회 >
$ curl -X GET http://192.168.###.###/api/v2/inventory/ \
--header 'Content-Type: application/json' \
--header 'Authorization: Bearer VypvIAXQTd0nLkzQ471w6KzENKtW2' | sed -e 's/[{}]/''/g' | awk -v k="text" '{n=split($0,a,","); for (i=1; i<=n; i++) print a[i]}'
< Credential 정보 조회 >
$ curl -X GET http://192.168.###.###/api/v2/credentials/ \
--header 'Content-Type: application/json' \
--header 'Authorization: Bearer VBuXmkGJKdhJyU23hl8d4zy15AXMmJ' | sed -e 's/[{}]/''/g' | awk -v k="text" '{n=split($0,a,","); for (i=1; i<=n; i++) print a[i]}'
< job templates 조회 >
$ curl -X GET http://192.168.###.###/api/v2/job_templates/ \
--header 'Content-Type: application/json' \
--header 'Authorization: Bearer VBuXmkGJKdhJyU23hl8d4zy15AXMmJ' | sed -e 's/[{}]/''/g' | awk -v k="text" '{n=split($0,a,","); for (i=1; i<=n; i++) print a[i]}'
< job template 실행 >
Templates ID : 9 / Credential ID : 3 / inventory ID : 1 인 Job 실행 --> 성공 !!!
$ curl -X POST http://192.168.###.###/api/v2/job_templates/9/launch/ \
--header 'Content-Type: application/json' \
--header 'Authorization: Bearer VBuXmkGJKdhJyU23hl8d4zy15AXMmJ' \
--data '{
"inventory": 1,
"credentials": [3]
}'
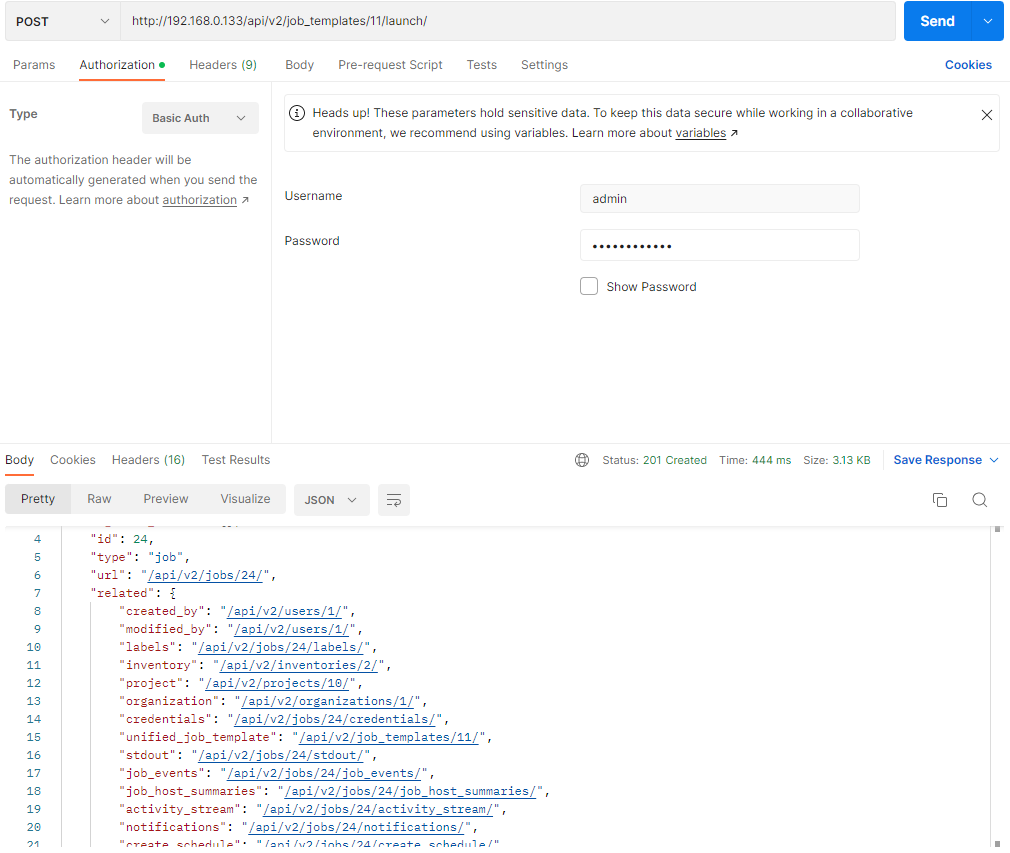
- Postman version
- http://192.168.###.###/api/v2/ (서버IP) 접속
- ID / PW 로그인 ( 미리 로그인 되어있어도 OK )
- 필요한 리스트 클릭해서 ID 확인 ( ex) /api/v2/job_templates/ 눌러서 Template ID 확인 )
- Authorization -> Type/Basic Auth 선택 -> ID/PW 입력
- 결과
- Spring version
public class AwxTest {

	@PostMapping("/api/v2/getJobListV1/")
    public void getJobTemplatesV1() throws IOException {

        // 참고 - https://dream-kwon.tistory.com/39
        URL url = new URL("http://192.168.0.133/api/v2/job_templates/9/launch/");

        HttpURLConnection conn = (HttpURLConnection) url.openConnection();

        // ID / PW 를 Base64 로 인코딩하는 방식
        // 아이디와 비밀번호를 아래와 같은 방식으로 String 에 넣는다.
        String auth = "admin:okestro2018!";
        byte[] authEncBytes = Base64.encodeBase64(auth.getBytes());
        String authStringEnc = new String(authEncBytes);


        // Basic 한칸 뛰고 인코딩된 id /pw
        conn.setRequestProperty("Authorization", "Basic " + authStringEnc);
        conn.setRequestProperty("Content-Type", "application/json");
        conn.setRequestProperty("Accept", "application/json");
        conn.setConnectTimeout(5000);
        conn.setDoOutput(true);

        // 요청시 body 사용할경우
        OutputStream os = conn.getOutputStream();
        os.flush();

        conn.connect();

        System.out.println(conn.getResponseMessage()); // 성공 Created, 실패 Unauthorized

	}
참고