우선 겪었던 issue
Image와 request.body를 동시에 보내야 하는 상황, Flutter에서
MultipartRequest를 사용할 땐Map<String,String>형태만 가능
Flutter에서 자주 사용하는 model을 구현할 때 json과 원활한 작업을 위해서 fromJson()이나 toJson()과 같은 함수를 만들어서 종종 사용합니다. toJson()같은 경우, class 내에는 String, DateTime, int 등 다양한 자료형을 가지고 있을 때 Map<String, dynamic> 형태로 return할 수 밖에 없습니다. 이번 포스트에서는 제가 실제로 작성한 코드를 예시로 Flutter, Express 그리고 MongoDB가 어떻게 작업이 이루어지는지 보여드리겠습니다.
파일 업로드 준비 - (1) Express.js
model
Server의 구조는 hopspring2님의 velog를 참고해서 구현하였습니다. 먼저 게시글 생성/조회/삭제/수정에 사용될 model입니다.
// parent document
const articleSchema = new mongoose.Schema({
    // 💡 MongoDB does not allow overwriting the default _id
    imagePath: String,
    image: String,
    members: [{ type: String }],
    contracts: [{ type: String }],
    detail: {
        type: detailSchema,
        // don't create objectID in sub document
        _id: false
    }
});
detail 안에는 여러 sub document가 있지만 파일 업로드와 관련이 없어서 생략하였습니다.
imagePath: Flutter에서 선택한 이미지 경로를 저장 / Express에서 MongoDB에서 찾을 파일이름image: Flutter에서Image.memory()로 불러올Buffer/ Express에서 MongoDB에서 알맞은 값을 찾아return해줄 변수
3 계층 설계(3-Layer Architecture)를 사용하여 Business Logic과 API route를 따로 분리해주었습니다. 분리를 하면 다음과 같습니다.
route
// 1) C[Create] →
    router.post('/', uploadFilesMiddleware, async (req, res) => {
        const thumbnail = req.file;
        if(!thumbnail) return res.status(400).send({
            message : "[POST] thumbnail not uploaded !"
        });
        // file path
        const file = thumbnail.filename;
        const { status, result } = await articleService.post(req.body, file);
        return res.status(status).send(result);
    });
middleware - multer
저는 파일 업로드를 위해서 multer, multer-gridfs-storage 패키지를 사용하였습니다.
npm install multer multer-gridfs-storage --save아래는 제가 작성한 multer.js 입니다.
const util = require('util');
const multer = require('multer');
const GridFsStorage = require("multer-gridfs-storage");
// config
const { config } = require('../../config');
var storage = new GridFsStorage({
    url: config.dbURI,
    options: { useNewUrlParser: true, useUnifiedTopology: true },
    file: (req, file) => {
        if (file.mimetype === 'image/jpeg' || file.mimetype === 'image/png') {
            // for thumbnail and profile image
            if (req.baseUrl === '/user') {
                return {
                    bucketName: 'user-images',
                    filename: `${req.params.id}-profile`
                };
            }
            else if(req.baseUrl === '/articles') {
                const { detail } = req.body;
                const { reportedDate } = detail;
                return {
                    bucketName: 'article-images',
                    filename: `${reportedDate}-thumbnail`
                }
            }
        } else {
            // expecting only pdf, docx, txt, ... -> portfolio
            return {
                bucketName: 'files',
                filename: `${req.params.id}-${file.originalname}`
            };
        }
    }
});

var upload = multer({ storage: storage }).single('file');
var uploadFilesMiddleware = util.promisify(upload);

module.exports = uploadFilesMiddleware;
url 은 DB주소를 입력해주시면 되고, 옵션에 사용할 기능을 설정해주었습니다. 그리고 저는 user와 article 모두 파일이나 이미지가 필요해서 mimetype 으로 먼저 구분을 지었고 그 후에는 baseUrl 로 user와 article를 구분해주었습니다.
article과 같은 경우, save 될 때 ObjectId가 자동으로 주어지기 때문에 새로운 게시글 등록시간을 기준으로 파일명을 생생해주었습니다. Flutter에서 file 이란 field 를 가진 요청이 해당 경로로 도착했다면 위 미들웨어가 동작하면서 filename을 service 계층으로 전달해주게됩니다.
service
post = async (body, file) => {
        try {
            const {
                members, contracts, detail
            } = body;
            const {
                status, reportedDate, dueDate, period, condition, content, writer, location, applicants
            } = detail;
            const {
                title, desc, tags, genres, prefer
            } = content;
            // create object
            const uploadData = await Article.create({
                imagePath: file,
                image: null,
                members: members != null ? JSON.parse(members) : [],
                contracts: contracts != null ? JSON.parse(contracts) : [],
                detail: {
                    status : status,
                    reportedDate : reportedDate,
                    dueDate : dueDate,
                    period : period,
                    condition : condition,
                    writer : writer,
                    location : location,
                    applicants : applicants != null ? JSON.parse(applicants) : [],
                    content : {
                        title : title,
                        desc : desc,
                        tags : tags != null ? JSON.parse(tags) : [],
                        genres : genres != null ? JSON.parse(genres) : [] ,
                        prefer : prefer
                    }
                }
            });
            // db query
            await uploadData.save();
            return onPostSuccess(body);
        } catch (error) {
            console.error(error);
            return onPostFailure(error);
        }
    }
service 계층에서 route에서 전달해준 req.body를 받아와 필요한 객체들을 분리해줍니다. 필요한 값으로 처리를 해줍니다.
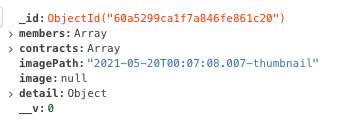
만약 성공적으로 save가 됐다면 총 3개의 collection에서 변화가 있을 것 입니다.
- article : 위 코드 처럼 생성된 Article 모델이 저장된 모습을 확인할 수 있습니다.
- article-images.files : 미들웨어에서 처리한 이미지파일이 저장되어 있습니다.
- article-images.chunks : Grid-File-System을 사용해서 생긴 collection 입니다.
MongoDB
MongoDB의 특징
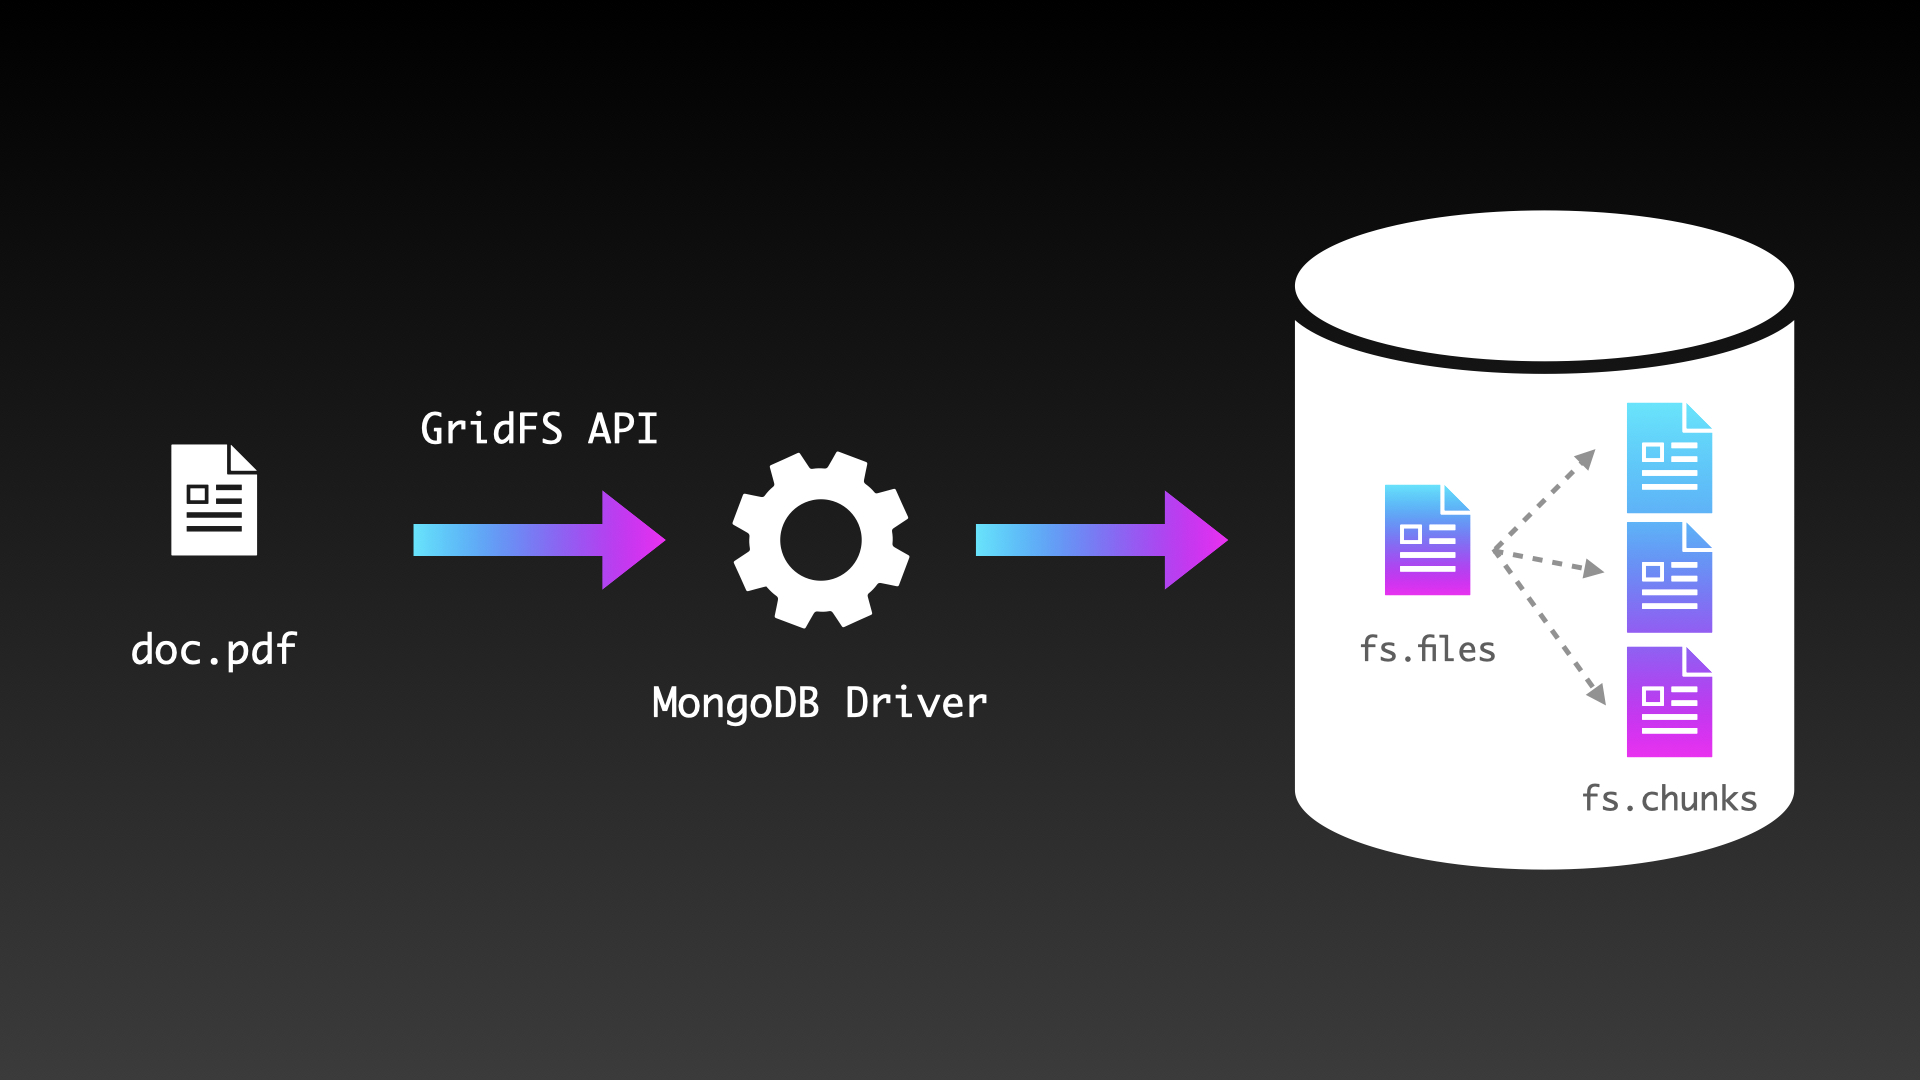
- 대용량 파일을 저장하기 위해서 Grid-File-System을 사용합니다.
- 하나의 document 최대 크기는 16MB로 제한됩니다.
- 그 이상의 파일을 저장하기 위해서는 작은 파일로 분할해서 분리된 document로 저장하는 MongoDB driver를 제공합니다. - 만약 파일이 용량이 커서 분리되었다면 분할된 Chunk들을 모아서 반환해주어야합니다.
- 즉, GridFS는 BSON document 크기인 16MB가 넘는 크기의 데이터를 저장 하고 조회 하는 방법입니다.
- 하나의 파일은 Chunk와 metadata로 이루어지며 2개의 collection을 사용한다.
- 이때 Chunk의 기본 크기는 256KB로 제한되어있습니다.nicewoong님 블로그 - MongoDB(몽고디비) 특징 정리 참고하였습니다.
실행결과화면 - article-images.chunks

실행결과화면 - article-images.files

실행결과화면 - articles
파일 업로드하기 - (2) Flutter
Flutter에서는 MultipartRequest를 사용했습니다. 제가 겪은 이슈는 서버를 만들때 postman으로 테스트를 해보면서 만들긴 했지만 raw-data로 request.body값을 전달하는 방식이었는데, MultipartRequest에서는 명시적으로 body를 추가하는 함수나 변수가 보이지 않았습니다. 그래서 공식문서를 찾아보니 fields 란 Property에 담을 수 있어 보였습니다.
다음 문제는 fields에는 내장 함수가 addAll()이란 함수가 있었는데, 이는 Map<String, String>만을 입력받아서 평소에 Flutter 모델을 구현할 때 사용하던 Map<String, dynamic> 은 사용할 수 없었습니다.
// create multipart Request
    var request = http.MultipartRequest("POST", Uri.parse(baseURL));
    // multipart takes file
    ...
    request.fields.addAll(
    	{
        	"title" : "title for Article"
        }
    );
이런식으로 body를 전달할 수 있습니다. 하지만 제가 담을려는 정보가 모두 String으로 되어있지 않았고 json.encode()를 사용해서 객체를 저장하려고 시도를 해보았으나 실패하였습니다. CastError: Cast to Embedded failed for value 이와 같은 에러가 발생하여 다시 검색을 통해서 찾아보았습니다. 찾아보니 MultipartRequest를 통해서 body : { } 이런식으로 전달이 되지 않고 모두 각각 입력을 해줘야한다고 합니다.
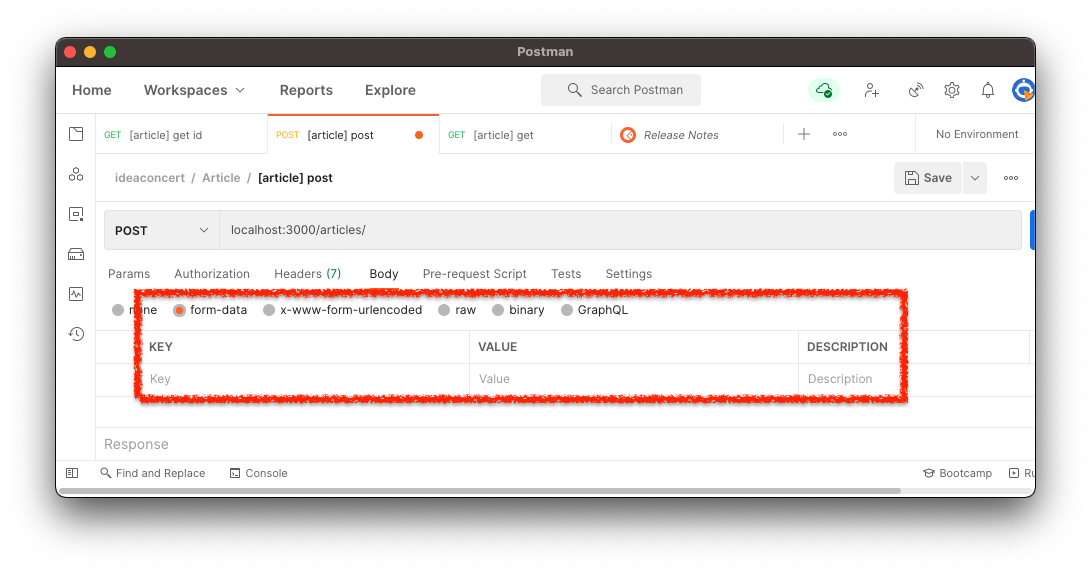
Postman에서 form-data를 전달하는 것 처럼 MultipartRequest를 사용을 해보았습니다.
우선 저는 Nested Object였기 때문에 아래 코드처럼 body를 추가해주었습니다.
   // body
    request.fields['imagePath'] = data.imagePath;
    request.fields['memebers'] = jsonEncode(data.members);
    request.fields['contracts'] = jsonEncode(data.contracts);
    request.fields['detail[status]'] = data.detail.status;
    request.fields['detail[reportedDate]'] = data.detail.reportedDate;
    request.fields['detail[dueDate]'] = data.detail.dueDate;
    request.fields['detail[writer]'] = data.detail.writer;
    request.fields['detail[location]'] = data.detail.location;
    request.fields['detail[applicants]'] = jsonEncode(data.detail.applicants);
    request.fields['detail[peroid][from]'] = data.detail.period.from;
    request.fields['detail[peroid][to]'] = data.detail.period.to;
    request.fields['detail[condition][projectType]'] = data.detail.condition.projectType;
    request.fields['detail[condition][contractType]'] = data.detail.condition.contractType;
    request.fields['detail[condition][wage]'] = data.detail.condition.wage;
    request.fields['detail[content][title]'] = data.detail.content.title;
    request.fields['detail[content][desc]'] = data.detail.content.desc;
    request.fields['detail[content][tags]'] = jsonEncode(data.detail.content.tags);
    request.fields['detail[content][genres]'] = jsonEncode(data.detail.content.genres);
    request.fields['detail[content][prefer]'] = data.detail.content.prefer;
    // headers for body
request.headers["Content-Type"] = "application/json";jsonEncode()를 해준 값들은 데이터 타입이 List여서 처리를 해주었습니다. 그리고 전체코드는 아래와 같습니다. multipartFile 에서 선언해준 filename 은 없어도 관계가 없습니다. 위에서 작성한 multer 미들웨어에서 overwrite 해주기 때문입니다.
// POST
  Future<void> postNewArticle(Article data, String filePath) async {
    // create multipart Request
    var request = http.MultipartRequest("POST", Uri.parse(baseURL));
    // multipart takes file
    var multipartFile = await http.MultipartFile.fromPath("file", filePath,
        filename: data.detail.content.title + '-thumbnail',
        contentType: MediaType('image', 'png'));
    // add file to multipart
    request.files.add(multipartFile);
    // body
    request.fields['imagePath'] = data.imagePath;
    request.fields['memebers'] = jsonEncode(data.members);
    request.fields['contracts'] = jsonEncode(data.contracts);
    request.fields['detail[status]'] = data.detail.status;
    request.fields['detail[reportedDate]'] = data.detail.reportedDate;
    request.fields['detail[dueDate]'] = data.detail.dueDate;
    request.fields['detail[writer]'] = data.detail.writer;
    request.fields['detail[location]'] = data.detail.location;
    request.fields['detail[applicants]'] = jsonEncode(data.detail.applicants);
    request.fields['detail[peroid][from]'] = data.detail.period.from;
    request.fields['detail[peroid][to]'] = data.detail.period.to;
    request.fields['detail[condition][projectType]'] = data.detail.condition.projectType;
    request.fields['detail[condition][contractType]'] = data.detail.condition.contractType;
    request.fields['detail[condition][wage]'] = data.detail.condition.wage;
    request.fields['detail[content][title]'] = data.detail.content.title;
    request.fields['detail[content][desc]'] = data.detail.content.desc;
    request.fields['detail[content][tags]'] = jsonEncode(data.detail.content.tags);
    request.fields['detail[content][genres]'] = jsonEncode(data.detail.content.genres);
    request.fields['detail[content][prefer]'] = data.detail.content.prefer;
    // headers for body
    request.headers["Content-Type"] = "application/json";
    // send request
    var response = await request.send();

    // listen for response
    response.stream.transform(utf8.decoder).listen((event) {
      print(event);
    });
  }
그 외 겪었던 issue - toIso8601String()
flutter: NoSuchMethodError: The method 'toIso8601String' was called on null.Flutter 에서 겪었던 한가지 문제가 또 있습니다. DateTime 내에 있는 함수 중 toIso8601String() 가 인식이 안되는 문제가 발생했었습니다. 간헐적으로 일어났었는데 DateFormat()을 이용해서 toIso8601String()함수를 사용하지 않고 parsing 해주었습니다.
reportedDate: DateFormat('yyyy-MM-ddTHH:mm:ss.mmm').format(new DateTime.now()).toString(),위와 같은 방식으로 MongoDB에서 사용하는 Date 형식에 맞춰서 parsing을 진행해준 다음에 전달해주었습니다.