Arkime 설치
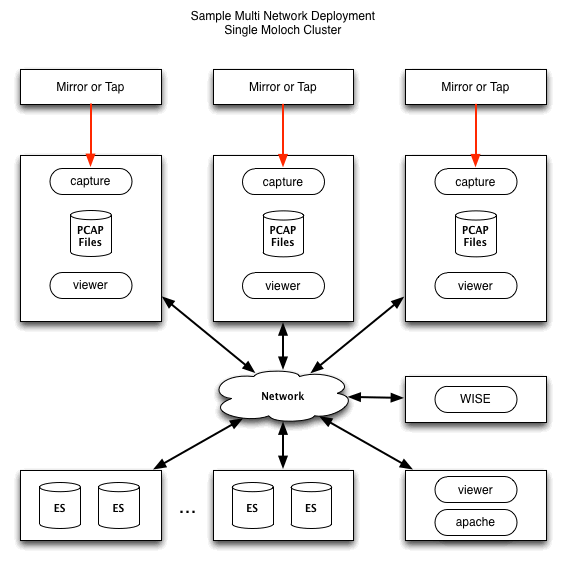
Arkime에서 제공하는 아키텍쳐이다. 하나의 네트워크에 ES, 서버머신, 프록시 등이 동작하는 형태이다. 여기서는 조금 간략하게 구성해본다. 위 아키텍쳐와 다른점은
- viewer 프로세스는 하나의 서버에서만 돌도록 하여 viewer 웹페이지를 하나의 머신에서 통합적으로 관제
- WISE 미사용
- 프록시(apache, viewer) 미사용
테스트 목적이므로 간단하게 구성했고 설명하자면 하나의 메인 서버arkime-1에 arkime를 설치하고 capture, viewer를 서비스한다. 다른 관제대상 서버인 arkime-2는 capture만 서비스하고 viewer는 arkime-1에서 통합으로 관제한다.
Requirements Hardware Spec
Arkime에서 권장하는 서버 하드웨어의 스펙이다.
- RAM : 64GB~96GB
- CPU : 최소 2 x 6 Core
- OS Disk : RAID 1
- Disk : 20 x 4TB
- RAID : RAID 5 with 1 hot spare
요구하는 스펙이 어마무시하다. 하지만 이 권장사항은 평균 1Gbps의 네트워크 대역폭을 가진 서버기준이고 그 보다 이하 이거나 특정 서버만 감시하기를 원한다면 요구사항보다는 스펙이 낮아도된다.
서버 환경구성
| Hostname | OS | IP Address | CPU | Memory |
|---|---|---|---|---|
| arkime-1 | Ubuntu20.04 | 192.168.122.11/24 | 2Core | 2GB |
| arkime-2 | Ubuntu20.04 | 192.168.122.12/24 | 2Core | 2GB |
| es-1 | Ubuntu20.04 | 192.168.122.21/24 | 4Core | 4GB |
Arkime 서버구성은 Vagrant를 이용하여 구성하였고 코드는 다음과 같다.
-
Vagrantfile
# -*- mode: ruby -*-
# vi: set ft=ruby :
Vagrant.configure("2") do |config|
  ES = 1 # max number of ES Server
  C = 2 # max number of Capture, Viewer

  # Caputre, Viewer Node
  (1..C).each do |i|
    config.vm.define "arkime-#{i}" do |cfg|
      cfg.vm.box = "generic/ubuntu2004"
      cfg.vm.provider "virtualbox" do |vb|
        vb.name = "arkime-#{i}"
        vb.cpus = 2
        vb.memory = 2048
      end
      cfg.vm.host_name = "arkime-#{i}"
      cfg.vm.network "private_network", ip: "192.168.122.1#{i}"
      cfg.vm.network "forwarded_port", guest: 22, host: "6000#{i}", auto_correct: true, id: "ssh"
      cfg.vm.network "forwarded_port", guest: 8005, host: "8080", auto_correct: true, id: "arkime"
      cfg.vm.synced_folder "../data", "/vagrant", disabled: true
    end

  # Elastic Search Node
    (1..ES).each do |i|
      config.vm.define "es-#{i}" do |cfg|
        cfg.vm.box = "generic/ubuntu2004"
        cfg.vm.provider "virtualbox" do |vb|
          vb.name = "es-#{i}"
          vb.cpus = 4
          vb.memory = 4096
        end
        cfg.vm.host_name = "es-#{i}"
        cfg.vm.network "private_network", ip: "192.168.122.2#{i}"
        cfg.vm.network "forwarded_port", guest: 22, host: "6001#{i}", auto_correct: true, id: "ssh"
        cfg.vm.network "forwarded_port", guest: 9200, host: "8081", auto_correct: true, id: "elasticsearch"
        cfg.vm.synced_folder "../data", "/vagrant", disabled: true
      end
    end
  end
Elasticsearch 설치 (es-1)
Arkime는 인덱싱 및 검색에 Elasticsearch를 사용하기 때문에 필수로 설치해야 한다.
-
저장소 추가
wget -qO - https://artifacts.elastic.co/GPG-KEY-elasticsearch --no-check-certificate | apt-key add - -
APT에 추가
echo "deb https://artifacts.elastic.co/packages/7.x/apt stable main" | tee -a /etc/apt/sources.list.d/elastic-7.x.list -
Elasticsearch 패키지 설치
apt-get update -y apt-get install elasticsearch -y -
Java 메모리 설정
vi /etc/elasticsearch/jvm.options # 기본적으로 주석처리가 되어있을텐데 해제하고 변경한다. 31 -Xms1g 32 -Xmx1g -
재부팅 시 활성화
systemctl enable --now elasticsearch -
Elasticsearch 포트 확인 및 동작확인
# 1. 포트확인
netstat -tnlp |grep 9200
## 혹은
ss -antpl |grep 9200

# 2. 웹 동작확인
curl localhost:9200
{
  "name" : "arkime-1",
  "cluster_name" : "elasticsearch",
  "cluster_uuid" : "CvXlzvZ7TuqnLdXpZT9t8Q",
  "version" : {
    "number" : "7.12.0",
    "build_flavor" : "default",
    "build_type" : "deb",
    "build_hash" : "78722783c38caa25a70982b5b042074cde5d3b3a",
    "build_date" : "2021-03-18T06:17:15.410153305Z",
    "build_snapshot" : false,
    "lucene_version" : "8.8.0",
    "minimum_wire_compatibility_version" : "6.8.0",
    "minimum_index_compatibility_version" : "6.0.0-beta1"
  },
  "tagline" : "You Know, for Search"
}
Elasticsearch 포트개방
기본적으로 Elasticsearch는 설치하면 자기자신의 서버만 포트접근을 허용하게 설정되어있다. 다른 서버도 같이 관제하기 위해서는 포트를 열어줘야 한다.
-
설정수정
vi /etc/elasticsearch/elasticsearch.yml 56 network.host: 0.0.0.0 70 discovery.seed_hosts: ["0.0.0.0"]- 두 개의 항목 모두 주석처리가 되어있는데 주석해제하고 0.0.0.0으로 설정해준다.
-
서비스 재시작
systemctl restart elasticsearch.service -
포트 확인
root@arkime-1:/etc/elasticsearch# netstat -tnlp Active Internet connections (only servers) Proto Recv-Q Send-Q Local Address Foreign Address State PID/Program name tcp 0 0 127.0.0.53:53 0.0.0.0:* LISTEN 555/systemd-resolve tcp 0 0 0.0.0.0:22 0.0.0.0:* LISTEN 858/sshd: /usr/sbin tcp6 0 0 :::9200 :::* LISTEN 2321/java tcp6 0 0 :::9300 :::* LISTEN 2321/java tcp6 0 0 :::22 :::* LISTEN 858/sshd: /usr/sbin- 이제 9200, 9300 포트가 외부접속을 모두 허용한다.
Arkime 설치 (arkime-1)
Arkime 설치는 공식 홈페이지의 링크를 이용하여 패키지를 다운받는다.
-
패키지 다운로드
> wget https://s3.amazonaws.com/files.molo.ch/builds/ubuntu-20.04/moloch_2.7.1-1_amd64.deb > dpkg -i moloch_2.7.1-1_amd64.deb # 만약 다음과같은 오류가 출력되면 dpkg: dependency problems prevent configuration of moloch: moloch depends on libwww-perl; however: Package libwww-perl is not installed. moloch depends on libjson-perl; however: Package libjson-perl is not installed. moloch depends on libyaml-dev; however: Package libyaml-dev is not installed. dpkg: error processing package moloch (--install): dependency problems - leaving unconfigured Errors were encountered while processing: moloch # 바로 아래의 명령어를 입력하면 의존성문제가 해결된다. > apt-get -f install -
Arkime 환경설정
/data/moloch/bin/Configure

# Arkime가 모니터링 할 네트워크 인터페이스를 지정한다.
Found interfaces: eth0;eth1;lo
Semicolon ';' seperated list of interfaces to monitor [eth1]

# 데모를 위한 Elasticsearch의 설치여부 (기본값 : no)
Install Elasticsearch server locally for demo, must have at least 3G of memory, NOT recommended for production use (yes or no) [no]

# Elasticsearch의 URL입력
Elasticsearch server URL [http://192.168.122.21:9200]

# Arkime의 패스워드 입력
Password to encrypt S2S and other things [no-default] dkagh1.
Moloch - Creating configuration files
Installing systemd start files, use systemctl
Moloch - Installing /etc/logrotate.d/moloch to rotate files after 7 days
Moloch - Installing /etc/security/limits.d/99-moloch.conf to make core and memlock unlimited

# GEO 파일 다운로드 여부
Download GEO files? (yes or no) [yes]
Moloch - Downloading GEO files
Elasticsearch DB셋팅
-
초기화
Arkime에서 Elasticsearch를 사용하기 위해 기본 DB를 초기화해준다.
*초기화는 Elasticsearch와 최초에 연동할 때 한번만 해주면 된다.
/data/moloch/db/db.pl http://192.168.122.21:9200 init -
Arkime에 대한 관리자 계정 생성
/data/moloch/bin/moloch_add_user.sh admin "Moloch SuperAdmin" dkagh1. --admin -
정보확인
/data/moloch/db/db.pl http://192.168.122.21:9200 info
Arkime 서비스 시작
Arkime는 Caputre, Views, Elasticsearch 총 3가지 구성으로 이루어진다. 따라서 각각의 구성에 대한 서비스를 시작해야한다.
-
Capture, Views 시작
systemctl enable --now molochcapture systemctl enable --now molochviewer -
상태확인
systemctl status molochcapture molochviewer -
로그확인
cat /data/moloch/logs/viewer.log Express server listening on port 8005 in development mode # 위와 같은 문구가 출력되면 서비스 시작이 성공한것이다. -
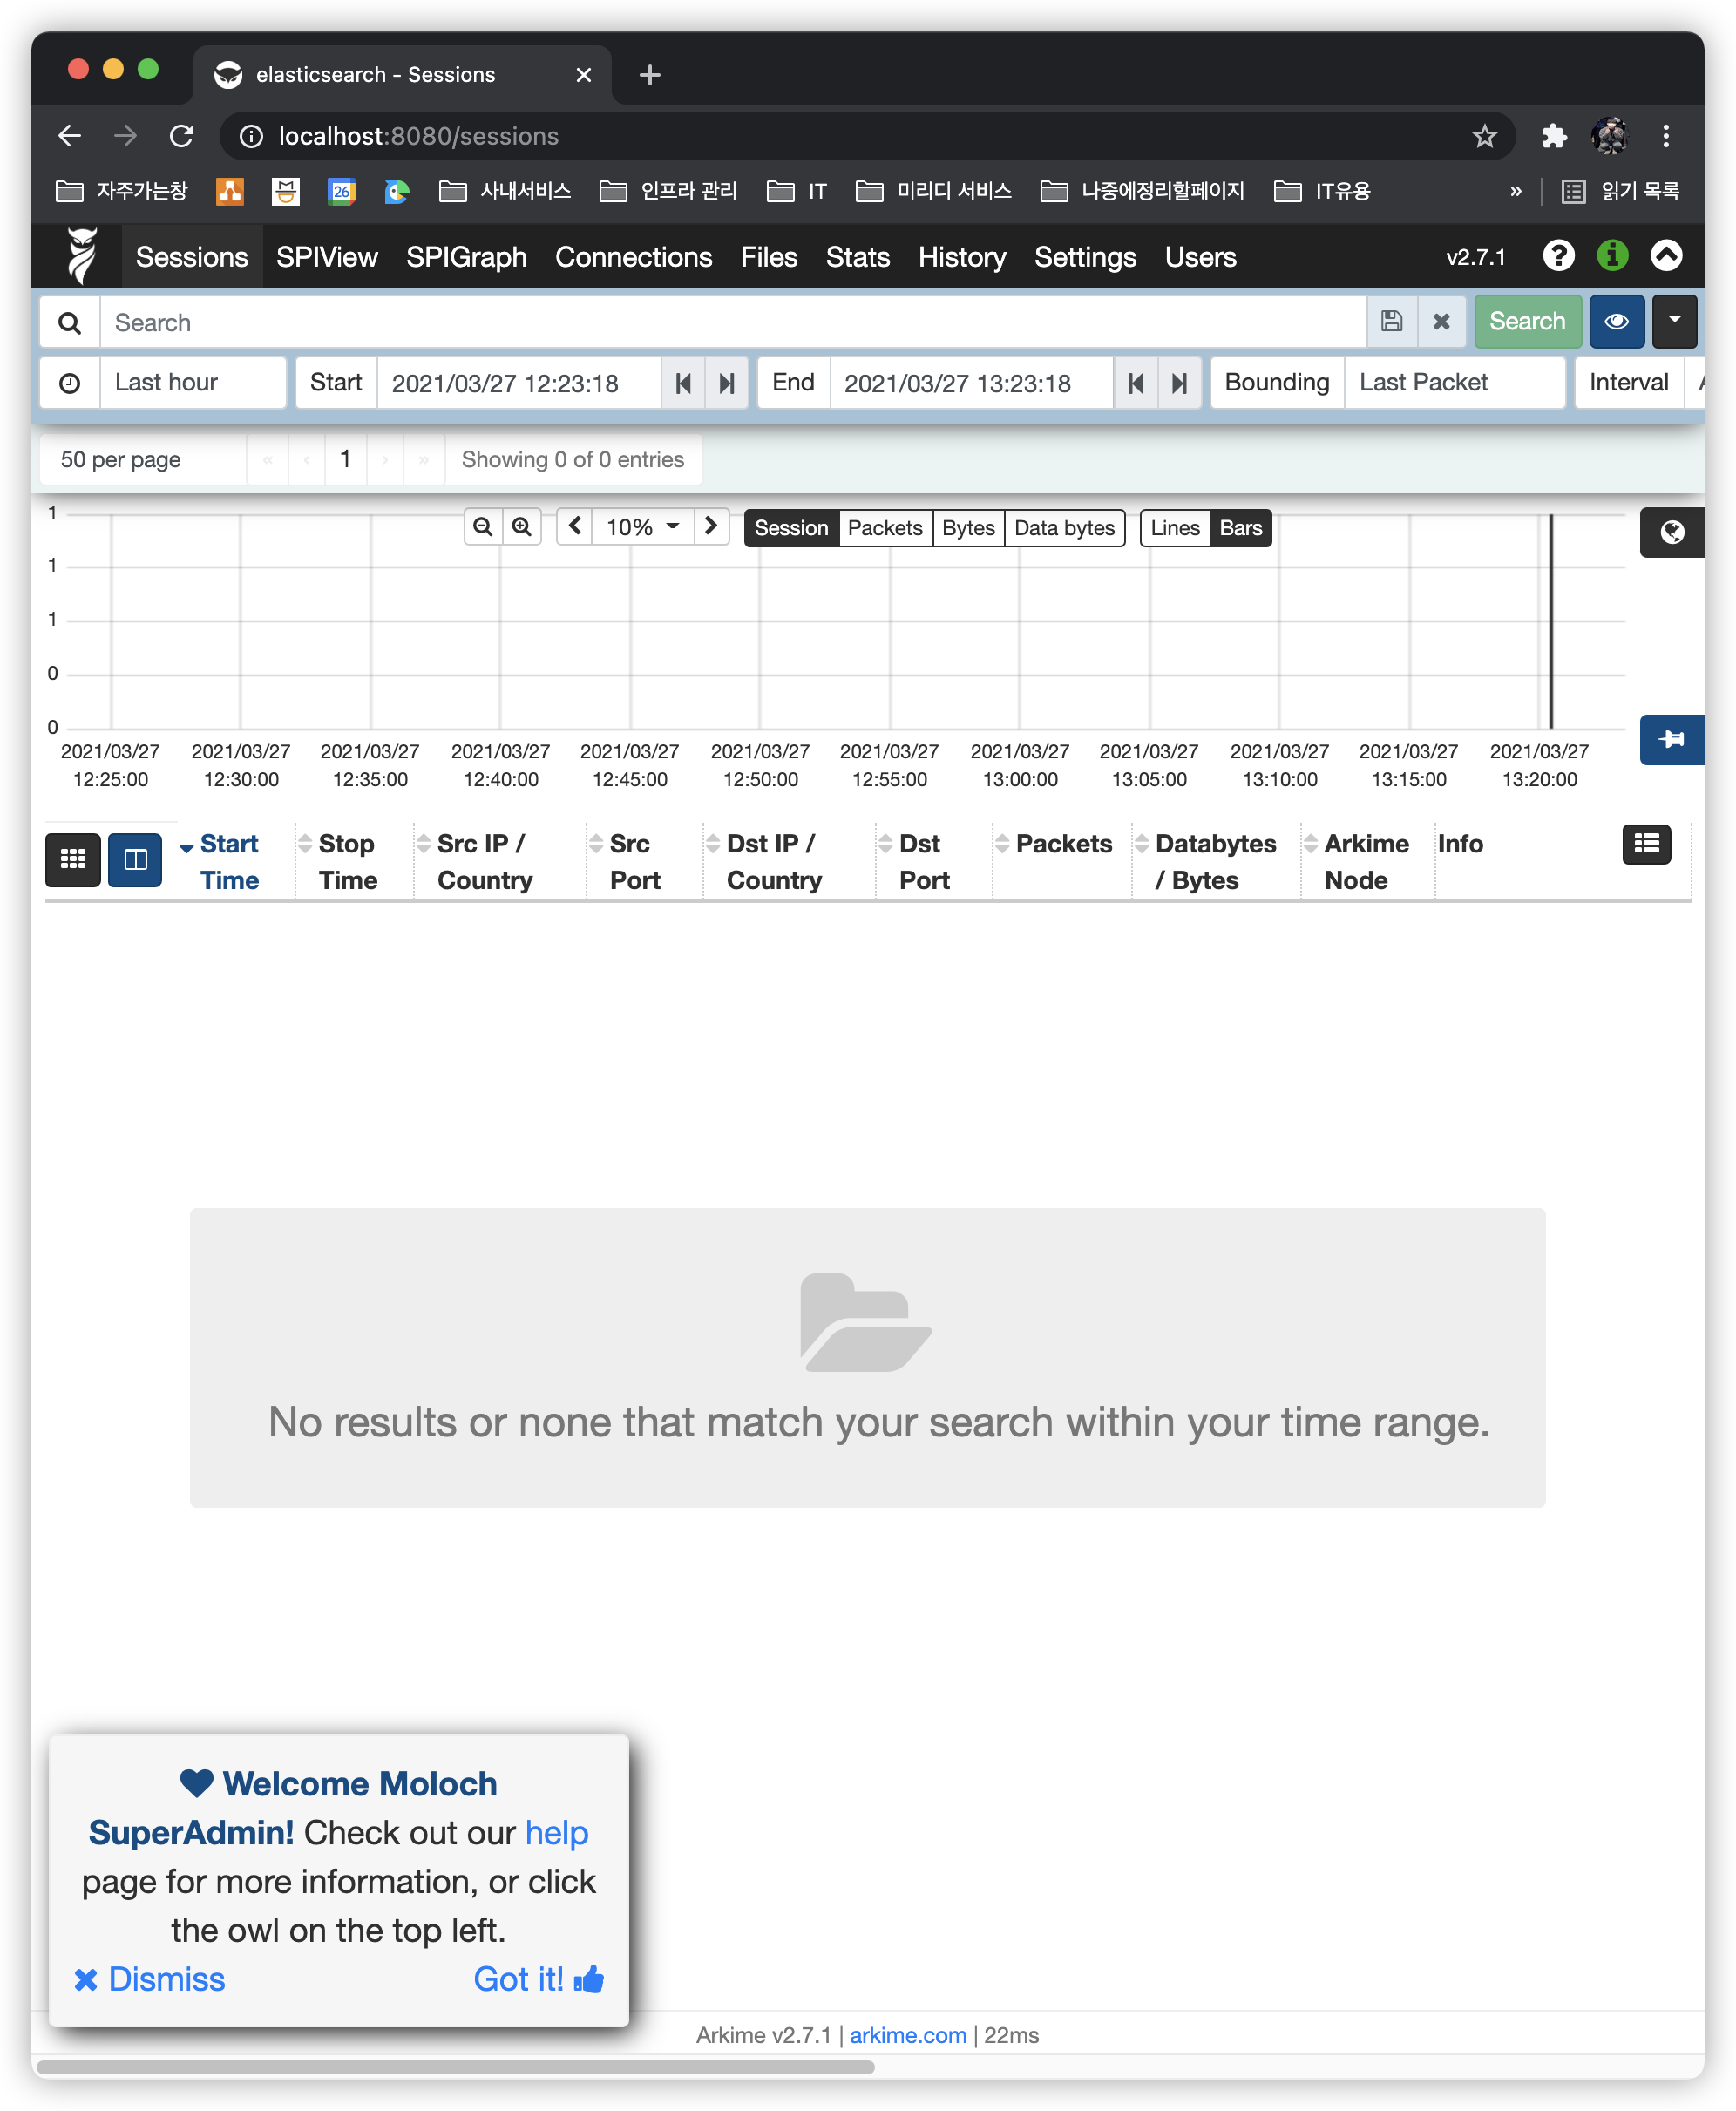
Arkime 포트확인 및 웹 동작 확인
# 1. 포트확인
netstat -tnlp |grep 8005
# 혹은
ss -tnlp |grep 8005

# 2. 웹 동작 확인
curl localhost:8005
Arkime 웹 접근
이제 Arkime 웹으로 접근할 수 있다. Vagrant에서 VM의 8005포트에 대해 8080으로 포워딩 해놓아서 호스트에서 localhost:8080으로 접근하고 위에서 설정한 관리자 계정으로 접속하면 Arkime 웹페이지에 접근할 수 있다.
Capture 노드 추가 (arkime-2)
Capture 노드 추가는 굉장히 간단하다. 추가하고 싶은 서버에 arkime 패키지만 설치하면 된다.
패키지 설치까지는 arkime-1과 동일하게 진행한다.
-
패키지 다운로드
> wget https://s3.amazonaws.com/files.molo.ch/builds/ubuntu-20.04/moloch_2.7.1-1_amd64.deb > dpkg -i moloch_2.7.1-1_amd64.deb # 바로 아래의 명령어를 입력하면 의존성문제가 해결된다. > apt-get -f install -
Arkime 환경설정
/data/moloch/bin/Configure # Arkime가 설치될 네트워크 인터페이스를 지정한다. Found interfaces: eth0;eth1;lo Semicolon ';' seperated list of interfaces to monitor [eth1] # 데모를 위한 Elasticsearch의 설치여부 (기본값 : no) Install Elasticsearch server locally for demo, must have at least 3G of memory, NOT recommended for production use (yes or no) [no] # Elasticsearch의 URL입력 Elasticsearch server URL [http://192.168.122.21:9200] # Arkime의 패스워드 입력 Password to encrypt S2S and other things [no-default] dkagh1. Moloch - Creating configuration files Installing systemd start files, use systemctl Moloch - Installing /etc/logrotate.d/moloch to rotate files after 7 days Moloch - Installing /etc/security/limits.d/99-moloch.conf to make core and memlock unlimited # GEO 파일 다운로드 여부 Download GEO files? (yes or no) [yes] Moloch - Downloading GEO files -
서비스 시작
viewer는 이미
arkime-1에서 실행되고 있으므로 실행 Xsystemctl enable --now molochcapture -
확인
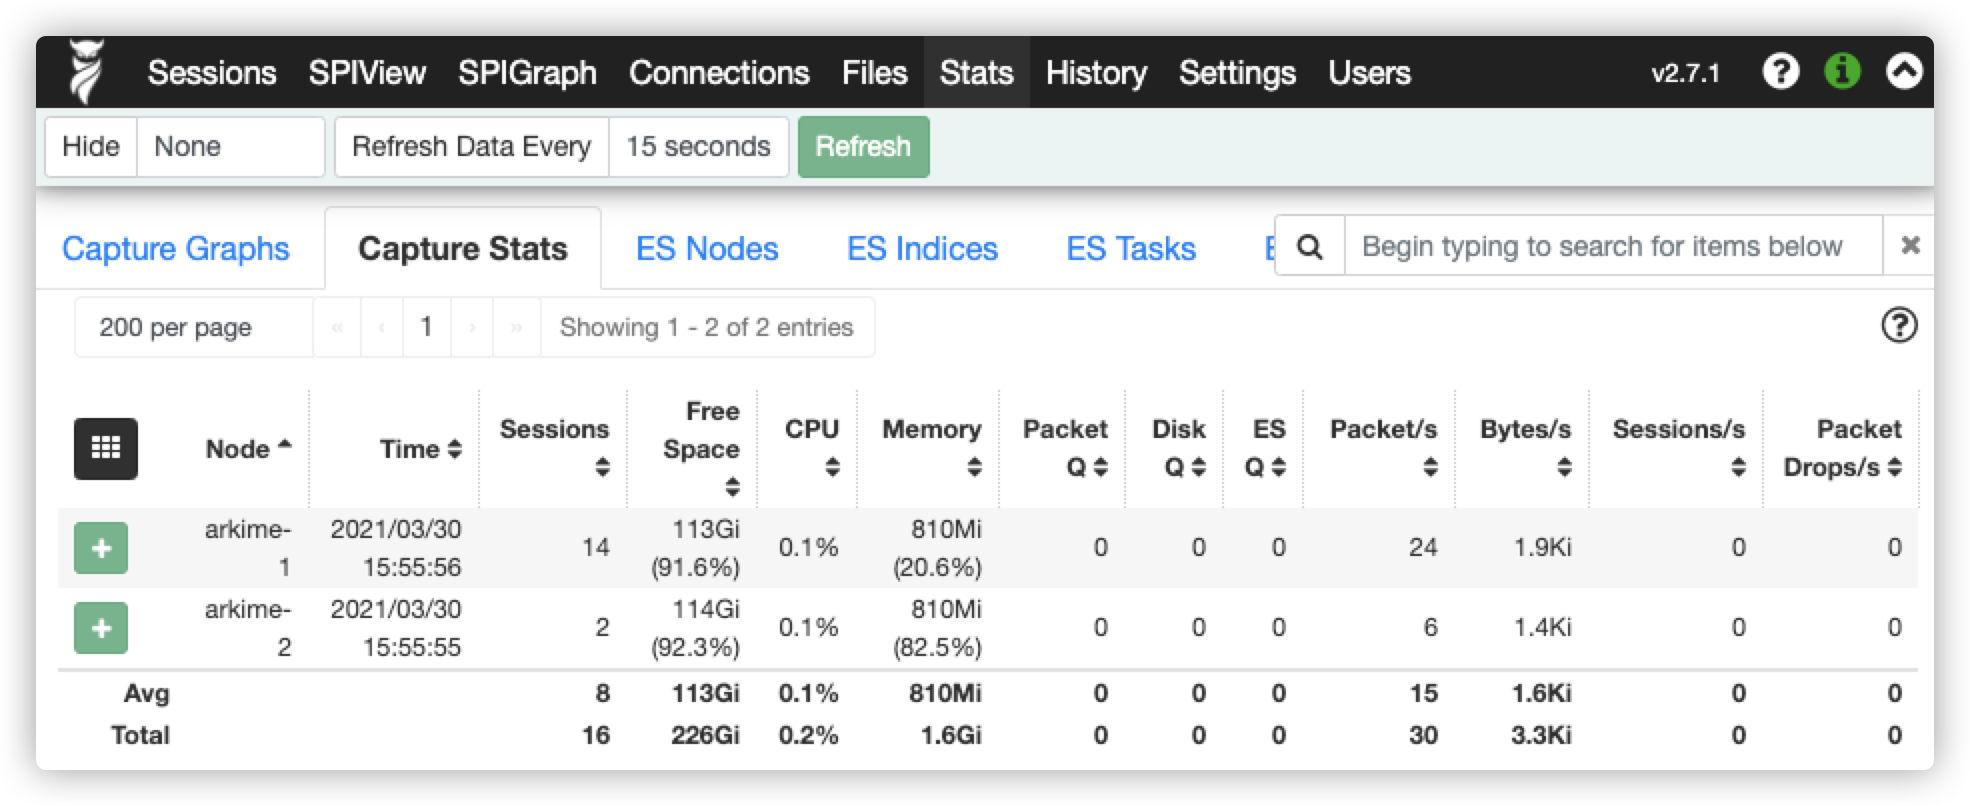
'Arkime 웹' → 'Stats' 에서 추가된 Capture Node를 확인할 수 있다.
Nginx Proxy 설정
-
nginx 환경설정
-
/etc/nginx/sites-available/arkime.seunghyeon.comupstream arkime { server 127.0.0.1:8005; } server { listen 80; server_name arkime.seunghyeon.com; return 301 https://$server_name$request_uri; } server { listen 443 ssl; server_name arkime.seunghyeon.com; ssl_protocols TLSv1.2 TLSv1.3; access_log /var/log/nginx/arkime.seunghyeon.com/access.log compression; error_log /var/log/nginx/arkime.seunghyeon.com/error.log info; ssl_ciphers ECDHE-RSA-AES256-GCM-SHA512:DHE-RSA-AES256-GCM-SHA512:ECDHE-RSA-AES256-GCM-SHA384:DHE-RSA-AES256-GCM-SHA384:ECDHE-RSA-AES256-SHA384; client_max_body_size 100M; ssl_certificate /etc/certs/seunghyeon_com.crt; ssl_certificate_key /etc/certs/seunghyeon_com.pem; location / { allow [Trusted IP Address]; deny all; proxy_redirect off; proxy_set_header Host $host; proxy_set_header X-Real-IP $remote_addr; proxy_set_header X-Forwarded-For $proxy_add_x_forwarded_for; proxy_set_header X-Forwarded-Proto $scheme; proxy_pass http://arkime; } }
-
-
로그 포맷 설정
-
/etc/nginx/conf.d/log_format.conflog_format compression '$remote_addr - $remote_user [$time_local] ' '"$request" $status $body_bytes_sent ' '"$http_referer" "$http_user_agent" "$gzip_ratio"'; log_format upstream_time '$remote_addr - $remote_user [$time_local] ' '"$request" $status $body_bytes_sent ' '"$http_referer" "$http_user_agent"' 'rt=$request_time uct="$upstream_connect_time" uht="$upstream_header_time" urt="$upstream_response_time"';
-
-
nginx 재기동
nginx -tnginx -s reload
nginx 설정 후 해당 도메인에 A 레코드를 등록한다.
+) CentOS
Arkime 설치
wget moloch-2.3.2-1.x86_64.rpm
yum localinstall moloch-2.3.2-1.x86_64.rpm

/data/moloch/bin/Configure
Elasticsearch 설치
rpm --import https://artifacts.elastic.co/GPG-KEY-elasticsearch

vi /etc/yum.repos.d/elasticsearch.repo

[Elasticsearch-7]
name=Elasticsearch repository for 7.x packages
baseurl=https://artifacts.elastic.co/packages/7.x/yum
gpgcheck=1
gpgkey=https://artifacts.elastic.co/GPG-KEY-elasticsearch
enabled=1
autorefresh=1
type=rpm-md

yum install -y elasticsearch
Elasticsearch 실행 오류
-
bootstrap checks failed. You must address the points described in the following [1] lines before starting Elasticsearch.
- elasticsearch.yml 파일의
[network.host](http://network.host)설정값이 잘못되어있어서 발생하는 문제
# before network.host: "192.168.1.0" # after network.host: _site_ - elasticsearch.yml 파일의
-
system call filters failed to install; check the logs and fix your configuration or disable system call filters at your own risk
- 서버의 커널문제
# 아래의 문구를 elasticsearch.yml에 추가시키면 된다. bootstrap.system_call_filter: false -
max number of threads [1024] for user [elasticsearch] is too low, increase to at least [4096]
- 서버에 제한되어있는 limits.conf 문제
# 리밋설정 확인
ulimit -Sa

# 아래문구 추가
vi /etc/security/limits.conf
...
elasticsearch   soft    nofile  65535
elasticsearch   hard    nofile  65535
elasticsearch   soft    nproc   65535
elasticsearch   hard    nproc   65535
