선행 사항
EKS Cluster 구성
helm 설치
sudo snap install helm --classic
구성할 목록
- 로드 밸런서
- Ingress Controller
- Ingress Object
- 모니터링
- metrics-server
- Grafana Loki
- Continuous Deploy (CD)
- Argo CD
1. 로드 밸런서
1-1. Ingress Controller
인그레스 컨트롤러는 helm을 이용하여 설치를 진행하고 nginx-ingress를 설치한다.
- nginx-ingress의 repo를 helm에 추가 및 업데이트 한다.
helm repo add ingress-nginx https://kubernetes.github.io/ingress-nginx
helm repo update - Ingress 컨트롤러를 생성할 namespace를 생성한다.
kubectl create ns kube-ingress - 생성한 namespace에 nginx-ingress를 설치한다.
helm install nginx-ingress-admin ingress-nginx/ingress-nginx -n kube-ingress
확인
$ kubectl get pod -n kube-ingress
------------------------------------------------------------------------------------------------
NAME                                                            READY   STATUS    RESTARTS   AGE
nginx-ingress-admin-ingress-nginx-controller-7995755565-5knzr 1/1 Running 0 2m- STATUS :'running' 상태 확인
1-2. Ingress 오브젝트 Deploy
ingress 오브젝트가 제대로 동작하는지 확인하기 위해 deployment를 배포하고 deployment를 타겟으로 하는 ingress object를 배포한다.
deployment.yml배포
apiVersion: apps/v1
kind: Deployment
metadata:
  name: mynapp-deploy
  labels:
    app: mynapp-deploy
spec:
  strategy:
    type: RollingUpdate
    rollingUpdate:
      maxUnavailable: 2
      maxSurge: 2
  minReadySeconds: 20
  replicas: 3
  selector:
    matchLabels:
      app: mynapp-deploy
  template:
    metadata:
      labels:
        app: mynapp-deploy
    spec:
      containers:
        - image: c1t1d0s7/myweb
          name: mynapp
          ports:
          - containerPort: 8080
ingress.yml배포 +nodeport
---
apiVersion: networking.k8s.io/v1beta1
kind: Ingress
metadata:
  name: mynapp-ing
spec:
  rules:
  - host: mynapp.example.com          #외부에서 접속하는 FQDN 주소
    http:
      paths:
      - path: /                       #해당 path로 들어오면
        backend:
          serviceName: test-nodeport  #'test-nodeport'서비스로 연결시킨다.
          servicePort: 80
---
apiVersion: v1
kind: Service
metadata:
  name: test-nodeport
spec:
  type: NodePort
  ports:
  - port: 80
    targetPort: 8080
    nodePort: 31111
  selector:
    app: mynapp-deploy
확인
- nodeport의 ENDPOINTS 확인
$ kubectl get ep
----------------------------------------------------------------------
NAME            ENDPOINTS                                        AGE
kubernetes      10.0.1.246:443,10.0.3.112:443                    123m
test-nodeport 10.0.1.245:8080,10.0.2.198:8080,10.0.3.45:8080 69m- ingress에 ADDRESS 확인
$ kubectl get ing
----------------------------------------------------------------------------------------------------------------------------
NAME         HOSTS                ADDRESS                                                                        PORTS   AGE
mynapp-ing mynapp.example.com acc4b512ab4eb43d0b6e914578ecb44c-1709268104.ap-northeast-2.elb.amazonaws.com 80 68m- 정상적으로 생성이 되었으면 AWS 웹에서 리소스가 생성이 된걸 확인할 수 있다.

2. 모니터링
2-1. metric-server
metric-server로 메트릭 API를 통해 주어진 노드나 파드에서 현재 사용중인 컨테이너 CPU 및 메모리 사용량과 같은 리소스 사용량을 알 수 있다.
- repo를 helm에 추가한다.
helm repo add eks https://aws.github.io/eks-charts - monitoring 네임스페이스를 추가한다.
kubectl create ns monitoring metrice-server를 생성한 네임스페이스에 설치한다.
helm install metrics-server stable/metrics-server -n monitoring
확인
kubectl top nodes명령어로 노드의 리소스사용량 확인
$ kubectl top nodes
-------------------------------------------------------------------------------------------
NAME                                            CPU(cores)   CPU%   MEMORY(bytes)   MEMORY%
ip-10-0-1-194.ap-northeast-2.compute.internal   56m          2%     403Mi           27%
ip-10-0-2-199.ap-northeast-2.compute.internal   52m          2%     420Mi           28%
ip-10-0-3-101.ap-northeast-2.compute.internal   53m          2%     402Mi           27%
kubectl top pods명령어로 dafault NS의 파드의 리소스사용량 확인 (1분정도 소요)
kubectl top pods
--------------------------------------------------------------
NAME                             CPU(cores)   MEMORY(bytes)
mynapp-deploy-77c4d84774-g6k6d   0m           5Mi
mynapp-deploy-77c4d84774-pq7zb   0m           5Mi
mynapp-deploy-77c4d84774-qv7fg   0m           5Mi
2-2. Grafana Loki 설치
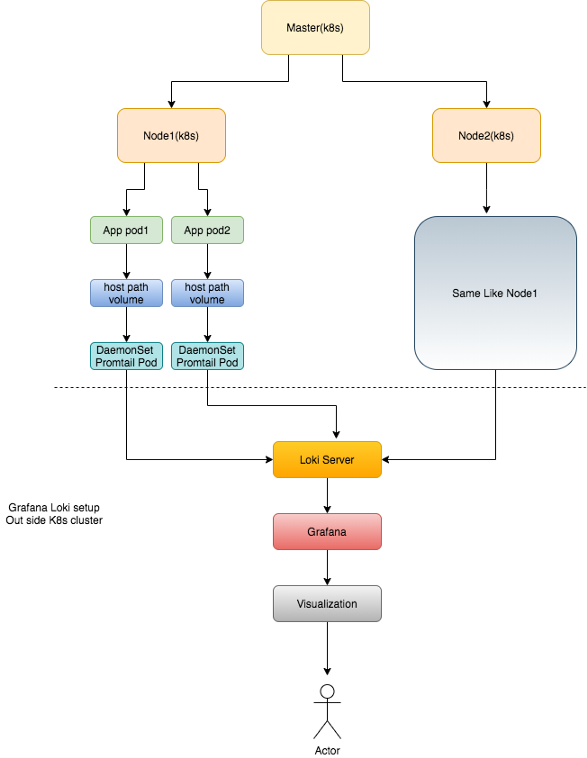
Prometheus에 영감을 받아서 탄생한 클라우드 네이티브 인프라를 위한 로깅 서비스이다.
설치방법은 Grafana-loki Docs와 github를 참고하여 설치한다.
Grafana Loki의 아키텍쳐

- Grafana
- Loki
- Promtail
2-2-1. Loki & Prometheus
- loki 설치를 위한 repo를 helm에 추가
helm repo add loki https://grafana.github.io/loki/charts
helm repo update - loki 설치
helm upgrade --install loki loki/loki-stack --namespace monitoring
2-2-2. Grafana
-
Grafana 배포
helm install stable/grafana -n monitoring -
배포된 Grafana의 서비스명 확인
kubectl get svc -n monitoring -
'admin' 계정의 암호 확인
kubectl get secret --namespace monitoring grafana-1600230534 -o jsonpath="{.data.admin-password}" | base64 --decode ; echo -
웹 접속을 위해 Grafana 서비스 포트포워딩
kubectl port-forward --namespace monitoring service/grafana-1600230534 3000:80
- http://localhost:3000/로 접속한다.
3. Continuous Deploy (CD)
3-1. Argo CD

Argo CD?
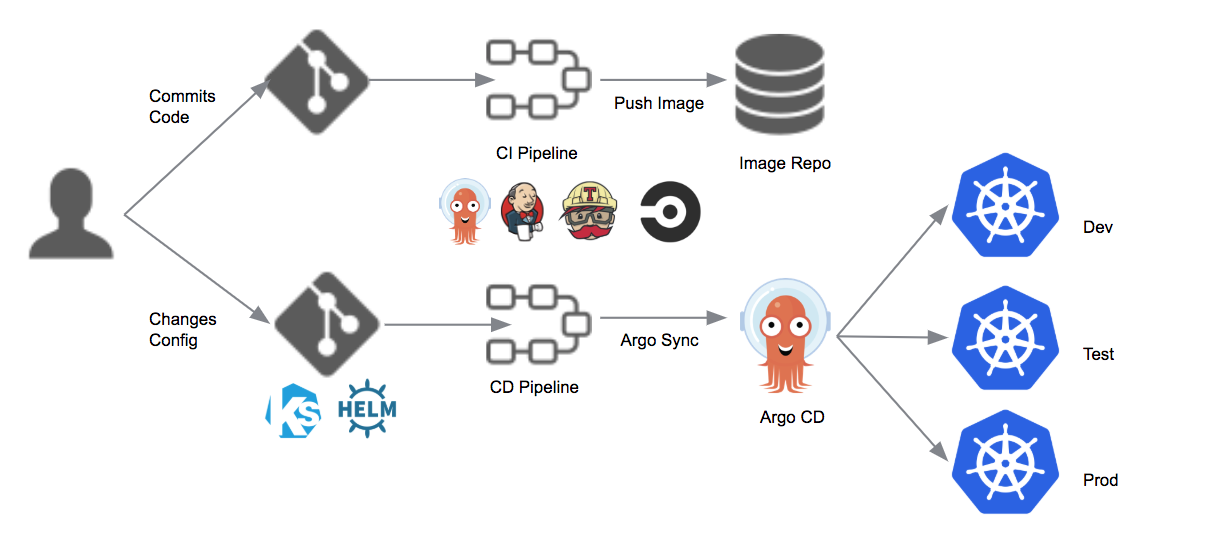
쿠버네티스 환경에서 지속적 전달을 통해 서비스를 배포하기 위한 전략을 도와주는 오픈소스 툴킷
CI/CD Architecture

-
ArgoCD 배포
kubectl apply -n monitoring -f <https://raw.githubusercontent.com/argoproj/argo-cd/stable/manifests/install.yaml> -
웹으로 접속 가능하게 Type 변경
kubectl patch svc argocd-server -n monitoring -p '{"spec": {"type": "LoadBalancer"}}' -
ArgoCD CLI 설치
VERSION=$(curl --silent "https://api.github.com/repos/argoproj/argo-cd/releases/latest" | grep '"tag_name"' | sed -E 's/.*"([^"]+)".*/\1/')
sudo curl --silent --location -o /usr/local/bin/argocd https://github.com/argoproj/argo-cd/releases/download/$VERSION/argocd-linux-amd64
sudo chmod +x /usr/local/bin/argocd
4. admin계정의 패스워드를 'dkagh1.'으로 변경 (여기에서 해시암호를 생성할 수 있다.)
kubectl -n monitoring patch secret argocd-secret -p '{"stringData": { "admin.password": "$2a$10$Bln37c5XJT7kY5D3MBA5NupvCBcAZHmYpoUXfRO3qSf/JKDu2.qCu", "admin.passwordMtime": "'$(date +%FT%T%Z)'" }}'5. 주소 확인 후 접속
$ kubectl get svc -n monitoring
----------------------------------------------------------------------------------------
NAME                    TYPE           CLUSTER-IP       EXTERNAL-IP                                                                    PORT(S)                      AGE
argocd-server           LoadBalancer   172.20.177.6     a765731440a4444a5b8f2ef7671eeb77-1379951734.ap-northeast-2.elb.amazonaws.com   80:30180/TCP,443:31368/TCP   25m
ArgoCD로 애플리케이션 배포
EKS Workshop을 참고하여 작성하였다.
- 컨텍스트 연결
CONTEXT_NAME=`kubectl config view -o jsonpath='{.contexts[].name}'`
argocd cluster add $CONTEXT_NAME
2.
