
컴포넌트는 여러 부품으로 이루어져 있습니다. 예를 들어, 지난 번 작성한 모달의 경우 상단(헤더), 중단(바디), 하단(푸터)로 나뉠 수 있습니다.
이 때 만약, 사용자에게 각 부품을 커스터마이징 하여 넘겨줄 수 있도록 하고, 넘겨받은 컴포넌트를 정확하게 특정 위치에 렌더링 하려면 어떻게 할 수 있을까요?
본 글에서는 그에 대한 다양한 방법 중, '슬롯 컴포넌트'를 사용하는 방법에 대해 소개해보고자 합니다.
슬롯 컴포넌트란
슬롯 컴포넌트라는 개념은, Vue.js 진영에서는 공식적으로 지원하기도 하고, 자주 사용되는 개념 중 하나입니다. 슬롯 컴포넌트를 사용하면 미리 정해진 위치에 사용자가 원하는 컴포넌트를 삽입할 수 있습니다.
// Layout.vue
<div class="container">
  <header>
    <slot name="header"></slot>
  </header>
  <main>
    <slot name="content"></slot>
  </main>
  <footer>
    <slot name="footer"></slot>
  </footer>
</div>
// App.vue
<BaseLayout>
<template #header>
<h1>자기소개</h1>
</template>
<template #content>
<p>안녕하세요.</p>
<p>이승로입니다.</p>
</template>
<template #footer>
<p>감사합니다.</p>
</template>
</BaseLayout>이렇게 코드를 작성하면 Layout.vue에서 slot의 위치에, App.vue에서 입력한 template들이 각각 지정한 이름에 맞게 들어가, 최종적으로 아래와 같이 렌더링 됩니다.
<div class="container">
  <header>
    <!-- <slot name="header"></slot> -->
    <h1>자기소개</h1>
  </header>
  <main>
    <!-- <slot name="content"></slot> -->
    <p>안녕하세요.</p>
  	<p>이승로입니다.</p>
  </main>
  <footer>
    <!-- <slot name="footer"></slot> -->
    <p>감사합니다.</p>
  </footer>
</div>
일반적인 방식
글의 서론에서 언급한 바와 같이 사용자에게 넘겨받은 컴포넌트 내 부품을 특정 위치에 렌더링하기 위해 리액트에서는 주로 props로 컴포넌트를 넘기는 방식을 사용했습니다.
<Layout
  header={<h1>자기소개</h1>}
  content={
  	<>
      <p>안녕하세요.</p>
  	  <p>이승로입니다.</p>
    </>
  }
  footer={
   	<p>감사합니다.</p>
  }
/>
음... 관점에 따라 다르겠지만 제가 느끼기에는 그리 깔끔하지 않았습니다. 제가 그렇게 느낀 이유는 아래와 같습니다.
- 데이터를 나타내는
props에 레이아웃을 구성하는Element가 작성되어,Element와props의 역할이 명확하지 않습니다. - 하나의 루트 요소가 있지 않은 경우(
content와 같은 경우)Fragment로 감싸주어야 합니다. - 하나의 컴포넌트에 대한
props선언부가 길어지면서, 전체적인 구조를 파악하기가 어려워집니다.
그렇다면, 리액트에서는 Vue.js와 같이 슬롯의 형식으로 코드를 작성할 수 없을까요?
children에서 내가 원하는 요소만 뽑기
만약, 전달받은 children에서 내가 원하는 요소만 뽑아 사용할 수 있다면, 이것이 불가능하지는 않을 것 같습니다.
리액트의 모든 노드는 ReactNode로 표현되고, ReactNode는 string, number, boolean과 같은 원시값으로도 표현되지만, ReactElement, ReactFragment와 같은 객체 형태로도 표현될 수 있습니다.
이러한 객체 형태의 child들은 해당 노드를 설명하기 위한 많은 정보들을 담고 있는데요, 이 정보들을 살펴보면 힌트를 얻을 수도 있을 것 같습니다.
const Parent = ({ children }: ComponentProps<'div'>) => {
  console.log(children);
  return <div>{children}</div>;
};

const Page = () => {
  return (
    <Parent>
      <Child />
    <Parent>
  );
};
위 Page 컴포넌트를 렌더링 해보면 아래와 같은 로그가 찍힙니다.
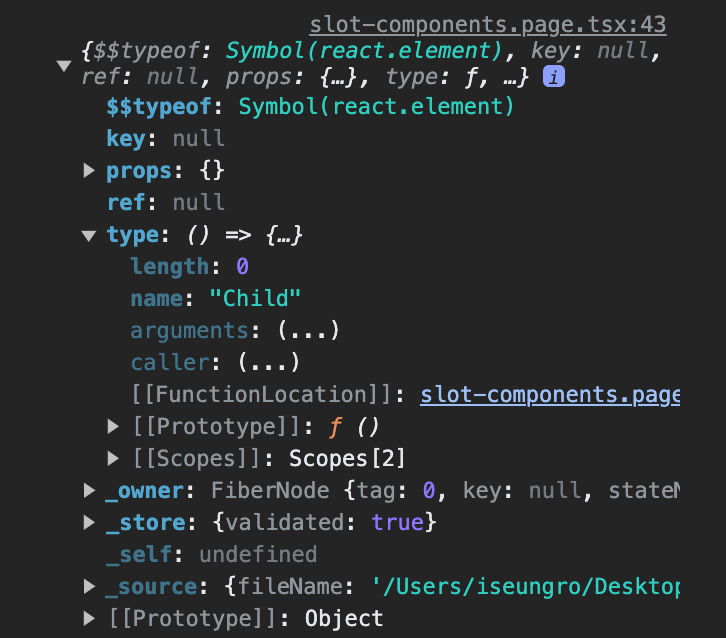
위 로그에서 대충 유추할 수 있듯이, ReactElement 객체는 type이라는 멤버를 가집니다.
// @types/react/index.d.ts

interface ReactElement<
  P = any,
  T extends string | JSXElementConstructor<any> = string | JSXElementConstructor<any>,
> {
  type: T;
  props: P;
  key: string | null;
}
그리고 이 type은 string 혹은 JSXElementConstructor를 상속 받는데, 이 JSXElementConstructor는 JSX로 사용될 수 있는 컴포넌트, 즉, ReactElement를 리턴하는 함수를 의미합니다.
// @types/react/index.d.ts

type JSXElementConstructor<P> =
  | ((
    props: P,
    /**
     * @deprecated
     */
    deprecatedLegacyContext?: any,
  ) => ReactNode)
  | (new(
      props: P,
      /**
       * @deprecated
       */
      deprecatedLegacyContext?: any,
  ) => Component<any, any>);
잠깐,
string은 왜 저기 붙어 있나요?
ReactElement는 컴포넌트로 생성될 수도 있지만,<div>,<p>와 같은 기본 HTML 요소를 통해서도 생성될 수 있습니다. 이러한 기본 HTML 요소로ReactElement가 생성된 경우,"div","p"와 같은 문자열이type에 지정됩니다.
그렇다면, 이 type 값을 비교함을 통해 우리가 원하는 요소를 선택할 수 있지 않을까요?
const Child = () => {
  return <div>I'm child!</div>;
};

const Sibiling = () => {
  return <div>I'm sibiling</div>;
};

const isChildElement = (
  child: ReactNode
): child is ReactElement<{}, typeof Child> => {
  return isValidElement(child) && child.type === Child;
};

const Parent = ({ children }: ComponentProps<'div'>) => {
  const selectedChild = useMemo(() => {
    if (Array.isArray(children)) {
      return children.find(isChildElement);
    }

    if (isChildElement(children)) {
      return children;
    }
  }, []);

  return <div>selected: {selectedChild}</div>;
};

const Page = () => {
  return (
    <Parent>
      <Child />
      <p>hello!</p>
      <Sibiling />
    </Parent>
   );
};
위 컴포넌트를 렌더링 해보면
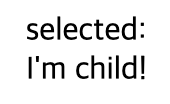
Child에 해당하는 컴포넌트가 잘 렌더링 되는 것을 볼 수 있습니다! 이제 우리는 children 중에서 우리가 원하는 특정 요소를 선택해서, 원하는 위치에 배치할 수 있게 되었습니다. 즉, 슬롯 컴포넌트의 개념을 도입할 수 있게 되었다고도 볼 수 있을 것 같습니다. 이제 슬롯 컴포넌트의 개념을 모달 컴포넌트에 적용해 볼까요? 그 전에, 몇 가지 수정해야 할 부분들이 조금 보입니다.
선택하고자 하는 child의 타입 동적으로 지정하기
현재 isChildElement 함수는 Child 타입의 요소만 걸러낼 수 있습니다. 만약 Child가 아닌 N개의 다른 요소에 대해서도 걸러내기 위해서는 이런 식이라면, N개의 함수를 작성해야 합니다.
그보다는, 함수가 좀 더 동적인 상황에 대응할 수 있도록 지원하는 것이 바람직 해 보입니다.
잠깐! 에디터를 켜고 키보드로 손을 옮기기 전에 한번만 생각을 해봅시다. 이러한 순간에서 '동적인 상황'에 대해 구체적으로 정의하는 것은 대부분의 상황에서 우리의 시간을 절약해 줄 가능성이 높습니다.
단순히 타입을 동적으로 입력받을 수 있으면 그만일까요?
우리가 만들, Modal의 경우를 떠올려 보겠습니다. Modal 컴포넌트 내에서 이 함수를 사용한다면, 그 목적은 Modal.Header, Modal.Body, Modal.Footer를 각각 분리해내기 위함일 것입니다. 그렇다면 이 함수 내에서, 단순히 한 가지 타입에 대해서만 걸러내는 것이 아니라, 위 세개 타입에 대해 children을 걸러낼 수 있다면 좀 더 효율적이지 않을까요?
이를 구현하기 위해, 걸러내고자 하는 child의 타입을 배열 형태로 받아 처리할 수 있도록 함수를 구현해보겠습니다.
const isTypeOfElement = (
  types: (string | JSXElementConstructor<any>)[],
  child?: ReactNode
) {
  return isValidElement(child) && types.includes(child.type);
}
실습
모든 준비가 끝났으니, 이제 지난 글에서 작성한 모달 컴포넌트에 슬롯 컴포넌트의 개념을 도입해보겠습니다.
먼저, 아래와 같이 JSX 구조를 짜는 것을 목표로 하겠습니다.
<div>
  <header>
    {header /* header 슬롯 */}
  </header>
  <main>
    {body /* body 슬롯 */}
  </main>
  <footer>
    {footer /* footer 슬롯 */}
  </footer>
</div>
이를 위해서는 header, body, footer 각각을 추출해야 합니다. 많은 방법이 있겠지만 저는 useMemo에서 이들 각각을 객체에 담아 리턴하고, 구조분해할당을 사용해서 받아 사용할 수 있도록 reduce를 사용하여 추출해 보겠습니다.
const { header, body, footer } = useMemo(() => {
  if (!Array.isArray(children)) {
    throw Error('Modal 컴포넌트의 자식 요소는 단일 요소일 수 없습니다.');
  }

  /**
   * reduce 과정에서 각각 child가 알맞은 키 값을 가질 수 있도록
   * key가 각 부품 컴포넌트 함수(JSXElementConstructor)이고,
   * value는 (리턴할 객체의)키 값인 Map을 만듭니다.
   * 이렇게 하면 partsMap.get(child.type)을 통해 키 값을 획득할 수 있습니다.
   */
  const partsMap = new Map<
    string | JSXElementConstructor<any>,
    string
  >((['Header', 'Body', 'Footer'] as const).map((name) => [
    Modal[name],
    name.toLowerCase(),
  ]));

  return children
    .filter(
      (child): child is ReactElement =>
        // Map.keys 메소드는 IterableIterator를 반환하기 때문에, 이를 배열으로 변환합니다.
        isTypeOfElement([...partsMap.keys()], child)
      )
    .reduce(
      (result, child) => ({
        ...result,
        [partsMap.get(child.type)!]: child,
      }),
      {} as Record<'header' | 'body' | 'footer', ReactElement>
    );
}, []);
이렇게 children에서 각 부품을 추출하는 것까지 완료하면 아래와 같은 전체 코드가 작성됩니다.
import {
  ComponentPropsWithCSS,
  JSXElementConstructor,
  ReactElement,
  ReactNode,
  forwardRef,
  isValidElement,
  useMemo,
} from 'react';
import { css } from '@emotion/react';

type ModalProps = ComponentPropsWithCSS<'div'> & {
  visible: boolean;
};

const modalStyle = css`
  display: flex;
  flex-direction: column;

  padding: 0.75rem 1rem;
  border-radius: 0.75rem;

  background-color: white;
`;

const backdropStyle = css`
  position: fixed;
  top: 0;
  left: 0;
  width: 100vw;
  height: 100vh;

  display: flex;
  justify-content: center;
  align-items: center;

  background-color: rgba(0, 0, 0, 0.3);
`;

const isTypeOfElement = (
  types: (string | JSXElementConstructor<any>)[],
  child?: ReactNode
): child is ReactElement => {
  return isValidElement(child) && types.includes(child.type);
};

const _Modal = forwardRef<HTMLDivElement, ModalProps>(
  ({ visible, css, children, ...props }, ref) => {
    const { header, body, footer } = useMemo(() => {
      if (!Array.isArray(children)) {
        throw Error('Modal 컴포넌트의 자식 요소는 단일 요소일 수 없습니다.');
      }

      const partsMap = new Map(
        (['Header', 'Body', 'Footer'] as const).map(
          (name) =>
            [Modal[name], name.toLowerCase()] as [
              string | JSXElementConstructor<any>,
              string
            ]
        )
      );

      return children
        .filter((child): child is ReactElement =>
          isTypeOfElement([...partsMap.keys()], child)
        )
        .reduce(
          (result, child) => ({
            ...result,
            [partsMap.get(child.type)!]: child,
          }),
          {} as Record<'header' | 'body' | 'footer', ReactElement>
        );
    }, []);

    return (
      <>
        {visible && (
          <div css={backdropStyle}>
            <div css={[css, modalStyle]} ref={ref} {...props}>
              <header>{header}</header>
              <main>{body}</main>
              <footer>{footer}</footer>
            </div>
          </div>
        )}
      </>
    );
  }
);

// 이하 생략...여기에서 예시를 직접 내려받아 확인해보실 수 있습니다.
이렇게 슬롯 컴포넌트의 개념을 모달 컴포넌트에 도입할 수 있었습니다. 그러나 여전히, 코드의 품질적인 측면에서 많이 아쉽다고 할 수 있을 것 같습니다.
마무리
슬롯 컴포넌트는 React.js 진영에서는 아직 보편적인 개념은 아닌 것 같지만, 잘 리팩토링 한 후 사용하면 개인적으로는 굉장히 매력있는 개념이라고 생각합니다.
앞으로 본격적으로 코드를 리팩토링 해가면서, 다양한 기술들을 접목해보면서 개인적으로 프론트엔드 개발을 진행할 때 사용했던 방법들을 소개해볼까 합니다.