- ConstraintLayout
Constraint : 제약, 제한, 통제
어떤 Widget(ImageView나 TextView,Button 등)을 쉽게 "통제"할수 있다. 동시에 필수적으로 "제약"을 걸어주어야 한다.
ConstraintLayout을 사용하면
1. 복잡한 레이아웃 계층구조를 단순히 구성하여 작성할 수 있다.
2. 자식Veiw 간의 상호관계를 정의할 수 있다.
예) 두 View를 위 아래 기준으로 중앙에 배치하기 등 (아래 읽어보면 앎)
ConstraintLayout이 제공하는 "제약(Constraint)"들, 즉, 컨스트레인트레이아웃 속성의 이름은 기본적으로 "layout_constraint"로 시작하며, 바로 뒤에 구체적인 제약 조건이 명시된다.
Layout_constraintXXXXXXXXX (XXX: 구체적인 제약 조건)
ex) Layout_constraintLeft_toRightof = "~"
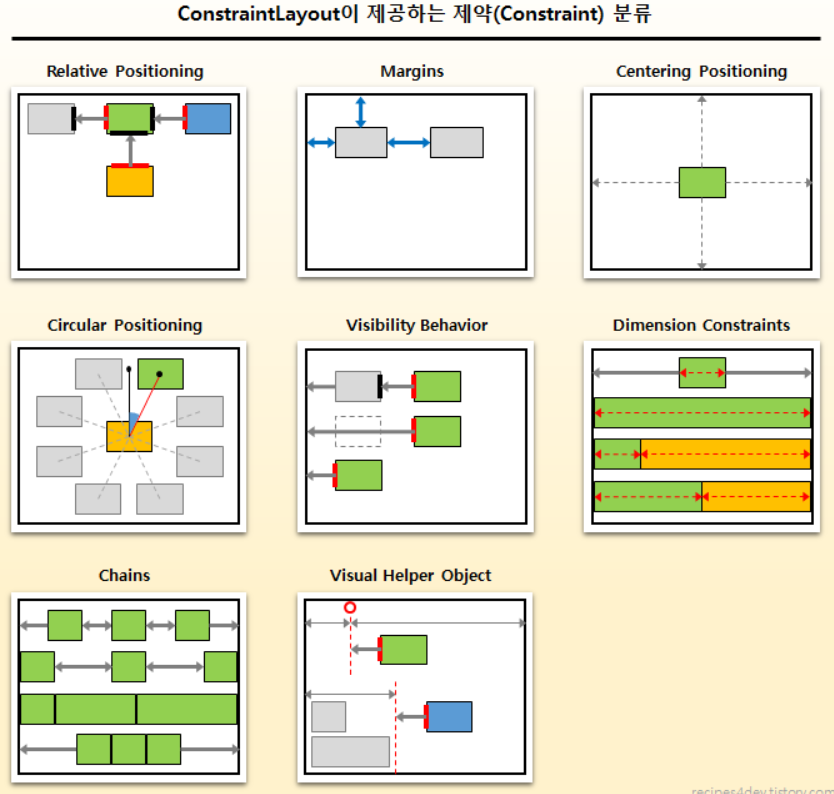
아래 링크를 클릭하면, 각 항목에 대한 좀 더 상세한 설명과 예제를 확인할 수 있다.
다양한 제약 유형
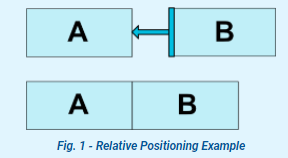
Relative positioning
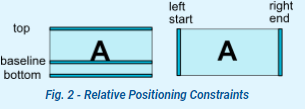
요소 간 상대 위치 지정. (left, right, top, bottom, start, end, baseline)
Margins
요소 간 여백(Margin) 설정을 위한 제약.
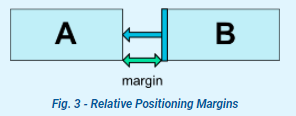
margin값은 항상 양수이거나 0.
layout_goneMarginStart 와 같이 GONE을 사용해서 다른 margin값을 줄 수 있다.
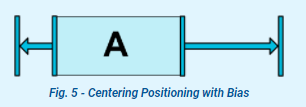
Centering positioning
뷰를 부모 레이아웃 또는 제약 치수의 중앙에 배치.

제약이 불가능하도록 제약을 닿지않는 끝에 주면 가운데로 위치된다.
Bias
위 경우처럼 제약을 두되 특정 비율을 정해주어서 가운데가 아닌 곳에 위치하도록 설정.
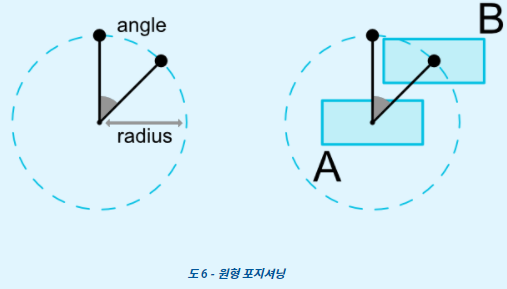
Circular positioning
대상 뷰를 기준으로 각도(angle)와 반지름(radius)으로 상대 위치 지정.
Visibility behavior
뷰의 Visibility 상태에 따른 최종 위치 결정 및 여백.
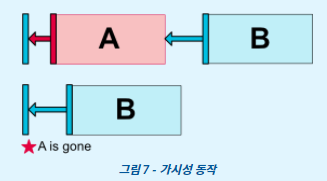
A가 GONE 상태가 되면 A의 크기와 마진값이 0 이되면서 B의 위치가 결정된다.
- Dimension constraints
뷰에 적용된 치수 제약에 따른 뷰의 크기 결정.
android:minWidth
android:maxHeight 레이아웃의 최소/최대 너비/높이 설정
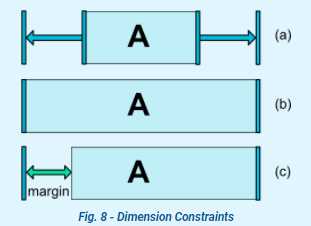
(a) 는 wrap_content 에 Center Positioning, (b)는 0dp에 Center Positioning, (c)는 0dp에 margin 왼쪽만 설정
MATCH_PARENT 는 ConstraintLayout에서는 권장되지 않음. 비슷한 작업이 left/right 혹은 top/bottom를 parent로 제약을 걸어주는 MATCH_CONSTRAINT로 걸어주는 것으로 정의될 수 있다.
Percent Dimension
치수을 MATCH_CONSTRAINT(0dp)로 설정해야 함
기본값은 app:layout_constraintWidth_default = "percent" 혹은 constraintHeight 로 설정해야 함.
그리고 layout_constraintWidth_percent 를 0과 1사이의 값으로 설정
Ratio
한 위젯의 치수을 다른 위젯 치수에 대한 비율로 설정 가능. 최소한 하나의 제한 치수을 0dp로 설정해야 함. 그리고 laytout_constraintDimensionRatio로 비율 설정.
아래 코드는 너비와 높이를 같은 비율로 설정한 것. (실수형, 너비 : 높이)
<Button android:layout_width="wrap_content"
	android:layout_height="0dp"
	app:layout_constraintDimensionRatio="1:1" />
그리고 만약 너비와 높이 모두 MATCH_CONSTRAINT(0dp)일 때 W나 H를 먼저 적어서 하나를 제약에 맞춰 설정한 뒤 비율에 따라 높이를 결정할 수 있다.
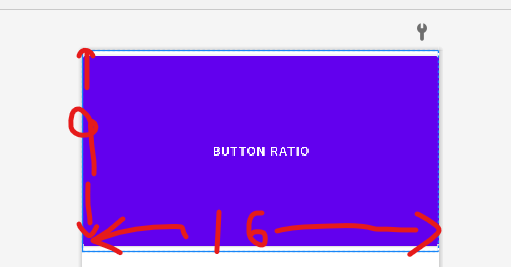
아래 코드는 먼저 높이를 제약에 맞춰서 설정한 후 너비: 높이 를 16: : 9 비율로 크기를 설정한다.
<Button
	android:text="Button Ratio"
    	android:layout_width="0dp"
    	android:layout_height="0dp"
        app:layout_constraintDimensionRatio="H,16:9"
        app:layout_constraintBottom_toBottomOf="parent"
        app:layout_constraintTop_toTopOf="parent"
        app:layout_constraintStart_toStartOf="parent"
        app:layout_constraintEnd_toEndOf="parent"
        />
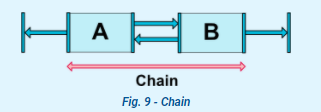
Chains
수평 또는 수직 방향(Axis)으로 나열된 뷰에 대한 그룹화. 배치 스타일 지정. 아래 추가 설명

Virtual Helpers objects
레이아웃 내 효율적인 뷰 배치에 사용 가능한 몇 가지 Helper 객체들. (Guideline, Barrier, GroupOptimizer) 제약 카테고리에 대한 최적화.
Guideline
- 가로 또는 세로 축 방향을 가진 가상의 뷰
- 부모 뷰의 특정 위치를 기준점으로 삼을 때 사용
- 축, 위치 값을 속성으로 가짐
- 축 : android:orientation = "[vertical | horizontal]"
- 위치- app : layout_constraintGuide_begin : 시작 지점으로부터의 거리
- app : layout_constriantGuide_end : 끝 지점으로부터의 거리
- app : layout_constraintGuide_percent : 시작 지점으로부터의 % 위치
<androidx.constraintlayout.widget.Guideline
            android:id="@+id/guideline1"
            android:layout_width="wrap_content"
            android:layout_height="wrap_content"
            android:orientation="horizontal"
            app:layout_constraintGuide_begin="120dp" />

        <androidx.constraintlayout.widget.Guideline
            android:id="@+id/guideline2"
            android:layout_width="wrap_content"
            android:layout_height="wrap_content"
            android:orientation="vertical"
            app:layout_constraintGuide_end="120dp" />

        <androidx.constraintlayout.widget.Guideline
            android:id="@+id/guideline3"
            android:layout_width="wrap_content"
            android:layout_height="wrap_content"
            android:orientation="vertical"
            app:layout_constraintGuide_percent="0.3" />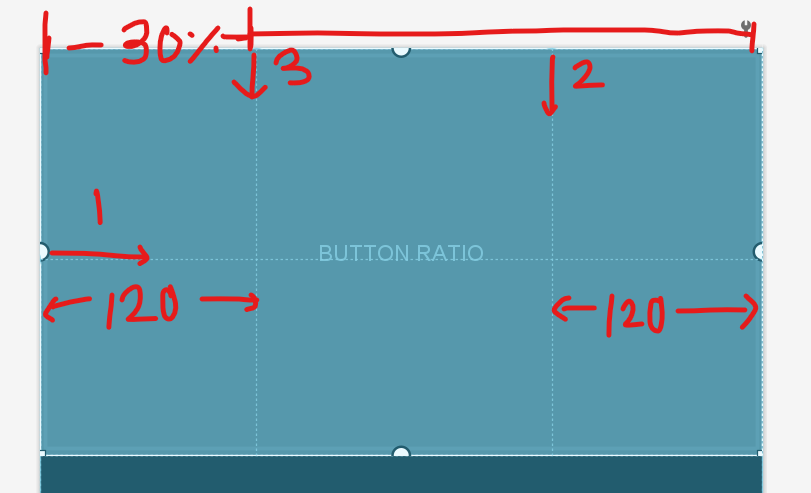
Barrier
Barrier: 장벽. 말그대로 장벽을 만들어 그 이상 뷰들이 넘어 오지 못하도록 만든다.
Guideline은 정적으로 수치를 입력하여 고정된 벽을 만들었다면, Barrier는 어떤 뷰들을 기준으로 동적인 벽을 만들 수 있다..
- barrierDirection : barrier의 방향을 결정한다.
- constraint_referenced_ids : 장벽의 기준점으로 참조할 뷰의 아이디를 여러개 참조
- barrierAllowsGoneWidgets : 참조하고 있던 true 또는 false 값을 통해 참조하고 있던 뷰가 GONE 될 때의 동작을 지정.
<TextView
        android:id="@+id/tv1"
        android:layout_width="wrap_content"
        android:layout_height="wrap_content"
        android:text="동해물과 "
        app:layout_constraintStart_toStartOf="parent"
        app:layout_constraintBottom_toTopOf="@+id/tv2"
        app:layout_constraintTop_toTopOf="parent"
        app:layout_constraintVertical_chainStyle="packed" />
    <TextView
        android:id="@+id/tv2"
        android:layout_width="wrap_content"
        android:layout_height="wrap_content"
        android:text="마르고 닳도록"
        app:layout_constraintStart_toStartOf="parent"
        app:layout_constraintBottom_toBottomOf="parent"
        app:layout_constraintTop_toBottomOf="@+id/tv1" />

    <androidx.constraintlayout.widget.Barrier
        android:id="@+id/barrier"
        android:layout_width="wrap_content"
        android:layout_height="0dp"
        app:barrierDirection="end"
        app:constraint_referenced_ids="tv1,tv2" />

    <Button
        android:id="@+id/btn1"
        android:layout_width="wrap_content"
        android:layout_height="wrap_content"
        android:text="barrier"
        app:layout_constraintBottom_toBottomOf="parent"
        app:layout_constraintStart_toEndOf="@id/barrier"
        app:layout_constraintTop_toTopOf="parent" />

</androidx.constraintlayout.widget.ConstraintLayout>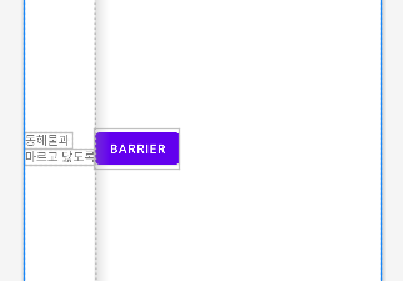
tv2가 tv1보다 길어서 tv2의 end부분에 장벽이 생김
만약 TV1과 TV2를 참조하는 Barrier를 right, left 방향으로 두개 만들고, 그 Barrier들 중앙에 Object를 배치했을 때 TV2이 GONE된다면? TV2를 참조하는 Barrier가 constraintLayout의 가장 왼쪽에 달라 붙으면서 object의 위치도 변하게 된다.
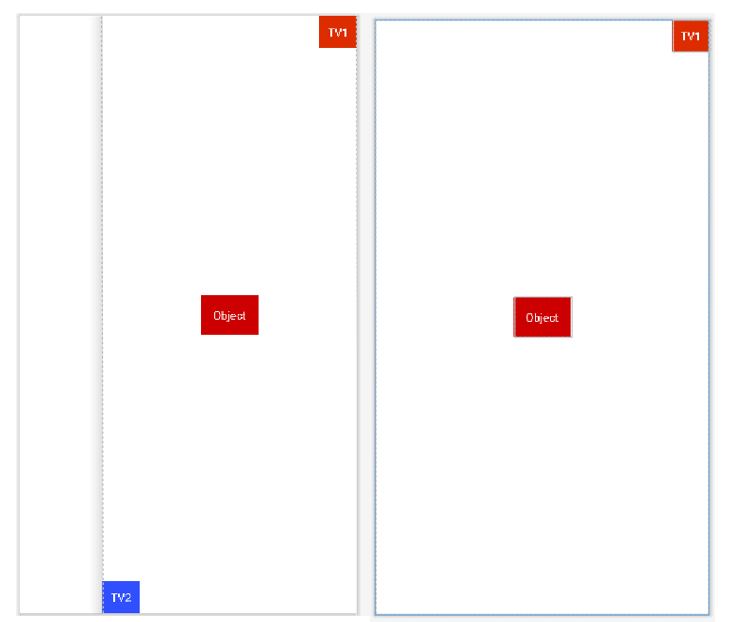
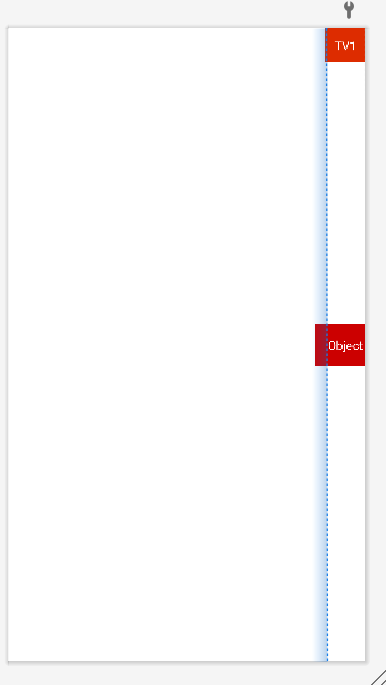
TV2가 GONE 상태일 때는 이러한 상태를 끊고 싶다면 해당 배리어의 속성을 app:barrierAllowsGoneWidgets=”false” 으로 바꾸어 설정하면 된다. 그렇게 되면 TV2가 GONE일 때 layout의 가장 왼쪽에 붙던 배리어가 TV1의 왼쪽에 붙게되어 아래와 같이 만들어진다.
Group
Group은 여러 뷰들을 참조하며, 참조된 뷰들을 쉽게 hide / show 할 수 있는 클래스
여러 Group들이 동시에 같은 뷰를 참조하여 뷰의 상태를 변경하는 경우 xml에 선언된 순서를 따라 마지막에 적용된 Group의 state를 따른다.
    <Button
        android:id="@+id/btn1"
        android:layout_width="wrap_content"
        android:layout_height="wrap_content"
        android:text="btn1"
        app:layout_constraintLeft_toLeftOf="parent"
        app:layout_constraintTop_toTopOf="parent" />

    <Button
        android:id="@+id/btn2"
        android:layout_width="wrap_content"
        android:layout_height="wrap_content"
        android:text="btn2"
        app:layout_constraintRight_toRightOf="parent"
        app:layout_constraintTop_toTopOf="parent" />

    <androidx.constraintlayout.widget.Group
        android:layout_width="wrap_content"
        android:layout_height="wrap_content"
        android:visibility="visible"
        app:constraint_referenced_ids="btn1,btn2" />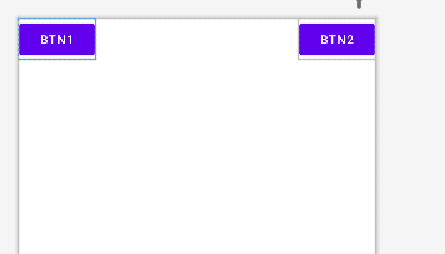
Group에서 visibility를 gone으로 할 때 버튼 두개가 모두 gone 된다.
https://recipes4dev.tistory.com/158?category=658689
위 홈페이지에서 구체적인 ConstraintLayout 속성을 확인할 수 있다.
<ImageView
	android:id="@+id/home_btn_setting_iv"
    	android: : ayout_width="40dp"
    	android:layout_height="40dp"
    	android:layout_marginTop="15dp"
    	android:scaleType="centerCrop"
    	android:src="@drawable/btn_main_setting"
    	app:layout_constraintEnd_toEndOf="parent"
    	app:layout_constraintTop_toTopOf="parent" />
<ImageView
	android:id="@+id/home_btn_ticket_iv"
	android:layout_width="40dp"
	android:layout_height="40dp"
	android:layout_marginTop="15dp"
	android:scaleType="centerCrop"
	android:src="@drawable/btn_main_ticket"
    	app:layout_constraintEnd_toStartOf="@id/home_btn_setting_iv"
	app:layout_constraintTop_toTopOf="parent">
</ImageView>
위의 코드와 사진의 설정 이미지와 티켓 이미지를 보면
ImageView로 두개의 image를 추가하는데 위치를 지정할 때 아래의 코드처럼 작성한다.
app:layout_constraintEnd_toEndOf="parent" <- 해당 이미지의 오른쪽 끝을 "parent"의 오른쪽 끝에다가 붙힌다는 의미
app:layout_constraintTop_toTopOf="parent" <- 해당 이미지의 위쪽 끝을 "parent"의 위쪽 끝에다가 붙힌다는 의미
app:layout_constraintEnd_toStartOf="@id/home_btn_setting_iv" <- 해당 이미지의 오른쪽끝은 home_btn_setting_iv 라는 아이디의 위젯의 왼쪽 끝에 붙힌다는 의미
app:layout_constraintTop_toTopOf="parent"> <- 해당 이미지의 위쪽 끝을 "parent"의 위쪽 끝에다가 붙힌다는 의미
여기서 parent는 ImageView를 감싸고 있는 Layout이 된다.
parent가 아닌 Widget의 id를 참조해서 constriant을 거는 것을 chain이라고 한다.
그렇다면 만약 티켓의 start를 parent의 start의 붙히고 설정의 end를 parent의 end에 붙힌 뒤
티켓의 end를 설정의 start, 설정의 start를 티켓의 end에 붙히면 어떻게 될까?
이미지의 크기가 늘어나면서 수평으로 꽉차게 될까 혹은 오류가 뜰까?
이것은 아래 이미지처럼 된다.

- ConstraintLayout Chain
ConstraintLayout 의 Chain도 타입이 있다. 따로 아무런 타입을 지정해주지 않으면 위처럼 된다.
이를 Spread Chain이라고 한다.
아래는 Chain의 종류이다.
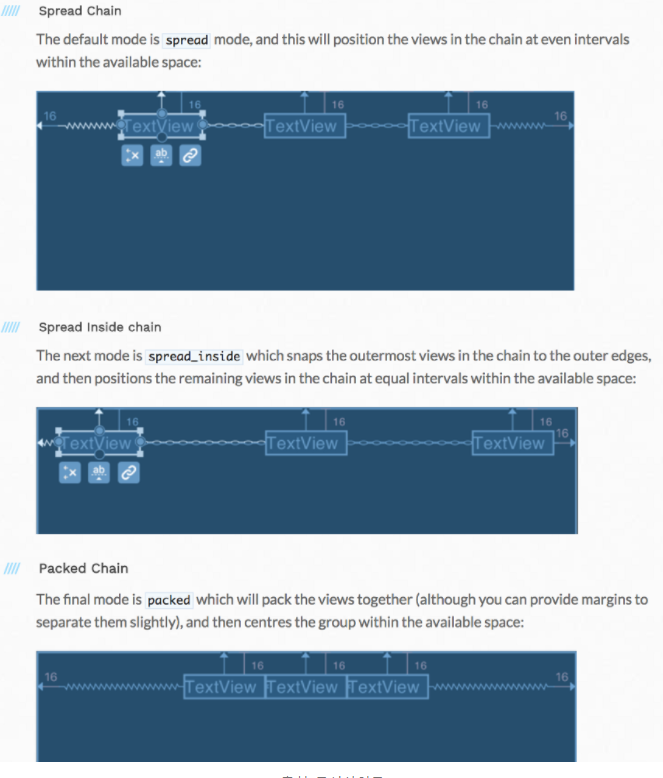
spread Chain : 기본 모드. 같은 간격(위에서는 16)으로 배치된다.
spread instide chain : 제일 바깥쪽 위젯은 제일 바깥쪽으로 배치되고 사이에 위젯이 있따면 같은 간격으로 배치된다.
Packed Chain : 바깥쪽의 끝을 기준으로 가운데에 모여서 배치된다. (물론 margin을 주면서 위치를 조금 조정할 수 있다.)
<Button.
    android:id="@+id/button1"
    android:layout_width="wrap_content"
    android:layout_height="wrap_content"
    android:text="button1"
    app:layout_constraintRight_toRightOf="parent"
    app:layout_constraintLeft_toRightOf="@+id/button2" />

<Button.
    android:id="@+id/button2"
    android:text="button2"
    android:layout_width="wrap_content"
    android:layout_height="wrap_content"
    app:layout_constraintHorizontal_chainStyle="packed"
    app:layout_constraintLeft_toLeftOf="parent"
app:layout_constraintRight_toLeftOf="@id/button1" />- what if?
만약에
1)왼쪽에 텍스트가 있고, 오른쪽에 이미지가 있는상황,
2) text maxline 은 1줄이고, text가 길어지든 짧아지든 text 바로옆에 이미지가 있도록 만들고 싶다면?
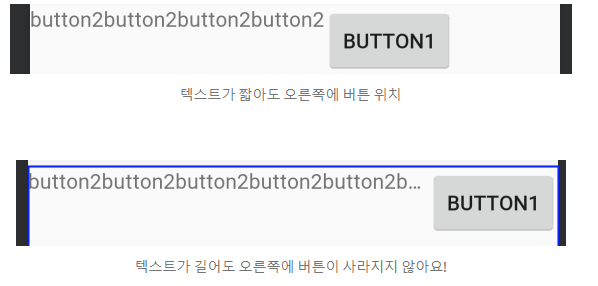
<android.support.constraint.ConstraintLayout
xmlns:android="http://schemas.android.com/apk/res/android"
xmlns:app="http://schemas.android.com/apk/res-auto"
  android:layout_width="match_parent"
  android:layout_height="match_parent">
  <TextView
    android:id="@+id/text1"
    android:text="button2button2button2button2"
    **android:layout_width="wrap_content"**
    android:layout_height="wrap_content"
    android:maxLines="1"
    **app:layout_constrainedWidth="true"**
    **app:layout_constraintHorizontal_weight="1"**
**    app:layout_constraintHorizontal_bias="0"
****    app:layout_constraintHorizontal_chainStyle="packed"
**    app:layout_constraintStart_toStartOf="parent"
    app:layout_constraintEnd_toStartOf="@id/button1" />

  <Button
    android:id="@+id/button1"
    android:layout_width="wrap_content"
    android:layout_height="wrap_content"
    android:text="button1"
    app:layout_constraintEnd_toEndOf="parent"
    app:layout_constraintStart_toEndOf="@id/text1" />

</android.support.constraint.ConstraintLayout>
하나씩 천천히 보자.
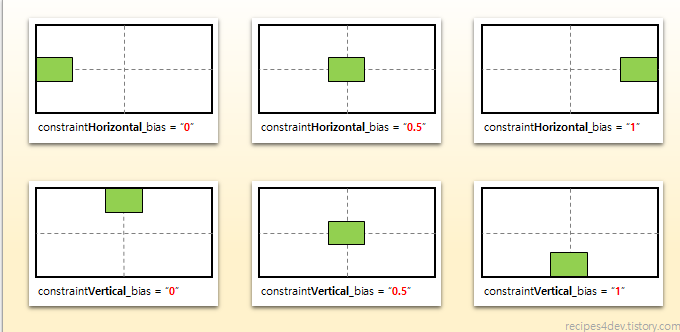
app:layout_constraintHorizontal_bias="0" : 수평 방향(Left/Right 또는 Strat/End)사이드 제약 시, 양 사이드 간 위치 비율
0이상의 소수점 값 사용 가능.
뷰의 왼쪽(또는 시작) 사이드 제약 위치가 0, 오른쪽(또는 끝)이 1
기본값은 0.5 0.5일때 정 가운데가 됨.
app:layout_constraintVerttical_bias= " " 이것도 마찬가지
app:layout_constraintHorizontal_weight="1" : 전체 너비 안에 화면에 요소가 전부 보이도록 너비를 수정해준다.
전체 너비를 1로 지정하고 그 안에서 나눠서 할 수 있따
출처 : https://recipes4dev.tistory.com/163
https://app-dev.tistory.com/98
https://seminzzang.tistory.com/21
https://recipes4dev.tistory.com/158?category=658689
https://medium.com/@futureofdev/android-constraintlayout-%EC%89%BD%EA%B2%8C-%EC%95%8C%EC%95%84%EA%B0%80%EC%9E%90-62d2ded79c17
https://www.charlezz.com/?p=691
