ES6 문법 정리
예전에 ES6에 대한 포스트를 작성한 적이 있지만, 책에 나온 김에 다시 한번 리뷰하면 좋을 것 같다는 생각이 들었다.
Template Literals - 템플릿 문자열
문자열 안에 변수나 연산을 혼합할 수 있는 문법이다.
var cart = { name: '도서', price: 1500 };
var getTotal = function(cart) {
  return cart.price + '원';
};
// 이러한 문자열이 있을 때 Template Literals를 적용하면
var myCart = '장바구니에 ' + cart.name + '가 있습니다. 총 금액은 ' + getTotal(cart) + ' 입니다.';
// 아래처럼 정리되어 변환할 수 있다.
var myCart = `장바구니에 ${cart.name}가 있습니다. 총 금액은 ${getTotal(cart)} 입니다.`;
문자열로 표시하려는 부분은 따옴표 대신 ``(backtick)으로 감싸주고, 그 안의 변수나 연산을 ${}으로 감싸주면 된다.
Spread Operator - 전개 연산자
책에 따르면 전개 연산자는 '나열형 자료를 추출하거나 연결할 때 사용되는데, 배열이나 객체, 변수 앞에 "..." 을 붙이는 방식이다.'
예를 들어 여러 변수를 선언하면서 배열 안의 값들을 각각 할당하려 한다면,
var array1 = ['one', 'two'];
var array2 = ['three', 'four'];
// 배열 안에서 ...array1, ...array2 처럼 작성해주면 각 배열안의 값을 나열하여 추출할 수 있다.
var combined = [...array1, ...array2];

// 이렇게 여러 변수를 선언하면서도 ...others 처럼 three 이후의 값들을 배열로 묶어 할당할 수 있다.
var [first, second, three = 'empty', ...others] = combined;

first === 'one';
second === 'two';
three === 'three'; // 'empty'는 값이 없을 때를 대비한 지정값
others === ['four'];
객체의 경우 또한 같다.
var objectOne = { one: 1, two: 2, other: 0 };
var objectTwo = { three: 3, four: 4, other: -1 };

// ES5 에선 각각 할당을 해주고,
var combined = {
  one: objectOne.one,
  two: objectOne.two,
  three: objectTwo.three,
  four: objectTwo.four,
};
// Object.assign 을 이용해 combined를 생성하고
var combined = Object.assign({}, objectOne, objectTwo); // combined = { one: 1, two: 2, three: 3, four: 4, other: -1}
// Object.assign 을 이용해 others를 생성하고 그 안의 other를 제거해야 했다.
var others = Object.assign({}, combined);
delete others.other;

// ES6 에선 Spread Operator를 통해 간단하게 객체의 값을 추출할 수 있다.
var combined = {
  ...objectOne,
  ...objectTwo,
}; // combined = { one: 1, two: 2, three: 3, four: 4, other: -1}

// 또한 ES6 Destructuring(비구조화 할당)을 이용하여 따로 구분하여 할당할 수 있다.
var { other, ...others } = combined;
// others = { one: 1, two: 2, three: 3, four: 4}
let & const - 가변 변수 & 불변 변수
기존의 var 와 다르게 ES6 의 let, const는 일단 선언되면 재선언이 불가능하다.
이 둘의 차이는 할당을 할 때 찾을 수 있는데, let의 경우 재할당이 가능하다.
let num = 123;
num = 456;
let arr = [1,2,3];
arr = [4,5,6];
let obj = { a: 1, b: 2, c: 3};
obj = { a: 4, b: 5, c: 6};
하지만 const같은 경우는 재할당이 불가능하다.
let num = 123;
num = 456; // Uncaught TypeError: Assignment to constant variable. - 타입에러 발생
let arr = [1,2,3];
arr = [4,5,6]; // Uncaught TypeError: Assignment to constant variable. - 타입에러 발생
let obj = { a: 1, b: 2, c: 3};
obj = { a: 4, b: 5, c: 6}; // Uncaught TypeError: Assignment to constant variable. - 타입에러 발생
그렇지만 재할당이 불가능하다는 것이 값을 변경할 수 없다는 뜻은 아니다.
let arr = [1,2,3];
arr[0] = arr[0] + 1; // arr === [2,2,3]
arr.push(4); // arr === [2,2,3,4]
let obj = { a: 1, b: 2, c: 3};
obj.a = 4; // obj === { a: 4, b: 2, c: 3}
이런 경우를 integrity constraint, 즉 무결성 제약 조건을 위배했다고 하는 경우다.
무결성을 유지하면서 값을 변경하려면 기존 변수에서 값을 추출해서 새로운 변수에 할당하는 방식을 사용할 수 있다. 또한 immutable한 함수들 (push 대신 concat, pop 대신 slice)을 사용하면서 무결성을 지킬 수 있다.
아래 예제는 https://github.com/justinpark/justin-do-it-react/blob/master/src/02/02-4.js 에서 참조했습니다.
const num1 = 1;
const num2 = num1 * 3; // num2 = 3

const str1 = '문자';
const str2 = str1 + '추가'; // str2 = '문자추가'

const arr3 = [];
const arr4 = arr3.concat(1); // arr4 = [1]
const arr5 = [...arr4, 2, 3]; // arr5 = [1, 2, 3]
const arr6 = arr5.slice(0, 1); // arr6 = [1], arr5 = [1, 2, 3]
const [first, ...arr7] = arr5; // arr7 = [2, 3], first = 1

const obj3 = { name: '내이름', age: 20 };
const obj4 = { ...obj3, name: '새이름' }; // obj4 = { name: '새이름', age: 20}
const { name, ...obj5 } = obj4; // obj5 = { age: 20 }

const arr = [1, 2, 3];
// 가변 변수를 사용한 예
for (let i = 0; i < arr.length; i++) {
  console.log(arr[i]);
}
// iterator 방식의 for-in 루프와 함께 불변 변수를 사용한 예
for (const item in arr) {
  console.log(item);
}

// forEach 함수를 활용한 예
arr.forEach((item, index) => {
  console.log(item);
  console.log(index);
});
아래 테이블에서 확인했을 때, 값을 직접 변경하는 가변 내장 함수를 사용하기보다 새결과를 반환하는 무결성 내장 함수를 사용하면 무결성 제약 조건을 지킬 수 있다.
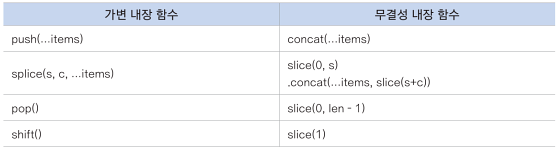
이미지 참조: Do it! 리액트 프로그래밍 정석 – 박호준 (p.36)
class - 클래스
ES6 class 에 관해서는 예전 포스트에서 작성한 내용이 있어 다시 복습해보려 한다.
먼저 아래의 예제에서 Student 가 Person 의 상속을 받는 함수로 만드려면
var Person = function(name) {
  this.name = name;
};

Person.prototype.eat = function() {
  console.log( this.name, " is eating." );
}

var Student = function(name) {
  this.name = name;
};

Student.prototype.learn = function() {
  console.log( this.name, " is coding." );
}Student 에 Person 의 this(실행 context) 를 전달해준 후,
Object.create() 을 이용해 Person 의 prototype 을 복사하고 Student 의 constructor 를 원래대로 재설정해주면,
var Student = function(name) {
  Person.call(this, name);
};

Student.prototype = Object.create(Person.prototype);
Student.prototype.constructor = Student;

Student.prototype.learn = function() {
  console.log( this.name, " is coding." );
}
new operator로 생성된 인스턴스는 Student 와 Person 모두의 인스턴스이고,
Prototype Link(__proto__) 의 constructor 가 Student 인 것 또한 확인할 수 있다.
let jim = new Student(“jim”);
jim instanceOf Student // true;
jim instanceOf Person // true;
jim.__proto__.constructor === Student // true
jim.eat() // 'jim is eating.'
이러한 과정들을 생략하고, 마치 자바에서의 클래스처럼 간편화시킨 것이 ES6 class 이다.
class Person {
  constructor(name) {
    this.name = name;
  }

  eat() {
    console.log(this.name + " is eating.");
  }
}

class Student extends Person {
  // Property를 따로 변경하지 않았기 때문에 생략 가능하다.
  constructor(name) {
    super(name);
  }

  eat() {
    // Person.eat()을 가져오기에 override하려면 생략 가능
    super.eat();
    // override Person.eat()
    console.log(this.name+ “is studying.”);
  }

  learn() {
    console.log(this.name+ “is coding.”);
  }
}
쓰다보니 길어져서 Arrow function(화살표 함수) 등 나머지는 내일 정리를 이어서 하기로...