
커맨드 패턴 (Command Pattern)
요청 내역을 객체로 캡슐화해서 객체를 서로 다른 요청 내역에 따라 매개변수화할 수 있다. 이러면 요청을 큐에 저장하거나 로그로 기록하거나 작업 취소 기능을 사용할 수 있다.
1. 커맨드 패턴
(1) 커맨드 패턴이란?
이제는 메소드 호출도 캡슐화할 수 있다 !
커맨드 패턴을 통해 어떤 작업을 요청하는 쪽과 그 작업을 처리하는 쪽을 분리할 수 있다.
이는 커맨드 객체(command object)를 추가함으로써 구현할 수 있다.
(2) 커맨드 패턴은 음식 주문 과정과 비슷하다
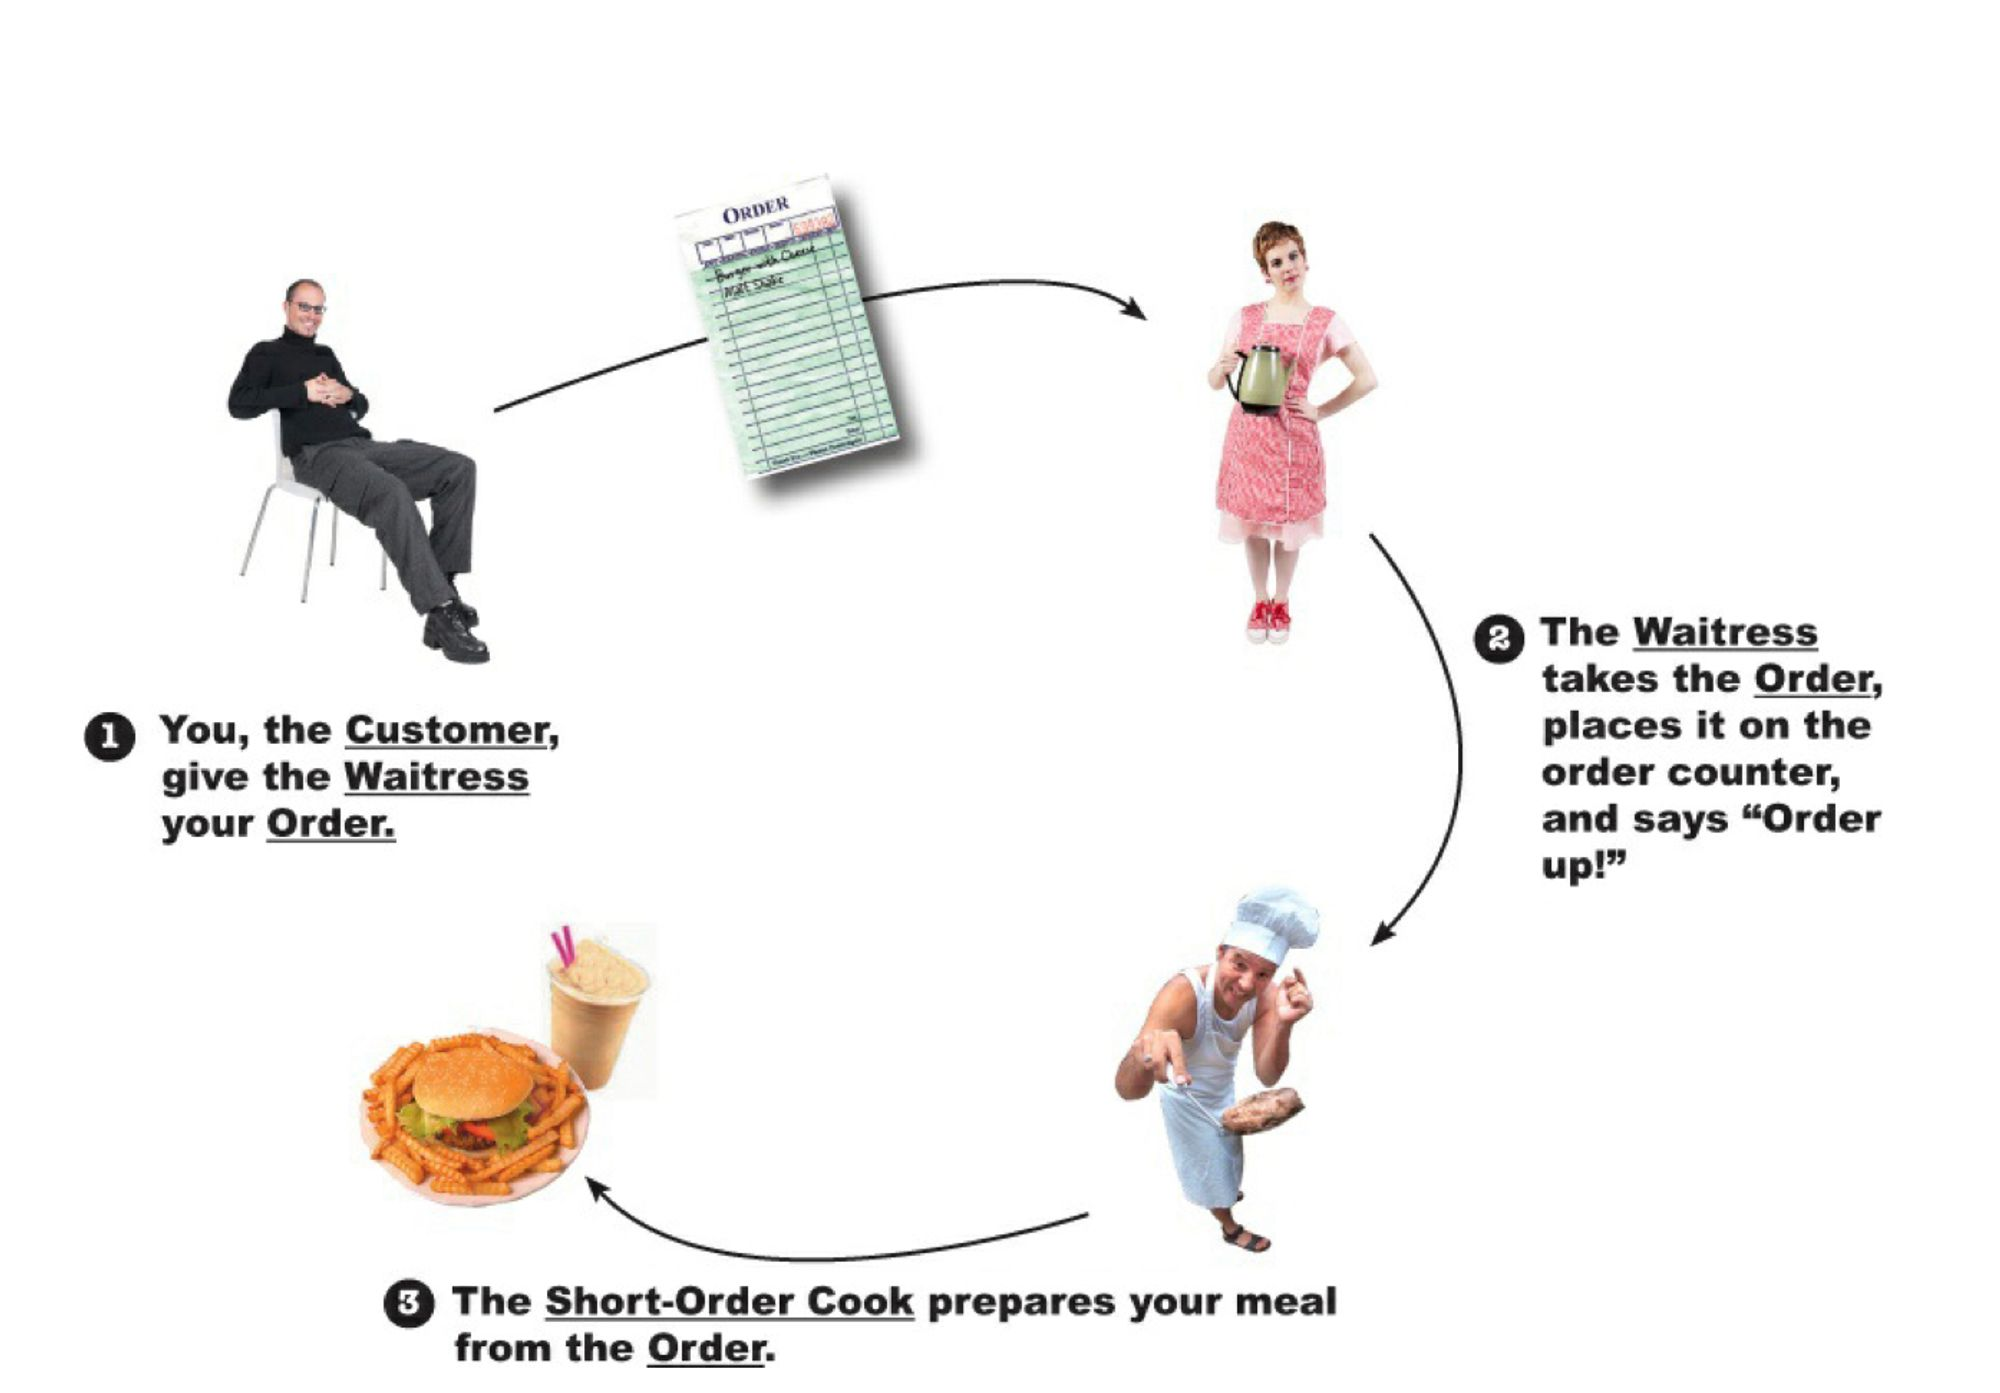
고객이 종업원에게 주문을 하면, 종업원을 이를 셰프에게 알린다.
이 때, 종업원은 고객이 주문하는 메뉴가 무엇이든 그냥 주문서에 적기만 하면 된다.
주문서를 셰프에게 전달하면 주문에 맞는 음식을 만드는 건 셰프가 된다.
음식 주문 과정 자세히 살펴보기
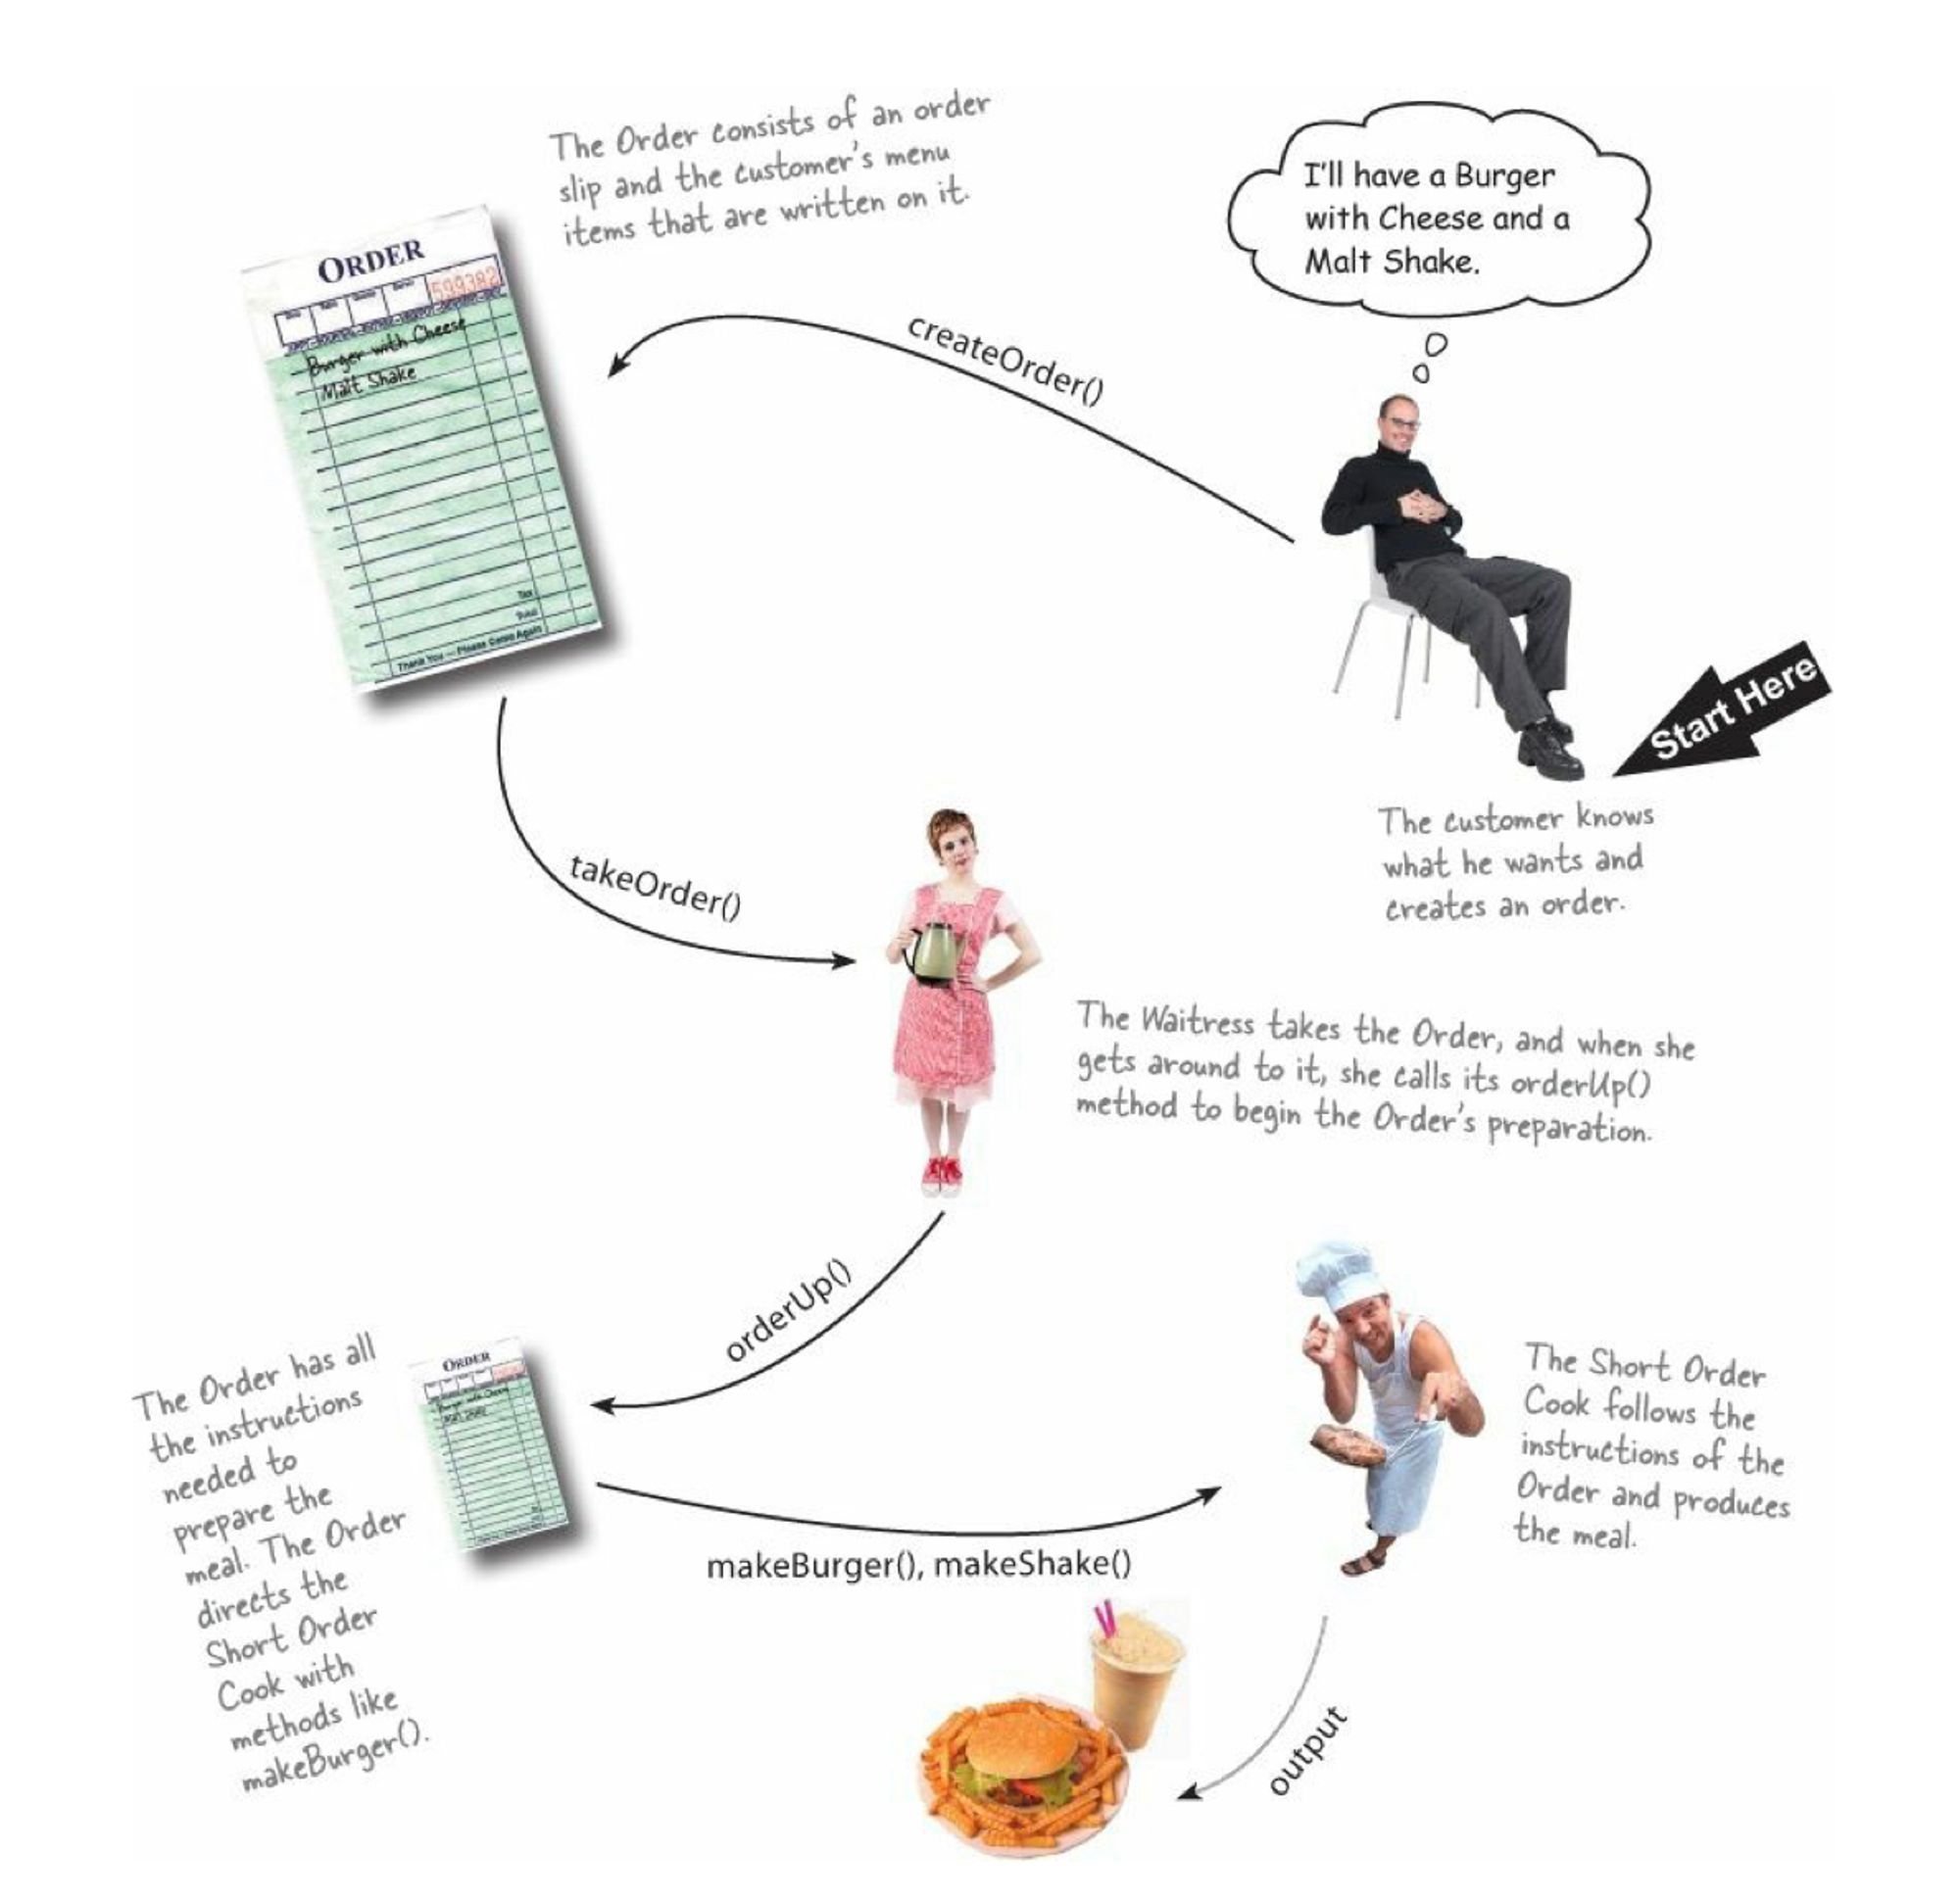
객체와 메소드 관점에서 다시 보자.
- 고객에 주문을 하면
createOrder()를 통해 주문(Order) 객체가 생성된다. - 주문 객체는 주문서와 그 주문 내용으로 구성된다.
- 종업원은
takeOrder()를 통해 주문 내역을 가져간다. - 종업원은
orderUp()를 통해 해당 주문을 처리한다. - 주문 객체에는 음식을 준비할 때 필요한 모든 지시 사항이 들어 있다.
만약 햄버거 세트를 준비했다면,makeBurger(),makeShake()가 호출될 것이다. - 셰프는 호출된 메소드에 맞게 음식을 준비한다.
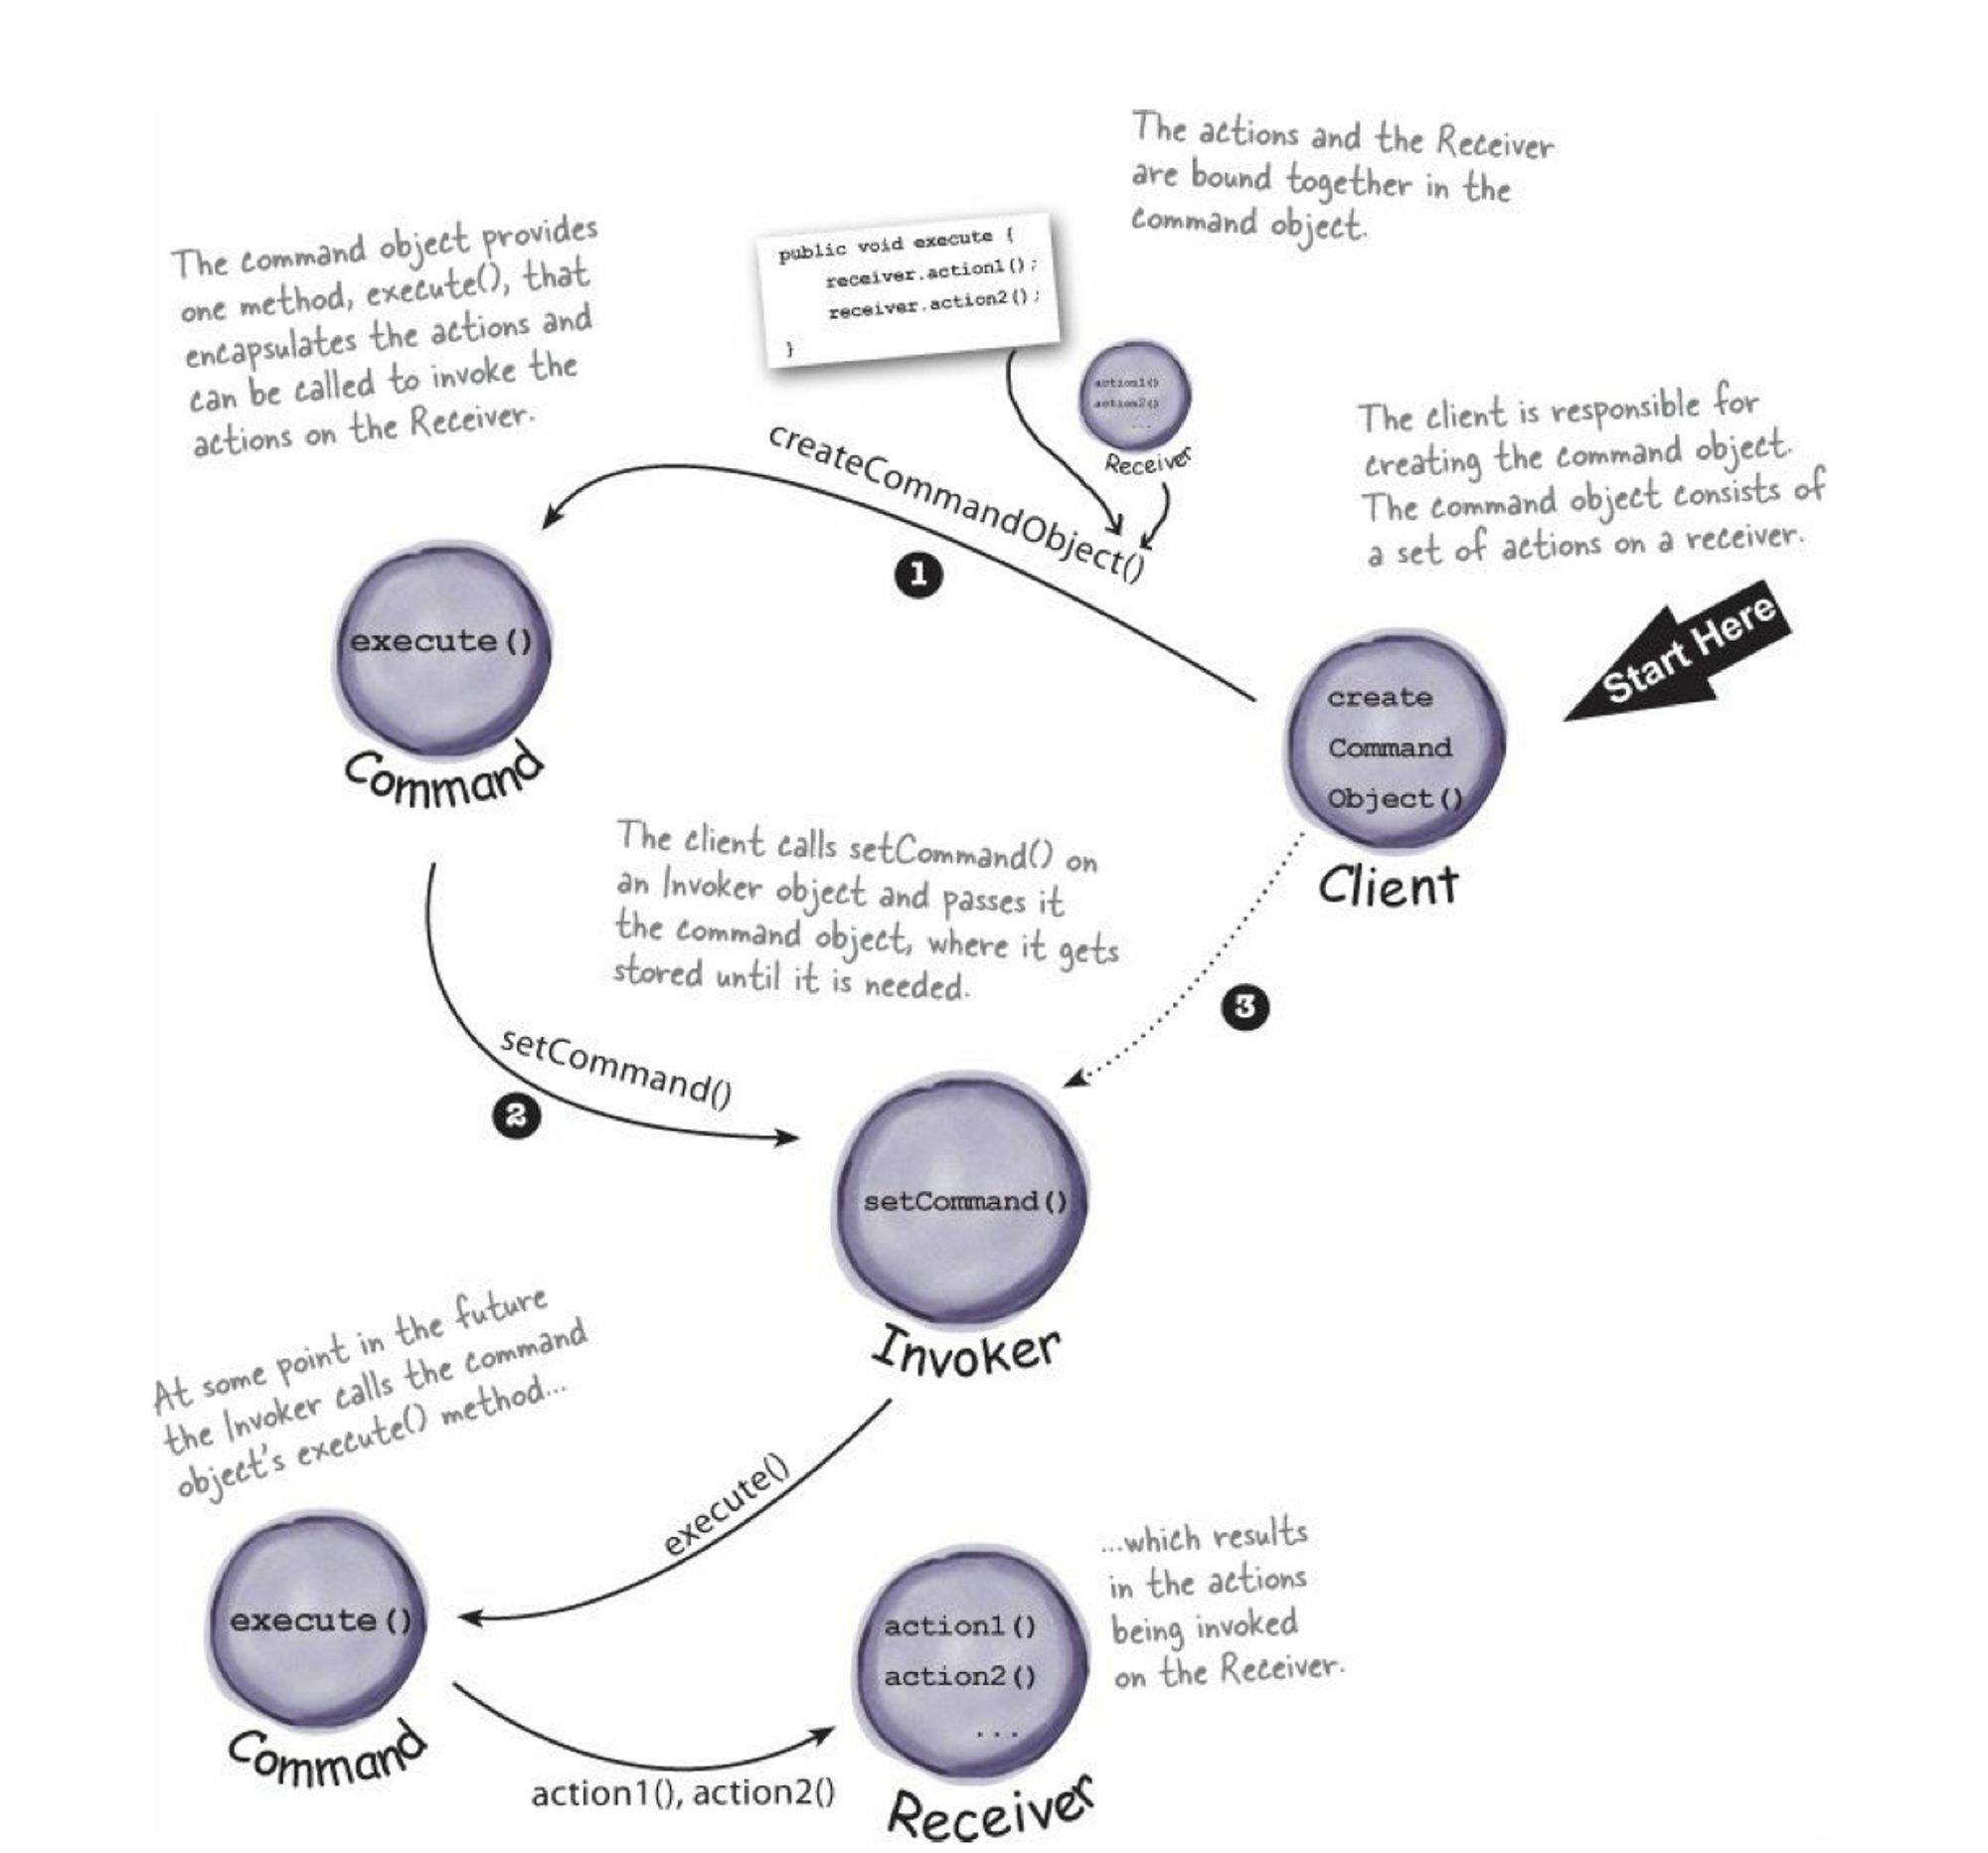
이 때 각 역할들과 그에 대응하는 커맨드 패턴의 요소, 각각의 매칭 정보는 다음과 같다.
- 고객: 클라이언트 객체
- 주문서: 커맨드 객체
- 종업원: 인보커 객체
- 셰프: 리시버 객체
takeOrder():setCommand()orderUp():execute()
각 등장인물의 역할
[주문서] 주문 내용을 캡슐화
주문서는 주문 내용을 요구하는 객체로서, 셰프든 종업원이든 계산대든 여기저기 전달될 수 있다.
주문서의 내용은 캡슐화되어 있기 때문에 종업원은 누가 어떤 메뉴를 주문했는지 모르고, 종업원 본인조차 신경 쓰지 않는다 !
[종업원] 주문서를 받고 orderUp() 메소드 호출
종업원은 그~냥 주문 받고 orderUp() 메소드를 호출해 메뉴 준비를 요청하면 된다.
어떤 메뉴가 주문이 들어왔든 ! 종업원은 그냥 orderUp() 메소드만 호출한다 !
[주방장] 메뉴를 준비하는 데 필요한 정보 갖고 있음
주방장은 실제로 메뉴를 준비하는 방법, 그 레시피를 알고 있는 유일한 사람이다.
메뉴를 준비하는 데 필요한 메소드를 여기서 다 ~~ 처리한다.
커맨드 패턴 다이어그램으로 보기
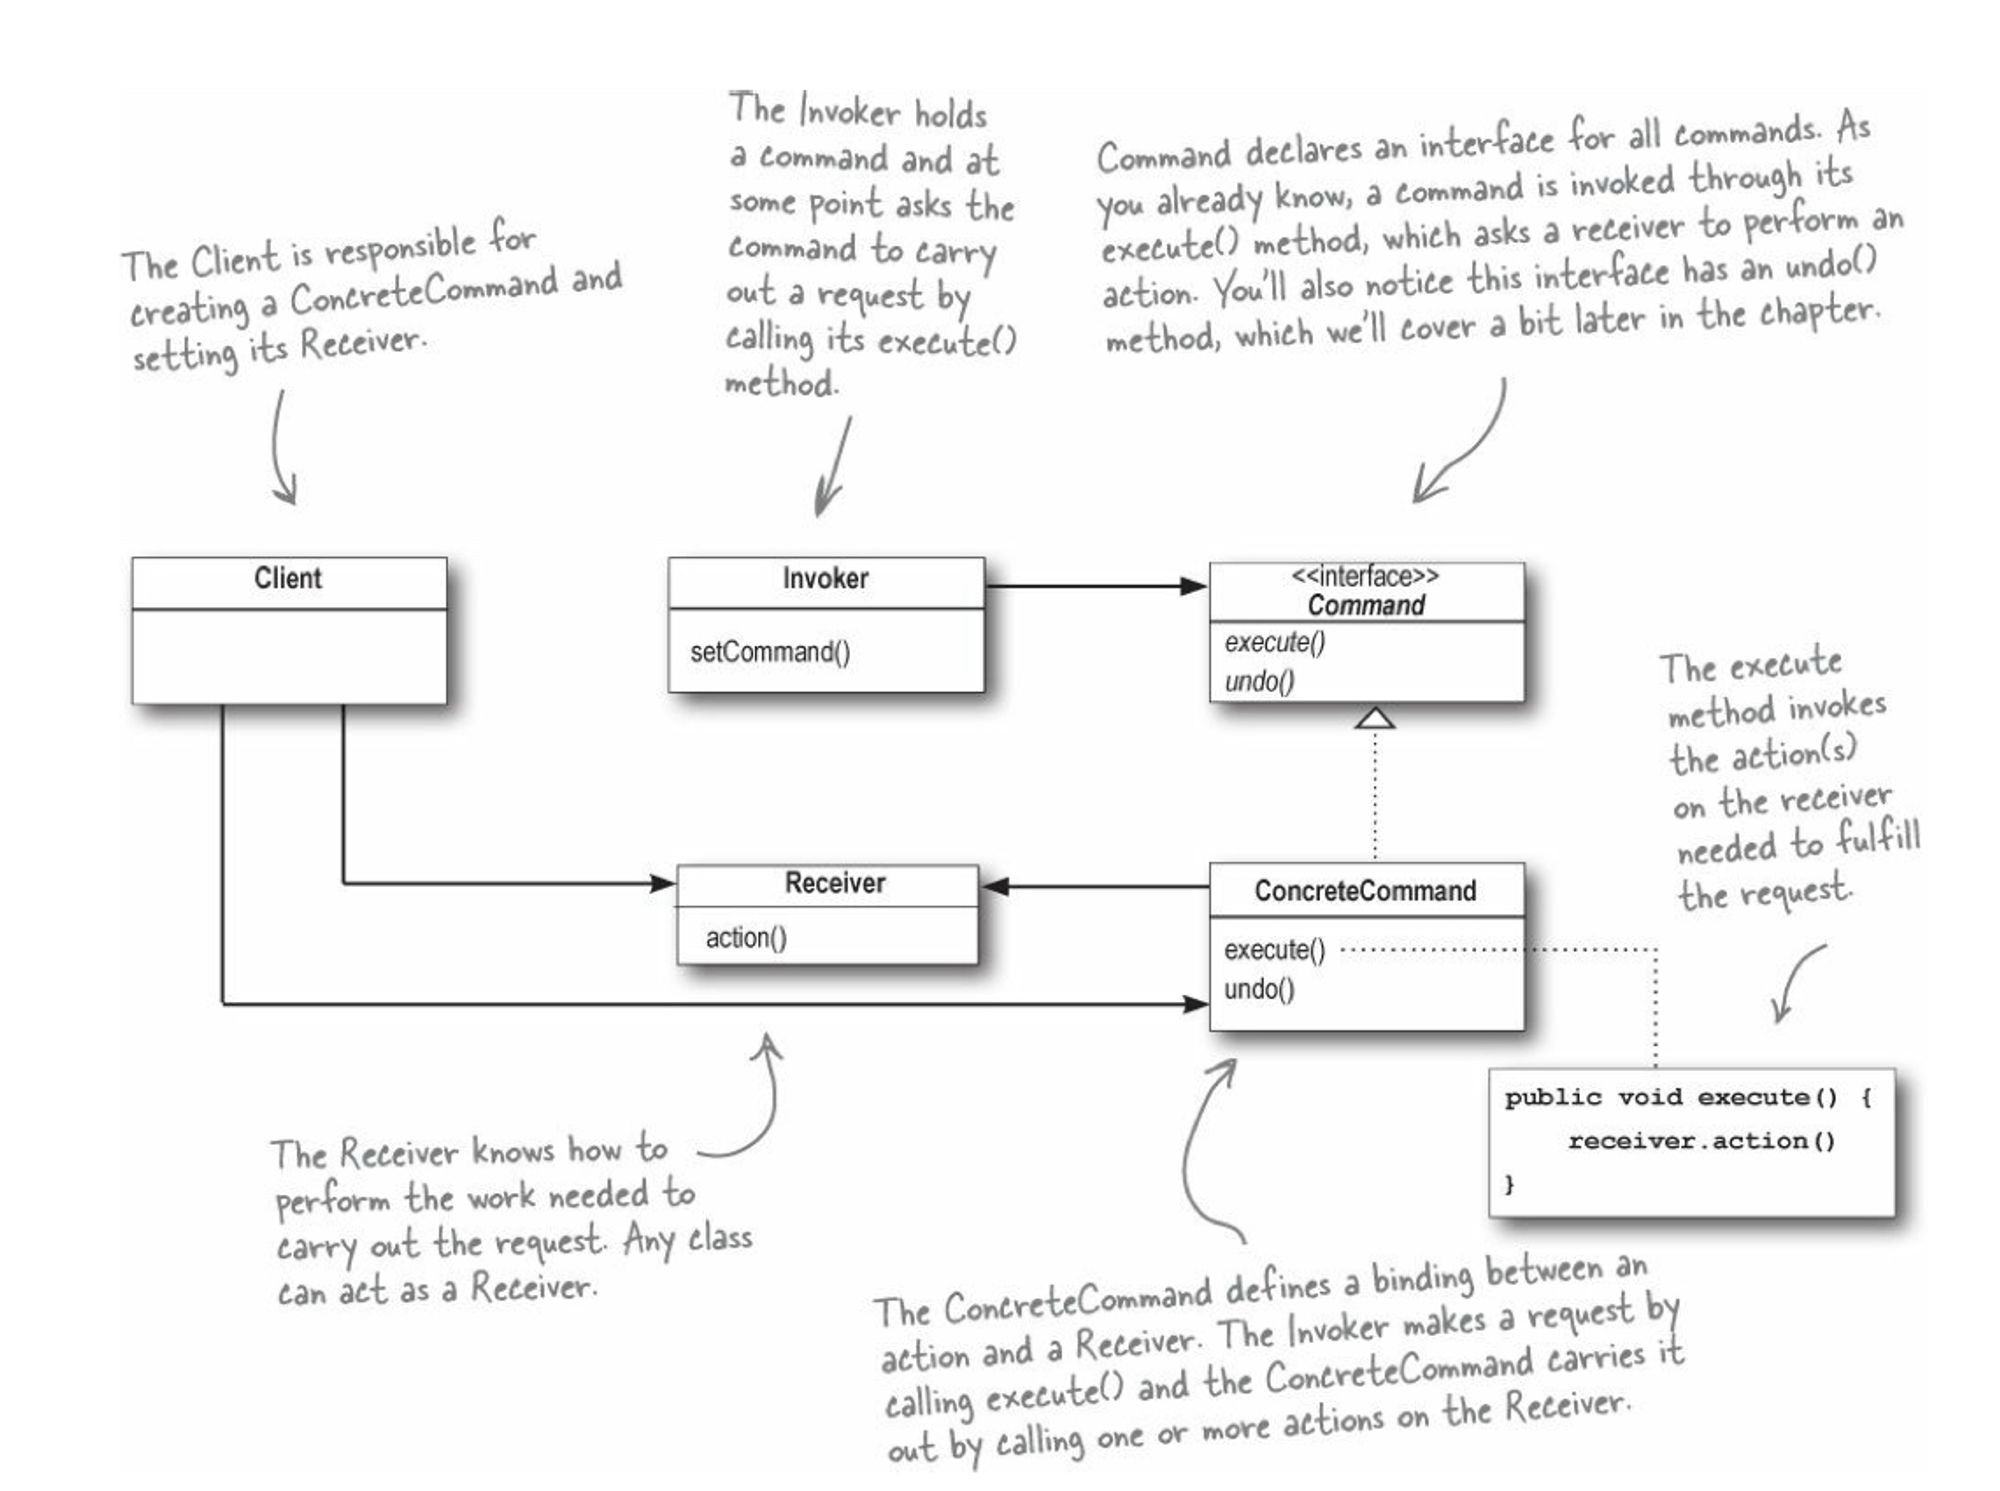
(3) 커맨드 패턴 클래스 다이어그램
2. 적용해보기: 만능 IoT 리모컨
(0) 만능 IoT 리모컨
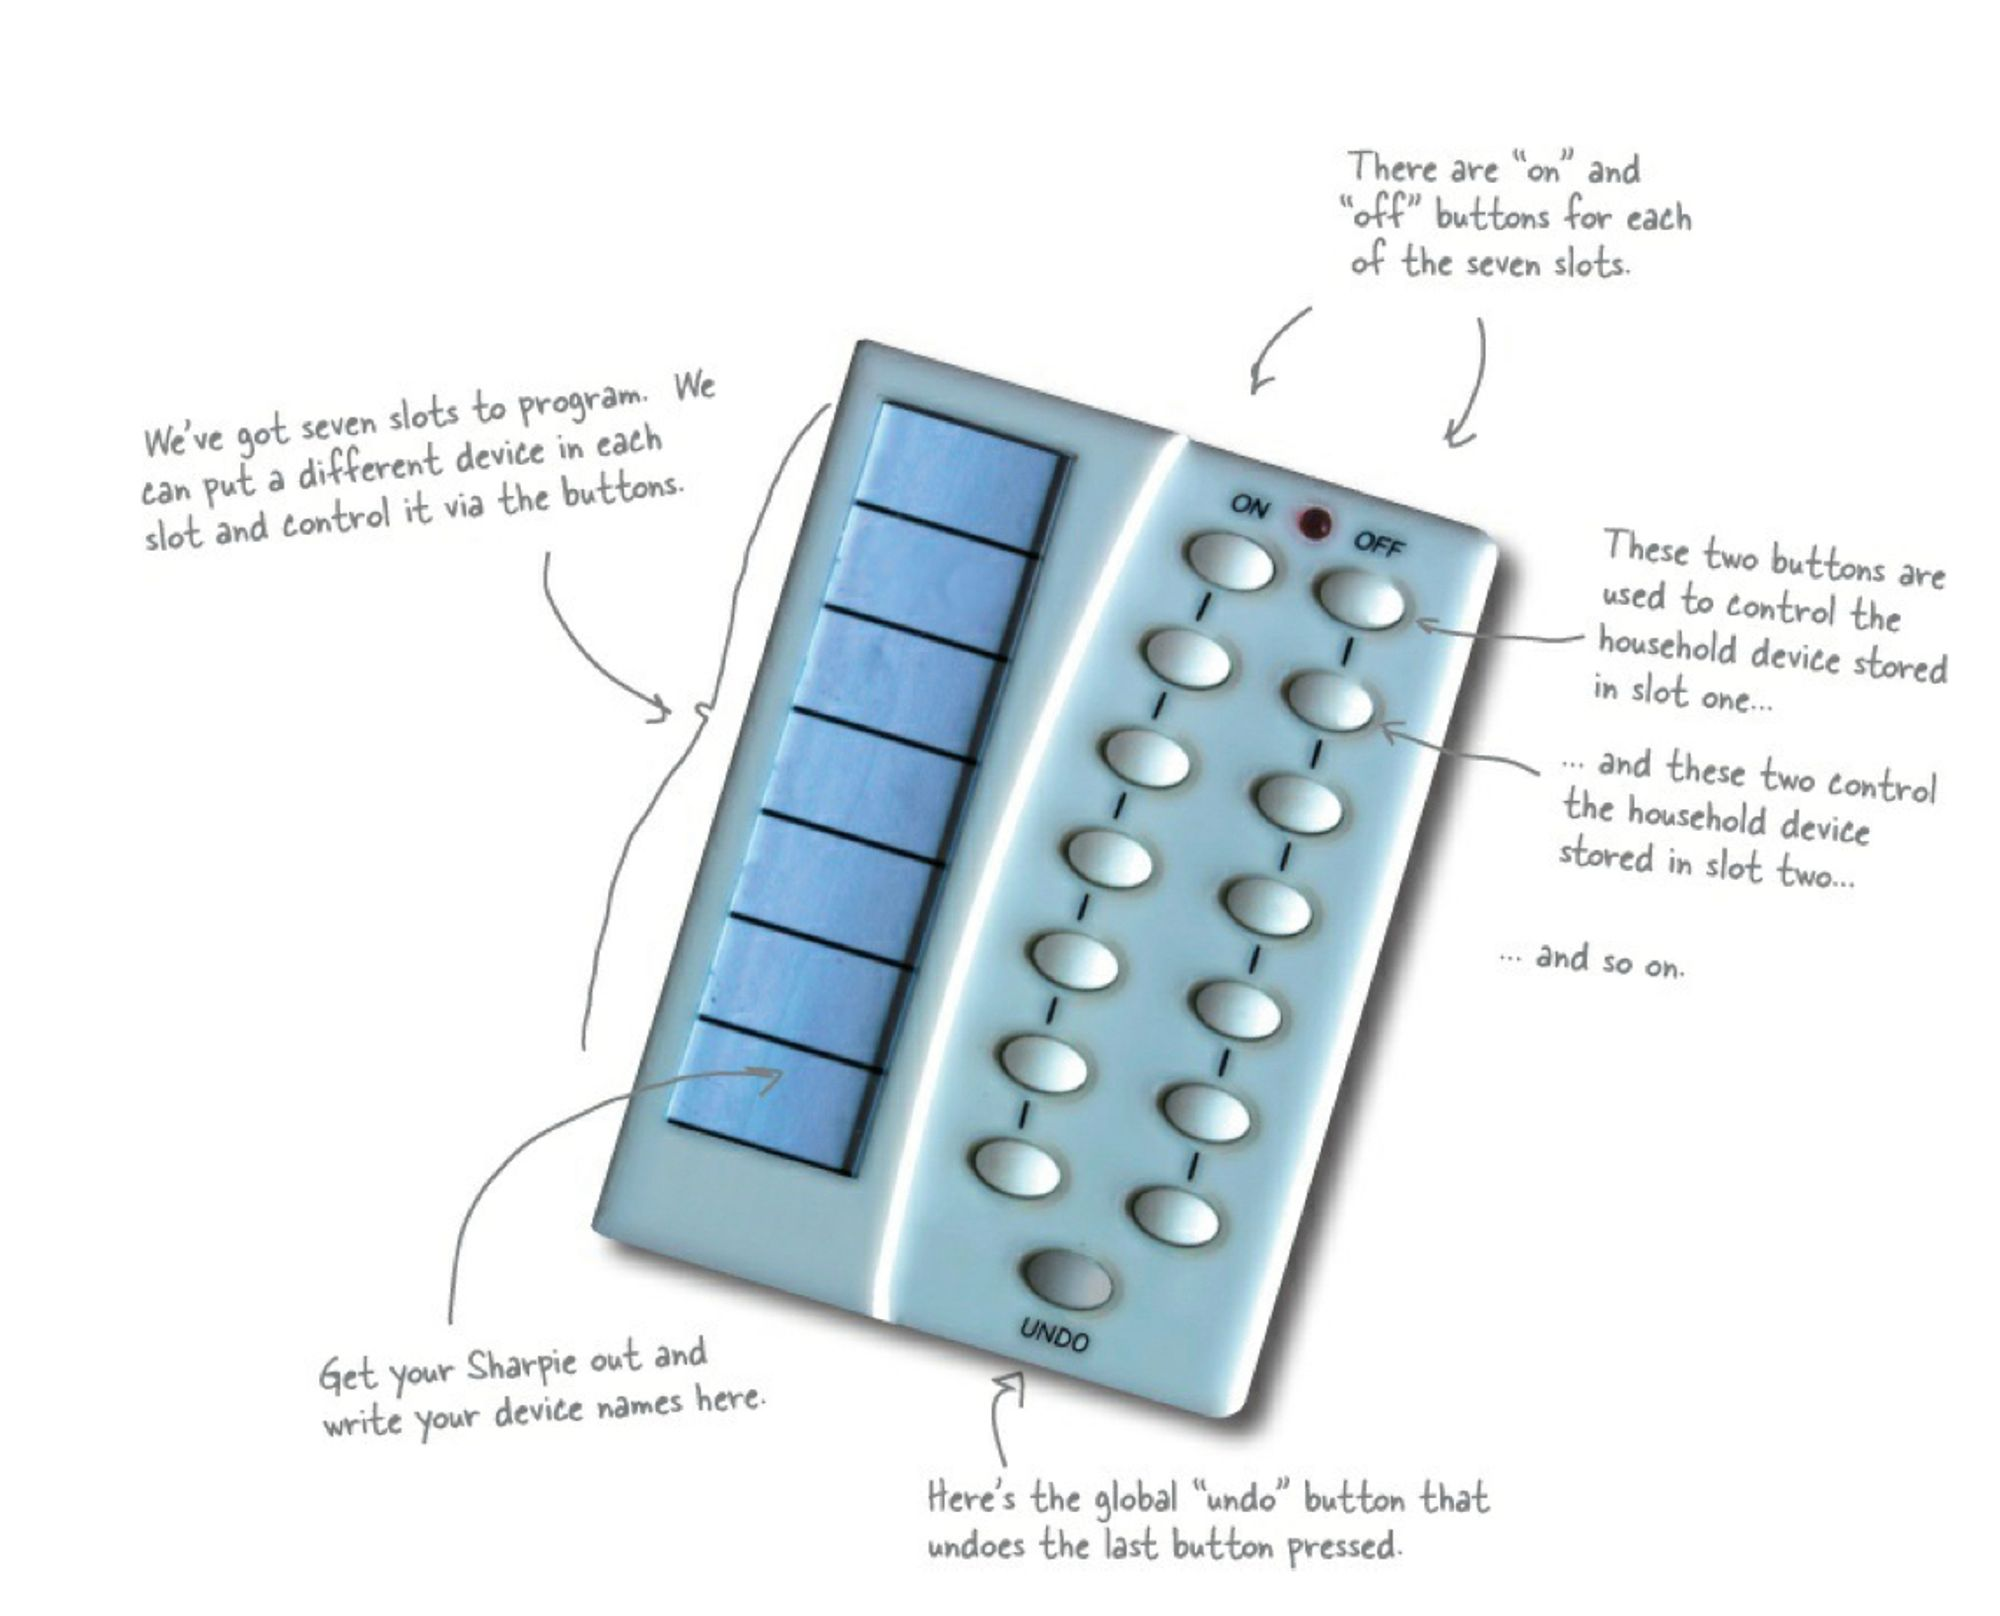
이 리모컨에 맞는 API를 제작해달라는 요청이 들어왔다.
해당 리모컨으로 TV를 켜고 끌 수 있고, 조명도 켜고 끌 수 있다.
그 외 욕조, 오디오, 냉장고, 에어컨 등의 홈오토메이션 장비를 제어할 수 있다.
허
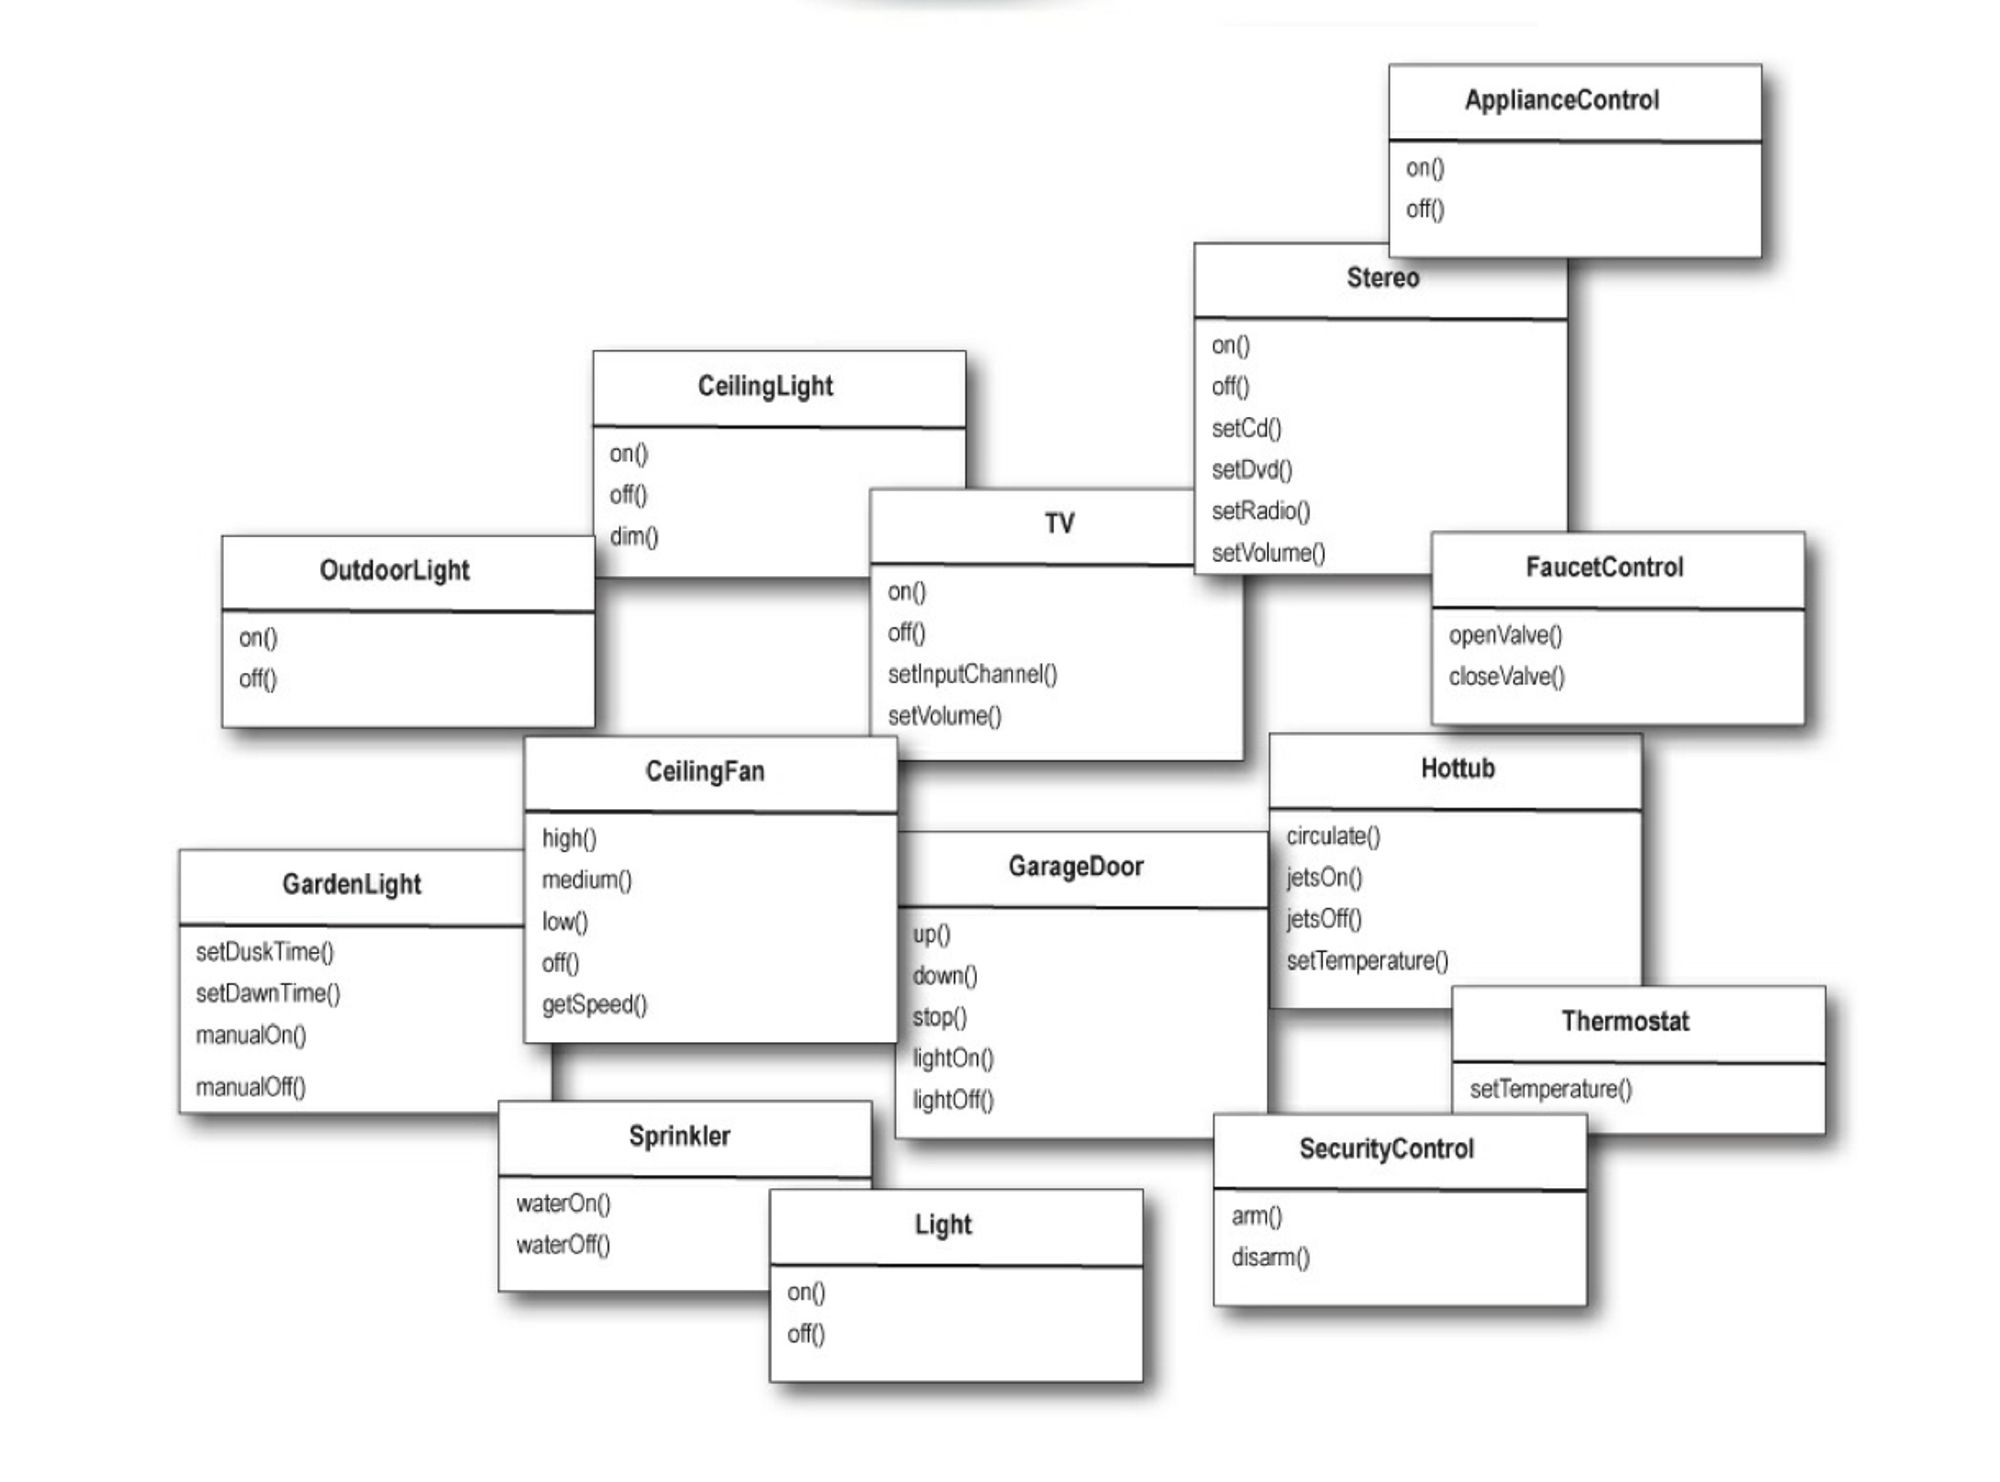
그런데 리모컨에서 제어해야 하는 객체의 인터페이스를 보니 클래스가 정말 많다.
공통적인 인터페이스는 없다.
그러면 앞으로 클래스가 더 추가되는 상황이 생기면 또 그에 맞는 코드를 구현해야 한다.
이 때 적용할 수 있는 패턴이 바로 커맨드 패턴 👍
(1) 기기 연결 슬롯과 버튼이 하나만 존재하는 리모컨
커맨드 인터페이스 구현
커맨드 객체는 모두 같은 인터페이스를 구현해야 한다.
public interface Command {
	public void execute();
}
커맨드 클래스 구현: 조명 ON 용도
public class LightOnCommand implements Command {
	// Light 객체에는 on(), off() 2개의 메소드가 존재
    Light light;

    public LightOnCommand(Light light) {
    	this.light = light;
    }

    public void execute() {
    	light.on();
    }
}
리모컨 클래스 구현: 커맨드 객체 사용하기
public class RemoteControl {
	Command slot;
    public SimpleRemoteControl() {}

    public void setCommand(Command command) {
    	slot = command;
    }

    public void buttonWasPressed() {
    	slot.execute();
    }
}
테스트 클래스
public class RemoteControlTest {
	public static void main(String[] args) {
    	// remote: 인보커(Invoker) 역할
    	RemoteControl remote = new RemoteControl();
        // light: 리시버(Receiver) 역할
        Light light = new Light();
        LightOnCommand lightOn = new LightOnCommand(light);

        remote.setCommand(lightOn);
        remote.buttonWasPressed();
    }
}
(2) 기기 연결 슬롯과 버튼이 여러 개인 리모컨
커맨드 클래스 추가 구현: 오디오 ON 용도
public class StereoOnWithCDCommand implements Command {
	// Stereo 객체에는 on(), off(), setCd(), setDvd(), SetRadio(), setVolume() 메소드 존재
    Stereo stereo;

    public StereoOnWithCDCommand(Stereo stereo) {
    	this.stereo = stereo;
    }

    public void execute() {
    	stereo.on();
        stereo.setCD();
        setreo.setVolume(5);
    }
}
리모컨 클래스 수정
public class RemoteControl {
	// 리모컨은 7개의 ON, OFF 버튼을 가지고 있음
	Command[] onCommands;
    Command[] offCommands;

    public RemoteControl() {
    	onCommands = new Command[7];
        offCommands = new Command[7];

        Command noCommand = new NoCommand();
        for (int i = 0; i < 7; i++) {
        	onCommands[i] = noCommand;
            offCommands[i] = noCommand;
        }
    }

    public void setCommand(int slot, Command onCommand, Command offCommand) {
    	onCommands[slot] = onCommand;
        offCommands[slot] = offCommand;
    }

    public void onButtonWasPushed(int slot) {
    	onCommands[slot].execute();
    }

    public void offButtonWasPushed(int slot) {
    	offCommands[slot].execute();
    }

    // 슬롯별 명령 출력
    public String toString() {
    	StringBuffer stringBuff = new StringBuffer();
        stringBuff.append("\n----- 리모컨 -----\n");
        for (int i = 0; i < onCommands.length; i++) {
        	stringBuff.append("[slot " + i + "] " + onCommands[i].getClass().getName() + "
 + offCommands[i].getClass().getName() + "\n");
        }
        return stringBuff.toString();
    }
}
테스트 클래스 수정
public class RemoteLoader {

    public static void main(String[] args) {
    	RemoteControl remoteControl = new RemoteControl();

        Light livingRoomLight = new Light("Living Room");
        Light kitchenLight = new Light("Kitchen");
        Stereo stereo = new Stereo("Living Room");

        /* 조명용 커맨드 객체 */
        LightOnCommand livingRoomLightOn = new LightOnCommand(livingRoomLight);
        LightOffCommand livingRoomLightOff = new LightOffCommand(livingRoomLight);
        LightOnCommand kitchenLightOn = new LightOnCommand(kitchenLight);
        LightOffCommand kitchenLightOff = new LightOffCommand(kitchenLight);

        /* 오디오용 커맨드 객체 */
        StereoOnWithCDCommand stereoOnWithCD = new StereoOnWithCDCommand(stereo);
        StereoOffWithCDCommand stereoOff = new StereoOffCommand(stereo);

        ...

        remoteControl.setCommand(0, livingRoomLightOn, livingRoomLightOff);
        remoteControl.setCommand(1, kitchenLightOn, kitchenLightOff);
        remoteControl.setCommand(2, stereoOnWithCD, stereoOff);

        // 슬롯 정보 출력
        System.out.println(remoteControl);

        remoteControl.onButtonWasPushed(0);
        remoteControl.onButtonWasPushed(1);
        remoteControl.onButtonWasPushed(2);

        remoteControl.offButtonWasPushed(1);
        remoteControl.offButtonWasPushed(0);
    }
}
✨ NoCommand 객체
일종의 널 객체(null object)로, 딱히 리턴할 객체도 없고 클라이언트가 null을 처리하지 않게 하고 싶을 때 활용하면 좋다.
널 객체는 여러 디자인 패턴에서 유용하게 쓰이기 때문에 일종의 디자인 패턴으로 분류하기도 한다.
ex) 리모컨의 3~6번 슬롯에는 아직 명령이 할당되지 않았는데, 이 때 NoCommand 객체를 넣어서execute()메소드가 호출되어도 문제가 생기지 않도록 함.
(3) 리모컨에 취소 기능 추가
커맨드 인터페이스 수정
public interface Command {
	public void execute();
    public void undo();
}
커맨드 클래스 수정: 조명 ON 용도
public class LightOnCommand implements Command {
	// Light 객체에는 on(), off() 2개의 메소드가 존재
    Light light;

    public LightOnCommand(Light light) {
    	this.light = light;
    }

    public void execute() {
    	light.on();
    }

    ---
    public void undo() {
    	light.off();
    }
    ---
}
리모컨 클래스 수정
public class RemoteControl {
	// 리모컨은 7개의 ON, OFF 버튼을 가지고 있음
	Command[] onCommands;
    Command[] offCommands;
    ---
    Command undoCommand;
    ---

    public RemoteControl() {
    	onCommands = new Command[7];
        offCommands = new Command[7];

        Command noCommand = new NoCommand();
        for (int i = 0; i < 7; i++) {
        	onCommands[i] = noCommand;
            offCommands[i] = noCommand;
        }
        ---
        undoCommand = noCommand;
        ---
    }

    public void setCommand(int slot, Command onCommand, Command offCommand) {
    	onCommands[slot] = onCommand;
        offCommands[slot] = offCommand;
    }

    public void onButtonWasPushed(int slot) {
    	onCommands[slot].execute();
        ---
        undoCommand = onCommands[slot];
        ---
    }

    public void offButtonWasPushed(int slot) {
    	offCommands[slot].execute();
        ---
        undoCommand = offCommands[slot];
        ---
    }

    ---
    public void undoButtonWasPushed() {
    	undoCommand.undo();
    }

    // 슬롯별 명령 출력
    public String toString() {
    	// toString 코드
}
(4) 여러 기능 한 번에 처리하기
새로운 커맨드 클래스 구현: 여러 가지 커맨드 한 번에 실행하는 용도
public class MacroCOmmand implements Commad {
	Command[] commands;

    public MacroCommand(Command[] commands) {
    	this.commands = commands;
    }

    public void execute() {
    	for (int i = 0; i < commands.length; i++) {
        	commands[i].execute();
        }
    }
}
매크로에 넣을 커맨드들 만들기
Light light = new Light("Living Room");
TV tv = new TV("Living Room");
Stereo stereo = new Stereo("Living Room");

LightOnCommand lightOn = new LightOnCommand(light);
TVOnCommand tvOn = new TVOnCommand(tv);
StereoOnCommand stereoOn = new StereoOnCommand(stereo);
...
ON 커맨드 배열, OFF 커맨드 배열 만들고 집어넣기
Command[] partyOn = { lightOn, tvOn, stereoOn };
Command[] partyOff = { lightOff, tvOff, stereoOff };

MacroCommand partyOnMacro = new MacroCommand(partyOn);
MacroCommand partyOffMacro = new MacroCommand(partyOff);
매크로 객체 -> 버튼에 할당
remoteControl.setCommand(0, partyOnMacro, partyOffMacro);버튼 누르기
System.out.println(remoteControl);
System.out.println("--- 매크로 ON ---");
remoteControl.onButtonWasPushed(0);
System.out.println("--- 매크로 OFF ---");
remoteControl.offButtonWasPushed(0);
3. 정리
객체지향 기초
- 추상화
- 캡슐화
- 다형성
- 상속
객체지향 원칙
- 바뀌는 부분은 캡슐화 한다.
- 상속보다는 구성을 활용한다.
- 구현보다는 인터페이스에 맞춰서 프로그램이한다.
- 상호작용하는 객체 사이에서는 가능하면 느슨한 결합을 사용해야 한다.
- OCP: 클래스는 확장에는 열려 있어야 하지만 변경에는 닫혀 있어야 한다.
- 추상화된 것에 의존하게 만들고 구상 클래스에 의존하지 않게 만든다.
객체지향 패턴
전략 패턴
전략 패턴은 알고리즘군을 정의하고 캡슐화해서 각각의 알고리즘군을 수정해서 쓸 수 있게 한다.
전략패턴을 사용하면 클라이언트로부터 알고리즘을 분리해서 독립적으로 변경할 수 있다.옵저버 패턴
한 객체의 상태가 바뀌면 그 객체에 의존하는 다른 객체에게 연락이 가고 자동으로 내용이 갱신되는 방식으로, 일대다 (one-to-many) 의존성을 정의한다.
데코레이터 패턴
객체에 추가 요소를 동적으로 더할 수 있다.
데코레이터를 사용하면 서브 클래스를 만들 때보다 훨씬 유연하게 기능을 확장할 수 있다.팩토리 메소드 패턴
객체에서 생성할 때 필요한 인터페이스를 만든다.
어떤 클래스의 인스턴스를 만들지는 서브클래스에서 결정한다.
이 패턴을 사용하면 클래스 인스턴스 만드는 일을 서브클래스에게 맡긴다.추상 팩토리 패턴
구상 클래스에 의존하지 않고도 서로 연관되거나 의존적인 객체로 이루어진 제품군을 생산하는 인터페이스를 제공한다.
구상 클래스는 서브클래스에서 만든다.싱글턴 패턴
클래스 인스턴스를 하나만 만들고, 그 인스턴스로의 전역 접근을 제공한다.
커맨드 패턴(Command Pattern)
요청 내역을 객체로 캡슐화해서 객체를 서로 다른 요청 내역에 따라 매개변수화할 수 있다. 이러면 요청을 큐에 저장하거나 로그로 기록하거나 작업 취소 기능을 사용할 수 있다.