
들어가며
RESTful API를 만족하기 위해서 중요한 부분은 바로 self-descriptive이다. 문서가 스스로를 설명할 수 있어야 한다. 또 그리고 우리가 서버를 개발하면은 해당 서버를 우리가 관리하는 것이 아니라 다른 개발자들이 관리할 가능성이 높다. 이럴 때, 우리는 우리가 만든 작업을 문서화를 해야하는데 Spring에서 클라이언트의 입력값, 그리고 그에 대한 응답값, 헤더값 등을 정의를 사전해놓는 것을 도와주는 도구 중 하나가 REST Docs이다.
사용 방법
응답으로 받아온 ResultActions 객체에 andDo() 메소드를 이용한다. 그리고 안에 docuemnt() 함수를 콜백하여 사용할 수 있다.
document()의 첫 번째 인자로는 설명하고자 하는 HTTP 요청에 대해 포괄적으로 설명하고 2번째 인자부터 links(), requestHeaders(), requestFields(), responseHeader(), responseFields() 등을 사용해서 설명을 추가할 수 있다.
links()
.andDo(document("create-event",
        links(linkWithRel("self").description("link to self"),
                linkWithRel("query-events").description("link to query events"), // linkWithRel: 링크의 종류를 명시
                linkWithRel("update-event").description("link to update event") // description: 링크에 대한 설명
        ),
사용한 예제이다. linkWithRel() 함수에 hateoas로 추가한 링크에 대해서 설명할 수 있으며 메소드 체이닝으로 각 링크에 대해서 설명을 추가할 수 있다.
requestHeaders()
requestHeaders(
        headerWithName(HttpHeaders.ACCEPT).description("aceept header"),
        headerWithName(HttpHeaders.CONTENT_TYPE).description("content type header")
),
HttpHeaders class에 정의되어 있는 헤더명을 이용해서 헤더명에 대해서 기술할 수 있다.
requestFields()
requestFields(
        fieldWithPath("name").description("Name of new event"), // 필드명과 동일해야한다.
        fieldWithPath("description").description("description of new event"),
        fieldWithPath("beginEnrollmentDateTime").description("beginEnrollmentDateTime of new event"),
        fieldWithPath("closeEnrollmentDateTime").description("closeEnrollmentDateTime of new event"),
        fieldWithPath("beginEventDateTime").description("beginEventDateTime of new event"),
        fieldWithPath("endEventDateTime").description("endEventDateTime of new event"),
        fieldWithPath("location").description("location of new event"),
        fieldWithPath("basePrice").description("basePrice of new event"),
        fieldWithPath("maxPrice").description("maxPrice of new event"),
        fieldWithPath("limitOfEnrollment").description("limitOfEnrollment of new event")
),
각 필드 명에 대해 filedWithPath 함수를 이용해서 필드에 선택하고 해당 필드에 대한 설명을 추가할 수 있다.
나머지 헤더들에 대해서도 설명을 추가해서 테스트를 진행하면
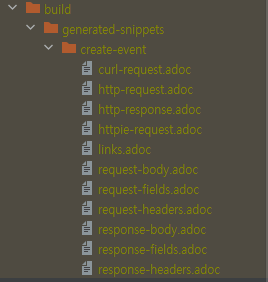
build/ 아래에 각 헤더나 필드에 대해서 설명하는 문서 조각들을 생성한다.
문서 빌드하기
plugins {
    id 'org.springframework.boot' version '2.4.5'
    id 'io.spring.dependency-management' version '1.0.11.RELEASE'
    id 'java'
    id 'org.asciidoctor.jvm.convert' version '3.3.2'        // jvm.convert를 사용해야 한다!
}

group = '...'
version = '0.0.1-SNAPSHOT'
sourceCompatibility = '1.8'


// 여기 추가!
configurations {
    asciidoctorExtensions
}

repositories {
    mavenCentral()
}

// 이 부분도 추가
ext {
    snippetsDir = file('build/generated-snippets')
}

dependencies {
    implementation 'org.springframework.boot:spring-boot-starter-web'

    // 이 부분이 추가됨!
    asciidoctorExtensions 'org.springframework.restdocs:spring-restdocs-asciidoctor'

    testImplementation 'org.springframework.restdocs:spring-restdocs-mockmvc'
    testImplementation 'org.springframework.boot:spring-boot-starter-test'
}

test {
    outputs.dir snippetsDir
    useJUnitPlatform()
}

asciidoctor {
    configurations 'asciidoctorExtensions'
    inputs.dir snippetsDir
    dependsOn test
}

bootJar {
    dependsOn asciidoctor
    copy {
        from "${asciidoctor.outputDir}"
        into 'src/main/resources/static/docs'
    }
}
build.gradle(7이상)에 필요한 의존성을 추가하고 생성한 문서 조각(snippets)들을 이용해서 만든 .adoc파일을 src/docs/ 아래에 만들어주고 build를 하면은 REST Docs HTML 파일이 만들어진다.

좋은 글이네요. 공유해주셔서 감사합니다.