
들어가며
지금까지는 AppConfig 파일에 @Bean annotation을 이용해서 직접 스프링을 등록하고 의존관계를 주입했다.
하지만 실전에서는 수십, 수백 개의 빈들을 등록해야 하며 설정 정보가 커지고 누락되는 문제가 발생한다. 그래서 설정 정보가 없어도 자동으로 스프링 빈을 등록하는 컴포넌트 스캔이라는 기능이 스프링에서 제공된다.
AutoAppConfig.java
@Configuration
@ComponentScan(
        excludeFilters = @ComponentScan.Filter(type
        	= FilterType.ANNOTATION, classes = Configuration.class)
)
public class AutoAppConfig {
}
먼저 컴포넌트 스캔은 말 그대로 @Component annotation이 붙어있는 컴포넌트들을 스캔하는 것이다.
먼저 설정정보임을 나타내는 @Configuration annotation을 class에 붙혀주고 @ComponentScan annotaion도 부여한다. 만약에 컴포넌트 스캔에서 제외하고 싶은 컴포넌트가 있다면 위처럼 특정 class를 스캔에서 제외할 수도 있다.
그리고 각 클래스가 컴포넌트의 스캔 대상이 될 수 있게 모든 클래스에 @Component annotation을 붙혀준다.
<예시>
@Component
public class MemoryMemberRepository implements MemberRepository{
		...
하지만 여기까지만 하면은 의존관계가 주입이 되지 않는다. 현재 DI를 생성자 주입을 이용하고 있기 때문에 생성자에 @Autowired annotation을 붙혀주면은 spring이 알아서 빈으로 등록된 class중에서 적절한 빈을 찾아 DI를 해준다.
<예시>
@Component
public class OrderServiceImpl implements OrderService{

    private final MemberRepository memberRepository;
    private final DiscountPolicy discountPolicy

    @Autowired // 의존 관계 주입
    public OrderServiceImpl(MemberRepository memberRepository, DiscountPolicy discountPolicy) {
        this.memberRepository = memberRepository;
        this.discountPolicy = discountPolicy;
    }
    ...
Test
@Test
void basicScan() {
    AnnotationConfigApplicationContext ac
   	 = new AnnotationConfigApplicationContext(AutoAppConfig.class);

    MemberService memberService
   	 = ac.getBean(MemberService.class);

    Assertions.assertThat(memberService).isInstanceOf(MemberService.class);
}
설정정보로 AutoAppConfig 파일을 넘겨주고 임의로 하나의 빈을 잡아서 확인해본 결과로 제대로 빈이 등록되었음을 확인했다.
탐색 위치 및 스캔 대상
모든 class를 전부 컴포넌트 스캔을 하면 시간이 오리 걸린다. 그래서 스캔을 할 디렉토리를 지정할 수 있다.
@ComponentScan(
	basePackages = "hello.core"
)
위와 같이 등록하면 hello/core 하위에 있는 컴포넌트들만 등록을 한다.
또한 여러 개의 시작 위치를 등록할 수도 있다.
이 외에도 basePackageclasses 라는 속성은 지정한 클래스를 포함하는 패키지를 탐색 위치로 지정한다. 아무것도 설정하지 않으면 설정파일을 포함하는 패키지가 시작 위치가 되늗데, 권장하는 방법은 / 아래에 설정 파일을 두고 아무것도 지정하지 않는 것이다.
컴포넌트 스캔 대상은 @Component 뿐만 아니라 @Controller, @Service, @Repository, @Configuration도 포함이 되는데 이는 모든 annotation이 @Component를 갖고있기 때문이다. annotation은 상속이 되지 않는데 스프링이 알아서 상속관계를 규명한다.
필터
includeFilters, excludeFilters 라는 속성으로 컴포넌트 스캔 대상을 지정하거나 제외할 수 있다.
예제
custom annotation 생성
@Target(ElementType.TYPE)
@Retention(RetentionPolicy.RUNTIME)
@Documented
public @interface MyExcludeComponent {
}@Target(ElementType.TYPE)
@Retention(RetentionPolicy.RUNTIME)
@Documented
public @interface MyIncludeComponent {
}컴포넌트 생성
@MyIncludeComponent
public class BeanA {
}
@MyExcludeComponent
public class BeanB {
}
Test
public class ComponentFilterAppConfigTest {
    @Test
    void filterScan() {
        AnnotationConfigApplicationContext ac
        	= new AnnotationConfigApplicationContext(ComponentFilterAppConfig.class);

        BeanA beanA = ac.getBean("beanA", BeanA.class);
        assertThat(beanA).isNotNull();

        org.junit.jupiter.api.Assertions.assertThrows(
                NoSuchBeanDefinitionException.class,
                () -> ac.getBean("BeanB", BeanB.class)
        );
    }

    @Configuration
    @ComponentScan(
            includeFilters = @ComponentScan.Filter(type = FilterType.ANNOTATION, classes = MyIncludeComponent.class),
            excludeFilters = @ComponentScan.Filter(type = FilterType.ANNOTATION, classes = MyExcludeComponent.class)
    )
    static class ComponentFilterAppConfig {
    }

}
@ComponentScan에 등록한 것처럼 BeanA는 빈으로 등록이 되었지만 @MyExcludeComponent를 가진 BeanB는 빈으로 동록되지 않았다.
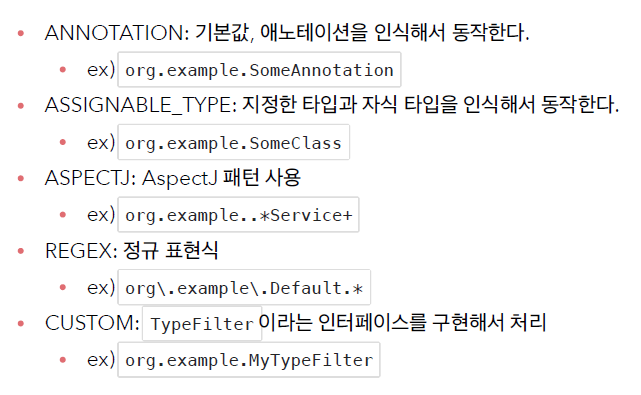
FilterType
중복 등록과 충돌
컴포넌트 스캔에서 같은 빈 이름을 등록하면 충돌이 발생한다.
@Component("OrderServiceImpl")
public class MemoryMemberRepository implements MemberRepository{
위와 같이 특정 컴포넌트의 이름을 다른 컴포넌트 이름과 동일하게 바꾸고 app을 실행하면 ConflictingBeanDefinitionException이 발생한다. 이는 자동 빈 등록 vs 자동 빈 등록에서 발생하는 오류인데, 수동 빈 등록 vs 자동 빈 등록에서는 어떨까?
@Configuration
@ComponentScan(
        excludeFilters = @ComponentScan.Filter(type = FilterType.ANNOTATION, classes = Configuration.class) // 예제를 살리기 위한 코드
)
public class AutoAppConfig {
    @Bean(name = "memoryMemberRepository")
    MemberRepository memberRepository() {
        return new MemoryMemberRepository();
    }
}
위와 같이 수동으로 빈을 하나 등록하고 앱을 실행하면은 수동 빈이 자동 빈을 overriding하면서 문제가 사라진다. 하지만 이는 어디까지나 스프링 부트를 사용하기 전까지이고, 스프링부트를 사용해서 앱을 실행하면은 오류가 발생한다. 이는 스프링부트가 빈을 중복해서 등록하는 것을 허용하지 않기 때문이다.
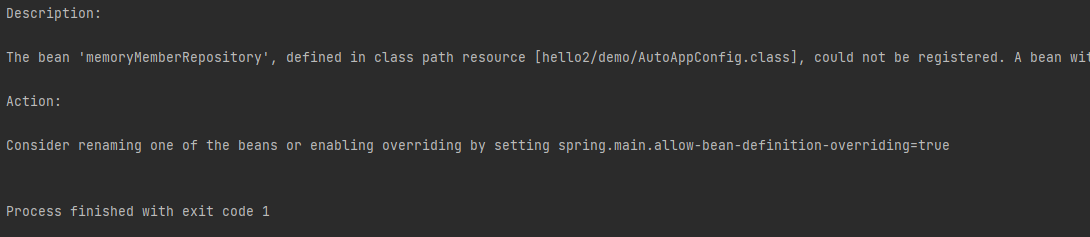
여기서 부트가 친절하게 설명하는 것처럼 resource/applicaton.properties 파일에 spring.main.allow-bean-definition-overriding=true 을 기입하고 다시 실행하면 문제 없이 실행이 된다.
