node.js MySQL #4
JOIN을 이용하여 상세보기 추가 구현
topic table과 author table은
topic table의 author_id와 author table의 id로 관계를 맺고 있다.


이 두 테이블을 합치기 위해서 사용할 쿼리문은
SELECT * FROM topic LEFT JOIN author ON topic.author_id = author.id이다.

선택한 글의 데이터만을 불러오기 위해 where문까지 추가하여
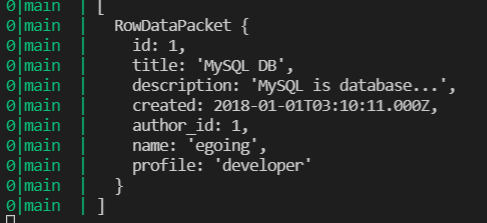
db.query(`SELECT * FROM topic LEFT JOIN author ON topic.author_id = author.id WHERE topic.id=?`,[queryData.id], function(error2, topic){...}을 실행하면, 결과값이 담기는 topic 안에는 topic table의 데이터들 뿐만 아니라 author 테이블의 연관 데이터들도 하나의 배열 요소로서의 객체로 담긴다.

따라서 상세보기 페이지의 제목과 본문 뿐만이 아니라 저자에 관련된 데이터로 표시할 수 있게 된다.
author table 중 name, 즉 저자명을 화면에 함께 출력하기 위해
template 모듈의 HTML 함수로 생성해줄 body UI를 다음과 같이 구성할 수 있다.
`<h2>${title}</h2>
${description}
<p>by ${topic[0].name}</p>
이렇게 구성하면, 본문 내용이 출력되고 그 아래에 by.저자명 도 함께 출력되는 웹페이지를 구현할 수 있다.
JOIN을 이용하여 글 생성 기능에서 저자 선택하기
- 저자 목록 출력 커리 :
select * from author;
db.query('select * from author;', function(error2, authors) {...}여기서 author table의 모든 데이터들이 authors변수에 담긴다.
- 글 생성 화면에서 콤보박스로 작가 선택창 구현하기
<select name="author">
  <option value="1">1st ex</option>
  <option value="2">2nd ex</option>
</select>
author table에서 불러온 정보를 활용하여 콤보박스를 만들어야 한다. 따라서 결과값이 담기는 배열인 authors을 반복문으로 처리하여 구현할 수 있다.
var tag = '';
var i = 0;
while(i < authors.length) {
  tag += `<option value="${authors[i].id}">${authors[i].name}</option>`;
  i++;
}
반복문을 통해 각 저자에 대한 콤보박스 option을 만들어 tag라는 변수에 쌓아올린 뒤,
template 모듈의 HTML 함수를 통해 글생성 UI를 만드는 코드의 body 부분에 다음과 같이 변수 tag를 사용한다.
var html = template.HTML(title, list,
            `
            <form action="/create_process" method="post">
              <p><input type="text" name="title" placeholder="title"></p>
              <p>
                <textarea name="description" placeholder="description"></textarea>
              </p>
              <p>
                <select name="author">
                  ${tag}
                </select>
              </p>
              <p>
                <input type="submit">
              </p>
            </form>
            `,
            `<a href="/create">create</a>`
          );
여기서, 조금더 정돈된 코드를 위하여 콤보박스의 옵션들을 생성해주는 코드를 template 모듈로 독립적으로 분리시킨다.
<template.js>
//HTML, list 함수에 이어서...
authorSelect:function(authors){
  var tag = '';
  var i = 0;
  while(i < authors.length) {
    tag += `<option value="${authors[i].id}">${authors[i].name}</option>`;
    i++;
  }
  return `
<select name="author">
${tag}
</select>
`
}
최종적으로 UI를 구현하는 html 변수의 값은 다음과 같다.
var html = template.HTML(title, list,
            `
            <form action="/create_process" method="post">
              <p><input type="text" name="title" placeholder="title"></p>
              <p>
                <textarea name="description" placeholder="description"></textarea>
              </p>
              <p>
                ${template.authorSelect(authors)}
              </p>
              <p>
                <input type="submit">
              </p>
            </form>
            `,
            `<a href="/create">create</a>`
);- 마지막으로, create_process 웹서버에서 새로 추가된 글에 대해 저자정보도 추가하는 처리를 해야 한다.
이전에 글생성 시 실행되는 쿼리문은 다음과 같았다.
db.query(`INSERT INTO topic (title, description, created, author_id)
VALUES(?, ?, NOW(), ?)`,
         [post.title, post.description, 1],
         function(error, result){...}
이전에는 작가 데이터를 다루지 않았기 때문에 topic table의 author 속성에 대한 값을 임의로 1로 지정했었다.
하지만 이제 author table의 데이터도 사용할 수 있기 때문에 임의의 값이 아닌 post.author으로 변경시켜준다.
db.query(`INSERT INTO topic (title, description, created, author_id)
VALUES(?, ?, NOW(), ?)`,
         [post.title, post.description, post.author],
         function(error, result){...}
여기서 post.author인 이유는, 콤보박스 태그인 <select>에 설정된 name이 author이기 때문에, 웹서버로 전송되는 데이터를 모다놓은 변수인 post에는 html form에서 각 control의 속성으로 붙여진 name값에 따라 키값이 만들어진 object가 담겨있기 때문이다.
