[SwiftUI/TCA] NavigationStack과 TabView, 그리고 path의 계층적 이동
들어가며
TCA에서 NavigationStack과 TabView, 그리고 path를 사용하여 계층적 이동을 해야하는 상황이 있었다. 그러나 뜻대로 되지않고 탭뷰에서 디테일뷰로 이동하지 못하거나 디테일뷰의 디테일뷰로 이동하지 못하는 이슈가 있었다. 또한 NavigationStack은 중첩해서 사용할 경우 크래시가 나는 경우도 생겼었다. 그렇게 많은 실패를 거듭한 결과! 계층적 이동방법을 알아냈다.
NavigationStack의 중첩?
우선적으로 NavigationStack은 중첩하여 사용하지 않는다. 상위뷰에서 NavigationStack을 선언하였다면 하위뷰에서 NavigationStack을 또 선언하면 안된다.
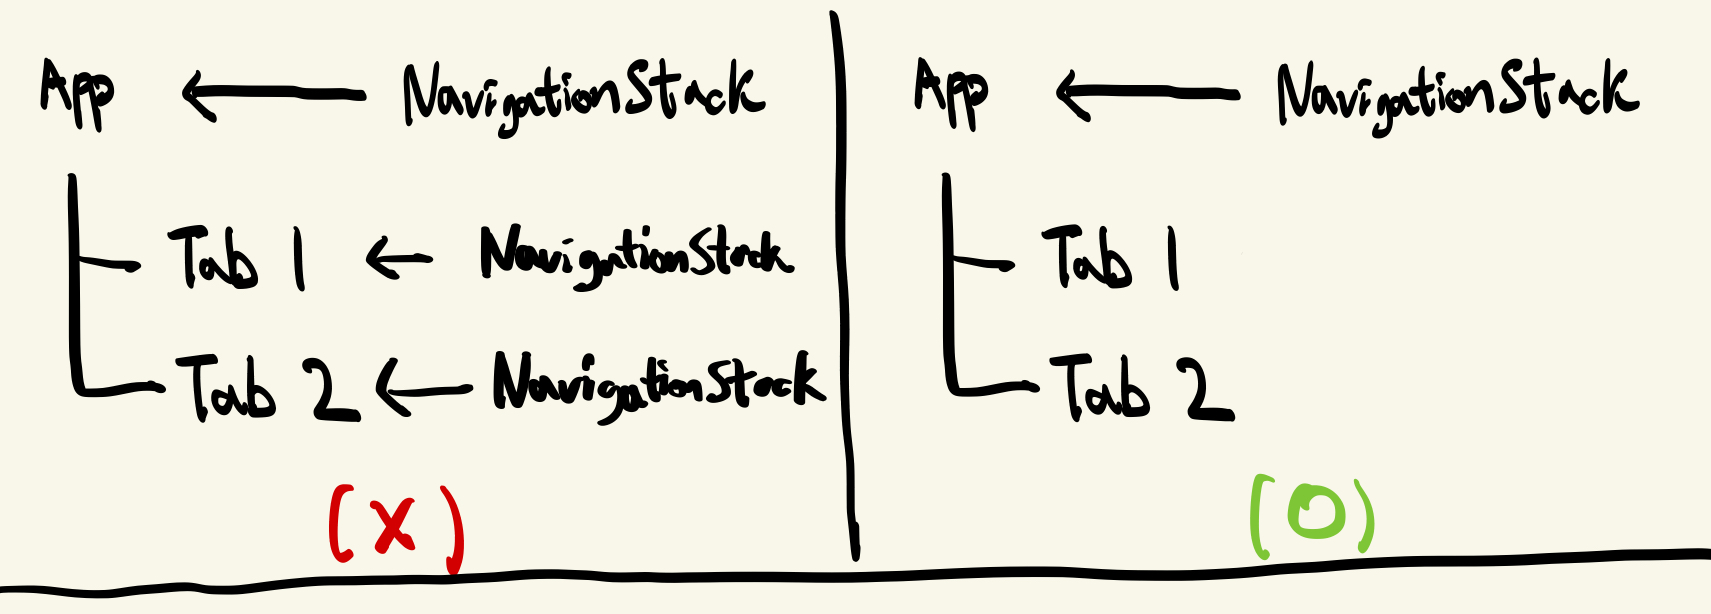
나는 각각의 탭에서 NavigationStack을 선언한뒤 최상위뷰에서 NavigationStack을 또 선언했었는데 런타임 시 Tab2에서 Tab1으로 이동했다 Tab1의 디테일뷰로 진입할때 크래시가 나버렸다. 그래서 최상위에서 NavigationStack을 선언하고 최상위에서 전역으로 관리하기로 했다.
AppFeature
import ComposableArchitecture

@Reducer
struct AppFeature {
    @ObservableState
    struct State: Equatable {
        var path = StackState<Path.State>()
        var tab1 = FirstFeature.State()
        var tab2 = SecondFeature.State()
    }
    enum Action {
        case path(StackActionOf<Path>)
        case tab1(FirstFeature.Action)
        case tab2(SecondFeature.Action)
    }
    var body: some ReducerOf<Self> {
        Scope(state: \.tab1, action: \.tab1) {
            FirstFeature()
        }
        Scope(state: \.tab2, action: \.tab2) {
            SecondFeature()
        }
        Reduce { state, action in
            switch action {
            case .tab1(.moveDetailViewButtonTapped):
                state.path.append(.firstDetail(FirstDetailFeature.State()))
                return .none

            case .tab2(.moveDetailViewButtonTapped):
                state.path.append(.secondDetail(SecondDetailFeature.State()))
                return .none

            case .tab1, .tab2, .path:
                return .none
            }
        }
        .forEach(\.path, action: \.path)
    }
}

extension AppFeature {
    @Reducer
    enum Path {
        case firstDetail(FirstDetailFeature)
        case secondDetail(SecondDetailFeature)
    }
}
import SwiftUI
struct AppView: View {
@Bindable var store: StoreOf<AppFeature>
var body: some View{
NavigationStack(path: $store.scope(state: \.path, action: \.path)) {
TabView {
FirstView(store: store.scope(state: \.tab1, action: \.tab1))
.tabItem {
VStack {
Image(systemName: "house")
Text("First")
}
}
SecondView(store: store.scope(state: \.tab2, action: \.tab2))
.tabItem {
VStack {
Image(systemName: "list.bullet")
Text("Second")
}
}
}
} destination: { store in
switch store.case {
case .firstDetail(let store):
FirstDetailView(store: store)
case .secondDetail(let store):
SecondDetailView(store: store)
}
}
}
}최상위 feature인 AppFeature에서 path를 선언해주고, 최상위뷰인 AppView에서 NavigationStack을 선언해준다. 그리고 하위에 TabView를 놓고 Scope를 통하여 리듀서들을 통합해준다.
FirstFeature, SecondFeature
import ComposableArchitecture

@Reducer
struct FirstFeature {
    @ObservableState
    struct State: Equatable {
    }

    enum Action {
        case moveDetailViewButtonTapped
    }

    var body: some ReducerOf<Self> {
        Reduce { state, action in
            switch action {
            case .moveDetailViewButtonTapped:
                return .none
            }
        }
    }
}
import SwiftUI
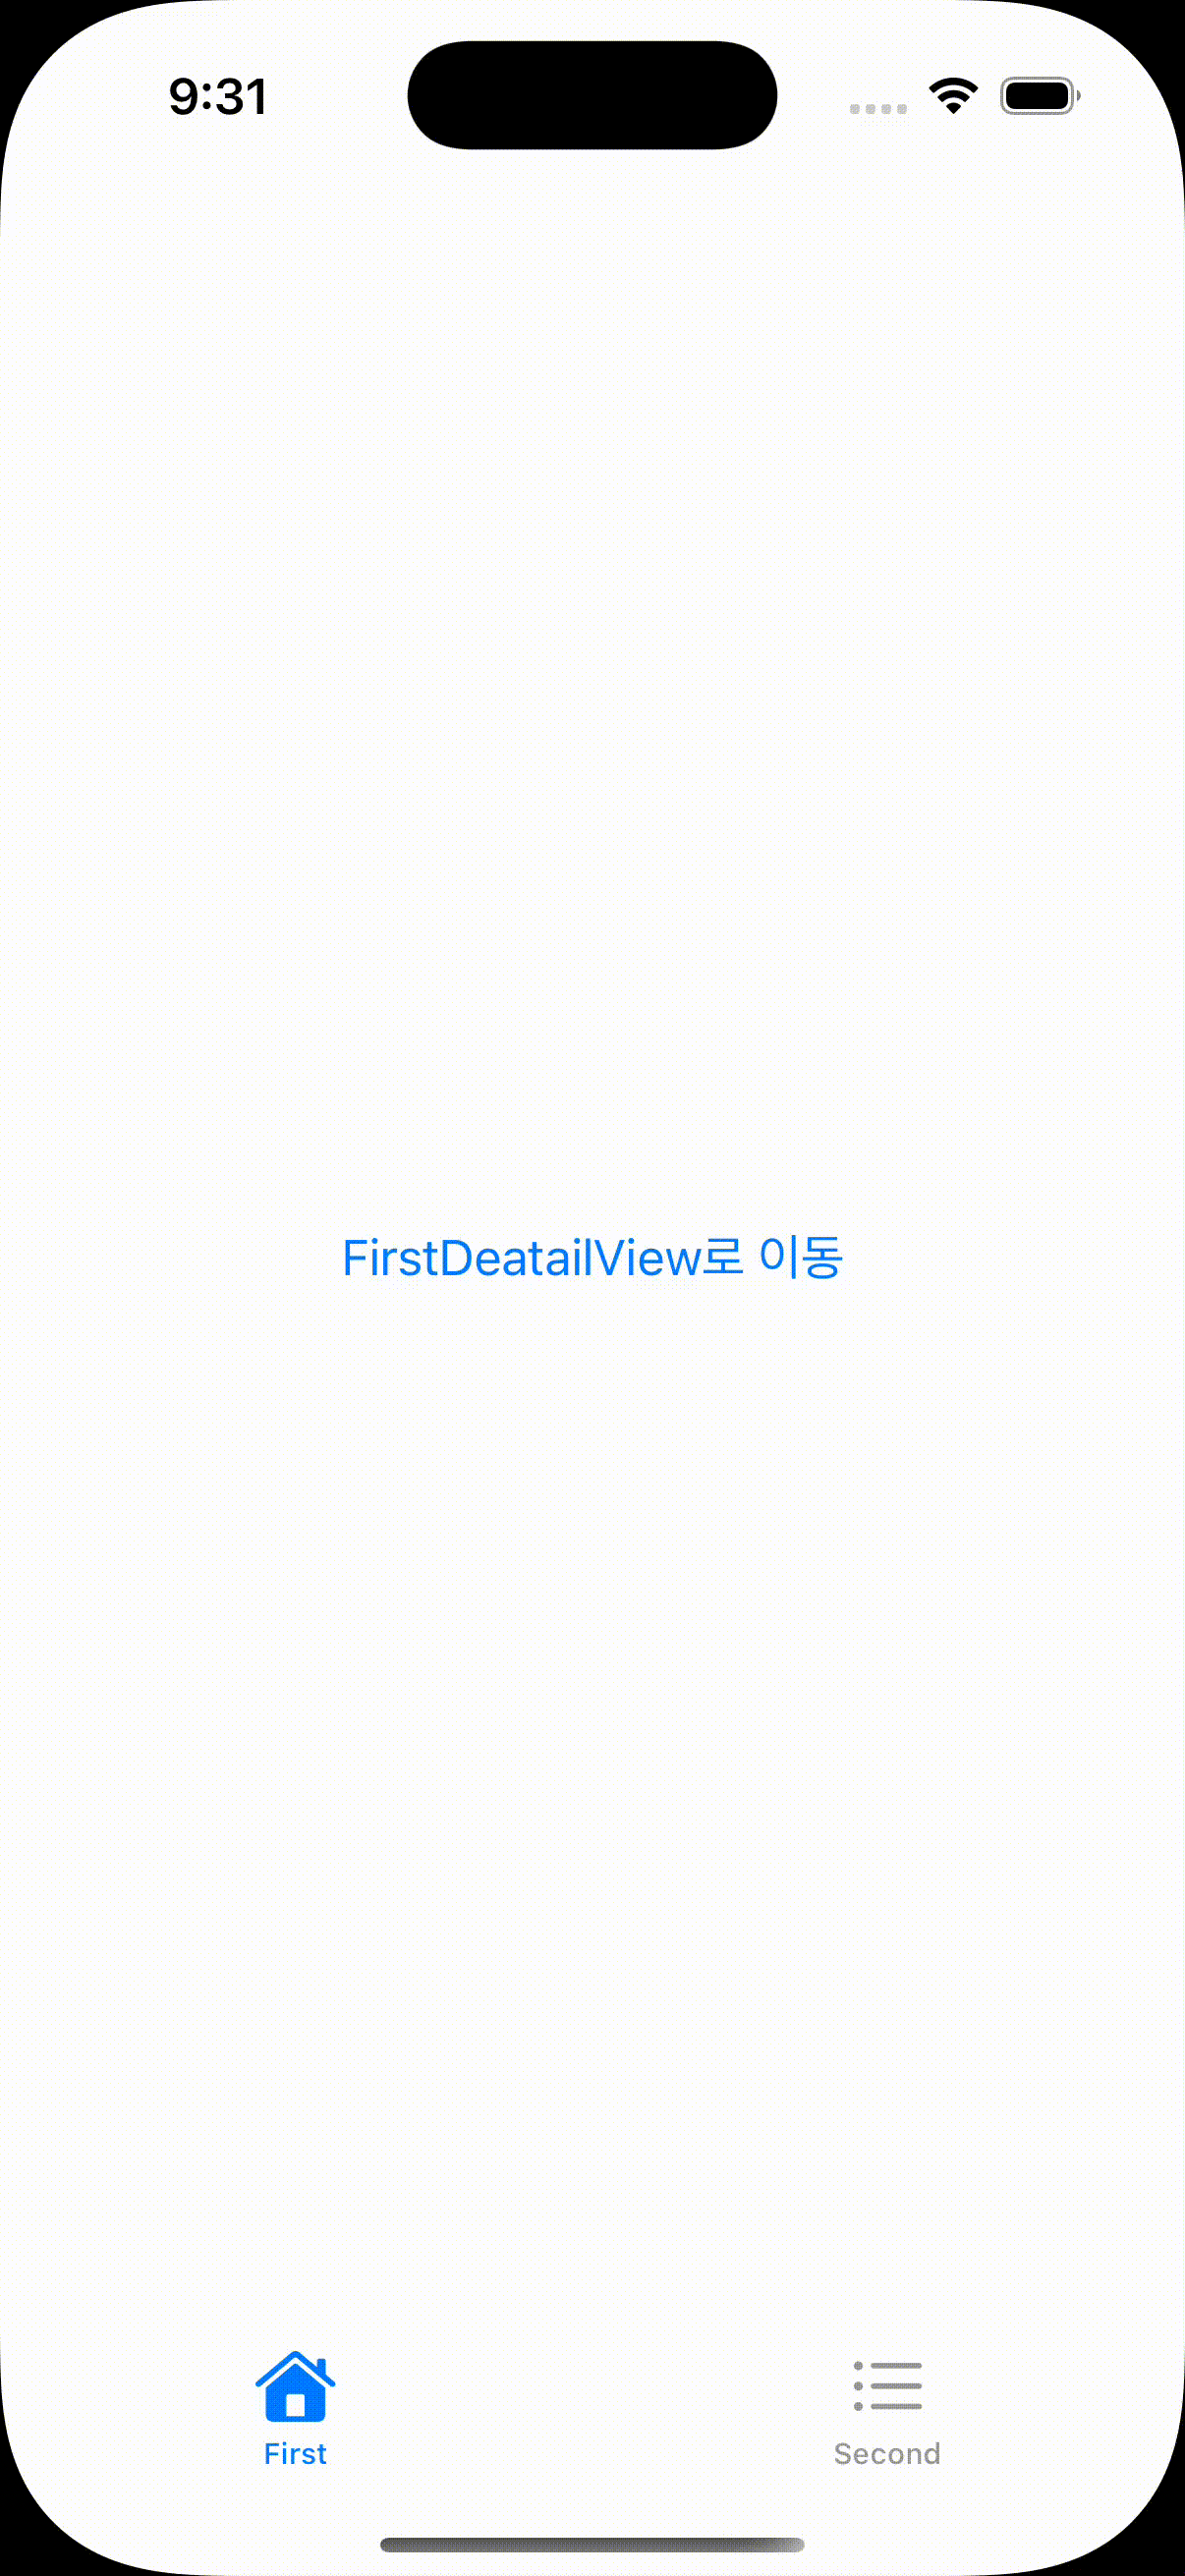
struct FirstView: View {
let store: StoreOf<FirstFeature>
var body: some View {
Button("FirstDeatailView로 이동") {
store.send(.moveDetailViewButtonTapped)
}
}
}import ComposableArchitecture
@Reducer
struct SecondFeature {
@ObservableState
struct State: Equatable {
}
enum Action {
case moveDetailViewButtonTapped
}
var body: some ReducerOf<Self> {
Reduce { state, action in
switch action {
case .moveDetailViewButtonTapped:
return .none
}
}
}
}import SwiftUI
struct SecondView: View {
let store: StoreOf<SecondFeature>
var body: some View {
Button("SecondDeatailView로 이동") {
store.send(.moveDetailViewButtonTapped)
}
}
}FirstView와 SecondView는 각각의 탭뷰의 뷰다. 그리고 나는 이 각각의 뷰의 디테일뷰로 이동하고 싶기 때문에 moveDetailViewButtonTapped을 선언해주었고 버튼을 만들어 주었다. FirstFeature와 SecondFeature에는 path가 없기때문에 path.append()로 네비게이션 이동을 할 수가 없다. 그렇기 때문에 여기서는 액션만 두고, 네비게이션 처리는 AppFeature에서 할 것이다.
FirstDetailFeature, SecondDetailFeature
import ComposableArchitecture

@Reducer
struct FirstDetailFeature {
    @ObservableState
    struct State: Equatable {
    }

    enum Action {
    }

    var body: some ReducerOf<Self>{
        Reduce{ state, action in
            switch action {
            }

        }

    }
}

import SwiftUI

struct FirstDetailView: View {
    let store: StoreOf<FirstDetailFeature>

    var body: some View{
        Text("FirstDetailView")
    }
}
import ComposableArchitecture
@Reducer
struct SecondDetailFeature {
@ObservableState
struct State: Equatable {
}
enum Action {
}
var body: some ReducerOf<Self>{
Reduce{ state, action in
switch action {
}
}
}
}
import SwiftUI
struct SecondDetailView: View {
let store: StoreOf<SecondDetailFeature>
var body: some View{
Text("SecondDetailView")
}
}이런식으로 진행이 됐다면 AppView에서 First탭이나 Second탭으로 이동할 수 있고, 각각의 디테일뷰로 이동할 수가 있다.
case .tab1(.moveDetailViewButtonTapped):
                state.path.append(.firstDetail(FirstDetailFeature.State()))
                return .none

case .tab2(.moveDetailViewButtonTapped):
                state.path.append(.secondDetail(SecondDetailFeature.State()))
                return .none
바로 아까 AppFeature에서의 이 코드가 First, Second의 각각의 .moveDetailViewButtonTapped 액션을 받아서 디테일뷰로의 네비게이션 처리를 해주는 것이다 !!
즉, 하위 Feature에서는 Action만 두고, 네비게이션 처리는 최상위 Feature에서 하는 것이다 !
자, 지금까지 AppView -> FirstView(Tab1) -> FirstDetailView 이런식으로 네비게이션 이동을 해보았는데, 만약에 FirstDetailView에서 또 다른 뷰로 이동해야 한다면 어떻게 해야할까? 바로 구현해보자
DetailView -> AnotherView
우선 AppFeature에서 코드를 추가 해보자.
case .path(.element(id: _, .firstDetail(.moveAnotherViewButtonTapped))):
                state.path.append(.another(AnotherFeature.State()))
                return .none

case .path(.element(id: _, .secondDetail(.moveAnotherViewButtonTapped))):
                state.path.append(.another(AnotherFeature.State()))
                return .none
리듀서 부분에서 추가된 이 부분은 디테일 feature에서 moveAnotherViewButtonTapped 액션이 이루어지면 AnotherFeature로 네비게이션 이동이 되도록 하는 부분이다.
case another(AnotherFeature)Path안에는 새로운 경로인 AnotherFeature를 넣어주고
 case .another(let store):
     AnotherView(store: store)
AppView에서 destination 안에도 추가해준다. 그리고 FirstFeature와 SecondFeature 둘다
import ComposableArchitecture

@Reducer
struct FirstDetailFeature {
  @ObservableState
  struct State: Equatable {

  }

  enum Action {
      case moveAnotherViewButtonTapped
  }

  @Dependency(\.dismiss) var dismiss
  var body: some ReducerOf<Self>{
      Reduce{ state, action in
          switch action {
          case .moveAnotherViewButtonTapped:
              return .none
          }

      }

  }
}

import SwiftUI

struct FirstDetailView: View {
  let store: StoreOf<FirstDetailFeature>

  var body: some View{
      Button("또 다른 뷰로 가기") {
          store.send(.moveAnotherViewButtonTapped)
      }
  }
}
이런식으로 moveAnotherViewButtonTapped을 만들어준다.
마지막으로 AnotherFeature만 만들어주면 끝!
import ComposableArchitecture

@Reducer
struct AnotherFeature {
    @ObservableState
    struct State: Equatable {

    }
    enum Action {
    }
    var body: some ReducerOf<Self> {
        Reduce { state, action in
            switch action {
            }

        }

    }
}

import SwiftUI

struct AnotherView: View {
    let store: StoreOf<AnotherFeature>
    var body: some View {
        Text("또 다른 페이지")
    }
}
이렇게 되면 App -> Tab -> Detail -> Another 이런식으로의 계층적 이동이 가능하게 된다.
실행결과
이렇게 NavigationStack 과 TabView 그리고 Path를 이용한 계층적 이동에 대해 알아보았다. 그럼에도 걸리는 부분들이 있다. 지금 네비게이션 이동에 관한 로직들을 AppFeature에서 모두 처리하고 있지만, 만약에 네비게이션 목적지가 많아지면 어떡할까? 앱이 커지면 커질수록 AppFeature가 방대해질 것이다. 이러한 부분도 생각해봐야 할 것이다.
📚참고
https://stackoverflow.com/questions/76301602/dealing-with-nested-navigationstacks-in-swiftui
