본격적으로 YOLO v8에 대해 공부해보려 한다. 공식적으로 발행된 paper가 없기 때문에 다양한 사이트를 참고하여 공부해볼 예정이다
reference 1 : https://blog.roboflow.com/whats-new-in-yolov8/#:~:text=YOLOv8%20was%20launched%20on%20January%2010th%2C%202023
- YOLO v8은 YOLO v5 모델을 만든 Ultralytics에 의해 개발되었다.
- C code & Darknet
- python package를 이용하기 때문에 CLI 사용이 매우 쉬움
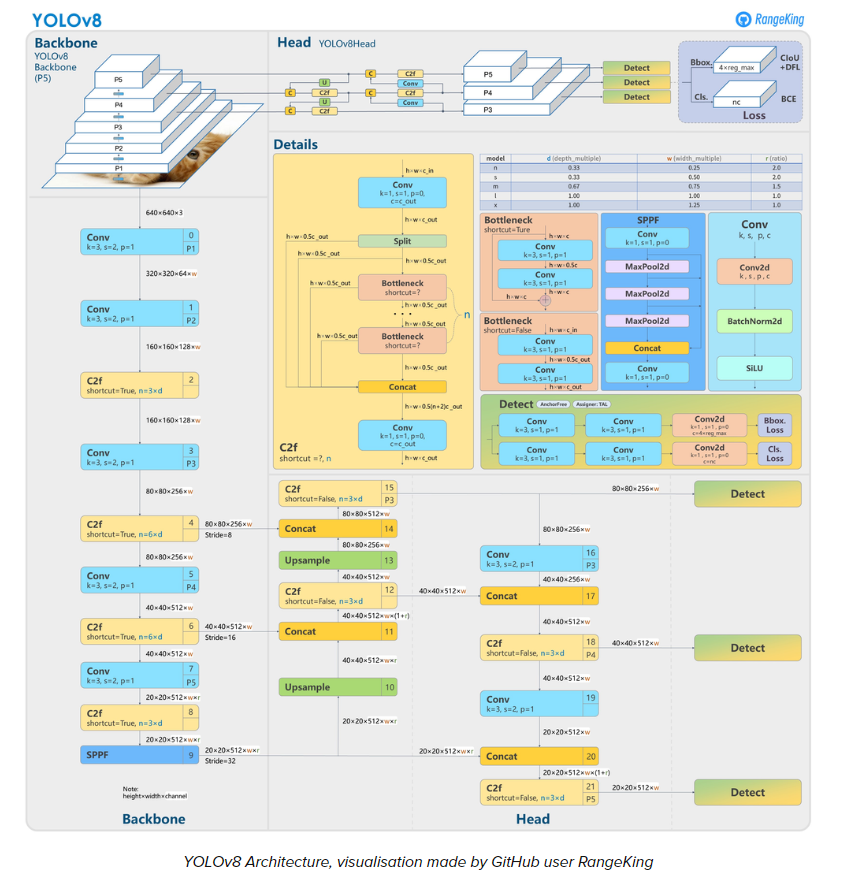
backbone : layer을 쌓아가며 feature의 size 조절
head : bounding box 및 클래스 확률 예측
-> 아직 이해가 완벽히는 안된다. 그래도 architecture가 굉장히 상세하게 그려져 있어서 코드를 보면서 이해해보아야 될 것 같다.
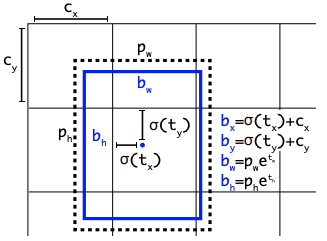
- Anchor Free Detection : YOLO v8은 anchor-free model이다. anchor box의 offset을 예측하는 것 대신 객체의 center을 예측한다.
-The Mosaic Augmentation : 데이터 증강 기법, 주변의 다른 픽셀 및 새로운 위치에 데이터를 증강한다.
YOLO v8 코드 예시
from ultralytics import YOLO

# Load a model
model = YOLO("yolov8n.yaml")  # build a new model from scratch
model = YOLO("yolov8n.pt")  # load a pretrained model (recommended for training)

# Use the model
results = model.train(data="coco128.yaml", epochs=3)  # train the model
results = model.val()  # evaluate model performance on the validation set
results = model("https://ultralytics.com/images/bus.jpg")  # predict on an image
success = YOLO("yolov8n.pt").export(format="onnx")  # export a model to ONNX format
-> .yaml 파일은 모델을 scratch 형식으로 불러올 수 있는 파일이다. 코드 공부할 때 참고해보면 좋을 것 같다.
reference 2 : https://docs.ultralytics.com/
@Train
- YOLO dataset은 COCO, VOC, ImageNet을 사용 -> ex ) yolo traindata = coco.yaml
- YOLOv8n은 COCO128 dataset을 image size 640으로 설정
from ultralytics import YOLO

# Load a model
model = YOLO('yolov8n.yaml')  # build a new model from YAML
model = YOLO('yolov8n.pt')  # load a pretrained model (recommended for training)
model = YOLO('yolov8n.yaml').load('yolov8n.pt')  # build from YAML and transfer weights

# Train the model
model.train(data='coco128.yaml', epochs=100, imgsz=640)
- gpu 사용시
from ultralytics import YOLO

# Load a model
model = YOLO('yolov8n.pt')  # load a pretrained model (recommended for training)

# Train the model with 2 GPUs
model.train(data='coco128.yaml', epochs=100, imgsz=640, device=[0, 1])
- 이전에 저장된 상태에서 훈련 재개할 시 마지막으로 저장된 모델에서 가중치 로드, resume 인수 설정
from ultralytics import YOLO

# Load a model
model = YOLO('path/to/last.pt')  # load a partially trained model

# Resume training
model.train(resume=True)
- TensorBoard : TensorFlow용 시각화 도구 키트 (colab 환경)
load_ext tensorboard
tensorboard --logdir ultralytics/runs  # replace with 'runs' directory
@Validate
- 사용 예시
from ultralytics import YOLO

# Load a model
model = YOLO('yolov8n.pt')  # load an official model
model = YOLO('path/to/best.pt')  # load a custom model

# Validate the model
metrics = model.val()  # no arguments needed, dataset and settings remembered
metrics.box.map    # map50-95
metrics.box.map50  # map50
metrics.box.map75  # map75
metrics.box.maps   # a list contains map50-95 of each category
@Export
- 사용 예시
from ultralytics import YOLO

# Load a model
model = YOLO('yolov8n.pt')  # load an official model
model = YOLO('path/to/best.pt')  # load a custom trained

# Export the model
model.export(format='onnx')
reference 3 : https://learnopencv.com/ultralytics-yolov8/
-
YOLO 모델 종류
YOLOv8n, YOLOv8s, YOLOv8l, YOLOv8x -
사용 방법
git clone https://github.com/ultralytics/ultralytics.git #1

pip install -r requirements.txt #2

pip install ultralytics #3
- YOLOv5 vs YOLOv8
Replace the C3 module with the C2f module
Replace the first 6x6 Conv with 3x3 Conv in the Backbone
Delete two Convs (No.10 and No.14 in the YOLOv5 config)
Replace the first 1x1 Conv with 3x3 Conv in the Bottleneck
Use decoupled head and delete the objectness branch
-YOLOv5 reference : https://docs.ultralytics.com/yolov5/tutorials/architecture_description/#44-build-targets
이제 어느정도 모델 실행 방법은 익히긴 했지만, 아직 모델의 정확한 아키텍처에 대한 이해는 하지 못했다. 이 부분은 직접 코드를 보면서 하는 것이 나은 것 같아 다음에 코드를 직접 분석해보며 이해도 같이 해볼 예정이다.
