🤷 기간 : 2021.04.23 ~ 2021.04.25
🤷 자료 : https://www.notion.so/wecode/Django-C-R-U-D-2-98d0ec4c3de844338e769096aee13537
🤷 내용: ORM 과제 리뷰
순서
Miniconda가상환경 설치하기Project에 필요한python package설치project세팅.gitignore설정settings.pyDjango application생성models.py작성(table)table에 data 넣기
1. Miniconda 가상환경 설치하기
conda 서버 생성 및 활성화
- conda 서버 리스트 확인
base ❯ conda env list
# conda environments:
#
base                  *  /Users/shinisgood/miniconda3
crud1-20기                /Users/shinisgood/miniconda3/envs/crud1-20기
test-20                  /Users/shinisgood/miniconda3/envs/test-20
westarbucks              /Users/shinisgood/miniconda3/envs/westarbucks


~ master*- conda 서버 생성
conda create -n westarbucks2 python=3.9- conda 서버 활성화
base ❯ conda activate westarbucks22. Project에 필요한 python package 설치 & mySQL 설치
- django 설치
~/Desktop/wecode/wecode_backend feature/crud*
westarbucks2 ❯ pip install django- django 버젼 확인
~/Desktop/wecode/wecode_backend feature/crud*
westarbucks2 ❯ python -m django --version- mysql 설치
~/Desktop/wecode/wecode_backend feature/crud*
westarbucks2 ❯ pip install mysqlclient
westarbucks2databases생성mysql -u root -pcreate database westarbucks2 character set utf8mb4 collate utf8mb4_general_ci;**
my_settings.py를 통하여 연결
3. project 세팅
project생성
~/Desktop/wecode/wecode_backend feature/crud*
westarbucks2 ❯ django-admin startproject westarbucks2projecttree확인
~/Desktop/wecode/wecode_backend/westarbucks2 feature/crud*
westarbucks2 ❯ tree .
.
├── manage.py
└── westarbucks2
    ├── __init__.py
    ├── asgi.py
    ├── settings.py
    ├── urls.py
    └── wsgi.py

1 directory, 6 files- 서버 작동 확인
~/Desktop/wecode/wecode_backend/westarbucks2_name feature/crud* 1m 59s
westarbucks2 ❯ python manage.py runserver
4. .gitignore 파일 생성
.gitignore파일 생성- 웹 사이트가서 가져온 자료
.gitignore에 추가(https://www.toptal.com/developers/gitignore/api/python,pycharm,vscode,vim,macos,linux,zsh,windows)
5. settings.py파일 설정
- IP허용
ALLOWED_HOSTS = ["*"]- 주석 처리 :
admin과로그인 시스템관련 안씀, 주석처리해
INSTALLED_APPS = [
    #'django.contrib.admin',
    #'django.contrib.auth',
MIDDLEWARE = [
# 'django.middleware.csrf.CsrfViewMiddleware',
# 'django.contrib.auth.middleware.AuthenticationMiddleware',westarbucks2/urls.py의urlpatterns수정
from django.urls import path
`
urlpatterns = [
]
보안을 위한 my_settings.py 생성
westarbucks2_namne/my_settings.py생성- 수정 시 생성한 mySQL DATABASES 랑 잘 연결해줘
.gitignore에my_settings.pyimportwestarbucks2/settings.py수정from my_settings import DATABASES, SECRETSECRET_KEY = SECRETDATABASES = DATABASES
6.Django application 생성
App생성
~/Desktop/wecode/wecode_backend/westarbucks2_name feature/crud* 1m 3s
westarbucks2 ❯ python manage.py startapp productstree확인
~/Desktop/wecode/wecode_backend/westarbucks2_name/products feature/crud*
westarbucks2 ❯ tree .
.
├── __init__.py
├── admin.py
├── apps.py
├── migrations
│   └── __init__.py
├── models.py
├── tests.py
└── views.py

1 directory, 7 filesINSTALLED_APPS에 생성한app추가
INSTALLED_APPS = [
    'product'
7. models.py 작성(table)
** 완전 똑같이는 안하고, 이걸 보면서 갈꺼야
table을 위한 products/models.py에 코드 작성
- 먼저
models을import해주자
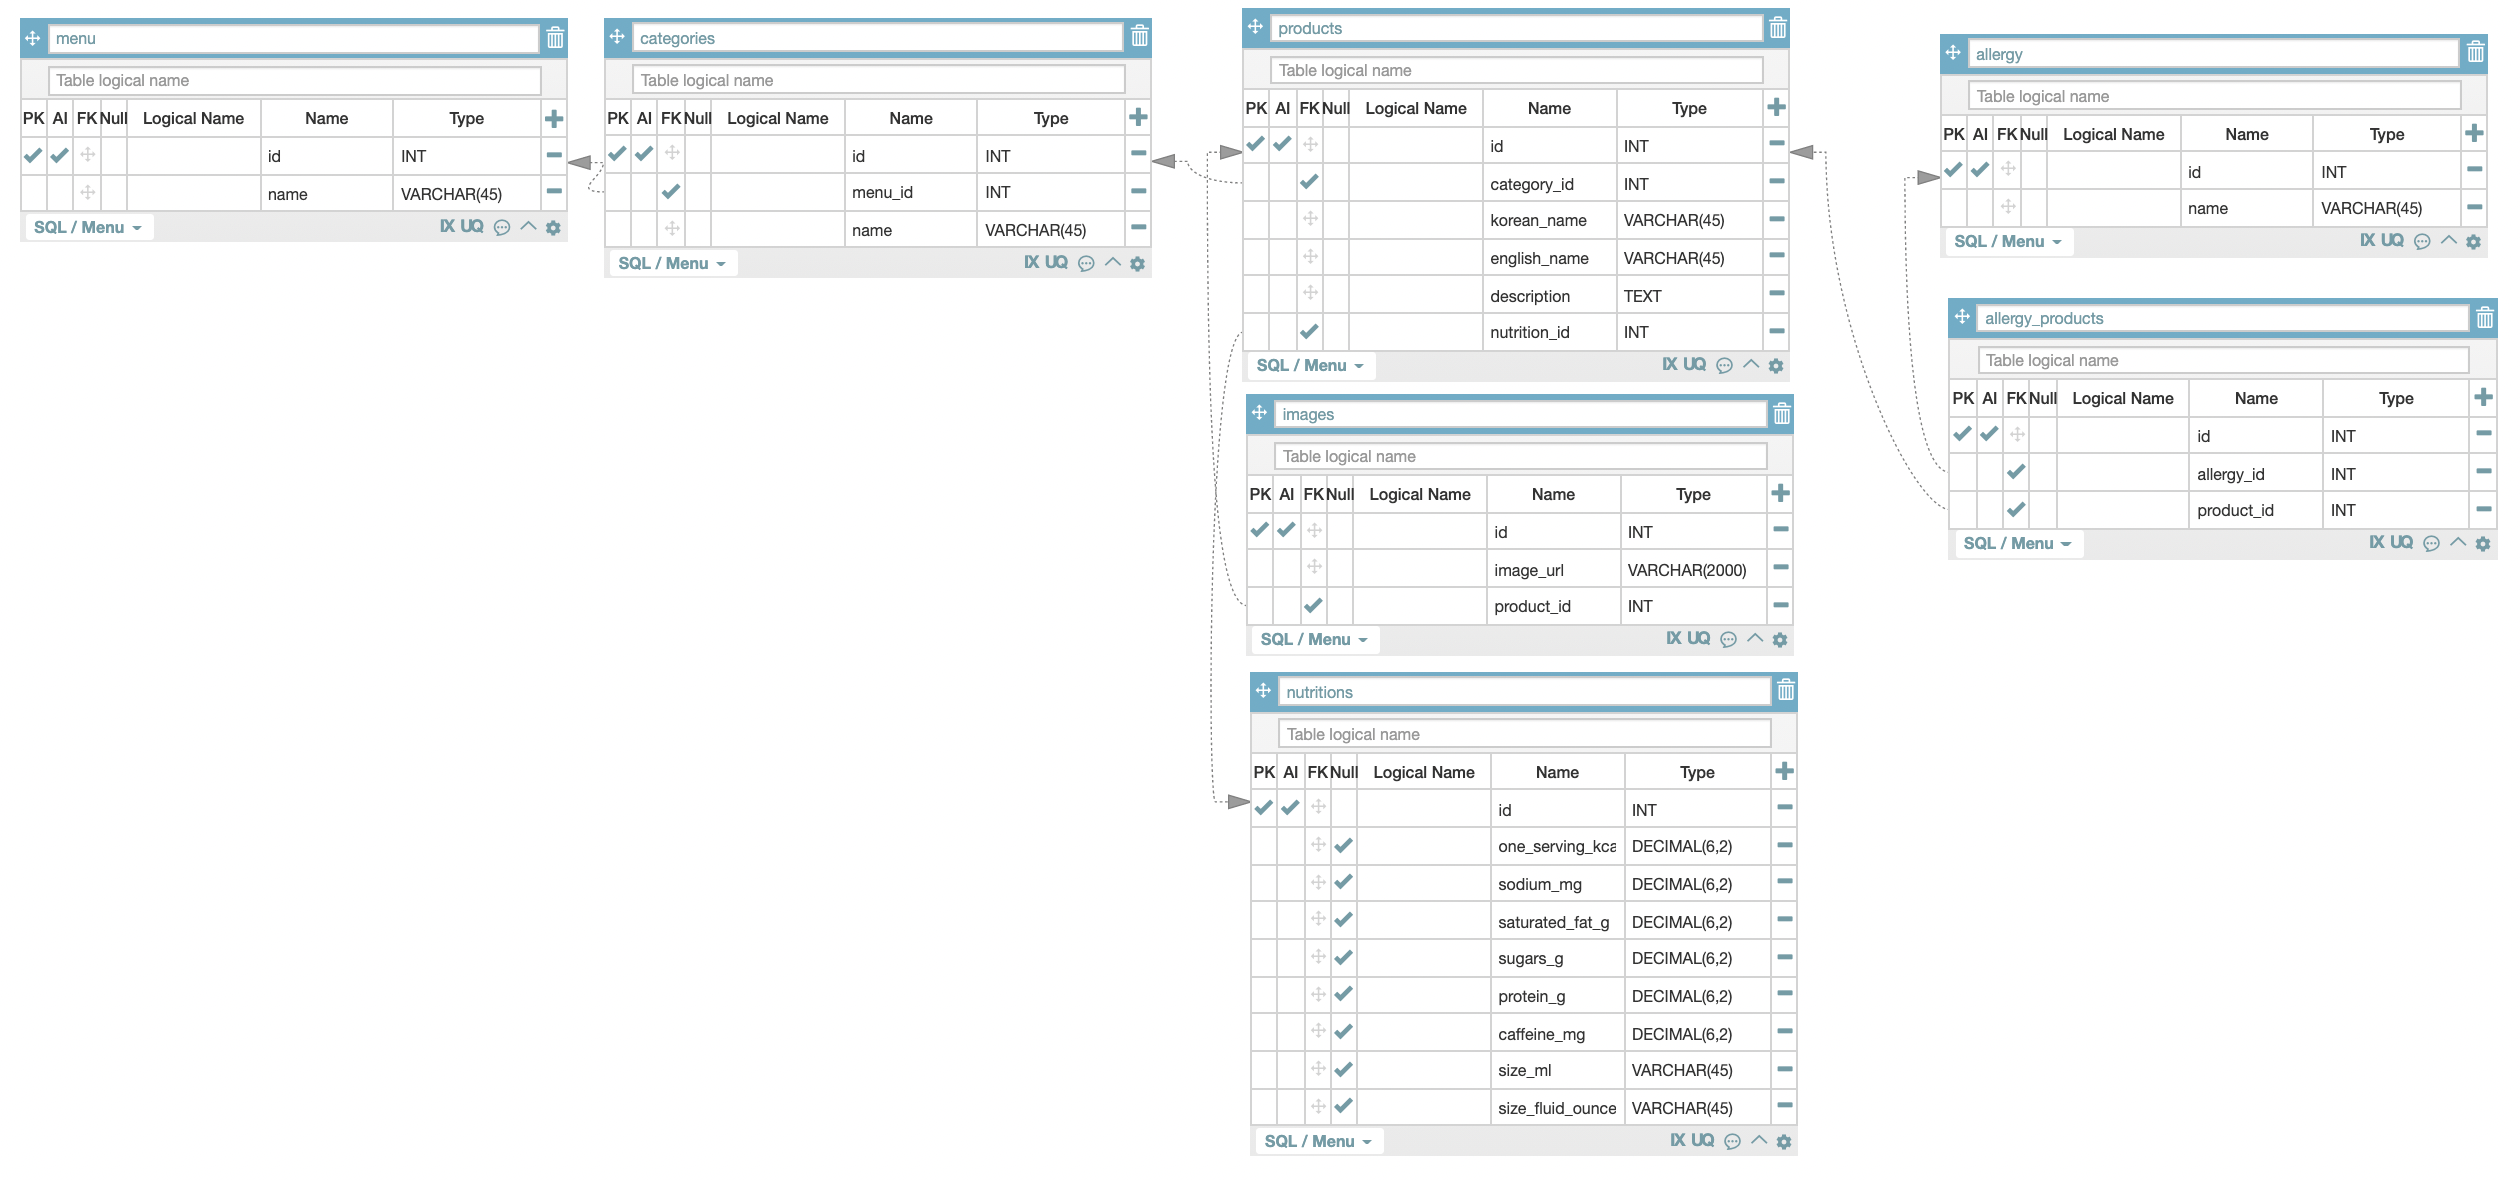
from django.db import modelsMenu테이블
class Menu(models.Model):
    name = models.CharField(max_length = 45) 				# INT/varcha(45)

    class Meta:
db_table= "menus" # 요 이름으로 저장 무조건 "=" 써야함Category테이블
class Category(models.Model):
    menu = models.ForeignKey("Menu",on_delete=models.CASCADE)		# Menu클래스에 연결
    name = models.CharField(max_length = 45)

    class Meta:
db_table = "categories"Nutrition테이블
class Nutrition(models.Model):
    sodium_mg   = models.DecimalField(max_digits = 6, decimal_places = 2)	# 6자리, 소숫점은 2자리까지
    sugars_g    = models.DecimalField(max_digits = 6, decimal_places = 2)
    protein_g   = models.DecimalField(max_digits = 6, decimal_places = 2)
    caffeine_mg = models.DecimalField(max_digits = 6, decimal_places = 2)

    class Meta:
db_table = "nutritions"Product테이블
class Product(models.Model):
    category    = models.ForeignKey("Category", on_delete=models.CASCADE)	# Category 클래스에 연결
    nutrition   = models.ForeignKey("Nutrition", on_delete=models.CASCADE)	# Nutrition 클래스에 연결
    name        = models.CharField(max_length = 45)
    allergy     = models.ManyToManyField("Allergy", through = "AllergyProduct")	# "through="AllergyProduct"는 many to many 거는 법 !

    class Meta:
db_table = "products"Allergy테이블
class Allergy(models.Model):
    name = models.CharField(max_length= 45)

    class Meta:
db_table = "allergies"AllergyProduct중간 테이블
class AllergyProduct(models.Model):
    product = models.ForeignKey("Product", on_delete=models.CASCADE)		   # Product 클래스에 연결
    allergy = models.ForeignKey("Allergy", on_delete=models.CASCADE, null = True)  # Allergy 클래스에 연결

    class Meta:
        db_table = "allergiesproducts"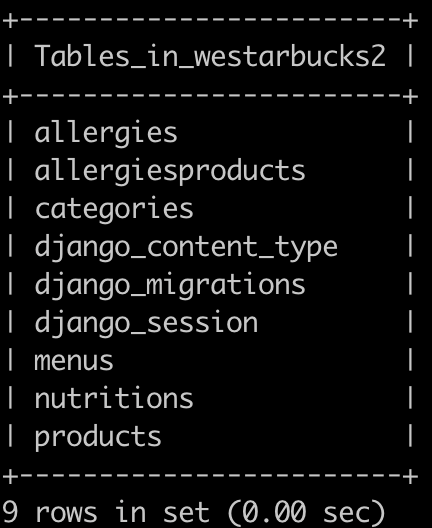
8. 테이블에 데이터값 넣기
>>> from products.models import *Menu Table데이터 추가
>>> Menu.objects.create(name = "음료")		# 메뉴 테이블에 데이터 입력
<Menu: Menu object (1)>
>>> Menu.objects.create(name = "푸드")
<Menu: Menu object (2)>
>>> a3 = Menu(name ="상품")
>>> a3.save()
>>> a4 = Menu(name = "카드")
>>> a4.save()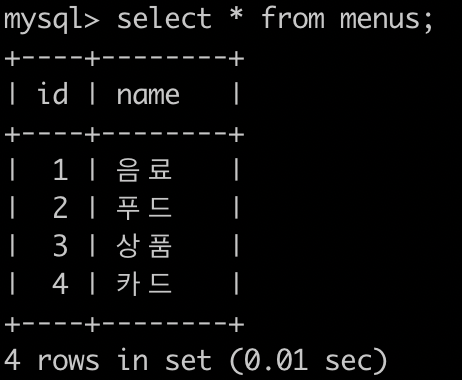
Category Table데이터 추가- **foreign key 확인 해라
>>> a1 = Menu.objects.get(id=1)					# foreign key a1으로 받아서
>>> a2 = Menu.objects.get(name = "푸드")				# foreign key a2으로 받아서
>>> Category.objects.create(name = "콜드브루커피", menu = a1)	# foreign key(a1)이랑 연결 시키기
<Category: Category object (1)>
>>> a2 = Menu.objects.get(name = "푸드")
>>> Category.objects.create(name = "브래드", menu=a2)		# foreign key(a2)이랑 연결 시키기
<Category: Category object (2)>
>>> Category.objects.create(name = "케이크", menu=a2)		# foreign key(a2)이랑 연결 시키기
<Category: Category object (3)>
>>> Category.objects.create(name = "에스프레소", menu = a1)	# foreign key(a1)이랑 연결 시키기
<Category: Category object (4)>
>>> Category.objects.create(name = "블랜디드", menu=Menu(id=1))	# foreign key를 Menu의 id=1이랑 연결 시키기, 결국 a1이랑 같은말
<Category: Category object (5)>
>>> a1 = Menu.objects.get(name ="상품")
>>> Category.objects.create(name = "머그", menu = a1)
<Category: Category object (6)>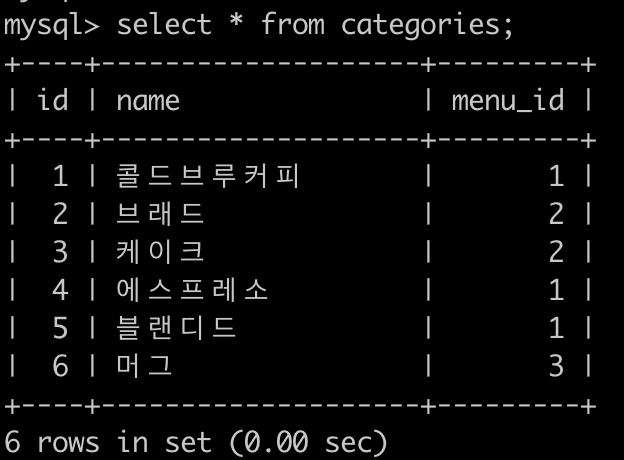
Nutrition Table데이터 추가
>>> Nutrition.objects.create(sodium_mg=11, sugars_g=10, protein_g= 19, caffeine_mg= 20)
<Nutrition: Nutrition object (1)>
>>> Nutrition.objects.create(sodium_mg=31, sugars_g=24, protein_g= 1, caffeine_mg= 240)
<Nutrition: Nutrition object (2)>
>>> Nutrition.objects.create(sodium_mg=311, sugars_g=242, protein_g= 155, caffeine_mg= 20)
<Nutrition: Nutrition object (3)>
>>> Nutrition.objects.create(sodium_mg=3121, sugars_g=2452, protein_g= 1155, caffeine_mg= 2520)
<Nutrition: Nutrition object (4)>
>>> Nutrition.objects.create(sodium_mg=3112421, sugars_g=242, protein_g= 11455, caffeine_mg= 220)
>>> Nutrition.objects.create(sodium_mg=3112, sugars_g=242, protein_g= 1145, caffeine_mg= 220)
<Nutrition: Nutrition object (5)>
>>> Nutrition.objects.create()			# models.py에 "null = True" 추가함
<Nutrition: Nutrition object (6)> 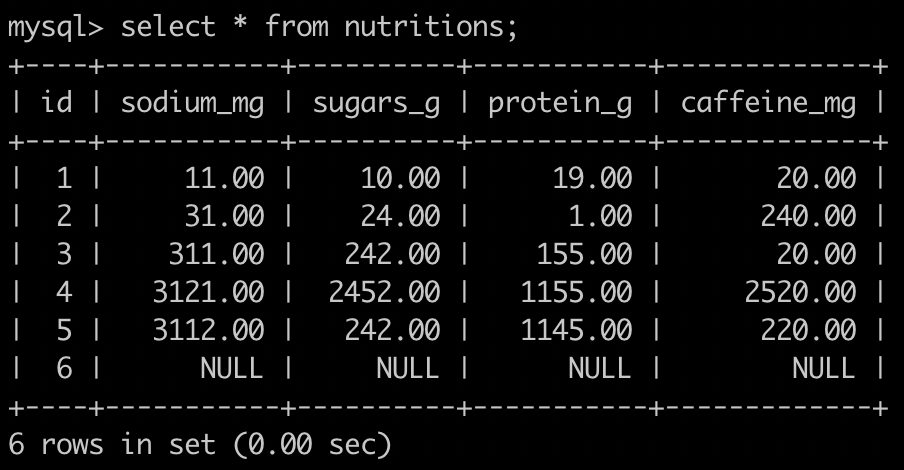
Product Table데이터 추가
>>> a1 = Category.objects.get(name="콜드브루커피")
>>> a2 = Category.objects.get(id=2)
>>> a3 = Category.objects.get(id=3)
>>> a4 = Category.objects.get(id=4)
>>> a5 = Category.objects.get(id=5)
>>> a6 = Category.objects.get(id=6)
>>> b1  = Nutrition.objects.get(id =1)
>>> b1  = Nutrition.objects.get(id =2)
>>> b1  = Nutrition.objects.get(id =1)
>>> b2  = Nutrition.objects.get(id =2)
>>> b3  = Nutrition.objects.get(id =3)
>>> b4  = Nutrition.objects.get(id =4)
>>> b5  = Nutrition.objects.get(id =5)
>>> b6  = Nutrition.objects.get(id =6)
<Product: Product object (1)>
>>> Product.objects.create(name = "망고패션후르츠블렌디드", category=a5, nutrition=b2)
<Product: Product object (2)>
>>> Product.objects.create(name = "리얼 치즈 베이글", category=a2, nutrition=b3)
<Product: Product object (3)>
>>> Product.objects.create(name = "그랜 사이렌 클레식", category=a6, nutrition=b6)
<Product: Product object (4)>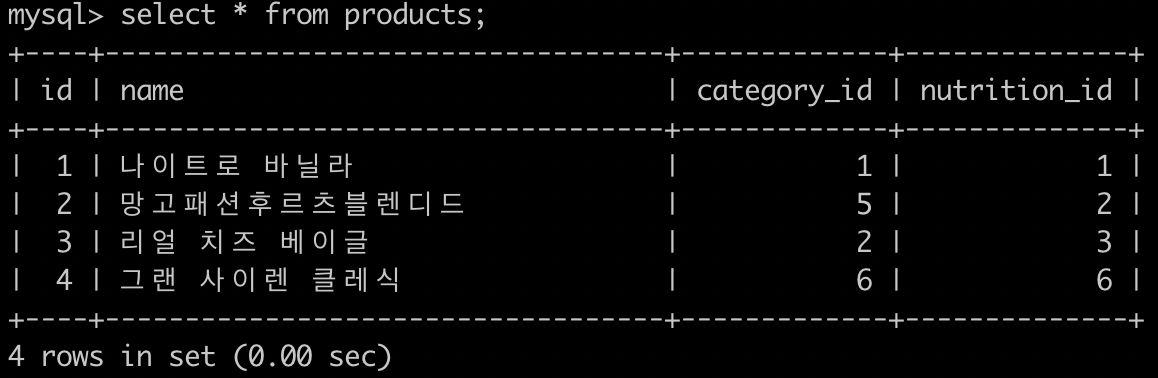
Allergy Table데이터 추가
>>> Allergy.objects.create(name = "우유")
<Allergy: Allergy object (1)>
>>> Allergy.objects.create(name = "대두")
<Allergy: Allergy object (2)>
>>> Allergy.objects.create(name = "바닐라")
<Allergy: Allergy object (3)>
AllergyProduct Table데이터 추가 (many-to-many의 중간 테이블임)
>>> p1 = Product.objects.get(id=1)
>>> p2 = Product.objects.get(id=2)
>>> p3 = Product.objects.get(id=3)
>>> p4 = Product.objects.get(id=4)
>>> a1 = Allergy.objects.get(id=1)
>>> a2 = Allergy.objects.get(id=2)
>>> a3 = Allergy.objects.get(id=3)
>>> AllergyProduct.objects.create(product = p1, allergy = a1)
<AllergyProduct: AllergyProduct object (1)>
>>> AllergyProduct.objects.create(product = p1, allergy = a3)
<AllergyProduct: AllergyProduct object (2)>
>>> AllergyProduct.objects.create(product = p2)
<AllergyProduct: AllergyProduct object (3)>
>>> AllergyProduct.objects.create(product = p3, allergy = a1)
<AllergyProduct: AllergyProduct object (4)>
>>> AllergyProduct.objects.create(product = p4)
<AllergyProduct: AllergyProduct object (5)>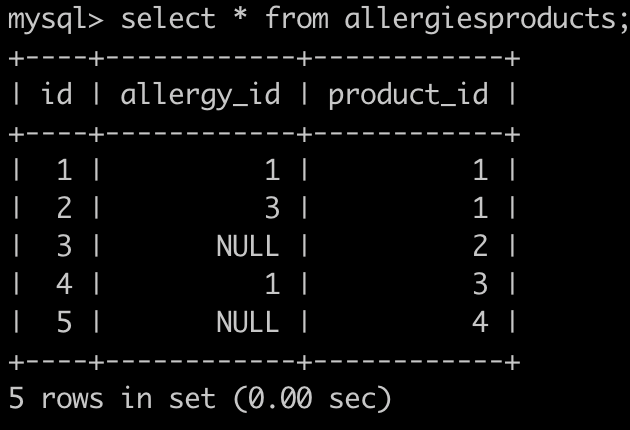
어려웠던점...
- 가상환경 세팅 맨처음에 진행하는게 헷깔렸으나 이제는 익숙해져 가고있음
my_settings.py를 만들어서 새로만든 sql서버와 연결시키기 !settings.py에서from my_settings import DATABASES, SECRET이거 맨위에 해주기table생성 시, many to many롤 연결 할 떄through = "중간테이블이름"해주기Foreign Key연결 시키기 정신 똑바로 챙기고 해라 ..- 오타를 줄이자 . ..
추가 공부 목록
table생성 시,CharField(),ManyToManyField(),Textfield()등 사용에 익숙해져 보자.shell에서 데이터 추가시C.R.U.D사용에 좀 더 익숙해져 보자- 전체적 흐름을 완벽하게 숙지하자.

신승홉니다