HTTP 요청 데이터
주로 다음 3가지 방법을 사용
GET - 쿼리 파라미터
- /url?username=hello&age=20
- 메세지 바디 없이, URL의 쿼리 파라미터에 데이터를 포함해서 전달
- ex) 검색, 필터 , 페이징 등에서 많이 사용
POST - HTML Form
- content-type: appllication/x-www-form-urlencoded
- 메세지 바디에 쿼리 파라미터 형식으로 전달
- ex) 회원가입, 상품주문, HTML Form 사용
HTTP message body
- HTTP API에서 주로 사용, JSON,XML,TEXT
- 데이터 형식은 주로 JSON 자용
- POST ,PUT, PATCH
POST-HTML form 예시
GET 쿼리 파라미터
전달 데이터 :
username = hello
age = 20
메세지 바디 없이, URL의 쿼리 파라미터를 사용해서 데이터를 전달
쿼리 파라미터는 URL에 ?를 시작으로 보낼 수 있다.
추가 파라미터는 &로 구분하면 된다.
http://localhost:8080/request-param?username=hello&age=20
서버에서는 HttpServletRequest가 제공하는 다음 메서드를 통해 쿼리 파라미터를 편리하게 조회할 수 있다.
쿼리 파라미터 조회 메서드
//단일 파라 미터 조회
String username = request.getParameter("username");
// 파라미터 이름들 모두 조회
Enumeration<String> parameterNames = request.getParameterNames();
// 파라미터를 Map으로 조회
Map<String,String[]> parameterMap = request.getParameterMap();
// 복수 파라미터 조회
String[] usernames = request.getParameterValues("username");
RequestParamServlet
경로 : hello.servlet.basic.requset
package hello.servlet1.basic.request;

import javax.servlet.ServletException;
import javax.servlet.annotation.WebServlet;
import javax.servlet.http.HttpServlet;
import javax.servlet.http.HttpServletRequest;
import javax.servlet.http.HttpServletResponse;
import java.io.IOException;
import java.util.Enumeration;

/**
 * 1. 파라미터 전송 기능
 * http://localhost:8080/request-param?username=hello&age=20
 * 2. 동일한 파라미터전송 기능
 * http://localhost:8080/request-param?username=hello&username=kim&age=20
 */

@WebServlet(name = "RequestParamServlet", urlPatterns = "/request-param")
public class RequestParamServlet extends HttpServlet {
    @Override
    protected void service(HttpServletRequest request, HttpServletResponse response) throws ServletException, IOException {
        System.out.println("[전체 파라미터 조회] - start");
        /*Enumeration<String> parameterNames = request.getParameterNames();
        while (parameterNames.hasMoreElements()){
            String paramName = parameterNames.nextElement();
            System.out.println(paramName + ": " + request.getParameter(paramName));
        }*/
        request.getParameterNames().asIterator()
                .forEachRemaining(paramName -> System.out.println(paramName + ": " + request.getParameter(paramName)));
        System.out.println("[전체 파라미터 조회] - end");
        System.out.println();

        System.out.println("[단일 파라미터 조회]");
        String username = request.getParameter("username");
        String age = request.getParameter("age");
        System.out.println("username = " + username);
        System.out.println("age = " + age);
        System.out.println();

        System.out.println("이름이 같은 복수 파라미터 조회");
        System.out.println("request.getParameterValues(username)");
        String[] usernames = request.getParameterValues("username");
        for (String name : usernames) {
            System.out.println("username = " + name);
        }

        response.getWriter().write("ok");

    }
}
복수 파라미터에서 단일 파라미터 조회
username=hello&username=kim 과 같이 파라미터 이름은 하나인데, 값이 중복이면 어떻게 될까?
request.getParameter() 는 하나의 파라미터 이름에 대해서 단 하나의 값만 있을 때 사용해야 한다.
지금 중복일 때는 request.getParameterValues()를 사용해야 한다.
참고로 이렇게 중복일때 request.getParameter() 를 사용하면 request.getParameterValues()의 첫 번째 값을 반환 한다.
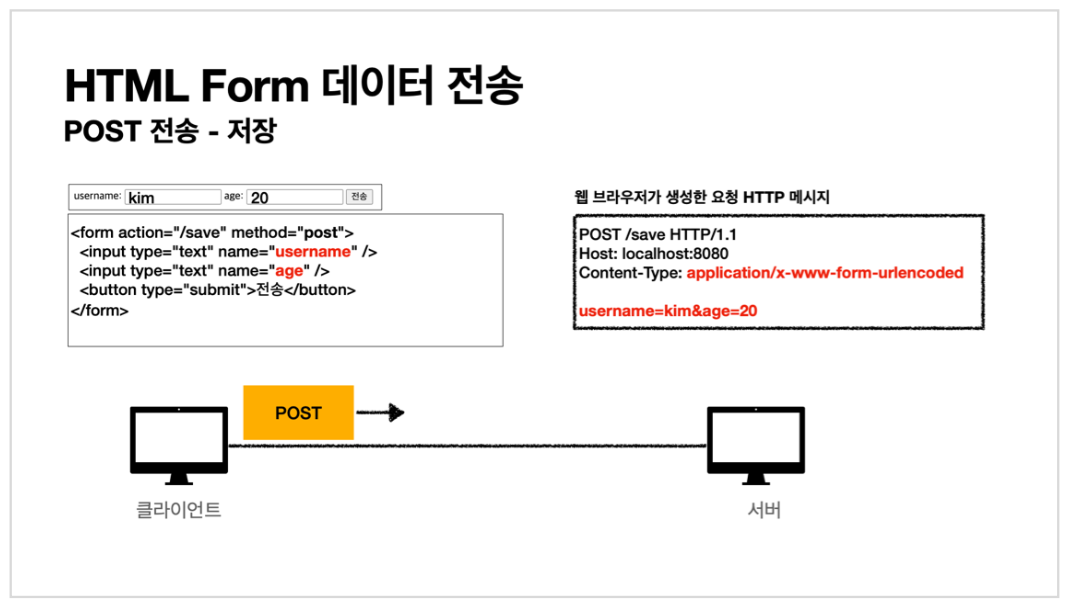
HTTP 요청 데이터 - POST HTML Form
이번에는 HTML의 Form을 사용해서 클라이언트에서 서버로 데이터를 전송
주로 회원가입, 상품주문등에서 사용하는 방식
특징)
content-type :application/x-www-form-urlencoded
메세지 바디에 쿼리 파라미터 형식으로 데이터를 전달한다.username=hello&age=20
경로 ) src/main/webapp/basic/hello-form.html
 <!DOCTYPE html>
    <html>
    <head>
        <meta charset="UTF-8">
        <title>Title</title>
    </head>
    <body>
    <form action="/request-param" method="post">
username: <input type="text" name="username" /> age: <input type="text" name="age" /> <button type="submit">전송</button>
    </form>
    </body>
    </html>
http://localhost:8080/basic/hello-form.html
POST의 HTML Form을 전송하면 웹 브라우저는 다음 형식으로 HTTP 메세지를 만든다 (웹브라우저 개발자 모드 확인)
요청 URL : http://localhost:8080/request-param
content-type : application/x-www-form-urlencoded
message body : username=hello&age=20
application/x-www-form-urlencoded 형식은 앞서 GET에서 살펴본 쿼리 파라미터 형식과 같다.
따라서 쿼리 파라미터 조회 메스드를 그대로 사용하면 된다.
클라이언트(웹 브라우저) 입장에서는 두 방식에 차이가 있지만, 서버 입장에서는 둘의 형식이 동일하므로, request.getParameter()로 편리하게 구분없이 조회할 수 있다.
✍️ 정리하면
request.getParameter()는 GET URL 쿼리 파라미터 형식도 지원하고,
POST HTML Form 형식도 둘 다 지원한다.
🤞 참고 )
content-type은 HTTP 메세지 바디의 데이터 형식을 지정한다.
GET URL 쿼리 파라미터 형식으로 클라이언트에서 서버로 데이터를 전달할 때는 HTTP 메세지 바디를 사용하지 않기 때문에 content-type이 없다.
POST HTML Form 형식으로 데이터를 전달하면 HTTP 메세지 바디에 해당 데이터를 포함해서 보내기 때문에 바디에 포함된 데이터가 어떤 형식인지 content-type을 꼭 지정해야 한다. 이렇게 폼으로 데이터를 전송하는 형식을 application/x-www-form-urlencoded라 한다.
postmen을 사용한 테스트
POST 전송 시
Body -> x-www-form-urlencoded 선택
Headers에서 content-type : applicatoin/x-www-form-urlencoded
HTTP 요청 데이터 - API 메세지 바디 - 단순 텍스트
HTTP message body에 데이터를 직접 담아서 요청
- HTTP API에서 주로 사용, JSON, XML, TEXT
- 데이터 형식은 주로 JSON 사용
- POST,PUT,PATCH
먼저 가장 단순한 텍스트 메세지를 HTTP 메세지 바디에 담아서 전송하고 읽어보자
HTTP 메세지 바디의 데이터를 inputStream을 사용해서 직접 읽을 수 있다.
경로 ) hello.servlet.basic.request
package hello.servlet1.basic.request;

import org.springframework.util.StreamUtils;

import javax.servlet.ServletException;
import javax.servlet.ServletInputStream;
import javax.servlet.annotation.WebServlet;
import javax.servlet.http.HttpServlet;
import javax.servlet.http.HttpServletRequest;
import javax.servlet.http.HttpServletResponse;
import java.io.IOException;
import java.nio.charset.StandardCharsets;

@WebServlet(name = "RequestBodyStringServlet",urlPatterns = "/request-body-string")
public class RequestBodyStringServlet extends HttpServlet {
    @Override
    protected void service(HttpServletRequest request, HttpServletResponse response) throws ServletException, IOException {
        ServletInputStream inputStream = request.getInputStream();
        String messageBody = StreamUtils.copyToString(inputStream, StandardCharsets.UTF_8);
        System.out.println("messageBody = " + messageBody);
        response.getWriter().write("ok");
    }
}
🤞 참고 )
inputStream은 byte 코드를 우리가 읽을 수 있는 문자(String)로 보려면 문자표(Charset)를 지정해주어야 한다. 여기서는 UTF-8 Charset을 지정해주었다.
문자 전송
POST http://localhost:8080/request-body-string
content-type : text/plain
message body : hello
결과 : messageBody = hello
HTTP 요청 데이터 - API 메세지 바디 - JSON
이번에는 HTTP API에서 주로 사용하는 JSON 형식으로 데이터를 전달해 보자
Json 형식 전송
POST http://localhost:8080/request-body-json
content-type : application/json
message body : {"username":"hello","age":20}
결과 : messageBody = {"username" : "hello","age",20}
JSON 형식 파싱 추가
JSON 형식으로 파싱할 수 있게 객체를 하나 생성하자
경로 ) hello.servlet.basic.HelloData
package hello.servlet1.basic;

import lombok.Getter;
import lombok.Setter;

@Getter @Setter
public class HelloData {
    private String username;
    private int age;
}
lombok이 제공하는 @Getter @Setter 덕분에 프로퍼티 코드가 자동으로 생성된다.
package hello.servlet.basic;
  public class HelloData {
      private String username;
      private int age;
//==== lombok 생성 코드 ====// public String getUsername() {
          return username;
      }
      public void setUsername(String username) {
          this.username = username;
	}
      public int getAge() {
          return age;
	}
      public void setAge(int age) {
          this.age = age;
	}
}
경로 ) hello.servlet.basic.request
package hello.servlet1.basic.request;

import com.fasterxml.jackson.databind.ObjectMapper;
import hello.servlet1.basic.HelloData;
import org.springframework.util.StreamUtils;

import javax.servlet.ServletException;
import javax.servlet.ServletInputStream;
import javax.servlet.annotation.WebServlet;
import javax.servlet.http.HttpServlet;
import javax.servlet.http.HttpServletRequest;
import javax.servlet.http.HttpServletResponse;
import java.io.IOException;
import java.nio.charset.StandardCharsets;

@WebServlet(name = "requestBodyJsonServlet",urlPatterns = "/request-body-json")
public class RequestBodyJsonServlet extends HttpServlet {
    private ObjectMapper objectMapper = new ObjectMapper();

    @Override
    protected void service(HttpServletRequest request, HttpServletResponse response) throws ServletException, IOException {
        ServletInputStream inputStream = request.getInputStream();
        String messageBody = StreamUtils.copyToString(inputStream, StandardCharsets.UTF_8);
        System.out.println("messageBody = " + messageBody);

        HelloData helloData = objectMapper.readValue(messageBody, HelloData.class);
        System.out.println("helloData.username =" + helloData.getUsername());
        System.out.println("helloData.getAge() = " + helloData.getAge());

        response.getWriter().write("ok");

    }
}
Postmen으로 실행해 보기
POST http://localhost:8080/request-body-json
content-type : application/json(Body -> raw, 가장 오른쪽에서 JSON 선택)
message body : {"username" : "hello","age":20}
🤞 참고 )
JSON 결과를 파싱해서 사용할 수 있는 자바 객체로 변환하려면 Jackson,Gson 같은 Json 변환 라이브러리를 추가해서 사용해야한다.
Spring boot로 Spring MVC를 선택하면 기본으로 Jackson 라이브러리 ObjectMapper를 함께 제공한다.
🤞 참고 )
HTML form 데이터도 메세지 바디를 통해 전송되므로 직접 읽을 수 있다.
하지만 편리한 파라미터 조회 기능 request.getParamter(...)을 이미 제공하기 때문에 파라미터 조회 기능을 사용하면 된다.