UserDefault는 사용해본 적이 있는데 이 친구는 처음이다..!!UserDefault보다 훨씬더 많은 내용을 저장할 수 있다는데 일단 시작해봄시다...👩🚀
📖 CoreData?
"iOS 앱에서 데이터를 관리하고 저장하기 위한 프레임워크"
core data가 iOS앱에서 데이터를 관리하고 저장하는 도구라면, Core Data stack은 데이터를 관리하는 구조이다. core data stack이라는 구조로 core data는 데이터를 관리한다! 라고 생각하면 될듯!!!
(갑자기 막 새로운 내용이 머리에 들어와서 쪼금 혼란스럽다..🙉🙈🙉)
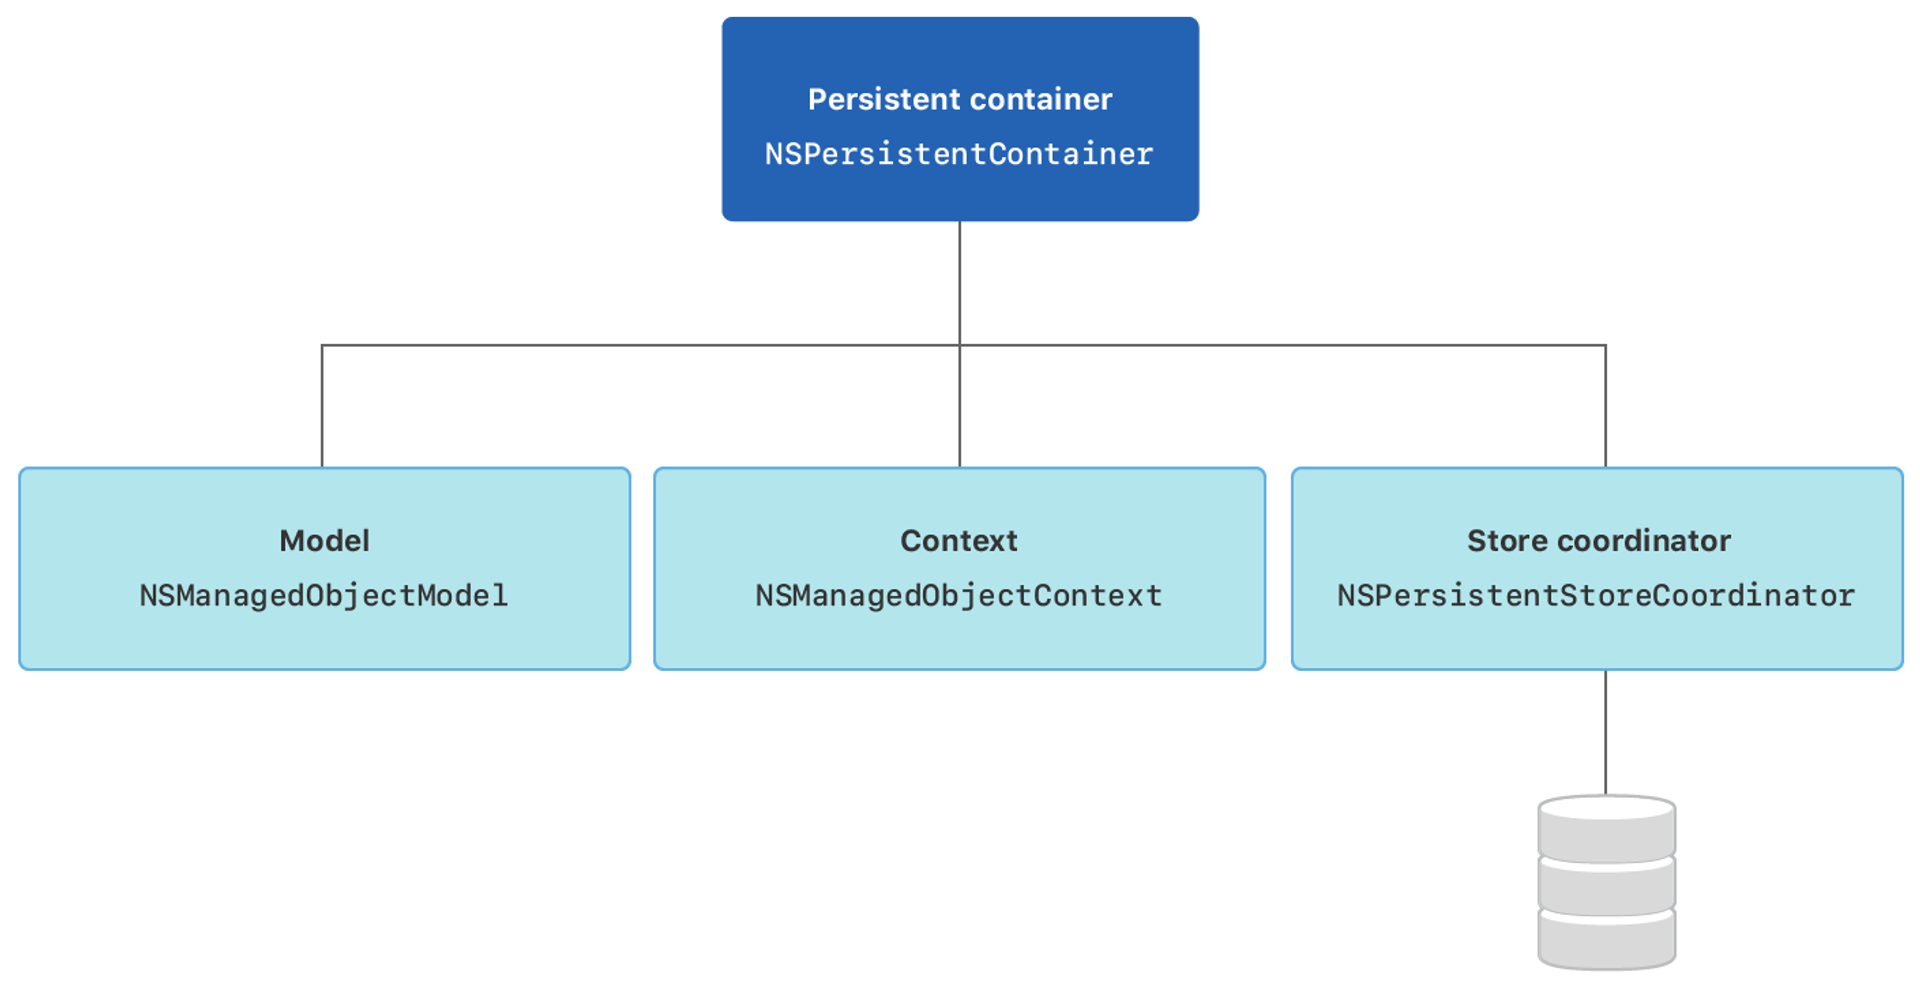
- NSManagedObjectModel 관리 객체 모델 : 데이터베이스에서 테이블의 구조를 정의하는 스키마에 해당하는 것으로, 코어 데이터에서 테이블에 대으오디는 엔티티의 구조를 정의하는 객체를 말한다.
- NSManagedObjectContext 관리 객체 컨텍스트 : 관리 객체를 생성, 수정, 삭제하거나 메모리에 로드하는 작업을 제공한다.
- NSPersistentStoreCoordinator 영구 저장소 코디네이터 : 영구 저장소를 관리하고 데이터베이스와의 통신을 담당하는 객체이다. 영구저장소와 관리 객체 모델을 연결한다.
- NSPersistentStore 영구 저장소 : 실제로 데이터가 영구적으로 저장되는 저장소를 말한다.
CoreData 생성하는법
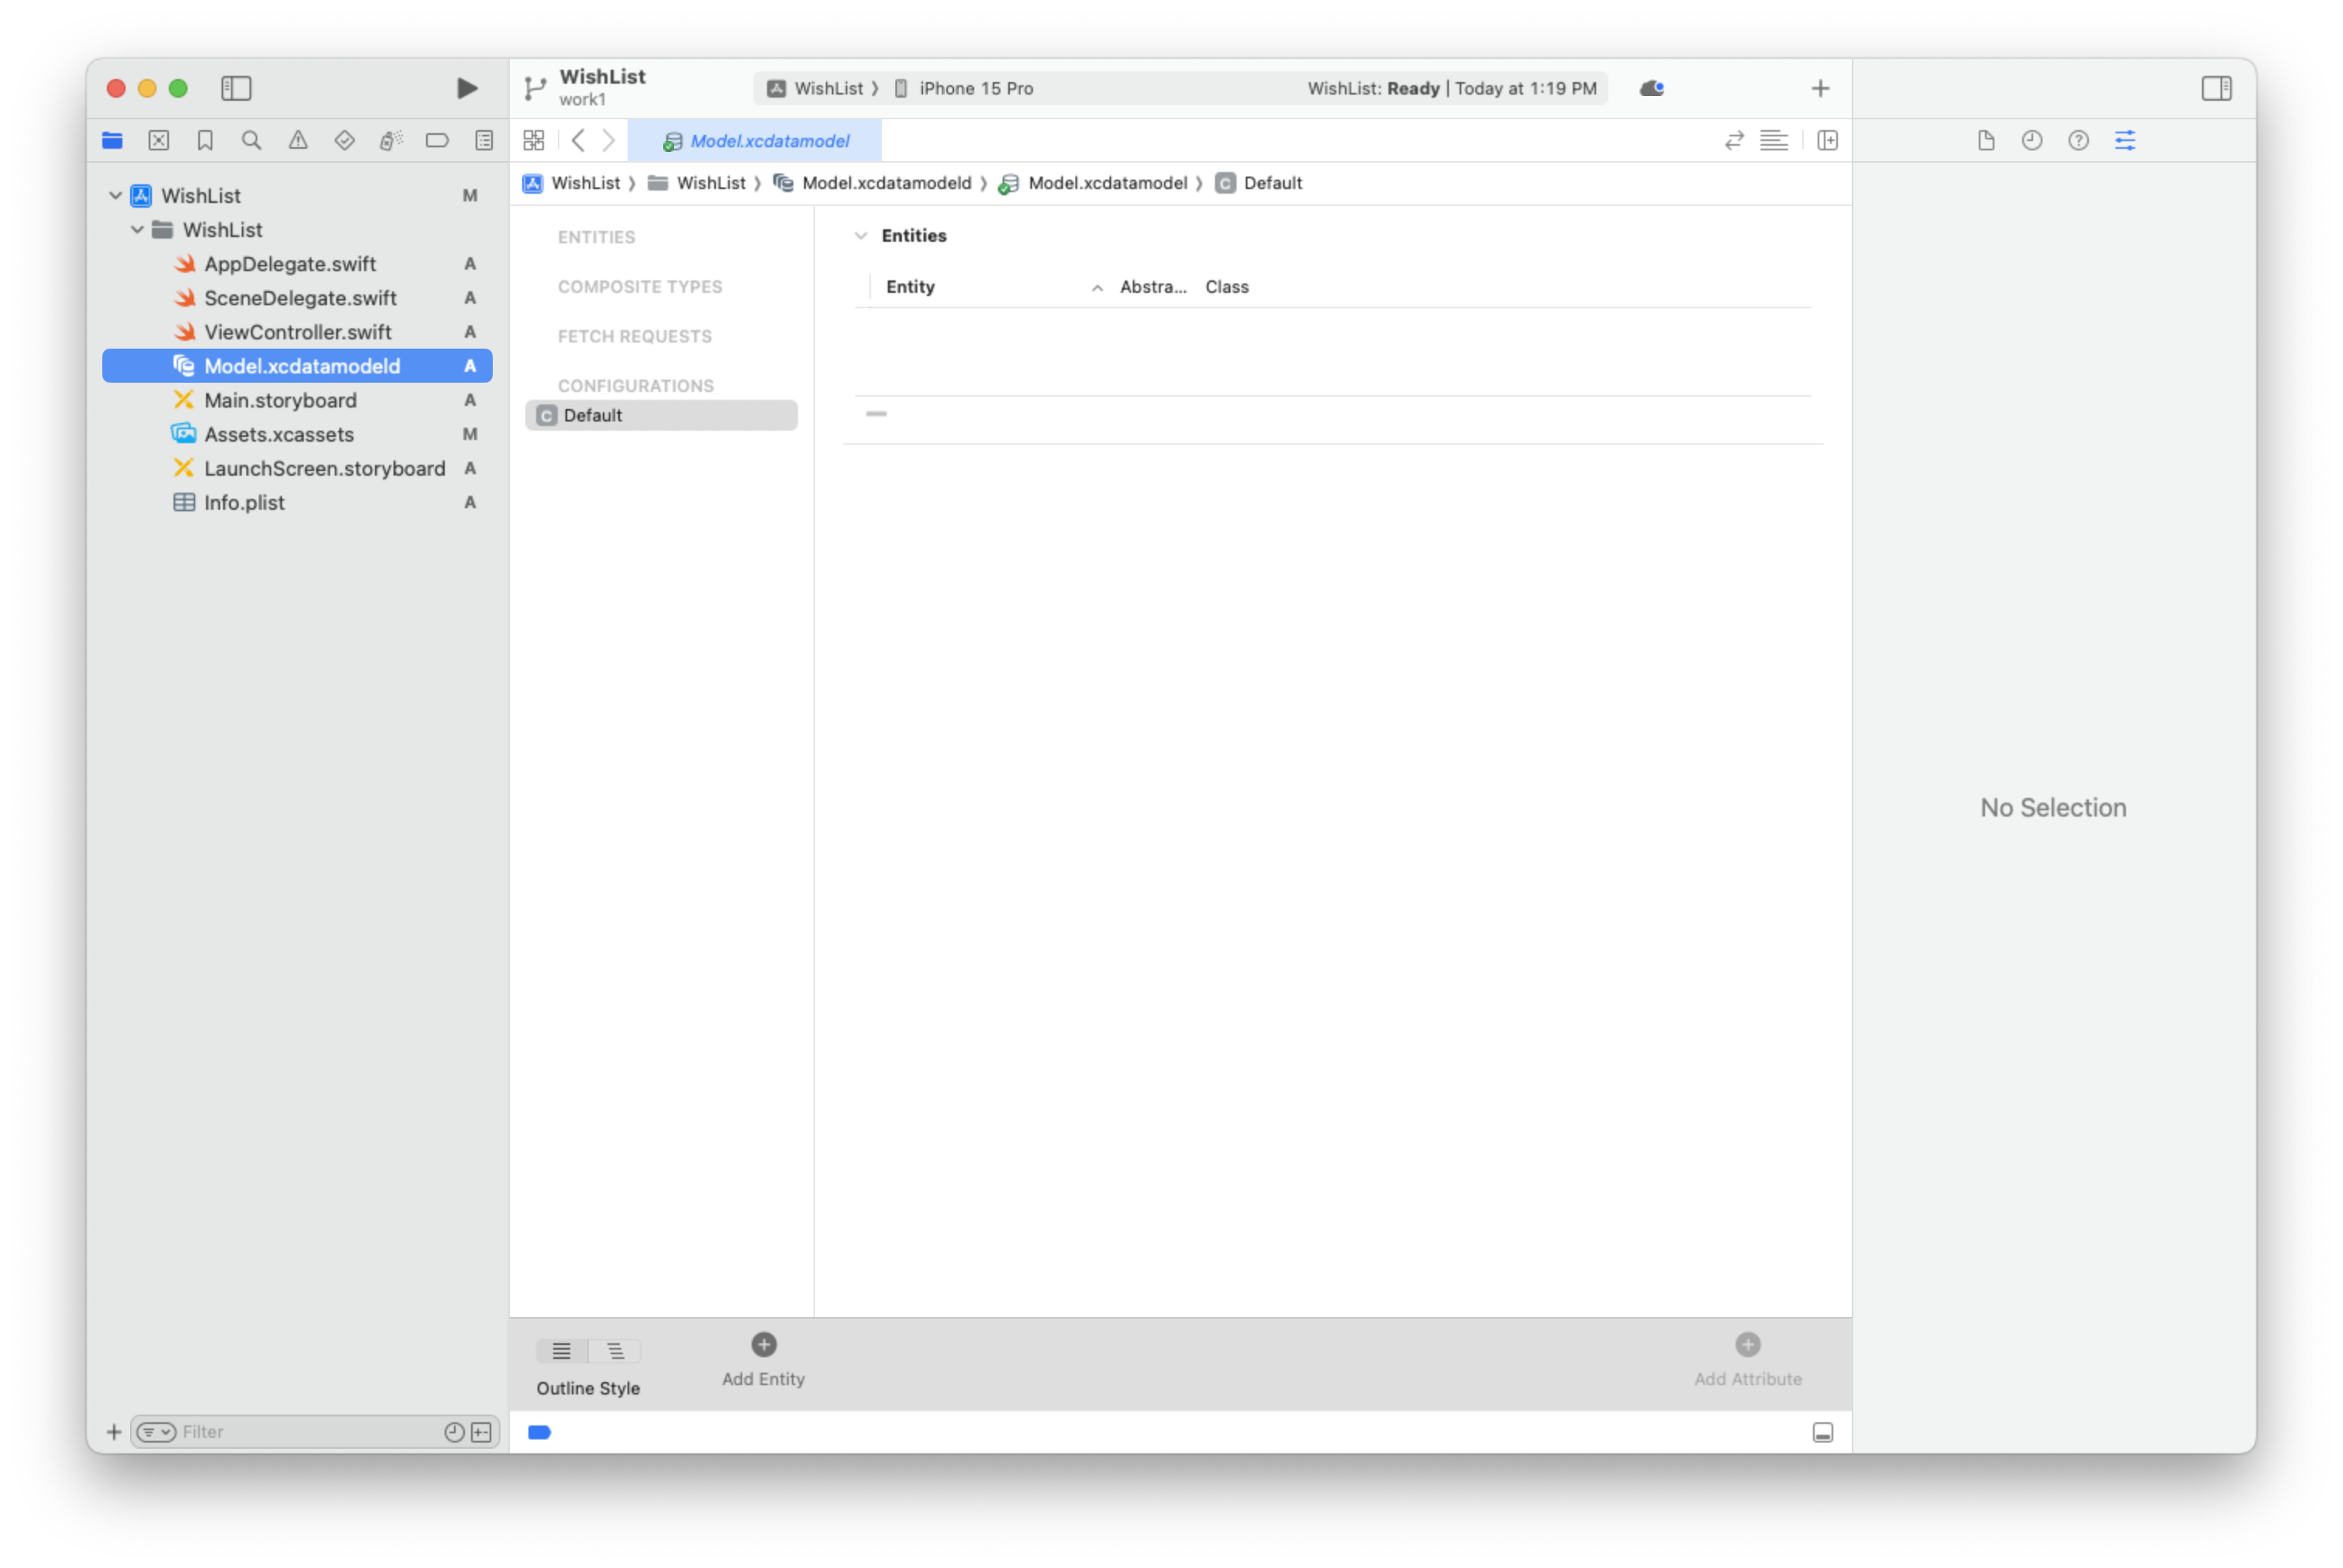
1. 기존에 생성한 프로젝트에서 command + N 키를 눌러 DataModel 파일을 추가해준다.

그러면 이렇게 파일이 생성된걸 확인할 수 있다.
2. Add Entity로 entity를 추가해준다. entity는 데이터베이스의 테이블과 비슷한 개념으로 데이터 모델 내에서 객체의 유형을 정의하고 해당 객체들이 갖는 속성을 나타낸다. 나는 상품을 받기 위해 Product라는 Entity를 만들어주었다.
그리고 product Entity에 attribute를 추가해주었다.
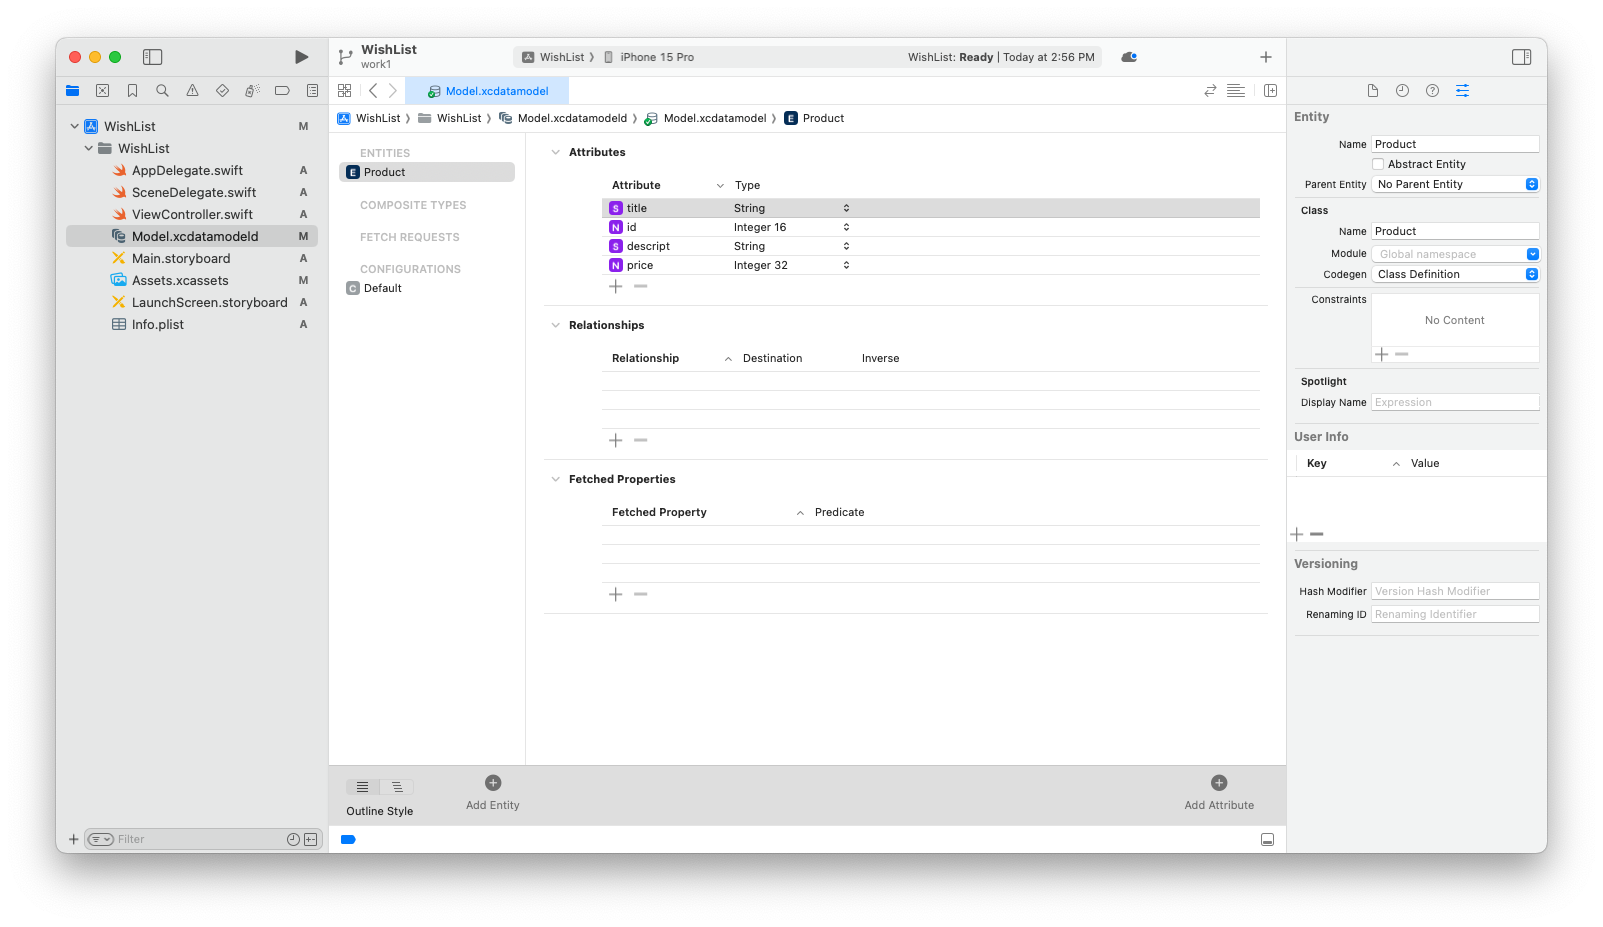
👩🏫 entity는 데이터 모델에서 개별 객체를 나타내며, attribute는 해당 객체의 속성이다.
3. 엔티티의 설정을 추가할 수 있다.
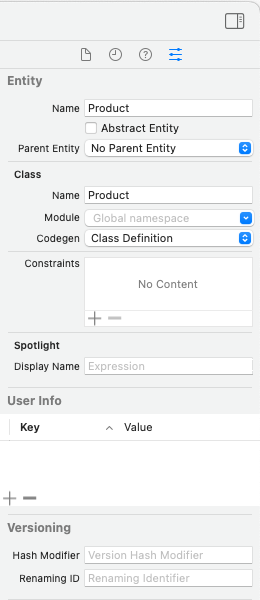
Codegen 영역에 Class Definition 이라고 되어있는 것을 확인할 수 있다. codegen 옵션은 coredata 모델 파일을 기반으로 관리 객체 클래스를 생성하는 방법을 지정하는 곳이다.
- class definition 옵션 : 코어데이터가 자동으로 생성된다.
- category/Extension : NSManagedObject를 하위 클래스로 만들고, 관리 객체의 속성과 관련된 코드를 분리하여 확장으로 정의할 수 있다.
- Manual/None : 관리 객체 클래스를 수동으로 생성해야 함
3.1 릴레이션을 정의할 수 있다
그 sql에서 외래키 같은 역할인데 쫌 다른거 같다.. 일단 나중에 하겠음.
4. 엔티티가 정의되었다. 코어 데이터는 엔티티 구조를 객체 형태로 변한하여 데이터 모델 클래스를 자동으로 생성해 준다! 이제 데이터를 저장하고 등록하기 위한 코드 설정을 해주어야 한다.
4.1. app delegate 설정 추가
나는 빈 프로젝트에 core data를 추가해주었기 때문에 app delegate에 코어 데이터 스택을 설정하는 코드를 추가해주어야 했다.
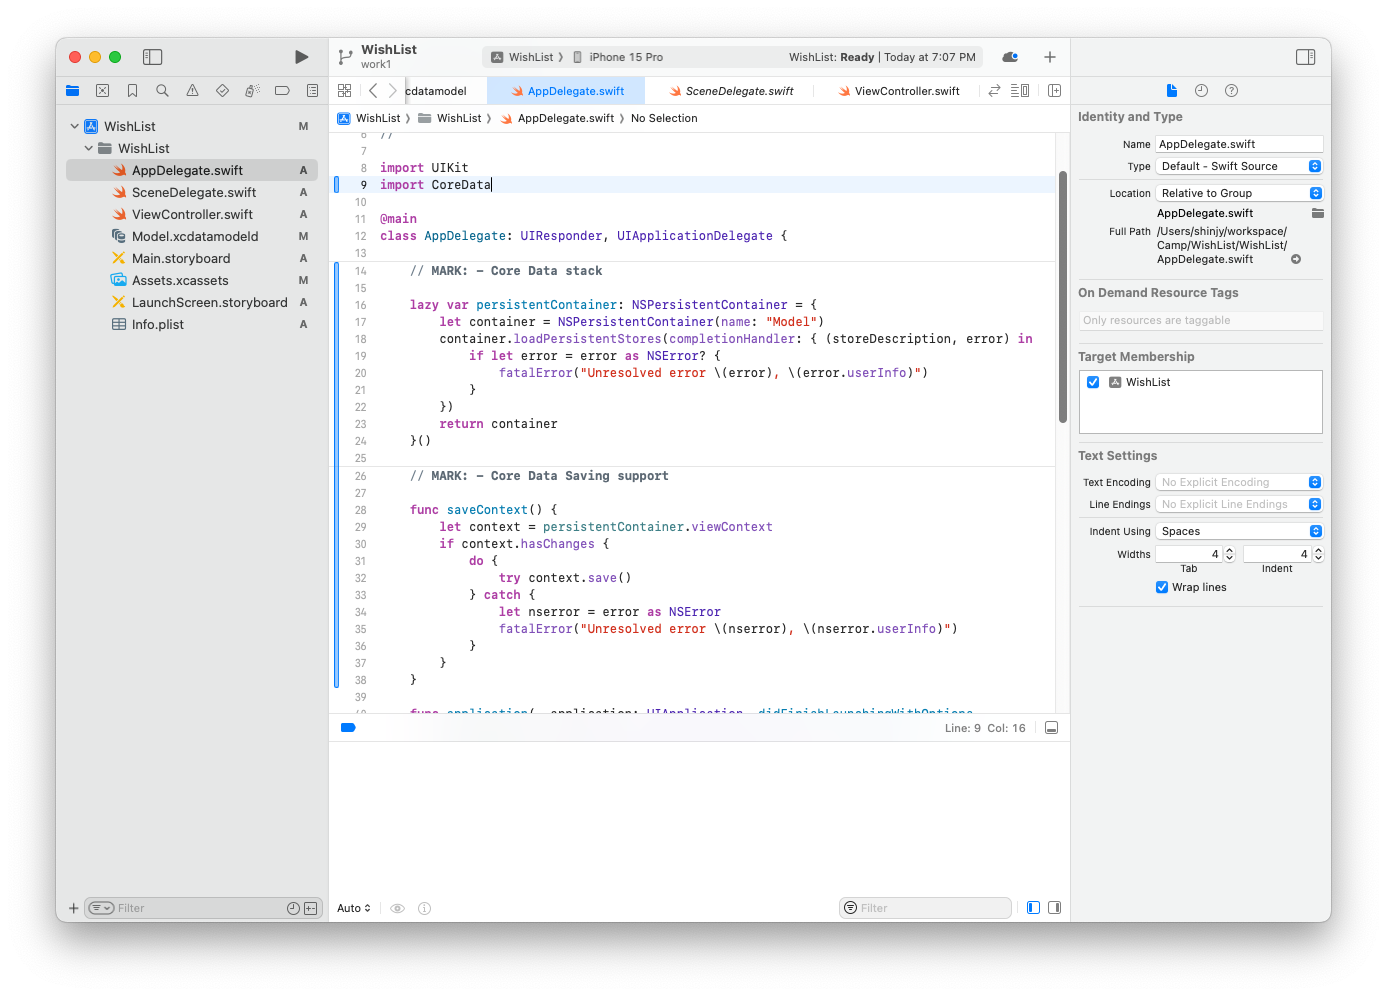
추가한 코드를 간단히만 살펴보자면
var persistentContainer: NSPersistentContainer = {
    let container = NSPersistentContainer(name: "Model")
    container.loadPersistentStores(completionHandler: { (storeDescription, error) in
        if let error = error as NSError? {
            fatalError("Unresolved error \(error), \(error.userInfo)")
        }
    })
    return container
}()
이 구문은 프로젝트에 추가된 xcdatamodelId 파일을 코어 데이터 시스템에 등록하고, 이를 이요하여 NSPersistentContainer 객체를 생성하는 역할을 한다.
func saveContext() {
    let context = persistentContainer.viewContext
    if context.hasChanges {
        do {
            try context.save()
        } catch {
            let nserror = error as NSError
            fatalError("Unresolved error \(nserror), \(nserror.userInfo)")
        }
    }
}
saveContext() 메서드의 첫줄을 보면 context 상수에 저장되는 것은 NSManagedObjectContext 객체이다. 코어 데이터에서 데이터를 읽고 쓰기 위해서는 매번 컨텍스트 객체가 필요한데 그때마다 직접생성하는 것이 아니라 persistentContainer 객체의 viewContext 속성을 통해 참조하는 것이였다.!!!🫨🫨🫨🫨🫨
👩🏫 여기서 정리! 우리는 결국 데이터를 패치하거나 저장하거나 수정하려면 model 객체가 아닌 NSManagedObjectContext 객체가 필요한 것이다!! 얘의 역할이 데이터 생성 수정 삭제 등 총관리 였으니까!!! 아웅헷갈려
5. 이제 데이터를 저장할 수 있다.
그러니까 이제 우린 앱에 데이터를 저장할 수 있고 저장된 데이터를 읽어올 수도 있다. 컨텍스트 객체를 통해서! 그럼 일단 데이터를 저장하는 과정은 어떻게 될까?
데이터 저장하기
- 일단 appdelegate에 있는 NSManagedObjectContext 객체를 가져온다.
//앱 델리게이트 객체 참조
let appDelegate = UIApplication.shared.delegate as! AppDelegate
//관리 객체 컨텍스트 참조
let context = appDelegate.persistentContainer.viewContext- 빈 NSManagedObject를 만들고 이를 NSManagedObjectContext 객체에 등록한다.
//앱 델리게이트 객체 참조
let appDelegate = UIApplication.shared.delegate as! AppDelegate
//관리 객체 컨텍스트 참조
let context = appDelegate.persistentContainer.viewContext
//빈 관리 객체 생성하고 컨텍스트 객체에 등록
let entity = NSEntityDescription.entity(forEntityName: "Product", in: context)- 생성된 NSManagedObject에 값을 넣고
//앱 델리게이트 객체 참조
let appDelegate = UIApplication.shared.delegate as! AppDelegate

//관리 객체 컨텍스트 참조
let context = appDelegate.persistentContainer.viewContext

//빈 관리 객체 생성하고 컨텍스트 객체에 등록
let entity = NSEntityDescription.entity(forEntityName: "Product", in: context)

if let entity = entity {
   let product = NSManagedObject(entity: entity, insertInto: context)
   //값 설정
   product.setValue("아이폰", forKey: "title")
   product.setValue("123", forKey: "price")
}- NSManagedObjectContext의 변경사항을 영구 저장소에 반영한다. (이를 커밋이라고 부른다함)
//앱 델리게이트 객체 참조
let appDelegate = UIApplication.shared.delegate as! AppDelegate

//관리 객체 컨텍스트 참조
let context = appDelegate.persistentContainer.viewContext

//빈 관리 객체 생성하고 컨텍스트 객체에 등록
let entity = NSEntityDescription.entity(forEntityName: "Product", in: context)

if let entity = entity {
   let product = NSManagedObject(entity: entity, insertInto: context)
   //값 설정
   product.setValue("아이폰", forKey: "title")
   product.setValue(123, forKey: "price")

   //영구저장소에 커밋
	do {
        try context.save()
    } catch {
        context.rollback()
    }
}
이렇게 저장한 데이터가 제대로 저장되어 있는지 패치도 해야 한다...
5.1. 데이터 패치도 가능하겠지요
데이터 패치하기
코어 데이터에 저장된 데이터를 가져올 때에는 요청 객체 NSFetchRequest 객체를 사용한다.! 또 새로운놈이 등장해버림.. 이 객체는 다양한 요청들을 복합적으로 정의할 수 있다.
그래서 데이터를 패치하는 방법은 저장하는 방법과 비슷하면서도 약간 다른데, 일단 데이터를 조회 하는 것이기에 NSManagedObjectContext 객체를 참조할 것이고, 요청 객체를 생성하여 데이터를 가져올 것이다.
- 일단 appdelegate에 있는 NSManagedObjectContext 객체를 가져온다.
- 요청 객체를 생성
- 데이터 가져오기
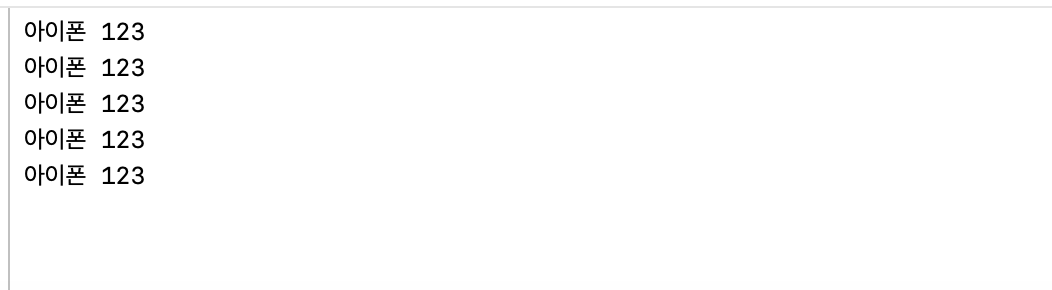
do {
	let fetchRequest: NSFetchRequest<Product> = Product.fetchRequest()
	let products = try context.fetch(fetchRequest)
		products.forEach {
			print($0.title ?? "No Title", $0.price)
        }
   } catch {
   		print("Error fetching data: \(error)")
	}
실행하면 콘솔창에 다음과 같이 나온걸 확인할 수 있다.
설명은 난중에 할게요...🫠 나 과제 언제 시작하뮤ㅠㅠ
참고
1

오 지연님도 베스트 블로거 후보에 오르실 수 있겠는걸요!! 오늘도 고생하셨습니다~!