
<출처>
스프링 MVC 1편 - 백엔드 웹 개발 핵심 기술 /인프런 강의/ 김영한
6. 스프링 MVC - 기본 기능 - 로깅 간단히 알아보기
6. 스프링 MVC - 기본 기능 - 요청 매핑
6. 스프링 MVC - 기본 기능 - 요청 매핑 API 예시
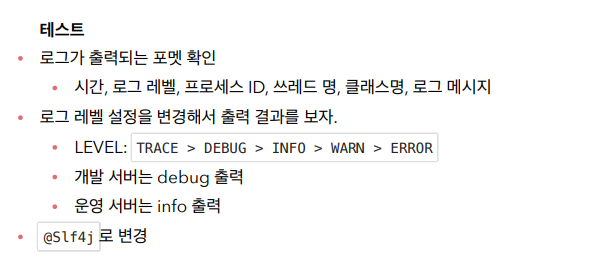
로깅 간단히 알아보기
로그 라이브러리는 Logback, Log4J, Log4J2 등등 수 많은 라이브러리가 있는데, 그것을 통합해서
인터페이스로 제공하는 것이 바로 SLF4J 라이브러리다.
쉽게 이야기해서 SLF4J는 인터페이스이고, 그 구현체로 Logback 같은 로그 라이브러리를 선택하면 된다.
실무에서는 스프링 부트가 기본으로 제공하는 Logback을 대부분 사용한다.
로그 선언
private Logger log = LoggerFactory.getLogger(getClass());
private static final Logger log = LoggerFactory.getLogger(Xxx.class)
@Slf4j : 롬복 사용 가능로그 호출
log.info("hello")
System.out.println("hello")
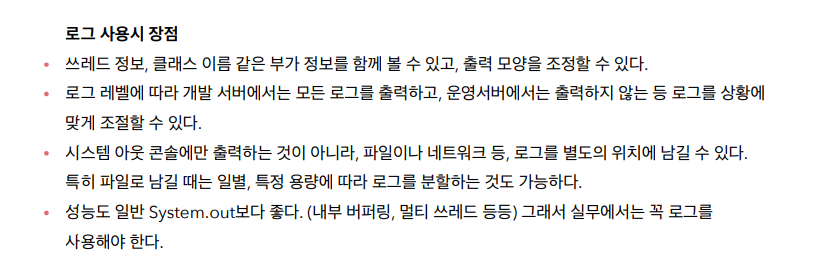
시스템 콘솔로 직접 출력하는 것 보다 로그를 사용하면 다음과 같은 장점이 있다. 실무에서는 항상 로그를 사용해야 한다
package hello.springmvc.basic;
import lombok.extern.slf4j.Slf4j;
import org.slf4j.Logger;
import org.slf4j.LoggerFactory;
import org.springframework.web.bind.annotation.RequestMapping;
import org.springframework.web.bind.annotation.RestController;

//@Slf4j
@RestController
public class LogTestController {

 private final Logger log = LoggerFactory.getLogger(getClass());

 @RequestMapping("/log-test")
 public String logTest() {
 String name = "Spring";

 log.trace("trace log={}", name);

 log.debug("debug log={}", name);

 log.info(" info log={}", name);

 log.warn(" warn log={}", name);

 log.error("error log={}", name);

 //로그를 사용하지 않아도 a+b 계산 로직이 먼저 실행됨, 이런 방식으로 사용하면 X
 log.debug("String concat log=" + name);
 return "ok";


//올바른 로그 사용법
log.debug("data="+data)
로그 출력 레벨을 info로 설정해도 해당 코드에 있는 "data="+data가 실제 실행이 되어 버린다.
결과적으로 문자 더하기 연산이 발생한다.
log.debug("data={}", data)
로그 출력 레벨을 info로 설정하면 아무일도 발생하지 않는다. 따라서 앞과 같은 의미없는 연산이
발생하지 않는다
 }
}
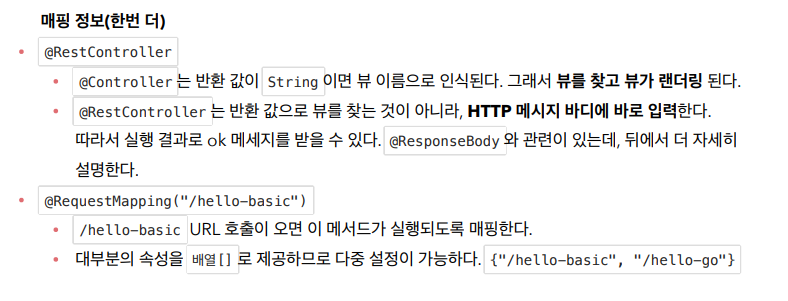
요청 매핑
package hello.springmvc.basic.requestmapping;
import org.slf4j.Logger;
import org.slf4j.LoggerFactory;
import org.springframework.web.bind.annotation.*;
@RestController
public class MappingController {

 private Logger log = LoggerFactory.getLogger(getClass());

 /**
 * 기본 요청
 * 둘다 허용 /hello-basic, /hello-basic/
 * HTTP 메서드 모두 허용 GET, HEAD, POST, PUT, PATCH, DELETE
 */

 @RequestMapping("/hello-basic")
 public String helloBasic() {

 log.info("helloBasic");
 return "ok";
 }

}
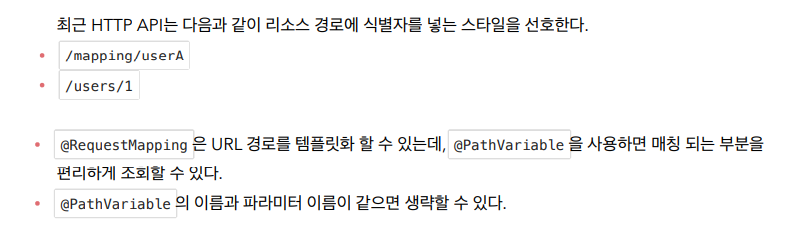
PathVariable(경로 변수) 사용
/**
 * PathVariable 사용
 * 변수명이 같으면 생략 가능
 * @PathVariable("userId") String userId -> @PathVariable userId
 */

@GetMapping("/mapping/{userId}")
public String mappingPath(@PathVariable("userId") String data) {

 log.info("mappingPath userId={}", data);
 return "ok";
}
PathVariable 사용 - 다중
/**
 * PathVariable 사용 다중
 */

@GetMapping("/mapping/users/{userId}/orders/{orderId}")
public String mappingPath(@PathVariable String userId, @PathVariable Long
orderId) {

 log.info("mappingPath userId={}, orderId={}", userId, orderId);
 return "ok";

 실행
 http://localhost:8080/mapping/users/userA/orders/100
특정 파라미터 조건 매핑
/**
 * 파라미터로 추가 매핑
 * params="mode",
 * params="!mode"
 * params="mode=debug"
 * params="mode!=debug" (! = )
 * params = {"mode=debug","data=good"}
 */

@GetMapping(value = "/mapping-param", params = "mode=debug")
public String mappingParam() {

 log.info("mappingParam");
 return "ok";
}

실행
http://localhost:8080/mapping-param?mode=debug

특정 파라미터가 있거나 없는 조건을 추가할 수 있다. 잘 사용하지는 않는다
특정 헤더 조건 매핑
    /**
     * 특정 헤더로 추가 매핑
     * headers="mode",
     * headers="!mode"
     * headers="mode=debug"
     * headers="mode!=debug" (! = )
     */
    @GetMapping(value = "/mapping-header", headers = "mode=debug")
    public String mappingHeader() {

        log.info("mappingHeader");
        return "ok";
    }

    파라미터 매핑과 비슷하지만, HTTP 헤더를 사용한다
미디어 타입 조건 매핑 - HTTP 요청 Content-Type, consume
    /**
     * Content-Type 헤더 기반 추가 매핑 Media Type
     * consumes="application/json"
     * consumes="!application/json"
     * consumes="application/*"
     * consumes="*\/*"
     * MediaType.APPLICATION_JSON_VALUE
     */

    @PostMapping(value = "/mapping-consume", consumes = "application/json")
    public String mappingConsumes() {

        log.info("mappingConsumes");
        return "ok";
    }


HTTP 요청의 Content-Type 헤더를 기반으로 미디어 타입으로 매핑한다.
만약 맞지 않으면 HTTP 415 상태코드(Unsupported Media Type)을 반환한다


예시) consumes
consumes = "text/plain"
consumes = {"text/plain", "application/*"}
consumes = MediaType.TEXT_PLAIN_VALUE
미디어 타입 조건 매핑 - HTTP 요청 Accept, produce
/**
* Accept 헤더 기반 Media Type
* produces = "text/html"
* produces = "!text/html"
* produces = "text/*"
* produces = "*\/*"
*/
@PostMapping(value = "/mapping-produce", produces = "text/html")
public String mappingProduces() {
log.info("mappingProduces");
return "ok";
}
HTTP 요청의 Accept 헤더를 기반으로 미디어 타입으로 매핑한다.
만약 맞지 않으면 HTTP 406 상태코드(Not Acceptable)을 반환한다
예시)
produces = "text/plain"
produces = {"text/plain", "application/*"}
produces = MediaType.TEXT_PLAIN_VALUE
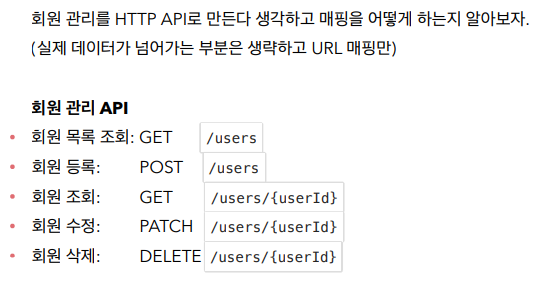
produces = "text/plain;charset=UTF-8"요청 매핑 - API 예시
package hello.springmvc.basic.requestmapping;
import org.springframework.web.bind.annotation.*;
@RestController
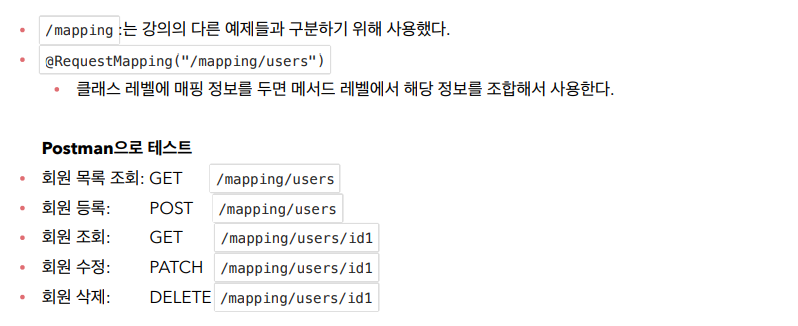
@RequestMapping("/mapping/users")
public class MappingClassController {
/**
* GET /mapping/users
*/
@GetMapping
public String users() {
return "get users";
}
/**
* POST /mapping/users
*/
@PostMapping
public String addUser() {
return "post user";
}
/**
* GET /mapping/users/{userId}
*/
@GetMapping("/{userId}")
public String findUser(@PathVariable String userId) {
return "get userId=" + userId;
}
/**
* PATCH /mapping/users/{userId}
*/
@PatchMapping("/{userId}")
public String updateUser(@PathVariable String userId) {
return "update userId=" + userId;
}
/**
* DELETE /mapping/users/{userId}
*/
@DeleteMapping("/{userId}")
public String deleteUser(@PathVariable String userId) {
return "delete userId=" + userId;
}
}

화이팅