1편에 이어서 boto3 사용하는 방법을 공유한다.
Code Example을 보면 원하는 서비스(여기선 dynamo db)의 client나 resource객체를 변수에 담아서 활용하는걸 볼 수 있다.
import boto3
# Get the service resource.
dynamodb = boto3.resource('dynamodb')
# Create the DynamoDB table.
table = dynamodb.create_table(
TableName='users',
KeySchema=[
{
'AttributeName': 'username',
'KeyType': 'HASH'
},
{
'AttributeName': 'last_name',
'KeyType': 'RANGE'
}
],
AttributeDefinitions=[
{
'AttributeName': 'username',
'AttributeType': 'S'
},
{
'AttributeName': 'last_name',
'AttributeType': 'S'
},
],
ProvisionedThroughput={
'ReadCapacityUnits': 5,
'WriteCapacityUnits': 5
}
)
# Wait until the table exists.
table.wait_until_exists()
# Print out some data about the table.
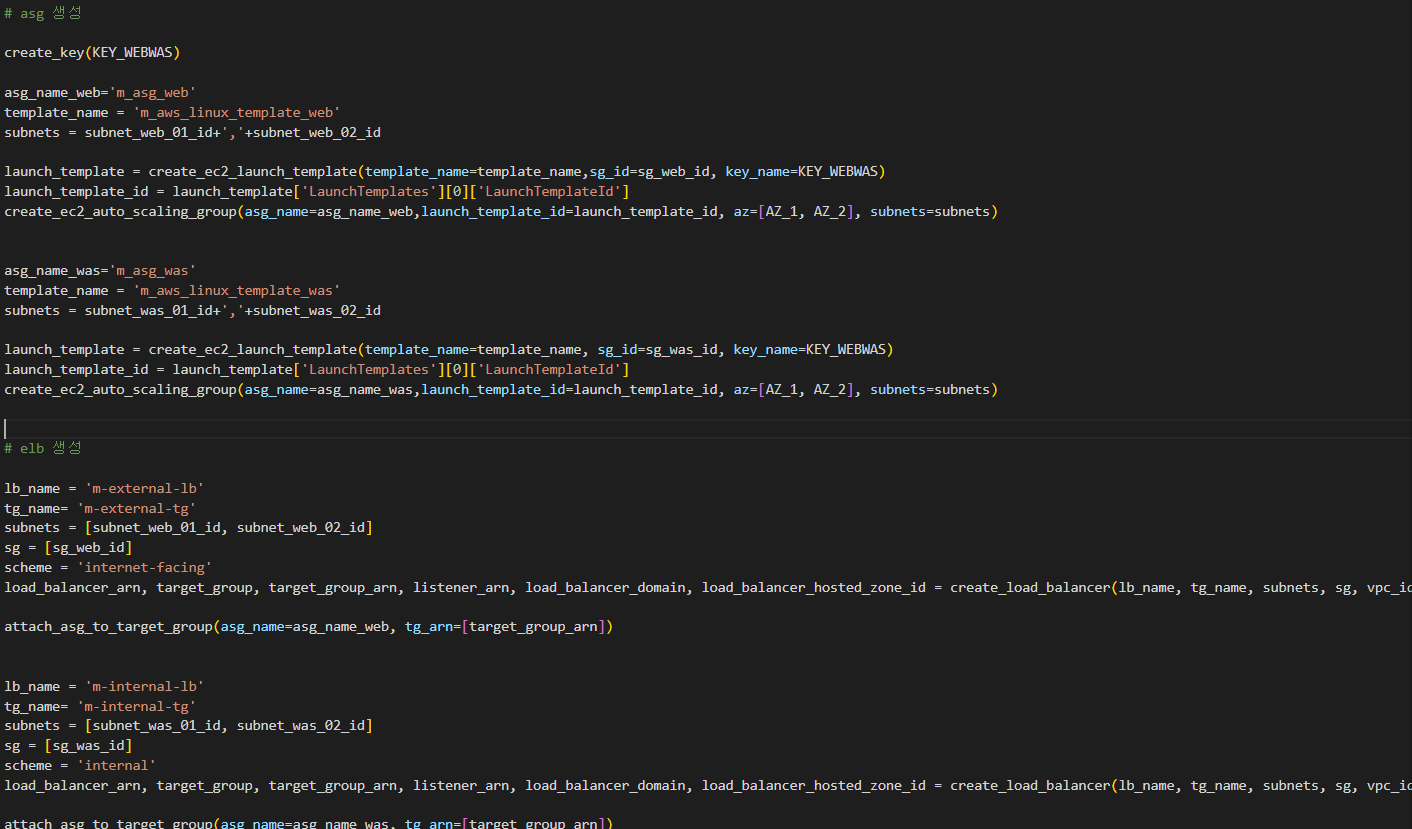
print(table.item_count)이렇게 하면 코드도 복잡해지고 가장 중요한건 재사용성이 떨어질거 같아서, 인터넷에서 아이디어를 얻고 모듈화를 진행해봤다.
init_aws_session이라는 boto3 세션을 리턴하는 함수를 작성해주고, 각 AWS 리소스를 만들 때 세션을 열고 닫는 식으로 만들어봤다.
def init_aws_session():

    return boto3.Session(region_name=AWS_REGION, profile_name=AWS_PROFILE)
각 리소스를 만드는 함수 부분에서 aws 세션을 열고 각 세션에서 우리가 원하는 값을 위한 client나 resource를 부르게 되면 나름대로 코드의 재사용이 좋아졌다.
def create_custom_vpc(ip_cidr):

    session = init_aws_session()
    vpc_resource = session.resource("ec2", region_name=AWS_REGION)
    try:
        response = vpc_resource.create_vpc(CidrBlock=ip_cidr,
                                            InstanceTenancy='default',
                                            TagSpecifications=[{
                                                'ResourceType':'vpc',
                                                'Tags': [{
                                                    'Key':'Name',
                                                    'Value':TAG_VALUE
                                                }]
                                            }],
                                           #,DryRun=True
                                           )

    except ClientError:
        logger.exception('Could not create a custom vpc.')
        raise
    else:
        return response
이후 함수의 리턴값을 활용해 필요한 attribute를 가져온다.
vpc = create_custom_vpc(ip_cidr=CIDR_BLOCK_VPC)
vpc_id = vpc.id
이렇게 할당된 값은 다양한 aws 리소스를 만드는데 활용한다.
create_custom_subnet(az=AZ_1, vpc_id=vpc_id, cidr_block=CIDR_BLOCK_PUB_01)
attach_internet_gw(vpc_id=vpc_id,gw_id=gw_id)
create_route_table(vpc_id=vpc_id)
create_alb_target_group(tg_name=tg_name,vpc_id=vpc_id)
코드 활용하는 부분 공유하며 마무리 한다.

I live fullest