프로미스의 이해
콜백 함수 vs 프로미스
// 콜백 함수의 중첩 사용

function requestData1(callback) {
  // ...
  callback(data);
}

function requestData2(callback) {
  // ...
  callback(data)
}

function onSuccess1(data) {
  console.log(data);
  requestData2(onSuccess2);
}

function onSuccess2(data) {
  console.log(data);
}

requestData1(onSuccess1);
// 프로미스 코드
requestData1()
.then(data => {
console.log(data);
return requestData2();
})
.then(data => {
console.log(data);
});프로미스의 세가지 상태
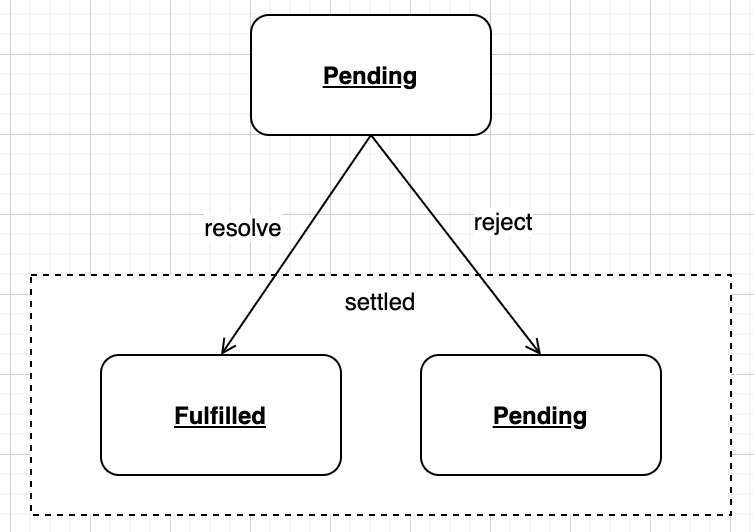
- 대기 중(pending) : 결과를 기다리는 중
- 이행됨(fullfilled) : 수행이 정상적으로 끝났고, 결괏값을 가지고 있음
- 거부됨(rejected) : 수행이 비정상적으로 끝났음
프로미스 생성하는 방법
- new 키워드를 사용해서 프로미스를 생성할 수 있다.
- pending 상태의 프로미스가 반환되며 성공 시 resove, 실패 시 reject를 호출하면 된다.
- 함수 안에서 exception 발생하면 rejected 상태가 된다
- Promise.resolve를 호출하면 fullfilled 상태인 프로미스가 생성된다
- 인자로 프로미스를 전달하면 전달한 프로미스 객체를 그대로 반환한다
- 입력값이 프로미스가 아니라면 입력값을 담고있는 fullfilled 상태의 프로미스가 반환된다
- Promsie.reject를 호출하면 rejected 상태인 프로미스가 생성된다
const promise1 = new Promise((resolve, reject) => {
  // ...
  // resolve(data)
  // or reject('error message')
})

const promise2 = Promise.resolve(data);

const promise3 = Promise.reject('error message');
then, catch, finally
then
-
then 은 fullfilled 상태의 프로미스를 처리할 때 주로 사용되는 메소드다.
-
프로미스가 fullfilled 상태가 되면 then 메소드의 첫번째 인수로 전달된 함수가 호출된다
-
프로미스가 rejected 상태가 되면 then 메소드의 두번째 인수로 전달된 함수가 호출된다
requestData().then(onResolve, onReject);
// fullfilled 상태가 되면 onResolve 함수가 호출되고
// rejected 상태가 되면 onReject 호출 -
then 메소드는 항상 프로미스를 반환한다
-
then 에서 프로미스를 반환하면 프로미스 객체 그대로 반환하고
-
프로미스가 아닌 값을 반환하면 그 값을 resolve하는 프로미스를 반환한다
-
함수 내부에서 예외가 발생하면 rejected 상태의 프로미스를 반환한다
-
따라서 하나의 프로미스로부터 연속적으로 then 메소드를 호출할 수 있다
// 연속해서 then 호출하기
requestData1()
  .then(data => {
  return requestData2();
})
  .then(data => {
  return data + 1;
})
  .then(null, error => {
  console.log(error);
});- rejected 상태의 프로미스는 rejected 상태의 프로미스를 처리할 수 있는 메소드가 나올 때까지 간다
Promise.reject('ERROR')
  .then(() => console.log(1))
  .then(() => console.log(2))
  .then(() => console.log(3), () => console.log(4))
  .then(() => console.log(5), () => console.log(6))

    // 무엇이 출력될까? 4,5가 출력된다
catch
- catch는 then 메소드의 onReject 함수와 같은 역할을 한다
- 프로미스에서 예외 처리를 할 때는 then 메소드의 onRejct 보다는 catch 메소드를 이용하는 것이 좋다
Promise.resolve().then(
  () => {
    throw new Error('error');
  },
  error => {
    console.log(error); // 같은 then 안의 onResolve의 에러는 onReject에서 처리할 수 없다
  }
);

Promise.reject('error')
  .then((data => console.log(data))
.catch(err => console.log(err))- then과 마찬가지로 catch 메소드도 새로운 프로미스를 반환한다
- 따라서 catch 이후에도 계속해서 then 메소드를 사용할 수 있다
Promise.reject(10)
  .then(data => {
  console.log(data);
  return 20;
})
  .catch(error => {
  console.log(error);
  return 30;
})
  .then(data => {
  console.log(data);
});

// 10 30
finally
- 프로미스가 fullfilled 또는 rejected 상태일 때 호출된다
- 프로미스 체인의 가장 마지막에 사용된다
- 이전에 사용된 프로미스를 그대로 반환하는 특징이 있다
- 따라서 프로미스의 데이터를 건드리지 않고 추가작업을 할 때 유용하게 사용될 수 있다
function requestData() {
  return Promise.resolve(10)
    .then(data => data + 20)
    .catch(error => console.log(error))
    .finally(() => console.log("finished"))
}

requestData().then(data => console.log(data))

// finished
// 30
Engineer