안녕하세요. Son입니다.
저는 지도 렌더링이 필요할 때, 네이버 Map API를 자주 사용하는 편입니다.
다만, 공식홈페이지엔 바닐라 자바스크립트, Jquery를 이용한 예시들만 있어 타입스크립트,리액트에서 여러 클래스의 사용법을 정리해보았습니다.
npm i -D @types/navermaps명령어를 통해 설치 후 테스트해보시길 바랍니다.
가끔 window.naver접근 시 naver namespace를 찾을 수 없다고 뜨는데,
	"compilerOptions": {
       "types": [
       "@types/navermaps"
       ],
    }
tsconfig.json에 types를 추가하시면 해결됩니다.
1. 주요 클래스들
LatLng
**LatLng** 클래스는 위/경도 좌표를 정의합니다.

// 사용 예시
let coordinate : naver.maps.LatLng = new naver.maps.LatLng(lat, lng);

// 구현체
class LatLng extends Point {
    constructor(lat: number, lng: number);
    constructor(literal: LatLngLiteral);
    clone(): LatLng;
    destinationPoint(angle: number, meter: number): LatLng;
    equals(point: Coord | LatLngLiteral): boolean;
    lat(): number;
    lng(): number;
    toPoint(): Point;
    toString(): string;
    isEmpty(): boolean;
}
제일 많이 사용하는 객체입니다.
좌표를 정의하기 위한 객체입니다.
이때 lat(위도),lng(경도)는 Number Type입니다. String으로 넣을 땐 캐스팅을 해줍시다.
좌표를 표현하기 위한 객체이므로 (add, sub)같은 연산메서드를 사용할 수 없습니다. (return이 undefined가 됩니다)
구현 내용을 보시면 Point클래스를 상속받고 있습니다.
느낌이 비슷하지만 용도가 다릅니다.
Point
**Point** 클래스는 2차원 평면의 좌표를 정의합니다.

let point : naver.maps.Point = new naver.maps.Point(0, -10);

const infoWindow = new naver.maps.InfoWindow({
  ...
  pixelOffset: point,
});

// 구현체
class Point {
    x: number;
    y: number;
    constructor(x: number, y: number);
    constructor(literal: PointLiteral);
    add(x: number, y: number): Point;
    add(point: Coord | PointLiteral): Point;
    ceil(): Point;
    clone(): Point;
    div(point: Coord | PointLiteral): void;
    div(x: number, y: number): Point;
    equals(point: Coord | PointLiteral): boolean;
    floor(): Point;
    mul(x: number, y: number): Point;
    mul(point: Coord | PointLiteral): Point;
    round(): Point;
    sub(point: Coord | PointLiteral): Point;
    sub(x: number, y: number): Point;
    toString(): string;
}
LatLng클래스가 좌표를 정의하기 위한 용도면 Point는 2차원좌표 (브라우저 화면)에 어디에 표시할지 나타내는 용도입니다.
저는 주로 InfoWindow 관련해서 사용을했습니다.
InfoWindow객체를 기준으로 툴팁을 어디로 띄울지 좌표를 정하는거죠.
추가적으로 해당 타입 파일의 맨위를 보면 여러 type들이 정의되어있습니다.
type Coord = Point | LatLng;Coord라는 타입이 정의되어 있는데요.
내부적으로 혼용하여 많이 사용되어 이렇게 선언되어있는것으로 추측됩니다.
화면좌표 -> 실제좌표, 실제좌표 -> 화면좌표 변환을 위해 (DX용으로 추측)
InfoWindow
**InfoWindow** 클래스는 지도 위에 올리는 정보 창을 정의합니다.

// 사용 예제
const infoWindow = new naver.maps.InfoWindow({
  content: `
    <div style="padding: 8px 12px; background: rgba(0,0,0,0.8); color: white; border-radius: 4px; font-size: 12px;">
      <div>안녕하세요</div>
    </div>
  `,
});

// 우아하게 사용

const $div: HTMLElement = document.createElement("div");
$div.style.backgroundColor = "white";

const infoWindowOptions : naver.maps.InfoWindowOptions = {
  content: $div // Content는 필수입니다! HTMLElement | string
};
const infoWindow : naver.maps.InfoWindow = new naver.maps.InfoWindow(infoWindowOptions);

// 구현체
class InfoWindow extends OverlayView {
  constructor(options: InfoWindowOptions);
  close(): void;
  getContent(): string | HTMLElement;
  getContentElement(): HTMLElement;
  getOptions(key?: string): any; // if key is undefined, return InfoWindowOptions
  getPosition(): Coord;
  getZIndex(): number;
  open(map: Map, anchor?: Coord | CoordLiteral | Marker): void;
  setContent(content: string | HTMLElement): void;
  setOptions(options: InfoWindowOptions): void;
  setPosition(position: Coord | CoordLiteral): void;
  setZIndex(zIndex: number): void;
}

interface InfoWindowOptions {
    /**
     * The position of the info window.
     *
     * 정보 창의 위치입니다.
     */
    position?: Coord | CoordLiteral;
    /**
     * The content of the info window.
     *
     * 정보 창의 콘텐츠입니다.
     */
    content: string | HTMLElement;
    /**
     * The stacking order of the info window.
     *
     * 정보 창의 쌓임 순서입니다.
     */
    zIndex?: number;
    /**
     * The maximum width of the info window.
     *
     * 정보 창의 최대 너비입니다.
     */
    maxWidth?: number;
    /**
     * The offset from the tail of the info window to the point where the info window is positioned.
     *
     * 정보 창의 꼬리에서 정보 창이 위치한 지점까지의 오프셋입니다.
     */
    pixelOffset?: Point | PointLiteral;
    /**
     * The background color of the info window. Set using CSS color notation.
     *
     * 정보 창의 배경색입니다. CSS 색상 표현법으로 설정합니다.
     */
    backgroundColor?: string;
    /**
     * The border color of the info window. Set using CSS color notation.
     *
     * 정보 창의 테두리 색상입니다. CSS 색상 표현법으로 설정합니다.
     */
    borderColor?: string;
    /**
     * The border thickness of the info window.
     *
     * 정보 창의 테두리 두께입니다.
     */
    borderWidth?: number;
    /**
     * Whether to use automatic movement (panning) to show the entire info window when opening it.
     *
     * 정보 창을 열 때 정보 창 전체를 보여줄 수 있는 자동 이동(패닝) 사용 여부입니다.
     */
    disableAutoPan?: boolean;
    /**
     * Whether to use the default speech bubble tail.
     *
     * 기본 말풍선 꼬리의 사용 여부입니다.
     */
    disableAnchor?: boolean;
    /**
     * Whether to use the skew effect for the default speech bubble tail.
     *
     * 기본 말풍선 꼬리의 기울임(skew) 효과 사용 여부입니다.
     */
    anchorSkew?: boolean;
    /**
     * The size of the default speech bubble tail.
     *
     * 기본 말풍선 꼬리의 크기입니다.
     */
    anchorSize?: Size | SizeLiteral;
    /**
     * The color of the default speech bubble tail. Set using CSS color notation.
     *
     * 기본 말풍선 꼬리의 색상입니다. CSS 색상 표현법으로 설정합니다.
     */
    anchorColor?: string;
}
백문이 불여일견
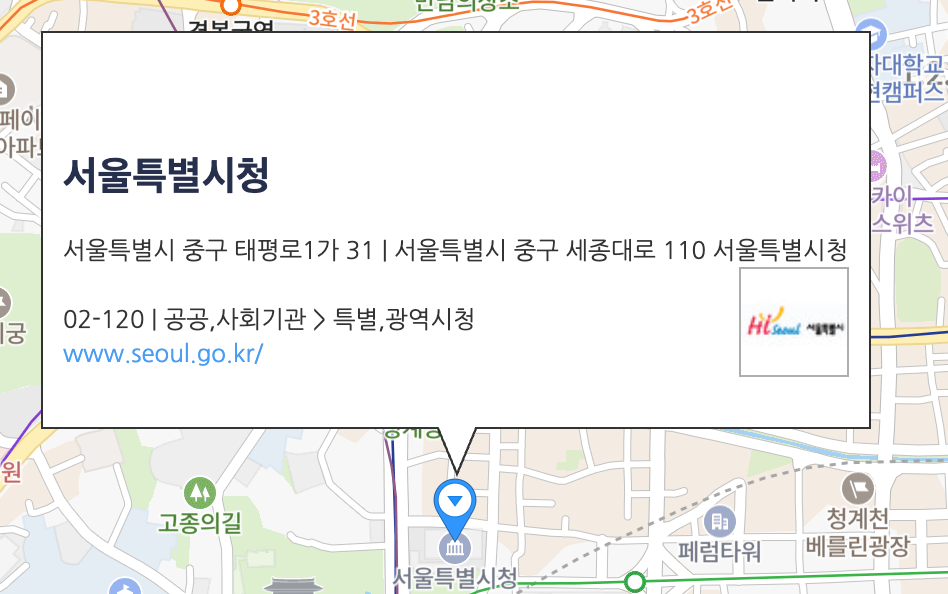
이런식으로 생긴 요소를 말합니다. 뒤에 서술할 마커와 같이 사용되는 요소입니다.
정보 창의 디자인은 NAVER 지도 API v3에서 제공하는 스타일을 사용할 수 있고, 스타일 관련 옵션으로 정보 창 테두리, 배경색, 말풍선 꼬리의 스타일을 설정할 수 있습니다.
정보 창 내부의 콘텐츠는 DOM 요소로 구성되어 있습니다.
Constructor를 보면 InfoWindowOptions를 필수로 넣도록 되어있습니다.
주요 메소드는 open과 close입니다.
InfoWindow를 열었다 닫았다 하는 메소드입니다.
주로 마커와 연결하여 마커를 눌렀을 때, 정보창이 열리고 다시누르면 닫히도록 사용합니다.
Marker
**Marker** 클래스는 지도 위에 올리는 마커를 정의합니다.

// 사용 예제
const markerOptions: naver.maps.MarkerOptions = {
  position: new naver.maps.LatLng(lat, lng), // position은 필수 입니다.
};
const marker: naver.maps.Marker = new naver.maps.Marker(markerOptions);

// 우아하게 사용하기
const $div: HTMLElement = document.createElement("div");
$div.style.backgroundColor = "white";

const infoWindowOptions : naver.maps.InfoWindowOptions = {
  map: map // Naver Map객체를 의미합니다.
  content: $div // Content는 필수입니다! HTMLElement | string
};
const infoWindow : naver.maps.InfoWindow = new naver.maps.InfoWindow(infoWindowOptions);

// 클릭으로 infowindow를 열고 닫습니다.
marker.addListener("click", () => {
  if (infoWindow.getMap()) { // OverlayView Class에 있는 메소드입니다.
    // 해당 객체가 map에 있으면 해당 map객체를 반환합니다.
    infoWindow.close();
  } else {
    infoWindow.open(map, marker);
  }
});


// 구현체
class Marker extends OverlayView {
    constructor(options: MarkerOptions);
    getAnimation(): Animation | null;
    getClickable(): boolean;
    getCursor(): string;
    getDraggable(): boolean;
    getDrawingRect(): Bounds;
    getElement(): HTMLElement;
    getIcon(): ImageIcon | SymbolIcon | HtmlIcon;
    getOptions(key?: string): any; // if key is undefined, return MarkerOptions
    getPosition(): Coord;
    getShape(): MarkerShape;
    getTitle(): string;
    getVisible(): boolean;
    getZIndex(): number;
    setAnimation(animation: Animation | null): void;
    setClickable(clickable: boolean): void;
    setCursor(cursor: string): void;
    setDraggable(draggable: boolean): void;
    setIcon(icon: string | ImageIcon | SymbolIcon | HtmlIcon): void;
    setOptions(options: MarkerOptions): void;
    setOptions(key: string, value: unknown): void;
    setPosition(position: Coord | CoordLiteral): void;
    setShape(shape: MarkerShape): void;
    setTitle(title: string): void;
    setVisible(visible: boolean): void;
    setZIndex(zIndex: number): void;
}
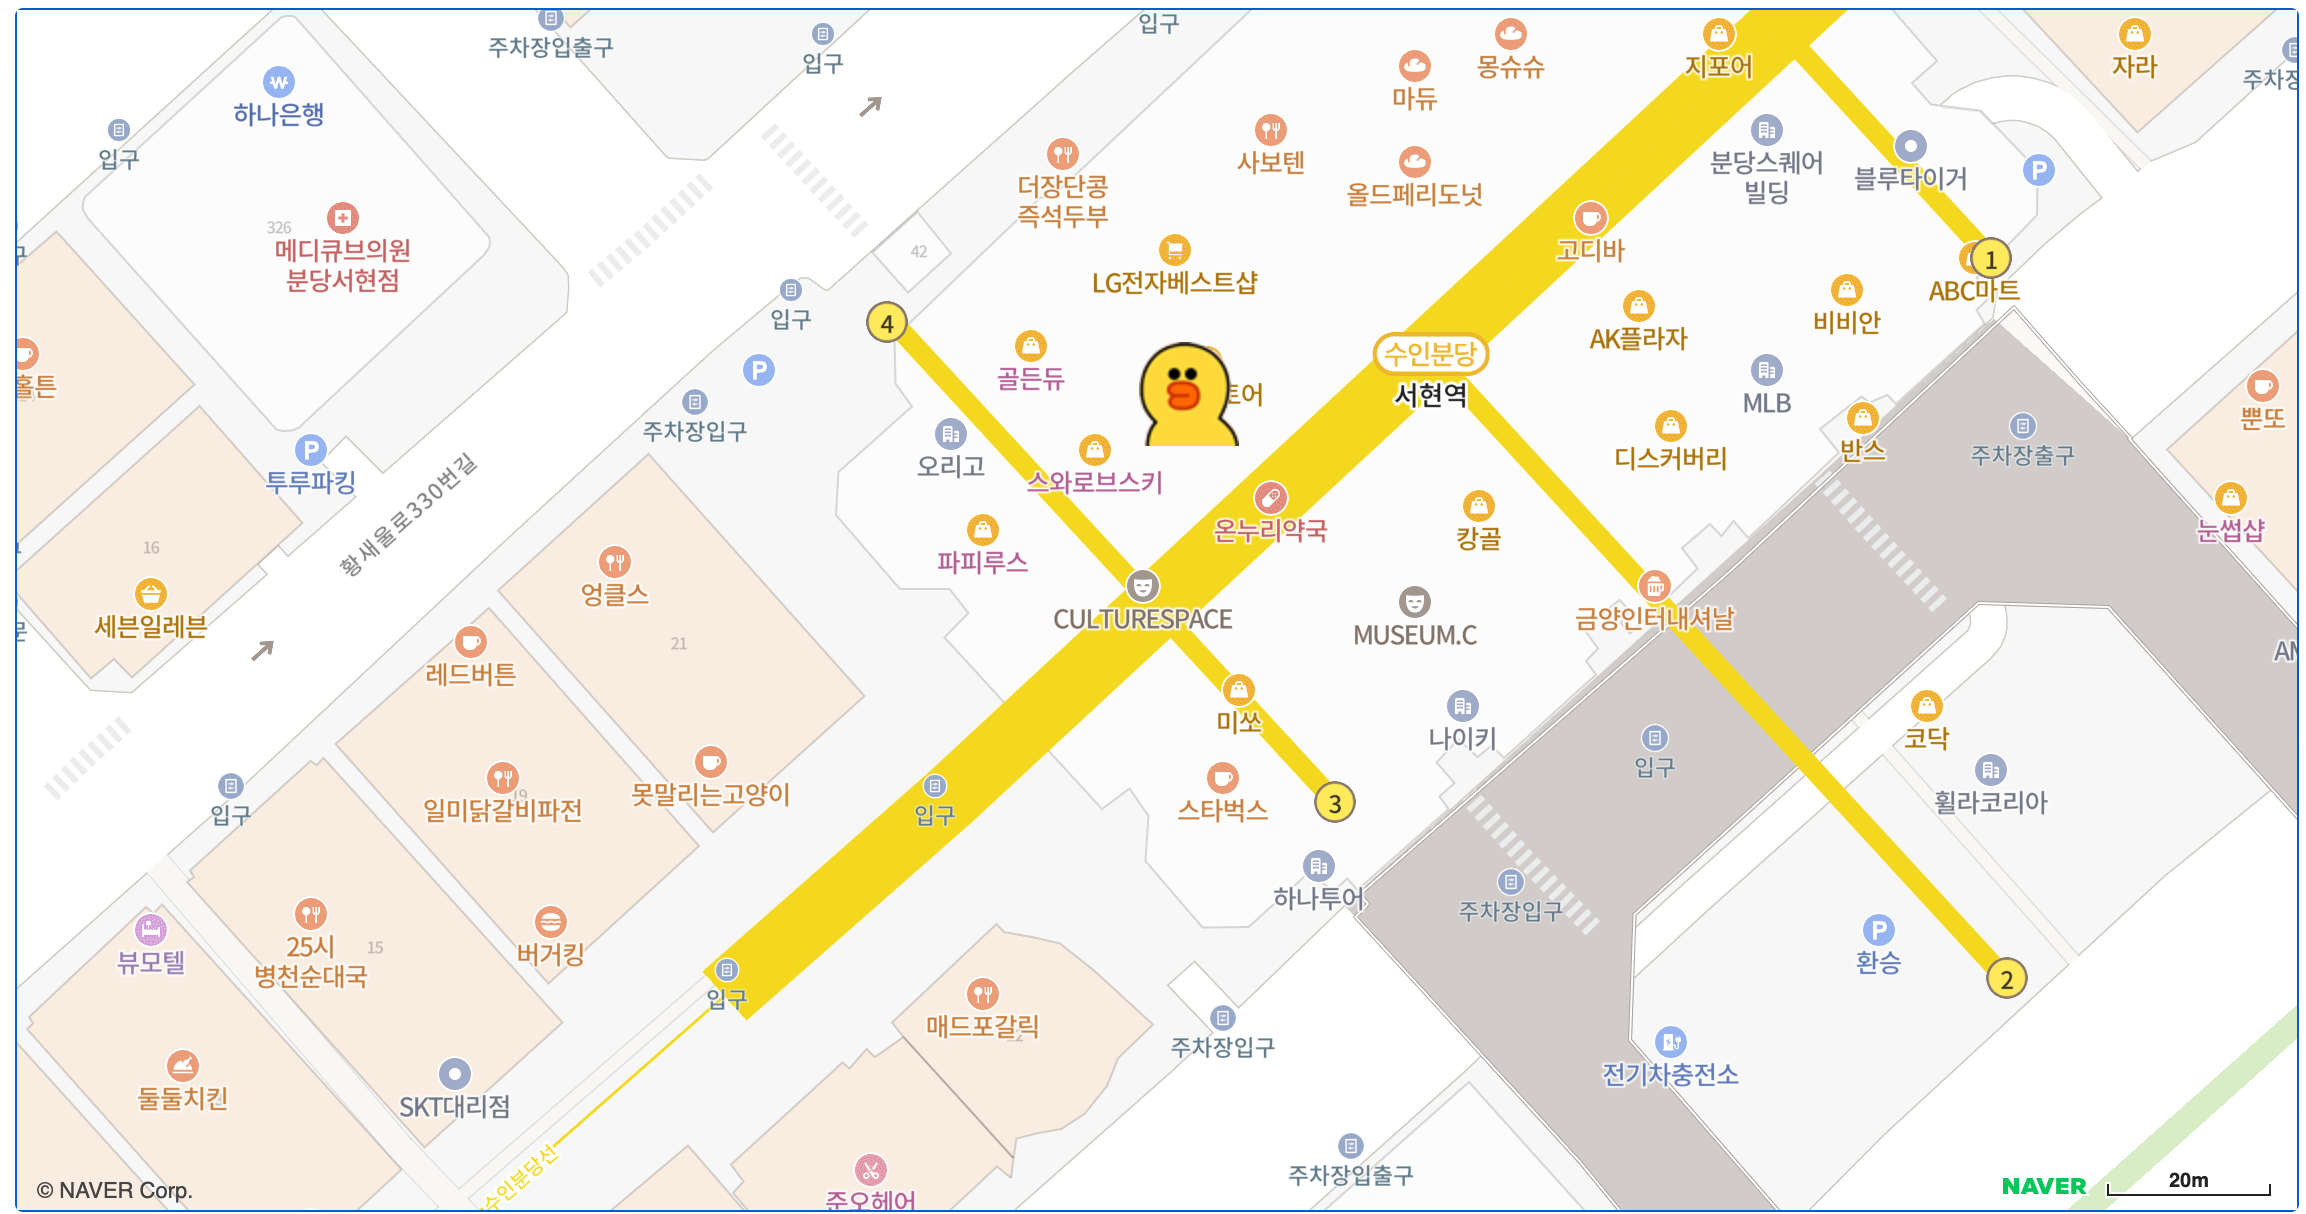
Marker객체를 통해 지도위에 마커를 올릴 수 있습니다.
이미지를 넣어서 다양한 마커를 띄울 수 있습니다.
 const markerOptions: naver.maps.MarkerOptions = {
    position: position.destinationPoint(90, 15),
    map: map,
    icon: {
        url: HOME_PATH +'/img/example/sally.png',
        size: new naver.maps.Size(50, 52),
        origin: new naver.maps.Point(0, 0),
        anchor: new naver.maps.Point(25, 26)
    }
};
CustomControl
**CustomControl** 클래스는 지도 위에 올리는 UI 컨트롤의 기본 클래스입니다. NAVER 지도 API v3에서 제공하는 모든 컨트롤은 이 클래스를 상속받아 구현했습니다.

// 우아하게 사용하기
const customButtonHTML = Icons.locationBtnHtml;
const controlOptions: naver.maps.ControlOptions = {
  position: naver.maps.Position.LEFT_CENTER, // 필수입니다.
};
const customControl = new naver.maps.CustomControl(
  customButtonHTML,
  controlOptions,
);

customControl.setMap(map);

// 구현체
class CustomControl extends KVO {
  constructor(html: string, ControlOptions: ControlOptions);
  getElement(): HTMLElement;
  getMap(): Map | null;
  getOptions(key?: string): any;
  html(html?: string): string;
  setMap(map?: Map | null): void;
  setOptions(newOptions: ControlOptions): void;
  setPosition(position: Position): void;
}
지도상에서 컨트롤을 해주는 UI를 의미합니다.
우리가 지도를 사용하다보면 마커기점 화면 전환등의 버튼이 필요할 때가 있습니다.
이럴 때 customControl을 이용해 해당 버튼을 만들 수 있습니다.
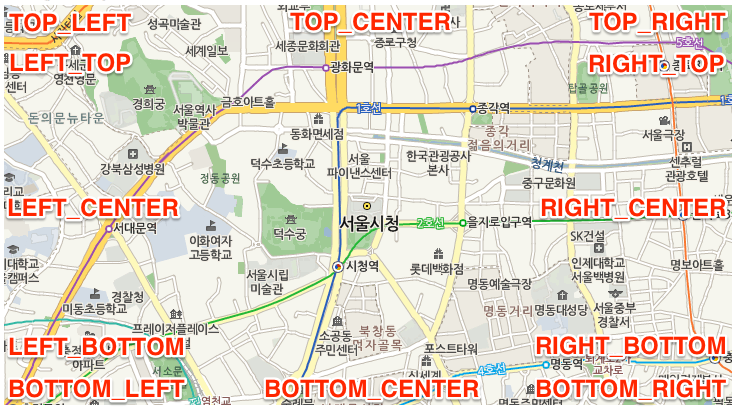
이 때 position값에 따른 위치는 다음과 같습니다.
2. 맵 표현
Map
**Map** 클래스는 애플리케이션에서 지도 인스턴스를 정의합니다. 이 객체를 생
성함으로써 개발자는 지정한 DOM 요소에 지도를 삽입할 수 있습니다.

const containerRef = useRef<HTMLDivElement>(null);

const map = new naver.maps.Map(containerRef.current!, mapOptions);
// 첫번째 요소인 mapDiv(string)은 필수입니다.

// 구현체
class Map extends KVO {
    controls: KVOArray<Position>;
    data: Data;
    layers: LayerRegistry;
    mapTypes: MapTypeRegistry;
    mapSystemProjection: MapSystemProjection;

    constructor(mapDiv: string | HTMLElement, mapOptions?: MapOptions);
    addPane(name: string, elementOrIndex: HTMLElement | number): void;
    autoResize(): void;
    destroy(): void;
    fitBounds(
        bounds: Bounds | BoundsLiteral | ArrayOfCoords | ArrayOfCoordsLiteral,
        fitBoundsOptions?: FitBoundsOptions,
    ): void;
    getBounds(): Bounds;
    getCenter(): Coord;
    getCenterPoint(): Coord;
    getElement(): HTMLElement;
    getMapTypeId(): string;
    getMaxZoom(): number;
    getMinZoom(): number;
    getOptions(key?: string): any;
    getPanes(): MapPanes;
    getPrimitiveProjection(): Projection;
    getProjection(): MapSystemProjection;
    getSize(): Size;
    getZoom(): number;
    morph(coord: Coord | CoordLiteral, zoom?: number, transitionOptions?: TransitionOptions): void;
    panBy(offset: Point | PointLiteral): void;
    panTo(coord: Coord | CoordLiteral, transitionOptions?: TransitionOptions): void;
    panToBounds(bounds: Bounds | BoundsLiteral, transitionOptions?: TransitionOptions, margin?: Margin): void;
    refresh(noEffect?: boolean): void;
    removePane(name: string): void;
    setCenter(center: Coord | CoordLiteral): void;
    setCenterPoint(point: Point | PointLiteral): void;
    setCursor(cursor: string): void;
    setMapTypeId(mapTypeId: string): void;
    setOptions(newOptionsOrKey: { [key: string]: any } | string, value?: any): void;
    setSize(size: Size | SizeLiteral): void;
    setZoom(zoom: number, effect?: boolean): void;
    updateBy(coord: Coord | CoordLiteral, zoom: number): void;
    zoomBy(deltaZoom: number, zoomOrigin?: Coord | CoordLiteral, effect?: boolean): void;
    stop(): void;
}
Map객체는 지정한 DOM요소에 지도를 넣는 식으로 동작합니다.
DOM요소 접근을 위해 useRef를 이용했습니다.
저의 경우 프로젝트에서 커스텀훅을 만들어, 사용하고 있습니다.
반환되는 MapInstanceRef를 통해 위해서 알아본 InfoWindow나 Marker등을 넣는식으로 사용하시면 됩니다.
// 우아하게 사용
interface Props {
  latitude: number,
  longtitude: number,
  mapOption? : naver.maps.MapOptions
};

export const useInitMap({
  latitude,
  longtitude,
  mapOption = DEFAULT_MAP_OPTION,
} : Props) => {
  const containerRef = useRef<HTMLDivElement>(null);
  const mapInstanceRef = useRef<naver.maps.Map | null>(null);

  useEffect(()=>{
    try {
      await loadScript();
    }
    catch (error:unknown) {
      // 에러별 처리
    }
    initMap();
  }, []);
  return { containerRef, mapInstanceRef };
};
이런식으로 러프하게 처리하고 있습니다.
상황별로 props를 추가하여 사용하시면 될 것 같습니다.
참고로 loadScript함수는 HTML script에 스크립트를 동적으로 넣어주는 함수입니다.
일반적인 HTML에 스크립트 태그를 작성해 놓을시, 지도를 안쓰는 랜딩페이지에서부터 스크립트를 적용해 초기 렌더링이 느려집니다.
그래서 실제로 지도를 사용하는 부분에서만 동적으로 스크립트 태그를 불러오도록 적용했습니다. (꿀팁)
3. 기타
OverlayView
**OverlayView** 클래스는 오버레이를 만들 때 구현해야 할 여러 메서드를 정의하는 추상 클래스입니다. NAVER 지도 API v3에서 제공하는 모든 오버레이(마커, 정보 창 등)는 이 클래스를 상속받아 구현되었습니다.

사용자 정의 오버레이를 만들려면 이 클래스를 상속받아 구현해야 합니다. 이때 다음 메서드는 반드시 재정의해야 합니다.

// 구현체
class OverlayView extends KVO {
    constructor();
    draw(): void;
    getContainerTopLeft(): Point;
    getMap(): Map | null;
    getPanes(): MapPanes;
    getProjection(): MapSystemProjection;
    onAdd(): void;
    onRemove(): void;
    setMap(map: Map | null): void;
}
OverLayView, KVO 클래스 같은경우엔 기타로 분류해놓았습니다.
직접 사용하진 않지만, 네이버 설명처럼 모든 오버레이(덮어씌우는 객체들)의 부모 형태이므로 메소드들을 알아두면 좋을 것 같습니다.
커스텀 오버레이들을 만드실 분들은 해당 클래스를 상속받아 사용하시면 됩니다.
KVO
**KVO** 클래스는 KVO(Key-Value Observing) 패턴을 정의하는 클래스입니다.

이 클래스는 Event의 구현 일부를 상속받으며, NAVER 지도 API v3의 주요 클래스는
이 클래스를 상속받아 구현되었습니다.

// 구현체
class KVO {
    constructor();
    set(key: string, value: any, silently?: boolean): void;
    get(key: string): any;
    bindTo(key: string | string[], target: KVO, targetKey?: string): void;
    unbind(key: string): void;
    unbindAll(): void;
    setValues(properties: { [key: string]: any }): void;
    addListener(eventName: string, listener: (event: any) => any): MapEventListener;
    addListenerOnce(eventName: string, listener: (event: any) => any): MapEventListener;
    hasListener(eventName: string): boolean;
    removeListener(listeners: MapEventListener | MapEventListener[]): void;
    clearListeners(eventName: string): void;
    trigger(eventName: string, eventObject?: any): void;
}
OverlayView가 최상위 부모일 것 같은데..
해당 클래스의 부모가 또 존재합니다.
바로 KVO클래스입니다.
KVO클래스는 이벤트 처리를 위해 설계된 클래스입니다.
리스너에 의해 상태변경이 감지되면 등록된 이벤트를 시작합니다.
4. 좌표 변환
좌표변환은 subModule입니다.
해당 모듈을 사용하기 위해선 API관리에서 추가 설정을 하셔야합니다.
지도를 사용하다보면 지도를 움직이는 경우가 종종 필요합니다.
이때 해당 지역의 좌표가 궁금한 경우가 있는데, 이때 geocoder를 이용하면 됩니다.
Geocode : 주소 -> 좌표 변환
ReverseGeocode : 좌표 -> 주소 변환
Service 객체
서버 API 서비스를 활용하려면 naver.maps.Service 정적 객체를 사용합니다.
Service 객체는 서버 API를 호출하는 데 필요한 파라미터와 메서드를 제공합니다.

// 구현체
namespace Service {
      enum CoordinatesType {
          LATLNG = "epsg:4326",
          UTMK = "nhn:2048",
          TM128 = "nhn:128",
          EPSG3857 = "epsg:3857",
      }

      enum OrderType {
          LEGAL_CODE = "legalcode",
          ADDR = "addr",
          ROAD_ADDR = "roadaddr",
          ADM_CODE = "admcode",
      }
  	....
    function fromAddrToCoord(
        options: GeocodeServiceOptions,
        callback?: (status: Status, response: GeocodeResponse) => void,
    ): void;
    function fromCoordToAddr(
        options: ReverseServiceOptions,
        callback?: (status: Status, response: ReverseGeocodeResponse) => void,
    ): void;
    function geocode(
        options: GeocodeServiceOptions,
        callback?: (status: Status, response: GeocodeResponse) => void,
    ): void;
    function reverseGeocode(
        options: ReverseServiceOptions,
        callback?: (status: Status, response: ReverseGeocodeResponse) => void,
    ): void;
}
Service객체는 namespace로 되어있습니다.
다양한 enum,interface,함수들을 묶어둔 객체입니다.
해당 객체의 함수들을 호출하여 좌표변환을 해봅시다.
GeoCode, ReverseGeocode
// 우아하게 사용
 return new Promise<string>((resolve, reject) => {
    window.naver.maps.Service.reverseGeocode(
      {
        coords: new window.naver.maps.LatLng(lat, lng),
        orders: [
          naver.maps.Service.OrderType.ADDR,
          naver.maps.Service.OrderType.ROAD_ADDR,
        ].join(','),
      },
      (status, response) => {
        if (status === naver.maps.Service.Status.ERROR) {
          reject(new Error('주소 변환 실패'));
          return;
        }

        const {roadAddress, jibunAddress} = response.v2.address;
        if (roadAddress || jibunAddress) {
          resolve(roadAddress || jibunAddress);
        } else {
          reject(new Error('주소 없음'));
        }
      },
    );
  });
저같은 경우 이런걸 반환하는 Util함수를 만들어 사용하고 있습니다.
변수명이 jibunAddress네요 깨알재미..
참고문헌