1. 무료 도메인 생성 (내도메인.한국)
사용하고 싶은 도메인을 검색해 등록한다.

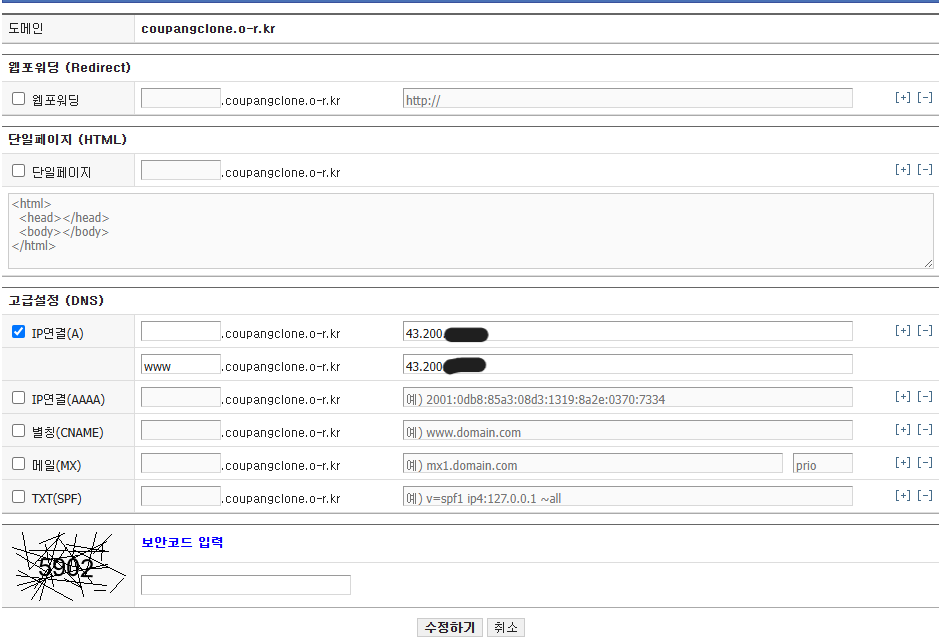
도메인 등록 후 DNS 설정에서 EC2 퍼블릭 IP로 A 레코드 추가
- 공백, www 모두 설정
2. EC2 인스턴스에서 Nginx + Certbot 설치
Nginx 설치
sudo amazon-linux-extras install nginx1 -y
sudo systemctl start nginx
sudo systemctl enable nginx
Cerbot 설치 (Amazon Linux 2 용)
sudo amazon-linux-extras enable epel
sudo yum clean metadata
sudo yum install -y epel-release
sudo yum install -y certbot python2-certbot-nginx
3. HTTPS 인증서 발급 (Let's Encrypt)
sudo certbot --nginx -d coupangclone.o-r.kr -d www.coupangclone.o-r.kr입력 흐름 예시
# 인증서 발급을 위해 이메일 주소 입력하면 됨
...
Enter email address (used for urgent renewal and security notices)
 (Enter 'c' to cancel): 내 이메일

# Let's Encrypt 약관에 동의할 지 묻는 것
...
You must agree in order to register with the ACME server. Do you agree?
- - - - - - - - - - - - - - - - - - - - - - - - - - - - - - - - - - - - - - - -
(Y)es/(N)o: Y

## Let's Encrypt와 관련된 비영리 단체(EFF)로부터 소식을 받아볼지 물어보는 것
...
We'd like to send you email about our work encrypting the web,
EFF news, campaigns, and ways to support digital freedom.
- - - - - - - - - - - - - - - - - - - - - - - - - - - - - - - - - - - - - - - -
(Y)es/(N)o: N

# 성공 메시지
Successfully received certificate.
Congratulations! Your certificate and chain have been saved at:
/etc/letsencrypt/live/coupangclone.o-r.kr/fullchain.pem
이메일 입력, 약관 동의 후 자동으로 Nginx에 SSL 설정 적용됨
인증서 유효기간 90일 → 자동 갱신 설정 완료
🔐 인증서 발급 시 사용되는 주요 파일
fullchain.pem: 공개 인증서와 중간 인증서가 합쳐진 파일 (브라우저가 서버를 믿게 해줌)
privkey.pem: 서버만 갖고 있는 비밀 키 파일 (보안의 핵심, 절대 유출 금지!)
인증서 갱신 테스트
sudo certbot renew --dry-runNginx 설정 확인
sudo nginx -t
# → syntax is ok, configuration file test is successful
출력 예시
nginx: the configuration file /etc/nginx/nginx.conf syntax is ok
nginx: configuration file /etc/nginx/nginx.conf test is successful
4. Nginx 설정
Nginx 설정 수정
sudo nano /etc/nginx/nginx.conf4-1. HTTPS 리버스 프록시 설정
/etc/nginx/nginx.conf 내 HTTPS 블럭 설정 예시
server {
    listen 443 ssl;
    server_name coupangclone.o-r.kr www.coupangclone.o-r.kr;

    ssl_certificate /etc/letsencrypt/live/coupangclone.o-r.kr/fullchain.pem;
    ssl_certificate_key /etc/letsencrypt/live/coupangclone.o-r.kr/privkey.pem;

    location / {
        proxy_pass http://localhost:8080;
        proxy_set_header Host $host;
        proxy_set_header X-Real-IP $remote_addr;
    }
}
4-2. HTTP → HTTPS 리디렉션 설정
server {
    listen 80;
    listen [::]:80;
    server_name coupangclone.o-r.kr www.coupangclone.o-r.kr;

    location / {
        return 301 https://$host$request_uri;
    }

    include /etc/nginx/default.d/*.conf;
    error_page 404 /404.html;
}
5. Spring Boot 배포 및 Nginx와 연결 확인
💡 EC2에서 Spring Boot가 실행되고 있어야 한다.
Nginx는 443 포트로 HTTPS 요청 받고, 내부 8080으로 전달한다.
EC2 내부에서 연결 테스트
curl -I https://coupangclone.o-r.kr난 HTTP/2 401 (Spring Security 인증 필요)이라고 Security에서 필터링됐다.
포트 확인
sudo netstat -tuln | grep 443출력 예시
tcp        0      0 0.0.0.0:443             0.0.0.0:*               LISTEN
tcp6       0      0 :::443                  :::*                    LISTEN
⚠️ 504 Gateway Timeout 디버깅 경험
🔍 원인 : Postman에서 504 발생 -> CORS 차단 문제
🛠️ 해결: SecurityConfig에서 CORS 전역 설정해서 해결
@Bean
public SecurityFilterChain securityFilterChain(HttpSecurity http) throws Exception {
    http
        .cors(cors -> cors.configurationSource(corsConfigurationSource()))
    	.csrf(AbstractHttpConfigurer::disable)
        ....
    return http.build();
}
@Bean
public CorsConfigurationSource corsConfigurationSource() {
    CorsConfiguration configuration = new CorsConfiguration();
    configuration.setAllowedOrigins(List.of("http://localhost:8080",
                                            "https://coupangclone.o-r.kr"));
    configuration.setAllowedMethods(List.of("GET", "POST", "PUT", "DELETE"));
    configuration.setAllowedHeaders(List.of("*"));
    configuration.setAllowCredentials(true);

    UrlBasedCorsConfigurationSource source = new UrlBasedCorsConfigurationSource();
    source.registerCorsConfiguration("/**", configuration);
    return source;
}
✅ 배운 점
무료 도메인으로 HTTPS 적용을 해봤다. Nginx와 Spring Boot 리버스 프록시 구조 이해할 수 있었고 인증서 자동 갱신, CORS 차단, 보안 관련 문제들을 직접 디버깅하면서 경험하는 시간이 되었다.

개발자가 되고 싶은 취준생