안드로이드 제트팩에는 네비게이션이라는 것이 있다.
UI전환을 시각적으로 보여주어서 좀 더 편하게 도와주는 라이브러리 입니다.
먼저 App단위의 gradle에서 dependency를 추가해야 한다.
//jetpack navigation

implementation("androidx.navigation:navigation-fragment-ktx:2.3.5")
implementation("androidx.navigation:navigation-ui-ktx:2.3.5")
그리고 3개의 fragment를 만들어 준다.
class Test1 : Fragment() {
    lateinit var binding: FragmentTest1Binding
    override fun onCreateView(
        inflater: LayoutInflater, container: ViewGroup?,
        savedInstanceState: Bundle?
    ): View? {
        binding = FragmentTest1Binding.inflate(inflater, container, false)
        return binding.root
		}
}
class Test2 : Fragment() {
lateinit var binding: FragmentTest2Binding
override fun onCreateView(
inflater: LayoutInflater, container: ViewGroup?,
savedInstanceState: Bundle?
): View? {
binding = FragmentTest2Binding.inflate(inflater, container, false)
return binding.root
}
}class Test3 : Fragment() {
lateinit var binding: FragmentTest3Binding
override fun onCreateView(
inflater: LayoutInflater, container: ViewGroup?,
savedInstanceState: Bundle?
): View? {
binding = FragmentTest3Binding.inflate(inflater, container, false)
return binding.root
}
}Navigation Host
Navigation을 구현 할 때에는 Host를 정의해야 합니다. Host는 화면이 보이는 객체입니다.
<?xml version="1.0" encoding="utf-8"?>
<FrameLayout
        xmlns:android="http://schemas.android.com/apk/res/android"
				xmlns:app="http://schemas.android.com/apk/res-auto"
				xmlns:tools="http://schemas.android.com/tools"
				android:layout_width="match_parent"
				android:layout_height="match_parent"
				android:background="@android:color/background_light"
				tools:context=".MainActivity">
		<fragment
            android:id="@+id/my_nav_host_fragment"
						android:name="androidx.navigation.fragment.NavHostFragment"
						android:layout_width="match_parent"
						android:layout_height="match_parent"
						app:defaultNavHost="true"
						app:navGraph="@navigation/nav_graph"/>
</FrameLayout>
fragment에서 navGraph는 fragment를 Host로 설정하는 속성입니다.
defaultNavHost를 true로 설정하면 Back을 눌렀을때 이전 화면으로 전환됩니다.
만약 false로 설정하게 된다면 앱을 종료하게 됩니다.
Graph 정의
res에 navigation 디렉토리를 하나 만들고 그 안에 nav_graph파일을 만들어 줍니다.
<?xml version="1.0" encoding="utf-8"?>
<navigation xmlns:android="http://schemas.android.com/apk/res/android"
            xmlns:app="http://schemas.android.com/apk/res-auto"
            xmlns:tools="http://schemas.android.com/tools"
            app:startDestination="@+id/test1_screen">

    <fragment
            android:id="@+id/test1"
            android:name="com.codechacha.navigation.Test1"
            android:label="Test1 screen"
            tools:layout="@layout/fragment_test1">
    </fragment>

    <fragment
            android:id="@+id/test2"
            android:name="com.codechacha.navigation.Test2"
            android:label="Test2 screen"
            tools:layout="@layout/fragment_test2">
    </fragment>

    <fragment
            android:id="@+id/test3"
            android:name="com.codechacha.navigation.Test3"
            android:label="Test3 screen"
            tools:layout="@layout/fragment_test3">
    </fragment>
최상단의 navigation 속성에 startDestination 속성은 맨 처음 보여질 화면이 어떠한 것인지를 설정하는 것입니다.

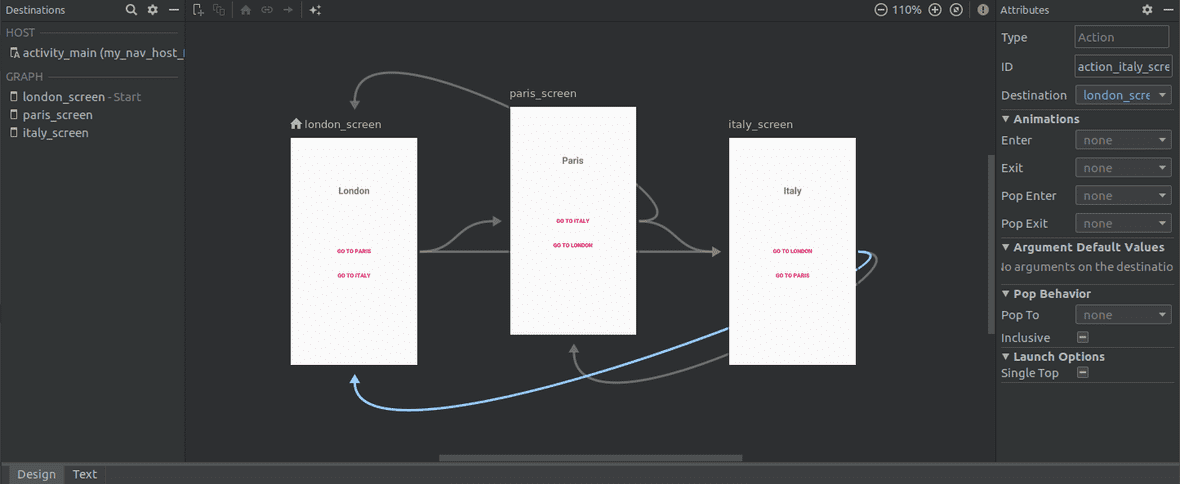
nav_graph파일에서 서로 이동할 화살표를 정해줍니다.
이 후에 코드를 확인하면
<action android:id="@+id/action_test1_to_test2"
		app:destination="@id/test2"/>
<action android:id="@+id/action_test1_to_test3"
		app:destination="@id/test3"/>
action이 추가된 것을 볼 수 있다.
이 후에는 원하는 대로 clicklistener나 특정 상황에 마자추어 Controller를 불러와서 action id를 이용하여 사용하면 된다.
				view.findViewById<Button>(R.id.to_test2_from_test1).setOnClickListener {
            Navigation.findNavController(view).navigate(R.id.action_test1_to_test2)
        }
        view.findViewById<Button>(R.id.to_test3_from_test1).setOnClickListener {
            Navigation.findNavController(view).navigate(R.id.action_test1_to_test3)
        }}
번외
Animation
Navigation을 이용하면 특정한 애니메이션 없이 바로 이동한다.
우리는 각 action마다 원하는 애니메이션을 정의할 수 있다.
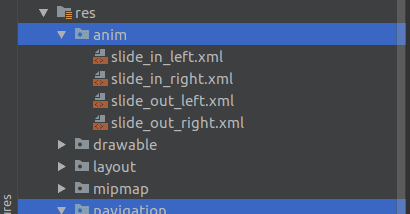
먼저 animation을 구현한다.

slide_in_left
<?xml version="1.0" encoding="utf-8"?>
<set xmlns:android="http://schemas.android.com/apk/res/android">

    <translate android:fromXDelta="-100%" android:toXDelta="0%"
               android:fromYDelta="0%" android:toYDelta="0%"
               android:duration="700"/>
</set>
from → to로 이어지며
-값은 화면 밖을, 0%는 사용자에게 보여지는 순간을 의미한다.
duration은 속도를 의미한다.
애니메이션을 구현하였으면 그래프 파일에 설정하면 된다.
<fragment
            android:id="@+id/test1"
            android:name="com.codechacha.navigation.Test1"
            android:label="Test1 screen"
            tools:layout="@layout/fragment_test1"
            app:popEnterAnim="@anim/slide_in_left"
            app:popExitAnim="@anim/slide_out_right"
            app:enterAnim="@anim/slide_in_right"
app:exitAnim="@anim/slide_out_left">- enterAnim : action을 수행할 때 이동할 화면(destination)에 대한 애니메이션입니다.
- exitAnim : action을 수행할 때 현재 화면에 대한 애니메이션입니다.
- popExitAnim : 지난 화면으로 돌아갈 때(pop) 종료되는 화면에 대한 애니메이션입니다.
- popEnterAnim : 지난 화면으로 돌아갈 때 이동할 화면에 대한 애니메이션입니다.
Global Action
사실 nav_graph.xml에는 중복된 Action들이 3개나 있습니다. 컨트롤 CV로 일단 구현을 해놨는데요, 구현이 끝났으니 코드를 깔끔하게 정리해보려합니다. Global action은 말 그대로 Global로 action을 정의해서 여러 객체에서 공통으로 사용하자는 것입니다.
Global action을 생성하는 방법은 코드로 할 수 있고, 그래프 에디터로도 할 수 있습니다. nav_graph.xml에서 왼쪽 하단에 Design버튼을 누르면 그래프 에디터가 실행됩니다. View를 클릭한 상태에서 Right Click -> Add Action -> Global을 누르면 Global action이 생성됩니다.
3개의 fragment의 Global action을 모두 생성하고 xml을 열어 보면 아래처럼 navigation 태그 하위에 Global action 코드가 생성됩니다.
<action android:id="@+id/action_global_london_screen"
        app:destination="@id/london_screen"/>

<action android:id="@+id/action_global_paris_screen"
        app:destination="@id/paris_screen"/>

<action android:id="@+id/action_global_italy_screen"
        app:destination="@id/italy_screen"/>
기존에 생성한 Fragment 내의 Action을 모두 삭제하고, Global action에 애니메이션을 추가하면 다음과 같은 코드가 됩니다.
/res/navigation/nav_graph.xml
<?xml version="1.0" encoding="utf-8"?>
<navigation xmlns:android="http://schemas.android.com/apk/res/android"
            xmlns:app="http://schemas.android.com/apk/res-auto"
            xmlns:tools="http://schemas.android.com/tools"
            app:startDestination="@+id/london_screen">

    <fragment
            android:id="@+id/london_screen"
            android:name="com.codechacha.navigation.LondonScreen"
            android:label="London screen"
            tools:layout="@layout/fragment_london_screen">
    </fragment>

    <fragment
            android:id="@+id/paris_screen"
            android:name="com.codechacha.navigation.ParisScreen"
            android:label="Paris screen"
            tools:layout="@layout/fragment_paris_screen">
    </fragment>

    <fragment
            android:id="@+id/italy_screen"
            android:name="com.codechacha.navigation.ItalyScreen"
            android:label="Italy screen"
            tools:layout="@layout/fragment_italy_screen">
    </fragment>

    <action android:id="@+id/action_global_london_screen"
            app:destination="@id/london_screen"
            app:popEnterAnim="@anim/slide_in_left"
            app:popExitAnim="@anim/slide_out_right"
            app:enterAnim="@anim/slide_in_right"
            app:exitAnim="@anim/slide_out_left"/>

    <action android:id="@+id/action_global_paris_screen"
            app:destination="@id/paris_screen"
            app:popEnterAnim="@anim/slide_in_left"
            app:popExitAnim="@anim/slide_out_right"
            app:enterAnim="@anim/slide_in_right"
            app:exitAnim="@anim/slide_out_left"/>

    <action android:id="@+id/action_global_italy_screen"
            app:destination="@id/italy_screen"
            app:popEnterAnim="@anim/slide_in_left"
            app:popExitAnim="@anim/slide_out_right"
            app:enterAnim="@anim/slide_in_right"
            app:exitAnim="@anim/slide_out_left"/>

</navigation>
Local action을 모두 삭제하고, Global action을 생성했기 때문에 Fragment 코드도 변경해줘야 합니다. 아래 코드처럼 Fragment에서 사용한 Local action을 모두 Global action으로 변경해주세요.
view.findViewById<Button>(R.id.to_london_from_italy).setOnClickListener {
    Navigation.findNavController(view).navigate(R.id.action_global_london_screen)
}
view.findViewById<Button>(R.id.to_paris_from_italy).setOnClickListener {
    Navigation.findNavController(view).navigate(R.id.action_global_paris_screen)
}
이제 앱을 실행해보면 이전과 동일하게 동작하는 화면을 볼 수 있습니다.
AppBarConfiguration
현재 보여지고 있는 화면의 Label을 AppBar에 보여주고 싶을 수 있습니다. AppBarConfiguration을 이용하면 네비게이션 그래프에 정의된 Label을 AppBar에 출력할 수 있습니다. 더불어 AppBar에 뒤로가기(<-) 버튼까지 보여줍니다. 뒤로가기 버튼은 startDestination로 정의된 처음 화면이 아닐 때만 보여줍니다.
NavController와 AppBarConfiguration를 멤버변수로 생성해야 합니다. 멤버변수로 선언하는 이유는 다른 곳에서 사용하기 때문입니다. NavController는 호스트 리소스를 인자로 넘겨주어 생성합니다. AppBarConfiguration는 Controller의 graph 변수를 인자로 넘겨주어 생성합니다.
navController = Navigation.findNavController(this, R.id.my_nav_host_fragment)
appBarConfiguration = AppBarConfiguration(navController.graph)setupActionBarWithNavController는 두 객체를 AppBar에 적용합니다.
setupActionBarWithNavController(navController, appBarConfiguration)AppBar에 생성되는 뒤로가기 버튼을 눌렀을 때, 뒤로 이동하려면 onSupportNavigateUp를 오버라이드해야 합니다.
override fun onSupportNavigateUp(): Boolean {
    return navController.navigateUp(appBarConfiguration) || super.onSupportNavigateUp()
}
전체적인 코드는 이렇게 됩니다.
MainActivity.kt
class MainActivity : AppCompatActivity() {

    private lateinit var appBarConfiguration: AppBarConfiguration
    private lateinit var navController: NavController

    override fun onCreate(savedInstanceState: Bundle?) {
        super.onCreate(savedInstanceState)
        setContentView(R.layout.activity_main)

        navController = Navigation.findNavController(this, R.id.my_nav_host_fragment)
        appBarConfiguration = AppBarConfiguration(navController.graph)
        setupActionBarWithNavController(navController, appBarConfiguration)
    }

    override fun onSupportNavigateUp(): Boolean {
        return navController.navigateUp(appBarConfiguration) || super.onSupportNavigateUp()
    }
}
실행해보면 현재 화면의 Label과 뒤로가기 버튼이 생성됩니다. 첫 화면으로 지정된 화면 일 때는 뒤로가기 버튼이 보이지 않습니다. 지금 예제는 무한으로 순환하기 때문에 조금 어색할 수 있겠네요. 실제로 순환하는 그래프를 만들어서는 안된다고 기억하시면 될 것 같네요.

참고
