Target
- TCPdump 4.9.2
- 네트워크 패킷을 캡쳐하고 분석하는 CLI 기반의 소프트웨어
- CVE-2017-13028
- BOOTP parser에서
print-bootp.c파일의bootp_print()함수에서 Out-of-Bound Read 취약점이 발생했습니다.
- BOOTP parser에서
- BOOTP
- 네트워크 부팅 과정에서 사용되는 패킷
- 클라이언트가 IP 주소와 기타 네트워크 구성 정보를 자동으로 받기 위해 사용
- UDP를 사용하며, 클라이언트 포트는 68, 서버는 67번 포트를 사용
Target Download & Build
libpcap Download
mkdir fuzzing_tcpdump && cd fuzzing_tcpdump
wget https://github.com/the-tcpdump-group/libpcap/archive/refs/tags/libpcap-1.8.0.tar.gz
tar -xzvf libpcap-1.8.0.tar.gz
libpcap Build
cd $HOME/fuzzing_tcpdump/libpcap-1.8.0/
./configure --enable-shared=no --prefix="$HOME/fuzzing_tcpdump/install/"
make
tcpdump Download
wget https://github.com/the-tcpdump-group/tcpdump/archive/refs/tags/tcpdump-4.9.2.tar.gz
tar -xzvf tcpdump-4.9.2.tar.gz
tcpdump Build
cd $HOME/fuzzing_tcpdump/tcpdump-tcpdump-4.9.2/
./configure --prefix="$HOME/fuzzing_tcpdump/install/"
make
make install
Testing
❯ $HOME/fuzzing_tcpdump/install/sbin/tcpdump -h
tcpdump version 4.9.2
libpcap version 1.8.0
OpenSSL 1.1.1f  31 Mar 2020
Usage: tcpdump [-aAbdDefhHIJKlLnNOpqStuUvxX#] [ -B size ] [ -c count ]
		[ -C file_size ] [ -E algo:secret ] [ -F file ] [ -G seconds ]
		[ -i interface ] [ -j tstamptype ] [ -M secret ] [ --number ]
		[ -Q in|out|inout ]
		[ -r file ] [ -s snaplen ] [ --time-stamp-precision precision ]
		[ --immediate-mode ] [ -T type ] [ --version ] [ -V file ]
		[ -w file ] [ -W filecount ] [ -y datalinktype ] [ -z postrotate-command ]
		[ -Z user ] [ expression ]
❯ $HOME/fuzzing_tcpdump/install/sbin/tcpdump -vvvvXX -ee -nn -r ./tests/geneve.pcap
reading from file ./tests/geneve.pcap, link-type EN10MB (Ethernet)
07:04:33.817203 00:1b:21:3c:ab:64 > 00:1b:21:3c:ac:30, ethertype IPv4 (0x0800), length 156: (tos 0x0, ttl 64, id 57261, offset 0, flags [DF], proto UDP (17), length 142)
    20.0.0.1.12618 > 20.0.0.2.6081: [no cksum] Geneve, Flags [C], vni 0xa, proto TEB (0x6558), options [class Standard (0x0) type 0x80(C) len 8 data 0000000c]
	b6:9e:d2:49:51:48 > fe:71:d8:83:72:4f, ethertype IPv4 (0x0800), length 98: (tos 0x0, ttl 64, id 48546, offset 0, flags [DF], proto ICMP (1), length 84)
    30.0.0.1 > 30.0.0.2: ICMP echo request, id 10578, seq 23, length 64
	0x0000:  001b 213c ac30 001b 213c ab64 0800 4500  ..!<.0..!<.d..E.
	0x0010:  008e dfad 4000 4011 32af 1400 0001 1400  ....@.@.2.......
	0x0020:  0002 314a 17c1 007a 0000 0240 6558 0000  ..1J...z...@eX..
	0x0030:  0a00 0000 8001 0000 000c fe71 d883 724f  ...........q..rO
	0x0040:  b69e d249 5148 0800 4500 0054 bda2 4000  ...IQH..E..T..@.
	0x0050:  4001 4104 1e00 0001 1e00 0002 0800 2c54  @.A...........,T
	0x0060:  2952 0017 f1a2 ce54 0000 0000 1778 0c00  )R.....T.....x..
	0x0070:  0000 0000 1011 1213 1415 1617 1819 1a1b  ................
	0x0080:  1c1d 1e1f 2021 2223 2425 2627 2829 2a2b  .....!"#$%&'()*+
	0x0090:  2c2d 2e2f 3031 3233 3435 3637            ,-./01234567
07:04:33.817454 00:1b:21:3c:ac:30 > 00:1b:21:3c:ab:64, ethertype IPv4 (0x0800), length 148: (tos 0x0, ttl 64, id 34821, offset 0, flags [DF], proto UDP (17), length 134)
    20.0.0.2.50525 > 20.0.0.1.6081: [no cksum] Geneve, Flags [none], vni 0xb, proto TEB (0x6558)
	fe:71:d8:83:72:4f > b6:9e:d2:49:51:48, ethertype IPv4 (0x0800), length 98: (tos 0x0, ttl 64, id 4595, offset 0, flags [none], proto ICMP (1), length 84)
    30.0.0.2 > 30.0.0.1: ICMP echo reply, id 10578, seq 23, length 64
	0x0000:  001b 213c ab64 001b 213c ac30 0800 4500  ..!<.d..!<.0..E.
	0x0010:  0086 8805 4000 4011 8a5f 1400 0002 1400  ....@.@.._......
	0x0020:  0001 c55d 17c1 0072 0000 0000 6558 0000  ...]...r....eX..
	0x0030:  0b00 b69e d249 5148 fe71 d883 724f 0800  .....IQH.q..rO..
	0x0040:  4500 0054 11f3 0000 4001 2cb4 1e00 0002  E..T....@.,.....
	0x0050:  1e00 0001 0000 3454 2952 0017 f1a2 ce54  ......4T)R.....T
	0x0060:  0000 0000 1778 0c00 0000 0000 1011 1213  .....x..........
	0x0070:  1415 1617 1819 1a1b 1c1d 1e1f 2021 2223  .............!"#
	0x0080:  2425 2627 2829 2a2b 2c2d 2e2f 3031 3233  $%&'()*+,-./0123
	0x0090:  3435 3637                                4567
07:04:33.999279 00:1b:21:3c:ac:30 > 00:1b:21:3c:ab:64, ethertype IPv4 (0x0800), length 124: (tos 0x0, ttl 64, id 34822, offset 0, flags [DF], proto UDP (17), length 110)
    20.0.0.2.43443 > 20.0.0.1.6081: [no cksum] Geneve, Flags [none], vni 0xb, proto TEB (0x6558)
fe:71:d8:83:72:4f > b6:9e:d2:49:51:48, ethertype IPv4 (0x0800), length 74: (tos 0x0, ttl 64, id 23057, offset 0, flags [DF], proto TCP (6), length 60)- 제대로 빌드되었습니다.
Fuzzing
이번에는 Fuzzing과 함께 Address Sanitizer를 사용해야 합니다. 그래서 빌드할 때 Address Sanitizer를 활성화 하고 빌드해줘야 합니다.
Build using afl-clang-lto & enable address sanitizer
rm -r $HOME/fuzzing_tcpdump/install
cd $HOME/fuzzing_tcpdump/libpcap-1.8.0
make clean

cd $HOME/fuzzing_tcpdump/tcpdump-4.9.2
make clean
cd ~/fuzzing_tcpdump/libpcap-1.8.0
export PATH="$PATH:/home/pwn/AFLplusplus"
export LLVM_CONFIG="llvm-config-11"
CC=afl-clang-lto ./configure --enable-shared=no --prefix="$HOME/fuzzing_tcpdump/install/"
AFL_USE_ASAN=1 makecd ~/fuzzing_tcpdump/tcpdump-4.9.2
AFL_USE_ASAN=1 CC=afl-clang-lto ./configure --prefix="$HOME/fuzzing_tcpdump/install/"
AFL_USE_ASAN=1 make
AFL_USE_ASAN=1 make install-
Addresss Santizer 사용을 위해
AFL_USE_ASAN=1옵션을 줘서 빌드를 해줍니다.
Fuzzing
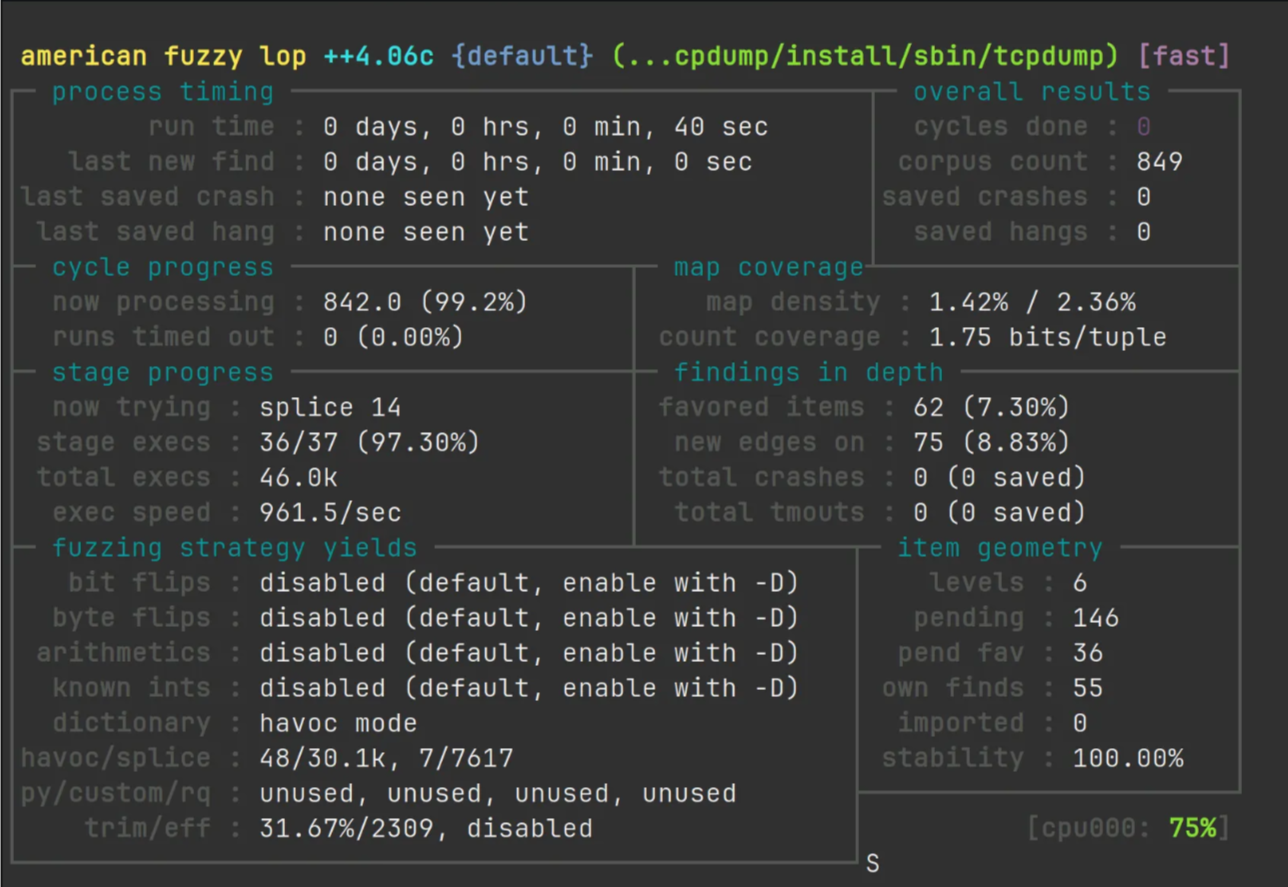
sudo su
echo core >/proc/sys/kernel/core_pattern
exit
afl-fuzz -m none -i $HOME/fuzzing_tcpdump/tcpdump/tests/ -o $HOME/fuzzing_tcpdump/out/ -s 123 -- $HOME/fuzzing_tcpdump/install/sbin/tcpdump -vvvvXX -ee -nn -r @@- ASAN은 메모리를 많이 사용하기 때문에
-m none옵션을 줘서 AFL의 메모리 제한을 해제해줍니다.
Root Cause Analysis
Address Sanitizer
❯ $HOME/fuzzing_tcpdump/install/sbin/tcpdump -vvvvXX -ee -nn -r crash6

reading from file crash6, link-type EN10MB (Ethernet)
15:05:15.631413 08:00:27:46:e8:84 > ff:ff:ff:ff:ff:ff, ethertype IPv4 (0x0800), length 342: (tos 0x10, ttl 128, id 0, offset 0, flags [none], proto UDP (17), length 328, bad cksum 39b9 (->3996)!)
    0.0.0.0.68 > 255.255.255.255.67: BOOTP/DHCP, Request, length 300, hlen 0, Flags [none] (0x0800)
=================================================================
==4425==ERROR: AddressSanitizer: heap-buffer-overflow on address 0x612000000157 at pc 0x0000003d5676 bp 0x7fffc250cda0 sp 0x7fffc250c548
READ of size 4 at 0x612000000157 thread T0
    #0 0x3d5675 in MemcmpInterceptorCommon(void*, int (*)(void const*, void const*, unsigned long), void const*, void const*, unsigned long) (/home/pwn/fuzzing_tcpdump/install/sbin/tcpdump+0x3d5675)
    #1 0x3d5b6a in memcmp (/home/pwn/fuzzing_tcpdump/install/sbin/tcpdump+0x3d5b6a)
    #2 0x4e2324 in bootp_print /home/pwn/fuzzing_tcpdump/tcpdump-tcpdump-4.9.2/./print-bootp.c:382:6
    #3 0x55ffe8 in ip_print_demux /home/pwn/fuzzing_tcpdump/tcpdump-tcpdump-4.9.2/./print-ip.c:402:3
    #4 0x5636e5 in ip_print /home/pwn/fuzzing_tcpdump/tcpdump-tcpdump-4.9.2/./print-ip.c:673:3
    #5 0x51cc27 in ethertype_print /home/pwn/fuzzing_tcpdump/tcpdump-tcpdump-4.9.2/./print-ether.c:333:10
    #6 0x51b96a in ether_print /home/pwn/fuzzing_tcpdump/tcpdump-tcpdump-4.9.2/./print-ether.c:236:7
    #7 0x47b1ab in pretty_print_packet /home/pwn/fuzzing_tcpdump/tcpdump-tcpdump-4.9.2/./print.c:332:18
    #8 0x47b1ab in print_packet /home/pwn/fuzzing_tcpdump/tcpdump-tcpdump-4.9.2/./tcpdump.c:2497:2
    #9 0x84844d in pcap_offline_read /home/pwn/fuzzing_tcpdump/libpcap-1.8.0/./savefile.c:507:4
    #10 0x472bfc in pcap_loop /home/pwn/fuzzing_tcpdump/libpcap-1.8.0/./pcap.c:875:8
    #11 0x472bfc in main /home/pwn/fuzzing_tcpdump/tcpdump-tcpdump-4.9.2/./tcpdump.c:2000:12
    #12 0x7f0e40eb6082 in __libc_start_main /build/glibc-LcI20x/glibc-2.31/csu/../csu/libc-start.c:308:16
    #13 0x3bea9d in _start (/home/pwn/fuzzing_tcpdump/install/sbin/tcpdump+0x3bea9d)

0x612000000157 is located 0 bytes to the right of 279-byte region [0x612000000040,0x612000000157)
allocated by thread T0 here:
    #0 0x438b0d in malloc (/home/pwn/fuzzing_tcpdump/install/sbin/tcpdump+0x438b0d)
    #1 0x8499c7 in pcap_check_header /home/pwn/fuzzing_tcpdump/libpcap-1.8.0/./sf-pcap.c:401:14
    #2 0x84780d in pcap_fopen_offline_with_tstamp_precision /home/pwn/fuzzing_tcpdump/libpcap-1.8.0/./savefile.c:380:7
    #3 0x847538 in pcap_open_offline_with_tstamp_precision /home/pwn/fuzzing_tcpdump/libpcap-1.8.0/./savefile.c:287:6

SUMMARY: AddressSanitizer: heap-buffer-overflow (/home/pwn/fuzzing_tcpdump/install/sbin/tcpdump+0x3d5675) in MemcmpInterceptorCommon(void*, int (*)(void const*, void const*, unsigned long), void const*, void const*, unsigned long)
Shadow bytes around the buggy address:
  0x0c247fff7fd0: 00 00 00 00 00 00 00 00 00 00 00 00 00 00 00 00
  0x0c247fff7fe0: 00 00 00 00 00 00 00 00 00 00 00 00 00 00 00 00
  0x0c247fff7ff0: 00 00 00 00 00 00 00 00 00 00 00 00 00 00 00 00
  0x0c247fff8000: fa fa fa fa fa fa fa fa 00 00 00 00 00 00 00 00
  0x0c247fff8010: 00 00 00 00 00 00 00 00 00 00 00 00 00 00 00 00
=>0x0c247fff8020: 00 00 00 00 00 00 00 00 00 00[07]fa fa fa fa fa
  0x0c247fff8030: fa fa fa fa fa fa fa fa fa fa fa fa fa fa fa fa
  0x0c247fff8040: fa fa fa fa fa fa fa fa fa fa fa fa fa fa fa fa
  0x0c247fff8050: fa fa fa fa fa fa fa fa fa fa fa fa fa fa fa fa
  0x0c247fff8060: fa fa fa fa fa fa fa fa fa fa fa fa fa fa fa fa
  0x0c247fff8070: fa fa fa fa fa fa fa fa fa fa fa fa fa fa fa fa
Shadow byte legend (one shadow byte represents 8 application bytes):
  Addressable:           00
  Partially addressable: 01 02 03 04 05 06 07
  Heap left redzone:       fa
  Freed heap region:       fd
  Stack left redzone:      f1
  Stack mid redzone:       f2
  Stack right redzone:     f3
  Stack after return:      f5
  Stack use after scope:   f8
  Global redzone:          f9
  Global init order:       f6
  Poisoned by user:        f7
  Container overflow:      fc
  Array cookie:            ac
  Intra object redzone:    bb
  ASan internal:           fe
  Left alloca redzone:     ca
  Right alloca redzone:    cb
  Shadow gap:              cc
==4425==ABORTING
-
heap-buffer-overflow가 발생했습니다.
-
취약점이 발생한 함수인
bootp_print함수를 찾을 수 있습니다. -
memcmp함수가 잘못된 메모리 접근을 하려고 하여 문제 발생했습니다.
Debugging
디버깅을 위해 tcpdump를 재빌드 하겠습니다.
cd $HOME/fuzzing_tcpdump/libpcap-1.8.0
./configure --enable-shared=no --prefix="$HOME/fuzzing_tcpdump/debug/"
make
make install
cd $HOME/fuzzing_tcpdump/tcpdump-4.9.2
CFLAGS="-fsanitize=address -g -O0 -fno-inline -fno-omit-frame-pointer" ./configure --prefix="$HOME/fuzzing_tcpdump/debug/"
make
make install-
-g -O0 -fno-inline -fno-omit-frame-pointer옵션을 주면 최적화를 해제하고 디버깅 정보를 바이너리에 포함시켜 빌드할 수 있습니다.
Eclipse Debugging Settings
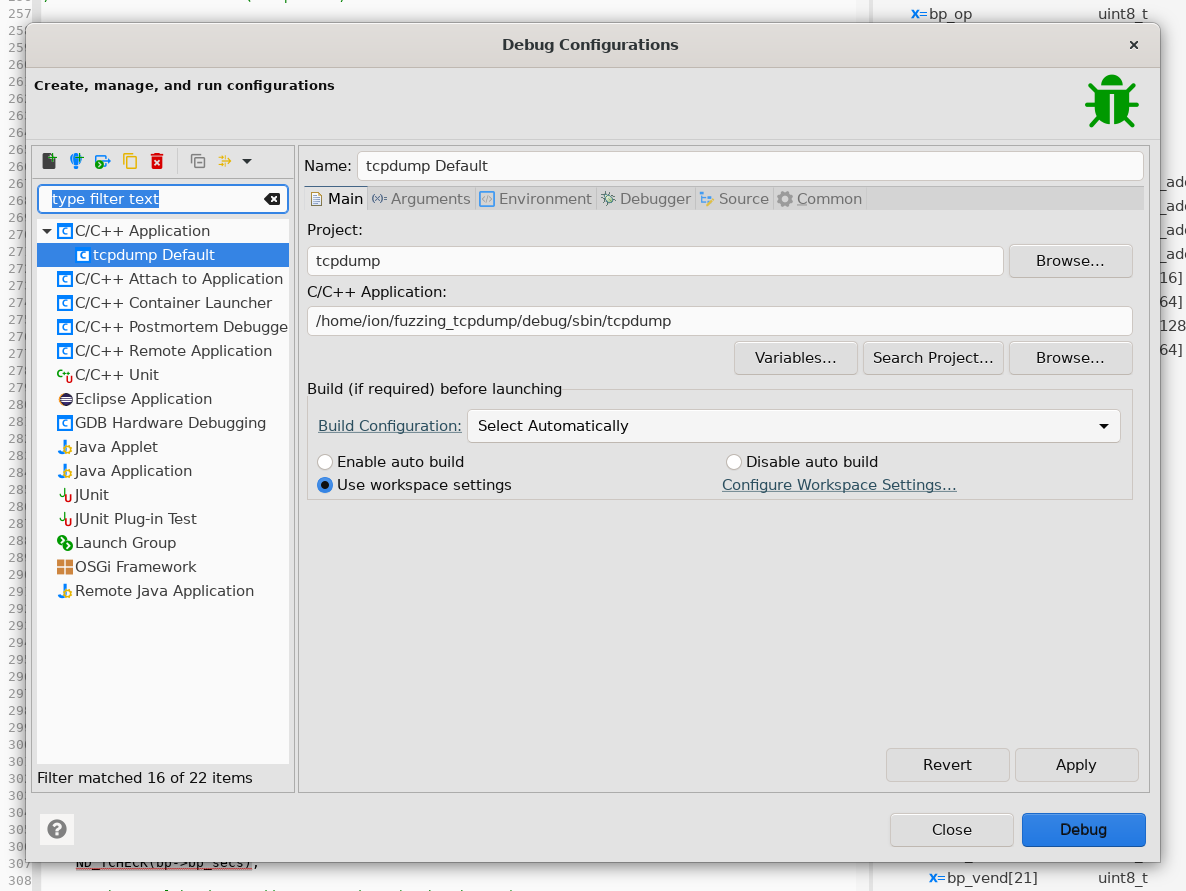
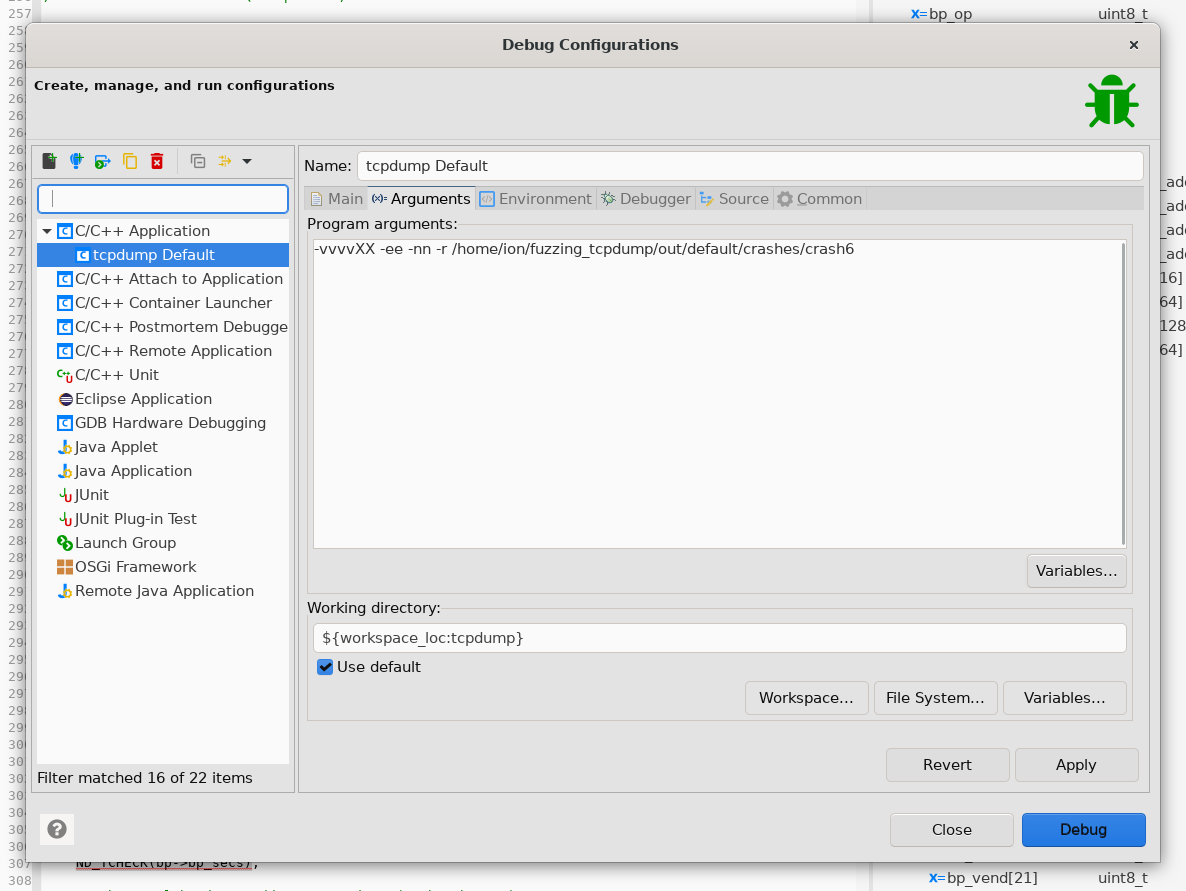
bootp_print
	/* Decode the vendor buffer */
	ND_TCHECK(bp->bp_vend[0]);
	if (memcmp((const char *)bp->bp_vend, vm_rfc1048,
		    sizeof(uint32_t)) == 0)
		rfc1048_print(ndo, bp->bp_vend);
	else if (memcmp((const char *)bp->bp_vend, vm_cmu,
			sizeof(uint32_t)) == 0)
		cmu_print(ndo, bp->bp_vend);
	else {
		uint32_t ul;

		ul = EXTRACT_32BITS(&bp->bp_vend);
		if (ul != 0)
			ND_PRINT((ndo, "\n\t  Vendor-#0x%x", ul));
}-
memcmp함수에서bp->bp_vend변수와vm_rfc1048변수 값을 비교할 때 Out-of-Bound Read 취약점이 발생합니다. -
NULL이 나올 때 까지 한 바이트씩 이동하며 문자 값을 비교하다가bp->bp_vend변수 값의 범위를 넘어선 접근을 한거 같습니다. -
좀 더 정확한 분석을 위해 구조체 값들을 확인해보겠습니다.
struct ndo
pwndbg> print *ndo
$5 = {
  ndo_bflag = 0,
  ndo_eflag = 2,
  ndo_fflag = 0,
  ndo_Kflag = 0,
  ndo_nflag = 2,
  ndo_Nflag = 0,
  ndo_qflag = 0,
  ndo_Sflag = 0,
  ndo_tflag = 0,
  ndo_uflag = 0,
  ndo_vflag = 4,
  ndo_xflag = 0,
  ndo_Xflag = 2,
  ndo_Aflag = 0,
  ndo_Hflag = 0,
  ndo_packet_number = 0,
  ndo_suppress_default_print = 2,
  ndo_tstamp_precision = 0,
  program_name = 0x7fffffffdb31 "tcpdump",
  ndo_espsecret = 0x0,
  ndo_sa_list_head = 0x0,
  ndo_sa_default = 0x0,
  ndo_sigsecret = 0x0,
  ndo_packettype = 0,
  ndo_snaplen = 262144,
  ndo_packetp = 0x0,
  ndo_snapend = 0x612000000157 "",
  ndo_if_printer = 0x5555555b57d0 <ether_if_print>,
  ndo_default_print = 0x5555555935f0 <ndo_default_print>,
  ndo_printf = 0x555555593860 <ndo_printf>,
  ndo_error = 0x555555593750 <ndo_error>,
  ndo_warning = 0x555555593610 <ndo_warning>
}
플래그 필드
- ndo_bflag: 0 - 버퍼링 관련 플래그로 보이며, 현재 비활성 상태입니다.
- ndo_eflag: 2 - 오류 또는 종료 상태를 나타내는 플래그일 수 있습니다.
- ndo_fflag: 0 - 파일 출력 관련 플래그로, 현재 비활성 상태입니다.
- ndo_Kflag: 0 - 커널 모드에서의 작업을 위한 플래그로 보입니다.
- ndo_nflag: 2 - 숫자 형식으로 출력할지 여부를 나타내며, 현재 활성화된 상태입니다.
- ndo_Nflag: 0 - 이름 해석을 하지 않도록 설정되어 있습니다.
- ndo_qflag: 0 - 조용한 모드로, 출력이 없음을 나타냅니다.
- ndo_Sflag: 0 - 요약 출력 관련 플래그로 비활성 상태입니다.
- ndo_tflag: 0 - 타임스탬프 출력을 제어하는 플래그로 비활성 상태입니다.
- ndo_uflag: 0 - 사용자 수준의 출력 관련 플래그로 비활성 상태입니다.
- ndo_vflag: 4 - 출력의 상세 수준을 나타내며, 높은 값일수록 더 많은 정보가 출력됩니다.
- ndo_xflag: 0 - 헥사 덤프 출력을 위한 플래그로 비활성 상태입니다.
- ndo_Xflag: 2 - 확장 헥사 덤프 출력을 위한 플래그로 활성화된 상태입니다.
기타 필드
- ndo_Aflag: 0 - ASCII 형식으로 출력할지 여부를 나타내며 비활성 상태입니다.
- ndo_Hflag: 0 - 사람이 읽기 쉬운 형식으로 출력할지 여부를 나타내며 비활성 상태입니다.
- ndo_packet_number: 0 - 처리된 패킷의 수를 추적하는 필드로 현재는 0입니다.
- ndo_suppress_default_print: 2 - 기본 출력 동작을 억제하는 설정으로, 특정 상황에서 기본 출력이 생략됩니다.
- ndo_tstamp_precision: 0 - 타임스탬프의 정밀도를 설정하는 필드로 현재는 기본값입니다.
포인터 및 함수 참조
- program_name: "tcpdump" 문자열을 가리키며, 사용 중인 프로그램 이름을 나타냅니다.
- ndo_if_printer: 이더넷 인터페이스 데이터를 출력하는 함수(
ether_if_print)를 가리킵니다. - ndo_default_print: 패킷 데이터의 기본 출력 함수(
ndo_default_print)를 가리킵니다. - ndo_printf, ndo_error, ndo_warning: 각각 형식화된 출력, 오류 메시지 및 경고 처리를 위한 함수 포인터입니다.
패킷 처리 관련
- ndo_snaplen:
262144로 설정되어 있으며, 패킷당 캡처되는 최대 바이트 수(스냅샷 길이)를 지정합니다. 이는 상당히 큰 값으로, 많은 양의 데이터를 캡처할 수 있음을 의미합니다. - ndo_packetp, ndo_snapend: 패킷 데이터 처리와 메모리 관리를 위한 포인터이며, 현재 패킷 데이터와 스냅샷 끝 위치를 가리킵니다.
➡️ ndo_snapend 는 패킷의 끝을 가리킵니다. 그래서 모든 패킷의 값들이 ndo_snapend 범위 안에 있어야 합니다.
struct bp
pwndbg> print *bp
$2 = {
  bp_op = 1 '\001',
  bp_htype = 1 '\001',
  bp_hlen = 0 '\000',
  bp_hops = 0 '\000',
  bp_xid = 0,
  bp_secs = 0,
  bp_flags = 8,
  bp_ciaddr = {
    s_addr = 2229814823
  },
  bp_yiaddr = {
    s_addr = 0
  },
  bp_siaddr = {
    s_addr = 0
  },
  bp_giaddr = {
    s_addr = 0
  },
  bp_chaddr = '\000' <repeats 15 times>,
  bp_sname = "\000\000\000\000\000\000\n\r\r\n4\000CAC\001\000\000\000\000\377\377\377\377\377\377\377\377\004\000\017\000E\000\000\000\000\334\005\000\000\t\000\001\000\006\000\000\000\000\000\000\000\037\370\000\000\006\000\000\000<\002",
  bp_file = "\000\000\000\000\000\024\000\000\000\000`\327\035\034\002\000\000\034\002\000\000\002\000\000\000E\377\002\030\000\000\000\000@\021\000\000\300\001\002-\300\001\002\027\001\364\001`\327\035\034\002\000\000\034\002\000\000\002\000\000\000E\377\b\000\000\000\000\000\000\001\374\"\200\000\364\002\000\000(\001\001\000\004\346\377\377\a\003\000\000\002.\347\377\a\002\000\000\002\000\000\000\bC\000\000", '\252' <repeats 19 times>,
  bp_vend = "\252", '\000' <repeats 62 times>
}- bp_op:
1 '\001'- DHCP 메시지의 유형을 나타냅니다.
1은 "부트 요청"을 의미합니다.
- DHCP 메시지의 유형을 나타냅니다.
- bp_htype:
1 '\001'- 하드웨어 타입을 나타냅니다.
1은 Ethernet을 의미합니다.
- 하드웨어 타입을 나타냅니다.
- bp_hlen:
0 '\000'- 하드웨어 주소의 길이를 나타냅니다. Ethernet의 경우 일반적으로 6바이트입니다. 여기서는 0으로 설정되어 있습니다.
- bp_hops:
0 '\000'- 중계된 DHCP 요청의 수를 나타냅니다. 기본값은 0입니다.
- bp_xid:
0- 트랜잭션 ID로, 클라이언트와 서버 간의 요청과 응답을 매칭하는 데 사용됩니다. 현재는 0으로 설정되어 있습니다.
- bp_secs:
0- 클라이언트가 부팅을 시작한 후 경과된 시간을 초 단위로 나타냅니다. 현재는 0입니다.
- bp_flags:
8- 플래그 필드로, 특정 옵션을 설정하는 데 사용됩니다. 예를 들어, 브로드캐스트 플래그를 나타낼 수 있습니다.
- bp_ciaddr:
s_addr = 2229814823- 클라이언트 IP 주소입니다. 이 값은 네트워크 바이트 오더로 표현되며, 이를 변환하면 실제 IP 주소를 확인할 수 있습니다.
- bp_yiaddr:
s_addr = 0- 서버가 클라이언트에게 할당한 IP 주소입니다. 현재는 할당된 IP가 없음을 나타냅니다.
- bp_siaddr:
s_addr = 0- 서버 IP 주소입니다. 현재는 설정되어 있지 않습니다.
- bp_giaddr:
s_addr = 0- 게이트웨이 IP 주소입니다. 현재는 설정되어 있지 않습니다.
- bp_chaddr:
'\000' <repeats 15 times>- 클라이언트 하드웨어 주소(예: MAC 주소)를 저장하는 필드입니다. 현재 값이 모두 0으로 설정되어 있습니다.
- bp_sname:
- 여러 바이트로 구성된 문자열로, 서버 이름을 포함합니다. 이 필드는 DHCP 서버가 클라이언트에게 제공하는 이름 또는 호스트명을 포함할 수 있습니다.
- bp_file:
- 여러 바이트로 구성된 문자열로, 클라이언트가 부팅할 때 사용할 파일 이름을 포함합니다. 이 필드는 일반적으로 PXE 부팅과 관련이 있습니다.
- bp_vend:
- 벤더 전용 옵션을 포함하는 필드입니다. 여기서는 특정 벤더에 대한 데이터가 포함될 수 있습니다.
➡️ Out-of-Bound Read가 발생하는 bp_vend 의 모든 원소가 ndo->snapend 범위 안에 있는지 확인해보면 될거 같습니다.
Check bp→bp_vend Address
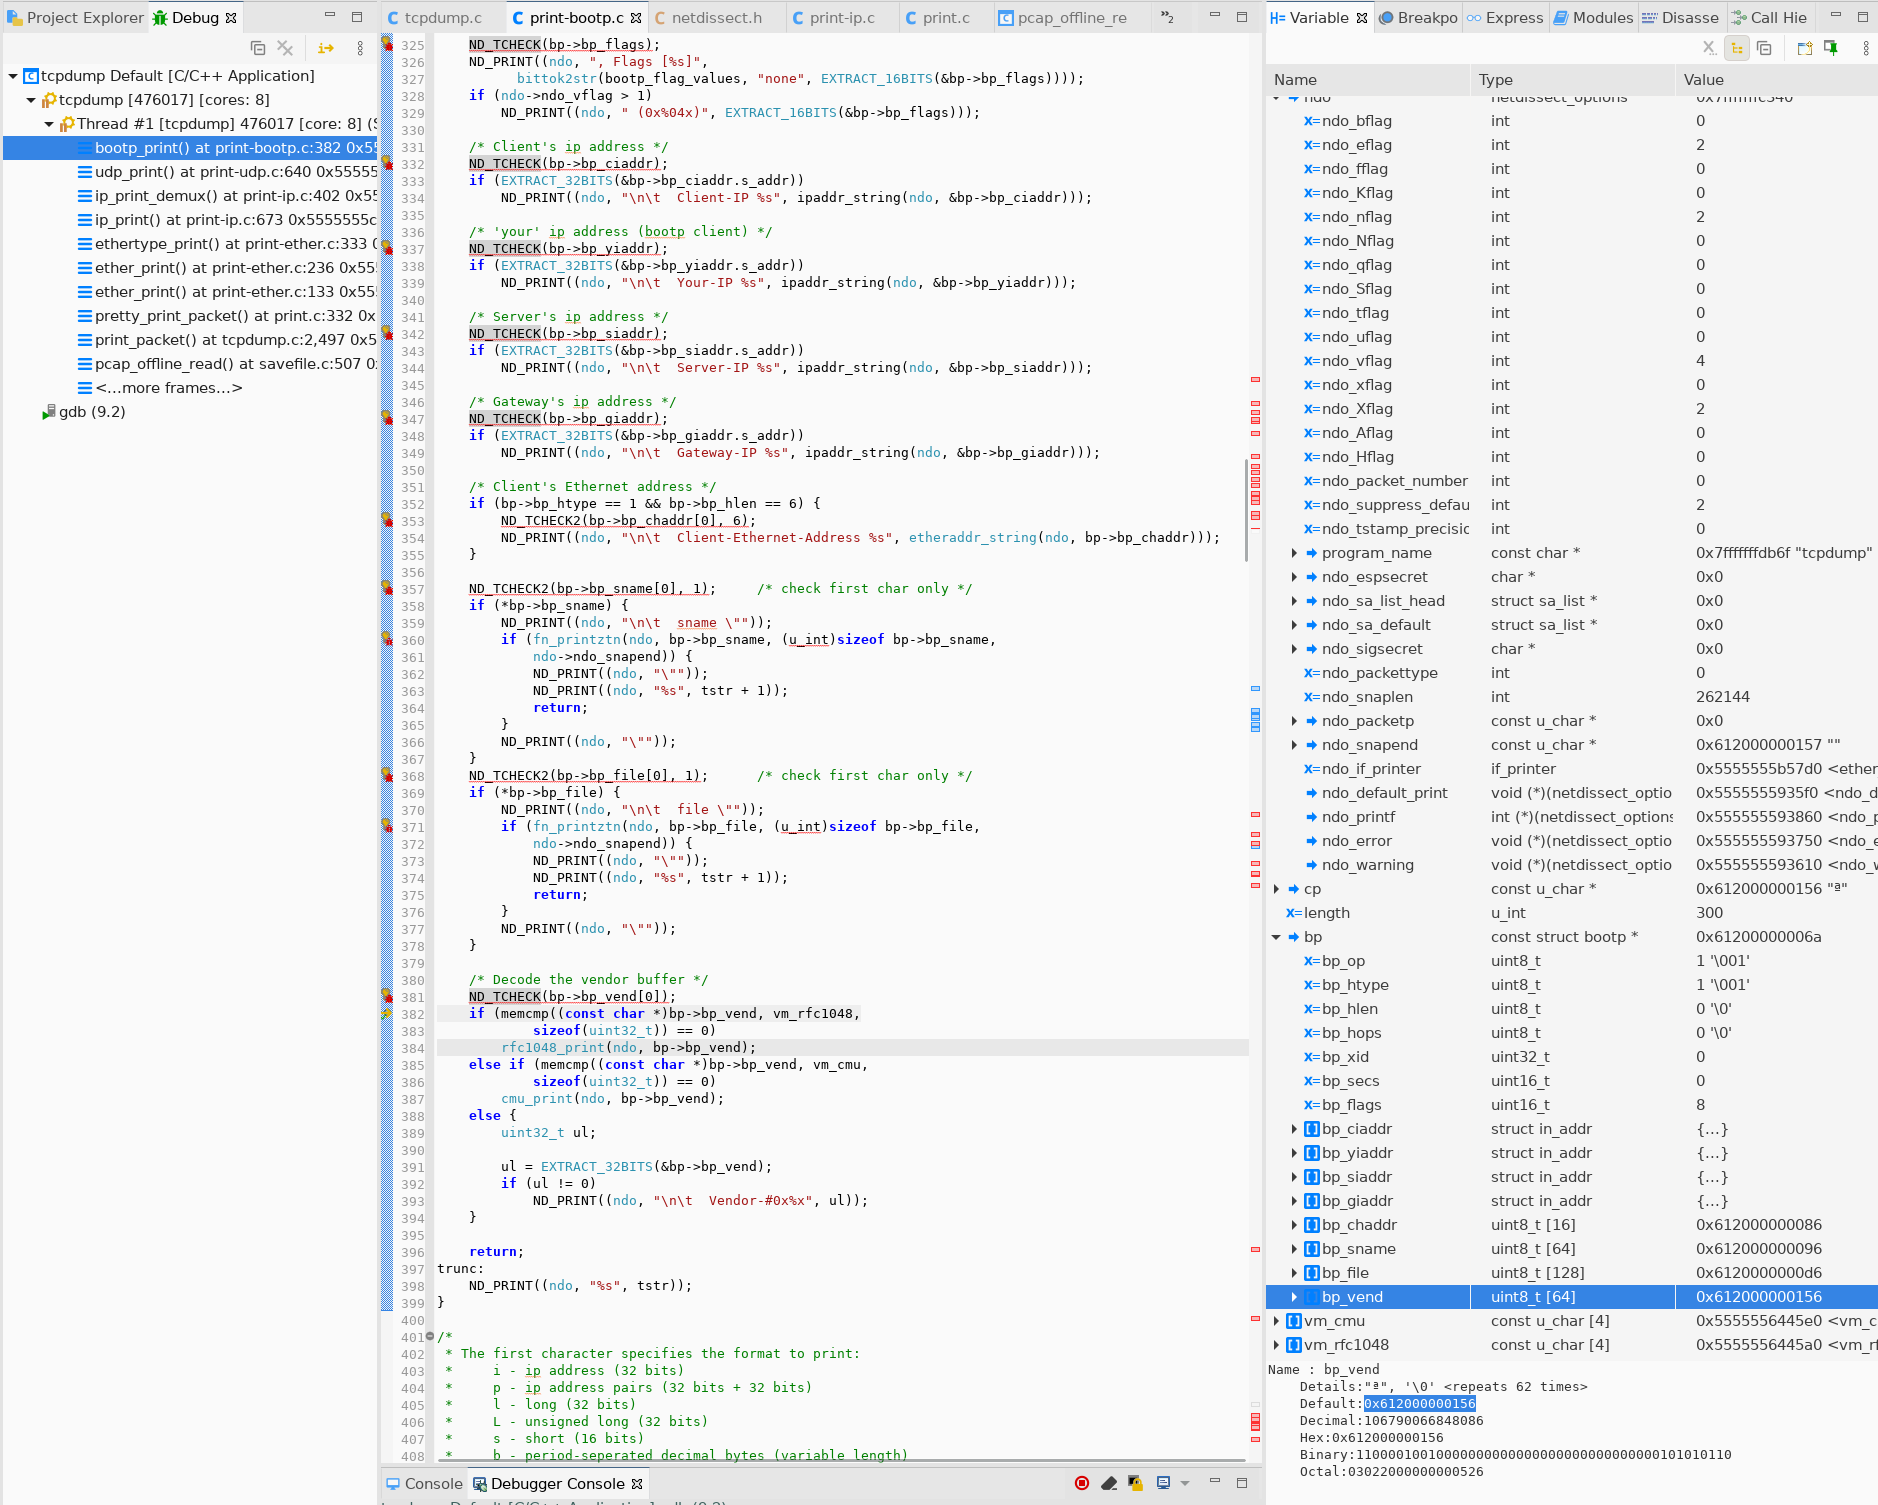
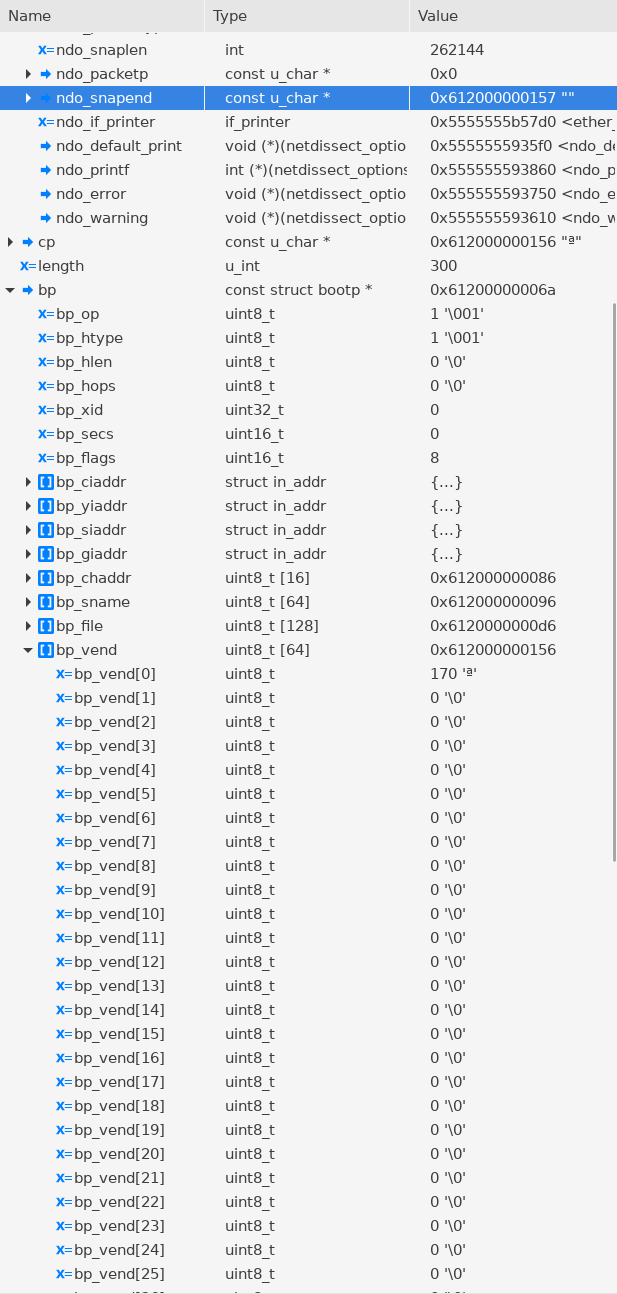
bp_vend의 첫번째 원소 주소가0x612000000156입니다.- 세 번째 원소부터는
ndo->snapend주소의 범위를 벗어납니다. - 여기서 Out-of-Bound Read가 발생했습니다.
➡️ 그럼 왜 ndo->snapend 에 패킷의 끝이 아닌 값이 저장되었을까요?
➡️ ndo->snapend 값이 결정되는 부분을 봐봐야 할거 같습니다.
pretty_print_packet

snapend값을 할당하는 부분을 찾아보면 콜 스택에 존재하는 pretty_print_packet 함수에서ndo_snapend변수에 값을 할당하는 부분을 찾을 수 있습니다.
이 부분에 break point를 걸고 다시 디버깅을 해보겠습니다.
pwndbg> break * pretty_print_packet
Breakpoint 5 at 0x555555593a80: file ./print.c, line 316. ndo->ndo_snapend = sp + h->caplen;sp: 현재 처리 중인 패킷의 시작 주소h->caplen: 캡쳐된 패킷 데이터의 길이
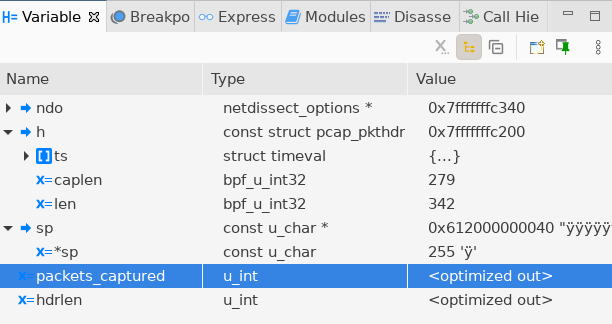
sp:0x612000000040h->caplen: 279
reading from file /home/ion/fuzzing_tcpdump/out/default/crashes/crash6, link-type EN10MB (Ethernet)
15:05:15.631413 08:00:27:46:e8:84 > ff:ff:ff:ff:ff:ff, ethertype IPv4 (0x0800), length 342: (tos 0x10, ttl 128, id 0, offset 0, flags [none], proto UDP (17), length 328, bad cksum 39b9 (->3996)!)
0.0.0.0.68 > 255.255.255.255.67: BOOTP/DHCP, Request, length 300, hlen 0, Flags [none] (0x0800)-
콘솔을 확인해보면 패킷의 길이가 출력이 되는데, 캡쳐된 패킷의 길이는 342입니다.
-
그래서
h->caplen도 342가 되어야ndo_snapend가 패킷의 끝을 가리킬 수 있게 되는데, 여기서는 279로 패킷의 길이보다 더 작은 값이 들어가서 문제가 발생했습니다.
Patch
에러를 해결하려면 bootp 패킷 마지막에 오는 vp_vend의 값을 검증할 때 첫 번째 원소만 하는게 아니라 마지막 원소까지 검증을 해야합니다.
기존 코드
ND_TCHECK(bp->bp_vend[0]);#define IS_NOT_NEGATIVE(x) (((x) > 0) || ((x) == 0))
#define ND_TTEST2(var, l) \
(IS_NOT_NEGATIVE(l) && \
((uintptr_t)ndo->ndo_snapend - (l) <= (uintptr_t)ndo->ndo_snapend && \
(uintptr_t)&(var) <= (uintptr_t)ndo->ndo_snapend - (l)))
/* True if "var" was captured */
#define ND_TTEST(var) ND_TTEST2(var, sizeof(var))
/* Bail if "l" bytes of "var" were not captured */
#define ND_TCHECK2(var, l) if (!ND_TTEST2(var, l)) goto trunc
/* Bail if "var" was not captured */
#define ND_TCHECK(var) ND_TCHECK2(var, sizeof(var))-
bp_vend첫 번째 원소가 유효한 주소 범위에 있는지ndo->ndo_snapend변수를 이용해서 검증합니다.
패치 후 코드
	/* Decode the vendor buffer */
	ND_TCHECK(bp->bp_vend[0]);
	ND_TCHECK(bp->bp_vend[3]);

	if (memcmp((const char *)bp->bp_vend, vm_rfc1048,
		    sizeof(uint32_t)) == 0)
		rfc1048_print(ndo, bp->bp_vend);
	else if (memcmp((const char *)bp->bp_vend, vm_cmu,
			sizeof(uint32_t)) == 0)
		cmu_print(ndo, bp->bp_vend);
	else {
		uint32_t ul;

		ul = EXTRACT_32BITS(&bp->bp_vend);
		if (ul != 0)
			ND_PRINT((ndo, "\n\t  Vendor-#0x%x", ul));
}vm_rfc1048이 4바이트 이기 때문에bp->bp_vend[3]도 유효한 범위에 있는지 체크를 하겠습니다.