.png)
Object
JS값 비교 방법
is()
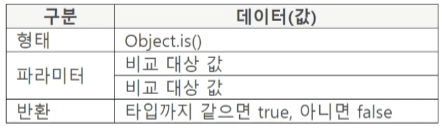
두 개의 파라미터 값과 값 타입을 비교하여 같으면 true 아니면 false 반환
- 오브젝트 비교 목적이 아님
- [ ]와 [ ]비교, { }와 { } 비교는 false
⇒ one이 참조하는 메모리 주소와 two가 참조하는 메모리 주소는 다르다.const result = Object.is(10, "10"); console.log(result); const one = {}, two = {} console.log(Object.is(one, two)); // false // false
- [ ]와 [ ]비교, { }와 { } 비교는 false
JS값 비교 방법
-
값과 타입까지 모두 비교하는 경우: ===
-
타입은 비교하지 않고 값만 비교: ==
console.log((undefined == null)); console.log((undefined === null)); console.log(Object.is(undefined, null)); // true // false // false -
Object.is()와 === 비교 차이
console.log((NaN === NaN)); // false console.log(Object.is(NaN, NaN)); // true console.log((NaN === 0/0)); // false console.log(Object.is(NaN, 0/0)); // true console.log((0 === -0)); // true console.log(Object.is(0, -0)); // false- NaN 비교
- +0과 -0비교
-
활용한 형태
function check(data){
	if(Object.is(typeof data, "object")){
		console.log(data);
	} else {
		console.log("object 타입이 아님");
	}
};
check({value:10});
check(200);
// {value: 10}
// object 타입이 아님
⇒ Object.is(typeof data, "object")에서 typeof data 결과로 비교합니다.
오브젝트 복사
assign()

두 번째 파라미터의 오브젝트 프로퍼티를 첫 번째 파라미터의 오브젝트에 복사 후 첫 번째를 반환합니다. own property만 복사합니다
const sports = {
	event: "축구",
	player: 11
};
let dup = {};
Object.assign(dup, sports);
console.log(dup);
// {event: 축구, player: 11}
-
첫 번째 파라미터 작성
-
첫 번째 파라미터는 필수 파라미터(essential)
-
Number, String, Symbol, Boolean값 작성
try {
  const obj = Object.assign(null, {});
} catch(e) {
  console.log("null 작성 불가");
};
// null 작성 불가
const obj = Object.assign(100); console.log(obj.valueOf()); // 100⇒ 첫 번째 파라미터를 작성하지 않거나 null, undefined를 작성하면 TypeError
⇒ 첫 번째 파라미터에 Number를 작성하면 Number 인스턴스를 생성 후 파라미터 값 100을 [[PrimitiveValue]]에 설정 하여 인스턴스를 반환합니다. Boolean, String, Symbol도 동일합니다.
-
-
두 번째 파라미터 작성
-
두 번째 파라미터는 필수는 아닙니다(Optional)
-
열거 가능 오브젝트 작성 (1)
-
오브젝트 다수 작성 (2)
-
값을 작성(3)
-
값과 오브젝트를 작성(4)
/*(1)*/
let obj = {};
Object.assign(obj, {ten: 10});
console.log(obj);
const one = Object.create({}, {
  book: {value:100, enumerable: false},
  sports: {value:200, enumerable: true}
});
Object.assign(obj, one);
console.log(obj);
// {ten: 10}
// {ten: 10, sports: 200}
/*(2)*/ const book = {title: "책"}; const sports = {item: "축구"}; const obj = Object.assign({}, book, sports); console.log(obj); // {title:책, item:축구}/*(3)*/ let obj = {ten: 10}; Object.assign(obj, undefined, null, 200); console.log(obj); const one = {un: undefined, nu:null} Object.assign(obj, one); console.log(obj); // {ten: 10} // {ten:10, un:undefined, nu:null}/*(4)*/ const obj = Object.assign(100, {book: 200}); console.log(obj.valueOf()); console.log(obj.book); // 100 // 200(3) ⇒ 열거 가능한 오브젝트가 아닌 단순한 값이면 복사되지 않습니다.
(4) ⇒ 100은 Number 인스턴스를 생성 후 두 번째 파라미터의 Object를 Number 인스턴스에 복사합니다. 데이터 타입이 맞지 않지만, 오브젝트이므로 복사가 됩니다(정상적인 모습 X)
-
deep copy
-
Object를 할당하면 프로퍼티 값이 연동됩니다.
const sports = {
  item: "축구"
};
let copy = sports;
sports.item = "농구";
console.log(copy.item);
// 농구
⇒ 한 쪽 오브젝트의 프로퍼티 값을 바꾸면 다른 오브젝트의 프로퍼티 값도 바뀝니다.
-
assign()함수로 복사
const sports = {
  item: "축구"
};
let copy = {};
Object.assign(copy, sports);
sports.item = "농구";
console.log(copy.item);
// 축구
⇒ 간단한 형태는 연동되지 않습니다.
-
assign()을 써도 연동되는 경우
const book= {
  item: {title: "자바스크립트"}
};
let copy = {};
Object.assign(copy, book);
copy.item.title = "책";
console.log(book.item.title);
// 책
⇒ Object안에 Object가 있는 형태에서는 item.title값이 연동됩니다.
⇒ 프로퍼티를 복사하는 것이 아닌 Object 참조를 복사하기 때문입니다.
-
프로퍼티 단위로 복사하여 연동되지 않도록 합니다.
const book= {
	item: {title: "자바스크립트"}
};
let copy = {};
for(let key in book) {
  let value = book[key];
  copy[key] = {};
  for(let name in value){
    copy[key][name] = value[name];
  };
};
copy.item.title = "책";
console.log(book.item.title);
// 자바스크립트
⇒ 연동은 되지 않지만 단계의 깊이가 유동적이면 코드가 복잡해집니다.
⇒ 다단계 계층 구조에서 값이 연동되지 않도록 복사하는 것을 Deep copy라고 부릅니다.
-
JSON함수를 이용한 deep copy
const book = {
  item: {title: "자바스크립트"}
};
const copy = JSON.parse(JSON.stringify(book));
book.item.title = "책";
console.log(copy.item.title);
// 자바스크립트
⇒ JSON.stringify()로 문자열 변환 후 JSON.parse()로 파싱하면 연동되지 않습니다.
Object 변환
entries()

-
열거 가능한 오브젝트의 {key: value}를 [[key, value]]형태로 변환합니다.
const obj = {music: "음악", book:"책"}; const list = Object.entries(obj); for(let keyValue of list) { console.log(keyValue); }; // [music, 음악] // [book, 책] -
작성한 순서가 바뀌는 경우
const obj = {10: "십", book:"책", 7:"칠"};
const list = Object.entries(obj);
for (let keyValue of list) {
  console.log(keyValue);
};
// [7, 칠]
// [10, 십]
// [book, 책]
⇒ key값이 숫자와 문자가 섞여있으면 숫자, 문자 순서로 분류
-
문자열은 문자 하나씩 분리
const list = Object.entries("ABC");
for(let keyValue of list) {
  console.log(keyValue);
};
// [0, A]
// [1, B]
// [2, C]
⇒ 문자열은 문자 하나씩 분리하며 인덱스를 key 값으로 사용
values()

-
열거 가능한 오브젝트의 {key: value}를 값만 [value1, value2]형태로 변환합니다.
const obj = {music: "음악", book: "책"}; const list = Object.values(obj); for (let value of list) { console.log(value); }; -
작성한 순서가 바뀌는 경우
const obj = {10: "십", book:"책", 7:"칠"}; const list = Object.values(obj); for (let keyValue of list) { console.log(keyValue); }; // 칠 // 십 // 책 -
문자열은 문자 하나씩 분리
const list = Object.values("ABC");
for(let keyValue of list) {
  console.log(keyValue);
};
// A
// B
// C
fromEntries()

-
[[key, value]]형태를 {key: value}형태로 변환하는 함수
const list = [["one", 10], ["two", 20]]; const obj = Object.fromEntries(list); console.log(obj); // {one: 10, two: 20} -
프로퍼티 키 값이 같을 경우 값을 대체합니다
const list2 = [["one", 10], ["one", 20]];
const obj2 = Object.fromEntries(list2);
console.log(obj2);
// {one:20}
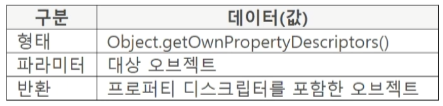
getOwnPropertyDescriptors()
Object의 프로퍼티 디스크립터를 반환합니다
상속받은 오브젝트는 반환하지 않습니다
-
데이터 디스크립터
const obj = {music: "음악"}; const des= Object.getOwnPropertyDescriptors(obj); for(let name in des.music) { console.log(name + ": "+ des.music[name]); }; // value: 음악 // writable: true // enumerable: true // configurable: true -
엑세스 디스크립터
const obj2 = {
  get music(){}
};
const des2 = Object.getOwnPropertyDescriptors(obj2);
for(let name in des2.music) {
  console.log(name + ": "+ des2.music[name]);
};
// get: get music(){}
// set: undefined
// enumerable: true
// configurable: true
메소드 호출 방법(prototype과 proto)
메소드 호출 방법
prototype과 __proto__에 연결된 메소드를 호출하는 방법이 다릅니다.
- prototype에 연결된 메소드 호출
- Array.prototype.slice()처럼 prototype을 작성하여 호출
- __propto__에 연결된 메소드 호출
- 인스턴스를 생성하여 호출
function Book() {
  this.point = 100;
};
Book.prototype.getPoint = function() {
  console.log(Object.is(this, Book.prototype));
  return this.point;
};
console.log(Book.prototype.getPoint());
console.log(Book.prototype.getPoint.call(Book));
// true
// undefined
// false
// undefined
- Book.prototype.getPoint()으로 prototype을 작성하여 호출하면 getPoint()에서 this가 Book.prototype을 참조합니다.
- Book.prototype.getPoint.call(Book)에서는 this로 Book을 참조합니다.
- 둘 다 this.point를 참조할 수없는데 참조하기 위해서는 Book의 인스턴스를 생성 후 인스턴스의 메소드를 호출해야 합니다.
- new 연산자로 생성한 인스턴스 구조
function Book() {
  this.point = 100;
};
Book.prototype.getPoint = function() {
  return this.point;
};
const obj = new Book();
console.log(obj.getPoint());
- const obj = new Book();
- obj의 Scope를 보면 point에 100이 할당되어 있으며 인스턴스 프로퍼티입니다. 이는 생성자 함수(Book(){...})에서 this.point = 100으로 설정한 것입니다.
- __proto__를 보면 prototype에 연결된 메소드가 표시되는데 여기서 getPoint는 Book.prototype.getPoint를 참조합니다.
- 여기서 주의할 점은 Book.prototype.getPoint를 참조하는 것이지 복사하여 __proto__에 설정하는 것이 아닙니다.
- console.log(obj.getPoint());
- 생성한 인스턴스의 이름을 사용하여 getPoint()를 호출하면 호출된 메소드에서 this로 해당 인스턴스를 참조합니다.
- 위 코드에서는 obj인스턴스를 참조하는데 obj는 생성자를 통해 생성할 때 this.point = 100을 할당해줬기 때문에 getPoint() 메소드 내에서 this.point를 참조할 수 있습니다.
인스턴스에 함수로 추가
함수로 추가
new 연산자로 인스턴스를 생성한 뒤 인스턴스의 프로퍼티로 함수를 추가합니다.
이렇게 인스턴스에 프로퍼티로 함수를 설정할 경우 다른 인스턴스에서는 해당 함수를 쓸 수 없습니다.
각각의 인스턴스는 생성자를 통해 인스턴스를 생성할 때 prototype에 연결된 메소드들의 참조를 __proto__에 담아 인스턴스에 설정하지만, 인스턴스에서 프로퍼티로 함수를 추가하는 것은 해당 인스턴스에 한정되기 때문입니다.
function Book() {
  this.point = 100;
};
Book.prototype.getPoint = function() {
  return this.point;
};
const obj = new Book();
// 인스턴스에 프로퍼티(함수)를 추가합니다.
obj.setPoint = function(param) {
  this.point = param;
};
obj.setPoint(200);
console.log(obj.getPoint());
const newObj = new Book();
console.log(newObj.setPoint);
// 200
// undefined
- obj.setPoint = function(param){...}
⇒ 인스턴스에 setPoint 프로퍼티를 설정해서 point값을 설정하는 로직을 추가합니다. - obj.setPoint(200);
⇒위에서 설정한 setPoint 함수를 호출해 파라미터(200)을 넘겨주면서 point의 값을 200으로 설정합니다. - console.log(newObj.setPoint);
⇒ 새로 생성한 Book()의 인스턴스인 newObj에서 setPoint 프로퍼티를 호출하지만 해당 프로퍼티는 obj인스턴스에서 개별로 추가한 함수이기 때문에 newObj에는 설정되지 않고 undefined가 출력됩니다.
__proto__에 메소드 추가
메소드 추가
__proto__에 function을 추가하면 prototype에 설정이 되며 메소드로 추가하는것과 같습니다.
여기까지만 보면 위에서 한 함수로 추가하는것과 동일해보이지만 가장 큰 차이점은 메소드의 '공유'에 있습니다.
인스턴스에 추가한 함수는 해당 인스턴스에서만 사용가능하지만, __proto__에 추가한 메소드는 공유되어 해당 객체의 인스턴스는 모두 사용할 수 있습니다. 심지어 메소드를 추가하기전에 생성된 인스턴스에서도 이는 적용됩니다.
function Book() {
  this.point = 100;
};
Book.prototype.getPoint = function() {
  return this.point;
};
const obj = new Book();
const beforeObj = new Book();
console.log(beforeObj.setPoint);
obj.__proto__.setPoint = function(param){
	this.point = param;
};
beforeObj.setPoint(700);
console.log(beforeObj.getPoint());
// undefined
// 700
- console.log(beforeObj.setPoint)
⇒ 아직 메소드를 추가하기 전 beforeObj에는 setPoint 프로퍼티(함수)가 설정되어 있지 않기에 undefined가 출력됩니다. - obj.__proto__.setPoint = function(param){...}
⇒ 함수 추가와는 다르게 __proto__에 setPoint property를 등록합니다. 이렇게 메소드를 추가하게되면 Book() 객체의 prototype을 참조하는 인스턴스들 모두에 공유됩니다. - beforeObj.setPoint(700);
⇒ obj인스턴스의 __proto__에 setPoint 프로퍼티를 추가 했는데 beforeObj에서 setPoint()를 호출해도 정상동작하는 것을 확인할 수 있습니다. 이를 통해 추가한 메소드가 공유되는 것을 확인할 수 있습니다.
setPrototypeOf(): 인스턴스 사용
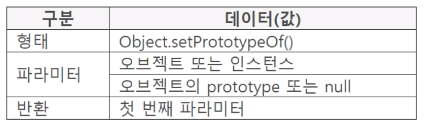
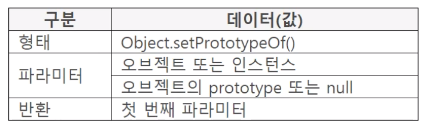
지정된 객체의 프로토타입 (즉, 내부 [[Prototype]] 프로퍼티)을 다른 객체 또는 null 로 설정합니다.
첫 번째 파라미터 인스턴스의 __proto__에 두 번째 파라미터의 prototype에 연결된 프로퍼티를 설정합니다.
ES5에 getPrototypeOf()가 있습니다.
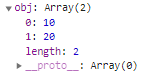
let obj = {0: 10, 1: 20, length: 2};
Object.setPrototypeOf(obj, Array.prototype);
const callback = (element, index, all) => console.log(element);
obj.forEach(callback);
const check = Object.prototype;
// 10
// 20
- let obj = {0: 10, 1: 20, length: 2};
⇒ obj는 Array-Like 오브젝트이며 인스턴스입니다. 빌트인 오브젝트에 의해 인스턴스가 생성되기 때문입니다. 그렇기에 prototype이 없습니다. prototype을 참조하는 __proto__가 있기에 setPrototypeOf는 인스턴스의 __proto__에 설정하는 것과 동일하다 할 수 있습니다.
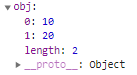
- Object.setPrototypeOf(obj, Array.prototype);
⇒ obj의 __proto__에 Array.prototype에 연결된 메소드를 설정합니다. Scope를 살펴보면 Object.prototype에 연결된 메소드가 없어지고 Array.prototype에 연결된 메소드가 표시됩니다.
- obj.forEach(callback);
⇒ 기존 Object.prototype에는 없는 메소드인 forEach를 사용할 수 있게 되었습니다. - const check = Object.prototype;
⇒ Object.prototype을 꺼내 확인해보면 prototype이 변경되지 않은 것을 볼 수 있습니다.
setPropertyOf() 메소드를 통해 프로퍼티를 변경한다면 그 변경은 해당 인스턴스로 한정됩니다. 그렇기에 원본의 prototype을 확인해도 변경되지 않았고, 다른 인스턴스에서도 변경되지 않습니다.
setPrototypeOf(): prototype 사용
setPrototypeOf()를 사용할 때 prototype이 대체됨으로써 기존에 쓰던 메소드를 못쓰는 상황이 생깁니다.
Object.prototype을 가지고 있지만 Array.prototype의 프로퍼티들도 사용하고 싶은 경우, 하나하나 따로 연결을 해주는 건 좋은 방법은 아닙니다.
첫 번째 파라미터에 prototype을 작성하고, 두 번째 파라미터의 prototype에 연결된 프로퍼티를 설정합니다.
JS에서 프로퍼티 식별자 해결(Identity Resolution)을 할 때 엔진은 식별자를 찾기위해 __proto__순서로 검색합니다.
예를 들어 A라는 인스턴스에서 getXXX()라는 프로퍼티를 식별자 해결하기 위해 메소드를 선언하면, 프로퍼티를 검색합니다. 이 후 __proto__내부를 순회한 뒤 없을경우 __proto__.__proto__...순으로 검색합니다.
여기서 착안해 setPrototypeOf()가 메소드를 대체함으로써 기존의 메소드를 사용 못하게 된다면, __proto__안에 새로운 __proto__를 만들어 설정하면 기존 메소드들이 없어지지 않고 새로운 메소드들을 정상적으로 설정할 수 있습니다.
const Point = function() {
  this.point = 100;
}
Point.prototype.getPoint = function() {
  return this.point;
}
const Book = function() {}
Book.prototype.setPoint = function(point){this.point = point}
Object.setPrototypeOf(Point.prototype, Book.prototype);
const obj = new Point();
obj.setPoint(300);
console.log(obj.getPoint());
// 300
- Object.setPrototypeOf(Point.prototype, Book.prototype);
⇒ Book에 연결된 메소드들을 Point.prototype.__proto__에 설정합니다. 이로써 Point의 prototype도 없어지지않고 Book의 prototype들도 사용할 수 있게 됩니다.
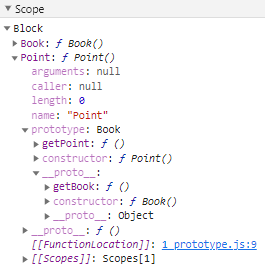
- const obj = new Point();
⇒ Point의 인스턴스를 생성합니다. - obj.setPoint(300);
⇒ setPoint 식별자 해결을 위해 엔진에서 식별자를 찾기 시작하면 obj.__proto__.__proto__.setPoint()를 찾을 수 있습니다. - console.log(obj.getPoint());
⇒ 기존의 point는 100으로 설정되었지만 setPoint를 통해 300으로 설정되어 300이 출력됩니다.
정리
기존의 setPrototypeOf()는 프로토타입을 대체하는 함수였습니다. 하지만 위 코드처럼 __proto__를 이용해 계층적 구조를 구현함으로써 prototype을 확장할 수 있습니다. 1단계 2단계 구조를 만드는 것이죠. 상속과 비슷한 개념으로 생각할 수도 있습니다.
하지만, prototype의 확장에는 생성자 함수의 처리가 없습니다. 그렇기 때문에 생성자 처리가 필요할 때는 super등의 상속 처리 키워드를 제공하는 Class를 사용하는게 좋습니다.