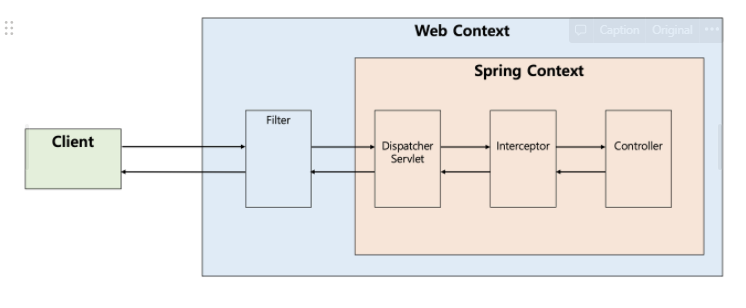
이번에는 이 포스트에서 다룬 Filter이 외에 Spring에서 제공하는 Interceptor를 알아봅니다.
그림에서도 설명이 되어있듯 Interceptor는 Spring에서 지원하기에 Spring에서 제공하는 틀안에서 작업하는게 가능합니다. 직접적으로 Controller의 전 후 처리를 담당할 수 있어서 Filter랑 비슷하지만 좀더 세세하게 ? 처리가 가능해지는 거죠...
HandlerInterceptor 등록
HandlerInterceptor를 사용하여 class 파일을 만듭니다.
- preHandle :
Controller진입전에 처리하는 매서드입니다. - postHandle :
Controller진입후에 처리하는 매서드입니다. - afterCompletion :
Controller진입후,modelAndView까지 처리되고 맨 마지막에 실행도는 매서드입니다.finally{}같은 느낌?
afterCompletion의 예외ex는preHandle나postHandle에서 넘어오는 오류들을 넘겨 받기도 합니다.
preHandle나postHandle에서 에러가나면 화면(view)에 뿌리게 되는거죠.
당연하겠지만,preHandle에서 에러가나면postHandle는 실행이 안되겠죠? 그냥 바로afterCompletion로ex를 넘깁니다.
@Slf4j
public class LoginInterceptor implements HandlerInterceptor {

    public static final String LOG_ID = "logId";
    @Override
    public boolean preHandle(HttpServletRequest request, HttpServletResponse response, Object handler) throws Exception {
        String requestURL = request.getRequestURI();
        String uuid = UUID.randomUUID().toString();
        request.setAttribute(LOG_ID, uuid);

        //@RequestMapping: HandlerMethod
        //정적 리소스: ResourceHttpRequestHandler
        //를 캐스팅해주시면 됩니다.
        if (handler instanceof HandlerMethod) {
            HandlerMethod handlerMethod = (HandlerMethod) handler;
        }

        log.info("preHandle [{}][{}][{}]", uuid, requestURL, handler);
        return true;
    }

    @Override
    public void postHandle(HttpServletRequest request, HttpServletResponse response, Object handler, ModelAndView modelAndView) throws Exception {
        log.info("postHandle [{}]", modelAndView);
    }

    @Override
    public void afterCompletion(HttpServletRequest request, HttpServletResponse response, Object handler, Exception ex) throws Exception {
        String requestURL = request.getRequestURI();
        String logId = (String) request.getAttribute(LOG_ID);
        log.info("afterCompletion [{}][{}]", logId, requestURL);
        if (ex != null) {
            log.error("afterCompletion error!!", ex);
        }
    }
}
Bean으로 등록
context.xml 방식
<beans xmlns="http://www.springframework.org/schema/beans"
       xmlns:xsi="http://www.w3.org/2001/XMLSchema-instance"
       xmlns:p="http://www.springframework.org/schema/p"
       xmlns:context="http://www.springframework.org/schema/context"
       xmlns:mvc="http://www.springframework.org/schema/mvc"
       xsi:schemaLocation="http://www.springframework.org/schema/beans
                           http://www.springframework.org/schema/beans/spring-beans.xsd
                           http://www.springframework.org/schema/context
                           http://www.springframework.org/schema/context/spring-context.xsd
                           http://www.springframework.org/schema/mvc
                           http://www.springframework.org/schema/mvc/spring-mvc.xsd">

	<mvc:interceptors>
		<mvc:interceptor>
			<mvc:mapping path="/**" />
            <mvc:exclude-mapping path="/css/**"/>
            <mvc:exclude-mapping path="/*.ico"/>
            <mvc:exclude-mapping path="/error"/>
			<bean id="loginInterceptor" class="com.web.LoginInterceptor" />
		</mvc:interceptor>
	 <!--여기에 interceptor 추가-->
     <!--order(순서)는 작성한순으로 작동합니다.-->
	</mvc:interceptors>

</bean>
Java Config 방식
@Configuration
public class WebConfig implements WebMvcConfigurer {
	//WebMvcConfigurer의 추상 매서드를 구현하여 사용하면 됩니다.
    @Override
    public void addInterceptors(InterceptorRegistry registry) {
        registry.addInterceptor(new LoginInterceptor())
                .order(1)
                .addPathPatterns("/**")
                .excludePathPatterns("/css/**", "/*.ico", "/error");
		//registry.addInterceptor(new 새로운거 추가())
    }

}
결론
해당 예제는 간단하게 interceptor를 작업했지만, 해당 기능을 통해서 PathPatterns의 URL에 따라 request.getSession() 상태를 확인해가며 현재 로그인 상태를 확인가능합니다. 그 외에 추가적인 작업들도 가능하겠죠?
참고자료들___
(참고) [Spring] xml configuration을 java configuration으로 변경하기 (2) Web.xml, dispatcher-servlet

하이