
📌 react-hook-form 사용 이유
많은 form들을 관리해야 할 때 → useState, onChange 핸들러 남발하면서 가독성이 떨어지는 것을 방지form validation을 하는데 시간을 절약하고 싶을 때- form 필드 값을 업데이트 하면서 불필요한
rerender을 피하려 할 때 - 위와 같은 이유 말고도 다양한 기능을 제공하면서 시간 절약을 할 수 있다.
📌 적용 전
function ToDoList() {
  const [toDo, setToDo] = useState("");
  const [toDoError, setToDoError] = useState("");
  const onChange = (event: React.FormEvent<HTMLInputElement>) => {
    const {
      currentTarget: { value },
    } = event;
    setToDoError("");
    setToDo(value);
  };
  const onSubmit = (event: React.FormEvent<HTMLFormElement>) => {
    event.preventDefault();
    if (toDo.length < 10) {
      return setToDoError("To do should be longer");
    }
    console.log("submit");
  };
  return (
    <div>
      <form onSubmit={onSubmit}>
        <input onChange={onChange} value={toDo} placeholder="Write a to do" />
        <button>Add</button>
        {toDoError !== "" ? toDoError : null}
      </form>
    </div>
  );
}- 간단한 ToDoList를 만들어본다고 하면, 하나의 Input을 입력 받는 폼을 만든다고 해도 그 값을 저장할 useState, 값의 변화를 handling 할 함수도 만들어야 하고, vaildation을 위한 useState를 만드는 등 가독성이 굉장히 떨어지게 된다.
- 만약 form이 더욱 커지게 된다면 관리하기 굉장히 힘들고, 코드 양이 굉장히 많아져 유지보수하기 힘들 것이다.
📌 적용
📄 패키지 설치
npm install react-hook-form
or
yarn install react-hook-form
📄 모듈 가져오기
import { useForm } from "react-hook-form";📄 기본적인 사용법
function ToDoList(){
  const { register, handleSubmit } = useForm<IForm>();

  const onValid = (data: IForm) => {
  	console.log(data) // form 에 입력한 data들이 출력됨. (email)
  }

  return (
    <div>
      <form onSubmit={handleSubmit(onValid)}>
        <input {...register("email")} />
        <button>등록</button>
      </form>
    </div>
  );
}- 입력 받을 input 태그에 {...register("변수명")} 을 넣는다. (input 태그 말고도 select 태그 등에서도 사용 가능)
handleSubmit함수를 사용할 때는 첫번째 매개변수로 데이터가 유효할 때 호출되는 다른 함수를 받는다.
만약 데이터가 유효하지 않을 때 호출 될 다른 함수를 두번째 매개변수로 넣을 수도 있다.- form이 유효할 경우 onValid가 실행되어 console.log 가 찍힌다.
📄 기능: required
- form에서 필수적으로 입력받아야 하는 태그에 사용한다.
- 단순히 required: true로 설정하여, 반드시 입력받게 할 수도 있지만, required에 텍스트 값을 주어 입력하지 않았을 때 해당 텍스트를 출력할 수도 있다.
  const { register, handleSubmit, formState: { errors } } = useForm<IForm>();

<form onSubmit={handleSubmit(onValid)}>
	<input
          {...register("email", {
            required: "Email is required",
          })}
          placeholder="Email"
        />
  	<span>{errors?.email?.message}</span> // 이메일을 입력 하지 않았을 때 "Email is required"가 표시된다.
	<button>등록</button>
</form>
📄 기능: 정규식 활용, pattern
- 이메일 같은 경우
naver.com만 받아야 하는 상황이 있을 수도 있다. - 폼을 정규식을 활용해서 validation 할 수 있다.
  const { register, handleSubmit, formState: { errors } } = useForm<IForm>();

<form onSubmit={handleSubmit(onValid)}>
	<input
          {...register("email", {
            required: "Email is required",
      		pattern: {
              value: /^[A-Za-z0-9._%+-]+@naver.com$/,
              message: "Only naver.com emails allowed",
            },
          })}
          placeholder="Email"
        />
  	<span>{errors?.email?.message}</span> // naver.com 으로 이메일이 끝나지 않는다면, 메시지가 출력된다.
	<button>등록</button>
</form>
📄 기능: min, maxLength
- 비밀번호 같은 경우 최소 길이, 최대 길이 제한이 있을 수 있다.
- 마찬가지로 길이 유효성이 검증되지 않으면 에러 메시지를 출력할 수 있다.
<input
          {...register("password1", {
            required: "Password is required",
            minLength: {
              value: 5,
              message: "Your password is too short.",
            },
          })}
          placeholder="Password1"
/>
📄 기능: setError, shouldFocus
- 비밀번호란과 비밀번호 확인란을 검증한다고 하면,
const { register, handleSubmit, formState: { errors }, setError } = useForm<IForm>();
const onValid = (data: IForm) => {
    if (data.password !== data.password1) {
      setError(
        "password1",
        { message: "Password are not the same" },
        { shouldFocus: true }
      );
    }
};- 폼에서 두 input을 받아와서 같지 않으면 setError를 통해 error를 발생시키고, 메시지를 출력한다.
- 사용자 입장에서 빠르게 수정할 수 있게끔 shouldFocus: true 값을 주어 password input 태그로 focusing되게 한다.
📄 기능: watch
- handleSubmit에서 전달되는 onVaild 내에서 값을 가져오는게 아닌 다른 스코프 내에서 form의 값을 가져와야 하는 상황이 생길 수도 있다.
- 이럴 때 watch를 사용하면 된다.
- 아래는 watch를 사용하여 폼을 제출하기 전에 이메일 가입 중복을 체크하는 코드의 일부이다. (사이드 프로젝트 devValley 코드의 일부이다)
  const emailCheck = async () => {
    const email = watch("email"); // 폼의 email 필드의 값을 가져온다.
    await axios
      .get(`${process.env.NEXT_PUBLIC_API_URL}/api/users/exists`, {
        params: {
          email: email,
        },
      })
      .then((res) => {
        // 이메일이 중복이면,
        if (res.data) {
          setError("email", {
            message: "* 이미 가입된 이메일입니다.",
          });
        } else {
          setError("email", {
            message: "* 가입 가능한 이메일입니다.",
          });
        }
      });
  };
  return (
    <RegisterForm onSubmit={handleSubmit(onVaild)}>
      <RegisterLabel>
        이메일 <ErrMsg>{errors?.email?.message}</ErrMsg>
      </RegisterLabel>
      <EmailContainer>
        <Input
          style={{ width: "300px" }}
          {...register("email", {
            required: "* 필수 입력",
          })}
          type="email"
          placeholder="user@email.com"
        />
        <EmailCheckBtn onClick={emailCheck}>중복 확인</EmailCheckBtn>
  );
📄 기능: defaultValue
- 폼의 기본값을 설정할 수 있다.
const {
    register,
    handleSubmit,
    formState: { errors },
    setError,
  } = useForm<IForm>({
    defaultValues: {
      email: "@naver.com",
    },
  });
📌 활용
- 기능을 익히고, 실제 프로젝트에 활용하였다.
- 장치 등록 폼을 만들고 유효성 검증이 끝나면 장치 등록 API를 호출하여 장치 등록을 하고, 캐싱되어 있는 devices를 업데이트 하려한다.
- 아래와 같은 장치 등록 폼을 만들었다.
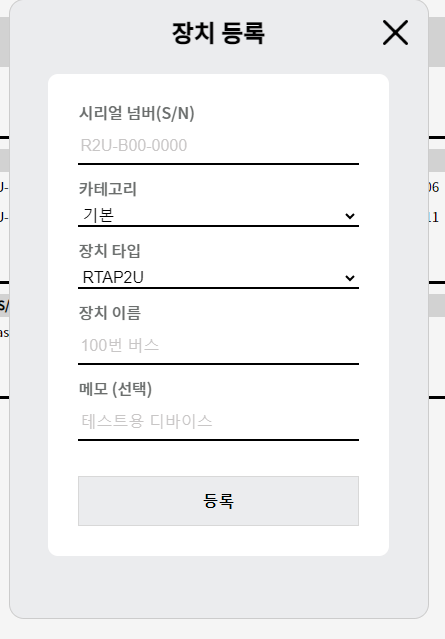
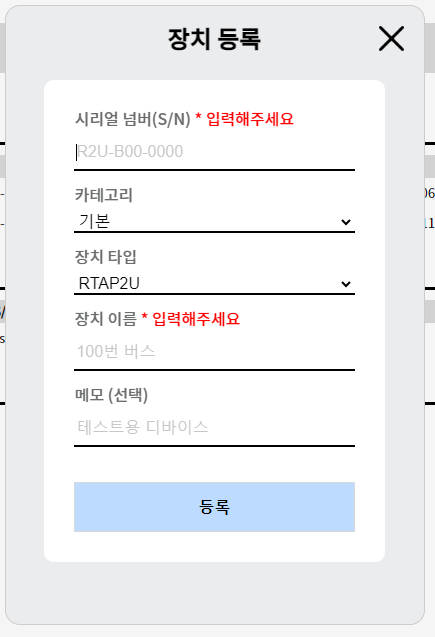
- 아무것도 입력하지 않고 등록 버튼을 누르게 되면, required 옵션을 통해 에러메시지가 출력된다. (유효성 검증)
- 시리얼 넘버, 장치 이름을 입력하는 순간 에러메시지는 사라지게 된다.
<ModalContainer>
        <Title>장치 등록</Title>
        <XBtn onClick={closeModal} />
        <FormContainer>
          <InputForm onSubmit={handleSubmit(onVaild)}>
            <InputLabel>
              시리얼 넘버(S/N) <ErrorMsg>{errors?.serial?.message}</ErrorMsg>
            </InputLabel>
            <Input
              {...register("serial", {
                required: "* 입력해주세요",
              })}
              placeholder="R2U-B00-0000"
            />
            <InputLabel>
              카테고리 <ErrorMsg>{errors?.category?.message}</ErrorMsg>
            </InputLabel>
            <Select {...register("category")}>
              {categoryList?.map((category) => {
                return (
                  <Option key={category.categoryName}>
                    {category.categoryName}
                  </Option>
                );
              })}
            </Select>
            <InputLabel>장치 타입</InputLabel>
            <Select {...register("type")}>
              <Option>RTAP2U</Option>
              <Option>RTK2U</Option>
            </Select>
            <InputLabel>
              장치 이름 <ErrorMsg>{errors?.name?.message}</ErrorMsg>
            </InputLabel>
            <Input
              {...register("name", {
                required: "* 입력해주세요",
              })}
              placeholder="100번 버스"
            />
            <InputLabel>메모 (선택)</InputLabel>
            <Input {...register("info")} placeholder="테스트용 디바이스" />
            <Btn>등록</Btn>
          </InputForm>
        </FormContainer>
</ModalContainer>input태그에서만 react-hook-form을 사용하는 것이 아닌select태그에서도 사용하였다.- 유효성 검증이 다 끝나면
handleSubmit으로 전달한 함수인onSubmit에서 장치 등록 mutation을 호출한다.
  const onVaild = (formData) => {
    addDeviceMutation.mutate({ formData, accessToken });
  };
// addDeviceMutation
const addDeviceMutation = useMutation(addDevice, {
onSuccess: () => {
queryClient.invalidateQueries({ queryKey: ["devices"] });
SaveAlert(); // 저장완료 Alert
reset(); // useForm 초기화
closeModal();
},
onError: () => {
WarningAlert(2);
},
});- addDeviceMutation에서 addDevice (장치 등록 API)를 호출하고, 호출한 결과 에러가 없으면 devices 데이터를 업데이트 한다.
- react-hook-form에서 제공하는 reset 메서드를 사용하여 폼을 초기화한다.
- reset 메서드에 매개변수로 특정 필드이름을 주면 특정 필드만 초기화 할 수 있다.
	reset({
      data: "test",
})- 만약 에러가 있으면 에러 Alert를 출력한다.
출처 : 노마드코더 마스터클래스

Frontend Developer