<공식문서 및 블로그 탐방 통해 실습해보는 Flask>
- 기초 공사
hello.py
from flask import Flask
app = Flask(__name__)

@app.route('/')
def hello_world():
    return 'Hello World!'

@app.route('/home')
def home():
    return '''
    <h1>Welcome to my Homepage</h1>
    <p>
    This is my Homepage made by Flask
    </p>
'''

@app.route('/user/<user_name>/<int:user_id>')
def user(user_name, user_id):
    return f"Hello, {user_name} {user_id}!!"


if __name__ == '__main__':
    app.run()
코드 설명
- 루트에는 hello world 값 리턴
- /home 에는 html 코드 비슷하게 리턴
- /user 값에는 뒤에 붙이는 url의 동적인 형태에 따라 결과값이 바뀜.
그 전까지 과정 :
공식문서 상 Flask 설치 및 hello.py 러닝까지. 실행 한 내용이 바뀌면 VSC 통해 파일 수정 후 저장하고 수동으로 러닝 해줘야 함. 노마드 코더에서 레플잇 끊임없이 수정 후 재가동한 것 생각하면 됨.
- Jinja2 템플릿 엔진 이용한 렌더링
app.py
from flask import Flask, render_template

app = Flask(__name__)

@app.route('/')
def index():
    return render_template("index.html")

if __name__ == '__main__':
app.run(debug = True)- templates 폴더 만든 후 index.html 만들기
<!DOCTYPE html>
<html lang="en">
<head>
    <meta charset="UTF-8">
    <meta name="viewport" content="width=device-width, initial-scale=1.0">
    <title>Document</title>
</head>
<body>
    <h1>Homepage Main</h1>
</body>
</html>
이후 구동해주면 화면에 h1태그가 그대로 출력되는 것을 볼 수 있다.(즉 파이썬으로 html을 서버와 함께 구동할 수 있다.)
- if, else, for반복문 등 사용하는 법
{% if template_variable < 20 %}
  <p>{{ template_variable }}은 20보다 작다.</p>
{% elif template_variable > 20 %}
   <p>{{ template_variable }}은 20보다 크다.</p>
{% else %}
   <p>{{ template_variable }}은 20이다.</p>
{% endif %}<ul>
{% for x in range(10) %}
<li>{{ x }}</li>
{% endfor%}
</ul>html 문 안에서 사용이 가능한 양식이며 꼭 end로 닫아줘야 한다.
- 문서 간 상속
부모문서 base.html
<!DOCTYPE html>
<html lang="en">
<head>
    <meta charset="UTF-8">
    <meta name="viewport" content="width=device-width, initial-scale=1.0">
    <title>Document</title>
</head>
<body>
    {% block content %}
    {% endblock %}
</body>
</html>
자식문서 index.html
    {% extends "base.html" %}
    {% block content %}
    <p>자식 문서에 포함될 내용</p>
    {% endblock %}
이렇게 렌더링 해주면 화면에 자식 문서가 상속되어서 나온다.
app.py
from flask import Flask, render_template

app = Flask(__name__)

@app.route('/')
def index():
    return render_template("index.html")

if __name__ == '__main__':
app.run(debug = True)- 이를 응용한 시험 성적표 확인 사이트 만들기
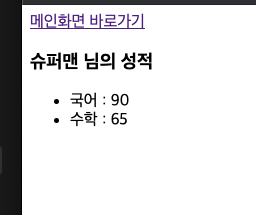
app.py
from flask import Flask, render_template

app = Flask(__name__)

student_data = {
    1 : {"name" : "슈퍼맨", "score" : {"국어" : 90, "수학" : 65}},
    2 : {"name" : "배트맨", "score" : {"국어" : 75, "영어" : 80, "수학" : 75}}
}


@app.route('/')
def index():
    return render_template("index.html", template_students = student_data)

@app.route('/student/<int:id>')
def student(id):
    return render_template("student.html",
                           template_name = student_data[id]["name"],
                           template_score = student_data[id]["score"])

if __name__ == '__main__':
    app.run(debug = True)
templates 파일들
base.html
<!DOCTYPE html>
<html lang="en">
<head>
    <meta charset="UTF-8">
    <meta name="viewport" content="width=device-width, initial-scale=1.0">
    <title>시험 성적 확인 사이트</title>
</head>
<body>
    <div>
        <a href="/">메인화면 바로가기</a>
    </div>

    {% block content %}{% endblock %}
</body>
</html>
index.html
    {% extends "base.html" %}
    {% block content %}
<h1>시험 성적 확인하기</h1>
<p>이름을 클릭하세요</p>
<ul>
    {% for key, value in template_students | dictsort %}
    <li><a href="/student/{{key}}">{{value["name"]}}</a></li>
    {% endfor %}
</ul>
    {% endblock %}
student.html
{% extends "base.html" %}
{% block content %}
<h3>{{template_name}} 님의 성적</h3>
<ul>
{% for key, value in template_score.items() %}
<li>{{key}} : {{value}}</li>
{% endfor %}
</ul>
{% endblock %}- 결과물


커피 내리고 향 맡는거 좋아해요. 이것 저것 공부합니다.