TIL(Today I Learned)
: 매일 저녁, 하루를 마무리하며 작성 !
: ⭕ 지식 위주, 학습한 것을 노트 정리한다고 생각하고 작성하면서 머리 속 흩어져있는 지식들을 정리 !
알고리즘 코드카타
- 문제 설명
오래전 유행했던 콜라 문제가 있습니다. 콜라 문제의 지문은 다음과 같습니다.
정답은 아무에게도 말하지 마세요.
콜라 빈 병 2개를 가져다주면 콜라 1병을 주는 마트가 있다. 빈 병 20개를 가져다주면 몇 병을 받을 수 있는가?
단, 보유 중인 빈 병이 2개 미만이면, 콜라를 받을 수 없다.
문제를 풀던 상빈이는 콜라 문제의 완벽한 해답을 찾았습니다. 상빈이가 푼 방법은 아래 그림과 같습니다. 우선 콜라 빈 병 20병을 가져가서 10병을 받습니다. 받은 10병을 모두 마신 뒤, 가져가서 5병을 받습니다. 5병 중 4병을 모두 마신 뒤 가져가서 2병을 받고, 또 2병을 모두 마신 뒤 가져가서 1병을 받습니다. 받은 1병과 5병을 받았을 때 남은 1병을 모두 마신 뒤 가져가면 1병을 또 받을 수 있습니다. 이 경우 상빈이는 총 10 + 5 + 2 + 1 + 1 = 19병의 콜라를 받을 수 있습니다.

문제를 열심히 풀던 상빈이는 일반화된 콜라 문제를 생각했습니다. 이 문제는 빈 병 a개를 가져다주면 콜라 b병을 주는 마트가 있을 때, 빈 병 n개를 가져다주면 몇 병을 받을 수 있는지 계산하는 문제입니다. 기존 콜라 문제와 마찬가지로, 보유 중인 빈 병이 a개 미만이면, 추가적으로 빈 병을 받을 순 없습니다. 상빈이는 열심히 고심했지만, 일반화된 콜라 문제의 답을 찾을 수 없었습니다. 상빈이를 도와, 일반화된 콜라 문제를 해결하는 프로그램을 만들어 주세요.
콜라를 받기 위해 마트에 주어야 하는 병 수 a, 빈 병 a개를 가져다 주면 마트가 주는 콜라 병 수 b, 상빈이가 가지고 있는 빈 병의 개수 n이 매개변수로 주어집니다. 상빈이가 받을 수 있는 콜라의 병 수를 return 하도록 solution 함수를 작성해주세요.
- 제한사항
1 ≤ b < a ≤ n ≤ 1,000,000
정답은 항상 int 범위를 넘지 않게 주어집니다.
class Solution {
    public int solution(int a, int b, int n) {
        int answer = 0;
        while(n >= a){
            answer += (n / a) * b;
            n = (n / a) * b + (n % a);
        }
        return answer;
    }
}
Spring 숙련주차 5주차 이어서
5-5 Mockito란 무엇일까?
- ProductService의 단위 테스트 작성 시도
// 관심 상품 최저가 업데이트

@Service
public class ProductService {
		// ...

		public static final int MIN_MY_PRICE = 100;

		// ...

	  @Transactional
    public Product updateProduct(Long id, ProductMypriceRequestDto requestDto) {
        int myprice = requestDto.getMyprice();
        if (myprice < MIN_MY_PRICE) {
            throw new IllegalArgumentException("유효하지 않은 관심 가격입니다. 최소 " + MIN_MY_PRICE + " 원 이상으로 설정해 주세요.");
        }

        Product product = productRepository.findById(id).orElseThrow(() -> new NullPointerException("해당 상품을 찾을 수 없습니다."));

        product.setMyprice(myprice);

        return product.getId();
		}

		// ...

}


// ProductServiceTest

class ProductServiceTest {
    @Test
    @DisplayName("관심 상품 희망가 - 최저가 이상으로 변경")
    void test1() {
        // given
        Long productId = 100L;
        int myprice = ProductService.MIN_MY_PRICE + 3_000_000;

        ProductMypriceRequestDto requestMyPriceDto = new ProductMypriceRequestDto();
        requestMyPriceDto.setMyprice(myprice);

        ProductService productService = new ProductService();

        // when
        ProductResponseDto result = productService.updateProduct(productId, requestMyPriceDto);

        // then
        assertEquals(myprice, result.getMyprice());
    }

    @Test
    @DisplayName("관심 상품 희망가 - 최저가 미만으로 변경")
    void test2() {
        // given
        Long productId = 200L;
        int myprice = ProductService.MIN_MY_PRICE - 50;

        ProductMypriceRequestDto requestMyPriceDto = new ProductMypriceRequestDto();
        requestMyPriceDto.setMyprice(myprice);

        ProductService productService = new ProductService();

        // when
        Exception exception = assertThrows(IllegalArgumentException.class, () -> {
            productService.updateProduct(productId, requestMyPriceDto);
        });

        // then
        assertEquals(
                "유효하지 않은 관심 가격입니다. 최소 " +ProductService.MIN_MY_PRICE + " 원 이상으로 설정해 주세요.",
                exception.getMessage()
        );
    }
}
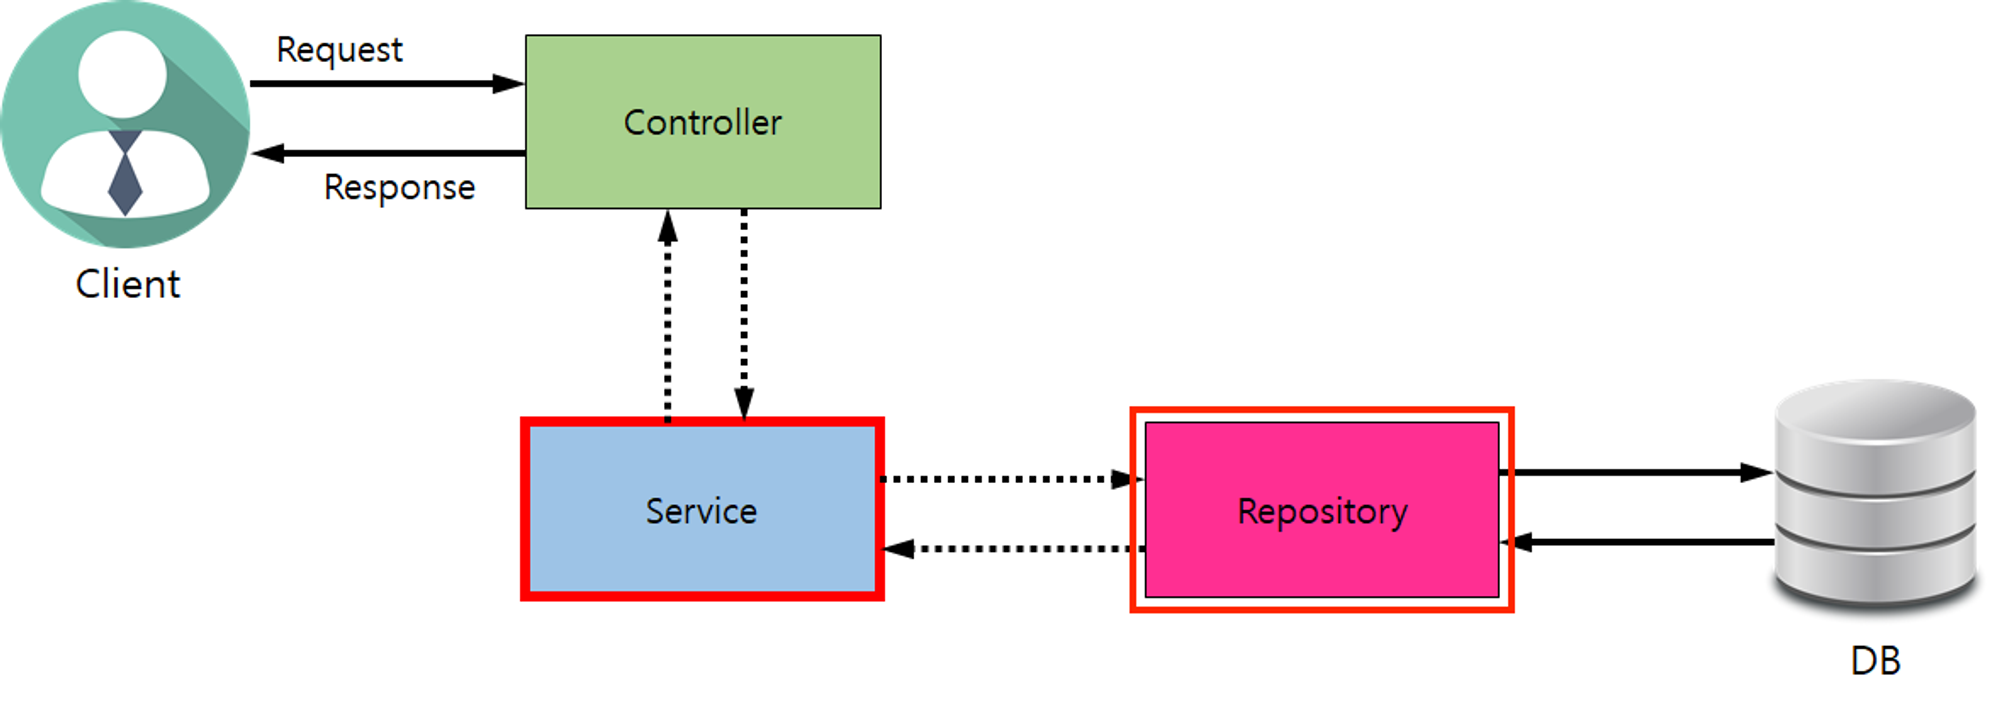
- ProductService의 updateProduct 메서드를 테스트하려면 ProductService 객체를 생성할 때 생성자로 ProductRepository, FolderRepository, ProductFolderRepository를 전달해야만 함
- 하지만 전달하려해도 인터페이스들인데 어떻게 전달?
- 그리고 또 전달한다고 해도 updateProduct 메서드 내부의 productRepository.findById(id) 코드는 어떻게 처리?
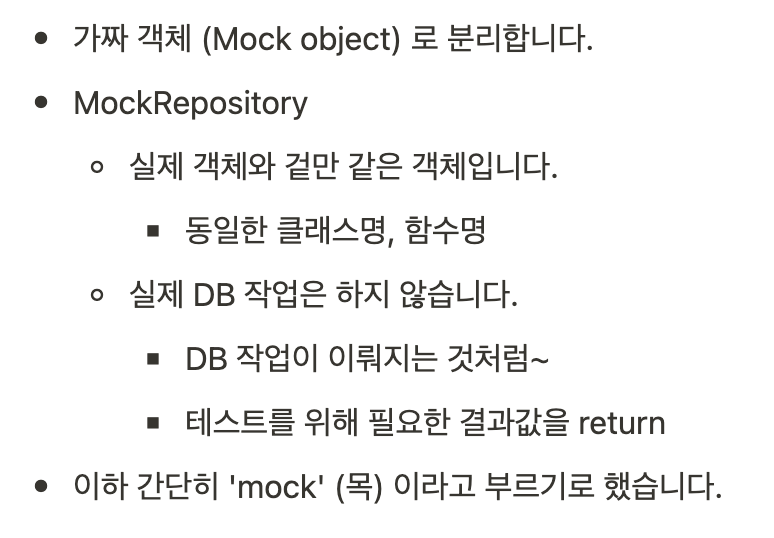
- Mock object (가짜 객체)?
이상적으로, 각 테스트 케이스는 서로 분리되어야 한다. 이를 위해 가짜 객체(Mock object)를 생성하는 것도 좋은 방법
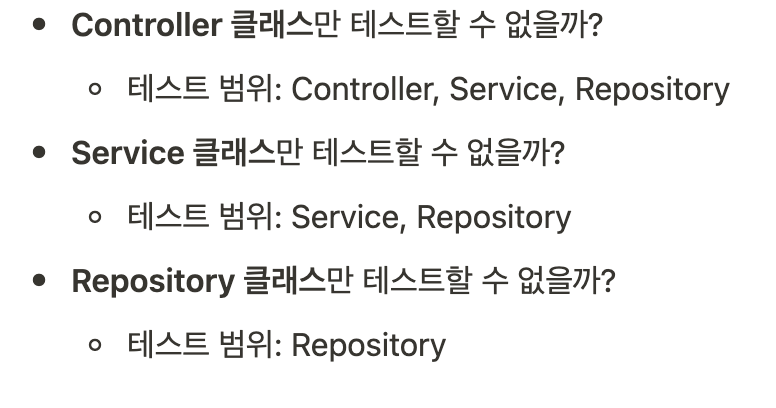
- 분리 되기 어려운 클래스들

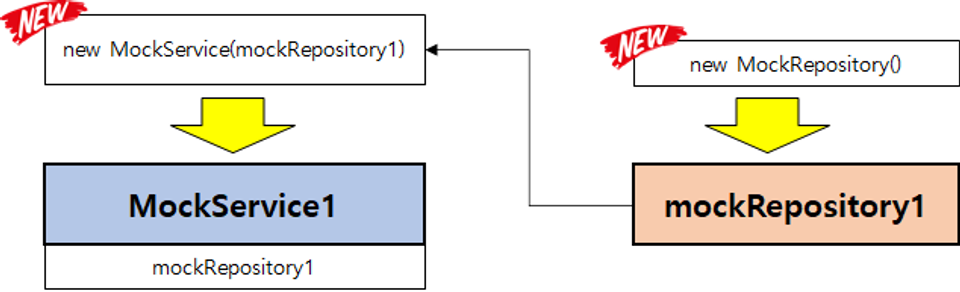
- 가짜객체 (Mock object) 를 통한 분리 방법
- Mockito 를 사용한 단위 테스트
// Mockito 적용

@ExtendWith(MockitoExtension.class) // @Mock 사용을 위해 설정합니다.
class ProductServiceTest {

    @Mock
    ProductRepository productRepository;

    @Mock
    FolderRepository folderRepository;

    @Mock
    ProductFolderRepository productFolderRepository;

    @Test
    @DisplayName("관심 상품 희망가 - 최저가 이상으로 변경")
    void test1() {
        // given
        Long productId = 100L;
        int myprice = ProductService.MIN_MY_PRICE + 3_000_000;

        ProductMypriceRequestDto requestMyPriceDto = new ProductMypriceRequestDto();
        requestMyPriceDto.setMyprice(myprice);

        ProductService productService = new ProductService(productRepository, folderRepository, productFolderRepository);

        // when
        ProductResponseDto result = productService.updateProduct(productId, requestMyPriceDto);

        // then
        assertEquals(myprice, result.getMyprice());
    }

    @Test
    @DisplayName("관심 상품 희망가 - 최저가 미만으로 변경")
    void test2() {
        // given
        Long productId = 200L;
        int myprice = ProductService.MIN_MY_PRICE - 50;

        ProductMypriceRequestDto requestMyPriceDto = new ProductMypriceRequestDto();
        requestMyPriceDto.setMyprice(myprice);

        ProductService productService = new ProductService(productRepository, folderRepository, productFolderRepository);

        // when
        Exception exception = assertThrows(IllegalArgumentException.class, () -> {
            productService.updateProduct(productId, requestMyPriceDto);
        });

        // then
        assertEquals(
                "유효하지 않은 관심 가격입니다. 최소 " +ProductService.MIN_MY_PRICE + " 원 이상으로 설정해 주세요.",
                exception.getMessage()
        );
    }
}
- Mockito 를 사용한 단위 테스트 실행 결과
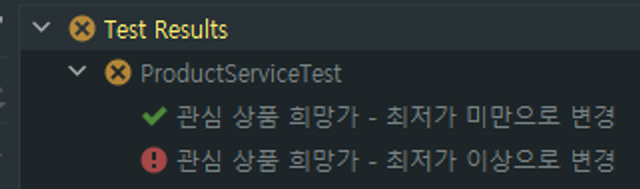
- 에러가 발생 : Mock 을 선언만 했지, 사용 케이스를 제대로 정의하지 못했기 때문
- Mock 사용 케이스 추가
// Mock 사용케이스 추가

@ExtendWith(MockitoExtension.class) // @Mock 사용을 위해 설정합니다.
class ProductServiceTest {

    @Mock
    ProductRepository productRepository;

    @Mock
    FolderRepository folderRepository;

    @Mock
    ProductFolderRepository productFolderRepository;

    @Test
    @DisplayName("관심 상품 희망가 - 최저가 이상으로 변경")
    void test1() {
        // given
        Long productId = 100L;
        int myprice = ProductService.MIN_MY_PRICE + 3_000_000;

        ProductMypriceRequestDto requestMyPriceDto = new ProductMypriceRequestDto();
        requestMyPriceDto.setMyprice(myprice);

        User user = new User();
        ProductRequestDto requestProductDto = new ProductRequestDto(
                "Apple <b>맥북</b> <b>프로</b> 16형 2021년 <b>M1</b> Max 10코어 실버 (MK1H3KH/A) ",
                "https://shopping-phinf.pstatic.net/main_2941337/29413376619.20220705152340.jpg",
                "https://search.shopping.naver.com/gate.nhn?id=29413376619",
                3515000
        );

        Product product = new Product(requestProductDto, user);

        ProductService productService = new ProductService(productRepository, folderRepository, productFolderRepository);

        given(productRepository.findById(productId)).willReturn(Optional.of(product));

        // when
        ProductResponseDto result = productService.updateProduct(productId, requestMyPriceDto);

        // then
        assertEquals(myprice, result.getMyprice());
    }

    @Test
    @DisplayName("관심 상품 희망가 - 최저가 미만으로 변경")
    void test2() {
        // given
        Long productId = 200L;
        int myprice = ProductService.MIN_MY_PRICE - 50;

        ProductMypriceRequestDto requestMyPriceDto = new ProductMypriceRequestDto();
        requestMyPriceDto.setMyprice(myprice);

        ProductService productService = new ProductService(productRepository, folderRepository, productFolderRepository);

        // when
        Exception exception = assertThrows(IllegalArgumentException.class, () -> {
            productService.updateProduct(productId, requestMyPriceDto);
        });

        // then
        assertEquals(
                "유효하지 않은 관심 가격입니다. 최소 " +ProductService.MIN_MY_PRICE + " 원 이상으로 설정해 주세요.",
                exception.getMessage()
        );
    }
}
5-6 통합 테스트란 무엇일까?
- 단위 테스트 VS 통합 테스트

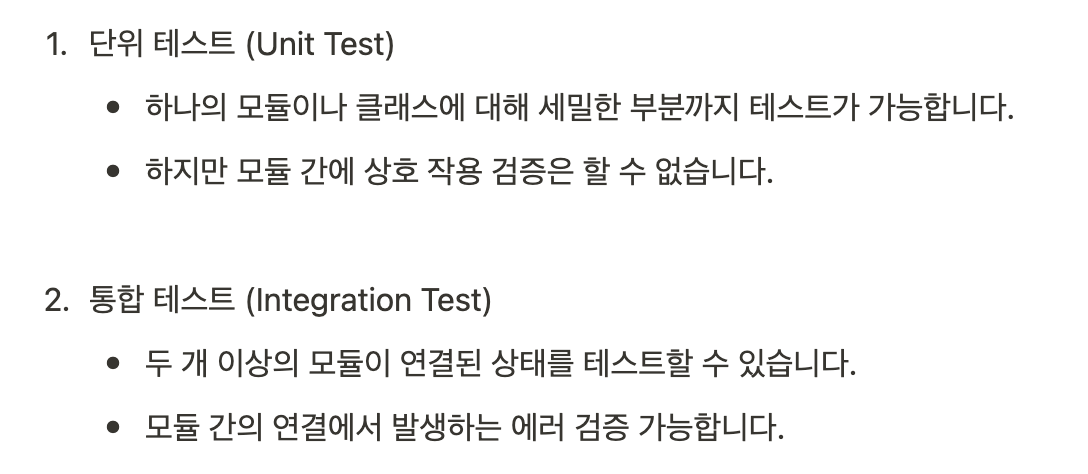
- Spring Boot를 이용한 통합 테스트
- 통합 테스트 : 여러 단위 테스트를 하나의 통합된 테스트로 수행, 단위 테스트 시 Spring은 동작되지 X
- "@SpringBootTest" : 스프링이 동작되도록 해주는 애너테이션, 테스트 수행 시 스프링이 동작 ( Spring IoC/DI 기능을 사용 가능, Repository를 사용해 DB CRUD가 가능 )
- 관심상품 통합 테스트 설계
- 신규 관심상품 등록 : User는 테스트 사용자인 1번 사용자
- 신규 등록된 관심상품의 희망 최저가 변경 : 1번에서 등록한 관심상품의 희망 최저가를 변경
- 회원 Id 로 등록된 모든 관심상품 조회 : 조회된 관심상품 중 1번에서 등록한 관심상품이 존재? and 2번에서 업데이트한 내용이 잘 반영?
- 관심상품 통합 테스트 구현
// test > service > ProductServiceIntegrationTest

package com.sparta.myselectshop.service;

import com.sparta.myselectshop.dto.ProductMypriceRequestDto;
import com.sparta.myselectshop.dto.ProductRequestDto;
import com.sparta.myselectshop.dto.ProductResponseDto;
import com.sparta.myselectshop.entity.User;
import com.sparta.myselectshop.repository.UserRepository;
import org.junit.jupiter.api.*;
import org.springframework.beans.factory.annotation.Autowired;
import org.springframework.boot.test.context.SpringBootTest;
import org.springframework.data.domain.Page;

import static org.junit.jupiter.api.Assertions.assertEquals;
import static org.junit.jupiter.api.Assertions.assertNotNull;

@SpringBootTest(webEnvironment = SpringBootTest.WebEnvironment.RANDOM_PORT) // 서버의 PORT 를 랜덤으로 설정합니다.
@TestInstance(TestInstance.Lifecycle.PER_CLASS) // 테스트 인스턴스의 생성 단위를 클래스로 변경합니다.
@TestMethodOrder(MethodOrderer.OrderAnnotation.class)
class ProductServiceIntegrationTest {

    @Autowired
    ProductService productService;
    @Autowired
    UserRepository userRepository;

    User user;
    ProductResponseDto createdProduct = null;
    int updatedMyPrice = -1;

    @Test
    @Order(1)
    @DisplayName("신규 관심상품 등록")
    void test1() {
        // given
        String title = "Apple <b>에어팟</b> 2세대 유선충전 모델 (MV7N2KH/A)";
        String imageUrl = "https://shopping-phinf.pstatic.net/main_1862208/18622086330.20200831140839.jpg";
        String linkUrl = "https://search.shopping.naver.com/gate.nhn?id=18622086330";
        int lPrice = 173900;
        ProductRequestDto requestDto = new ProductRequestDto(
                title,
                imageUrl,
                linkUrl,
                lPrice
        );
        user = userRepository.findById(1L).orElse(null);

        // when
        ProductResponseDto product = productService.createProduct(requestDto, user);

        // then
        assertNotNull(product.getId());
        assertEquals(title, product.getTitle());
        assertEquals(imageUrl, product.getImage());
        assertEquals(linkUrl, product.getLink());
        assertEquals(lPrice, product.getLprice());
        assertEquals(0, product.getMyprice());
        createdProduct = product;
    }

    @Test
    @Order(2)
    @DisplayName("신규 등록된 관심상품의 희망 최저가 변경")
    void test2() {
        // given
        Long productId = this.createdProduct.getId();
        int myPrice = 173000;
        ProductMypriceRequestDto requestDto = new ProductMypriceRequestDto();
        requestDto.setMyprice(myPrice);

        // when
        ProductResponseDto product = productService.updateProduct(productId, requestDto);

        // then
        assertNotNull(product.getId());
        assertEquals(this.createdProduct.getTitle(), product.getTitle());
        assertEquals(this.createdProduct.getImage(), product.getImage());
        assertEquals(this.createdProduct.getLink(), product.getLink());
        assertEquals(this.createdProduct.getLprice(), product.getLprice());
        assertEquals(myPrice, product.getMyprice());
        this.updatedMyPrice = myPrice;
    }

    @Test
    @Order(3)
    @DisplayName("회원이 등록한 모든 관심상품 조회")
    void test3() {
        // given
        // when
        Page<ProductResponseDto> productList = productService.getProducts(user,
                0, 10, "id", false);

        // then
        // 1. 전체 상품에서 테스트에 의해 생성된 상품 찾아오기 (상품의 id 로 찾음)
        Long createdProductId = this.createdProduct.getId();
        ProductResponseDto foundProduct = productList.stream()
                .filter(product -> product.getId().equals(createdProductId))
                .findFirst()
                .orElse(null);

        // 2. Order(1) 테스트에 의해 생성된 상품과 일치하는지 검증
        assertNotNull(foundProduct);
        assertEquals(this.createdProduct.getId(), foundProduct.getId());
        assertEquals(this.createdProduct.getTitle(), foundProduct.getTitle());
        assertEquals(this.createdProduct.getImage(), foundProduct.getImage());
        assertEquals(this.createdProduct.getLink(), foundProduct.getLink());
        assertEquals(this.createdProduct.getLprice(), foundProduct.getLprice());

        // 3. Order(2) 테스트에 의해 myPrice 가격이 정상적으로 업데이트되었는지 검증
        assertEquals(this.updatedMyPrice, foundProduct.getMyprice());
    }
}
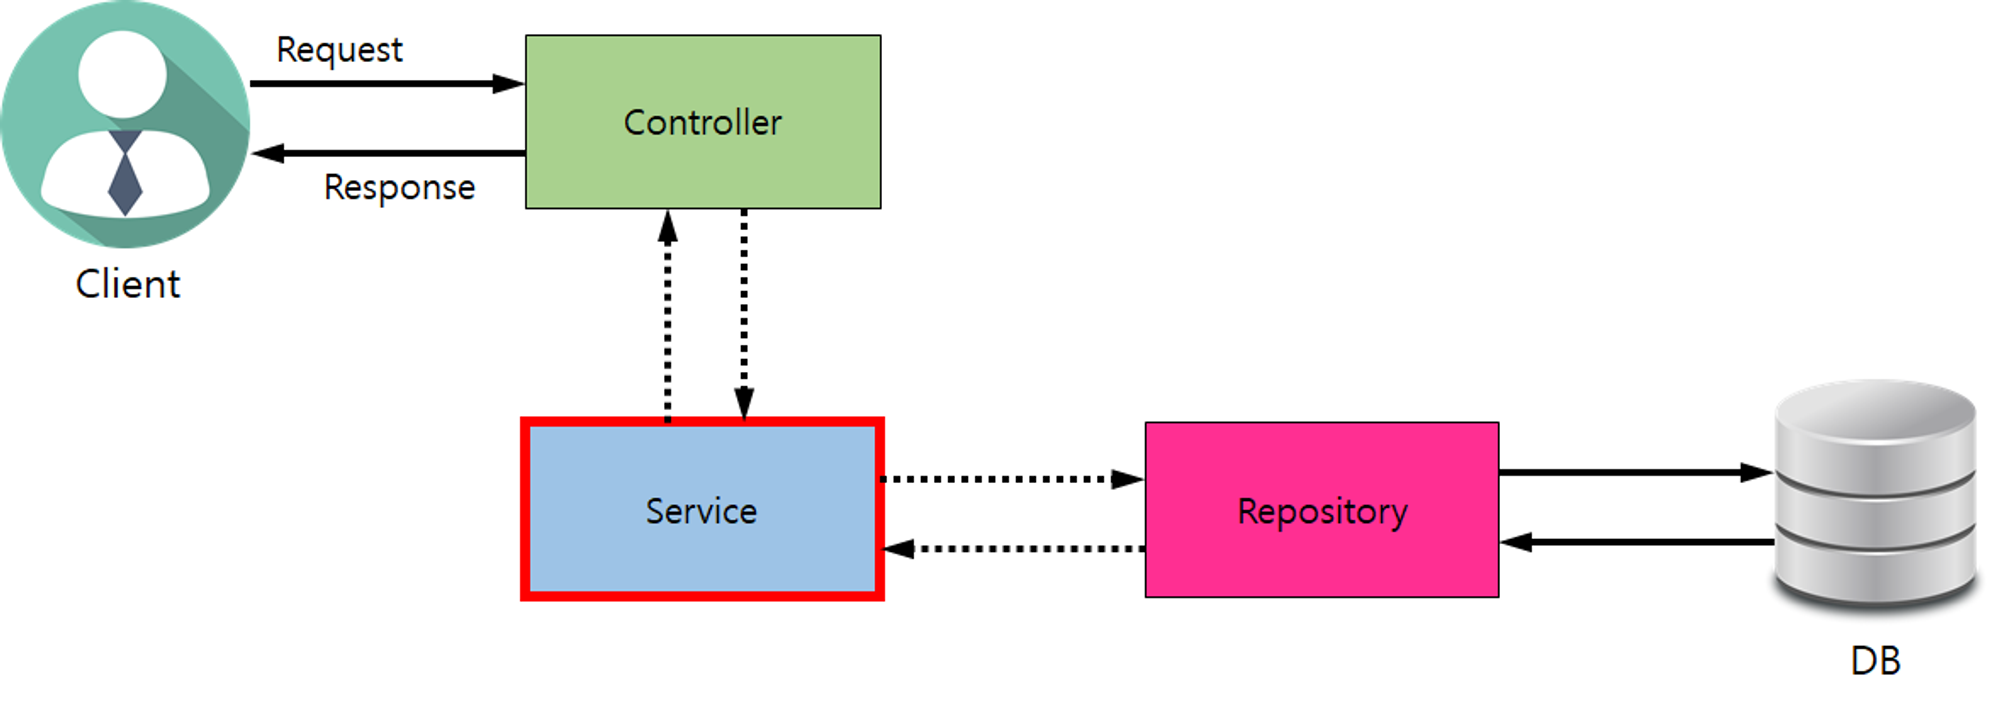
5-7 Controller는 어떻게 테스트할까?
- Controller 테스트

// test > mvc > MockSpringSecurityFilter

package com.sparta.myselectshop.mvc;

import jakarta.servlet.*;
import jakarta.servlet.http.HttpServletRequest;
import org.springframework.security.core.Authentication;
import org.springframework.security.core.context.SecurityContextHolder;

import java.io.IOException;

public class MockSpringSecurityFilter implements Filter {
    @Override
    public void init(FilterConfig filterConfig) {}

    @Override
    public void doFilter(ServletRequest req, ServletResponse res, FilterChain chain) throws IOException, ServletException {
        SecurityContextHolder.getContext()
                .setAuthentication((Authentication) ((HttpServletRequest) req).getUserPrincipal());
        chain.doFilter(req, res);
    }

    @Override
    public void destroy() {
        SecurityContextHolder.clearContext();
    }
}


// test > mvc > UserProductMvcTest

package com.sparta.myselectshop.mvc;

import com.fasterxml.jackson.databind.ObjectMapper;
import com.sparta.myselectshop.config.WebSecurityConfig;
import com.sparta.myselectshop.controller.ProductController;
import com.sparta.myselectshop.controller.UserController;
import com.sparta.myselectshop.dto.ProductRequestDto;
import com.sparta.myselectshop.entity.User;
import com.sparta.myselectshop.entity.UserRoleEnum;
import com.sparta.myselectshop.security.UserDetailsImpl;
import com.sparta.myselectshop.service.FolderService;
import com.sparta.myselectshop.service.KakaoService;
import com.sparta.myselectshop.service.ProductService;
import com.sparta.myselectshop.service.UserService;

import org.junit.jupiter.api.BeforeEach;
import org.junit.jupiter.api.DisplayName;
import org.junit.jupiter.api.Test;
import org.springframework.beans.factory.annotation.Autowired;
import org.springframework.boot.test.autoconfigure.web.servlet.WebMvcTest;
import org.springframework.boot.test.mock.mockito.MockBean;
import org.springframework.context.annotation.ComponentScan;
import org.springframework.context.annotation.FilterType;
import org.springframework.http.MediaType;
import org.springframework.security.authentication.UsernamePasswordAuthenticationToken;
import org.springframework.test.web.servlet.MockMvc;
import org.springframework.test.web.servlet.setup.MockMvcBuilders;
import org.springframework.util.LinkedMultiValueMap;
import org.springframework.util.MultiValueMap;
import org.springframework.web.context.WebApplicationContext;

import java.security.Principal;

import static org.springframework.security.test.web.servlet.setup.SecurityMockMvcConfigurers.springSecurity;
import static org.springframework.test.web.servlet.request.MockMvcRequestBuilders.get;
import static org.springframework.test.web.servlet.request.MockMvcRequestBuilders.post;
import static org.springframework.test.web.servlet.result.MockMvcResultHandlers.print;
import static org.springframework.test.web.servlet.result.MockMvcResultMatchers.status;
import static org.springframework.test.web.servlet.result.MockMvcResultMatchers.view;

@WebMvcTest(
        controllers = {UserController.class, ProductController.class},
        excludeFilters = {
                @ComponentScan.Filter(
                        type = FilterType.ASSIGNABLE_TYPE,
                        classes = WebSecurityConfig.class
                )
        }
)
class UserProductMvcTest {
    private MockMvc mvc;

    private Principal mockPrincipal;

    @Autowired
    private WebApplicationContext context;

    @Autowired
    private ObjectMapper objectMapper;

    @MockBean
    UserService userService;

    @MockBean
    KakaoService kakaoService;

    @MockBean
    ProductService productService;

    @MockBean
    FolderService folderService;

    @BeforeEach
    public void setup() {
        mvc = MockMvcBuilders.webAppContextSetup(context)
                .apply(springSecurity(new MockSpringSecurityFilter()))
                .build();
    }

    private void mockUserSetup() {
        // Mock 테스트 유져 생성
        String username = "sollertia4351";
        String password = "robbie1234";
        String email = "sollertia@sparta.com";
        UserRoleEnum role = UserRoleEnum.USER;
        User testUser = new User(username, password, email, role);
        UserDetailsImpl testUserDetails = new UserDetailsImpl(testUser);
        mockPrincipal = new UsernamePasswordAuthenticationToken(testUserDetails, "", testUserDetails.getAuthorities());
    }

    @Test
    @DisplayName("로그인 Page")
    void test1() throws Exception {
        // when - then
        mvc.perform(get("/api/user/login-page"))
                .andExpect(status().isOk())
                .andExpect(view().name("login"))
                .andDo(print());
    }

    @Test
    @DisplayName("회원 가입 요청 처리")
    void test2() throws Exception {
        // given
        MultiValueMap<String, String> signupRequestForm = new LinkedMultiValueMap<>();
        signupRequestForm.add("username", "sollertia4351");
        signupRequestForm.add("password", "robbie1234");
        signupRequestForm.add("email", "sollertia@sparta.com");
        signupRequestForm.add("admin", "false");

        // when - then
        mvc.perform(post("/api/user/signup")
                        .params(signupRequestForm)
                )
                .andExpect(status().is3xxRedirection())
                .andExpect(view().name("redirect:/api/user/login-page"))
                .andDo(print());
    }

    @Test
    @DisplayName("신규 관심상품 등록")
    void test3() throws Exception {
        // given
        this.mockUserSetup();
        String title = "Apple <b>아이폰</b> 14 프로 256GB [자급제]";
        String imageUrl = "https://shopping-phinf.pstatic.net/main_3456175/34561756621.20220929142551.jpg";
        String linkUrl = "https://search.shopping.naver.com/gate.nhn?id=34561756621";
        int lPrice = 959000;
        ProductRequestDto requestDto = new ProductRequestDto(
                title,
                imageUrl,
                linkUrl,
                lPrice
        );

        String postInfo = objectMapper.writeValueAsString(requestDto);

        // when - then
        mvc.perform(post("/api/products")
                        .content(postInfo)
                        .contentType(MediaType.APPLICATION_JSON)
                        .accept(MediaType.APPLICATION_JSON)
                        .principal(mockPrincipal)
                )
                .andExpect(status().isOk())
                .andDo(print());
    }
}


// config > JpaConfig

@Configuration // 아래 설정을 등록하여 활성화 합니다.
@EnableJpaAuditing // 시간 자동 변경이 가능하도록 합니다.
public class JpaConfig {
}
5-8 My 셀렉샵 Top5 회원 찾기 설계 및 구현
- 요구사항
- '나만의 셀렉샵' 서버 사용시간 : 'My 셀렉샵' 모든 API 수행시간의 총합
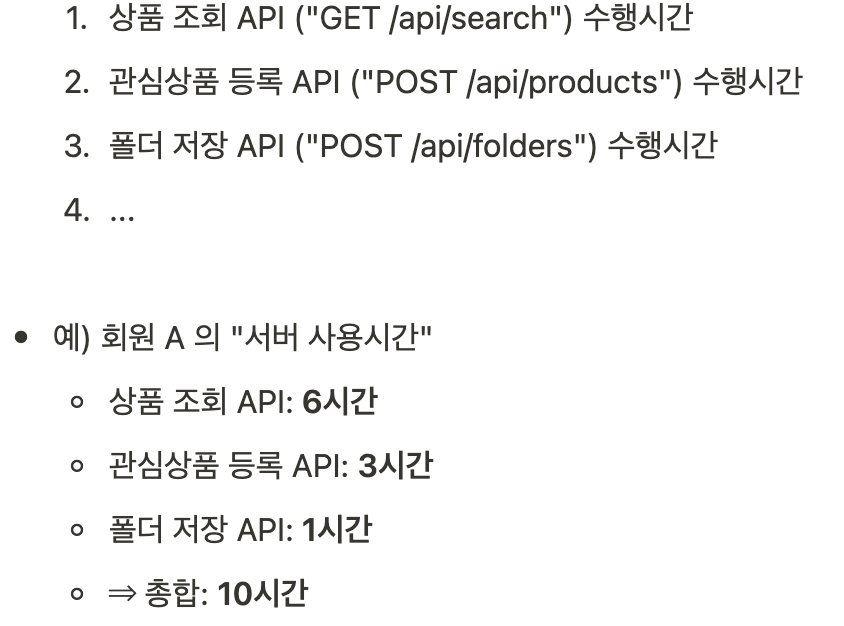
- API 사용시간 측정 방법
-
API 사용시간 = Controller 에 요청이 들어온 시간 ~ 응답이 나간 시간
-
수행시간 측정 코드 구현 : Intellij 메뉴에서 File > New > Scratch File → Java 선택
// 수행시간 측정

class Scratch {
    public static void main(String[] args) {
        // 측정 시작 시간
        long startTime = System.currentTimeMillis();

        // 함수 수행
        long output = sumFromOneTo(1_000_000_000);

        // 측정 종료 시간
        long endTime = System.currentTimeMillis();

        long runTime = endTime - startTime;
        System.out.println("소요시간: " + runTime);
    }

    private static long sumFromOneTo(long input) {
        long output = 0;

        for (int i = 1; i < input; ++i) {
            output = output + i;
        }

        return output;
    }
}
- 회원별 총 API 사용시간 저장
// entity > ApiUseTime

package com.sparta.myselectshop.entity;

import jakarta.persistence.*;
import lombok.Getter;
import lombok.NoArgsConstructor;
import lombok.Setter;

@Entity
@Getter
@Setter
@NoArgsConstructor
@Table(name = "api_use_time")
public class ApiUseTime {
    @Id
    @GeneratedValue(strategy = GenerationType.IDENTITY)
    private Long id;

    @OneToOne
    @JoinColumn(name = "user_id", nullable = false)
    private User user;

    @Column(nullable = false)
    private Long totalTime;

    public ApiUseTime(User user, Long totalTime) {
        this.user = user;
        this.totalTime = totalTime;
    }

    public void addUseTime(long useTime) {
        this.totalTime += useTime;
    }
}


// repository > ApiUseTimeRepository

package com.sparta.myselectshop.repository;

import com.sparta.myselectshop.entity.ApiUseTime;
import com.sparta.myselectshop.entity.User;
import org.springframework.data.jpa.repository.JpaRepository;

import java.util.Optional;

public interface ApiUseTimeRepository extends JpaRepository<ApiUseTime, Long> {
    Optional<ApiUseTime> findByUser(User user);
}


// 관심상품 저장하는 API (POST /api/products) 에만 적용 (ProductController)

@PostMapping("/products")
public ProductResponseDto createProduct(@RequestBody ProductRequestDto requestDto, @AuthenticationPrincipal UserDetailsImpl userDetails) {
    // 측정 시작 시간
    long startTime = System.currentTimeMillis();

    try {
        // 응답 보내기
        return productService.createProduct(requestDto, userDetails.getUser());
    } finally {
        // 측정 종료 시간
        long endTime = System.currentTimeMillis();
        // 수행시간 = 종료 시간 - 시작 시간
        long runTime = endTime - startTime;

        // 로그인 회원 정보
        User loginUser = userDetails.getUser();

        // API 사용시간 및 DB 에 기록
        ApiUseTime apiUseTime = apiUseTimeRepository.findByUser(loginUser)
                .orElse(null);
        if (apiUseTime == null) {
            // 로그인 회원의 기록이 없으면
            apiUseTime = new ApiUseTime(loginUser, runTime);
        } else {
            // 로그인 회원의 기록이 이미 있으면
            apiUseTime.addUseTime(runTime);
        }

        System.out.println("[API Use Time] Username: " + loginUser.getUsername() + ", Total Time: " + apiUseTime.getTotalTime() + " ms");
        apiUseTimeRepository.save(apiUseTime);
    }
}
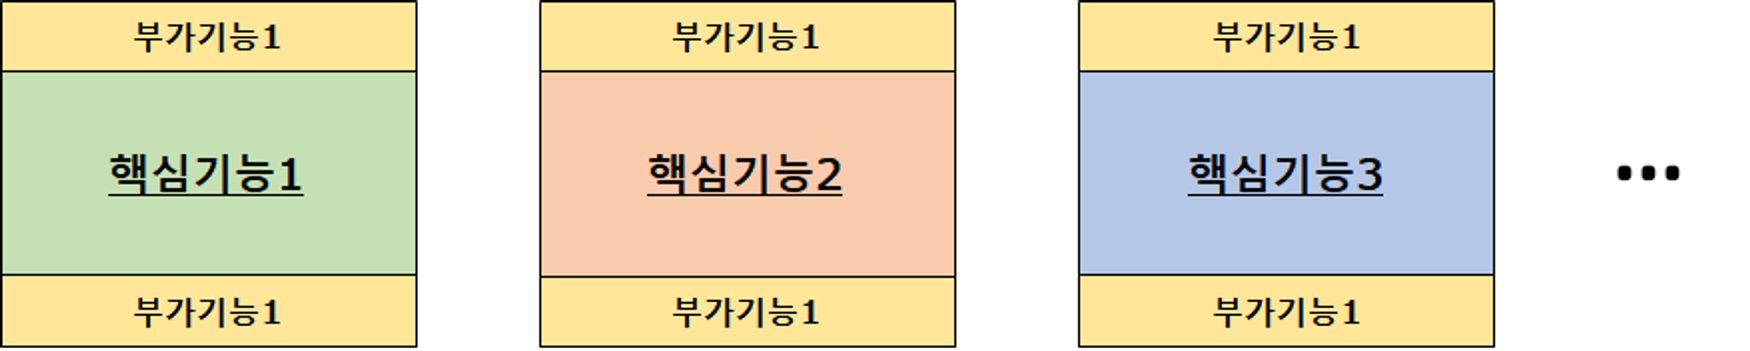
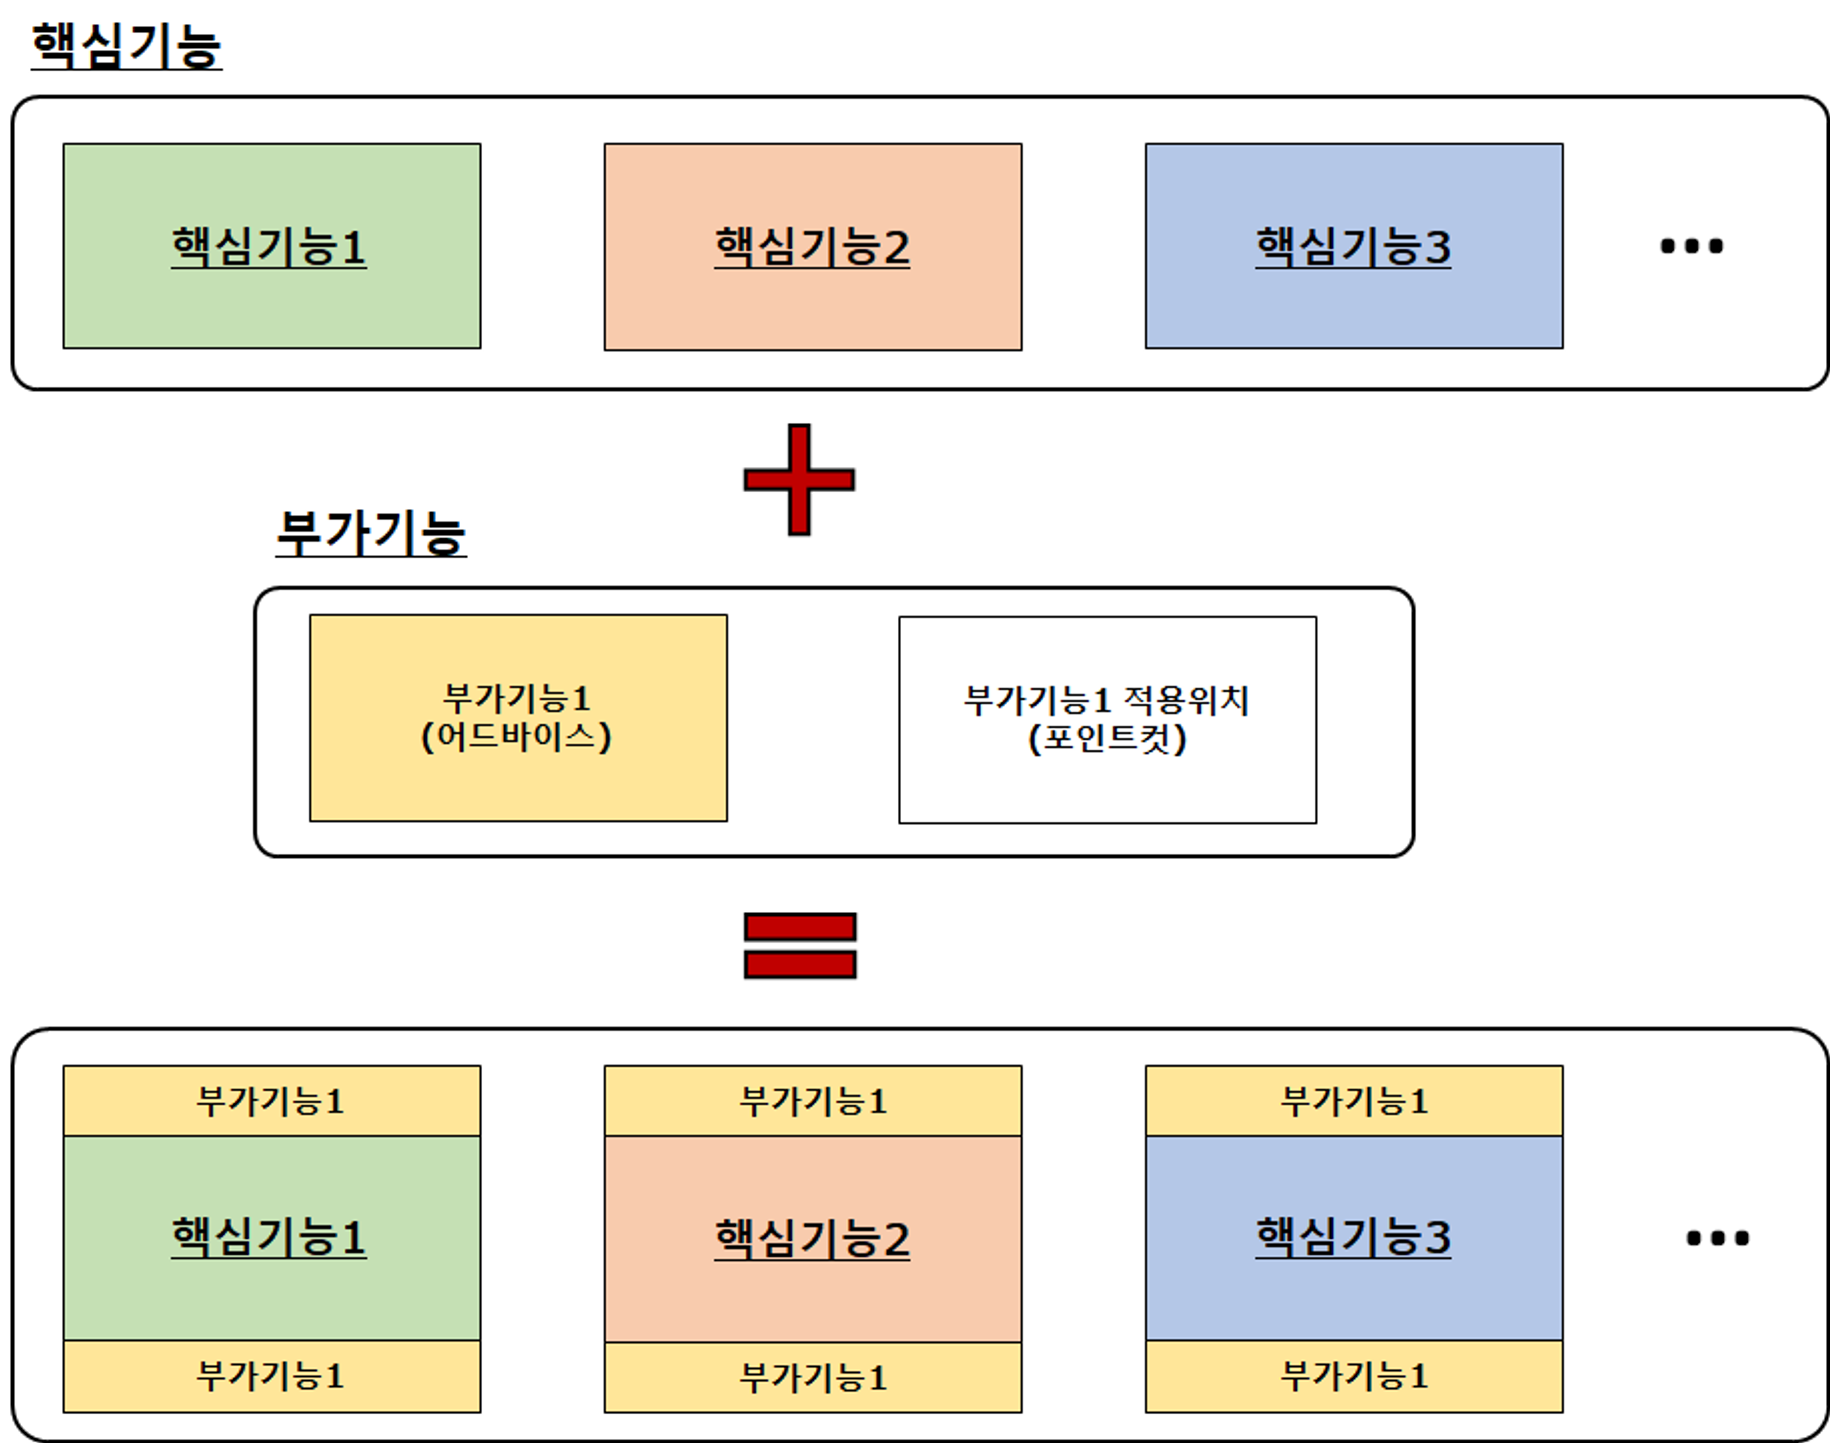
- 부가기능 모듈화의 필요성
- '핵심기능': 각 API 별 수행해야 할 비즈니스 로직

- '부가기능': 핵심기능을 보조하는 기능
// 측정 시작 시간
long startTime = System.currentTimeMillis();

try {
	// 핵심기능 수행
	// 로그인 되어 있는 회원 테이블의 ID
	Long userId = userDetails.getUser().getId();

	Product product = productService.createProduct(requestDto, userId);

	// 응답 보내기
	return product;
} finally {
	// 측정 종료 시간
	long endTime = System.currentTimeMillis();
	// 수행시간 = 종료 시간 - 시작 시간
	long runTime = endTime - startTime;
	// 수행시간을 DB 에 기록
	...
}- 문제점
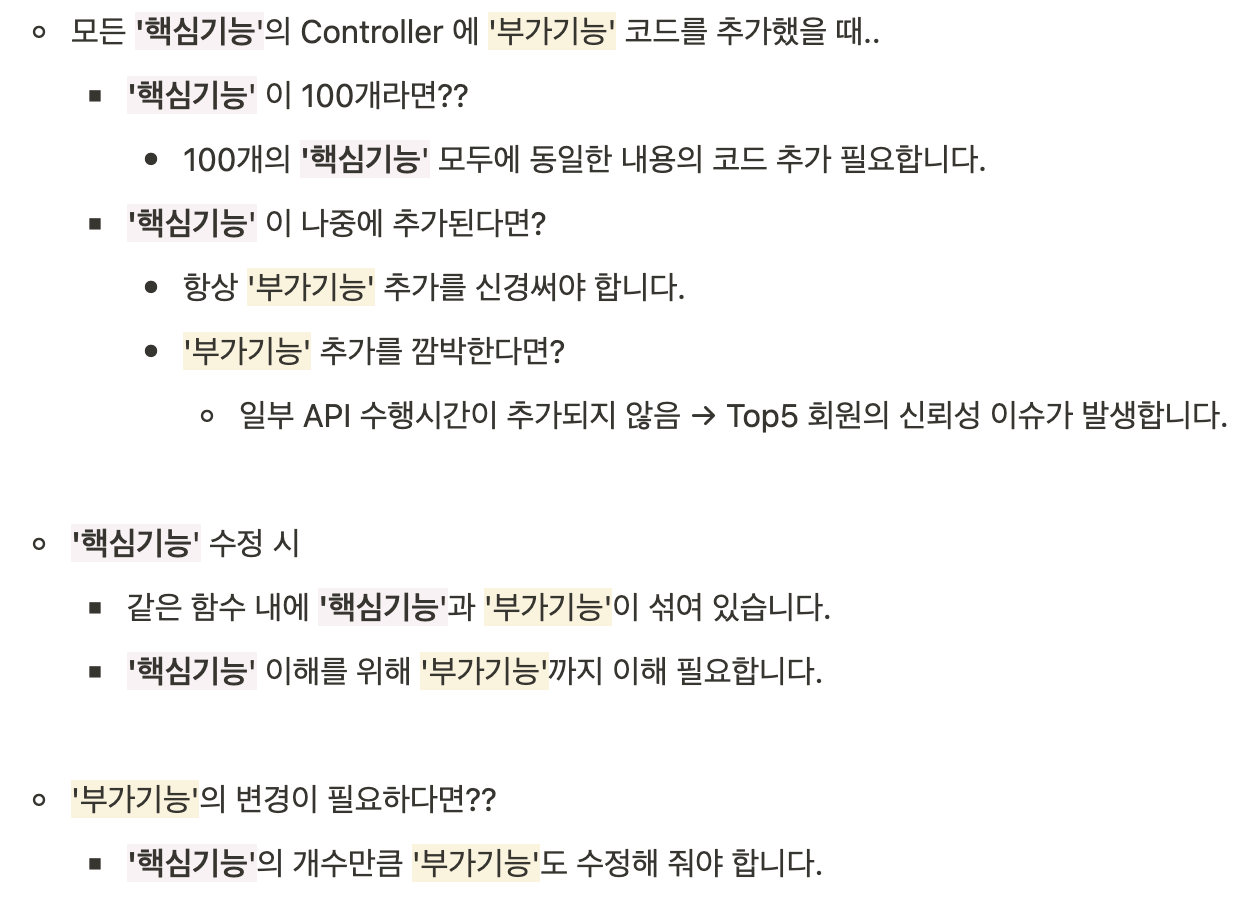
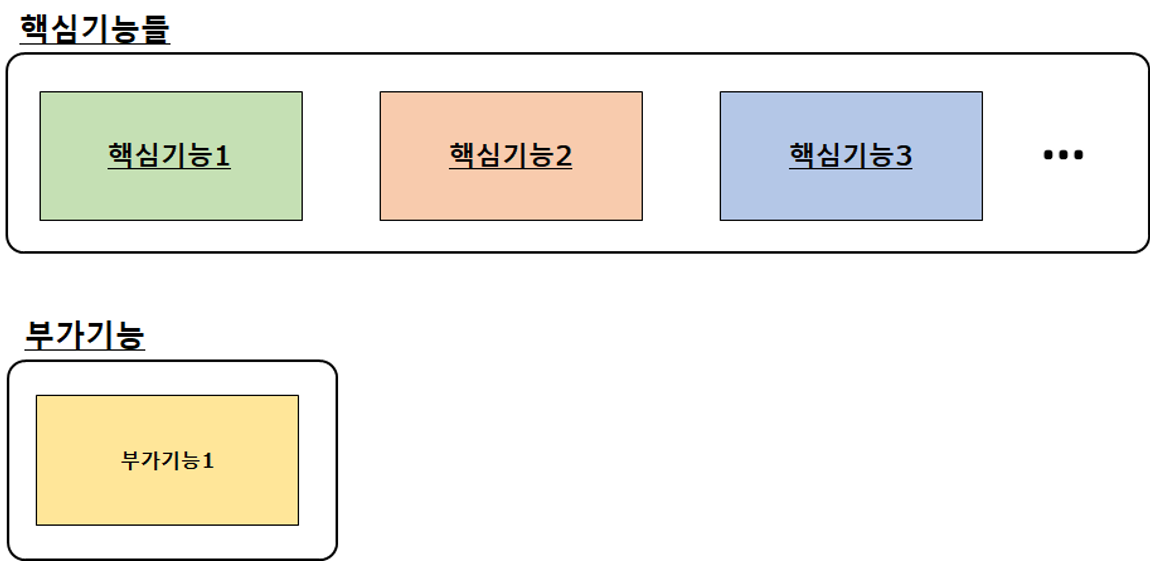
- 부가기능을 모듈화
- AOP (Aspect Oriented Programming) 를 통해 부가기능을 모듈화 : '부가기능'은 '핵심기능'과는 관점(Aspect), 관심이 다르다, 따라서 '핵심기능'과 분리해서 '부가기능' 중심으로 설계, 구현 가능
5-9 Spring AOP란 무엇일까?
- Spring의 AOP 애너테이션
- @Aspect : Spring 빈(Bean) 클래스에만 적용 가능
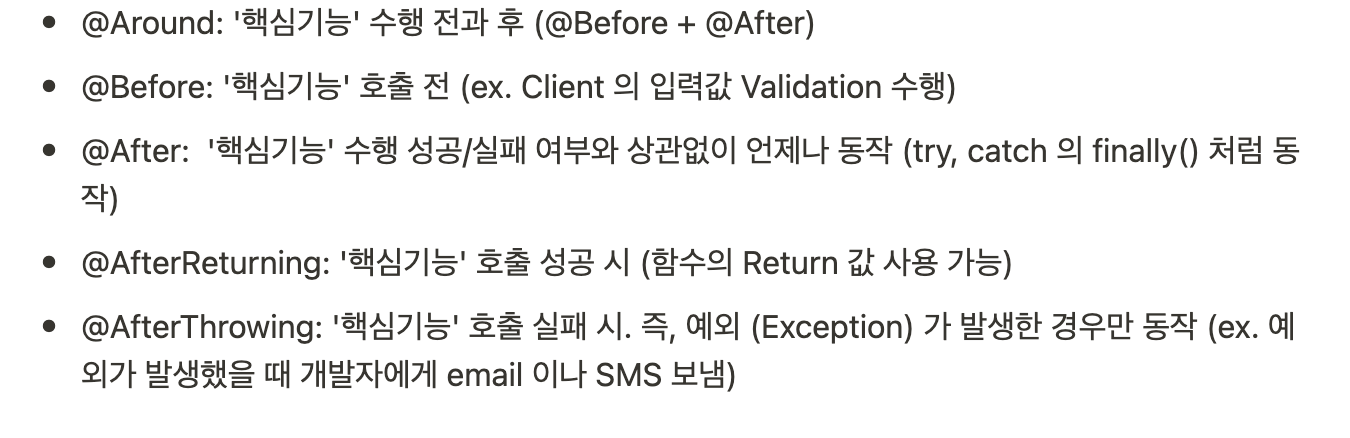
- 어드바이스 종류
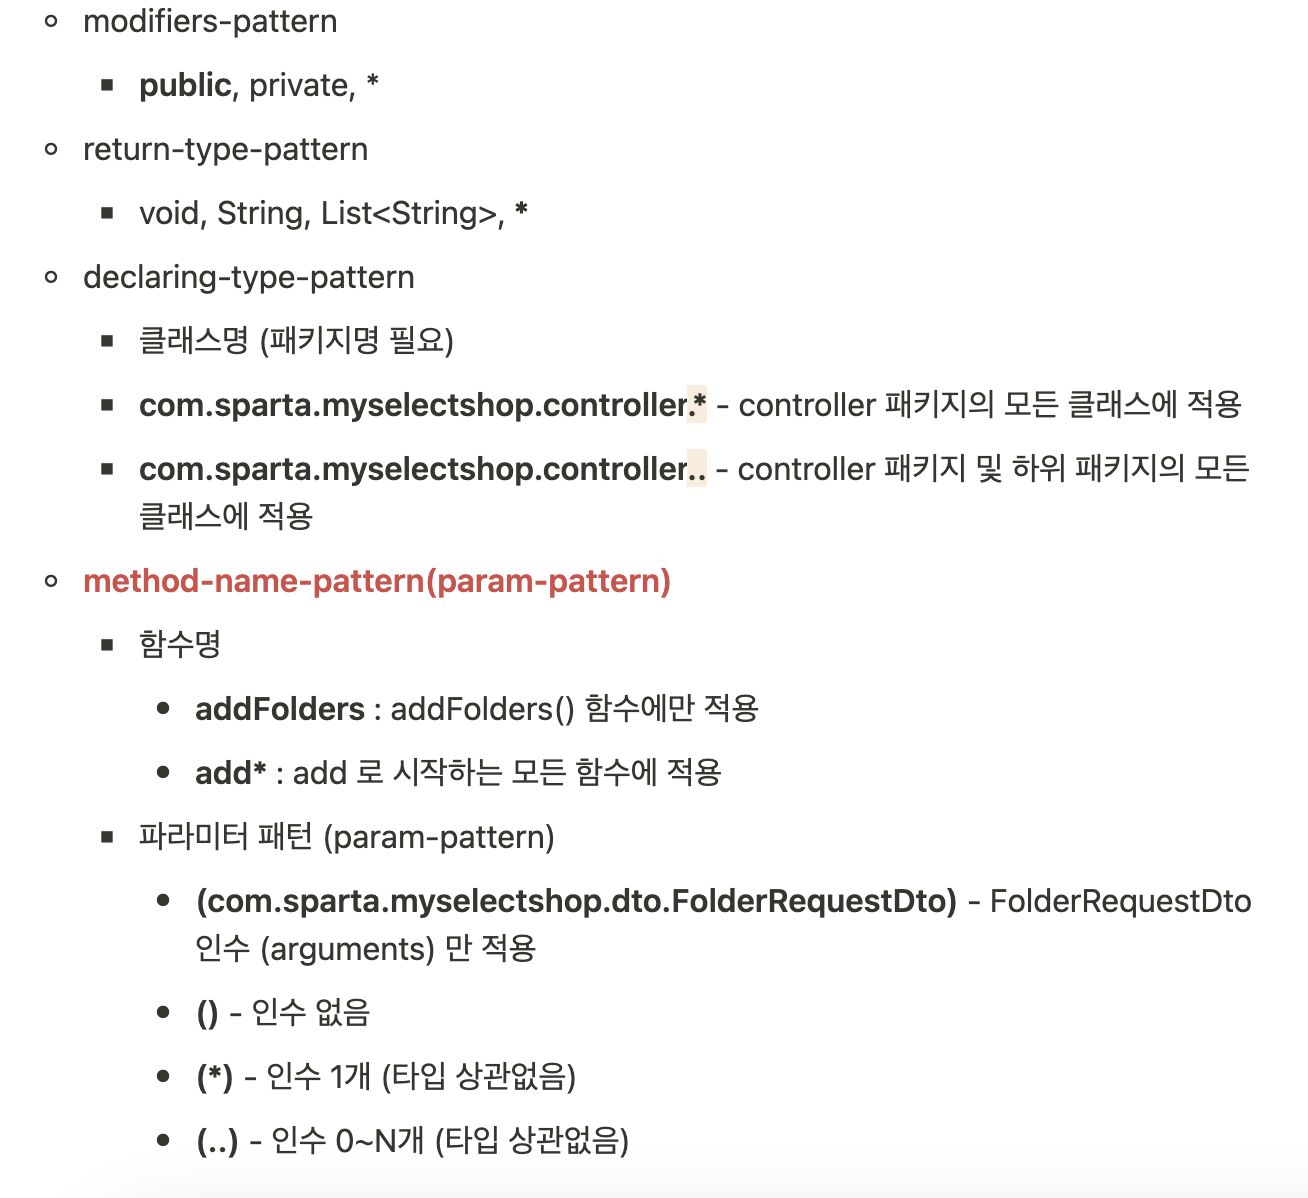
- 포인트컷
// 포인트컷 Expression 예제

@Around("execution(public * com.sparta.myselectshop.controller..*(..))")
public Object execute(ProceedingJoinPoint joinPoint) throws Throwable { ... }
@Pointcut : 포인트컷 재사용 가능, 포인트컷 결합 (combine) 가능
@Component
@Aspect
public class Aspect {
	@Pointcut("execution(* com.sparta.myselectshop.controller.*.*(..))")
	private void forAllController() {}

	@Pointcut("execution(String com.sparta.myselectshop.controller.*.*())")
	private void forAllViewController() {}

	@Around("forAllContorller() && !forAllViewController()")
	public void saveRestApiLog() {
		...
	}

	@Around("forAllContorller()")
	public void saveAllApiLog() {
		...
	}
}- Spring AOP 적용
- ProductController 에 추가했던 부가기능 제거 (Rollback)
// Rollback

@PostMapping("/products")
public ProductResponseDto createProduct(@RequestBody ProductRequestDto requestDto, @AuthenticationPrincipal UserDetailsImpl userDetails) {
    return productService.createProduct(requestDto, userDetails.getUser());
}
- AOP 사용해 FolderController, ProductController, NaverApiController 에 부가기능 추가
// aop > UseTimeAop

package com.sparta.myselectshop.aop;

import com.sparta.myselectshop.entity.ApiUseTime;
import com.sparta.myselectshop.entity.User;
import com.sparta.myselectshop.repository.ApiUseTimeRepository;
import com.sparta.myselectshop.security.UserDetailsImpl;
import lombok.extern.slf4j.Slf4j;
import org.aspectj.lang.ProceedingJoinPoint;
import org.aspectj.lang.annotation.Around;
import org.aspectj.lang.annotation.Aspect;
import org.aspectj.lang.annotation.Pointcut;
import org.springframework.security.core.Authentication;
import org.springframework.security.core.context.SecurityContextHolder;
import org.springframework.stereotype.Component;

@Slf4j(topic = "UseTimeAop")
@Aspect
@Component
public class UseTimeAop {

    private final ApiUseTimeRepository apiUseTimeRepository;

    public UseTimeAop(ApiUseTimeRepository apiUseTimeRepository) {
        this.apiUseTimeRepository = apiUseTimeRepository;
    }

    @Pointcut("execution(* com.sparta.myselectshop.controller.ProductController.*(..))")
    private void product() {}
    @Pointcut("execution(* com.sparta.myselectshop.controller.FolderController.*(..))")
    private void folder() {}
    @Pointcut("execution(* com.sparta.myselectshop.naver.controller.NaverApiController.*(..))")
    private void naver() {}

    @Around("product() || folder() || naver()")
    public Object execute(ProceedingJoinPoint joinPoint) throws Throwable {
        // 측정 시작 시간
        long startTime = System.currentTimeMillis();

        try {
            // 핵심기능 수행
            Object output = joinPoint.proceed();
            return output;
        } finally {
            // 측정 종료 시간
            long endTime = System.currentTimeMillis();
            // 수행시간 = 종료 시간 - 시작 시간
            long runTime = endTime - startTime;

            // 로그인 회원이 없는 경우, 수행시간 기록하지 않음
            Authentication auth = SecurityContextHolder.getContext().getAuthentication();
            if (auth != null && auth.getPrincipal().getClass() == UserDetailsImpl.class) {
                // 로그인 회원 정보
                UserDetailsImpl userDetails = (UserDetailsImpl) auth.getPrincipal();
                User loginUser = userDetails.getUser();

                // API 사용시간 및 DB 에 기록
                ApiUseTime apiUseTime = apiUseTimeRepository.findByUser(loginUser).orElse(null);
                if (apiUseTime == null) {
                    // 로그인 회원의 기록이 없으면
                    apiUseTime = new ApiUseTime(loginUser, runTime);
                } else {
                    // 로그인 회원의 기록이 이미 있으면
                    apiUseTime.addUseTime(runTime);
                }

                log.info("[API Use Time] Username: " + loginUser.getUsername() + ", Total Time: " + apiUseTime.getTotalTime() + " ms");
                apiUseTimeRepository.save(apiUseTime);
            }
        }
    }
}
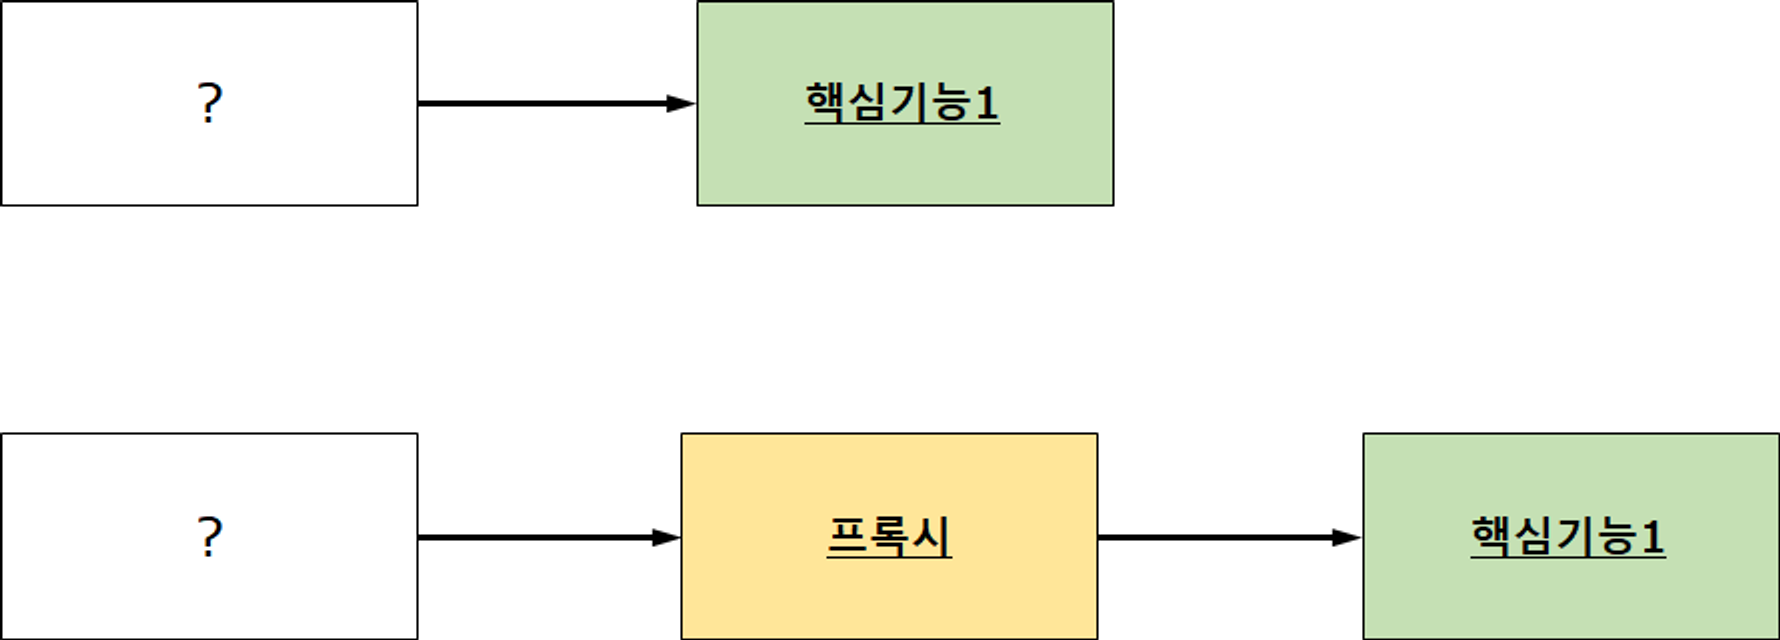
- Spring AOP 동작 이해
- 개념적 이해

- 스프링 실제 동작
- 시퀀스 다이어그램 (Sequence Diagram)
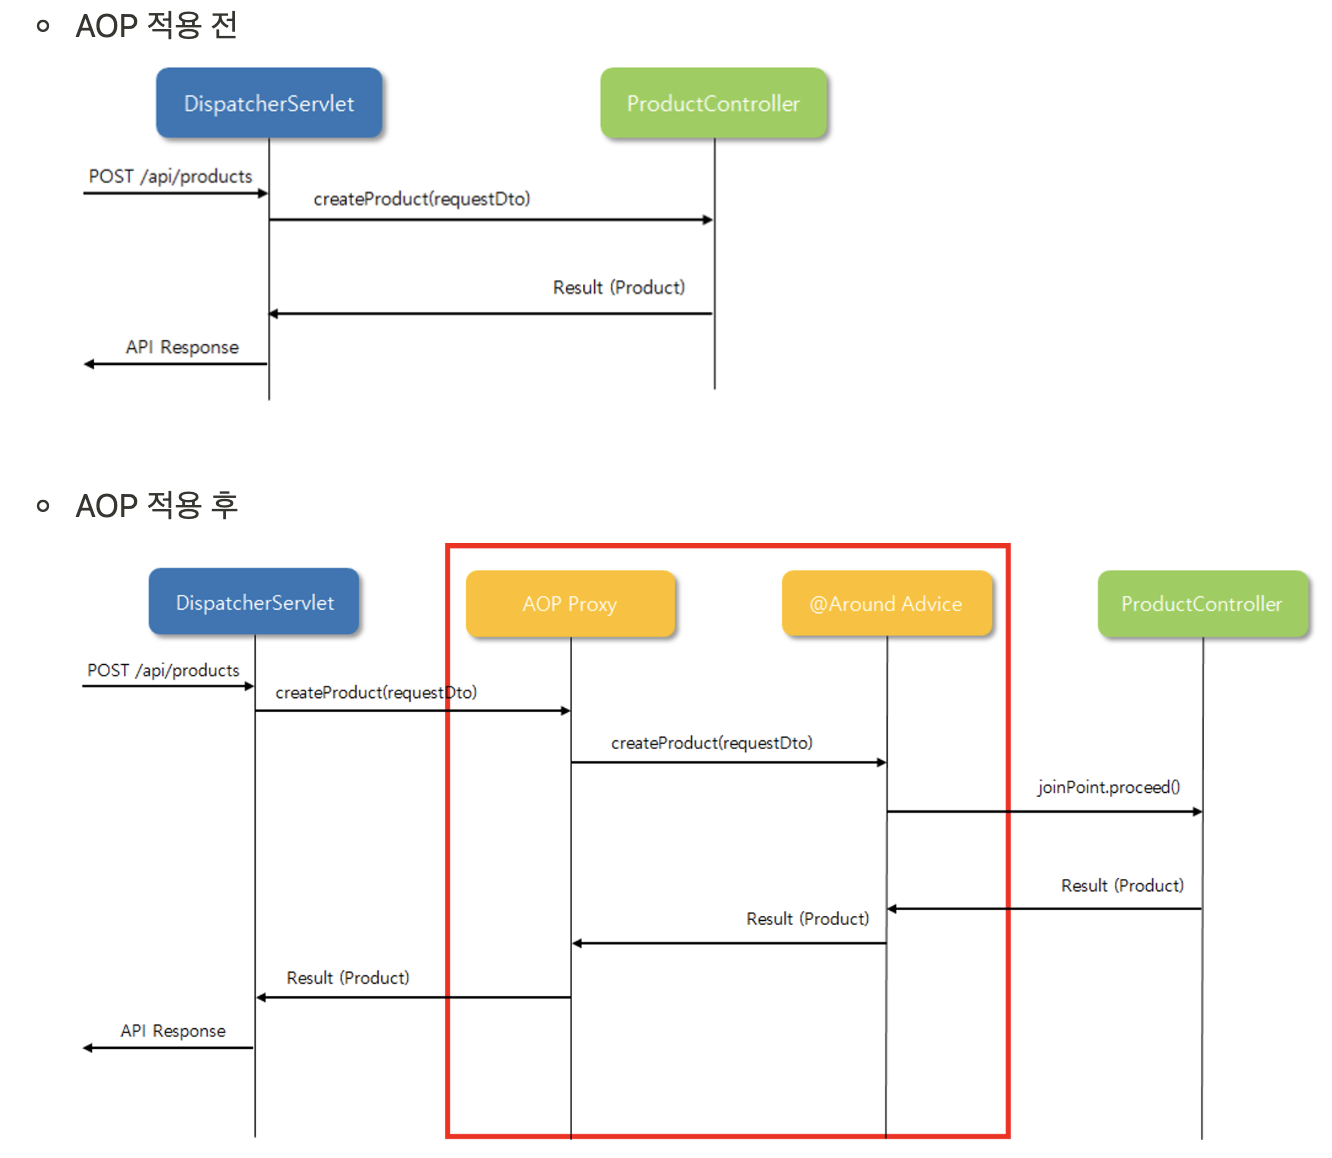
Spring이 프록시(가짜 혹은 대리) 객체를 중간에 삽입
DispatcherServlet 과 ProductController 입장에서는 변화가 전혀 없다.
: 호출되는 함수의 input, output 이 완전 동일
: "joinPoint.proceed()" 에 의해서 원래 호출하려고 했던 함수, 인수(argument) 가 전달 > createProduct(requestDto);
5-10 API 예외처리란 무엇일까?
- 예외 처리를 따로 배우는 이유!
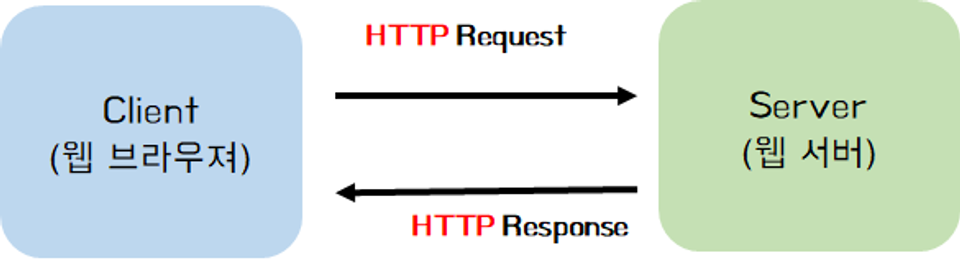
- 첫 번째 : 웹 애플리케이션의 “예외”에 대하여 다시 한 번 인지할 필요가 있다. 웹 애플리케이션에서의 에러를 Client와 Server 모두가 잘 알지 못하면, 서비스하는 환경에서 발생하는 에러에 대해서 제대로 대응 할 수 없다.
- 두 번째 : 에러를 처리하는 것 역시 관심사를 분리해서 더 효율적으로 처리 할 수 있지 않을까 고민해보는 시간이 필요
- 웹 애플리케이션의 에러
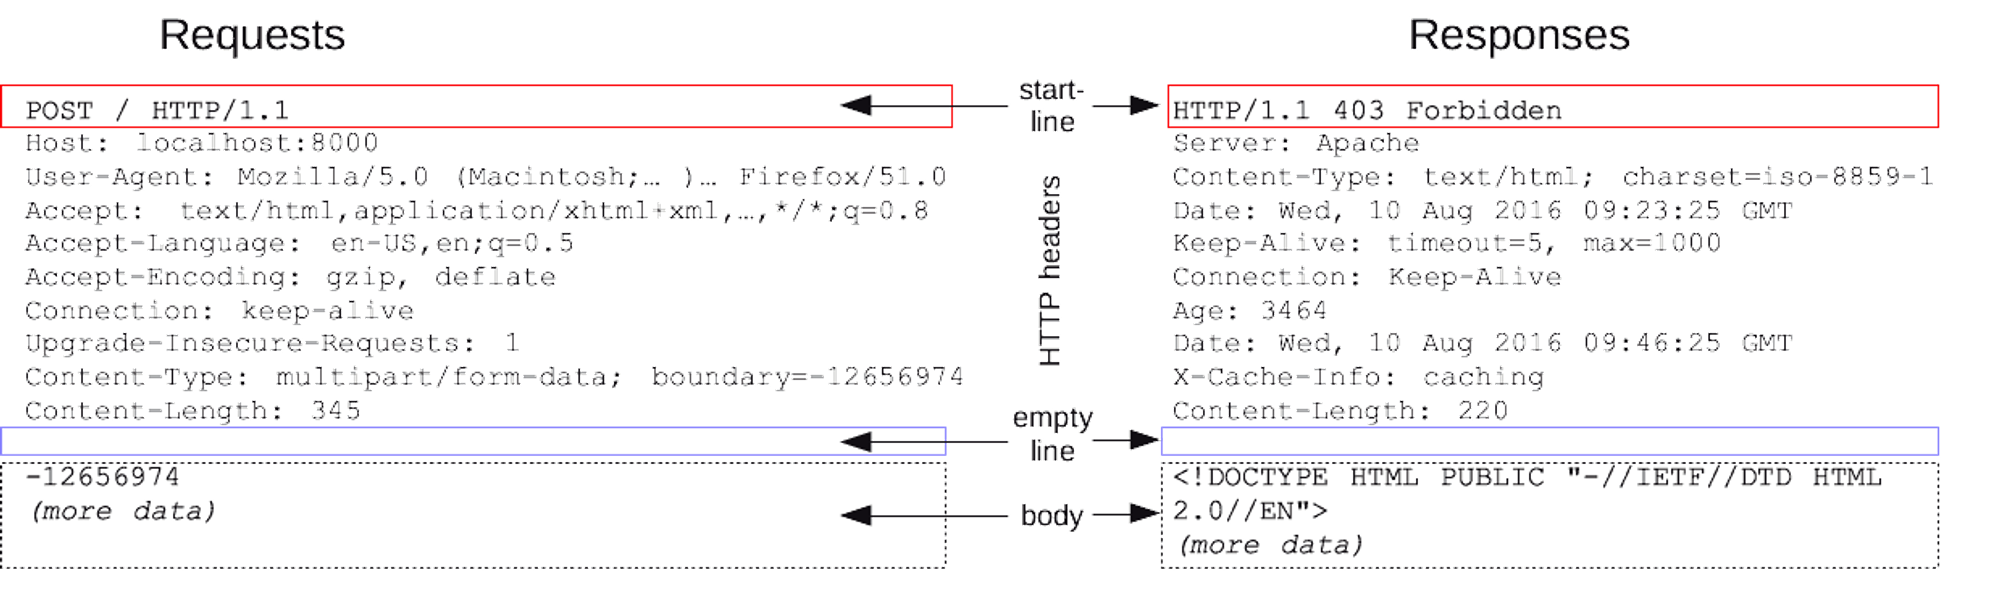
- Response 메시지
// start-line (상태줄) : API 요청 결과 (상태 코드, 상태 텍스트)

HTTP/1.1 404 Not Found


// HTTP 상태 코드 종류
// org.springframework.http > HttpStatus

public enum HttpStatus {
	// 1xx Informational
	CONTINUE(100, Series.INFORMATIONAL, "Continue"),
	// ...

	// 2xx Success
	OK(200, Series.SUCCESSFUL, "OK"),
	CREATED(201, Series.SUCCESSFUL, "Created"),
	// ...

	// 3xx Redirection
	MULTIPLE_CHOICES(300, Series.REDIRECTION, "Multiple Choices"),
	MOVED_PERMANENTLY(301, Series.REDIRECTION, "Moved Permanently"),
	FOUND(302, Series.REDIRECTION, "Found"),
	// ...

	// --- 4xx Client Error ---
	BAD_REQUEST(400, Series.CLIENT_ERROR, "Bad Request"),
	UNAUTHORIZED(401, Series.CLIENT_ERROR, "Unauthorized"),
	PAYMENT_REQUIRED(402, Series.CLIENT_ERROR, "Payment Required"),
	FORBIDDEN(403, Series.CLIENT_ERROR, "Forbidden"),
	// ...


	// --- 5xx Server Error ---
	INTERNAL_SERVER_ERROR(500, Series.SERVER_ERROR, "Internal Server Error"),
	NOT_IMPLEMENTED(501, Series.SERVER_ERROR, "Not Implemented"),
	BAD_GATEWAY(502, Series.SERVER_ERROR, "Bad Gateway"),
	// ...
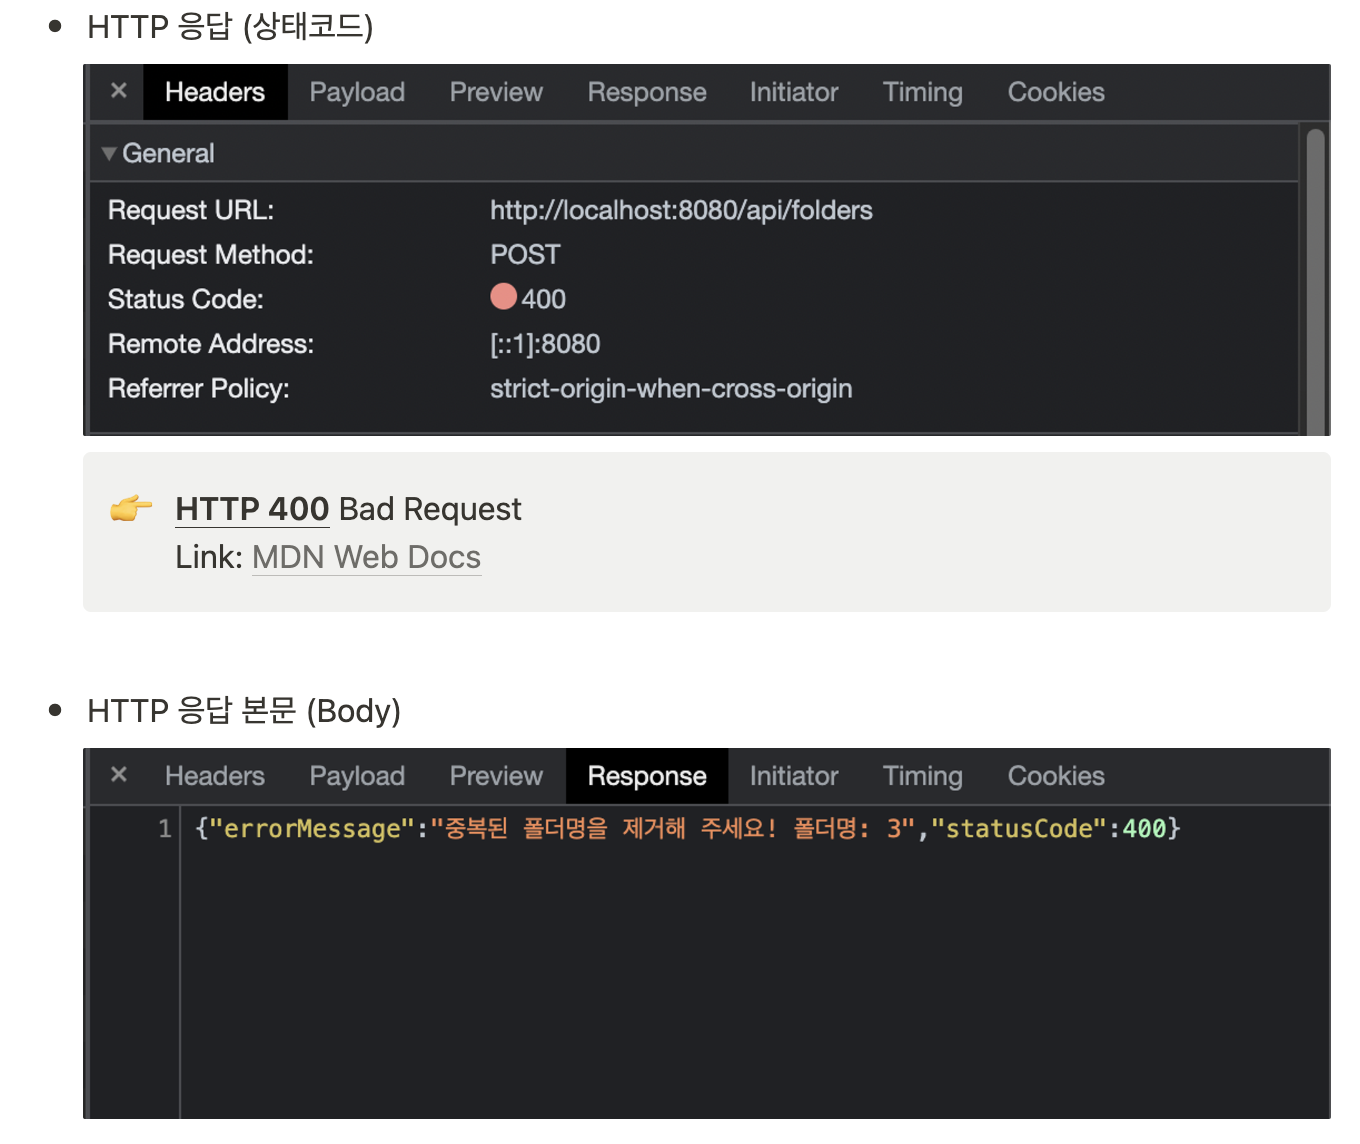
- 중복 폴더 Error 발생 시 어떻게 응답되는지 Client 에러 메시지를 확인

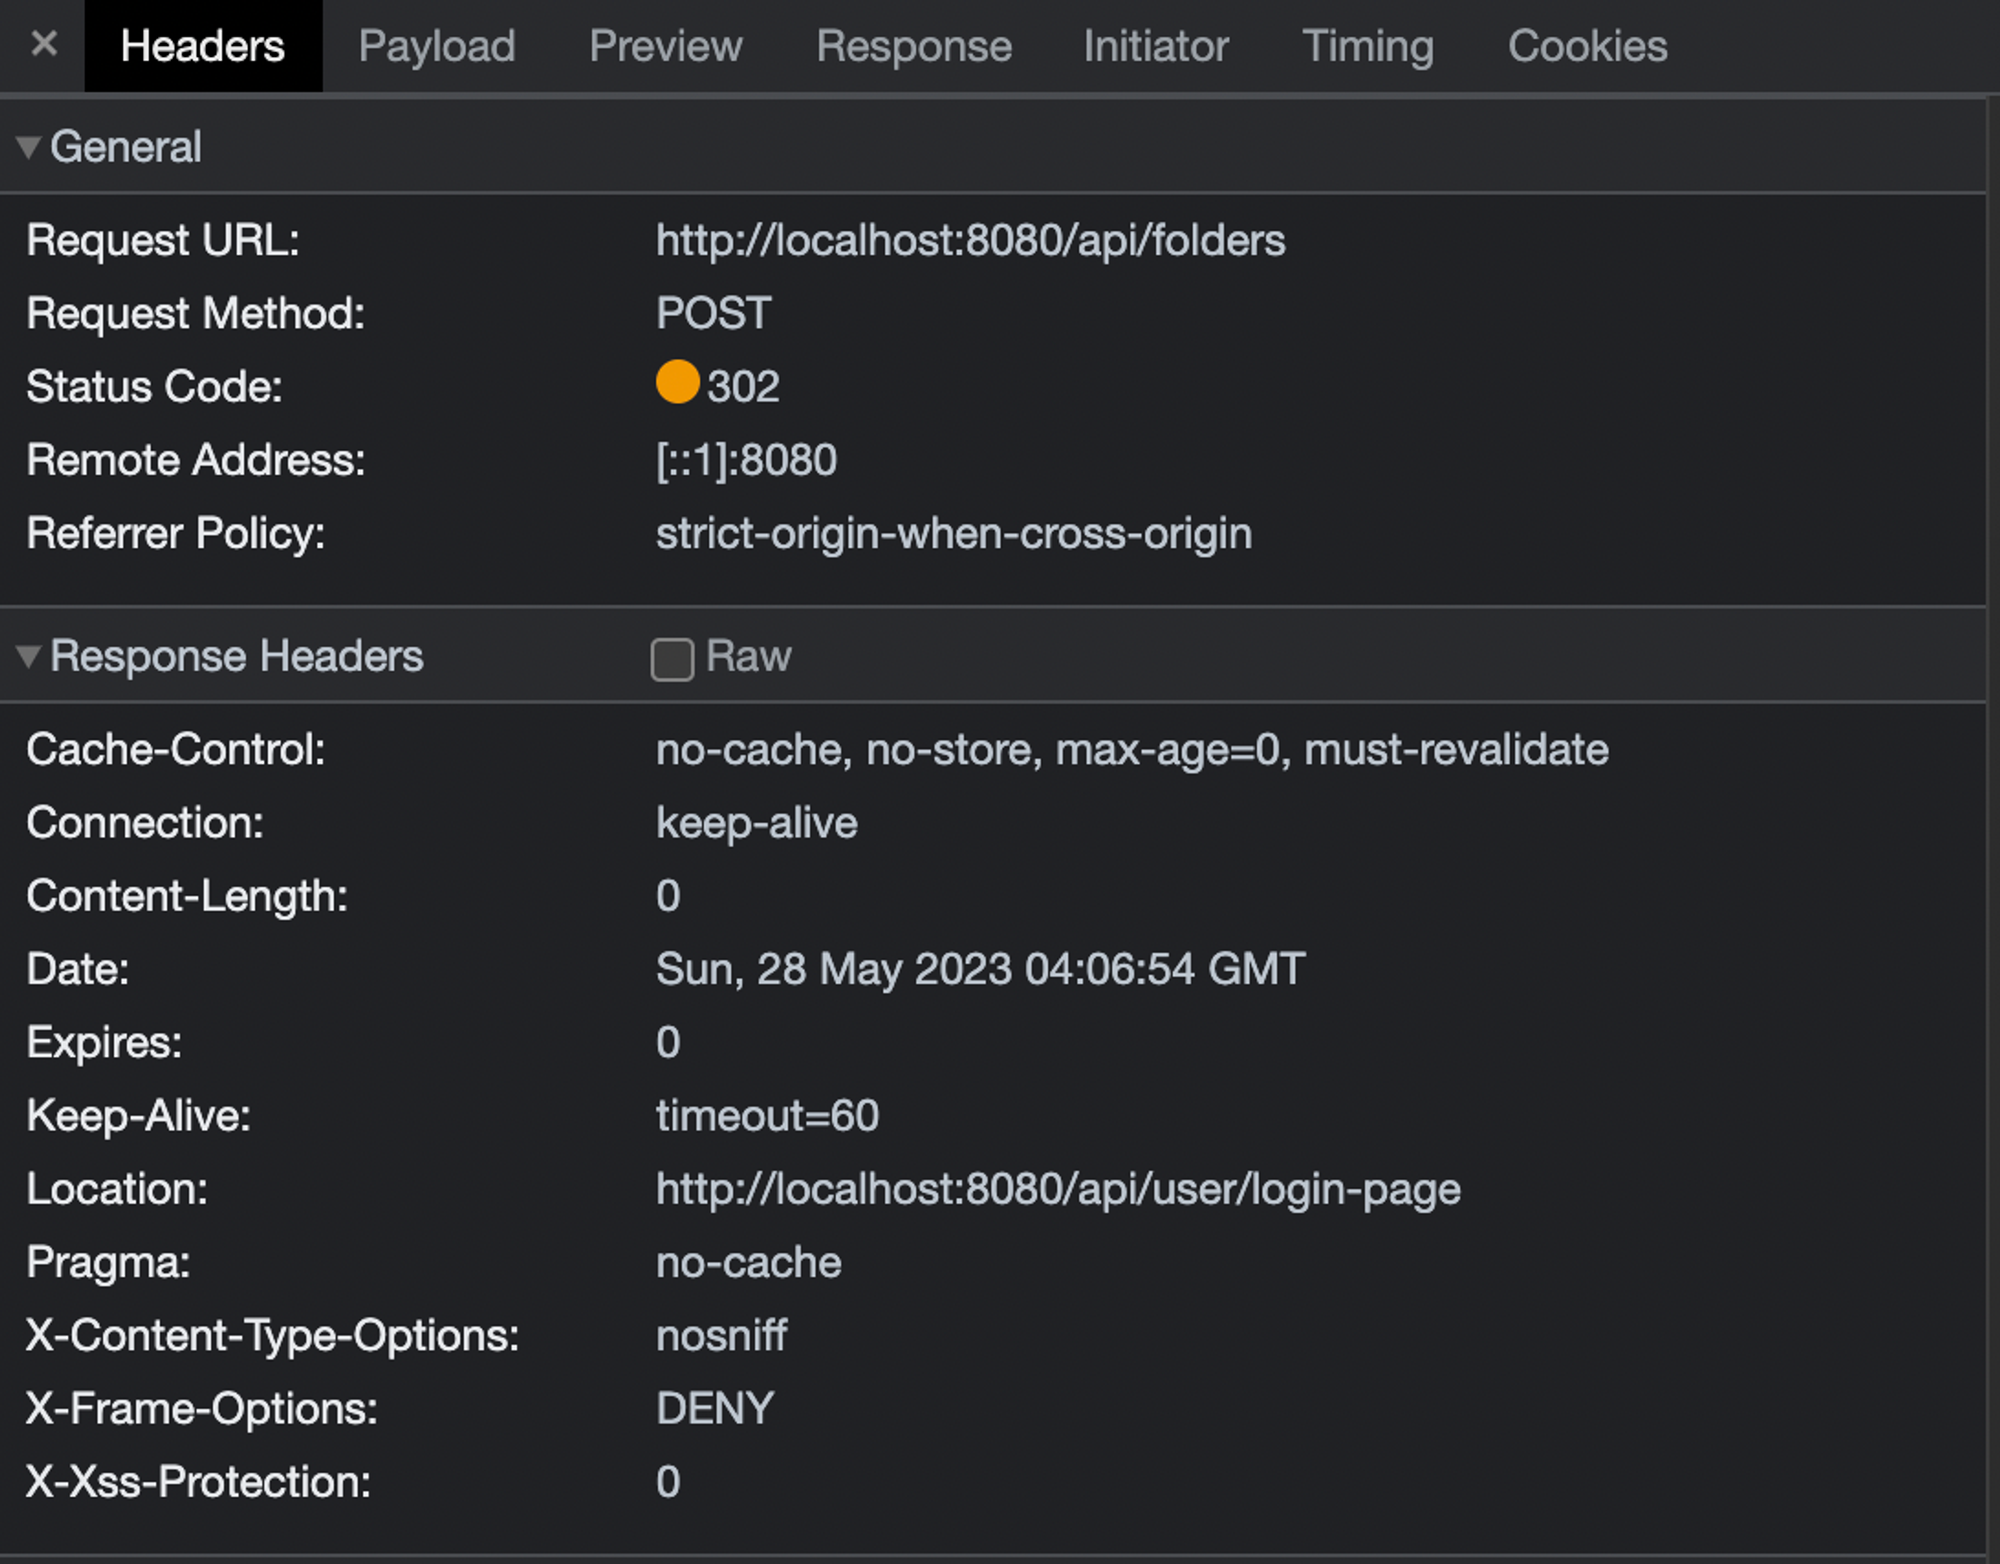
내부적으로 Security에 의해서 Error가 발생하자 로그인 페이지를 반환 > Client에서는 이를 제어하여 Error가 발생한 것 처럼 처리 > 따라서 제대로된 Error 처리를 위해 요구사항을 보내옴
- Client의 Error 처리에 대한 요구사항
폴더 중복 발생 시 상태코드는 400 : statusCode : 400
errorMessage : 중복된 폴더명을 제거해 주세요! 폴더명: {중복 폴더명}
- Spring 예외처리 방법
- Controller 코드 수정
//  RestApiException

@Getter
@AllArgsConstructor
public class RestApiException {
    private String errorMessage;
    private int statusCode;
}


//  addFolders 메서드

@PostMapping("/folders")
public ResponseEntity<RestApiException> addFolders(@RequestBody FolderRequestDto folderRequestDto,
                                 @AuthenticationPrincipal UserDetailsImpl userDetails) {
    try {
        List<String> folderNames = folderRequestDto.getFolderNames();

        folderService.addFolders(folderNames, userDetails.getUser());
        return new ResponseEntity<>(HttpStatus.OK);
    } catch(IllegalArgumentException ex) {
        RestApiException restApiException = new RestApiException(ex.getMessage(), HttpStatus.BAD_REQUEST.value());
        return new ResponseEntity<>(
                // HTTP body
                restApiException,
                // HTTP status code
                HttpStatus.BAD_REQUEST);
    }
}
- @ExceptionHandler 사용
@ExceptionHandler 는 Spring에서 예외처리를 위한 애너테이션 : @ExceptionHandler 가 붙어있는 메서드는 Controller에서 예외가 발생했을 때 호출 되며, 해당 예외를 처리하는 로직, AOP를 이용한 예외처리 방식이기때문에, 위에서 본 예시처럼 메서드 마다 try catch할 필요없이 깔금한 예외처리가 가능
// @ExceptionHandler 예외처리 추가

@ExceptionHandler({IllegalArgumentException.class})
public ResponseEntity<RestApiException> handleException(IllegalArgumentException ex) {
    RestApiException restApiException = new RestApiException(ex.getMessage(), HttpStatus.BAD_REQUEST.value());
    return new ResponseEntity<>(
            // HTTP body
            restApiException,
            // HTTP status code
            HttpStatus.BAD_REQUEST
    );
}


// basic.js

const host = 'http://' + window.location.host;
let targetId;
let folderTargetId;

$(document).ready(function () {
    const auth = getToken();

    if (auth !== undefined && auth !== '') {
        $.ajaxPrefilter(function (options, originalOptions, jqXHR) {
            jqXHR.setRequestHeader('Authorization', auth);
        });
    } else {
        window.location.href = host + '/api/user/login-page';
        return;
    }

    $.ajax({
        type: 'GET',
        url: `/api/user-info`,
        contentType: 'application/json',
    })
        .done(function (res, status, xhr) {
            const username = res.username;
            const isAdmin = !!res.admin;

            if (!username) {
                window.location.href = '/api/user/login-page';
                return;
            }

            $('#username').text(username);
            if (isAdmin) {
                $('#admin').text(true);
                showProduct();
            } else {
                showProduct();
            }

            // 로그인한 유저의 폴더
            $.ajax({
                type: 'GET',
                url: `/api/user-folder`,
                error(error) {
                    logout();
                }
            }).done(function (fragment) {
                $('#fragment').replaceWith(fragment);
            });

        })
        .fail(function (jqXHR, textStatus) {
            logout();
        });

    // id 가 query 인 녀석 위에서 엔터를 누르면 execSearch() 함수를 실행하라는 뜻입니다.
    $('#query').on('keypress', function (e) {
        if (e.key == 'Enter') {
            execSearch();
        }
    });
    $('#close').on('click', function () {
        $('#container').removeClass('active');
    })
    $('#close2').on('click', function () {
        $('#container2').removeClass('active');
    })
    $('.nav div.nav-see').on('click', function () {
        $('div.nav-see').addClass('active');
        $('div.nav-search').removeClass('active');

        $('#see-area').show();
        $('#search-area').hide();
    })
    $('.nav div.nav-search').on('click', function () {
        $('div.nav-see').removeClass('active');
        $('div.nav-search').addClass('active');

        $('#see-area').hide();
        $('#search-area').show();
    })

    $('#see-area').show();
    $('#search-area').hide();
})

function numberWithCommas(x) {
    return x.toString().replace(/\B(?=(\d{3})+(?!\d))/g, ",");
}

function execSearch() {
    /**
     * 검색어 input id: query
     * 검색결과 목록: #search-result-box
     * 검색결과 HTML 만드는 함수: addHTML
     */
        // 1. 검색창의 입력값을 가져온다.
    let query = $('#query').val();

    // 2. 검색창 입력값을 검사하고, 입력하지 않았을 경우 focus.
    if (query == '') {
        alert('검색어를 입력해주세요');
        $('#query').focus();
        return;
    }
    // 3. GET /api/search?query=${query} 요청
    $.ajax({
        type: 'GET',
        url: `/api/search?query=${query}`,
        success: function (response) {
            $('#search-result-box').empty();
            // 4. for 문마다 itemDto를 꺼내서 HTML 만들고 검색결과 목록에 붙이기!
            for (let i = 0; i < response.length; i++) {
                let itemDto = response[i];
                let tempHtml = addHTML(itemDto);
                $('#search-result-box').append(tempHtml);
            }
        },
        error(error, status, request) {
            logout();
        }
    })

}

function addHTML(itemDto) {
    /**
     * class="search-itemDto" 인 녀석에서
     * image, title, lprice, addProduct 활용하기
     * 참고) onclick='addProduct(${JSON.stringify(itemDto)})'
     */
    return `<div class="search-itemDto">
        <div class="search-itemDto-left">
            <img src="${itemDto.image}" alt="">
        </div>
        <div class="search-itemDto-center">
            <div>${itemDto.title}</div>
            <div class="price">
                ${numberWithCommas(itemDto.lprice)}
                <span class="unit">원</span>
            </div>
        </div>
        <div class="search-itemDto-right">
            <img src="../images/icon-save.png" alt="" onclick='addProduct(${JSON.stringify(itemDto)})'>
        </div>
    </div>`
}

function addProduct(itemDto) {
    /**
     * modal 뜨게 하는 법: $('#container').addClass('active');
     * data를 ajax로 전달할 때는 두 가지가 매우 중요
     * 1. contentType: "application/json",
     * 2. data: JSON.stringify(itemDto),
     */

    // 1. POST /api/products 에 관심 상품 생성 요청
    $.ajax({
        type: 'POST',
        url: '/api/products',
        contentType: 'application/json',
        data: JSON.stringify(itemDto),
        success: function (response) {
            // 2. 응답 함수에서 modal을 뜨게 하고, targetId 를 reponse.id 로 설정
            $('#container').addClass('active');
            targetId = response.id;
        },
        error(error, status, request) {
            logout();
        }
    });
}

function showProduct(folderId = null) {
    /**
     * 관심상품 목록: #product-container
     * 검색결과 목록: #search-result-box
     * 관심상품 HTML 만드는 함수: addProductItem
     */

    let dataSource = null;

    var sorting = $("#sorting option:selected").val();
    var isAsc = $(':radio[name="isAsc"]:checked').val();

    if (folderId) {
        dataSource = `/api/folders/${folderId}/products?sortBy=${sorting}&isAsc=${isAsc}`;
    } else if(folderTargetId === undefined) {
        dataSource = `/api/products?sortBy=${sorting}&isAsc=${isAsc}&folderId=${folderId}`;
    } else {
        dataSource = `/api/folders/${folderTargetId}/products?sortBy=${sorting}&isAsc=${isAsc}`;
    }

    $('#product-container').empty();
    $('#search-result-box').empty();
    $('#pagination').pagination({
        dataSource,
        locator: 'content',
        alias: {
            pageNumber: 'page',
            pageSize: 'size'
        },
        totalNumberLocator: (response) => {
            return response.totalElements;
        },
        pageSize: 10,
        showPrevious: true,
        showNext: true,
        ajax: {
            beforeSend: function () {
                $('#product-container').html('상품 불러오는 중...');
            },
            error(error, status, request) {
                if (error.status === 403) {
                    $('html').html(error.responseText);
                    return;
                }
                logout();
            }
        },
        callback: function (response, pagination) {
            $('#product-container').empty();
            for (let i = 0; i < response.length; i++) {
                let product = response[i];
                let tempHtml = addProductItem(product);
                $('#product-container').append(tempHtml);
            }
        }
    });
}

// Folder 관련 기능
function openFolder(folderId) {
    folderTargetId = folderId;
    $("button.product-folder").removeClass("folder-active");
    if (!folderId) {
        $("button#folder-all").addClass('folder-active');
    } else {
        $(`button[value='${folderId}']`).addClass('folder-active');
    }
    showProduct(folderId);
}

// 폴더 추가 팝업
function openAddFolderPopup() {
    $('#container2').addClass('active');
}

// 폴더 Input 추가
function addFolderInput() {
    $('#folders-input').append(
        `<input type="text" class="folderToAdd" placeholder="추가할 폴더명">
       <span onclick="closeFolderInput(this)" style="margin-right:5px">
            <svg xmlns="http://www.w3.org/2000/svg" width="30px" fill="red" class="bi bi-x-circle-fill" viewBox="0 0 16 16">
              <path d="M16 8A8 8 0 1 1 0 8a8 8 0 0 1 16 0zM5.354 4.646a.5.5 0 1 0-.708.708L7.293 8l-2.647 2.646a.5.5 0 0 0 .708.708L8 8.707l2.646 2.647a.5.5 0 0 0 .708-.708L8.707 8l2.647-2.646a.5.5 0 0 0-.708-.708L8 7.293 5.354 4.646z"/>
            </svg>
       </span>
      `
    );
}

function closeFolderInput(folder) {
    $(folder).prev().remove();
    $(folder).next().remove();
    $(folder).remove();
}

function addFolder() {
    const folderNames = $('.folderToAdd').toArray().map(input => input.value);
    try {
        folderNames.forEach(name => {
            if (name === '') {
                alert('올바른 폴더명을 입력해주세요');
                throw new Error("stop loop");
            }
        });
    } catch (e) {
        console.log(e);
        return;
    }

    $.ajax({
        type: "POST",
        url: `/api/folders`,
        contentType: "application/json",
        data: JSON.stringify({
            folderNames
        })
    }).done(function (data, textStatus, xhr) {
        if(data !== '') {
            alert("중복된 폴더입니다.");
            return;
        }
        $('#container2').removeClass('active');
        alert('성공적으로 등록되었습니다.');
        window.location.reload();
    })
        .fail(function(xhr, textStatus, errorThrown) {
            alert(xhr.responseJSON.errorMessage);
            console.log(xhr.status)
        });
}

function addProductItem(product) {
    const folders = product.productFolderList.map(folder =>
        `
            <span onclick="openFolder(${folder.id})">
                #${folder.name}
            </span>
        `
    );
    return `<div class="product-card">
                <div onclick="window.location.href='${product.link}'">
                    <div class="card-header">
                        <img src="${product.image}"
                             alt="">
                    </div>
                    <div class="card-body">
                        <div class="title">
                            ${product.title}
                        </div>
                        <div class="lprice">
                            <span>${numberWithCommas(product.lprice)}</span>원
                        </div>
                        <div class="isgood ${product.lprice > product.myprice ? 'none' : ''}">
                            최저가
                        </div>
                    </div>
                </div>
                <div class="product-tags" style="margin-bottom: 20px;">
                    ${folders}
                    <span onclick="addInputForProductToFolder(${product.id}, this)">
                        <svg xmlns="http://www.w3.org/2000/svg" width="30px" fill="currentColor" class="bi bi-folder-plus" viewBox="0 0 16 16">
                            <path d="M.5 3l.04.87a1.99 1.99 0 0 0-.342 1.311l.637 7A2 2 0 0 0 2.826 14H9v-1H2.826a1 1 0 0 1-.995-.91l-.637-7A1 1 0 0 1 2.19 4h11.62a1 1 0 0 1 .996 1.09L14.54 8h1.005l.256-2.819A2 2 0 0 0 13.81 3H9.828a2 2 0 0 1-1.414-.586l-.828-.828A2 2 0 0 0 6.172 1H2.5a2 2 0 0 0-2 2zm5.672-1a1 1 0 0 1 .707.293L7.586 3H2.19c-.24 0-.47.042-.684.12L1.5 2.98a1 1 0 0 1 1-.98h3.672z"/>
                            <path d="M13.5 10a.5.5 0 0 1 .5.5V12h1.5a.5.5 0 0 1 0 1H14v1.5a.5.5 0 0 1-1 0V13h-1.5a.5.5 0 0 1 0-1H13v-1.5a.5.5 0 0 1 .5-.5z"/>
                        </svg>
                    </span>
                </div>
            </div>`;
}

function addInputForProductToFolder(productId, button) {
    $.ajax({
        type: 'GET',
        url: `/api/folders`,
        success: function (folders) {
            const options = folders.map(folder => `<option value="${folder.id}">${folder.name}</option>`)
            const form = `
                <span>
                    <form id="folder-select" method="post" autocomplete="off" action="/api/products/${productId}/folder">
                        <select name="folderId" form="folder-select">
                            ${options}
                        </select>
                        <input type="submit" value="추가" style="padding: 5px; font-size: 12px; margin-left: 5px;">
                    </form>
                </span>
            `;
            $(form).insertBefore(button);
            $(button).remove();
            $("#folder-select").on('submit', function (e) {
                e.preventDefault();
                $.ajax({
                    type: $(this).prop('method'),
                    url: $(this).prop('action'),
                    data: $(this).serialize(),
                }).done(function (data, textStatus, xhr) {
                    if(data !== '') {
                        alert("중복된 폴더입니다.");
                        return;
                    }
                    alert('성공적으로 등록되었습니다.');
                    window.location.reload();
                })
                    .fail(function(xhr, textStatus, errorThrown) {
                        alert(xhr.responseJSON.errorMessage);
                        console.log(xhr.status)
                    });
            });
        },
        error(error, status, request) {
            logout();
        }
    });
}

function setMyprice() {
    /**
     * 1. id가 myprice 인 input 태그에서 값을 가져온다.
     * 2. 만약 값을 입력하지 않았으면 alert를 띄우고 중단한다.
     * 3. PUT /api/product/${targetId} 에 data를 전달한다.
     *    주의) contentType: "application/json",
     *         data: JSON.stringify({myprice: myprice}),
     *         빠뜨리지 말 것!
     * 4. 모달을 종료한다. $('#container').removeClass('active');
     * 5, 성공적으로 등록되었음을 알리는 alert를 띄운다.
     * 6. 창을 새로고침한다. window.location.reload();
     */
        // 1. id가 myprice 인 input 태그에서 값을 가져온다.
    let myprice = $('#myprice').val();
    // 2. 만약 값을 입력하지 않았으면 alert를 띄우고 중단한다.
    if (myprice == '') {
        alert('올바른 가격을 입력해주세요');
        return;
    }

    // 3. PUT /api/product/${targetId} 에 data를 전달한다.
    $.ajax({
        type: 'PUT',
        url: `/api/products/${targetId}`,
        contentType: 'application/json',
        data: JSON.stringify({myprice: myprice}),
        success: function (response) {

            // 4. 모달을 종료한다. $('#container').removeClass('active');
            $('#container').removeClass('active');
            // 5. 성공적으로 등록되었음을 알리는 alert를 띄운다.
            alert('성공적으로 등록되었습니다.');
            // 6. 창을 새로고침한다. window.location.reload();
            window.location.reload();
        },
        error(error, status, request) {
            logout();
        }
    })
}

function logout() {
    // 토큰 삭제
    Cookies.remove('Authorization', {path: '/'});
    window.location.href = host + '/api/user/login-page';
}

function getToken() {

    let auth = Cookies.get('Authorization');

    if(auth === undefined) {
        return '';
    }

    // kakao 로그인 사용한 경우 Bearer 추가
    if(auth.indexOf('Bearer') === -1 && auth !== ''){
        auth = 'Bearer ' + auth;
    }

    return auth;
}
- 예외처리 적용 결과 확인
5-11 Spring의 Global 예외처리
- Global 예외처리 방법
// exception > GlobalExceptionHandler

@RestControllerAdvice
public class GlobalExceptionHandler {

    @ExceptionHandler({IllegalArgumentException.class})
    public ResponseEntity<RestApiException> handleException(IllegalArgumentException ex) {
        RestApiException restApiException = new RestApiException(ex.getMessage(), HttpStatus.BAD_REQUEST.value());
        return new ResponseEntity<>(
                // HTTP body
                restApiException,
                // HTTP status code
                HttpStatus.BAD_REQUEST
        );
    }
}
5-12 Error 메시지 관리하기
- Spring의 properties 파일을 이용한 에러 메시지 관리
- 에러 메시지는 properties 파일에서 key-value 형태로 작성되며, 작성된 값은 messageSource 를 Bean으로 등록하여 사용
// resources > messages.properties

below.min.my.price=최저 희망가는 최소 {0}원 이상으로 설정해 주세요.
not.found.product=해당 상품이 존재하지 않습니다.
- Spring Boot에서는 messageSource 가 자동으로 Bean으로 등록
private final MessageSource messageSource;
...
@Transactional
public ProductResponseDto updateProduct(Long id, ProductMypriceRequestDto requestDto) {
int myprice = requestDto.getMyprice();
if (myprice < MIN_MY_PRICE) {
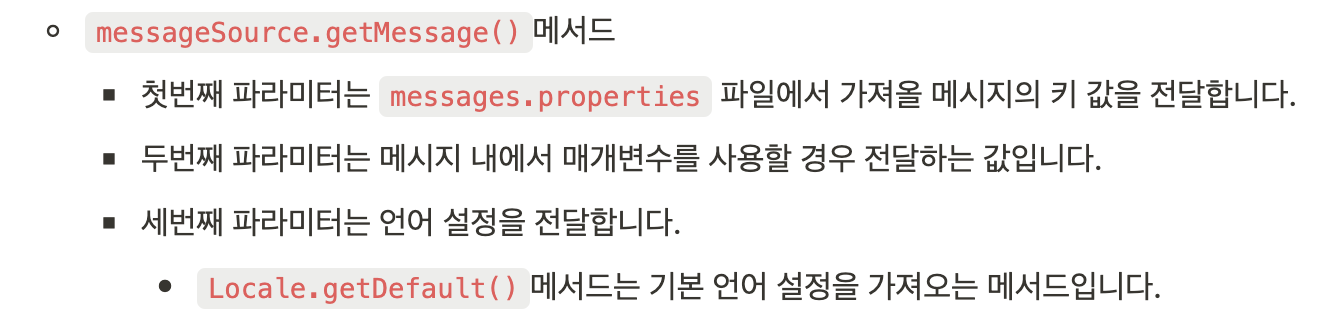
throw new IllegalArgumentException(messageSource.getMessage(
"below.min.my.price",
new Integer[]{MIN_MY_PRICE},
"Wrong Price",
Locale.getDefault()
));
}
Product product = productRepository.findById(id).orElseThrow(() ->
new ProductNotFoundException(messageSource.getMessage(
"not.found.product",
null,
"Not Found Product",
Locale.getDefault()
))
);
product.update(requestDto);
return new ProductResponseDto(product);
}
- Exception 클래스를 직접 구현하여 사용
// ProductNotFoundException

package com.sparta.myselectshop.exception;

public class ProductNotFoundException extends RuntimeException{
    public ProductNotFoundException(String message) {
        super(message);
    }
}


// GlobalExceptionHandler

package com.sparta.myselectshop.exception;

import org.springframework.http.HttpStatus;
import org.springframework.http.ResponseEntity;
import org.springframework.web.bind.annotation.ExceptionHandler;
import org.springframework.web.bind.annotation.RestControllerAdvice;

@RestControllerAdvice
public class GlobalExceptionHandler {

    @ExceptionHandler({IllegalArgumentException.class})
    public ResponseEntity<RestApiException> illegalArgumentExceptionHandler(IllegalArgumentException ex) {
        RestApiException restApiException = new RestApiException(ex.getMessage(), HttpStatus.BAD_REQUEST.value());
        return new ResponseEntity<>(
                // HTTP body
                restApiException,
                // HTTP status code
                HttpStatus.BAD_REQUEST
        );
    }

    @ExceptionHandler({NullPointerException.class})
    public ResponseEntity<RestApiException> nullPointerExceptionHandler(NullPointerException ex) {
        RestApiException restApiException = new RestApiException(ex.getMessage(), HttpStatus.NOT_FOUND.value());
        return new ResponseEntity<>(
                // HTTP body
                restApiException,
                // HTTP status code
                HttpStatus.NOT_FOUND
        );
    }

    @ExceptionHandler({ProductNotFoundException.class})
    public ResponseEntity<RestApiException> notFoundProductExceptionHandler(ProductNotFoundException ex) {
        RestApiException restApiException = new RestApiException(ex.getMessage(), HttpStatus.NOT_FOUND.value());
        return new ResponseEntity<>(
                // HTTP body
                restApiException,
                // HTTP status code
                HttpStatus.NOT_FOUND
        );
    }
}