Cache
컴퓨터 과학에서 데이터나 값을 미리 복사해 놓는 임시 장소를 가리킨다.
캐시에 데이터를 미리 복사해 놓으면 계산이나 접근 시간 없이 더 빠른 속도로 데이터에 접근할 수 있다.
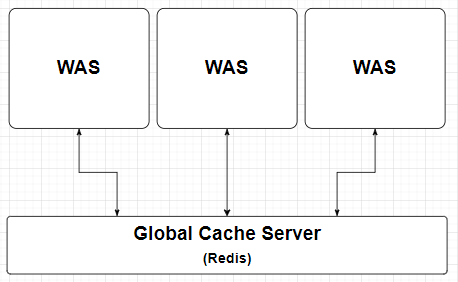
Global Cache

1. 여러 Server(WAS)가 Cache Server를 참조
2. 여러 Server간 데이터 공유가 쉬움
3. Network 사용으로 인해 Local Cache보다 느림
4. 대표적으로 Redis, Memcached
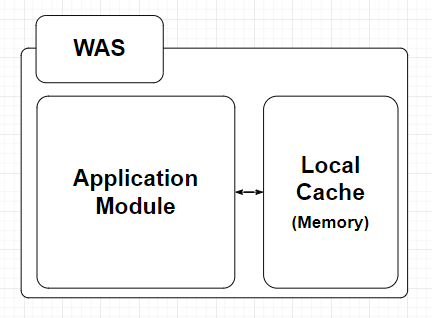
Local Cache

1. Server마다 Cache를 따로 저장 (데이터 정합성 이슈 발생 가능)
2. Server간 데이터 공유가 어려움
3. Server내 저장하기 때문에 속도가 빠름
4. 대표적으로 Caffeine, Ehcache
Cache 적용 대상
- 자주 조회하는 데이터
- 업데이트가 자주 발생하지 않는 데이터
- 입력 값과 출력 값이 일정한 데이터
2. Spring Boot Cache
2-1. 코드 적용
1. Dependency : spring-boot-starter-cache 추가
//   build.gradle
implementation group: 'org.springframework.boot', name: 'spring-boot-starter-cache'
2. @EnableCaching 추가
// XXAplication.java
...
@EnableCaching
public class XXApplication {
	...
    public static void main(String args[]) {
    	...
    }
}
3. CacheManager Bean 등록
// CacheConfig.java
@Configuration
public class CacheConfig {
   @Bean
   public CacheManager cacheManager() {
      SimpleCacheManager manager = new SimpleCacheManager();
      manager.setCaches(Arrays.asList(
         new ConcurrentMapCache("cache-1"),
         new ConcurrentMapCache("cache-2")
      ));
      return manager;
   }
}
4. Cache 사용
// XXXService.java
public class XXXService {
   ...
   @Cacheable(value = "cache-1")
   public String getValue(String parameter) {
      ...
      return value;
   }

   @CacheEvict(value = "cache-1")
   public String method(String parameter) { ... }

   @CachePut(value = "cache-1")
   public String method(String parameter) { ... }
}
2-2. Annotations
| Annotations | Descriptions |
|---|---|
| @EnableCaching | - Cache 기능 활성화 - CacheManager Bean을 호출하여 @cacheable 붙어있는 Component를 Spring이 관리 시작 |
| @Cacheable | - Cache가 있으면 값을 return. 없으면 새로 등록 - Method의 return 값을 Cache에 저장 |
| @CacheEvict | - Cache삭제 - Resource 변경 작업을 할 때 적용 |
| @CachePut | - Cache 데이터 갱신 |
3. Caffeine
vs EHCACHE
- xml 사용 X
vs SimpleCacheManager
- TTL 사용 가능
- maximumSize 설정 가능
3-1. 코드 적용
전체적인 사용법은 2. Spring Boot Cache 코드와 동일합니다
1. Dependency : Caffeine 추가
// build.gradle
implementation group: 'org.springframework.boot', name: 'spring-boot-starter-cache'
implementation group: 'com.github.ben-manes.caffeine', name: 'caffeine'
2. Cache 정의
// CacheType.java
@Getter
public enum CacheType {
   CACHE("name", 1L, 1L);

   CacheType(String name, Long expireTime, Long maximumSize) {
      this.name = name;
      this.expireTime = expireTime;
      this.maximumSize = this.maximumSize;
   }

   private String name;
   private Long expireTime;
   private Long maximumSize;
}
3. CacheManager에 Cache등록
// CacheConfig.java
@Configuration
public class CacheConfig {
   @Bean
   public CacheManager manager {
      SimpleCacheManager manager = new SimpleCacheManager();
      List<CaffeineCache> caches = Arrays.stream(CacheType.values())
         .map(cache -> new CaffeineCache(cache.getName(), Caffeine.newBuilder()
            .expireAfterWrite(cache.getExpireTime(), TimeUnit.MINUTS)
            .maximumSize(cache.getMaximumSize())
            .build())
         .collect(Collectors.toList());
   }
}
의문점
Q. Caffeine Cache를 사용하는데, CaffeineCacheManager가 아닌, SimpleCachceManager를 쓰는 이유는?
A. CaffeineCacheManager, SimpleCacheManager 모두 ConcurrentMap을 쓰는 것은 동일. 코드상 가독성이 좋은 SimpleCacheManager로 Bean을 등록하는 것으로 파악
Q. maximumCount의 의미는 무엇인가?
A. @Cacheable 걸려있으면 cache가 적용이 되는데, method의 parameter로 들어오는 값의 갯수를 최대 몇 개로 지정할것인지 설정값이다.
References
Cache
Caffeine
- blog.yevgnenll.me/posts/spring-boot-with-caffeine-cache
