if, else와 같이 분기를 갖는 코드의 경우, 어떤식으로 저장되는지 알아보기 위해, 간단하게 테스팅해보았다.
우선, 지난번에 알아보았던, pyTorch의 Trace방식과 Script 방식으로 둘 다 저장해보고 시각화해서 진행해보려고한다.
테스팅을 위해, 임의로 모델을 직접 만들어보았다.
- Script 방식
import torch.nn as nn
import torch
import os

class CustomLayer2(nn.Module):
    def __init__(self, first_dimension,second_dimension,third_dimension):
        super(CustomLayer2, self).__init__()
        self.first_dimension,self.second_dimension,self.third_dimension = first_dimension,second_dimension,third_dimension
        weights = torch.randn(first_dimension,second_dimension,third_dimension)
        self.weights = nn.Parameter(weights)
        bias = torch.randn(first_dimension,second_dimension,third_dimension)
        self.bias = nn.Parameter(bias)
        return

    def forward(self,x):
        if self.weights[0][0][0] % 2 == 0:
            return self.weights * x**2 + self.bias
        else:
            return self.weights * x**3 + self.bias

class CustomLayer(nn.Module):
    def __init__(self, first_dimension,second_dimension,third_dimension):
        super(CustomLayer, self).__init__()
        self.first_dimension,self.second_dimension,self.third_dimension = first_dimension,second_dimension,third_dimension
        weights = torch.randn(first_dimension,second_dimension,third_dimension)
        self.weights = nn.Parameter(weights)
        bias = torch.randn(first_dimension,second_dimension,third_dimension)
        self.bias = nn.Parameter(bias)

        return

    def forward(self,x):
        return self.weights * x + self.bias
커스텀 레이어는 임의로 만들어주었다. 가중치를 곱하고 편향을 더해주는 방식으로 간단하게 구성하였다. 단, CustomLayer2 클래스의 경우, if 구문을 추가하여, 분기가 생기도록 해주었다.
class CustomModel(nn.Module):
    def __init__(self):
        super(CustomModel, self).__init__()
        self.layer1 = nn.Sequential(
            nn.Conv2d(3,64,kernel_size=(3,3),stride=1,padding=1),
            nn.SiLU(inplace=True)
        )
        self.layer2 = nn.Sequential(
            nn.Conv2d(64,64,kernel_size=(3,3),stride=1,padding=1),
            nn.SiLU(inplace=True)
        )
        self.layer3 = nn.Sequential(
            nn.Conv2d(64,32,kernel_size=(3,3),stride=1,padding=1),
            nn.SiLU(inplace=True),
            nn.MaxPool2d(16)
        )
        self.custom_layer = CustomLayer(3,256,256)
        self.custom_layer2 = CustomLayer2(3,256,256)
        self.flatten = nn.Flatten()
        self.fc1 = nn.Linear(8192,1024)
        self.fc2 = nn.Linear(1024,10)
        return

    def forward(self,x):
        x = self.custom_layer(x)
        x = self.custom_layer2(x)
        x = self.layer1(x)
        x = self.layer2(x)
        x = self.layer3(x)
        x = self.flatten(x)
        x = self.fc1(x)
        x = self.fc2(x)
        return x
model의 경우, torch.nn의 sequential를 활용하여 일반적인 Convolution 레이어도 구성을 했으며, 위에서 만든 커스텀 레이어를 전체 모델에 추가해주었다. 또한, fully connected 레이어도 추가해주었다. dimension의 경우, 테스팅이기때문에 static 하게 선언해주었다.
input = torch.randn(1,3,256,256)
custom_model = CustomModel()
print(custom_model)

custom_model.eval()
script_v = torch.jit.script(custom_model)

with torch.no_grad():
    torch.jit.save(script_v,os.getcwd()+'/script_version_if.pt')
input을 random하게 넣어주고, 모델 인스턴스를 생성하여 scipt 형식의 pt 모델을 만들 준비를 하였다. 또한, 학습을 진행하는 것이 아니기 때문에, torch.no_grad() 를 통해 pt 파일을 생성해주었다.
script 모델의 경우, 위와 같이 모델이 생성되었다. 다만, 분기가 정확하게 그려지지는 않았다.
- Trace 방식
input = torch.randn(1,3,256,256)

custom_model = CustomModel()
print(custom_model)
custom_model.eval()

trace_v = torch.jit.trace(custom_model,input)
custom_model.eval()
with torch.no_grad():
    torch.jit.save(trace_v,os.getcwd()+'/trace_version_if.pt')
Trace 모델의 경우도, Script 모델과 동일하게 레이어를 구성했으며, 저장해주는 부분만 다르다.
Trace 모델의 경우, 말그대로 코드를 추적하며, pt파일을 만들기 때문에, input값도 넣어줘야한다. 따라서, Script방식과 다르게 input값을 따로 넣어주었다.

Trace 방식의 경우, tracing하며, 코드를 파일로 만들기때문에, if구문이 따로 포함되어 있지 않았다. 예상했던 결과였고, 조금 더 구체화하여 모델을 만들거나 테스팅해보도록 하겠다.
def forward(self,x):
        if self.weights[0][0][0] % 2 == 0:
            return self.weights * x**2 + self.bias
        else:
            return self.weights * x**3 + self.bias
생각해보니, 커스텀 레이어를 구성할 때, 위와 같이 forward 함수를 구성해주면, 큰 의미가 없다고 생각이 들었다. 가중치 값을 레이어 클래스의 인스턴스를 생성할 때, 임의로 만들어주는데, 결국 컨디션에 따라, 선택되는 것이 아니라 가중치 값에 따라 달라지기 때문에, 약간의 의미가 다르다고 생각이 든다.
또한, 레이어 컨디션이 아닌, forwarding에서 분기가 존재하게 될 경우, 어떤 방식으로 처리되는지 알아보도록 하겠다.
먼저 Script 방식이다.
def forward(self,x):
        x = self.custom_layer(x)
        x = self.custom_layer2(x)
        if self.branch_testing==True:
            x = self.custom_layer2(x)
            x = self.custom_layer2(x)
            x = self.layer1(x)
        else:
        	x = self.layer1(x)
        x = self.layer2(x)
        x = self.layer2(x)
        x = self.layer3(x)
        x = self.flatten(x)
        x = self.fc1(x)
        x = self.fc2(x)
        return x
이런식으로 forward 안에서 분기를 줘서 테스팅해보았다.
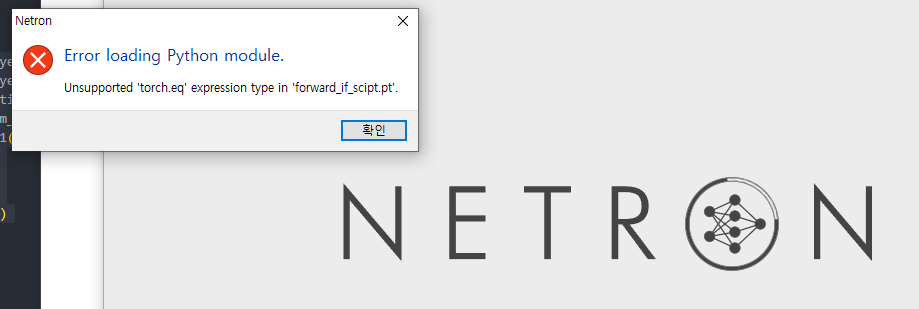
torch.eq 관련 모듈이 정상적으로 작동하지 않는다.
오히려 script 형식으로 파일을 저장했을 때, 문제가 발생하였다.
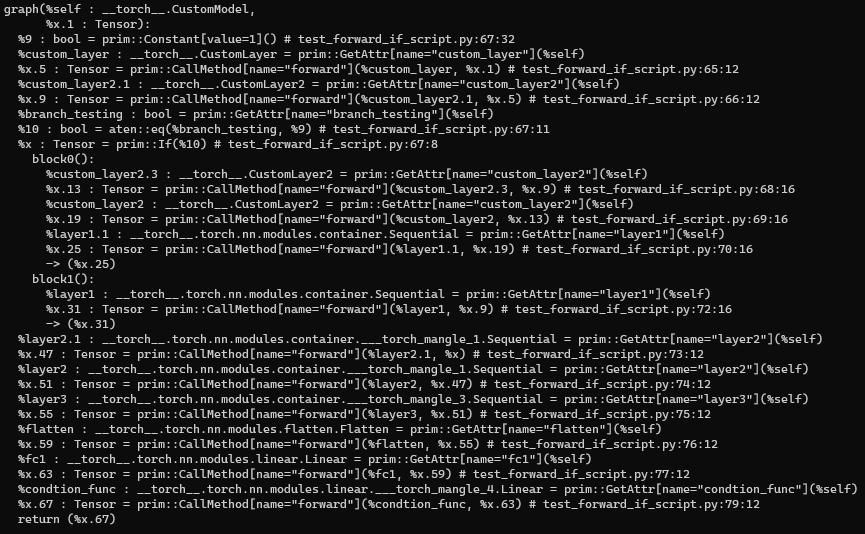
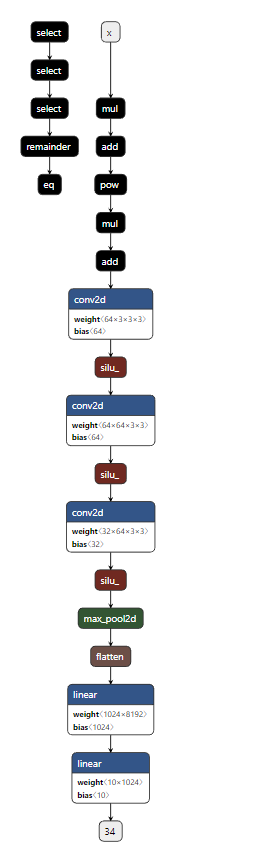
시각화만 안 될 뿐, 해당 torch.jit.script(script_model) 으로 태운 script Model의 경우, 스크립트모델.graph 로 그래프를 찍어 보았을 때, block 0, block 1 이렇게 두 가지 if, else 분기로 담긴 것을 확인할 수 있었다.
해당 문제는 Netron에서 시각화할 때, 열리지 않는 문제일 뿐, Onnx로 export 시켜주거나, TensorRT로 변환하여, 추론하였을 때는 정상적으로 작동이 되었다.

위의 결과를 보면 알 수 있듯이, 추론 결과 자체는 동일하게 나왔다.
다만, Netron으로 시각화했을 때, 포워딩 안에 존재하는 IF분기에 맞는 컨디션만 script 파일에 export되어 실행되었다.

Netron으로 보았을 때, IF분기 안에 이차원 방정식을 따르는 커스텀 레이어가 2개,1개의 컨볼루션 레이어가 포함되어 있는데, 그 레이어들이 포함되어 있고, ELSE분기는 따로 export되지 않았다.
반대로 이번에는 Trace 방식이다.
def forward(self,x):
        x = self.custom_layer(x)
        x = self.custom_layer2(x)
        if self.branch_testing==True:
            x = self.custom_layer2(x)
            x = self.layer1(x)
        else:
            x = self.layer1(x)
        x = self.layer2(x)
        x = self.layer2(x)
        x = self.layer3(x)
        x = self.flatten(x)
        x = self.fc1(x)
        x = self.fc2(x)
        return x
if 분기 들어갈 경우

else 분기로 들어간 경우

if문의 조건이 맞을경우, 해당 분기 안에 있는 연산을 실행하기는 한다. 하지만 조건이 맞지 않는 경우는 실행하지 않는다.
이번에는 pt파일을 torch.jit.load() 를 활용하여 onnx file로 export를 해보았다.

왼쪽은 Onnx로 변환된 모델, 오른쪽은 Pytorch pt 파일을 로드한 모델이다.
UserWarning: Model has no forward function
  warnings.warn("Model has no forward function")
일단 Onnx로 export해보았고, newtron으로 시각화해보았는데, 눈으로 보았을때는 정상적으로 변환된 것으로 보인다. 하지만 해당 warning이 존재했고, Onnx와 TensorRT로 inference했을 때, 어떤 결과가 나오는지 확인해보아야겠다.

inference 결과, Onnx와 TensorRT Engine으로 정상적으로 변환이 되며, 추론결과도 동일하다. 하지만, 근본적으로 Torch에서 Onnx로 변환할 때, 분기 부분을 한 쪽만 담았기 때문에, 정확히 변환되었다고 말할 수는 없다.
이번에는 pt 파일 중에 torch.jit.script 로 생성한 pt파일을 추론해볼 것이다. forward 안에서 if분기를 타는 경우에는 정상적으로 변환이 되지 않았기 때문에, 커스텀 레이어 안에서 분기를 탄 경우만 변환을 해 볼 예정이다.
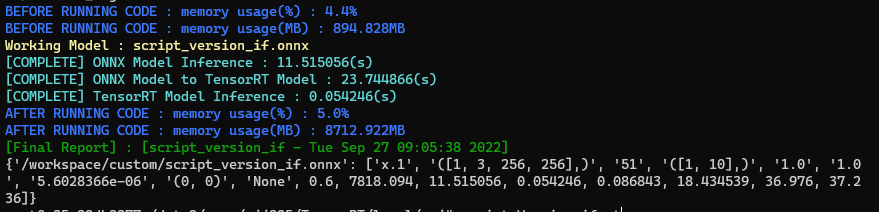
script 버전의 모델도 일단은 정상적으로 변환이 되었다.
결론, 3줄요약
- script,trace든 변환은 된다.(script는 Input 없이, Trace는 Input 포함해서 변환)
- trace의 경우, 분기에 따라서 방향성이 결정된 코드만 변환이 된다.
- Torch에 존재하는 함수,레이어가 동일한게 존재하지 않는다면, Onnx에서 임의로(내부 엔진) 최적화되어 변환된다.